LightRAG 由入门到精通
作者:王珂
邮箱:49186456@qq.com
文章目录
- [LightRAG 由入门到精通](#LightRAG 由入门到精通)
- 简介
- [一、LightRAG Server](#一、LightRAG Server)
-
- [1.1 安装 LightRAG Server](#1.1 安装 LightRAG Server)
- [1.2 LightRAG Server 和 WebUI](#1.2 LightRAG Server 和 WebUI)
-
- [1.2.1 配置 LightRAG Server](#1.2.1 配置 LightRAG Server)
- [1.2.2 启动 LightRAG Server](#1.2.2 启动 LightRAG Server)
- [1.2.3 使用 Docker 加载 LightRAG Server](#1.2.3 使用 Docker 加载 LightRAG Server)
- [1.2.4 使用 Docker 部署 LightRAG Server 不通过克隆仓库](#1.2.4 使用 Docker 部署 LightRAG Server 不通过克隆仓库)
- [1.2.5 将 LightRAG 安装为 Linux 服务](#1.2.5 将 LightRAG 安装为 Linux 服务)
- [1.3 Ollama 模拟](#1.3 Ollama 模拟)
- [1.3.1 Open WebUI 连接到 LightRAG](#1.3.1 Open WebUI 连接到 LightRAG)
-
- [1.3.2 在对话中选着查询模式](#1.3.2 在对话中选着查询模式)
- [1.3.2 添加用户提示词](#1.3.2 添加用户提示词)
- [1.3.3 API 密钥 和 认证](#1.3.3 API 密钥 和 认证)
- [1.3.4 Azure OpenAI 后端配置](#1.3.4 Azure OpenAI 后端配置)
- [1.3.5 LightRAG 服务器详细配置](#1.3.5 LightRAG 服务器详细配置)
- [1.3.6 LightRag API 服务器命令行选项](#1.3.6 LightRag API 服务器命令行选项)
- [二、LightRAG Core](#二、LightRAG Core)
-
- [2.1 安装 LightRAG Core](#2.1 安装 LightRAG Core)
- [2.2 快速开始](#2.2 快速开始)
-
- [2.2.1 快速开始使用 LightRAG Core](#2.2.1 快速开始使用 LightRAG Core)
- [2.3 使用 LightRAG Core 编程](#2.3 使用 LightRAG Core 编程)
-
- [2.3.1 LightRAG 编程示例](#2.3.1 LightRAG 编程示例)
- [2.3.2 LightRAG 初始化参数](#2.3.2 LightRAG 初始化参数)
- [2.3.3 查询参数](#2.3.3 查询参数)
- [2.3.4 LLM 和 Embedding 注入](#2.3.4 LLM 和 Embedding 注入)
- [2.3.5 对话历史支持](#2.3.5 对话历史支持)
- [2.3.6 用户提示词 vs 查询](#2.3.6 用户提示词 vs 查询)
- [2.3.7 插入](#2.3.7 插入)
- [2.3.8 存储](#2.3.8 存储)
- [2.3.9 编辑实体和关系](#2.3.9 编辑实体和关系)
- [2.3.10 实体合并](#2.3.10 实体合并)
- [2.3.11 Token 统计功能](#2.3.11 Token 统计功能)
- [2.3.12 数据导出功能](#2.3.12 数据导出功能)
- [2.3.13 缓存](#2.3.13 缓存)
- [2.3.14 LightRAG API](#2.3.14 LightRAG API)
- [2.3.15 知识图谱可视化](#2.3.15 知识图谱可视化)
- [2.3.16 评估](#2.3.16 评估)
简介
github 项目
url
https://github.com/HKUDS/LightRAG英文
url
https://github.com/HKUDS/LightRAG/blob/main/README.md中文
url
https://github.com/HKUDS/LightRAG/blob/main/README-zh.mdLightRAG 是由香港大学研究团队开发的一种检索增强生成(Retrieval-Augmented Generation, RAG)系统。结合图结构索引和双层检索机制,大大提高了大模型语言在信息检索方面的准确性和效率。
LightRAG 能够很好的捕捉实体之间的关系,能够处理具体 和抽象查询。
LightRAG 通过增量更新算法及时整合新数据,而无需重建整个知识库。
LightRAG架构
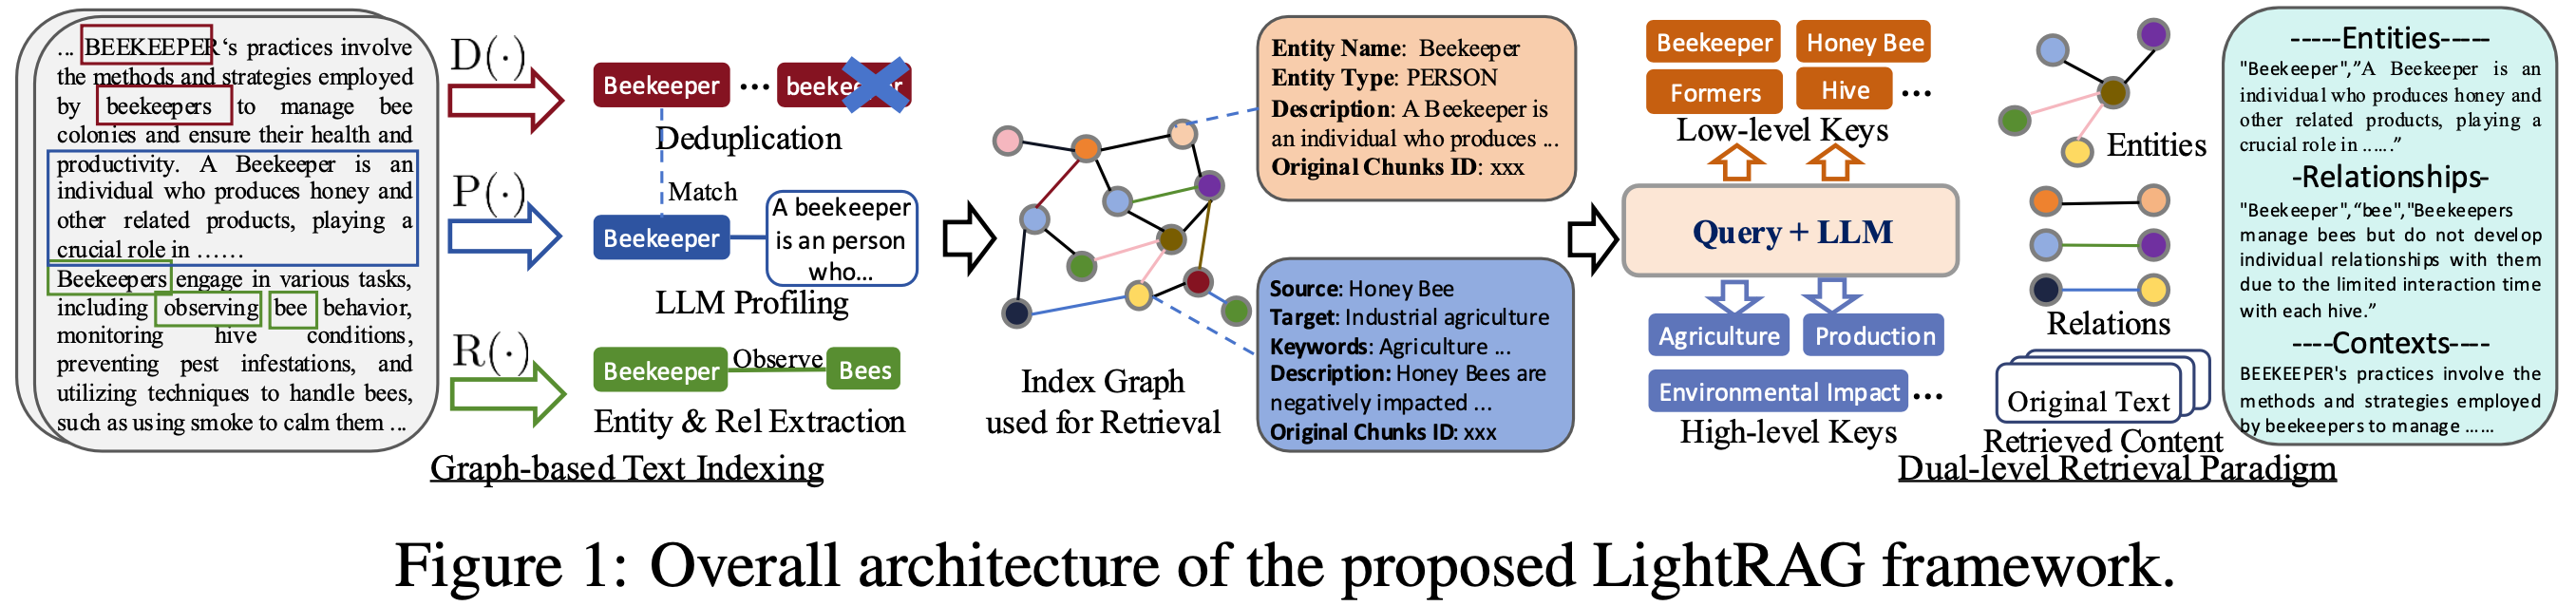
LightRAG 索引流程

LightRAG 检索和查询流程

环境准备
文档中需要用到大语言模型和向量模型,我们分别采用 DeepSeek 官网的 deepseek-chat 和 阿里百炼平台的 text-embedding-v3。如果没有请在如下地址申请 api-key,因为使用 token 需要付费,我们充值¥5 即可做实验。
大语言模型:deepseek-v3,api-key 申请地址:
url
https://platform.deepseek.com/api_keys阿里百炼平台 api-key 申请地址:
url
https://bailian.console.aliyun.com/?spm=5176.29677750.nav-v2-dropdown-menu-0.d_main_1_0.6514154a4FlHkA&tab=model&scm=20140722.M_10773066._.V_1#/api-key一、LightRAG Server
英文 README:
url
https://github.com/HKUDS/LightRAG/blob/main/lightrag/api/README.md中文 README-zh
url
https://github.com/HKUDS/LightRAG/blob/main/lightrag/api/README-zh.md1.1 安装 LightRAG Server
-
从 PyPI 安装
shellpip install "lightrag-hku[api]"因为国内网络限制,直接下载不下来,实际测试可以通过如下镜像下载
shellpip install -i https://mirrors.aliyun.com/pypi/simple "lightrag-hku[api]"示例项目:lightrag-server-pypi
-
从源码安装
shellgit clone https://github.com/HKUDS/LightRAG.git cd LightRAG # create a Python virtual enviroment if neccesary # Install in editable mode with API support pip install -e ".[api]"示例项目:lightrag-server-source
-
使用 Docker Compose 加载 LightRAG Server
shellgit clone https://github.com/HKUDS/LightRAG.git cd LightRAG cp env.example .env # modify LLM and Embedding settings in .env docker compose up
1.2 LightRAG Server 和 WebUI
LightRAG Server 被设计为提供 Web UI 和 API 的支持。使用 Web UI 更便于创建文档索引、知识图谱研究和简单的 RAG 查询索引。LightRAG Server 还提供了和 Ollama 兼容的接口,目的是将 LightRAG 模拟为一个 Ollama 的聊天模型,像 Open WebUI,很方便的访问 LightRAG。
文档管理
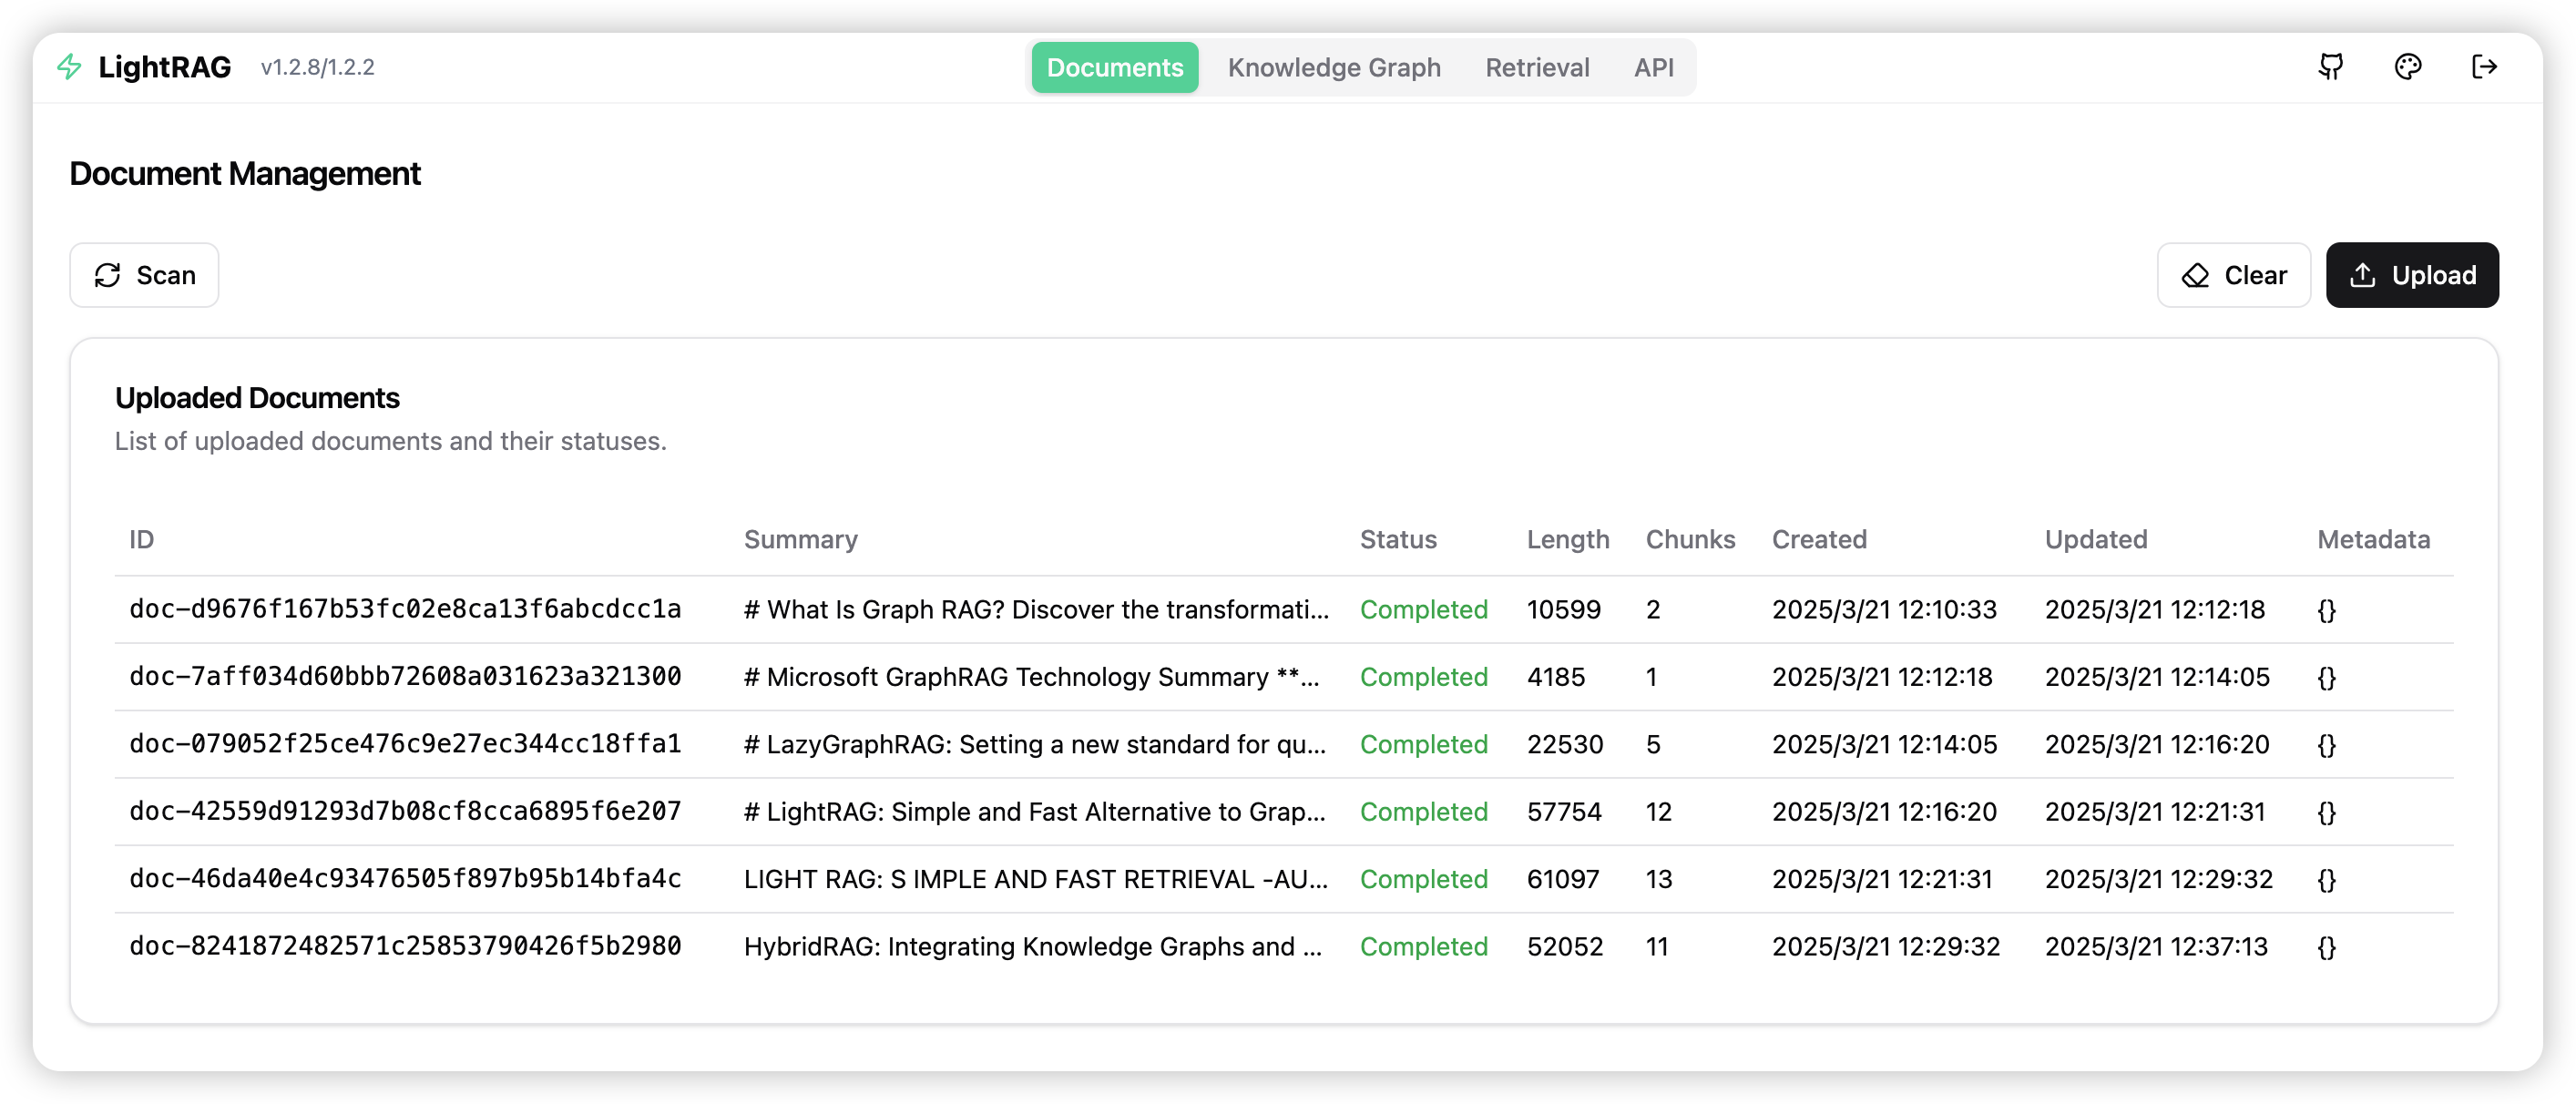
知识图谱

检索

1.2.1 配置 LightRAG Server
LightRAG 需要同时集成大语言模型(LLM)和嵌入模型(Embedding Model)来执行文档索引和查询操作。在初始化部署 LightRAG server 之前,需要分别对大语言模型和嵌入模型进行配置。LightRAG 为 LLM/Embedding 的后端绑定变量。
- ollama
- lollms
- openai or openai compatible
- azure_openai
推荐使用环境变量来配置 LightRAG Server。在项目的根目录下有一个配置环境变量示例的文件 env.example,把它复制到启动目录并重命名为.env,对 LLM 和 Embedding Model 的参数进行修改。一个很重要的点是当每次 LightRAG Server 启动时会从 .env 加载环境变量到系统环境变量。由于LightRAG Server 优先使用系统环境变量的设置,因此如果在通过命令行启动了 LightRAG Server 之后,你修改了 .env 文件,则需要执行 source .env 来使新配置生效。
LLM 和 Embedding 通用设置示例
-
OpenAI LLM + OpenAI Embedding:
yaml### OpenAI alike example LLM_BINDING=openai LLM_MODEL=deepseek-chat LLM_BINDING_HOST=https://api.deepseek.com LLM_BINDING_API_KEY=<修改为你的API Key> ### Embedding Configuration (Use valid host. For local services installed with docker, you can use host.docker.internal) EMBEDDING_MODEL=text-embedding-v3 EMBEDDING_DIM=1024 EMBEDDING_BINDING_API_KEY=<修改为你的API Key> ### OpenAI alike example EMBEDDING_BINDING=openai EMBEDDING_BINDING_HOST=https://dashscope.aliyuncs.com/compatible-mode/v1 -
OpenAI LLM + Ollama Embedding:
yamlLLM_BINDING=openai LLM_MODEL=gpt-4o LLM_BINDING_HOST=https://api.openai.com/v1 LLM_BINDING_API_KEY=your_api_key ### Max tokens sent to LLM (less than model context size) MAX_TOKENS=32768 EMBEDDING_BINDING=ollama EMBEDDING_BINDING_HOST=http://localhost:11434 EMBEDDING_MODEL=bge-m3:latest EMBEDDING_DIM=1024 # EMBEDDING_BINDING_API_KEY=your_api_key -
Ollama LLM + Ollama Embedding:
yamlLLM_BINDING=ollama LLM_MODEL=mistral-nemo:latest LLM_BINDING_HOST=http://localhost:11434 # LLM_BINDING_API_KEY=your_api_key ### Max tokens sent to LLM (based on your Ollama Server capacity) MAX_TOKENS=8192 EMBEDDING_BINDING=ollama EMBEDDING_BINDING_HOST=http://localhost:11434 EMBEDDING_MODEL=bge-m3:latest EMBEDDING_DIM=1024 # EMBEDDING_BINDING_API_KEY=your_api_key
1.2.2 启动 LightRAG Server
LightRAG Server 支持两种操作模式
-
简单且高效的 Uvicorn 模式
shelllightrag-server首次启动有一个警告,提示需要安装 wcwidth
Warning: 'wcwidth' library not found. Progress bar display accuracy for wide characters (like emojis) may be reduced. Install with 'pip install wcwidth'
shellpip install wcwidth安装之后再次启动,启动日志:
2025-05-19 18:43:17 - pipmaster.package_manager - INFO - Targeting pip associated with Python: D:\work\PycharmProject\lightrag-server-pypi\venv\Scripts\python.exe | Command base: D:\wo
rk\PycharmProject\lightrag-server-pypi\venv\Scripts\python.exe -m pip
LightRAG log file: D:\work\PycharmProject\lightrag-server-pypi\lightrag.log
WARNING:root:In uvicorn mode, workers parameter was set to 2. Forcing workers=1
╔══════════════════════════════════════════════════════════════╗
║                  🚀 LightRAG Server v1.3.7/0170              ║
║          Fast, Lightweight RAG Server Implementation         ║
╚══════════════════════════════════════════════════════════════╝
📡 Server Configuration:
├─ Host: 0.0.0.0
├─ Port: 9621
├─ Workers: 1
├─ CORS Origins: *
├─ SSL Enabled: False
├─ Ollama Emulating Model: lightrag:latest
├─ Log Level: INFO
├─ Verbose Debug: False
├─ History Turns: 3
├─ API Key: Not Set
└─ JWT Auth: Disabled
📂 Directory Configuration:
├─ Working Directory: D:\work\PycharmProject\lightrag-server-pypi\rag_storage
└─ Input Directory: D:\work\PycharmProject\lightrag-server-pypi\inputs
🤖 LLM Configuration:
├─ Binding: openai
├─ Host: https://api.deepseek.com
├─ Model: deepseek-chat
├─ Temperature: 0.5
├─ Max Async for LLM: 4
├─ Max Tokens: 32768
├─ Timeout: 150
├─ LLM Cache Enabled: True
└─ LLM Cache for Extraction Enabled: True
📊 Embedding Configuration:
├─ Binding: openai
├─ Host: https://dashscope.aliyuncs.com/compatible-mode/v1
├─ Model: text-embedding-v3
└─ Dimensions: 1024
⚙️ RAG Configuration:
├─ Summary Language: Chinese
├─ Max Parallel Insert: 2
├─ Max Embed Tokens: 8192
├─ Chunk Size: 1200
├─ Chunk Overlap Size: 100
├─ Cosine Threshold: 0.2
├─ Top-K: 60
├─ Max Token Summary: 500
└─ Force LLM Summary on Merge: 6
💾 Storage Configuration:
├─ KV Storage: JsonKVStorage
├─ Vector Storage: NanoVectorDBStorage
├─ Graph Storage: NetworkXStorage
└─ Document Status Storage: JsonDocStatusStorage
✨ Server starting up...
🌐 Server Access Information:
├─ WebUI (local): http://localhost:9621
├─ Remote Access: http://:9621
├─ API Documentation (local): http://localhost:9621/docs
└─ Alternative Documentation (local): http://localhost:9621/redoc
📝 Note:
Since the server is running on 0.0.0.0:
-
Use 'localhost' or '127.0.0.1' for local access
-
Use your machine's IP address for remote access
-
To find your IP address:
• Windows: Run 'ipconfig' in terminal
• Linux/Mac: Run 'ifconfig' or 'ip addr' in terminal
INFO: Process 19620 Shared-Data created for Single Process
INFO: Loaded graph from D:\work\PycharmProject\lightrag-server-pypi\rag_storage\graph_chunk_entity_relation.graphml with 343 nodes, 271 edges
Starting Uvicorn server in single-process mode on 0.0.0.0:9621
INFO: Started server process 19620
INFO: Waiting for application startup.
INFO: Process 19620 initialized updated flags for namespace: full_docs
INFO: Process 19620 ready to initialize storage namespace: full_docs
INFO: Process 19620 KV load full_docs with 2 records
INFO: Process 19620 initialized updated flags for namespace: text_chunks
INFO: Process 19620 ready to initialize storage namespace: text_chunks
INFO: Process 19620 KV load text_chunks with 22 records
INFO: Process 19620 initialized updated flags for namespace: entities
INFO: Process 19620 initialized updated flags for namespace: relationships
INFO: Process 19620 initialized updated flags for namespace: chunks
INFO: Process 19620 initialized updated flags for namespace: chunk_entity_relation
INFO: Process 19620 initialized updated flags for namespace: llm_response_cache
INFO: Process 19620 ready to initialize storage namespace: llm_response_cache
INFO: Process 19620 KV load llm_response_cache with 50 records
INFO: Process 19620 initialized updated flags for namespace: doc_status
INFO: Process 19620 ready to initialize storage namespace: doc_status
INFO: Process 19620 doc status load doc_status with 2 records
INFO: Process 19620 Pipeline namespace initialized
Server is ready to accept connections! 🚀
INFO: Application startup complete.
INFO: Uvicorn running on http://0.0.0.0:9621 (Press CTRL+C to quit)
-
-
The multiprocess Gunicorn + Uvicorn mode (产品模式,不支持 Windows 环境):
shelllightrag-gunicorn --workers 4
.env 文件必须放在启动目录
在启动的时,LightRAG Server 会创建一个文档目录(默认是 is ./inputs)和一个数据目录(默认是 ./rag_storage)。这允许你用不同的目录初始化多个 LightRAG 实例,每一个实例配置监听不同的网络端口。
常用的启动参数
--host:--port--timeout--log-level--input-dir
1.2.3 使用 Docker 加载 LightRAG Server
1.2.4 使用 Docker 部署 LightRAG Server 不通过克隆仓库
1.2.5 将 LightRAG 安装为 Linux 服务
1.3 Ollama 模拟
1.3.1 Open WebUI 连接到 LightRAG
1.3.2 在对话中选着查询模式
1.3.2 添加用户提示词
1.3.3 API 密钥 和 认证
1.3.4 Azure OpenAI 后端配置
1.3.5 LightRAG 服务器详细配置
1.3.6 LightRag API 服务器命令行选项
。。。。。。未完待续
二、LightRAG Core
2.1 安装 LightRAG Core
-
从源码安装(推荐)
-
从 gitlab 上拉取源码
shellgit clone https://github.com/HKUDS/LightRAG.git进入到 LightRAG 目录
-
创建虚拟环境
shellpython -m venv venv -
安装依赖
shellpip install -e .
示例项目:lightrag-core-source
-
-
从 PyPi 安装
shellpip install lightrag-hku
2.2 快速开始
2.2.1 快速开始使用 LightRAG Core
开始使用 LightRAG core,可以参考 examples中的样例代码。此外,有一个视频样例指导你搭建本例环境的过程。如果你已经有了一个 OpenAI API key,你可以立即运行这个样例。
yaml
### you should run the demo code with project folder
cd LightRAG
### provide your API-KEY for OpenAI
export OPENAI_API_KEY="sk-...your_opeai_key..."
### download the demo document of "A Christmas Carol" by Charles Dickens
curl https://raw.githubusercontent.com/gusye1234/nano-graphrag/main/tests/mock_data.txt > ./book.txt
### run the demo code
python examples/lightrag_openai_demo.py
一个流式响应的实现样例,请查看 examples/lightrag_openai_compatible_demo.py, 在执行之前,请确保你已经修改了样例代码 LLM 和 embedding 相应的配置。
说明 1:当运行演示程序时,请注意不同的测试脚本可能使用不同的嵌入模型。如果你切换到不同的嵌入模型,你必须清除数据目录(./dickens);否则,程序可能会遇到错误。如果希望保留LLM缓存,可以保留 kv_store_llm_response_cache。Json 文件,同时清除 data 目录。
说明 2:只有 lightrag_openai_demo.py 和 lightrag_openai_compatible_demo.py 是官方支持的示例代码。其他样例文件是尚未经过完整测试和优化的社区贡献文件。
运行自定义样例 lightrag_openai_compatible_wk_demo.py
-
修改 lightrag_openai_compatible_demo.py
-
修改 embedding_func
我们将 ollama_embed 换成 openai_embed,这样就可以使用阿里百炼平台的 text-embedding-v3 模型
pythonasync def embedding_func(texts: list[str]) -> np.ndarray: # return await ollama_embed( # texts=texts, # embed_model="bge-m3:latest", # host="http://m4.lan.znipower.com:11434", # ) # modified by wangke return await openai_embed( texts=texts, model="text-embedding-v3", base_url="https://dashscope.aliyuncs.com/compatible-mode/v1", api_key="<你的阿里百炼平台 API key>" ) -
修改 llm_model_func,配置 deepseek 的 API key
pythonasync def llm_model_func( prompt, system_prompt=None, history_messages=[], keyword_extraction=False, **kwargs ) -> str: return await openai_complete_if_cache( "deepseek-chat", prompt, system_prompt=system_prompt, history_messages=history_messages, api_key="<你的 deepseek api key>" base_url="https://api.deepseek.com", **kwargs, ) -
修改 main() 函数中读取文件的位置
pythonwith open("./inputs/Arthas 学习笔记.md", "r", encoding="utf-8") as f: await rag.ainsert(f.read()) -
修改查询问题
将 naive, global, hybrid 检索的问题都改成如下
pythonresp = await rag.aquery( "文章中介绍了几种垃圾收集器?", param=QueryParam(mode="hybrid", stream=True), )
-
-
修改 lightrag.py
第 193 行,将参数 32 修改为 10(百炼平台的 embedding 模型限制不能大于10)
pythonembedding_batch_num: int = field(default=int(os.getenv("EMBEDDING_BATCH_NUM", 10))) # 这里原本是 32 -
准备文档
创建目录 examples/input,并上传测试文档《Arthas 学习笔记.md》
-
执行测试
第一次运行有一个警告,提示需要安装 wcwidth
Warning: 'wcwidth' library not found. Progress bar display accuracy for wide characters (like emojis) may be reduced. Install with 'pip install wcwidth'
执行安装
shellpip install wcwidth再次运行
2.3 使用 LightRAG Core 编程
如果你想将 LightRAG 集成到你的项目中,我们推荐使用 LightRAG Server 提供的 REST API。LightRAG Core 通常用于嵌入式应用,或希望进行研究和评估的研究人员。
2.3.1 LightRAG 编程示例
pyth
import os
import asyncio
from lightrag import LightRAG, QueryParam
from lightrag.llm.openai import openai_embed, openai_complete_if_cache
from lightrag.kg.shared_storage import initialize_pipeline_status
from lightrag.utils import setup_logger, EmbeddingFunc
import numpy as np

setup_logger("lightrag", level="INFO")

WORKING_DIR = "./rag_storage"
if not os.path.exists(WORKING_DIR):
    os.mkdir(WORKING_DIR)


async def llm_model_func(
    prompt, system_prompt=None, history_messages=[], keyword_extraction=False, **kwargs
) -> str:
    return await openai_complete_if_cache(
        "deepseek-chat",
        prompt,
        system_prompt=system_prompt,
        history_messages=history_messages,
        api_key="<你的 deepseek api key>",
        base_url="https://api.deepseek.com",
        **kwargs
    )


async def embedding_func(texts: list[str]) -> np.ndarray:
    return await openai_embed(
        texts,
        model="text-embedding-v3",
        api_key="<你的阿里百炼平台 api key>",
        base_url="https://dashscope.aliyuncs.com/compatible-mode/v1"
    )


async def initialize_rag():
    rag = LightRAG(
        working_dir=WORKING_DIR,
        embedding_func=EmbeddingFunc(
            embedding_dim=1024, # 阿里百炼平台 text-embedding-v3 的维度是 1024,需要根据实际修改
            max_token_size=8192,
            func=embedding_func
        ),
        llm_model_func=llm_model_func,
    )

    await rag.initialize_storages()
    await initialize_pipeline_status()
    return rag


async def main():
    try:
        # Initialize RAG instance
        rag = await initialize_rag()

        await rag.insert("在11月19日举行的第68期励志讲坛上,中国科学院院士、上海交通大学校长张杰带着这样的期待,聆听了香港科技大学创校校长吴家玮关于治理大学的见解,同在台下的还有慕名而来的近500名交大学生。演讲结束后,张杰校长代表上海交通大学向吴家玮赠送了礼物。")

        # Perform hybrid search
        mode = "hybrid"
        print(
            await rag.aquery(
                  "张杰有什么样的期待?",
                  param=QueryParam(mode=mode)
            )
        )

    except Exception as e:
        print(f"An error occurred: {e}")
    finally:
        if rag:
            await rag.finalize_storages()

if __name__ == "__main__":
    asyncio.run(main())
重要提示:
- 这个程序使用LightRAG的默认存储设置,所以所有的数据将被持久化到WORKING_DIR/rag_storage。
- 这个程序只演示了初始化LightRAG对象的最简单方法:在创建LightRAG对象后注入嵌入函数和LLM函数,并初始化存储和管道状态。
2.3.2 LightRAG 初始化参数
| Parameter | Type | Explanation | Default |
|---|---|---|---|
| working_dir | str |
Directory where the cache will be stored | lightrag_cache+timestamp |
| kv_storage | str |
Storage type for documents and text chunks. Supported types: JsonKVStorage,PGKVStorage,RedisKVStorage,MongoKVStorage |
JsonKVStorage |
| vector_storage | str |
Storage type for embedding vectors. Supported types: NanoVectorDBStorage,PGVectorStorage,MilvusVectorDBStorage,ChromaVectorDBStorage,FaissVectorDBStorage,MongoVectorDBStorage,QdrantVectorDBStorage |
NanoVectorDBStorage |
| graph_storage | str |
Storage type for graph edges and nodes. Supported types: NetworkXStorage,Neo4JStorage,PGGraphStorage,AGEStorage |
NetworkXStorage |
| doc_status_storage | str |
Storage type for documents process status. Supported types: JsonDocStatusStorage,PGDocStatusStorage,MongoDocStatusStorage |
JsonDocStatusStorage |
| chunk_token_size | int |
Maximum token size per chunk when splitting documents | 1200 |
| chunk_overlap_token_size | int |
Overlap token size between two chunks when splitting documents | 100 |
| tokenizer | Tokenizer |
The function used to convert text into tokens (numbers) and back using .encode() and .decode() functions following TokenizerInterface protocol. If you don't specify one, it will use the default Tiktoken tokenizer. |
TiktokenTokenizer |
| tiktoken_model_name | str |
If you're using the default Tiktoken tokenizer, this is the name of the specific Tiktoken model to use. This setting is ignored if you provide your own tokenizer. | gpt-4o-mini |
| entity_extract_max_gleaning | int |
Number of loops in the entity extraction process, appending history messages | 1 |
| entity_summary_to_max_tokens | int |
Maximum token size for each entity summary | 500 |
| node_embedding_algorithm | str |
Algorithm for node embedding (currently not used) | node2vec |
| node2vec_params | dict |
Parameters for node embedding | {"dimensions": 1536,"num_walks": 10,"walk_length": 40,"window_size": 2,"iterations": 3,"random_seed": 3,} |
| embedding_func | EmbeddingFunc |
Function to generate embedding vectors from text | openai_embed |
| embedding_batch_num | int |
Maximum batch size for embedding processes (multiple texts sent per batch) | 32 |
| embedding_func_max_async | int |
Maximum number of concurrent asynchronous embedding processes | 16 |
| llm_model_func | callable |
Function for LLM generation | gpt_4o_mini_complete |
| llm_model_name | str |
LLM model name for generation | meta-llama/Llama-3.2-1B-Instruct |
| llm_model_max_token_size | int |
Maximum token size for LLM generation (affects entity relation summaries) | 32768(default value changed by env var MAX_TOKENS) |
| llm_model_max_async | int |
Maximum number of concurrent asynchronous LLM processes | 4(default value changed by env var MAX_ASYNC) |
| llm_model_kwargs | dict |
Additional parameters for LLM generation | |
| vector_db_storage_cls_kwargs | dict |
Additional parameters for vector database, like setting the threshold for nodes and relations retrieval | cosine_better_than_threshold: 0.2(default value changed by env var COSINE_THRESHOLD) |
| enable_llm_cache | bool |
If TRUE, stores LLM results in cache; repeated prompts return cached responses |
TRUE |
| enable_llm_cache_for_entity_extract | bool |
If TRUE, stores LLM results in cache for entity extraction; Good for beginners to debug your application |
TRUE |
| addon_params | dict |
Additional parameters, e.g., {"example_number": 1, "language": "Simplified Chinese", "entity_types": ["organization", "person", "geo", "event"]}: sets example limit, entiy/relation extraction output language |
example_number: all examples, language: English |
| convert_response_to_json_func | callable |
Not used | convert_response_to_json |
| embedding_cache_config | dict |
Configuration for question-answer caching. Contains three parameters: enabled: Boolean value to enable/disable cache lookup functionality. When enabled, the system will check cached responses before generating new answers. similarity_threshold: Float value (0-1), similarity threshold. When a new question's similarity with a cached question exceeds this threshold, the cached answer will be returned directly without calling the LLM. use_llm_check: Boolean value to enable/disable LLM similarity verification. When enabled, LLM will be used as a secondary check to verify the similarity between questions before returning cached answers. |
2.3.3 查询参数
使用 QueryParam 控制你的查询行为
python
class QueryParam:
    """Configuration parameters for query execution in LightRAG."""

    mode: Literal["local", "global", "hybrid", "naive", "mix", "bypass"] = "global"
    """Specifies the retrieval mode:
    - "local": Focuses on context-dependent information.
    - "global": Utilizes global knowledge.
    - "hybrid": Combines local and global retrieval methods.
    - "naive": Performs a basic search without advanced techniques.
    - "mix": Integrates knowledge graph and vector retrieval.
    """

    only_need_context: bool = False
    """If True, only returns the retrieved context without generating a response."""

    only_need_prompt: bool = False
    """If True, only returns the generated prompt without producing a response."""

    response_type: str = "Multiple Paragraphs"
    """Defines the response format. Examples: 'Multiple Paragraphs', 'Single Paragraph', 'Bullet Points'."""

    stream: bool = False
    """If True, enables streaming output for real-time responses."""

    top_k: int = int(os.getenv("TOP_K", "60"))
    """Number of top items to retrieve. Represents entities in 'local' mode and relationships in 'global' mode."""

    max_token_for_text_unit: int = int(os.getenv("MAX_TOKEN_TEXT_CHUNK", "4000"))
    """Maximum number of tokens allowed for each retrieved text chunk."""

    max_token_for_global_context: int = int(
        os.getenv("MAX_TOKEN_RELATION_DESC", "4000")
    )
    """Maximum number of tokens allocated for relationship descriptions in global retrieval."""

    max_token_for_local_context: int = int(os.getenv("MAX_TOKEN_ENTITY_DESC", "4000"))
    """Maximum number of tokens allocated for entity descriptions in local retrieval."""

    conversation_history: list[dict[str, str]] = field(default_factory=list)
    """Stores past conversation history to maintain context.
    Format: [{"role": "user/assistant", "content": "message"}].
    """

    history_turns: int = 3
    """Number of complete conversation turns (user-assistant pairs) to consider in the response context."""

    ids: list[str] | None = None
    """List of ids to filter the results."""

    model_func: Callable[..., object] | None = None
    """Optional override for the LLM model function to use for this specific query.
    If provided, this will be used instead of the global model function.
    This allows using different models for different query modes.
    """

    user_prompt: str | None = None
    """User-provided prompt for the query.
    If proivded, this will be use instead of the default vaulue from prompt template.
    """
2.3.4 LLM 和 Embedding 注入
LightRAG 需要使用 LLM 和 Embedding 模型完成文档的索引和查询任务。在初始化阶段,需要把 LLM 和 Embedding 的操作函数注入到 LightRAG 中。
-
使用类 Open AI 的 APIs
LightRAG 支持类 Open AI 的 chat/embeddings APIs
pythonasync def llm_model_func( prompt, system_prompt=None, history_messages=[], keyword_extraction=False, **kwargs ) -> str: return await openai_complete_if_cache( "deepseek-chat", prompt, system_prompt=system_prompt, history_messages=history_messages, api_key="<你的 deepseek api key>", base_url="https://api.deepseek.com", **kwargs ) async def embedding_func(texts: list[str]) -> np.ndarray: return await openai_embed( texts, model="text-embedding-v3", api_key="<你的阿里百炼 api key>", base_url="https://dashscope.aliyuncs.com/compatible-mode/v1" ) async def initialize_rag(): rag = LightRAG( working_dir=WORKING_DIR, llm_model_func=llm_model_func, embedding_func=EmbeddingFunc( embedding_dim=1024, # 阿里百炼 text-embedding-v3 的维度是 1024,需要根据实际情况修改 max_token_size=8192, func=embedding_func ) ) await rag.initialize_storages() await initialize_pipeline_status() return rag -
使用 Hugging Face 模型
-
使用 Ollama 模型
-
LlamaIndex
2.3.5 对话历史支持
LightRAG现在通过对话历史功能支持多轮对话。以下是使用方法:
python
# 创建对话历史
conversation_history = [
    {"role": "user", "content": "主角对圣诞节的态度是什么?"},
    {"role": "assistant", "content": "在故事开始时,埃比尼泽·斯克鲁奇对圣诞节持非常消极的态度..."},
    {"role": "user", "content": "他的态度是如何改变的?"}
]

# 创建带有对话历史的查询参数
query_param = QueryParam(
    mode="mix",  # 或其他模式:"local"、"global"、"hybrid"
    conversation_history=conversation_history,  # 添加对话历史
    history_turns=3  # 考虑最近的对话轮数
)

# 进行考虑对话历史的查询
response = rag.query(
    "是什么导致了他性格的这种变化?",
    param=query_param
)
2.3.6 用户提示词 vs 查询
当使用 LightRAG 查询内容的时候,不要把内容查询和与查询结果无关的输出加工写在一起。因为把两者混在一起会严重影响查询的效果。Query Param中的user_prompt就是为解决这一问题而设计的。user_prompt中的内容不参与RAG中的查询过程,它仅会在获得查询结果之后,与查询结果一起送给LLM,指导LLM如何处理查询结果。以下是使用方法:
python
# Create query parameters
query_param = QueryParam(
    mode = "hybrid",  # Other modes:local, global, hybrid, mix, naive
    user_prompt = "For diagrams, use mermaid format with English/Pinyin node names and Chinese display labels",
)

# Query and process
response_default = rag.query(
    "Please draw a character relationship diagram for Scrooge",
    param=query_param
)
print(response_default)
2.3.7 插入
-
基本插入
python# 基本插入 rag.insert("文本")协程插入
pythonrag.ainsert("文本") -
批量插入
python# 基本批量插入:一次插入多个文本 rag.insert(["文本1", "文本2",...]) # 带有自定义批量大小配置的批量插入 rag = LightRAG( ... working_dir=WORKING_DIR, max_parallel_insert = 4 ) rag.insert(["文本1", "文本2", "文本3", ...]) # 文档将以4个为一批进行处理 -
带 ID 插入
如果您想为文档提供自己的ID,文档数量和ID数量必须相同。
python# 插入单个文本,并为其提供ID rag.insert("文本1", ids=["文本1的ID"]) # 插入多个文本,并为它们提供ID rag.insert(["文本1", "文本2",...], ids=["文本1的ID", "文本2的ID"]) -
使用管道插入
apipeline_enqueue_documents和apipeline_process_enqueue_documents函数允许您对文档进行增量插入到图中。这对于需要在后台处理文档的场景很有用,同时仍允许主线程继续执行。
并使用例程处理新文档。
pythonrag = LightRAG(..) await rag.apipeline_enqueue_documents(input) # 您的循环例程 await rag.apipeline_process_enqueue_documents(input) -
插入多文件类型支持
textract支持读取TXT、DOCX、PPTX、CSV和PDF等文件类型。pythonimport textract file_path = 'TEXT.pdf' text_content = textract.process(file_path) rag.insert(text_content.decode('utf-8')) -
引文功能
通过提供文件路径,系统确保可以将来源追溯到其原始文档。
python# 定义文档及其文件路径 documents = ["文档内容1", "文档内容2"] file_paths = ["path/to/doc1.txt", "path/to/doc2.txt"] # 插入带有文件路径的文档 rag.insert(documents, file_paths=file_paths)
2.3.8 存储
LightRAG 使用到4种类型的存储,每一种存储都有多种实现方案。在初始化 LightRAG 的时候可以通过参数设定这四类存储的实现方案。详情请参看前面的LightRAG 初始化参数。
2.3.9 编辑实体和关系
LightRAG现在支持全面的知识图谱管理功能,允许您在知识图谱中创建、编辑和删除实体和关系。
2.3.10 实体合并
2.3.11 Token 统计功能
2.3.12 数据导出功能
2.3.13 缓存
2.3.14 LightRAG API
LightRAG服务器旨在提供Web UI和API支持。有关LightRAG服务器的更多信息,请参阅LightRAG服务器。
2.3.15 知识图谱可视化
2.3.16 评估
数据集
生成查询
批了评估
总体性能表
| ** 农业** | 计算机科学 | 法律 | 混合 | |||||
|---|---|---|---|---|---|---|---|---|
| NaiveRAG | LightRAG | NaiveRAG | LightRAG | NaiveRAG | LightRAG | NaiveRAG | LightRAG | |
| 全面性 | 32.4% | 67.6% | 38.4% | 61.6% | 16.4% | 83.6% | 38.8% | 61.2% |
| 多样性 | 23.6% | 76.4% | 38.0% | 62.0% | 13.6% | 86.4% | 32.4% | 67.6% |
| 赋能性 | 32.4% | 67.6% | 38.8% | 61.2% | 16.4% | 83.6% | 42.8% | 57.2% |
| 总体 | 32.4% | 67.6% | 38.8% | 61.2% | 15.2% | 84.8% | 40.0% | 60.0% |
| RQ-RAG | LightRAG | RQ-RAG | LightRAG | RQ-RAG | LightRAG | RQ-RAG | LightRAG | |
| 全面性 | 31.6% | 68.4% | 38.8% | 61.2% | 15.2% | 84.8% | 39.2% | 60.8% |
| 多样性 | 29.2% | 70.8% | 39.2% | 60.8% | 11.6% | 88.4% | 30.8% | 69.2% |
| 赋能性 | 31.6% | 68.4% | 36.4% | 63.6% | 15.2% | 84.8% | 42.4% | 57.6% |
| 总体 | 32.4% | 67.6% | 38.0% | 62.0% | 14.4% | 85.6% | 40.0% | 60.0% |
| HyDE | LightRAG | HyDE | LightRAG | HyDE | LightRAG | HyDE | LightRAG | |
| 全面性 | 26.0% | 74.0% | 41.6% | 58.4% | 26.8% | 73.2% | 40.4% | 59.6% |
| 多样性 | 24.0% | 76.0% | 38.8% | 61.2% | 20.0% | 80.0% | 32.4% | 67.6% |
| 赋能性 | 25.2% | 74.8% | 40.8% | 59.2% | 26.0% | 74.0% | 46.0% | 54.0% |
| 总体 | 24.8% | 75.2% | 41.6% | 58.4% | 26.4% | 73.6% | 42.4% | 57.6% |
| GraphRAG | LightRAG | GraphRAG | LightRAG | GraphRAG | LightRAG | GraphRAG | LightRAG | |
| 全面性 | 45.6% | 54.4% | 48.4% | 51.6% | 48.4% | 51.6% | 50.4% | 49.6% |
| 多样性 | 22.8% | 77.2% | 40.8% | 59.2% | 26.4% | 73.6% | 36.0% | 64.0% |
| 赋能性 | 41.2% | 58.8% | 45.2% | 54.8% | 43.6% | 56.4% | 50.8% | 49.2% |
| 总体 | 45.2% | 54.8% | 48.0% | 52.0% | 47.2% | 52.8% | 50.4% | 49.6% |