【大模型LLM学习】function call/agent学习记录
- [0 前言](#0 前言)
- [1 langchain实现function call](#1 langchain实现function call)
- [2 调用本地模型](#2 调用本地模型)
- [3 微调本地模型](#3 微调本地模型)
-
- [3.1 few-shot调用Claude生成Q-A对](#3.1 few-shot调用Claude生成Q-A对)
- [3.2 tools格式](#3.2 tools格式)
- [3.3 agent微调格式](#3.3 agent微调格式)
- [3.4 swift微调](#3.4 swift微调)
- p.s.
0 前言
记录一下使用langchain做简单的function call/agent(或者说意图识别,如果函数有返回值再进行summary即可),以及冷启动的场景下造训练数据+微调的过程。
1 langchain实现function call
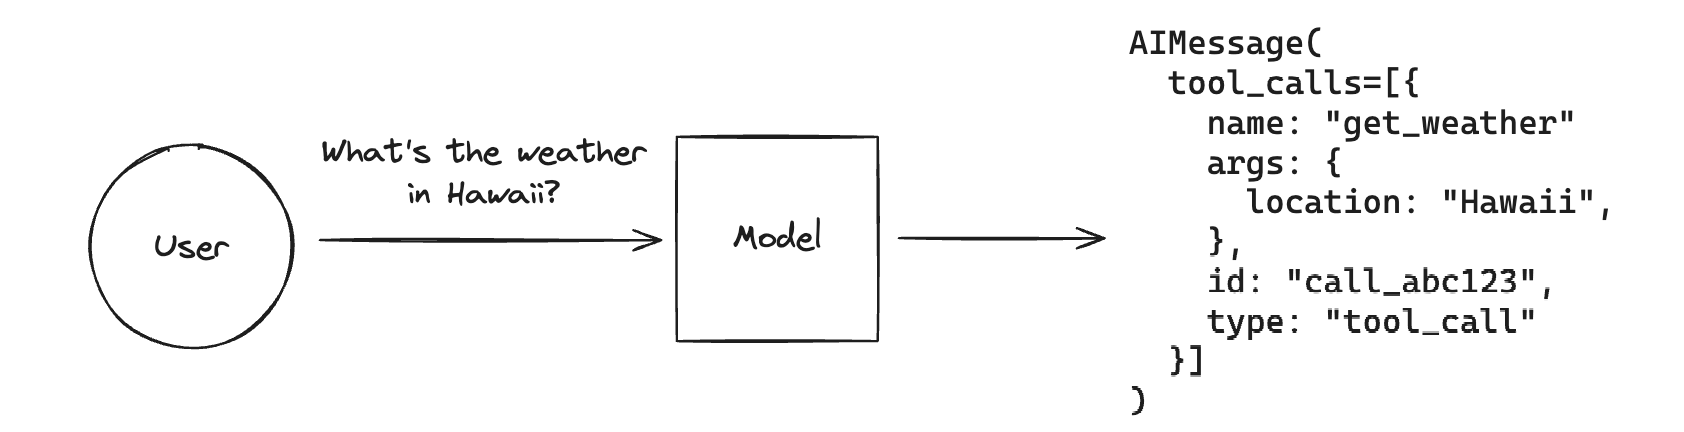
预期是,用户输入一段话,判断应该调用哪个函数来解决这个问题,返回函数名+函数的参数,以正确调用函数。如果这个函数能直接解决问题,模型不用关心返回值是什么,本质上就是一个意图识别+槽填充。
对于agent的模板,选用ReACT的回复模版,要求模型按照ReACT的格式来回答问题。一个具体的给模型看到的ReACT的提问模版如下,{tools}会填充funciton的描述,{input}会填充问模型的问题(或者说用户输入)。
python
react_template="""
Answer the following questions as best you can. You have access to the following tools:

{tools}

Use the following format:

Question: the input question you must answer
Thought: you should always think about what to do
Action: the action to take, should be one of [{tool_names}]
Action Input: the input to the action
Observation: the result of the action
... (this Thought/Action/Action Input/Observation can repeat N times)
Thought: I now know the final answer
Final Answer: the final answer to the original input question

Begin!

Question: {input}
"""
一个完整的ReACT过程包括Question->Thought->Action->Action Input->Observation->Thought->Final Answer这几个步骤:
- Action对应的就是要调用的函数,Action input就是要调用的函数的参数。
- 如果回答这个问题,模型觉得需要调用多个工具,就会有多个Action和Action Input。
- Observation是调用的函数的返回结果,如果模型要对返回结果处理后给出回答,最后的Final Answer是模型的结果;如果模型只需要做function call,具体功能函数会去完成,函数的返回结果模型也不需要处理,在Observation这里停下来就可以了.
2 调用本地模型
如果场景是函数/意图数量比较少,但是对准确率对要求比较高,可以微调一个本地模型来实现。调用本地模型需要先用swift部署一下:
python
# deploy.sh
CUDA_VISIBLE_DEVICES=0 # gpu卡号 \
swift deploy \
    --model /modelsavepath/Qwen/Qwen3-8b # 模型存储路径 \
    --infer_backend vllm
    --agent_template react_en  # agent的template的格式,使用ReACT的格式
    --port 9123  # 模型部署到的端口

# nohup bash deploy.sh > log_deploy.txt 2>&1
在langchain中,调用本地的qwen模型使用ChatOpenAI来调用
python
from langchain_openai import ChatOpenAI
model = ChatOpenAI(
    model_name='Qwen3-8b', # 模型名字,如果是微调后的模型,名字例如checkpoint-378-merged,部署的时候可以在log_deploy.txt里面查到;
    openai_api_key='EMPTY', # 本地的模型
    base_url='http://本机ip:9123/v1',
    stop=['Observation:','\nObservation: ','Observation:\n']  # 用于识别意图,ReACT的格式在Observation这里就停下来就可以
)
使用langchain完成模型端的代码,再Flask包装一个HTTP服务:
python
from flask import Flask, request, jsonify
import requests
from langchain_openai import ChatOpenAI
from langchain.agents import initialize_agent, Tool
from typing import Dict, Any
from typing_extensions import Annotated, TypedDict
import json
from langchain_core.messages import AIMessage, HumanMessage, ToolMessage,SystemMessage
from langchain_core.prompts import ChatPromptTemplate
from langchain_core.runnables import RunnablePassthrough
from typing import Dict, Optional, Literal
from pydantic import BaseModel, Field
from langchain.tools import BaseTool
import ast

class chat_with_user(TypedDict):
"""判断用户的意图是闲聊,调用这个函数完成与用户的闲聊"""
	user_question:Annoted[str,"","用户问的问题"]

class get_weather(BaseModel):
"""判断用户的意图是问天气怎么样,调用这个函数帮用户查天气"""
    date:int = Field(
    	default=0,
    	description="用户想查天气的时间距离今天的天数,如果查今天,这个值为0,如果查明天,这个值为1",
    	ge=0
	)
	city:str = Field(
		default="北京",
		description="用户想查天气的城市名"
	)

model = ChatOpenAI(
    model_name='Qwen3-8b', # 模型名字,如果是微调后的模型,名字例如checkpoint-378-merged,部署的时候可以在log_deploy.txt里面查到;
    openai_api_key='EMPTY', # 本地的模型
    base_url='http://本机ip:9123/v1',
    stop=['Observation:','\nObservation: ','Observation:\n']  # 用于识别意图,ReACT的格式在Observation这里就停下来就可以
)
tools = [chat_with_user,get_weather]
model_with_tool = model.bind_tools(tools)
app=Flask(__name__)

@app.route('/api/predict/',method=['POST'])
def predict():
	gloal model_with_tool
	user_input = request.json
	input = user_input.get('user') # 如果是没微调的qwen3可以拼接加入"/no_think"字符串避免模型思考
	model_with_tool.invoke(input)
	print(response.tool_calls[0]['name']) # 函数名
	print(response.tool_calls[0]['args']) # 函数参数

if __name__=='__main__':
	app.run(host='本地ip',port=1234)
可以使用HTTP的方式调用:
python
import requests
url = 'http//上面的本地ip:1234/api/predict'
data = {'user':'你好呀'}
response = requests.post(url,json=data)

url = 'http//上面的本地ip:1234/api/predict'
data = {'user':'明天洛阳天气怎么样'}
response = requests.post(url,json=data)
3 微调本地模型
专有业务场景下,如果之前就收集了很多问答数据,可以构造出对应的agent训练数据来微调本地模型。但是如果是一个新的业务场景,冷启动的情况下,可以借助闭源大模型的能力构造问答数据,可以参考OpenBMB的给出的一个开源的方案AutoPlan。AutoPlan可以实现冷启动场景下,复杂的长链条的问题的生成,因为目前还没有接触到类似的场景,简化版的流程如下:
- 给定tool+问题示例,生成模拟的问题,模仿用户的各种输入:(可以一次只针对一个function call)给Claude提供几条示例的用户输入数据+function的描述,把Claude的temperature调高,让Claude给出X条类似的问题能触发这个function call/被这个funciton解决的,尽量生成多样化的问题,可以人工筛选一下或者AI质检提升质量,记录好funciton名+问题便于后面调用生成回答
- Q-A对获取:把前面生成的问题让Claude来回答,给定tools+问题,生成答案,获得Q-A对
- (可选)根据函数返回值,再次调用Claude整合出最终返回用户的结果
3.1 few-shot调用Claude生成Q-A对
调用Claude时,直接让Claude回答的效果不一定好,可以给一些few-shot示例。如果函数多,可以利用前面记录下的函数名,针对性的给few shot示例。Claude模型是支持langchain里面的toolmessage的,有的模型例如qwen可能不支持。本质上这些few shot最后都是以字符串的形式传递的,如果不支持,以字符串的形式传递也可。
使用langchain的few-shot的template,需要注意examples是一个list\[\]而不是嵌套的list。本质上few-shot是字符串的形式,需要让模型这道这一段是few-shot,而不是正式的上下文,所以可以加上写system prompt来区分。对于同一个Toolmessage和对应的tool_calls,通过id来进行对应,需要让它们的id一致。
python
examples = [
        SystemMessage(content="为了便于你识别要调用的工具,给你提供几个示例\n--- 示例开始 ---"),)
        HumanMessage("早上好",name="example_user"),
        AIMessage("用户在打招呼,属于闲聊。根据工具描述,chat_with_user适用于这种情况。",
	        name="example_assisstant",
	        tool_calls={
		        	"name":"chat_with_user",
		        	"args":{"user_question":"早上好"},
		        	"id":"1"
	        	}
        ),
        ToolMessage("",tool_call_id="1"),

		HumanMessage("查明天南京天气",name="example_user"),
        AIMessage("用户想查天气,城市为南京,日期为明天。",
	        name="example_assisstant",
	        tool_calls={
		        	"name":"get_weather",
		        	"args":{"date":"1","city":"南京"},
		        	"id":"2"
	        	}
        ),
        ToolMessage("",tool_call_id="2"),
        SystemMessage(content="\n--- 示例结束 ---\n"),)
]
few_shot_prompt = ChatPromptTemplate.from_messages(
    [
        ("system", "你是一个专业的用户助手。"),
        *examples,
        ("human", "{query}"),
    ]
)

llm = ChatOpenAI()# claude的API
tools = [chat_with_user,get_weather]
llm_claude = few_shot_prompt|tools
3.2 tools格式
关于微调时tools的格式问题,有一种最简单的方式是,直接导出langchain里面的tools的描述,这样就能保证一致性了。
python
tools_desc = model_with_tool.kwargs.get('tools')
json.dump(tools_desc,open('tool_desc.json','w'),ensure_ascii=False,indent=4)
with open('tool_desc.json','r',encoding='utf-8') as f:
	tools_list = json.load(f)
tools_d = [tools_list[i] for i in range(len(tools_list)]
tools_str = json.dump(tools_d,ensure_ascii=False) # 变成字符串格式
3.3 agent微调格式
使用swift来训练微调,主要是要整理成对应的格式,tools使用上面dump的拼上来即可,swift的agent微调格式为
python
{'id':'123',
'tools':'[{"type":"function","funciton":{"name":"chat_with_user","description":"判断用户的意图是闲聊,调用这个函数完成与用户的闲聊","parameters":{...}}}]',
'conversation':[
	{'from':'user','value':'早上好'},
	{'from':'assisstant','value':'Thought: 用户在打招呼,是在闲聊,我将使用chat_with_user来和用户闲聊。\nAction: chat_with_user\nAction Input: {"user_question":"早上好"}\nObservation '}]
}
3.4 swift微调
与常规微调一致,指定agent_template为react_en
python
source activate swift

CUDA_VISIBLE_DEVICES=2,3 swift sft \
--model /data/coding/llm_model/Qwen/Qwen3-8B \
--dataset /data/coding/xxxx.jsonl \
--train_type lora \
--device_map auto \
--agent_template react_en \
--per_device_train_batch_size 2 \
--per_device_eval_batch_size 1 \
--split_dataset_ratio 0.1 \
--output_dir /data/coding/lora_qwen3_8b/ \
--num_train_epochs 5 \
--lorap_lr_ratio 10 \
--save_steps 50 \
--eval_steps 50 \
--save_total_limit 2 \
--logging_steps 10 \
--seed 42 \
--learning_rate 1e-4 \
--init_weights true \
--lora_rank 8 \
--lora_alpha 32 \
--adam_beta1 0.9 \
--adam_beta2 0.95 \
--adam_epsilon 1e-08 \
--weight_decay 0.1 \
--gradient_accumulation_steps 8 \
--max_grad_norm 1 \
--lr_scheduler_type cosine \
--warmup_ratio 0.05 \
--warmup_steps 0 \
--gradient_checkpointing false
p.s.
最近mcp很火,mcp是用另一种风格包装了一下函数接口,最后本质上和模型交互还是用比如ReACT的方式,能力上限由function的能力和模型的能力决定。