PolyU Palmprint Database
香港理工大学掌纹数据库官网为:datasets
目的
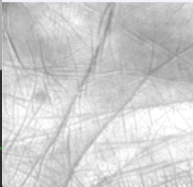
在Online Palmprint Identification论文中有描述其对于该数据集的预处理操作,最终是要获得手心的128*128的图像,感兴趣的可以去找这篇经典论文来学习。
我根据论文和资料复现了一下这个算法(实现效果不算很完美还有很大进步空间),这篇文章记录一下我的踩坑历史,需要代码的我先放在这里,感兴趣看这份代码的改进踩坑史的可以继续看后面。
python
def mouse_callback(event, x, y, flags, param):
    if event == cv2.EVENT_LBUTTONDOWN:  # 左键点击事件
        print(f"Clicked at: (x={x}, y={y})")
        # 在点击位置画一个红点(可选)
        cv2.circle(param, (x, y), 3, (0, 0, 255), -1)
def extract_palmprint_features(img_path,debug=0):
    """剪切去roi区域

    参数:
        img_path:图片路径
        debug:是否显示中间过程
    """
    #1.读取图片
    img = cv2.imread(img_path)

    if debug:
        cv2.namedWindow("Debug")
        cv2.setMouseCallback("Debug", mouse_callback)  # 绑定回调函数
        cv2.imshow("img",img)
    #2.滤波
    blurred_image = cv2.blur(img, (5, 5))
    if debug:
        cv2.imshow("blurred_image",blurred_image)
    gray_image = cv2.cvtColor(blurred_image, cv2.COLOR_BGR2GRAY)
    #3.二值化
    _, binary_image = cv2.threshold(gray_image,50, 1, cv2.THRESH_BINARY)

    if debug:
        Binary_img_for_show = cv2.normalize(binary_image, None, 0, 255, 32)
        cv2.imshow("binary_image",Binary_img_for_show)
        # cv2.waitKey(0)
        # cv2.destroyAllWindows()

    #4.寻找最外侧顶部白色区域和最底部白色区域
    Out_top =  (0,0)
    Out_bottom = (0,0)
    for row in range(binary_image.shape[0]):
        is_get = 0
        for col in range(binary_image.shape[1]):
            if binary_image[row][col] == 1:
                Out_top = (col,row)
                is_get = 1
                break
        if is_get:
            break
    for row in range(binary_image.shape[0]-1, -1, -1):
        is_get = 0
        for col in range(binary_image.shape[1]):
            if binary_image[row][col] == 1 and col<200:
                Out_bottom = (col, row)
                is_get = 1
                break
        if is_get:
            break
    if debug:
        print("Out_top(x,y):{}".format(Out_top))
        print("Out_bottom(x,y):{}".format(Out_bottom))
    #5.寻找最内侧顶部白色区域和最底部白色区域
    In_top = (0,0)
    In_bottom =(0,0)
    gap_x = 0
    for col in range(binary_image.shape[1]):
        gap_width = 0
        for row in range(binary_image.shape[0]):
            if binary_image[row][col] == 0:
                gap_width += 1
        if gap_width < 200:
            gap_x = col
            break
    In_top = (gap_x, 0)
    In_bottom = (gap_x, 0)
    center_y = binary_image.shape[0] // 2
    for row in range(center_y,-1,-1):
        if binary_image[row][gap_x] == 1:
            In_top = (gap_x, row)
            break
    for row in range(center_y,binary_image.shape[0]):
        if binary_image[row][gap_x] == 1:
            In_bottom = (gap_x,row)
            break
    if debug:
        print('In_top(x,y):{}'.format(In_top))
        print('In_bottom(x,y):{}'.format(In_bottom))
    #6.寻找边界轮廓,并且与上面四个点进行对比
    Out_top_j = Out_bottom_j = In_top_j = In_bottom_j = 0
    reference_point_num = 0
    contours, hierarchy = cv2.findContours(binary_image,0,1)
    if debug:
        debug_img = cv2.cvtColor(binary_image, cv2.COLOR_GRAY2BGR)
        cv2.drawContours(debug_img, contours, -1, (0, 255, 0), 1)  # 绿色轮廓
        cv2.circle(debug_img, Out_top, 3, (0, 0, 255), -1)         # 红色标记关键点
        cv2.circle(debug_img, Out_bottom, 3, (0, 0, 255), -1)
        cv2.circle(debug_img, In_top, 3, (0, 0, 255), -1)
        cv2.circle(debug_img, In_bottom, 3, (0, 0, 255), -1)
        cv2.imshow("Debug", debug_img)
    Contours = np.zeros(binary_image.shape,int)
    true_contour=0
    max=0
    for i in range(len(contours)):
        for j in range(len(contours[i])):
            if len(contours[i])>max:
                max=len(contours[i])
                true_contour=i
            if contours[i][j][0][0] == Out_top[0] and contours[i][j][0][1] == Out_top[1]:
                Out_top_j = j
                reference_point_num += 1
            if contours[i][j][0][0] == Out_bottom[0] and contours[i][j][0][1] == Out_bottom[1]:
                Out_bottom_j = j
                reference_point_num += 1
            if contours[i][j][0][0] == In_top[0] and contours[i][j][0][1] == In_top[1]:
                In_top_j = j
                reference_point_num += 1
            if contours[i][j][0][0] == In_bottom[0] and contours[i][j][0][1] == In_bottom[1]:
                In_bottom_j = j
                reference_point_num += 1
    if reference_point_num != 4:
        print(reference_point_num)
        print('not four')
        exit(0)
    for j in range(Out_top_j,In_top_j+1):
        P = (contours[true_contour][j][0][0], contours[true_contour][j][0][1])
        Contours[P[1]][P[0]] = 255
    for j in range(In_bottom_j,Out_bottom_j+1):
        P = (contours[true_contour][j][0][0], contours[true_contour][j][0][1])
        Contours[P[1]][P[0]] = 255
    #找到中间关键点位置
    Top_x = Bottom_x = 0.0
    Top_y_vector = []
    Bottom_y_vector = []
    for j in range(Out_top_j,In_top_j+1):
        if contours[true_contour][j][0][0] > Top_x:
            Top_x = contours[true_contour][j][0][0]
    for j in range(In_bottom_j,Out_bottom_j+1):
        if contours[true_contour][j][0][0] > Bottom_x:
            Bottom_x = contours[true_contour][j][0][0]
    for j in range(Out_top_j,In_top_j+1):
        if contours[true_contour][j][0][0] == Top_x:
            Top_y_vector.append(contours[true_contour][j][0][1])
    for j in range(In_bottom_j,Out_bottom_j+1):
        if contours[true_contour][j][0][0] == Bottom_x:
            Bottom_y_vector.append(contours[true_contour][j][0][1])

    top_sum = sum(Top_y_vector)
    bottom_sum = sum(Bottom_y_vector)
    Top_y = top_sum / float(len(Top_y_vector))
    Bottom_y = bottom_sum / float(len(Bottom_y_vector))

    print('Top:({},{})'.format(Top_x,Top_y))
    print('Bottom:({},{})'.format(Bottom_x,Bottom_y))
    #根据关键点的xy往后裁剪关键roi区域
    Top = (Top_x , Top_y)
    Bottom = (Bottom_x, Bottom_y)
    Origin_X = (Top[0] + Bottom[0]) / 2.0
    Origin_Y = (Top[1] + Bottom[1]) / 2.0
    Origin = (Origin_X, Origin_Y)
    Slope_y_axis = (Top_y - Bottom_y) / (Top_x - Bottom_x)
    Slope_x_axis = -1 / Slope_y_axis
    print('Origin:({},{})'.format(Origin_X,Origin_Y))
    center = (Origin_X, Origin_Y)
    dst = img.copy()
    Uleft = (int(Origin_X + 20), int(Origin_Y - 128 / 2))
    dst = dst[Uleft[1]:Uleft[1]+128, Uleft[0]:Uleft[0]+128]
    # root="./imgs/"
    # cv2.imwrite(root+img_path.split("/")[2],dst)
    if debug:
        cv2.imshow("dst",dst)
    if debug:
        cv2.waitKey(0)
踩坑史
调试工具
python
def mouse_callback(event, x, y, flags, param):
    if event == cv2.EVENT_LBUTTONDOWN:  # 左键点击事件
        print(f"Clicked at: (x={x}, y={y})")
        # 在点击位置画一个红点(可选)
        cv2.circle(param, (x, y), 3, (0, 0, 255), -1)
该回调函数主要是用于调试检查错误的,可以获取到点击图像上的点的x,y值,以此分析是哪个步骤出现问题。
extract_palmprint_features参数讲解:
img_path:图片路径
debug:是否显示中间过程,如果输入True就会跳出调试的中间过程图片,不建议输入很多图片路径的时候开,最好就是找到有问题的图片,针对一张图片开这个调试进行分析问题。
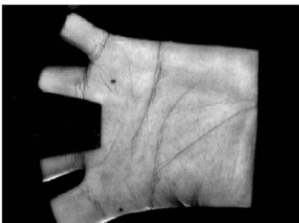
前期处理,重点调参
python
#1.读取图片
    img = cv2.imread(img_path)

    if debug:
        cv2.namedWindow("Debug")
        cv2.setMouseCallback("Debug", mouse_callback)  # 绑定回调函数
        cv2.imshow("img",img)
    #2.滤波
    blurred_image = cv2.blur(img, (5, 5))
    if debug:
        cv2.imshow("blurred_image",blurred_image)
    gray_image = cv2.cvtColor(blurred_image, cv2.COLOR_BGR2GRAY)
    #3.二值化
    _, binary_image = cv2.threshold(gray_image,50, 1, cv2.THRESH_BINARY)

    if debug:
        Binary_img_for_show = cv2.normalize(binary_image, None, 0, 255, 32)
        cv2.imshow("binary_image",Binary_img_for_show)
        # cv2.waitKey(0)
        # cv2.destroyAllWindows()
这部分就是简单读取图片,进行简单的滤波和二值化处理,需要注意的是滤波操作,这里选取不同的滤波效果差异还是比较大的,中值滤波,高斯滤波都可以进行尝试,选择最合适的滤波。而二值化的阈值也是比较关键的参数,如果出现效果不好,可以先尝试调这两个地方。
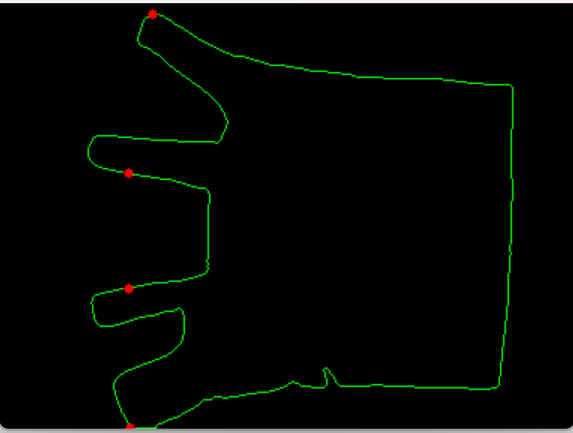
找四个关键点
这里需要找到下图的四个点,这个地方也有坑的地方,经常会出现有图片在二值化之后在右下角或者其他角落留有白点部分,这就会使得四个点找错位置,我的解决方法有两个:1.调整二值化阈值。 2.对找到点的位置进行限制。这份代码里面都有所体现。
python
#4.寻找最外侧顶部白色区域和最底部白色区域
    Out_top =  (0,0)
    Out_bottom = (0,0)
    for row in range(binary_image.shape[0]):
        is_get = 0
        for col in range(binary_image.shape[1]):
            if binary_image[row][col] == 1:
                Out_top = (col,row)
                is_get = 1
                break
        if is_get:
            break
    for row in range(binary_image.shape[0]-1, -1, -1):
        is_get = 0
        for col in range(binary_image.shape[1]):
            if binary_image[row][col] == 1 and col<200:
                Out_bottom = (col, row)
                is_get = 1
                break
        if is_get:
            break
    if debug:
        print("Out_top(x,y):{}".format(Out_top))
        print("Out_bottom(x,y):{}".format(Out_bottom))
    #5.寻找最内侧顶部白色区域和最底部白色区域
    In_top = (0,0)
    In_bottom =(0,0)
    gap_x = 0
    for col in range(binary_image.shape[1]):
        gap_width = 0
        for row in range(binary_image.shape[0]):
            if binary_image[row][col] == 0:
                gap_width += 1
        if gap_width < 200:
            gap_x = col
            break
    In_top = (gap_x, 0)
    In_bottom = (gap_x, 0)
    center_y = binary_image.shape[0] // 2
    for row in range(center_y,-1,-1):
        if binary_image[row][gap_x] == 1:
            In_top = (gap_x, row)
            break
    for row in range(center_y,binary_image.shape[0]):
        if binary_image[row][gap_x] == 1:
            In_bottom = (gap_x,row)
            break
    if debug:
        print('In_top(x,y):{}'.format(In_top))
        print('In_bottom(x,y):{}'.format(In_bottom))
确定四个点对不对
这部分是将四个点的位置与轮廓进行对比,看四个点在不在轮廓上面,不在就不认为是有校点。这部分的代码我改了很久,因为最大的问题就出现在这里,我这个代码是借鉴了其他人的代码的,当时就发现别人的代码在部分数据集上面问题很大,根本就找不到四个有校点。当时就很疑惑,看评论区也有很多人有这个疑惑,最后一步一步调试终于发现了关键的问题。那就是之前那份代码只处理contours0,这样处理在只找到手部轮廓的情况下是没有问题的。但是前面也提到了,会在角落出现白色区域,这时候轮廓就不止一个了就会出现对比的轮廓根本不是手的情况,最终导致有校点不是四个。
解决方法:我循环了所有轮廓进行对比,只要四个点在其中一个轮廓上就算是有校点。
python
#6.寻找边界轮廓,并且与上面四个点进行对比
    Out_top_j = Out_bottom_j = In_top_j = In_bottom_j = 0
    reference_point_num = 0
    contours, hierarchy = cv2.findContours(binary_image,0,1)
    if debug:
        debug_img = cv2.cvtColor(binary_image, cv2.COLOR_GRAY2BGR)
        cv2.drawContours(debug_img, contours, -1, (0, 255, 0), 1)  # 绿色轮廓
        cv2.circle(debug_img, Out_top, 3, (0, 0, 255), -1)         # 红色标记关键点
        cv2.circle(debug_img, Out_bottom, 3, (0, 0, 255), -1)
        cv2.circle(debug_img, In_top, 3, (0, 0, 255), -1)
        cv2.circle(debug_img, In_bottom, 3, (0, 0, 255), -1)
        cv2.imshow("Debug", debug_img)
    Contours = np.zeros(binary_image.shape,int)
    true_contour=0
    max=0
    for i in range(len(contours)):
        for j in range(len(contours[i])):
            if len(contours[i])>max:
                max=len(contours[i])
                true_contour=i
            if contours[i][j][0][0] == Out_top[0] and contours[i][j][0][1] == Out_top[1]:
                Out_top_j = j
                reference_point_num += 1
            if contours[i][j][0][0] == Out_bottom[0] and contours[i][j][0][1] == Out_bottom[1]:
                Out_bottom_j = j
                reference_point_num += 1
            if contours[i][j][0][0] == In_top[0] and contours[i][j][0][1] == In_top[1]:
                In_top_j = j
                reference_point_num += 1
            if contours[i][j][0][0] == In_bottom[0] and contours[i][j][0][1] == In_bottom[1]:
                In_bottom_j = j
                reference_point_num += 1
    if reference_point_num != 4:
        print(reference_point_num)
        print('not four')
        exit(0)
    for j in range(Out_top_j,In_top_j+1):
        P = (contours[true_contour][j][0][0], contours[true_contour][j][0][1])
        Contours[P[1]][P[0]] = 255
    for j in range(In_bottom_j,Out_bottom_j+1):
        P = (contours[true_contour][j][0][0], contours[true_contour][j][0][1])
        Contours[P[1]][P[0]] = 255
找到中间点,最后裁剪
这部分的实现我并没有修改,但是我最后裁剪出来的部分图片还是有位置偏移的情况出现,所以这部分应该还有改进空间供大家思考。
python
#找到中间关键点位置
    Top_x = Bottom_x = 0.0
    Top_y_vector = []
    Bottom_y_vector = []
    for j in range(Out_top_j,In_top_j+1):
        if contours[true_contour][j][0][0] > Top_x:
            Top_x = contours[true_contour][j][0][0]
    for j in range(In_bottom_j,Out_bottom_j+1):
        if contours[true_contour][j][0][0] > Bottom_x:
            Bottom_x = contours[true_contour][j][0][0]
    for j in range(Out_top_j,In_top_j+1):
        if contours[true_contour][j][0][0] == Top_x:
            Top_y_vector.append(contours[true_contour][j][0][1])
    for j in range(In_bottom_j,Out_bottom_j+1):
        if contours[true_contour][j][0][0] == Bottom_x:
            Bottom_y_vector.append(contours[true_contour][j][0][1])

    top_sum = sum(Top_y_vector)
    bottom_sum = sum(Bottom_y_vector)
    Top_y = top_sum / float(len(Top_y_vector))
    Bottom_y = bottom_sum / float(len(Bottom_y_vector))

    print('Top:({},{})'.format(Top_x,Top_y))
    print('Bottom:({},{})'.format(Bottom_x,Bottom_y))
    #根据关键点的xy往后裁剪关键roi区域
    Top = (Top_x , Top_y)
    Bottom = (Bottom_x, Bottom_y)
    Origin_X = (Top[0] + Bottom[0]) / 2.0
    Origin_Y = (Top[1] + Bottom[1]) / 2.0
    Origin = (Origin_X, Origin_Y)
    Slope_y_axis = (Top_y - Bottom_y) / (Top_x - Bottom_x)
    Slope_x_axis = -1 / Slope_y_axis
    print('Origin:({},{})'.format(Origin_X,Origin_Y))
    center = (Origin_X, Origin_Y)
    dst = img.copy()
    Uleft = (int(Origin_X + 20), int(Origin_Y - 128 / 2))
    dst = dst[Uleft[1]:Uleft[1]+128, Uleft[0]:Uleft[0]+128]
    # root="./imgs/"
    # cv2.imwrite(root+img_path.split("/")[2],dst)
    if debug:
        cv2.imshow("dst",dst)
    if debug:
        cv2.waitKey(0)
最后效果
这张图片效果还是不错啦!