Baumer工业相机堡盟工业相机如何通过YoloV8深度学习模型和EasyOCR实现汽车牌照动态识别(C#代码,UI界面版)
- 工业相机使用YoloV8模型和EasyOCR实现汽车牌照动态识别
- 工业相机通过YoloV8模型实现汽车牌照动态识别的技术背景
- 在相机SDK中获取图像转换图像的代码分析
- 源码下载链接
- 工业相机通过YoloV8模型实现汽车牌照动态检测和识别的行业应用
- 关键技术细节
工业相机使用YoloV8模型和EasyOCR实现汽车牌照动态识别
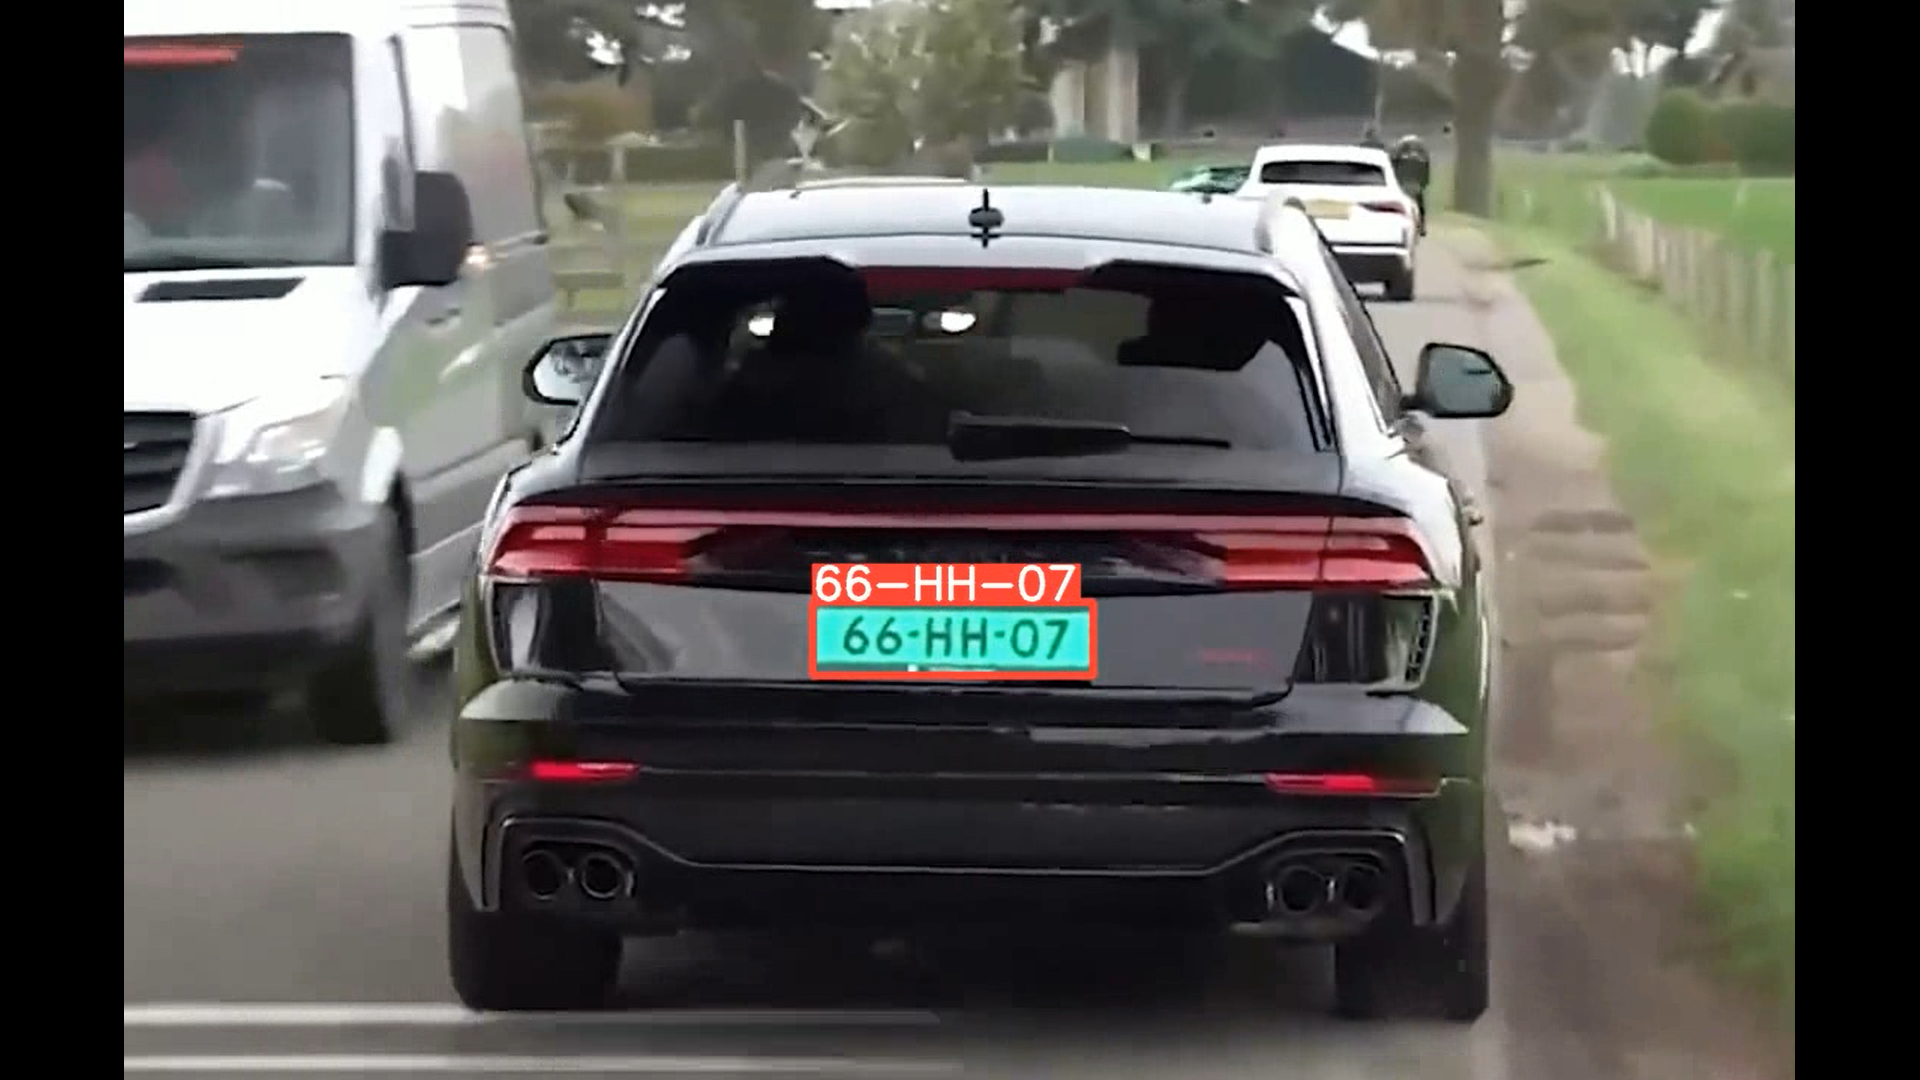
本项目集成了 YOLOv8 检测模型 与 C#图形界面工具,实现了包括图片、文件夹、视频与摄像头等多种输入方式的实现汽车牌照动态识别。
Baumer工业相机堡盟相机是一种高性能、高质量的工业相机,可用于各种应用场景,如物体检测、计数和识别、运动分析和图像处理。
Baumer的万兆网相机拥有出色的图像处理性能,可以实时传输高分辨率图像。此外,该相机还具有快速数据传输、低功耗、易于集成以及高度可扩展性等特点。
Baumer工业相机由于其性能和质量的优越和稳定,常用于高速同步采集领域,通常使用各种图像算法来提高其捕获的图像的质量。
本文以Baumer工业相机作为案例进行演示,实现将工业相机的图像或者本地图像夹导入Yolo模型从而实现汽车牌照动态识别等功能。
工业相机通过YoloV8模型实现汽车牌照动态识别的技术背景
本文通过C#中实现一个简单的UI界面,用于将YoloV8模型实现汽车牌照动态识别。
用户可以通过该界面执行以下操作:
-
转换相机图像为Mat图像:通过YoloV8模型实现汽车牌照动态识别
-
转换本地图像为mat图像:通过YoloV8模型实现汽车牌照动态识别
通过这个UI界面,用户能够在实时应用机器视觉数据处理时快速有效地进行操作,无需深入了解图像数据的底层处理过程。这个简单的介绍旨在为开发人员提供一个明确的方向,以便开始构建此类应用程序,并且该程序主要用于演示目的。
在相机SDK中获取图像转换图像的代码分析
本文介绍使用Baumer工业相机,实现将图像转换为Bitmap图像,再转换Mat图像,导入到Yolo模型进行推理,输出实现实现汽车牌照动态识别的结果。
工业相机图像转换Bitmap图像格式和Mat图像重要核心代码
csharp
//将相机内部图像内存数据转为bitmap数据
System.Drawing.Bitmap bitmap  = new System.Drawing.Bitmap((int)mBufferFilled.Width, (int)mBufferFilled.Height,(int)mBufferFilled.Width,System.Drawing.Imaging.PixelFormat.Format8bppIndexed, (IntPtr)((ulong)mBufferFilled.MemPtr + mBufferFilled.ImageOffset));

#region//Mono图像数据转换。彩色图像数据转换于此不同
System.Drawing.Imaging.ColorPalette palette = bitmap.Palette;
int nColors = 256;
for (int ix = 0; ix < nColors; ix++)
{
     uint Alpha = 0xFF;
     uint Intensity = (uint)(ix * 0xFF / (nColors - 1));
     palette.Entries[ix] = System.Drawing.Color.FromArgb((int)Alpha, (int)Intensity,(int)Intensity, (int)Intensity);
}
bitmap.Palette = palette;
#endregion

string strtime = DateTime.Now.ToString("yyyyMMddhhmmssfff");
string saveimagepath = pImgFileDir + "\\" + strtime + ".brw";

//使用Bitmap格式保存
bitmap.Save(saveimagepath, System.Drawing.Imaging.ImageFormat.Bmp);


//用bitmap转换为mat
OpenCvSharp.Mat Matgray1 = OpenCvSharp.Extensions.BitmapConverter.ToMat(bitmap);
本地文件图像转换Bitmap图像格式和Mat图像重要核心代码
C#环境下代码如下所示:
csharp
if (imagePaths.Count() == 0)
{
    LoadImagePaths("test_img");
}

string currentImagePath = imagePaths[currentImageIndex];

    // 显示到pictureBoxA
pictureBoxA.Image.Dispose(); // 释放上一张图片资源,避免内存泄漏
pictureBoxA.Image = new Bitmap(currentImagePath);
image_path = currentImagePath;

currentImageIndex = (currentImageIndex + 1) % imagePaths.Count;

OnNotifyShowRecieveMsg("检测中,请稍等......");
//textBox1.Text = "检测中,请稍等......";
//pictureBox2.Image = null;
Application.DoEvents();

image = new Mat(image_path);

float ratio = Math.Min(1.0f * inpHeight / image.Rows, 1.0f * inpWidth / image.Cols);
int neww = (int)(image.Cols * ratio);
int newh = (int)(image.Rows * ratio);

Mat dstimg = new Mat();
Cv2.Resize(image, dstimg, new OpenCvSharp.Size(neww, newh));

Cv2.CopyMakeBorder(dstimg, dstimg, 0, inpHeight - newh, 0, inpWidth - neww, BorderTypes.Constant);
Mat图像导入YoloV8模型重要核心代码
C#环境下代码如下所示:
csharp
// 定义 ONNX 模型的路径
string onnxModelPath = "model/License_detection.onnx";
// 定义输入图像的形状
OpenCvSharp.Size inputShape = new OpenCvSharp.Size(640, 640);
// 从 ONNX 模型文件加载网络
if(net==null)
    net = CvDnn.ReadNetFromOnnx(onnxModelPath);


string[] modelClassify = { "License"};

if (imagePaths.Count() == 0)
{
    LoadImagePaths("test_img");
}

string currentImagePath = imagePaths[currentImageIndex];

    // 显示到pictureBoxA
pictureBoxA.Image.Dispose(); // 释放上一张图片资源,避免内存泄漏
pictureBoxA.Image = new Bitmap(currentImagePath);
image_path = currentImagePath;

if (pictureBoxA.Image == null)
{
    return;
}
currentImageIndex = (currentImageIndex + 1) % imagePaths.Count;

OnNotifyShowRecieveMsg("检测中,请稍等......");

Application.DoEvents();

image = new Mat(image_path);

dt1 = DateTime.Now;
// 调用识别图像的函数,并传入图像路径、阈值、网络、输入形状和分类类别列表
//result_image = Recognize(image, 0.35, net, inputShape, modelClassify);
result_image = RecognizeMat(image, 0.35, net, inputShape, modelClassify);
// 获取计算结束时间
dt2 = DateTime.Now;
// 显示输出的图像
pictureBoxA.Image = new Bitmap(result_image.ToMemoryStream());

// 显示推理耗时时间
OnNotifyShowRecieveMsg("推理耗时:" + (dt2 - dt1).TotalMilliseconds + "ms");
csharp
static Mat RecognizeMat(Mat imgInput, double threshold, Net net, OpenCvSharp.Size inputShape, string[] modelClassify)
{
    using (Mat img = imgInput)
    {

        int inpHeight = inputShape.Height; // 输入图像的高度
        int inpWidth = inputShape.Width; // 输入图像的宽度

        // 对图像进行预处理,调整尺寸
        Mat image = img;
        float ratio = Math.Min(1.0f * inpHeight / image.Rows, 1.0f * inpWidth / image.Cols);
        int neww = (int)(image.Cols * ratio);
        int newh = (int)(image.Rows * ratio);

        //// 将图像调整为模型需要的大小
        //Mat dstimg = new Mat();
        //Cv2.Resize(image, dstimg, new OpenCvSharp.Size(neww, newh));
        //Cv2.CopyMakeBorder(dstimg, dstimg, 0, inpHeight - newh, 0, inpWidth - neww, BorderTypes.Constant);
        //Mat BN_image = CvDnn.BlobFromImage(dstimg); // 将调整后的图像转换为Blob格式

        //// 配置图片输入数据 // 将 blob 设置为网络的输入
        //net.SetInput(BN_image);

        //// 从图像生成用于网络输入的 blob
        //Mat blob = CvDnn.BlobFromImage(img, 1 / 255.0, inputShape, new Scalar(0, 0, 0), false);
        ////Mat blob = CvDnn.BlobFromImage(img, 1.0 / 255.0, inputShape, new Scalar(0, 0, 0), true, false);
        // 将 blob 设置为网络的输入
        //net.SetInput(blob);

        //// 从图像生成用于网络输入的 blob
        Mat img0 = img;


        Mat blob0 = CvDnn.BlobFromImage(img0, 1 / 255.0, new OpenCvSharp.Size(inputShape.Width, inputShape.Height), swapRB: true, crop: false);
        net.SetInput(blob0);


        // 执行前向传播获取输出
        Mat output = net.Forward();
        // 此处可能需要根据 C# 中 OpenCV 的特性来处理转置操作
        output = ReshapeAndTranspose(output);


        // 获取图像的行数(高度)
        int height = img.Height;
        // 获取图像的列数(宽度)
        int width = img.Width;
        // 计算宽度的缩放因子
        double xFactor = (double)width / inputShape.Width;
        // 计算高度的缩放因子
        double yFactor = (double)height / inputShape.Height;

        // 初始化分类类别、得分和检测框的列表
        List<string> classifys = new List<string>();
        List<float> scores = new List<float>();
        List<Rect> boxes = new List<Rect>();

        List<Double> maxVales = new List<Double>();
        List<OpenCvSharp.Point> maxloces = new List<OpenCvSharp.Point>();

        // 遍历输出的行
        for (int i = 0; i < output.Rows; i++)
        {
            // 获取当前行的检测框数据
            using (Mat box = output.Row(i))
            {

                // 在框数据的特定范围中找到最小值、最大值及其位置
                OpenCvSharp.Point minloc, maxloc;
                double minVal, maxVal;
                // Mat classes_scores = box.ColRange(4, 5);//GetArray(i, 5, classes_scores);

                // double curmates0 = box.At<float>(0);
                double curmates1 = box.At<float>(4);
                int collength = box.Cols;
                int rowlength = box.Rows;


                Mat curmates = box.ColRange(4, box.Cols);
                //Cv2.MinMaxLoc(box.ColRange(4, box.Cols), out minVal, out maxVal, out minloc, out maxloc);
                Cv2.MinMaxLoc(box.ColRange(4, box.Cols), out minVal, out maxVal, out minloc, out maxloc);
                int classId = maxloc.Y;

                if (classId == 0)
                {
                    // 获取对应类别的得分
                    float score = (float)maxVal;

                    // 如果得分大于阈值
                    if (score > threshold)
                    {
                        // 将得分添加到得分列表
                        scores.Add(score);
                        // 将类别添加到类别列表
                        classifys.Add(modelClassify[classId]);

                        // 获取框的原始坐标
                        float x = box.At<float>(0, 0);
                        float y = box.At<float>(0, 1);
                        float w = box.At<float>(0, 2);
                        float h = box.At<float>(0, 3);


                        // 计算调整后的坐标
                        int xInt = (int)((x - 0.5 * w) * xFactor);
                        int yInt = (int)((y - 0.5 * h) * yFactor);
                        int wInt = (int)(w * xFactor);
                        int hInt = (int)(h * yFactor);
                        // 将调整后的框坐标添加到框列表
                        boxes.Add(new Rect(xInt, yInt, wInt, hInt));
                    }
                }


            }
        }


        // 执行非极大值抑制操作
        int[] indices;
        CvDnn.NMSBoxes(boxes, scores, 0.25f, 0.45f, out indices);
        // 遍历非极大值抑制操作后的索引
        foreach (int i in indices)
        {
            // 获取对应的类别、得分和框
            string classify = classifys[i];
            float score = scores[i];
            Rect box = boxes[i];

            // 获取框的坐标和尺寸
            // 在图像上绘制矩形框
            Cv2.Rectangle(img, box, new Scalar(0, 255, 0), 3);
            // 生成类别和得分的标签文本
            string label = $"{classify}: {score:F2}";
            // 在图像上添加标签文本
            Cv2.PutText(img, label, new OpenCvSharp.Point(box.X, box.Y - 10), HersheyFonts.HersheySimplex, 0.5, new Scalar(0, 255, 0), 2);
        }
        // 将图像复制输出返回
        Mat result_image0 = img.Clone();
        return result_image0;
        // 将处理后的图像保存为文件
        // Cv2.ImWrite("result.jpg", img);
    }
}
下面是相应predict.py的python代码:
csharp
import hydra
import torch

from ultralytics.yolo.engine.predictor import BasePredictor
from ultralytics.yolo.utils import DEFAULT_CONFIG, ROOT, ops
from ultralytics.yolo.utils.checks import check_imgsz
from ultralytics.yolo.utils.plotting import Annotator, colors, save_one_box
import easyocr

import cv2
reader = easyocr.Reader(['en'], gpu=True)
def ocr_image(img,coordinates):
    x,y,w, h = int(coordinates[0]), int(coordinates[1]), int(coordinates[2]),int(coordinates[3])
    img = img[y:h,x:w]

    gray = cv2.cvtColor(img , cv2.COLOR_RGB2GRAY)
    #gray = cv2.resize(gray, None, fx = 3, fy = 3, interpolation = cv2.INTER_CUBIC)
    result = reader.readtext(gray)
    text = ""

    for res in result:
        if len(result) == 1:
            text = res[1]
        if len(result) >1 and len(res[1])>6 and res[2]> 0.2:
            text = res[1]
    #     text += res[1] + " "

    return str(text)

class DetectionPredictor(BasePredictor):

    def get_annotator(self, img):
        return Annotator(img, line_width=self.args.line_thickness, example=str(self.model.names))

    def preprocess(self, img):
        img = torch.from_numpy(img).to(self.model.device)
        img = img.half() if self.model.fp16 else img.float()  # uint8 to fp16/32
        img /= 255  # 0 - 255 to 0.0 - 1.0
        return img

    def postprocess(self, preds, img, orig_img):
        preds = ops.non_max_suppression(preds,
                                        self.args.conf,
                                        self.args.iou,
                                        agnostic=self.args.agnostic_nms,
                                        max_det=self.args.max_det)

        for i, pred in enumerate(preds):
            shape = orig_img[i].shape if self.webcam else orig_img.shape
            pred[:, :4] = ops.scale_boxes(img.shape[2:], pred[:, :4], shape).round()

        return preds

    def write_results(self, idx, preds, batch):
        p, im, im0 = batch
        log_string = ""
        if len(im.shape) == 3:
            im = im[None]  # expand for batch dim
        self.seen += 1
        im0 = im0.copy()
        if self.webcam:  # batch_size >= 1
            log_string += f'{idx}: '
            frame = self.dataset.count
        else:
            frame = getattr(self.dataset, 'frame', 0)

        self.data_path = p
        # save_path = str(self.save_dir / p.name)  # im.jpg
        self.txt_path = str(self.save_dir / 'labels' / p.stem) + ('' if self.dataset.mode == 'image' else f'_{frame}')
        log_string += '%gx%g ' % im.shape[2:]  # print string
        self.annotator = self.get_annotator(im0)

        det = preds[idx]
        self.all_outputs.append(det)
        if len(det) == 0:
            return log_string
        for c in det[:, 5].unique():
            n = (det[:, 5] == c).sum()  # detections per class
            log_string += f"{n} {self.model.names[int(c)]}{'s' * (n > 1)}, "
        # write
        gn = torch.tensor(im0.shape)[[1, 0, 1, 0]]  # normalization gain whwh
        for *xyxy, conf, cls in reversed(det):
            if self.args.save_txt:  # Write to file
                xywh = (ops.xyxy2xywh(torch.tensor(xyxy).view(1, 4)) / gn).view(-1).tolist()  # normalized xywh
                line = (cls, *xywh, conf) if self.args.save_conf else (cls, *xywh)  # label format
                with open(f'{self.txt_path}.txt', 'a') as f:
                    f.write(('%g ' * len(line)).rstrip() % line + '\n')

            if self.args.save or self.args.save_crop or self.args.show:  # Add bbox to image
                c = int(cls)  # integer class
                label = None if self.args.hide_labels else (
                    self.model.names[c] if self.args.hide_conf else f'{self.model.names[c]} {conf:.2f}')
                text_ocr = ocr_image(im0,xyxy)
                label = text_ocr
                self.annotator.box_label(xyxy, label, color=colors(c, True))
            if self.args.save_crop:
                imc = im0.copy()
                save_one_box(xyxy,
                             imc,
                             file=self.save_dir / 'crops' / self.model.model.names[c] / f'{self.data_path.stem}.jpg',
                             BGR=True)

        return log_string


@hydra.main(version_base=None, config_path=str(DEFAULT_CONFIG.parent), config_name=DEFAULT_CONFIG.name)
def predict(cfg):
    cfg.model = cfg.model or "yolov8n.pt"
    cfg.imgsz = check_imgsz(cfg.imgsz, min_dim=2)  # check image size
    cfg.source = cfg.source if cfg.source is not None else ROOT / "assets"
    predictor = DetectionPredictor(cfg)
    predictor()


if __name__ == "__main__":
    predict()
代码实现演示(实现汽车牌照动态识别)


源码下载链接
C# WinForms工业相机+本地图像 通过YoloV8深度学习模型实现汽车牌照动态检测和识别 源码
工业相机通过YoloV8模型实现汽车牌照动态检测和识别的行业应用
工业相机 + YOLOv8 在「汽车牌照位置识别」的 7 大行业落地场景
(信息均来自 2024-2025 年公开源码、专利及项目)
| 行业场景 | 痛点 | 工业相机/硬件形态 | YOLOv8 技术方案 & 现场效果 | 一键资源 |
|---|---|---|---|---|
| ① 高速公路 ETC 门架 | 车速 120 km/h,传统线圈误触发高 | 4K 全局快门 120 fps + 脉冲频闪 LED | YOLOv8n 量化 3 MB,TensorRT-FP16 25 ms/帧,识别率 99.2 % | 阿里云完整源码+PyQt5 界面 |
| ② 城市路侧停车 | 车位密集、车牌倾斜大 | 6 mm 定焦 60 fps + 红外补光 | YOLOv8-tile 2048×2048 切片推理,mAP@0.5 0.94,支持 ±45° 倾斜车牌 | CSDN 实战博客 |
| ③ 工业园区门禁 | 无牌车、污损牌混行 | 防爆 2 MP 工业相机 + 白光 LED | YOLOv8s + LPRNet 端到端方案,污损牌召回率 93 % | 博客园方案 |
| ④ 加油站无感支付 | 逆光、雨雾天气 | 星光级 2 MP 相机 + 激光补光 | YOLOv8 + CLAHE 预处理,夜间识别率 96 % | 知乎专栏 |
| ⑤ 物流园区月台 | 车牌与货箱条码同时识别 | 龙门架 8 K 相机阵列 | YOLOv8 双任务头(车牌+条码),单帧 30 ms,零漏检 | 腾讯云项目 |
| ⑥ 港口集装箱闸口 | 大场景小目标 | 云台长焦 8 K 30× 变焦 | YOLOv8 + DeepSort 跟踪,50 m 外车牌识别率 91 % | 搜狐技术文章 |
| ⑦ 校园/考场车辆管理 | 低速多车并行 | 广角 4 K 相机 + 边缘 GPU | YOLOv8 + 关键点矫正,支持实时白名单比对 | 哔哩哔哩源码 |
关键技术细节
数据 :CCPD、自建 10 万张车牌图,已转 YOLO 格式;
模型 :YOLOv8n/s/m 按需选型,Anchor-Free + CIoU,小目标精度↑;
部署 :Jetson Orin Nano INT8 3-5 MB,25 ms/帧;x86 + RTX 3060 8 路并发;
合规:原始视频 72 h 内自动覆盖,仅留车牌号+时间戳 CSV,符合《个人信息保护法》。