1.每日复盘与今日内容
1.1复盘
- 每一点都是面试题
1.2今日内容
- 安装Ansible🍟🍟🍟🍟🍟
- inventory主机清单定义方法🍟🍟🍟🍟🍟
- 8个常用模块
2.Ansible
1.介绍
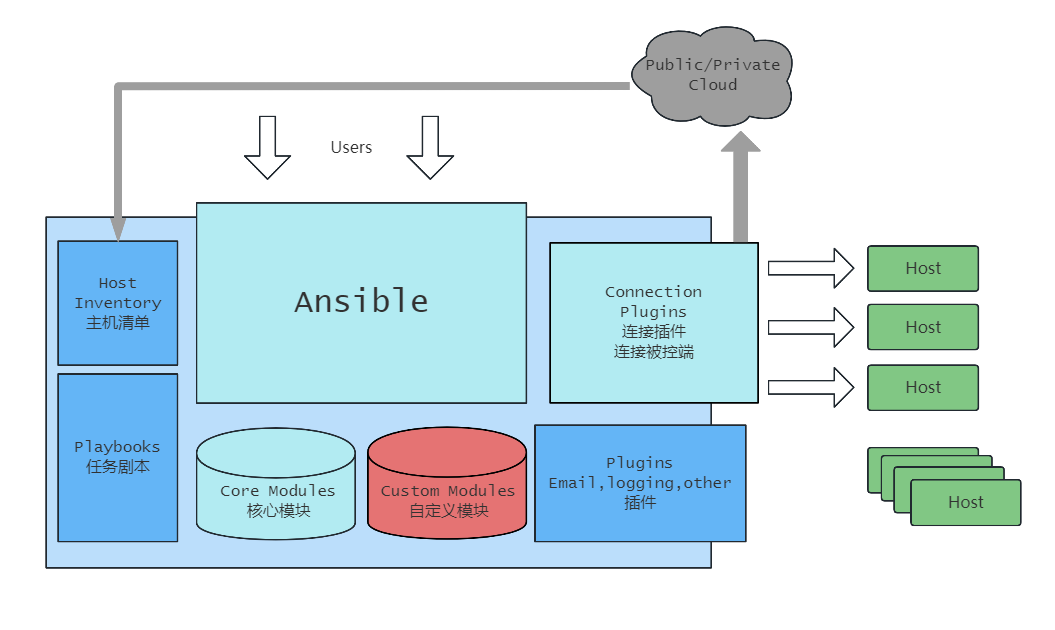
Ansible 是一款极其强大的开源自动化工具、批量化管理工具、类似工具有salt、puppet、用于配置管理、应用部署、任务自动化和IT流程编排。它的核心目标是让复杂的技术操作变得简单、可重复和一致。
|-------|-----------------------------------|
| 名称 | 功能 |
| 配置管理 | 服务器配置不一致,配置漂移 | 幂等性,状态一致性 |
| 应用部署 | 手动部署繁琐、易出错、效率低 | 自动化,可重复,一键部署 |
| 任务自动化 | 需要在多台机器上执行重复命令 | 无代理,SSH,批量执行 |
| 流程编排 | 多服务间依赖复杂,操作顺序严格 | 任务顺序控制,滚动更新 |
| CI/CD | 打通开发与运维,自动化流水线 | 易于与Jenkins等工具集成 |
| 安全合规 | 手动加固效率低,难以保证一致性 | 批量自动化,基线检查 |
- 配置管理
这是 Ansible 最经典的作用,类似于 Puppet, Chef, SaltStack。
功能:确保所有服务器(节点)保持一个期望的、一致的状态。
作用:
自动化地安装、配置和管理软件(如 Nginx, Docker, MySQL)。
管理配置文件,确保所有服务器上的某个配置文件内容完全相同,并且修改后能自动生效。
创建用户、分配权限。
启动、停止服务。
举例:你可以编写一个 Ansible 剧本(Playbook),确保一个 Web 服务器集群中的所有机器都安装了 Nginx,并且它们的 nginx.conf 配置文件都一模一样。
- 应用部署
功能:将应用程序(代码)自动、快速地部署到目标环境(如开发、测试、生产环境)。
作用:
从版本控制系统(如 Git)拉取最新代码。
执行构建步骤(如 mvn package 或 npm build)。
将构建好的应用包(如 JAR, WAR)分发到服务器。
重启应用服务(如 Tomcat, systemd 服务)。
举例:实现"一键部署",开发人员提交代码后,自动触发 Ansible 将新版本应用部署到测试服务器。
- 任务自动化(Ad-Hoc 命令)
功能:在远程服务器上执行一次性、快速的临时命令。
作用:
批量检查多台服务器的磁盘使用情况 (df -h)。
批量重启服务 (systemctl restart nginx)。
批量分发一个文件到一组机器。
批量查看服务器的日志尾行。
举例:ansible web_servers -a "uptime" 这条命令会返回所有 web_servers 分组下服务器的运行时间。
- 编排(Orchestration)
功能:定义和管理跨多个服务器的复杂流程。
作用:
按照特定顺序执行任务,例如先更新数据库结构,再更新应用服务器,最后刷新缓存。
执行滚动更新(先更新一台,确认无误后再更新下一台),实现零停机部署。
管理整个应用栈(数据库、中间件、前端)的启动和关闭顺序。
举例:部署一个高可用应用时,先从负载均衡器中摘除一台服务器,升级该服务器,将其重新加入负载均衡,然后再处理下一台。
- 持续交付(CI/CD)
功能:作为 CI/CD 流水线中的关键一环,实现部署自动化。
作用:与 Jenkins, GitLab CI 等工具集成。
在代码编译、测试完成后,自动由 Ansible 执行部署到各个环境的任务。
举例:Jenkins 在完成单元测试后,调用 Ansible Playbook 将应用部署到预发布环境。
- 安全性与合规性(Security and Compliance)
功能:自动化安全加固和合规性检查。
作用:
批量修复安全漏洞(如统一更新 OpenSSL 版本)。
统一配置安全策略(如防火墙规则、SSH 配置)。
确保所有服务器都符合公司或行业的安全基线(如 PCI DSS)
2.架构图
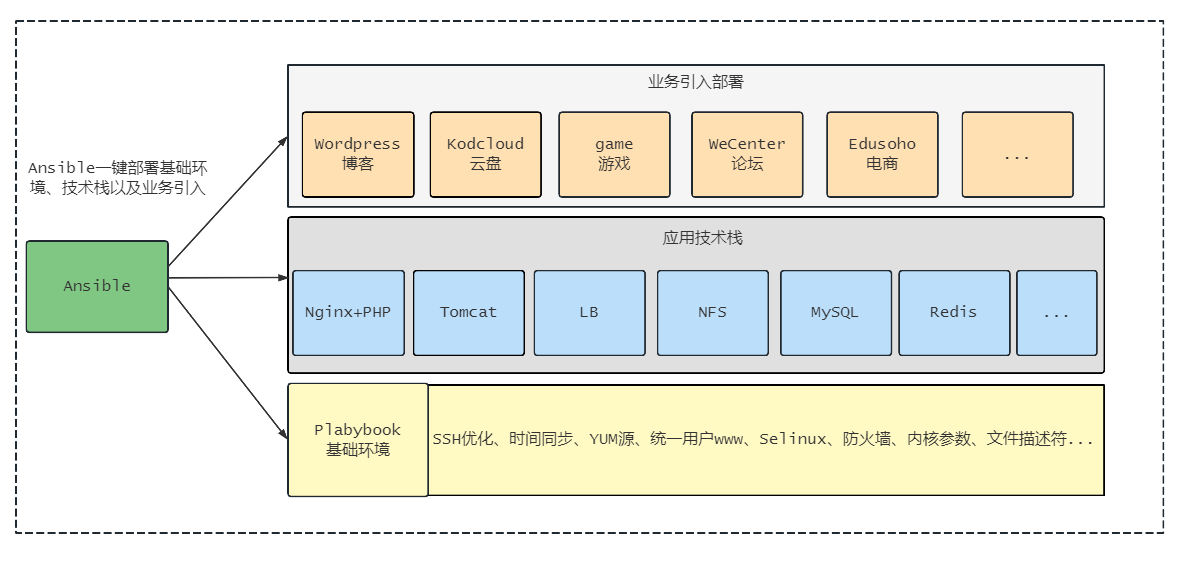
3.最终实现
4.学习流程

5.部署
#1.准备一台服务器kylin 1核2G内存

#安装python不在支持3.8以下版本,需要安装更高的python版本
wget https://www.python.org/ftp/python/3.8.16/Python-3.8.16.tgz
tar xzf Python-3.8.16.tgz
cd Python-3.8.16
./configure --enable-optimizations
make -j$(nproc)
make altinstall
[root@m01 ~]# pip3.8 install ansible -i https://mirrors.aliyun.com/pypi/simple/
mkdir /etc/ansible
vim /etc/ansible/ansible.cfg		# 默认没有、手动创建的。 写入文件时,把注释删除
[defaults]
host_key_checking = False	 # 控制 Ansible 是否检查远程主机的 SSH 密钥指纹
deprecation_warnings = False # 控制是否显示"弃用警告"
interpreter_python = /usr/bin/python3  # 指定使用的python3版本
[inventory]					 # 主机清单的位置默认/etc/ansible/hosts
[privilege_escalation]		 # sudo提权选项
[paramiko_connection]		 # 连接插件
[ssh_connection]			 # SSH远程连接插件
[persistent_connection]	     # SSH持久连接选项 默认选项
[accelerate]
[selinux]
[colors]					 # 颜色选项 默认
[diff]						 # copy模块对比内容 默认

#重要配置
1.禁用 SSH 主机密钥检查 (host_key_checking = False): 便于自动化,牺牲少量安全性。
2.禁用弃用警告 (deprecation_warnings = False): 让输出更干净。
3.强制使用 Python 3 (interpreter_python = /usr/bin/python3): 确保与现代系统的兼容性,这是一个非常重要的设置。


yum install sshpass  # 为了支持SSH用户名密码方式管理后端
6.Ansible-inventory
默认配置文件: /etc/ansible/hosts
-
1.单台
[root@m01 ~]# cat /etc/ansible/hosts
10.0.0.7 ansible_ssh_user=root ansible_ssh_port=22 ansible_ssh_pass='Lidao996'#测试单台
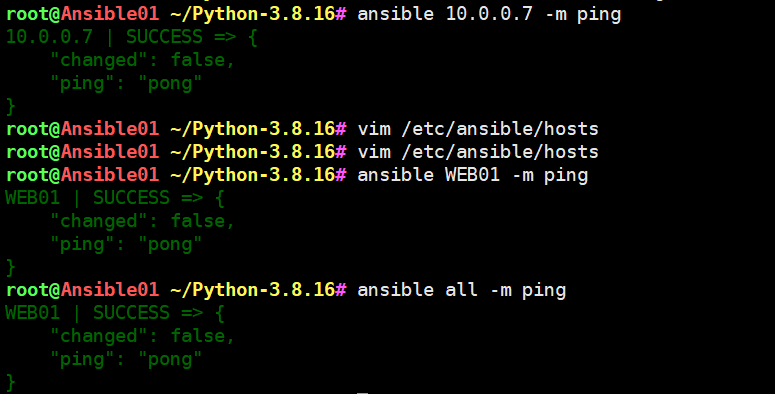
[root@m01 ~]# ansible 10.0.0.7 -m ping
10.0.0.7 | SUCCESS => {
"changed": false,
"ping": "pong"
}#2.定义别名
[root@m01 ~]# cat /etc/ansible/hosts
WEB01 ansible_ssh_host=10.0.0.7 ansible_ssh_user=root ansible_ssh_port=22 ansible_ssh_pass='Lidao996'
[root@m01 ~]# ansible WEB01 -m ping
web01 | SUCCESS => {
"changed": false,
"ping": "pong"
}
#all表示主机清单中的所有主机
[root@m01 ~]# ansible all -m ping
web01 | SUCCESS => {
"changed": false,
"ping": "pong"
}
-
2.定义组(多台)
定义多台:
[root@m01 ~]# cat /etc/ansible/hosts
WEB01 ansible_ssh_host=10.0.0.7 ansible_ssh_user=root ansible_ssh_port=22 ansible_ssh_pass='Lidao996'
WEB02 ansible_ssh_host=10.0.0.8 ansible_ssh_user=root ansible_ssh_port=22 ansible_ssh_pass='Lidao996'
db01 ansible_ssh_host=10.0.0.51 ansible_ssh_user=root ansible_ssh_port=22 ansible_ssh_pass='Lidao996'#all表示所有主机
[root@m01 ~]# ansible all -m ping
web01 | SUCCESS => {
"changed": false,
"ping": "pong"
}
web02 | SUCCESS => {
"changed": false,
"ping": "pong"
}
db01 | SUCCESS => {
"changed": false,
"ping": "pong"
}将web01和web02划分同一个小组
[root@m01 ~]# cat /etc/ansible/hosts
db01 ansible_ssh_host=10.0.0.51 ansible_ssh_user=root ansible_ssh_port=22 ansible_ssh_pass='Lidao996'[webs]
web01 ansible_ssh_host=10.0.0.7 ansible_ssh_user=root ansible_ssh_port=22 ansible_ssh_pass='Lidao996'
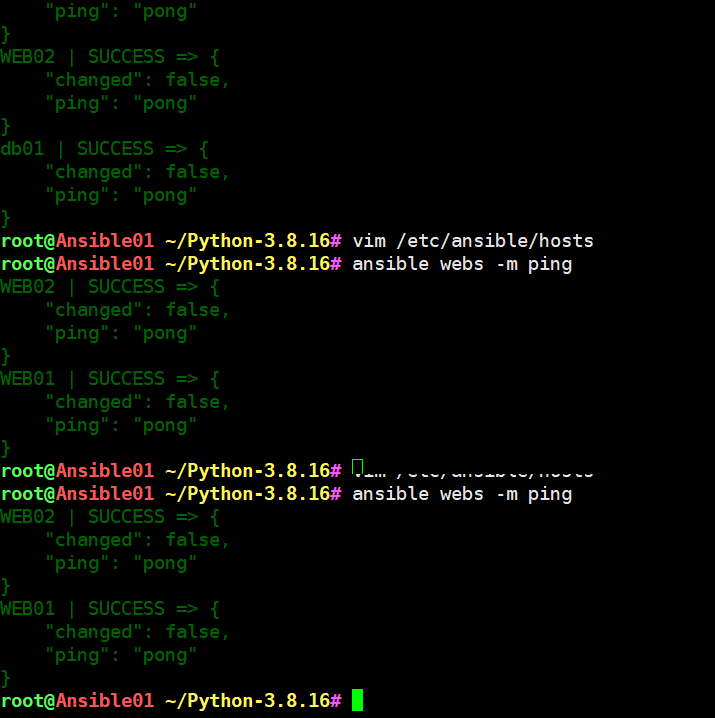
web02 ansible_ssh_host=10.0.0.8 ansible_ssh_user=root ansible_ssh_port=22 ansible_ssh_pass='Lidao996'[root@m01 ~]# ansible webs -m ping
web01 | SUCCESS => {
"changed": false,
"ping": "pong"
}
web02 | SUCCESS => {
"changed": false,
"ping": "pong"
}
#4.通过域名定义
www.oldboy.com
www.linu.com


#5.支持序列的定义方式
[root@m01 ~]# cat /etc/hosts
127.0.0.1   localhost localhost.localdomain localhost4 localhost4.localdomain4
::1         localhost localhost.localdomain localhost6 localhost6.localdomain6
10.0.0.7 web01
10.0.0.8 web02

[root@m01 ~]# cat /etc/ansible/hosts
[webs]
web[01:02]
ansible_ssh_user=root
ansible_ssh_port=22
ansible_ssh_pass='Lidao996'


#6.支持多个组定义
[root@m01 ~]# cat /etc/ansible/hosts
nfs ansible_ssh_host=10.0.0.31 ansible_ssh_user=root ansible_ssh_port=22 ansible_ssh_pass='Lidao996'

[dbs]
db01 ansible_ssh_host=10.0.0.51 ansible_ssh_user=root ansible_ssh_port=22 ansible_ssh_pass='Lidao996'

[webs]
web[01:02] ansible_ssh_user=root ansible_ssh_port=22 ansible_ssh_pass='Lidao996'

[lnmp:children]
dbs
webs

[root@m01 ~]# ansible lnmp -m ping
web01 | SUCCESS => {
    "changed": false,
    "ping": "pong"
}
web02 | SUCCESS => {
    "changed": false,
    "ping": "pong"
}
db01 | SUCCESS => {
    "changed": false,
    "ping": "pong"
}-
通过免秘钥的方式配置Inventory
#第一步: ansible服务端生成密钥对
[root@m01 ~]# ssh-keygen#第二步: 将公钥拷贝所有的客户端
[root@m01 ~]# ssh-copy-id 172.16.1.51
[root@m01 ~]# ssh-copy-id 172.16.1.7
[root@m01 ~]# ssh-copy-id 172.16.1.8#第三步: 编辑ansible的主机清单
[root@m01 ~]# cat /etc/ansible/hosts
10.0.0.7
10.0.0.8
10.0.0.51
[root@m01 ~]# ansible all -m ping
10.0.0.7 | SUCCESS => {
"changed": false,
"ping": "pong"
}
10.0.0.8 | SUCCESS => {
"changed": false,
"ping": "pong"
}
10.0.0.51 | SUCCESS => {
"changed": false,
"ping": "pong"
}通过别名、组的方式定义主机清单
[root@m01 ~]# cat /etc/ansible/hosts
10.0.0.31[webs]
10.0.0.7
10.0.0.8[dbs]
10.0.0.51
[root@m01 ~]# ansible webs -m ping
10.0.0.7 | SUCCESS => {
"changed": false,
"ping": "pong"
}
10.0.0.8 | SUCCESS => {
"changed": false,
"ping": "pong"
}

7.Ansible-ad-hoc
ansible临时执行的命令、不会保存、下次执行还是重新输入命令. 相当于系统执行shell命令
- 作用: 用来临时执行命令 批量对所有的主机执行命令 systemctl restart nginx,free -h,df -h
#Ansible执行的命令都是通过模块方式运行的。所以我们学习主要学习模块的使用方法
#Ansible大部分的模块几乎和我们的linux命令有关联
-
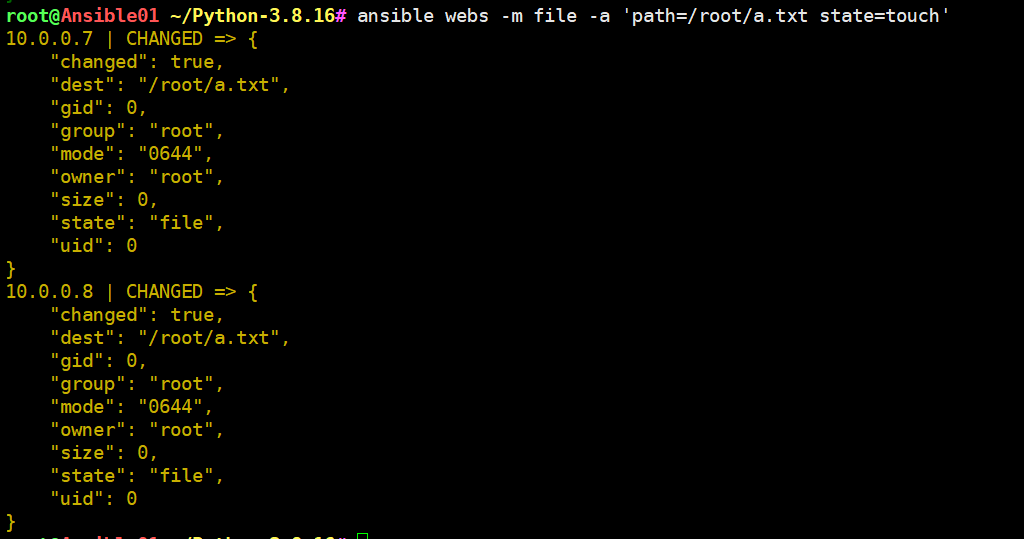
案例 在web01上创建一个文件需要用到file模块
ansible web01 -m file -a 'path=/root/a.txt state=touch'
案例1.在webs上创建a.txt
[root@m01 ~]# ansible webs -m file -a 'path=/root/a.txt state=touch'案例2.修改a.txt属主属组为oldboy 权限修改为600
[root@m01 ~]# ansible webs -m file -a 'path=/root/a.txt state=touch owner=nginx group=nginx mode=0600'案例3.在root下创建oldboy目录
[root@m01 ~]# ansible webs -m file -a 'path=/root/oldboy state=directory'案例4.使用命令
[root@m01 ~]# ansible webs -m command -a 'systemctl restart nginx'
[root@m01 ~]# ansible webs -m command -a 'free -h'案例5.删除a.txt
[root@m01 ~]# ansible webs -m file -a 'path=a.txt state=absent'
10.0.0.7 | CHANGED => {
"changed": true,
"path": "1.txt",
"state": "absent"
}
10.0.0.8 | CHANGED => {
"changed": true,
"path": "1.txt",
"state": "absent"
}案例6.创建test组
[root@m01 ~]# ansible webs -m group -a 'name=test gid=777'
10.0.0.7 | CHANGED => {
"changed": true,
"gid": 777,
"name": "test",
"state": "present",
"system": false
}
10.0.0.8 | CHANGED => {
"changed": true,
"gid": 777,
"name": "test",
"state": "present",
"system": false
}案例7.创建用户user
[root@m01 ~]# ansible webs -m user -a 'name=test uid=777 group=test shell=/sbin/nologin create_home=false'
ps:如果发现df -h一直卡住的情况,有可能为nfs没有开启并挂载到nfs,cat /proc/mounts查看挂载情况,使用umount -f 强制卸载掉挂载点
模块1.file
file:
  path: file/dir
  state:
       touch    # 创建文件
       directory# 创建文件
       absent   # 删除文件
   owner: www   # 文件的属主
   group: www   # 文件的属组
   mode: 0644   # 文件的权限

案例1.创建1个文件1.txt 属主属组为www 权限是0600
ansible webs -m file -a 'path=/root/1.txt state=touch owner=www group=www mode=0600'

案例2.删除1.txt
ansible webs -m file -a 'path=/root/1.txt state=absent'
模块2.group
group:
   name: oldboy  # 定义小组的名称
   gid: 777    # 小组的gid号

案例.创建gid为777的oldboy小组
模块3.user
user:
   name: oldboy  # 定义用户名
   uid: 777
   group: oldboy
   state: present  # 创建
   		  absent   # 删除用户
   remove: yes     # 删除家目录 类似userdel -r 参数
   shell: /sbin/nologin
          /bin/bash
   create_home: true
   				false

案例1.创建uid gid 777的oldboy虚拟用户
ansible webs -m user -a 'name=oldboy uid=777 group=oldboy state=present shell=/sbin/nologin create_home=false'

案例2.删除oldboy用户
ansible web -m user -a 'name=oldboy state=absent remove=yes'
模块4.systemd
systemd:
	 name: nginx  # 服务名称
	 state: started   # 启动服务
	 		stopped   # 停止服务
	 		restarted # 重启服务
	 		reloaded  # 重新加载
	 enabled: yes  # 开机自动启动
	          no   # 开机禁止运行

案例1.停止webs上运行的nginx
[root@m01 ~]# ansible webs -m systemd -a 'name=nginx state=stopped'

案例2.启动webs上的nginx服务
[root@m01 ~]# ansible webs -m systemd -a 'name=nginx state=started enabled=yes'
模块5.yum
yum:
  name: wget    # 服务、命令名称
        xxx.rpm # 也可以是本地的rpm包
  state: present  # 安装
  		 absent   # 卸载
  download_only: true  # 只下载不安装
  download_dir: /opt   # 下载到哪个目录

案例1.安装wget
[root@m01 ~]# ansible webs -m yum -a 'name=wget state=present'

案例2.卸载wget
[root@m01 ~]# ansible webs -m yum -a 'name=wget state=absent'
模块6.command
不建议使用command和shell: 核心原因、违背了 Ansible 的设计哲学、只有在万不得已的情况下使用!
command: 命令

案例1.执行df命令
ansible webs -m command -a 'df -h'
ansible webs -m command -a 'touch a.txt'
模块7.copy
copy:
   src: a.txt   # 源文件
   dest: /root/ # 目标路径
   owner: www   # 属主
   group: www   # 文件属组
   mode: 0644   # 文件权限
   backup: yes  # 拷贝前是否需要备份
   content: 字符串 # 将content后面的内容写入到目标文件
案例1.将a.txt拷贝webs两台的root家目录
[root@m01 ~]# ansible webs -m copy -a 'src=a.txt dest=/root/'

案例2.copy前备份目标文件
[root@m01 ~]# ansible webs -m copy -a 'src=a.txt dest=/root/ backup=yes'


案例3.使用content创建backup的密码文件
[root@backup ~]# cat /etc/rsync.passwd
rsync_backup:123
[root@backup ~]#
[root@backup ~]# ll /etc/rsync.passwd
-rw------- 1 root root 17 Aug  5 11:17 /etc/rsync.passwd

使用ansible生成类似密码文件 p.txt
[root@m01 ~]# ansible webs -m copy -a 'content=rsync_backup:123 dest=/root/p.txt mode=0600'
模块8.cron
cron:
   name: 时间同步
   minute: 1-59 分钟
   hour:  0-23  小时
   job:  具体执行的命令


案例1.创建时间同步定时任务 每分钟执行1次
[root@m01 ~]# ansible webs -m cron -a 'name=时间同步 minute=* hour=* job="ntpdate ntp1.aliyun.com &>/dev/null"'

案例2.删除时间同步的定时任务
[root@m01 ~]# ansible webs -m cron -a 'name=时间同步 state=absent'
3.今日总结
- 安装Ansible🍟🍟🍟🍟🍟
- inventory主机清单定义方法🍟🍟🍟🍟🍟
- 8个常用模块