《从零到精通:PyTorch (GPU 加速版) 完整安装指南》
一、弄清楚版本信息
1.查看系统支持安装的最高CUDA版本
cmd命令行输入以下命令:
nvidia-smi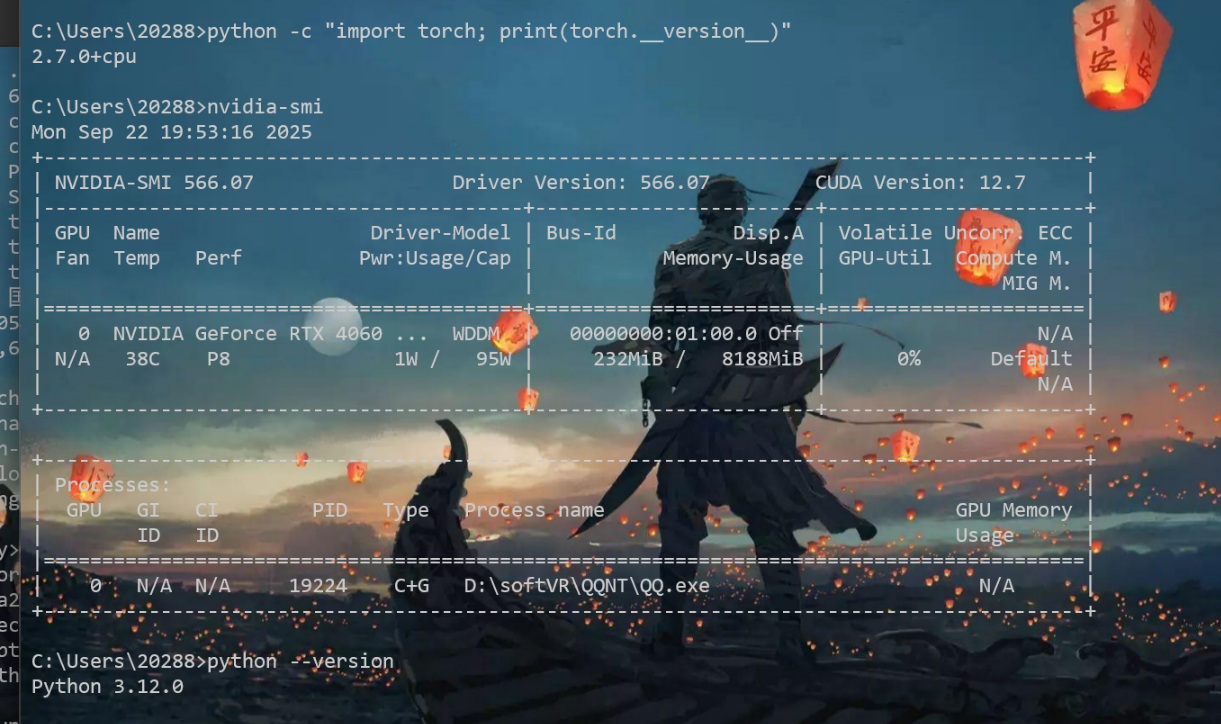
CUDA Version: 12.7表示最高能安装CUDA 12.7的版本,如果CUDA12.7及以下版本能满足项目需求,就不需要更新显卡驱动,否则就需要安装更高版本的显卡驱动,从而安装更高版本的CUDA
我的CUDA Version是12.7,只要安装小于等于12.7版本的CUDA就不用更新驱动
如果这里的CUDA Version小于你要安装的CUDA版本则进入下面英伟达官网下载更新驱动
https://www.nvidia.com/Download/index.aspx
2、查看torch和cuda版本对应关系
链接:https://download.pytorch.org/whl/torch/
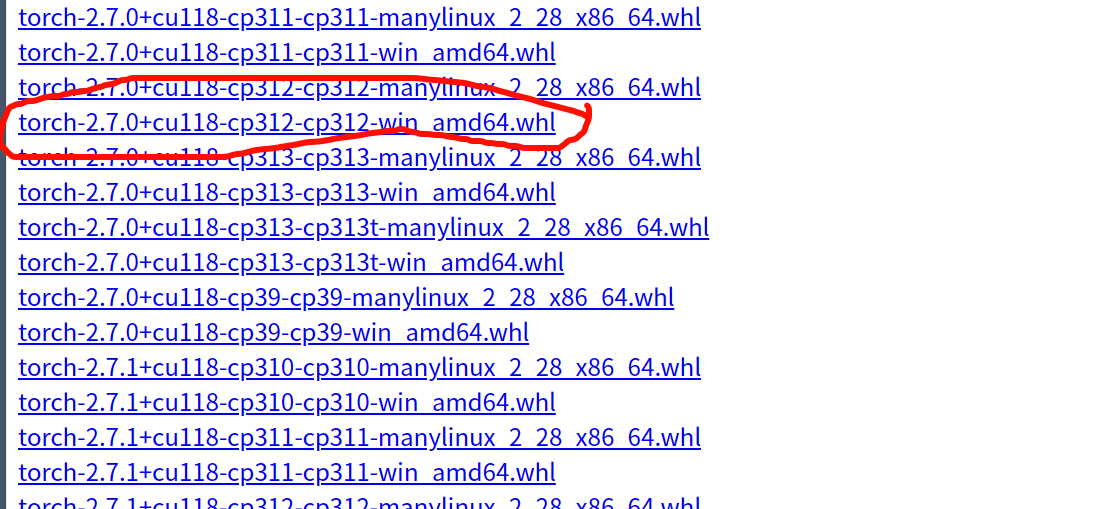
例如:红色标记的torch-2.7.0+cu118-cp312-cp312-win_amd64.wsl文件是一个适用于 Windows 64 位系统的 PyTorch 安装包,其中 2.7.0 是 PyTorch 版本,cu118 表示支持 CUDA 11.8,cp312 说明适配 Python 3.12 版本,整体用于在对应环境中安装支持 GPU 加速的 PyTorch 2.7.0。
3、查找torchvision、torchaudio版本
在 https://github.com/pytorch/vision#installation 可以查看和torch对应的版本关系torchvision
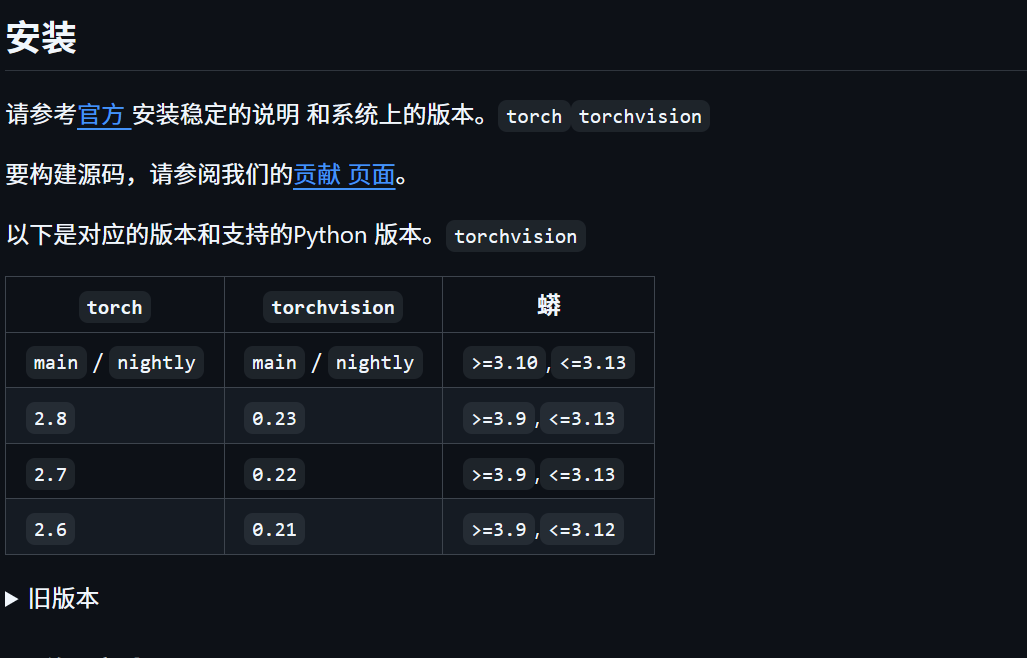
在 https://github.com/pytorch/audio/releases 可以查看torchaudio和torch对应的版本关系
并且在 https://download.pytorch.org/whl/ 分别寻找到torch、torchvision、torchaudio三个网页打开,和torch一样查找版本对应关系。如何分别下载torch、torchvision、torchaudio三个wsl文件(注意和刚才这里的一样: torch-2.7.0+cu118-cp312-cp312-win_amd64.wsl文件是一个适用于 Windows 64 位系统的 PyTorch 安装包,其中 2.7.0 是 PyTorch 版本,cu118 表示支持 CUDA 11.8,cp312 说明适配 Python 3.12 版本,整体用于在对应环境中安装支持 GPU 加速的 PyTorch 2.7.0。)
二、配置CUDA
进入官网下载CUDA Toolkit:https://developer.nvidia.com/cuda-toolkit-archive

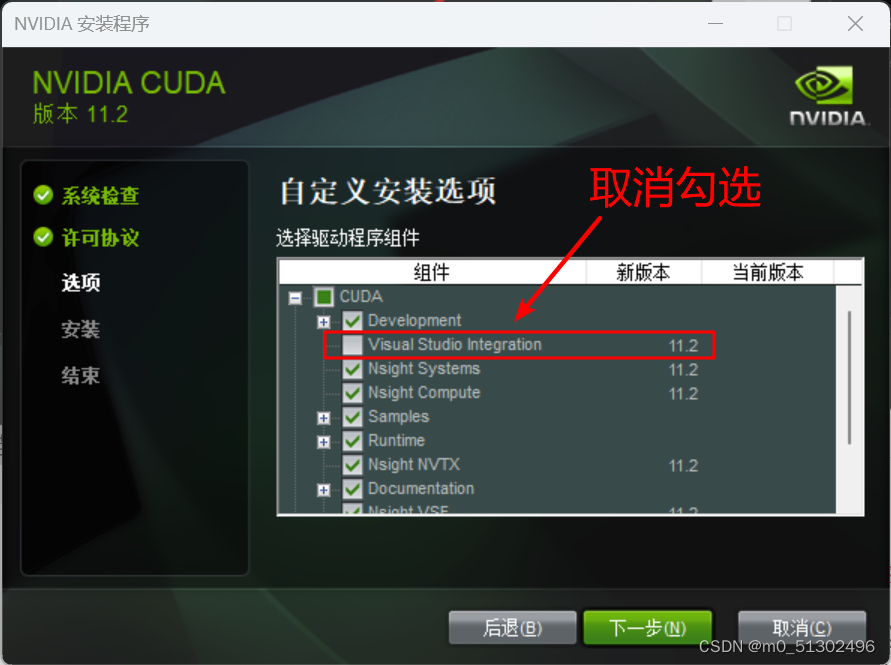
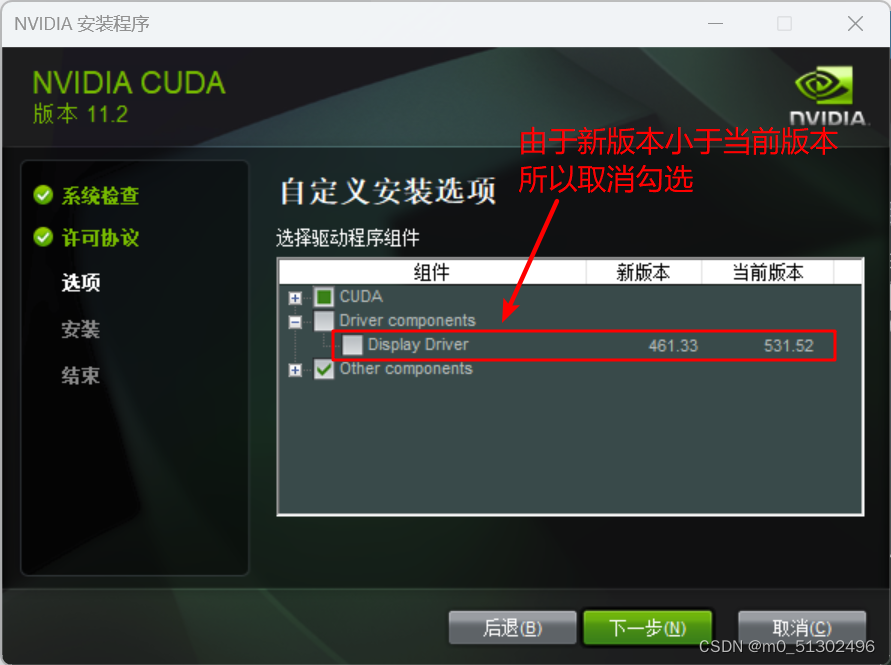
注意:这个取消勾选
安装完毕!!!
三、配置CUDNN
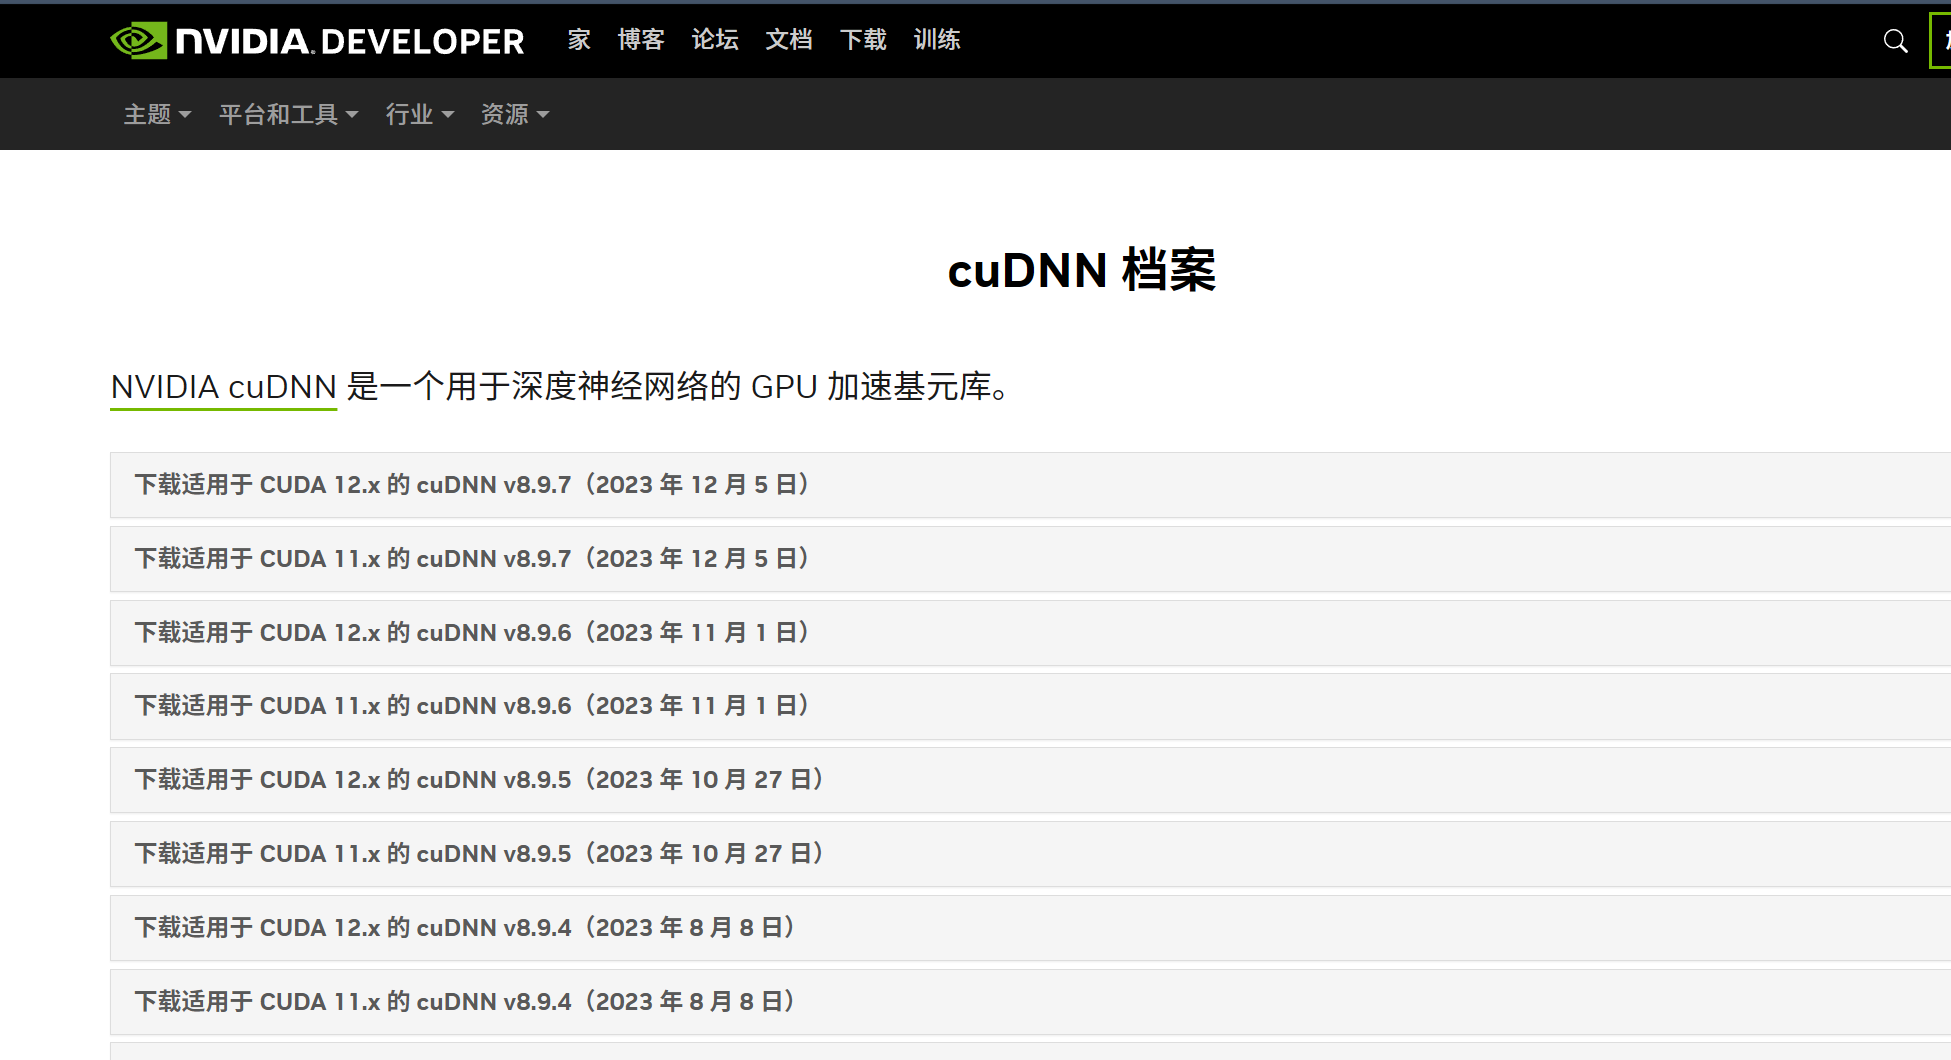
进入官网下载:https://developer.nvidia.com/rdp/cudnn-archive。根据CUDA版本下载CUDNN。
版本正确,版本有问题可以借助AI确定,部分版本大范围适配
安装完毕!!!
四、配置torch、三件套
在 https://download.pytorch.org/whl/ 分别寻找到torch、torchvision、torchaudio三个网页打开,和torch一样查找版本对应关系。分别下载torch、torchvision、torchaudio三个wsl文件(注意和刚才这里的一样: torch-2.7.0+cu118-cp312-cp312-win_amd64.wsl文件是一个适用于 Windows 64 位系统的 PyTorch 安装包,其中 2.7.0 是 PyTorch 版本,cu118 表示支持 CUDA 11.8,cp312 说明适配 Python 3.12 版本,整体用于在对应环境中安装支持 GPU 加速的 PyTorch 2.7.0。 )

找到你下载的三个 WHL 文件(、、),将它们放在同一个文件夹中(例如 ),然后执行以下操作:torch-2.7.0+cu118-cp312-cp312-win_amd64.whl``torchvision-0.22.0+cu118-cp312-cp312-win_amd64.whl``torchaudio-2.7.0+cu118-cp312-cp312-win_amd64.whl``D:\PyTorch
-
打开命令提示符(CMD),切换到文件所在目录:
cd D:\PyTorch -
按顺序安装三个包( → → ):
torch``torchvision``torchaudiopip install torch-2.7.0+cu118-cp312-cp312-win_amd64.whl pip install torchvision-0.22.0+cu118-cp312-cp312-win_amd64.whl pip install torchaudio-2.7.0+cu118-cp312-cp312-win_amd64.whl
安装完毕!!!
五、结束:检验
测试代码一:
import torch
import torchvision
import torchaudio
# 查看版本
print("torch 版本:", torch.__version__)
print("torchvision 版本:", torchvision.__version__)
print("torchaudio 版本:", torchaudio.__version__)
# 验证 GPU 支持(需先安装 CUDA 和 cuDNN)
if torch.cuda.is_available():
print("GPU 可用,设备数:", torch.cuda.device_count())
else:
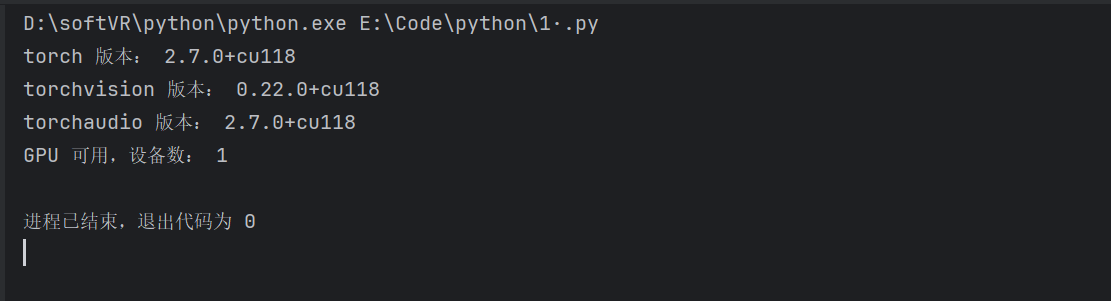
print("未检测到 GPU 支持")运行结果一如图:
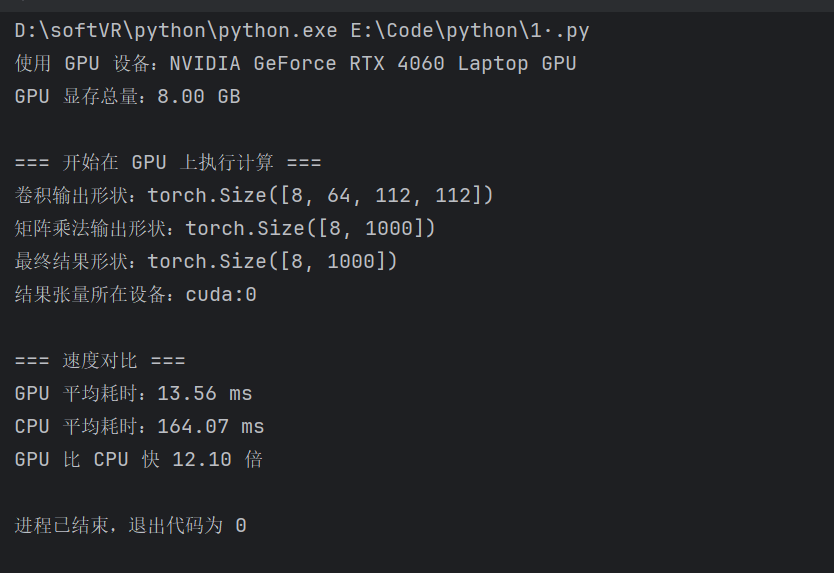
测试代码二:
import torch
import time

# 1. 检查 GPU 设备信息
if torch.cuda.is_available():
    device = torch.device("cuda:0")
    print(f"使用 GPU 设备:{torch.cuda.get_device_name(device)}")
    print(f"GPU 显存总量:{torch.cuda.get_device_properties(device).total_memory / 1024 ** 3:.2f} GB")
else:
    device = torch.device("cpu")
    print("未检测到 GPU,使用 CPU 计算")

# 2. 生成随机张量(调整为适合8GB显存的规模)
batch_size, in_channels, height, width = 8, 3, 112, 112
x = torch.randn(batch_size, in_channels, height, width, device=device)
w = torch.randn(64, in_channels, 3, 3, device=device)

# 3. 在 GPU 上执行计算
print("\n=== 开始在 GPU 上执行计算 ===")
conv_result = torch.nn.functional.conv2d(x, w, stride=1, padding=1)
flattened = conv_result.view(batch_size, -1)
mat_w = torch.randn(flattened.shape[1], 1000, device=device)
mat_result = torch.matmul(flattened, mat_w)
final_result = torch.relu(mat_result)

# 4. 验证计算结果及设备位置
print(f"卷积输出形状:{conv_result.shape}")
print(f"矩阵乘法输出形状:{mat_result.shape}")
print(f"最终结果形状:{final_result.shape}")
print(f"结果张量所在设备:{final_result.device}")

# 5. 对比 CPU 与 GPU 计算速度(使用通用计时方法)
if torch.cuda.is_available():
    # GPU 计算耗时
    torch.cuda.synchronize()  # 确保 GPU 计算完成
    start = time.time()
    for _ in range(10):
        conv_result = torch.nn.functional.conv2d(x, w, stride=1, padding=1)
        mat_result = torch.matmul(conv_result.view(batch_size, -1), mat_w)
    torch.cuda.synchronize()  # 等待 GPU 计算结束
    gpu_time = (time.time() - start) * 100  # 平均耗时(毫秒)

    # CPU 计算耗时
    x_cpu = x.cpu()
    w_cpu = w.cpu()
    mat_w_cpu = mat_w.cpu()

    start_cpu = time.time()
    for _ in range(10):
        conv_result_cpu = torch.nn.functional.conv2d(x_cpu, w_cpu, stride=1, padding=1)
        mat_result_cpu = torch.matmul(conv_result_cpu.view(batch_size, -1), mat_w_cpu)
    cpu_time = (time.time() - start_cpu) * 100  # 平均耗时(毫秒)

    print(f"\n=== 速度对比 ===")
    print(f"GPU 平均耗时:{gpu_time:.2f} ms")
    print(f"CPU 平均耗时:{cpu_time:.2f} ms")
    print(f"GPU 比 CPU 快 {cpu_time / gpu_time:.2f} 倍")
运行结果二: