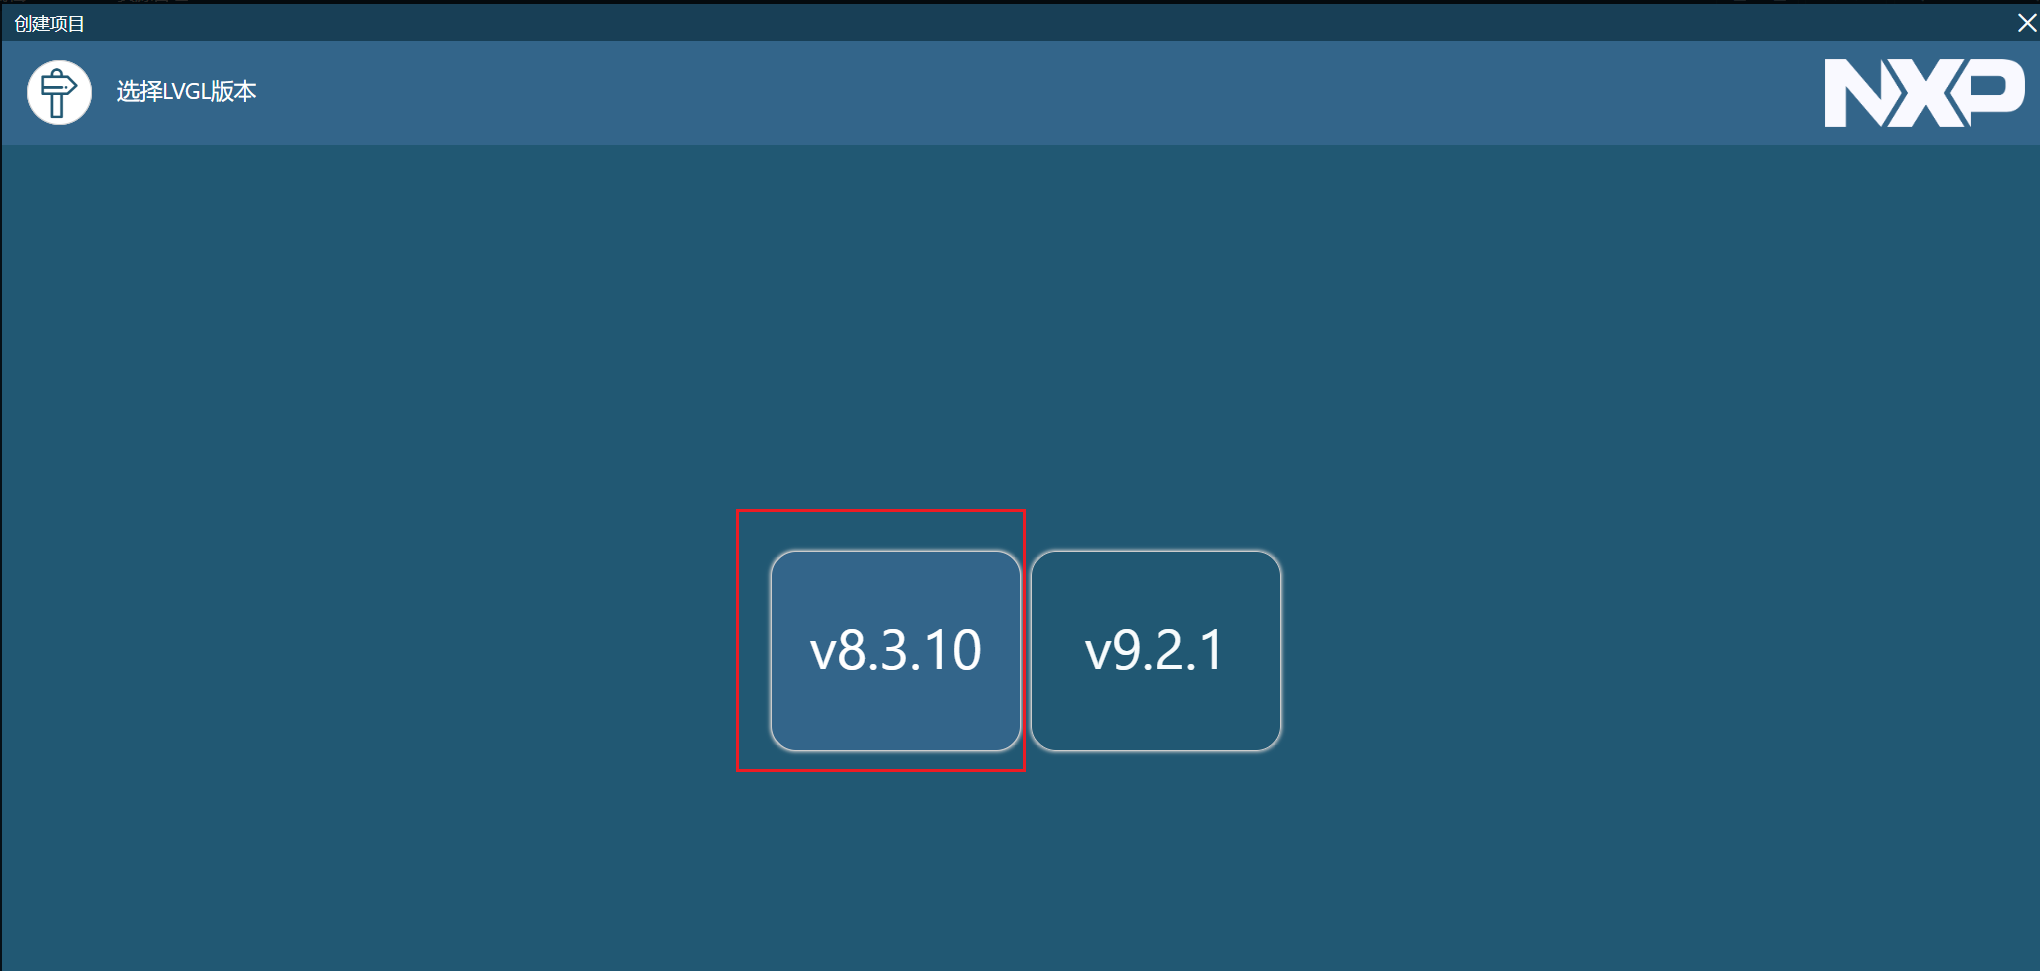
最近在学习NXP的Guider软件,图形化设计LVGL并导入到自己的STM32_LVGL工程中。由于LVGL版本问题导致很多的API函数不同,报错很多。(STM32工程是正点原子的例程LVGL 版本为 V8.2、而Guider设计软件的LVGL版本为V8.3.10)。
为了适用Guider(LVGL版本V8.3.10)的设计,本教程将从头带领我们一起移植LVGL到STM32工程中。
一、移植前准备资料
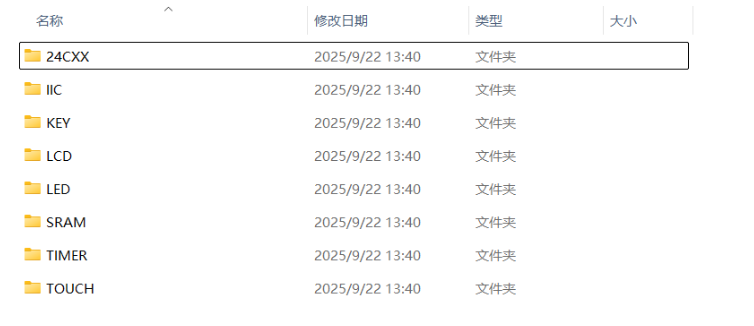
移植前我们需要准备STM32工程(包含内存管理、LCD显示、触摸屏、定时器中断这四种功能),我这里是均采用正点原子的例程。以及LVGL源码版本为V8.3.10,可以在官网找到或者GitHub仓库找到。
https://github.com/lvgl/lvgl/releases![]() http://LVGL的GitHub仓库
http://LVGL的GitHub仓库
1.1 STM32裸机工程
将内存管理、LCD显示、触摸屏、定时器中断这四种相关文件添加到裸机移植\Drivers\BSP位置。
并在keil5中添加相关的.c文件和头文件路径。
1.2 LVGL源码
官网下载的LVGL源码有许多是用不上的,我们需要进行裁剪再添加到STM32裸机工程中。下面是解压缩的LVGL源码:
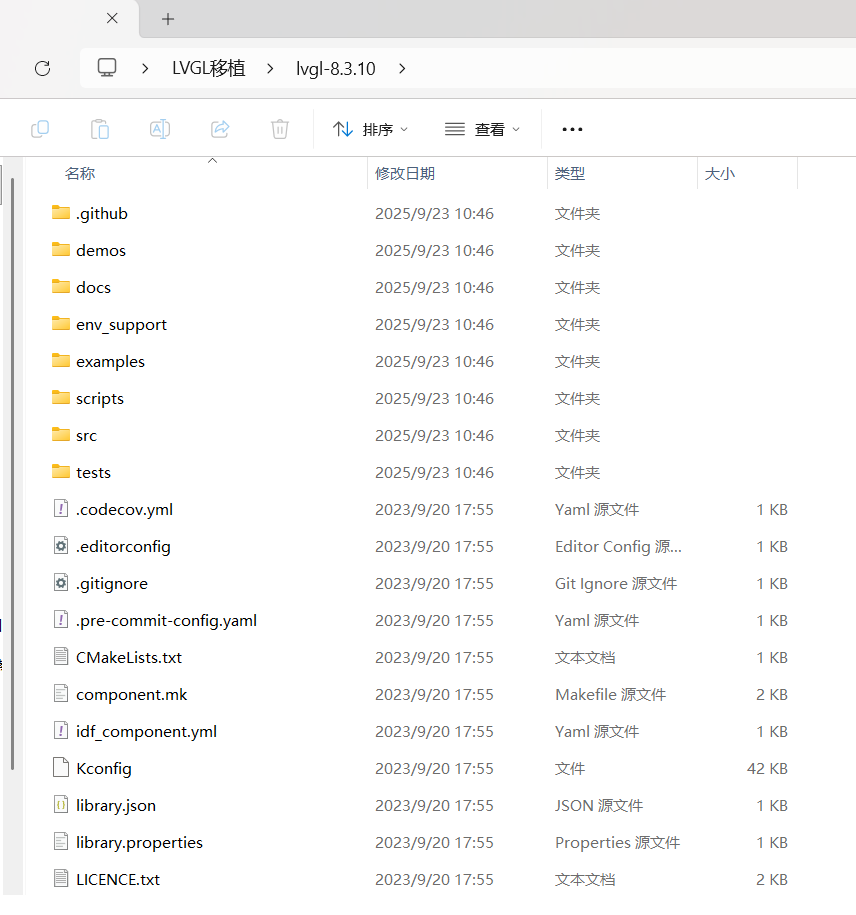
1.2.1 文件夹裁剪
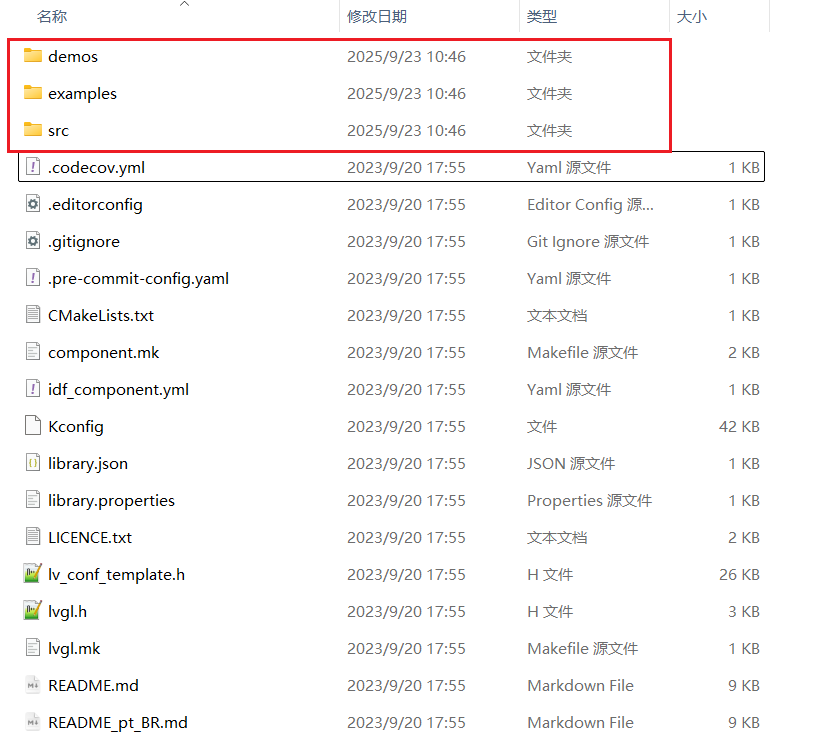
将.github、docs、env_support、scripts、tests文件夹删除,仅保留如下三个文件夹:
1.2.2 文件裁剪
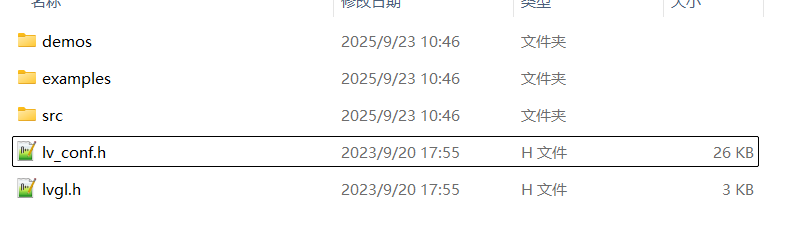
再此页面仅保留lvgl.h、lv_conf_template.h,其余文件均删除,并且将lv_conf_template.h重命名为lv_conf.h。裁剪完毕后如下:
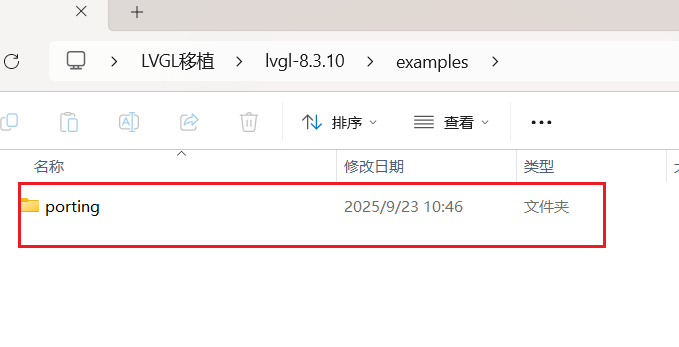
1.2.3 裁剪examples文件夹
examples文件夹仅保留porting文件夹,其余文件夹均删除掉。
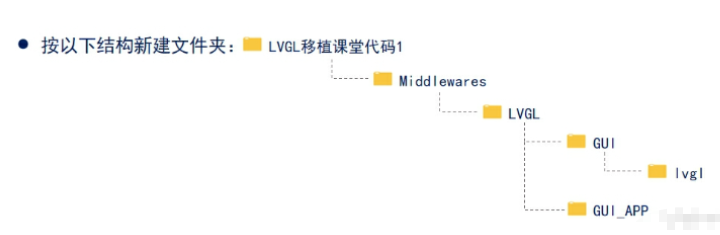
1.2.4 复制文件夹、文件到工程目录
首先创建如下LVGL目录:
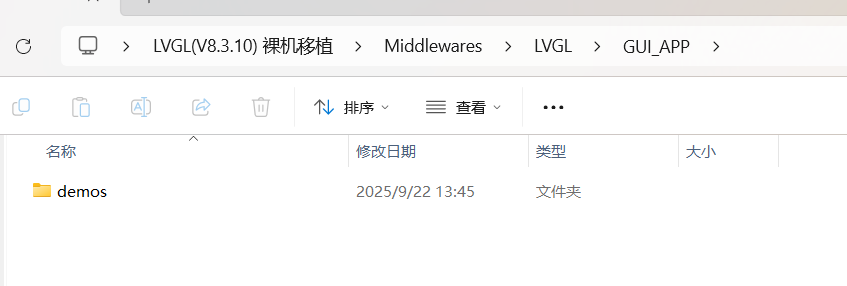
将demos文件夹复制到如下目录:工程名称\Middlewares\LVGL\GUI_APP
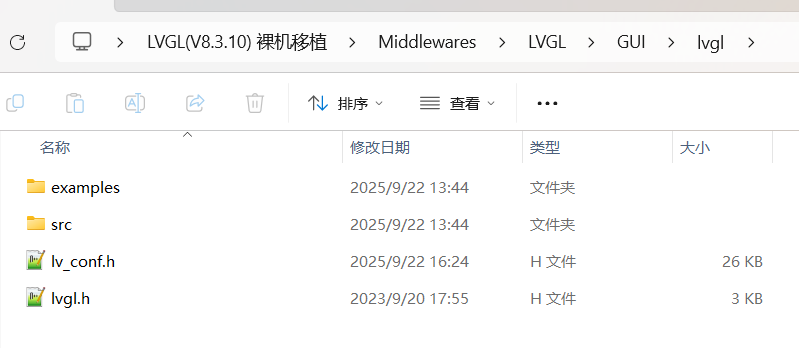
再将其他文件和文件夹复制到如下目录:工程名称\Middlewares\LVGL\GUI\lvgl
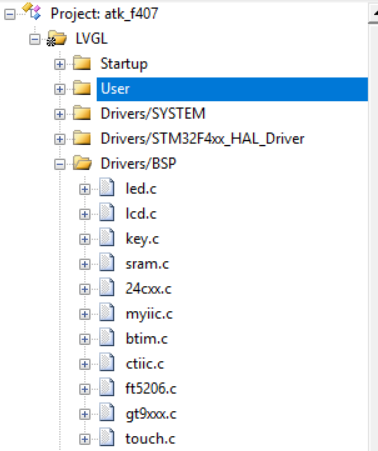
二、Keil V5添加LVGL文件
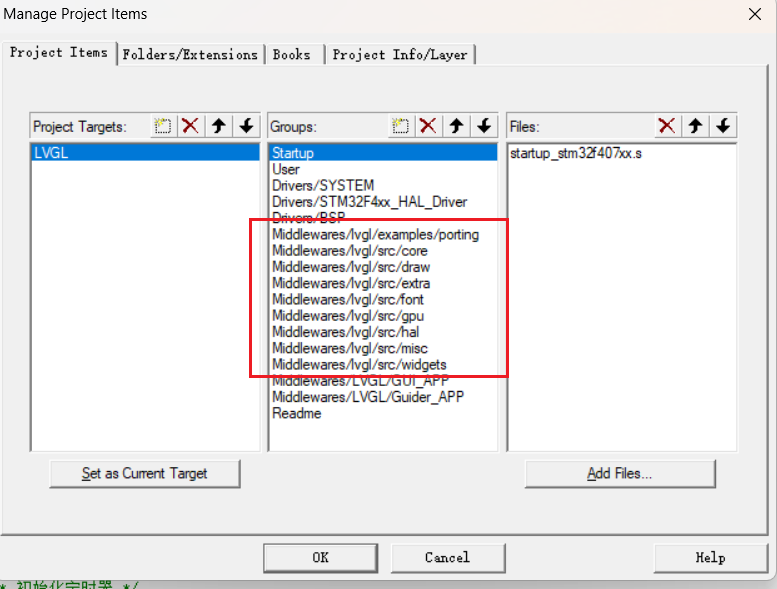
2.1 .c文件的添加
在Keil V5中添加工程目录,在目录下分别添加如下的.c源文件。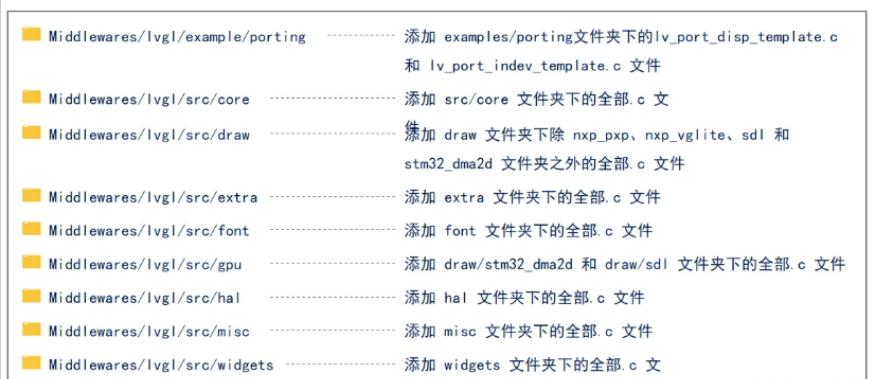
在Keil V5中添加工程目录:
2.2 头文件路径添加
根据如下图片选择头文件路径进行添加: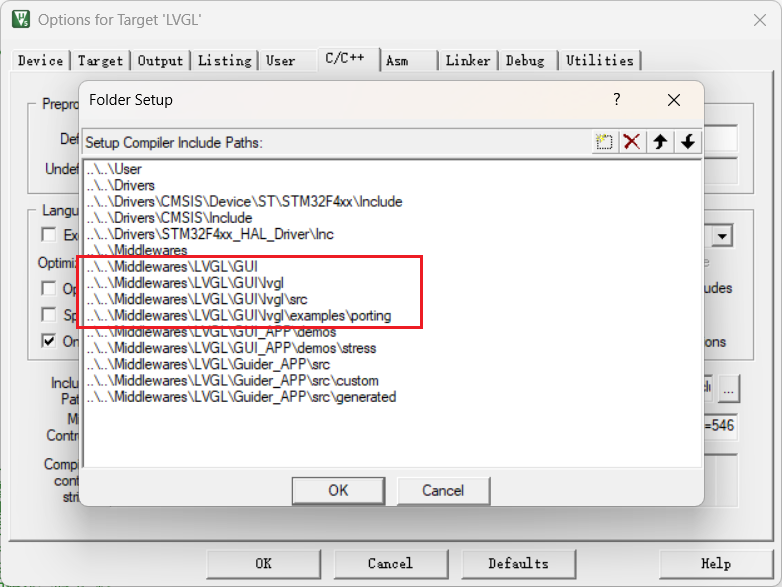
三、修改代码
3.1 LVGL时基
在btime.c文件中添加lvgl的1ms心跳节拍。
添加lvgl头文件:
cpp
#include "lvgl.h"在定时器中断回调函数中添加lvgl心跳函数:
cpp
/**
 * @brief       回调函数,定时器中断服务函数调用
 * @param       无
 * @retval      无
 */
void HAL_TIM_PeriodElapsedCallback(TIM_HandleTypeDef *htim)
{
    if (htim->Instance == BTIM_TIMX_INT)
    {
        lv_tick_inc(1);                 /*lvgl的1ms心跳*/
    }
}在mian.c中初始化BTIM定时器为1ms周期:
cpp
btim_timx_int_init(10-1,8400-1); /* 初始化定时器1ms */3.2 开启配置文件
打开lvgl_conf.h文件,将#if 0 改为 #if 1,开启配置文件:
cpp
#if 1 /*Set it to "1" to enable content*/3.3 配置显示屏
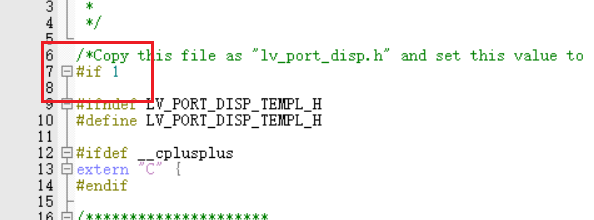
配置显示屏主要与两个文件有关:lv_port_disp_template.c和lv_port_disp_template.h。两个文件目录位置在:工程名称/Middlewares/lvgl/examples/porting。
3.3.1 开启文件
将lv_port_disp_template.c和lv_port_disp_template.h中的#if 0 改为 #if 1:
3.3.2 在.c文件添加头文件
主要是将控制LCD的头文件添加到lv_port_disp_template.c。
cpp
/* 导入lcd驱动头文件 */
#include "./BSP/LCD/lcd.h"
3.3.3 设置屏幕分辨率
我这里使用的是正点原子4.3寸的屏幕。分辨率为800x480:
cpp
#define MY_DISP_HOR_RES (800)   /* 屏幕宽度 */
#define MY_DISP_VER_RES (480)   /* 屏幕高度 */
3.3.4 定义正点原子LCD绘制函数
此函数用于刷新显示函数disp_flush()中,原有LVGL自带的刷新绘制效率较低。
cpp
/**
 * @brief       LCD加速绘制函数
 * @param       (sx,sy),(ex,ey):填充矩形对角坐标,区域大小为:(ex - sx + 1) * (ey - sy + 1)
 * @param       color:要填充的颜色
 * @retval      无
 */
void lcd_draw_fast_rgb_color(int16_t sx, int16_t sy,int16_t ex, int16_t ey, uint16_t *color)
{
    uint16_t w = ex-sx+1;
    uint16_t h = ey-sy+1;

    lcd_set_window(sx, sy, w, h);
    uint32_t draw_size = w * h;
    lcd_write_ram_prepare();

    for(uint32_t i = 0; i < draw_size; i++)
    {
        lcd_wr_data(color[i]);
    }
}
3.3.5 修改显示屏初始化函数
将lcd的初始化函数传入lvgl初始化显示中。
cpp
/*Initialize your display and the required peripherals.*/
static void disp_init(void)
{
    /*You code here*/
	  lcd_init();         /* 初始化LCD */
    lcd_display_dir(1); /* 设置横屏 */
}
3.3.6 修改刷新显示函数
添加3.3.4 定义正点原子LCD绘制函数。
cpp
/*Flush the content of the internal buffer the specific area on the display
 *You can use DMA or any hardware acceleration to do this operation in the background but
 *'lv_disp_flush_ready()' has to be called when finished.*/
static void disp_flush(lv_disp_drv_t * disp_drv, const lv_area_t * area, lv_color_t * color_p)
{
//    if(disp_flush_enabled) {
//        /*The most simple case (but also the slowest) to put all pixels to the screen one-by-one*/

//        int32_t x;
//        int32_t y;
//        for(y = area->y1; y <= area->y2; y++) {
//            for(x = area->x1; x <= area->x2; x++) {
//                /*Put a pixel to the display. For example:*/
//                /*put_px(x, y, *color_p)*/
//                color_p++;
//            }
//        }
//    }
    lcd_draw_fast_rgb_color(area->x1,area->y1,area->x2,area->y2,(uint16_t*)color_p);
    /*IMPORTANT!!!
     *Inform the graphics library that you are ready with the flushing*/
    lv_disp_flush_ready(disp_drv);
}
3.4 配置触摸输入
配置触摸输入主要与两个文件有关:lv_port_indev_template.c和lv_port_indev_template.h。两个文件目录位置在:工程名称/Middlewares/lvgl/examples/porting。
3.4.1 开启文件
将lv_port_disp_template.c和lv_port_disp_template.h中的#if 0 改为 #if 1:
3.4.2 在.c文件添加头文件
主要是将控制触摸的头文件添加到lv_port_indev_template.c。
cpp
/* 导入驱动头文件 */
#include "./BSP/TOUCH/touch.h"
#include "./BSP/LCD/lcd.h"
#include "./BSP/KEY/key.h"
3.4.3 屏蔽其他静态原型
除触摸屏外,其他输入均注释掉。
cpp
/**********************
 *  STATIC PROTOTYPES
 **********************/

static void touchpad_init(void);
static void touchpad_read(lv_indev_drv_t * indev_drv, lv_indev_data_t * data);
static bool touchpad_is_pressed(void);
static void touchpad_get_xy(lv_coord_t * x, lv_coord_t * y);

//static void mouse_init(void);
//static void mouse_read(lv_indev_drv_t * indev_drv, lv_indev_data_t * data);
//static bool mouse_is_pressed(void);
//static void mouse_get_xy(lv_coord_t * x, lv_coord_t * y);

//static void keypad_init(void);
//static void keypad_read(lv_indev_drv_t * indev_drv, lv_indev_data_t * data);
//static uint32_t keypad_get_key(void);

//static void encoder_init(void);
//static void encoder_read(lv_indev_drv_t * indev_drv, lv_indev_data_t * data);
//static void encoder_handler(void);

//static void button_init(void);
//static void button_read(lv_indev_drv_t * indev_drv, lv_indev_data_t * data);
//static int8_t button_get_pressed_id(void);
//static bool button_is_pressed(uint8_t id);
3.4.4 屏蔽其他静态变量
除触摸屏外,其他输入均注释掉。
cpp
/**********************
 *  STATIC VARIABLES
 **********************/
lv_indev_t * indev_touchpad;
//lv_indev_t * indev_mouse;
//lv_indev_t * indev_keypad;
//lv_indev_t * indev_encoder;
//lv_indev_t * indev_button;

//static int32_t encoder_diff;
//static lv_indev_state_t encoder_state;
3.4.5 屏蔽其他初始化函数
除触摸屏外,其他输入均注释掉。
cpp
/**********************
 *   GLOBAL FUNCTIONS
 **********************/

void lv_port_indev_init(void)
{
    /**
     * Here you will find example implementation of input devices supported by LittelvGL:
     *  - Touchpad
     *  - Mouse (with cursor support)
     *  - Keypad (supports GUI usage only with key)
     *  - Encoder (supports GUI usage only with: left, right, push)
     *  - Button (external buttons to press points on the screen)
     *
     *  The `..._read()` function are only examples.
     *  You should shape them according to your hardware
     */

    static lv_indev_drv_t indev_drv;

    /*------------------
     * Touchpad
     * -----------------*/

    /*Initialize your touchpad if you have*/
    touchpad_init();

    /*Register a touchpad input device*/
    lv_indev_drv_init(&indev_drv);
    indev_drv.type = LV_INDEV_TYPE_POINTER;
    indev_drv.read_cb = touchpad_read;
    indev_touchpad = lv_indev_drv_register(&indev_drv);

    /*------------------
     * Mouse
     * -----------------*/

    /*Initialize your mouse if you have*/
//    mouse_init();

//    /*Register a mouse input device*/
//    lv_indev_drv_init(&indev_drv);
//    indev_drv.type = LV_INDEV_TYPE_POINTER;
//    indev_drv.read_cb = mouse_read;
//    indev_mouse = lv_indev_drv_register(&indev_drv);

//    /*Set cursor. For simplicity set a HOME symbol now.*/
//    lv_obj_t * mouse_cursor = lv_img_create(lv_scr_act());
//    lv_img_set_src(mouse_cursor, LV_SYMBOL_HOME);
//    lv_indev_set_cursor(indev_mouse, mouse_cursor);

//    /*------------------
//     * Keypad
//     * -----------------*/

//    /*Initialize your keypad or keyboard if you have*/
//    keypad_init();

//    /*Register a keypad input device*/
//    lv_indev_drv_init(&indev_drv);
//    indev_drv.type = LV_INDEV_TYPE_KEYPAD;
//    indev_drv.read_cb = keypad_read;
//    indev_keypad = lv_indev_drv_register(&indev_drv);

//    /*Later you should create group(s) with `lv_group_t * group = lv_group_create()`,
//     *add objects to the group with `lv_group_add_obj(group, obj)`
//     *and assign this input device to group to navigate in it:
//     *`lv_indev_set_group(indev_keypad, group);`*/

//    /*------------------
//     * Encoder
//     * -----------------*/

//    /*Initialize your encoder if you have*/
//    encoder_init();

//    /*Register a encoder input device*/
//    lv_indev_drv_init(&indev_drv);
//    indev_drv.type = LV_INDEV_TYPE_ENCODER;
//    indev_drv.read_cb = encoder_read;
//    indev_encoder = lv_indev_drv_register(&indev_drv);

//    /*Later you should create group(s) with `lv_group_t * group = lv_group_create()`,
//     *add objects to the group with `lv_group_add_obj(group, obj)`
//     *and assign this input device to group to navigate in it:
//     *`lv_indev_set_group(indev_encoder, group);`*/

//    /*------------------
//     * Button
//     * -----------------*/

//    /*Initialize your button if you have*/
//    button_init();

//    /*Register a button input device*/
//    lv_indev_drv_init(&indev_drv);
//    indev_drv.type = LV_INDEV_TYPE_BUTTON;
//    indev_drv.read_cb = button_read;
//    indev_button = lv_indev_drv_register(&indev_drv);

//    /*Assign buttons to points on the screen*/
//    static const lv_point_t btn_points[2] = {
//        {10, 10},   /*Button 0 -> x:10; y:10*/
//        {40, 100},  /*Button 1 -> x:40; y:100*/
//    };
//    lv_indev_set_button_points(indev_button, btn_points);
}
3.4.6 修改触摸初始化函数
cpp
/*Initialize your touchpad*/
static void touchpad_init(void)
{
    /*Your code comes here*/
    tp_dev.init();

    /* 电阻屏坐标矫正 */
    if (key_scan(0) == KEY0_PRES)           /* KEY0按下,则执行校准程序 */
    {
        lcd_clear(WHITE);                   /* 清屏 */
        tp_adjust();                        /* 屏幕校准 */
        tp_save_adjust_data();
    }
}
3.4.7 修改触摸检测相关函数
触摸屏按下检测函数:
cpp
/*Return true is the touchpad is pressed*/
static bool touchpad_is_pressed(void)
{
    /*Your code comes here*/
    tp_dev.scan(0);

    if (tp_dev.sta & TP_PRES_DOWN)
    {
        return true;
    }

    return false;
}
触摸屏获取坐标函数:
cpp
/*Get the x and y coordinates if the touchpad is pressed*/
static void touchpad_get_xy(lv_coord_t * x, lv_coord_t * y)
{
    /*Your code comes here*/
    (*x) = tp_dev.x[0];
    (*y) = tp_dev.y[0];
}
触摸屏读取函数:
cpp
/*Will be called by the library to read the touchpad*/
static void touchpad_read(lv_indev_drv_t * indev_drv, lv_indev_data_t * data)
{
    static lv_coord_t last_x = 0;
    static lv_coord_t last_y = 0;

    /*Save the pressed coordinates and the state*/
    if(touchpad_is_pressed()) {
        touchpad_get_xy(&last_x, &last_y);
        data->state = LV_INDEV_STATE_PR;
    }
    else {
        data->state = LV_INDEV_STATE_REL;
    }

    /*Set the last pressed coordinates*/
    data->point.x = last_x;
    data->point.y = last_y;
}
3.4.8 屏蔽其他设备检测函数
其他设备检测函数均注释掉。
cpp
/*------------------
 * Mouse
 * -----------------*/

///*Initialize your mouse*/
//static void mouse_init(void)
//{
//    /*Your code comes here*/
//}

///*Will be called by the library to read the mouse*/
//static void mouse_read(lv_indev_drv_t * indev_drv, lv_indev_data_t * data)
//{
//    /*Get the current x and y coordinates*/
//    mouse_get_xy(&data->point.x, &data->point.y);

//    /*Get whether the mouse button is pressed or released*/
//    if(mouse_is_pressed()) {
//        data->state = LV_INDEV_STATE_PR;
//    }
//    else {
//        data->state = LV_INDEV_STATE_REL;
//    }
//}

///*Return true is the mouse button is pressed*/
//static bool mouse_is_pressed(void)
//{
//    /*Your code comes here*/

//    return false;
//}

///*Get the x and y coordinates if the mouse is pressed*/
//static void mouse_get_xy(lv_coord_t * x, lv_coord_t * y)
//{
//    /*Your code comes here*/

//    (*x) = 0;
//    (*y) = 0;
//}

///*------------------
// * Keypad
// * -----------------*/

///*Initialize your keypad*/
//static void keypad_init(void)
//{
//    /*Your code comes here*/
//}

///*Will be called by the library to read the mouse*/
//static void keypad_read(lv_indev_drv_t * indev_drv, lv_indev_data_t * data)
//{
//    static uint32_t last_key = 0;

//    /*Get the current x and y coordinates*/
//    mouse_get_xy(&data->point.x, &data->point.y);

//    /*Get whether the a key is pressed and save the pressed key*/
//    uint32_t act_key = keypad_get_key();
//    if(act_key != 0) {
//        data->state = LV_INDEV_STATE_PR;

//        /*Translate the keys to LVGL control characters according to your key definitions*/
//        switch(act_key) {
//            case 1:
//                act_key = LV_KEY_NEXT;
//                break;
//            case 2:
//                act_key = LV_KEY_PREV;
//                break;
//            case 3:
//                act_key = LV_KEY_LEFT;
//                break;
//            case 4:
//                act_key = LV_KEY_RIGHT;
//                break;
//            case 5:
//                act_key = LV_KEY_ENTER;
//                break;
//        }

//        last_key = act_key;
//    }
//    else {
//        data->state = LV_INDEV_STATE_REL;
//    }

//    data->key = last_key;
//}

///*Get the currently being pressed key.  0 if no key is pressed*/
//static uint32_t keypad_get_key(void)
//{
//    /*Your code comes here*/

//    return 0;
//}

///*------------------
// * Encoder
// * -----------------*/

///*Initialize your keypad*/
//static void encoder_init(void)
//{
//    /*Your code comes here*/
//}

///*Will be called by the library to read the encoder*/
//static void encoder_read(lv_indev_drv_t * indev_drv, lv_indev_data_t * data)
//{

//    data->enc_diff = encoder_diff;
//    data->state = encoder_state;
//}

///*Call this function in an interrupt to process encoder events (turn, press)*/
//static void encoder_handler(void)
//{
//    /*Your code comes here*/

//    encoder_diff += 0;
//    encoder_state = LV_INDEV_STATE_REL;
//}

///*------------------
// * Button
// * -----------------*/

///*Initialize your buttons*/
//static void button_init(void)
//{
//    /*Your code comes here*/
//}

///*Will be called by the library to read the button*/
//static void button_read(lv_indev_drv_t * indev_drv, lv_indev_data_t * data)
//{

//    static uint8_t last_btn = 0;

//    /*Get the pressed button's ID*/
//    int8_t btn_act = button_get_pressed_id();

//    if(btn_act >= 0) {
//        data->state = LV_INDEV_STATE_PR;
//        last_btn = btn_act;
//    }
//    else {
//        data->state = LV_INDEV_STATE_REL;
//    }

//    /*Save the last pressed button's ID*/
//    data->btn_id = last_btn;
//}

///*Get ID  (0, 1, 2 ..) of the pressed button*/
//static int8_t button_get_pressed_id(void)
//{
//    uint8_t i;

//    /*Check to buttons see which is being pressed (assume there are 2 buttons)*/
//    for(i = 0; i < 2; i++) {
//        /*Return the pressed button's ID*/
//        if(button_is_pressed(i)) {
//            return i;
//        }
//    }

//    /*No button pressed*/
//    return -1;
//}

///*Test if `id` button is pressed or not*/
//static bool button_is_pressed(uint8_t id)
//{

//    /*Your code comes here*/

//    return false;
//}
3.5 修改main.c
这里主要包括添加LVGL头文件、添加LVGL初始化、添加LVGL官方压力测试DEMO。
cpp
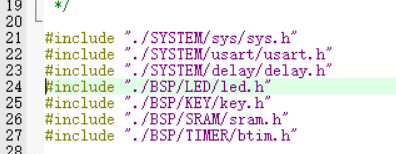
#include "./SYSTEM/sys/sys.h"
#include "./SYSTEM/usart/usart.h"
#include "./SYSTEM/delay/delay.h"
#include "./BSP/LED/led.h"
#include "./BSP/KEY/key.h"
#include "./BSP/SRAM/sram.h"
#include "./BSP/TIMER/btim.h"

/* LVGL */
#include "lvgl.h"
#include "lv_port_indev_template.h"
#include "lv_port_disp_template.h"
#include "lv_demo_stress.h"


int main(void)
{
    HAL_Init();                         /* 初始化HAL库 */
    sys_stm32_clock_init(336, 8, 2, 7); /* 设置时钟,168Mhz */
    delay_init(168);                    /* 延时初始化 */
    usart_init(115200);                 /* 串口初始化为115200 */
    led_init();                         /* 初始化LED */
    key_init();                         /* 初始化按键 */
    sram_init();                        /* SRAM初始化 */
    btim_timx_int_init(10-1,8400-1);    /* 初始化定时器 */


		/* lvgl初始化 */
    lv_init();
    lv_port_disp_init();
    lv_port_indev_init();

    /* lvgl官方demo */
		lv_demo_stress();                   /* 官方例程测试 */


    while (1)
    {
        lv_task_handler();
        delay_ms(5);
    }
}
注:为了运行官方压力测试DEMO还需要在lv_conf.h中开启压力测试DEMO的宏定义,如下所示。
cpp
/*Stress test for LVGL*/
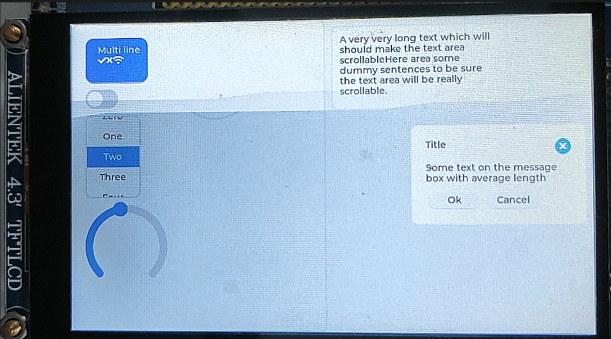
#define LV_USE_DEMO_STRESS 1四、烧录与显示
编译无误进行烧录,成功后可以看到显示屏运行压力测试程序,裸机移植LVGL完成。