一.前期内容回顾
对前面的准备不熟悉的,可以看前面的内容,连接如下:
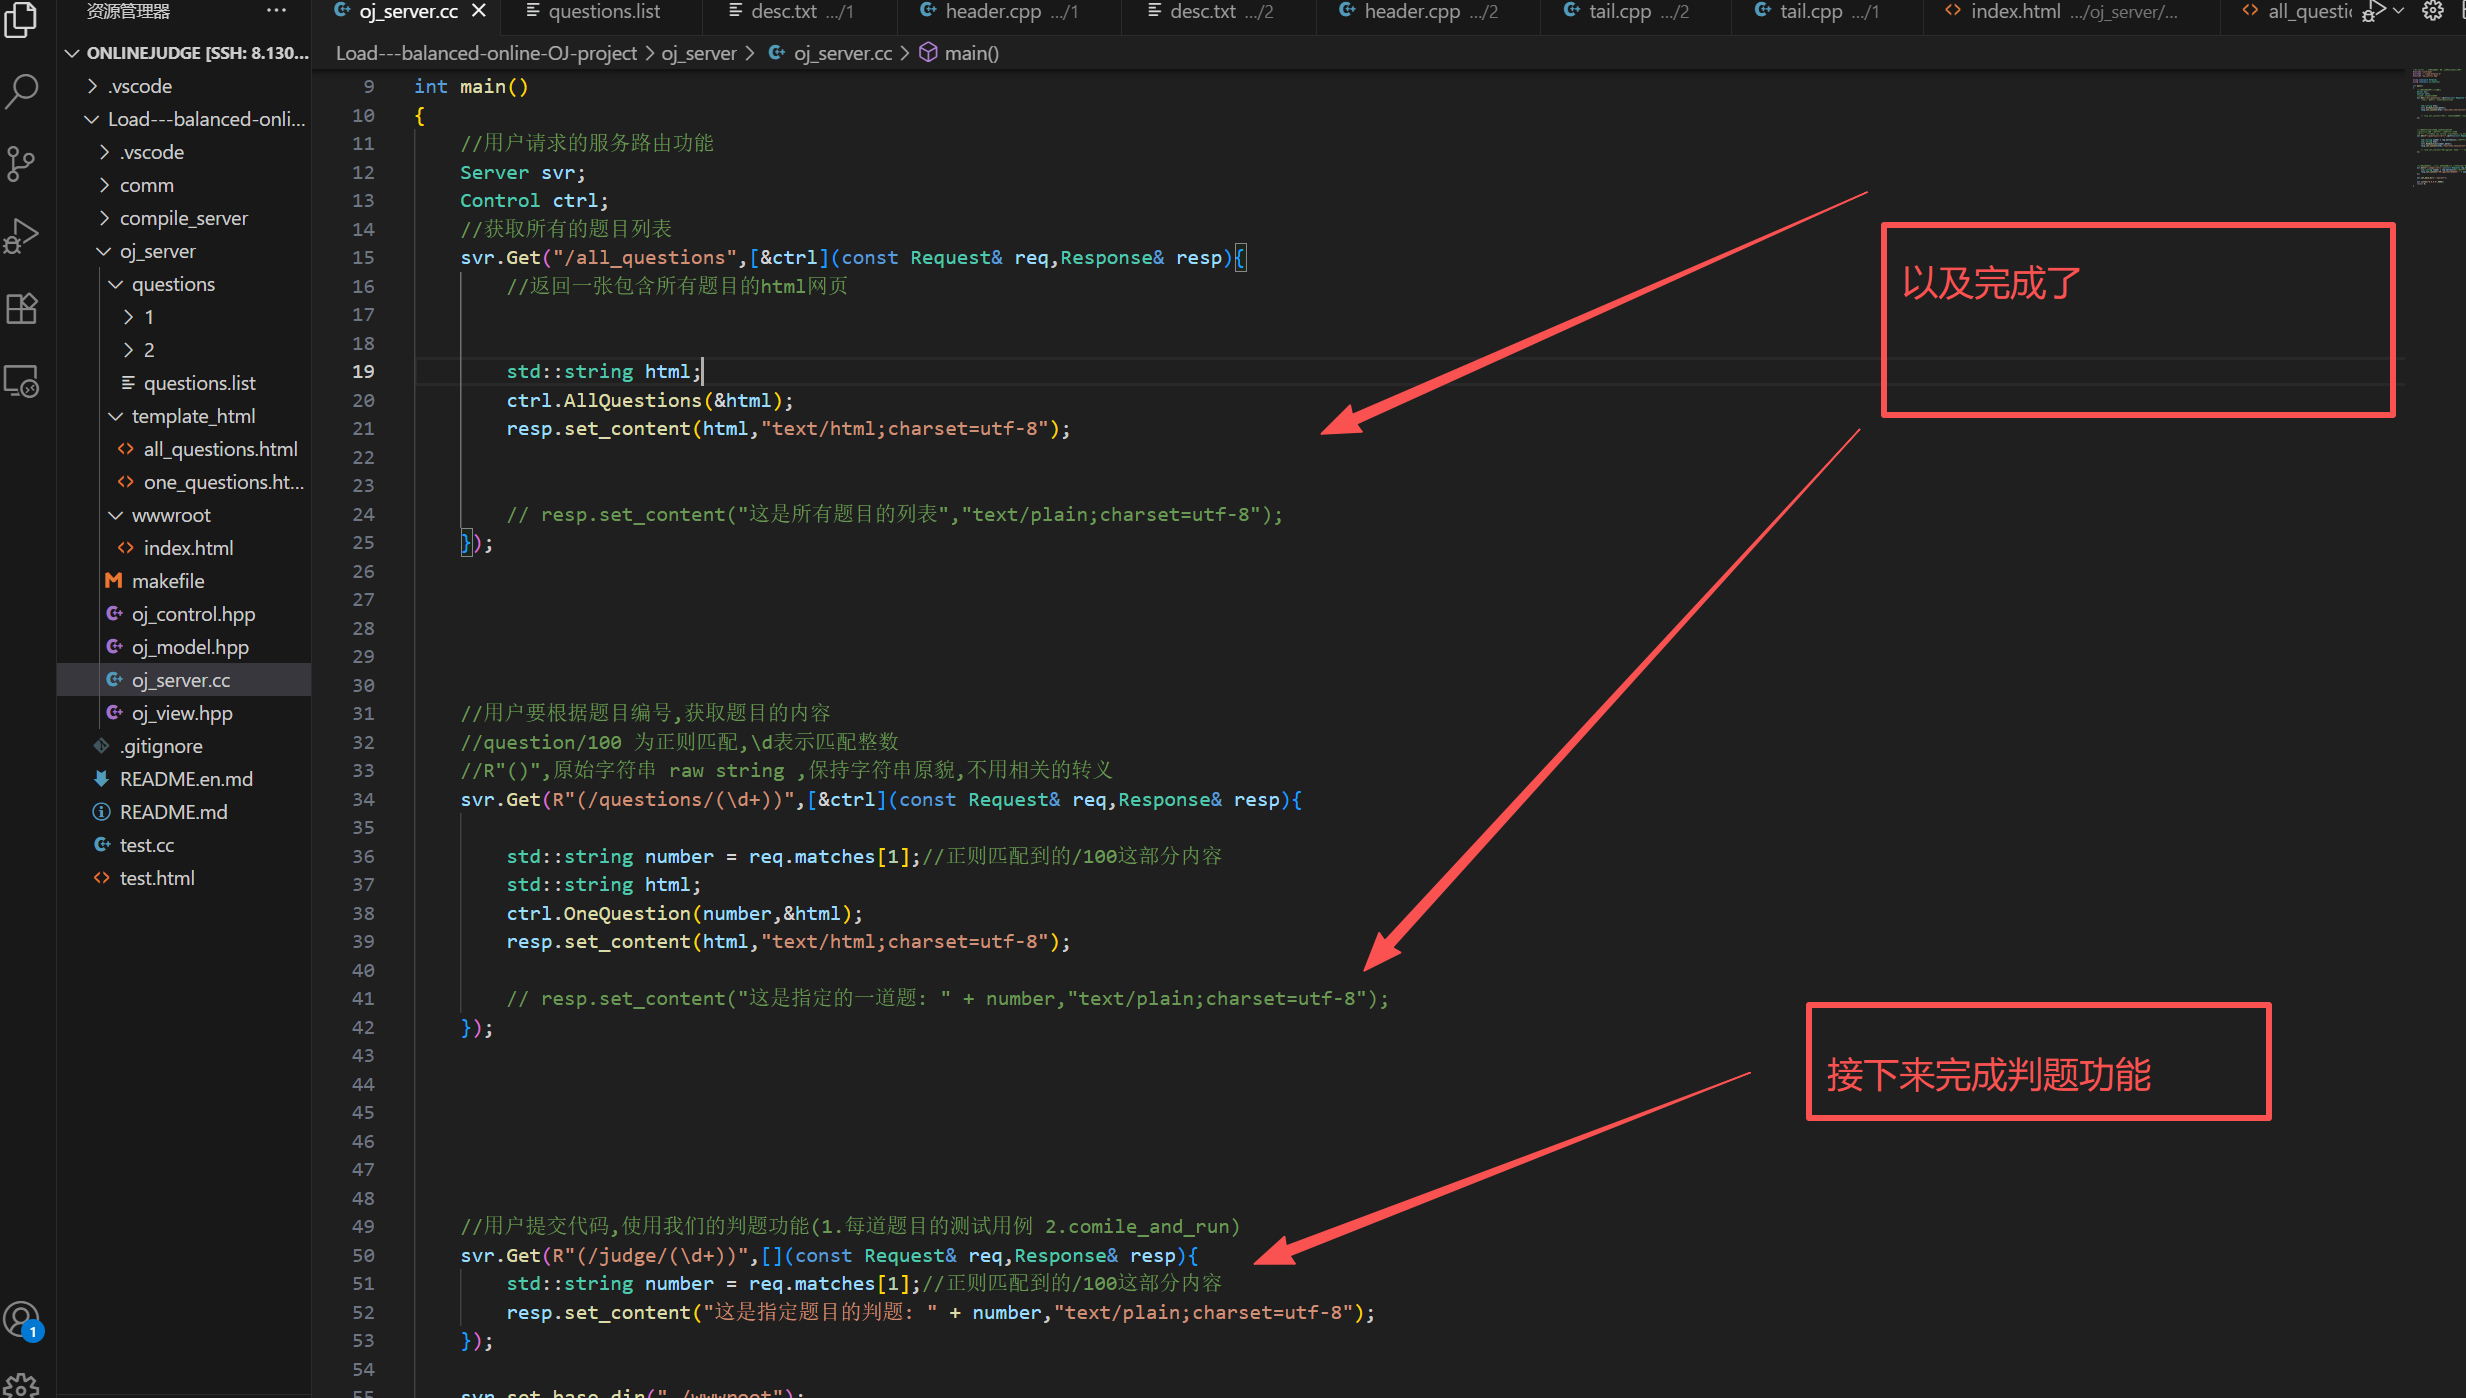
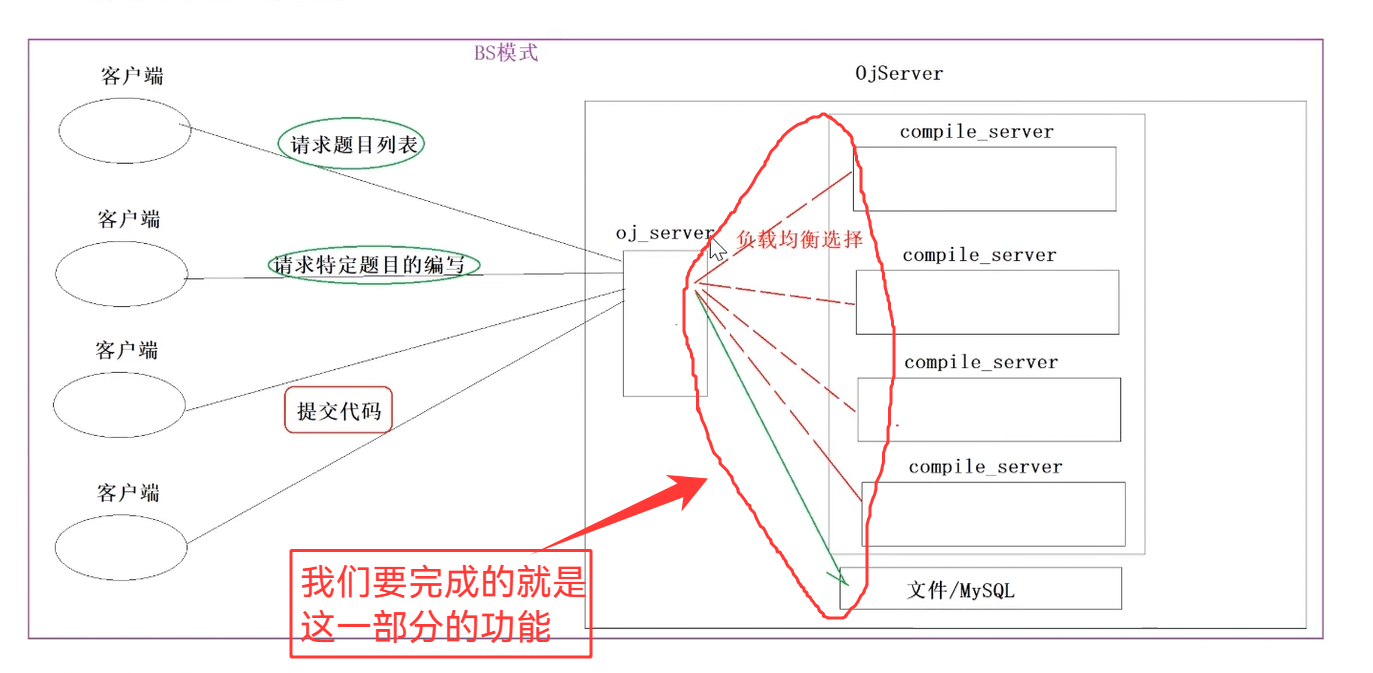
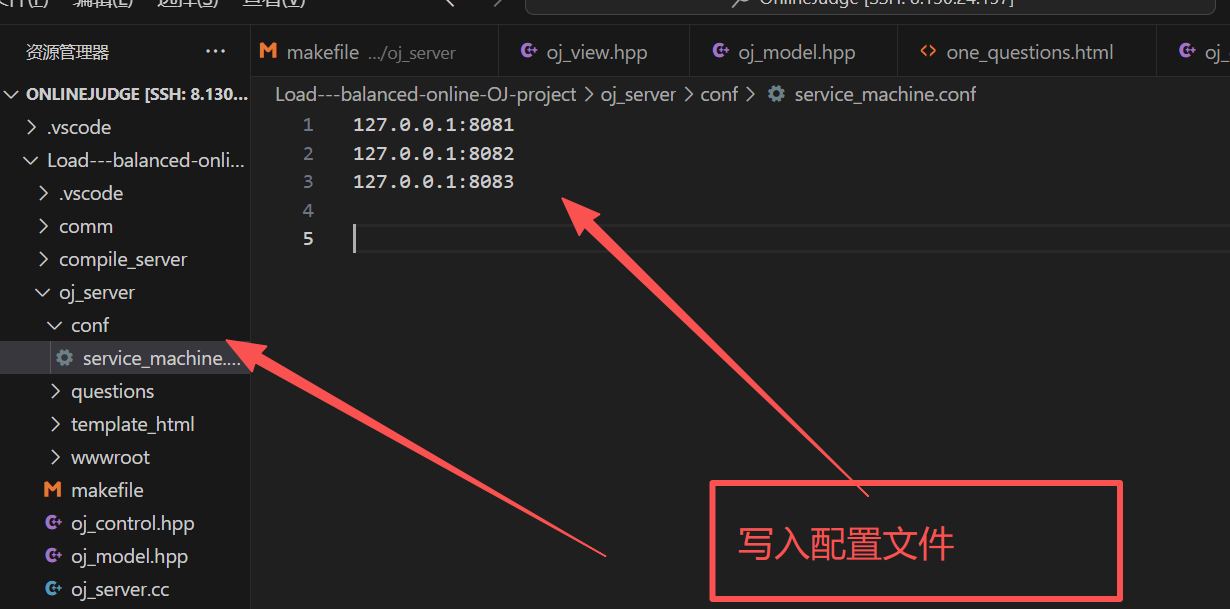
二.负载均衡器的编写
Judge实现思路如下:
cpp
/******************************************************
        * in_json:
        * id : 100
        * code : #include...
        * input : ""
        ******************************************************/
        void Judge(const std::string in_json,std::string *out_json)
        {
            //1. in_json进行反序列化,得到题目id,得到用户提交源代码,input
            //2. 重新拼接用户代码和测试用例代码
            //3. 选择负载最低的主机(差错处理)
            //4. 发起http请求,得到结果
            //5. 将结果赋值给out_json

        }
我们现在来设计负载均衡器,来选择负载最低的主机
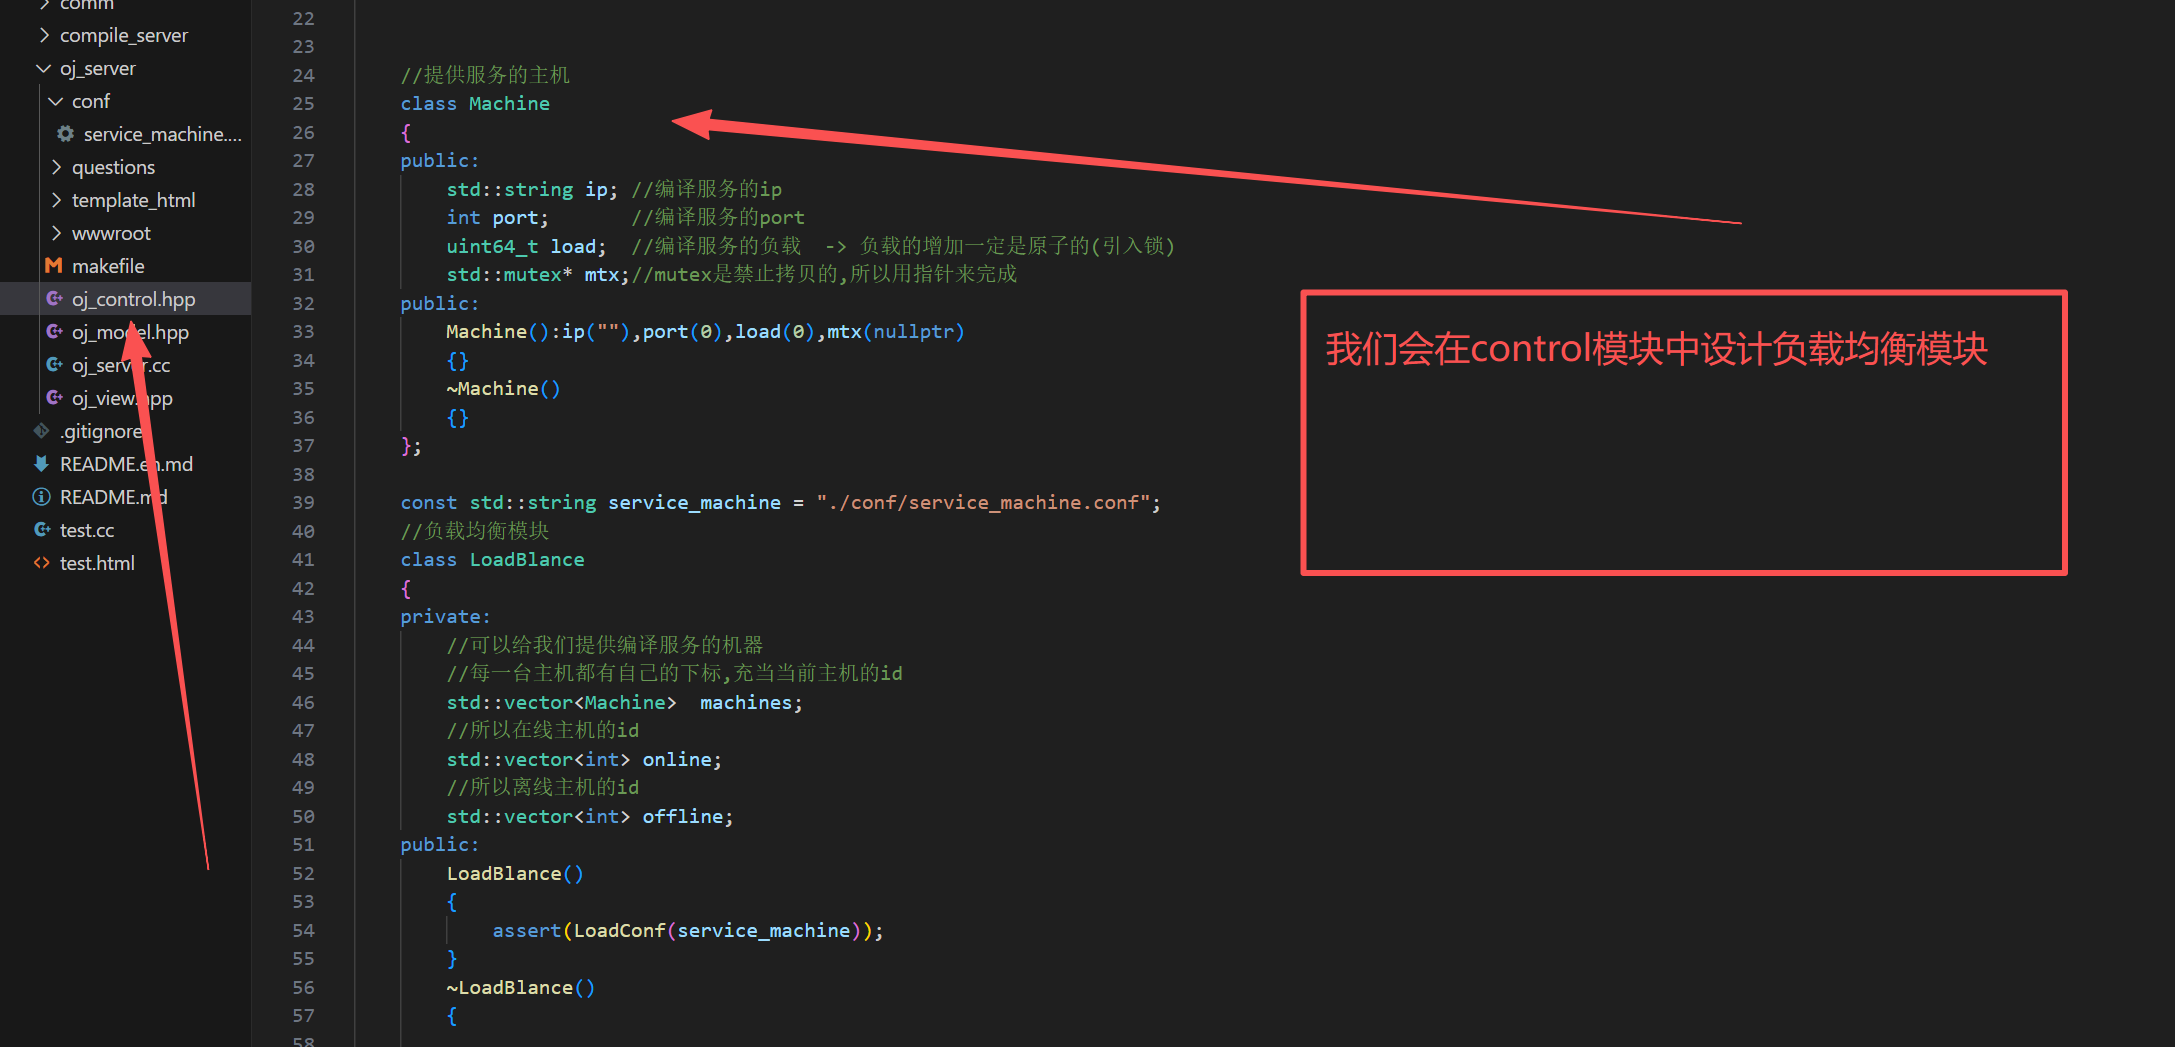
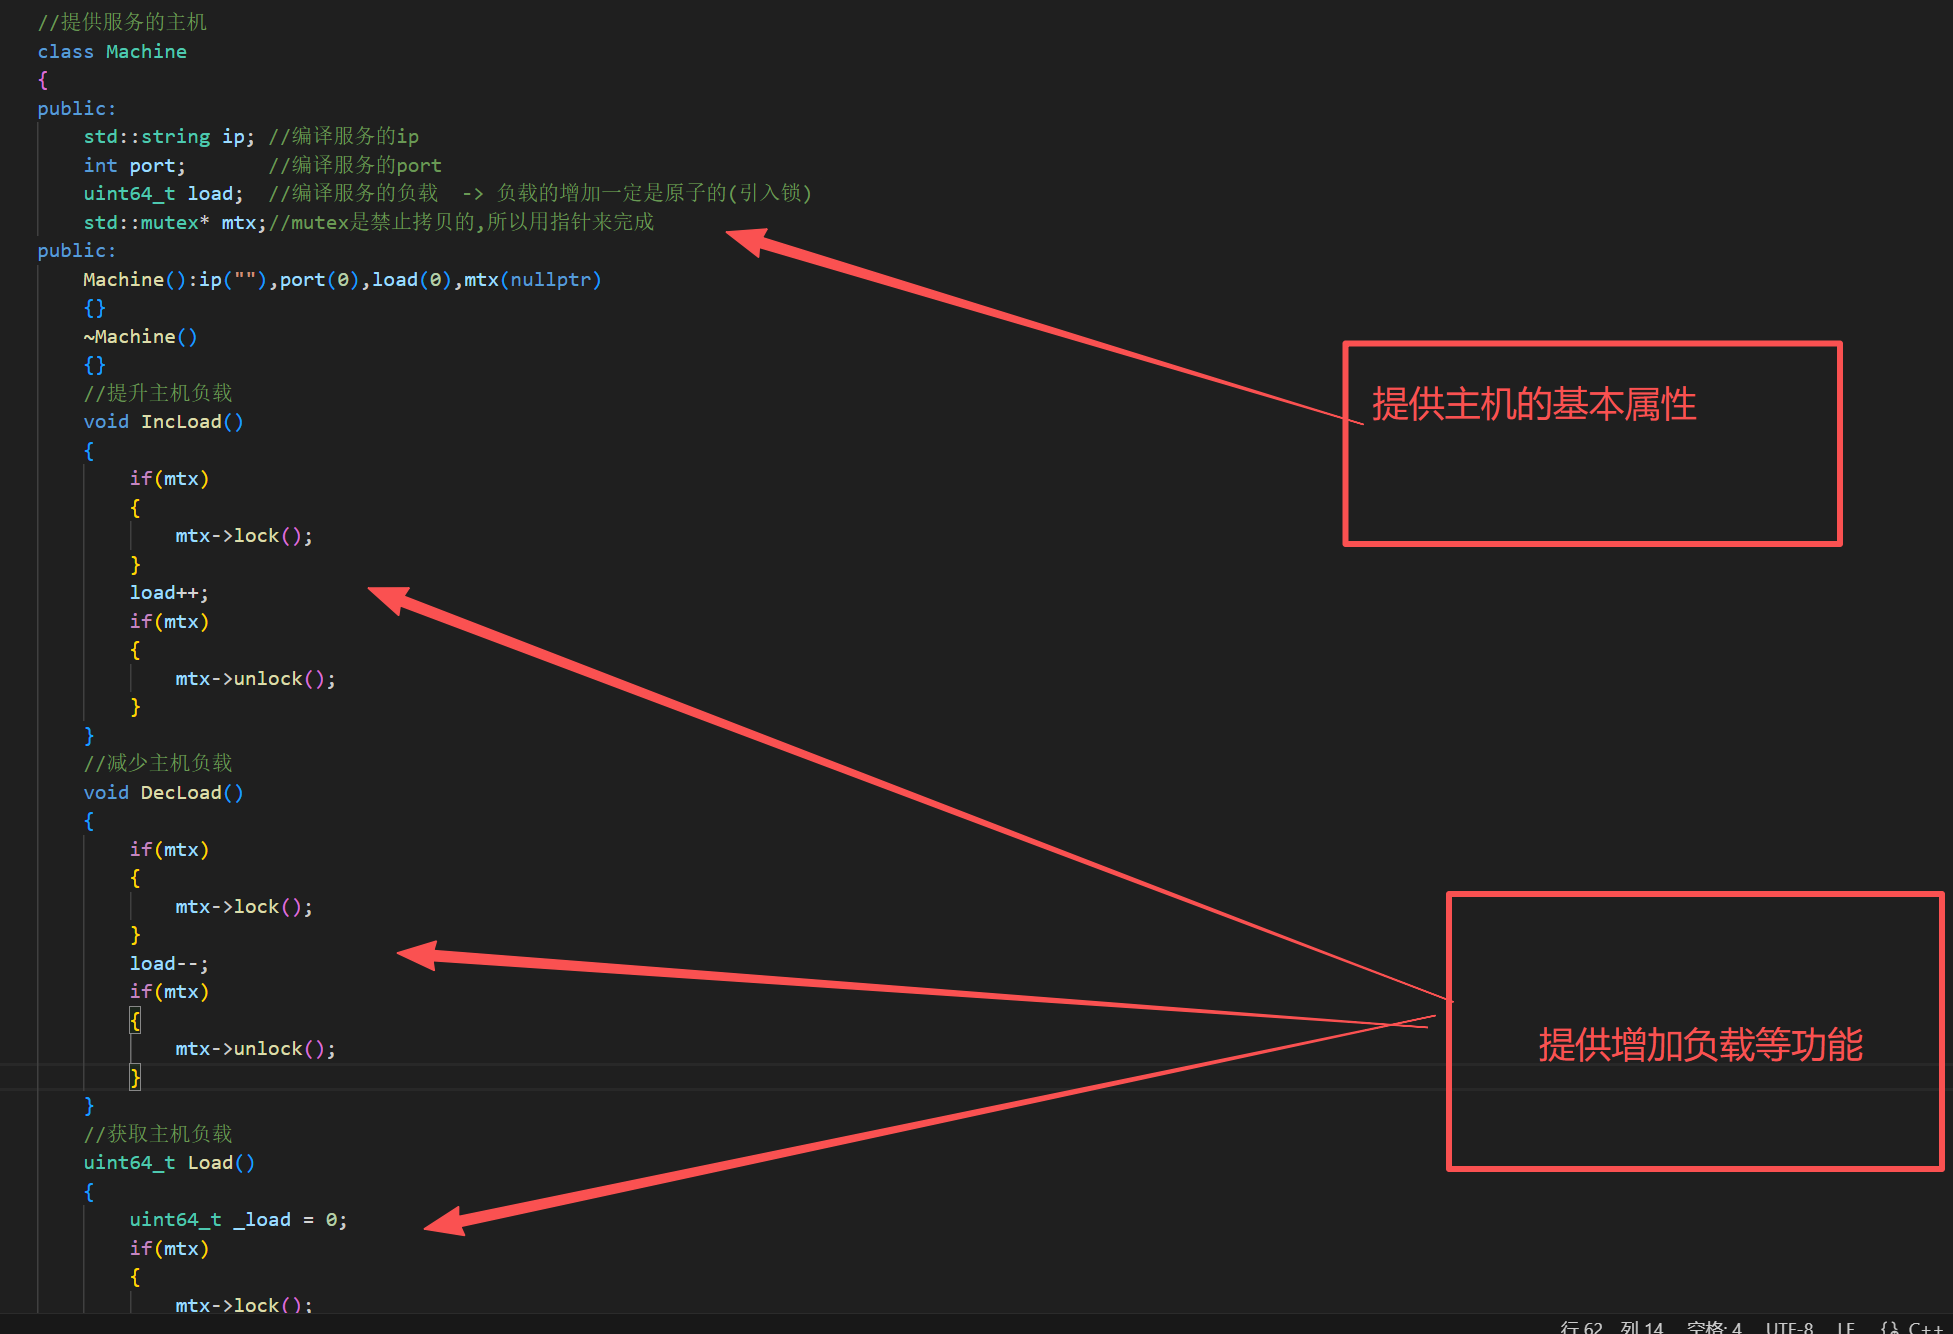
Machine定义的代码:
cpp
class Machine
    {
    public:
        std::string ip; //编译服务的ip
        int port;       //编译服务的port
        uint64_t load;  //编译服务的负载  -> 负载的增加一定是原子的(引入锁)
        std::mutex* mtx;//mutex是禁止拷贝的,所以用指针来完成
    public:
        Machine():ip(""),port(0),load(0),mtx(nullptr)
        {}
        ~Machine()
        {}
        //提升主机负载
        void IncLoad()
        {
            if(mtx)
            {
                mtx->lock();
            }
            load++;
            if(mtx)
            {
                mtx->unlock();
            }
        }
        //减少主机负载
        void DecLoad()
        {
            if(mtx)
            {
                mtx->lock();
            }
            load--;
            if(mtx)
            {
                mtx->unlock();
            }
        }
        //获取主机负载
        uint64_t Load()
        {
            uint64_t _load = 0;
            if(mtx)
            {
                mtx->lock();
            }
            _load = load;
            if(mtx)
            {
                mtx->unlock();
            }
            return _load;
        }
    };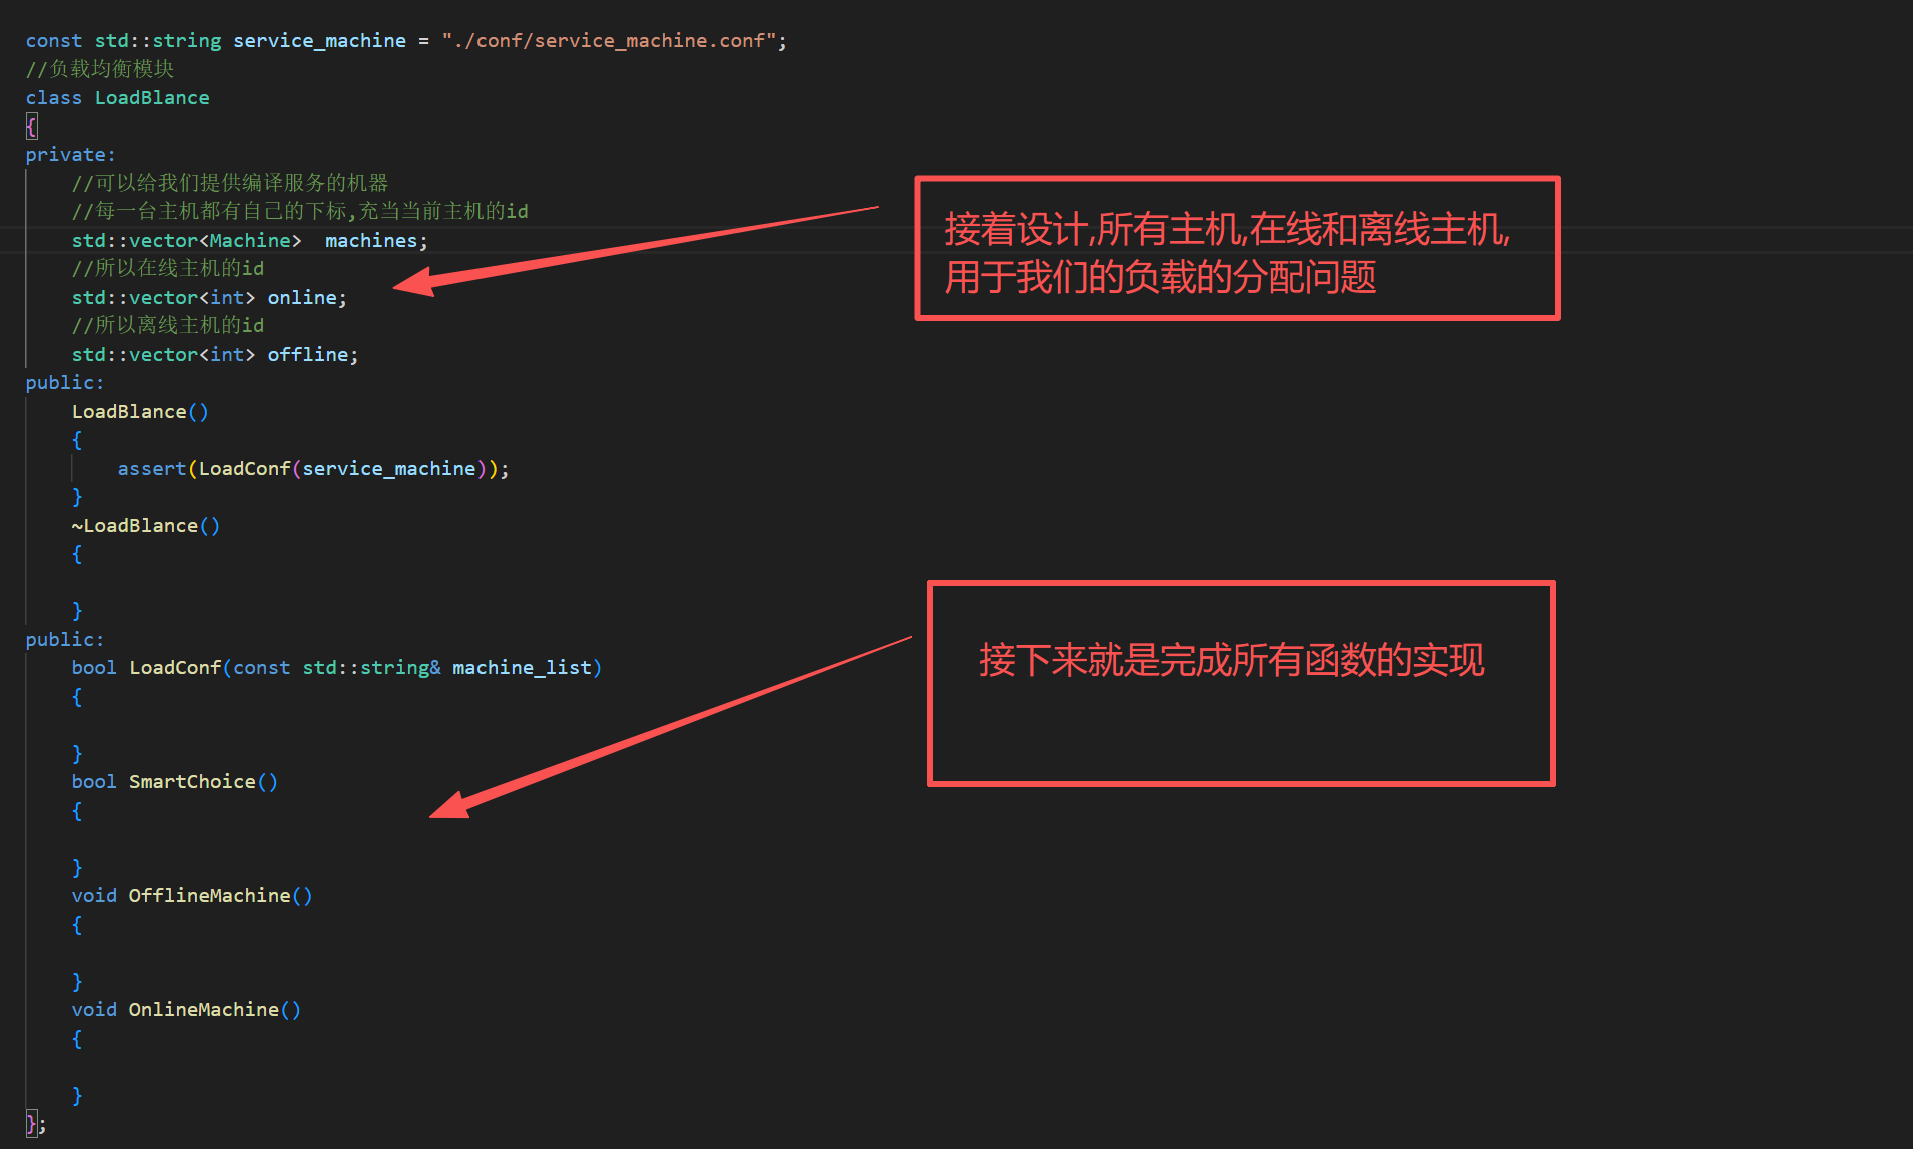
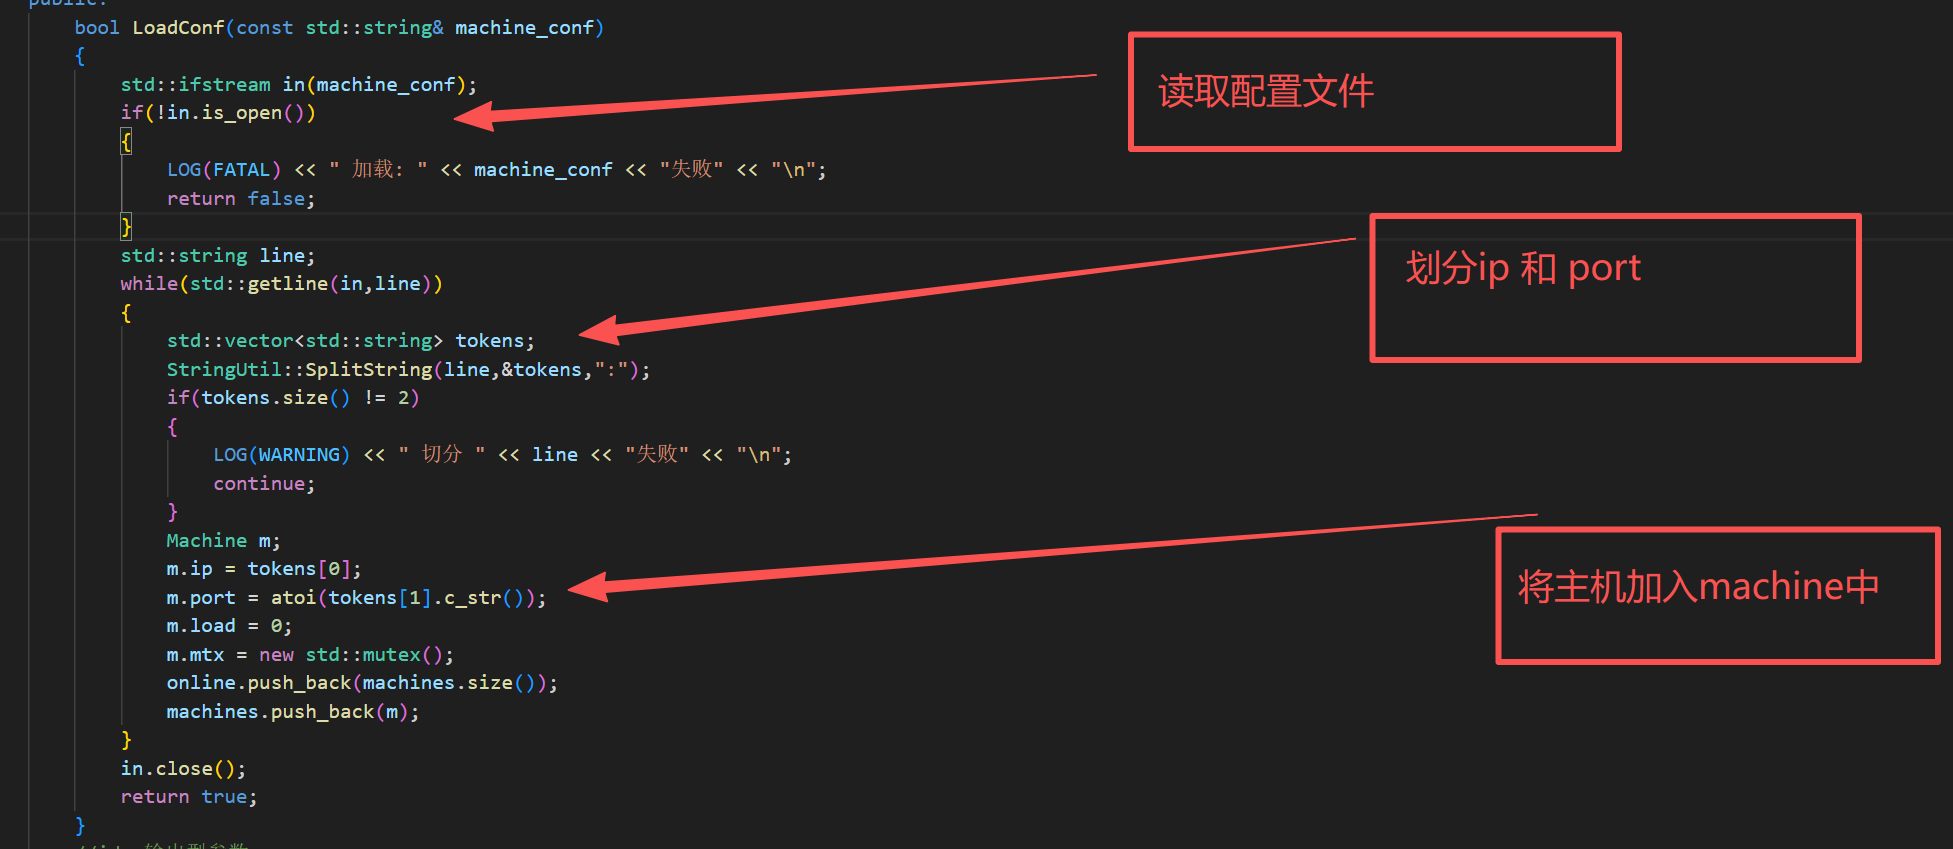
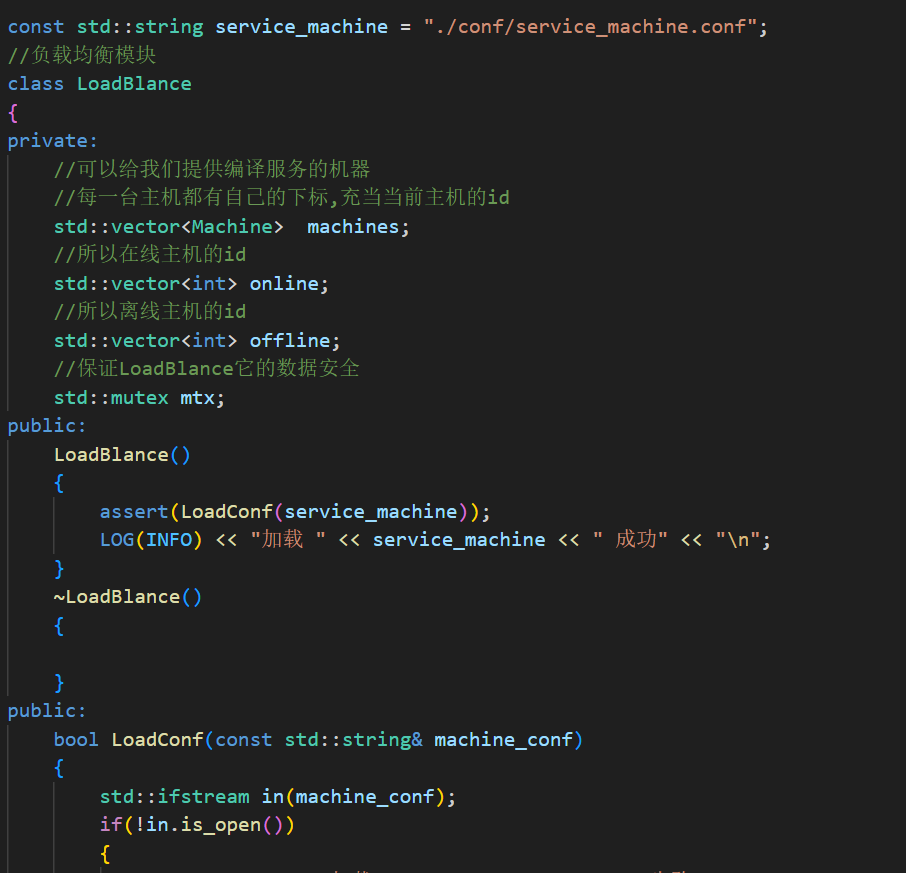
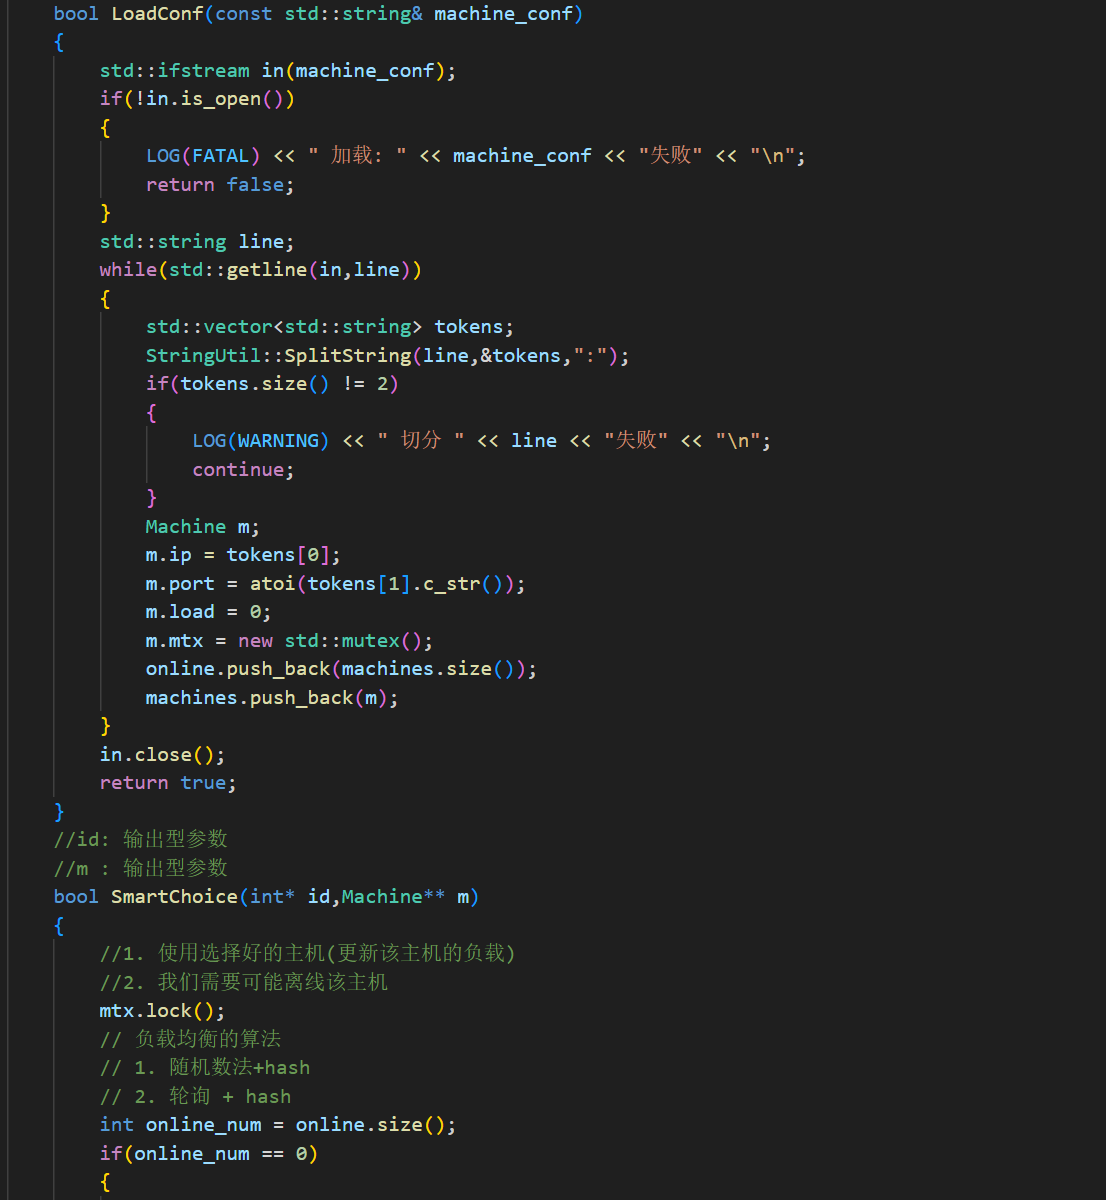
2.1LoadConf()函数的完成
cpp
bool LoadConf(const std::string& machine_conf)
        {
            std::ifstream in(machine_conf);
            if(!in.is_open())
            {
                LOG(FATAL) << " 加载: " << machine_conf << "失败" << "\n";
                return false;
            }
            std::string line;
            while(std::getline(in,line))
            {
                std::vector<std::string> tokens;
                StringUtil::SplitString(line,&tokens,":");
                if(tokens.size() != 2)
                {
                    LOG(WARNING) << " 切分 " << line << "失败" << "\n";
                    continue;
                }
                Machine m;
                m.ip = tokens[0];
                m.port = atoi(tokens[1].c_str());
                m.load = 0;
                m.mtx = new std::mutex();
                online.push_back(machines.size());
                machines.push_back(m);
            }
            in.close();
            return true;
        }
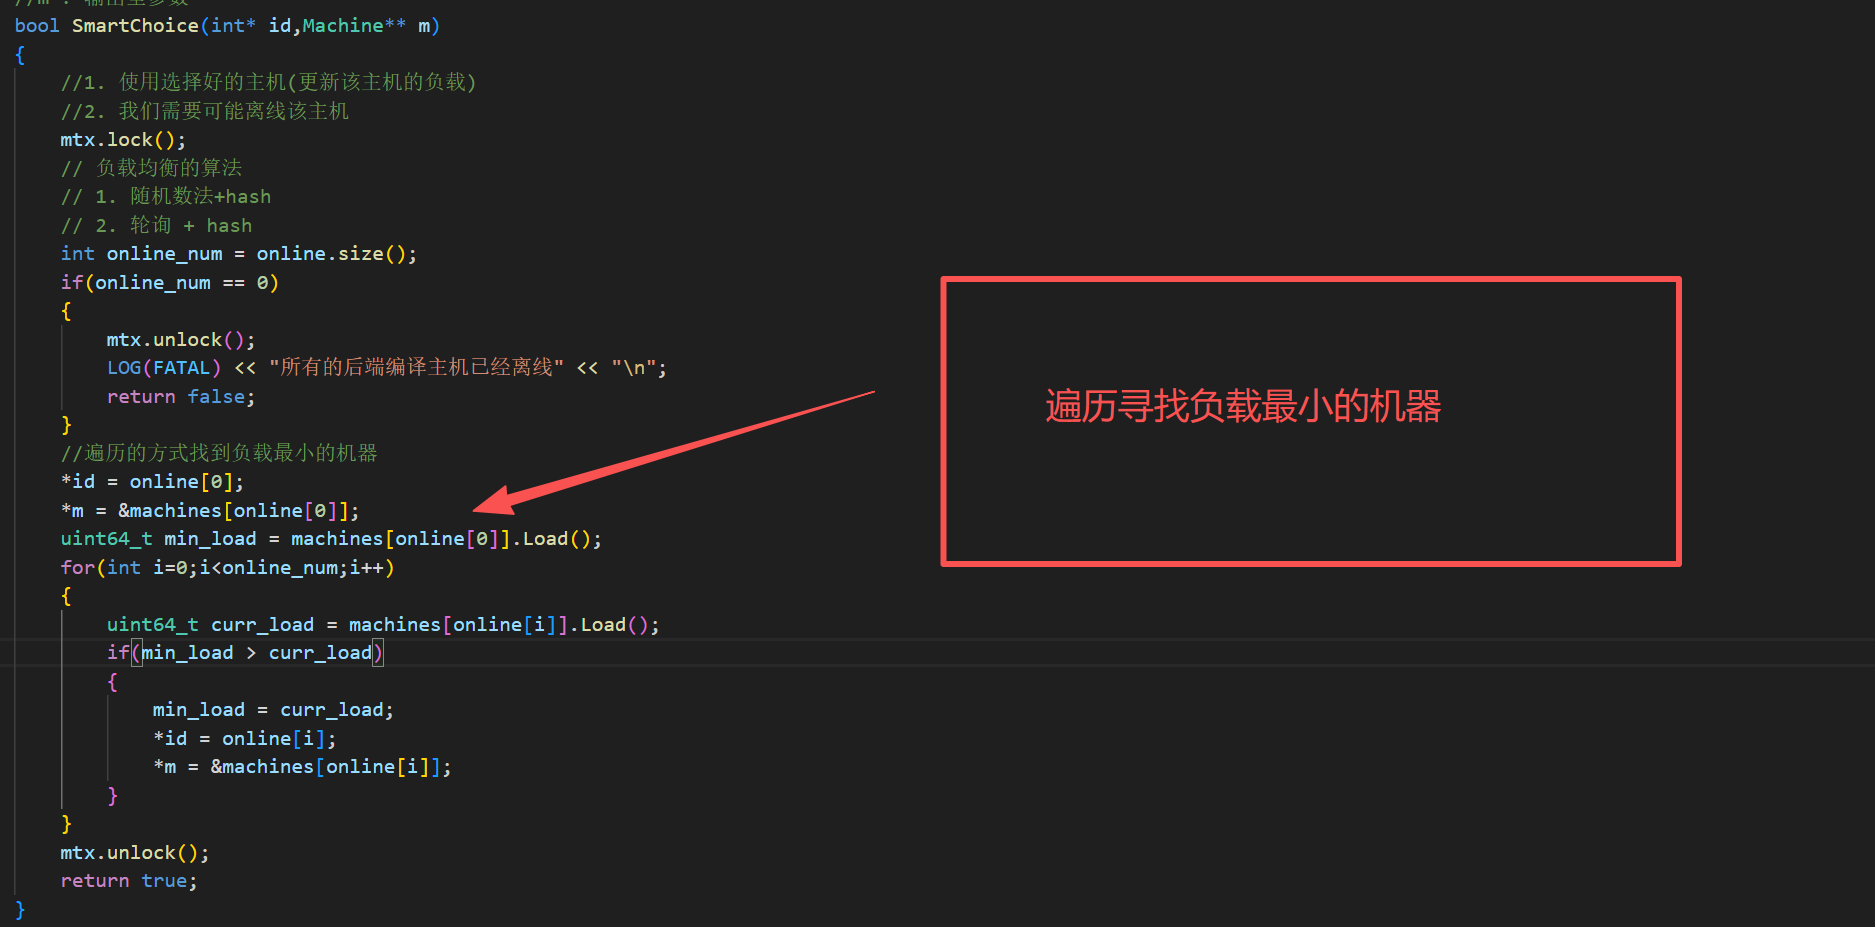
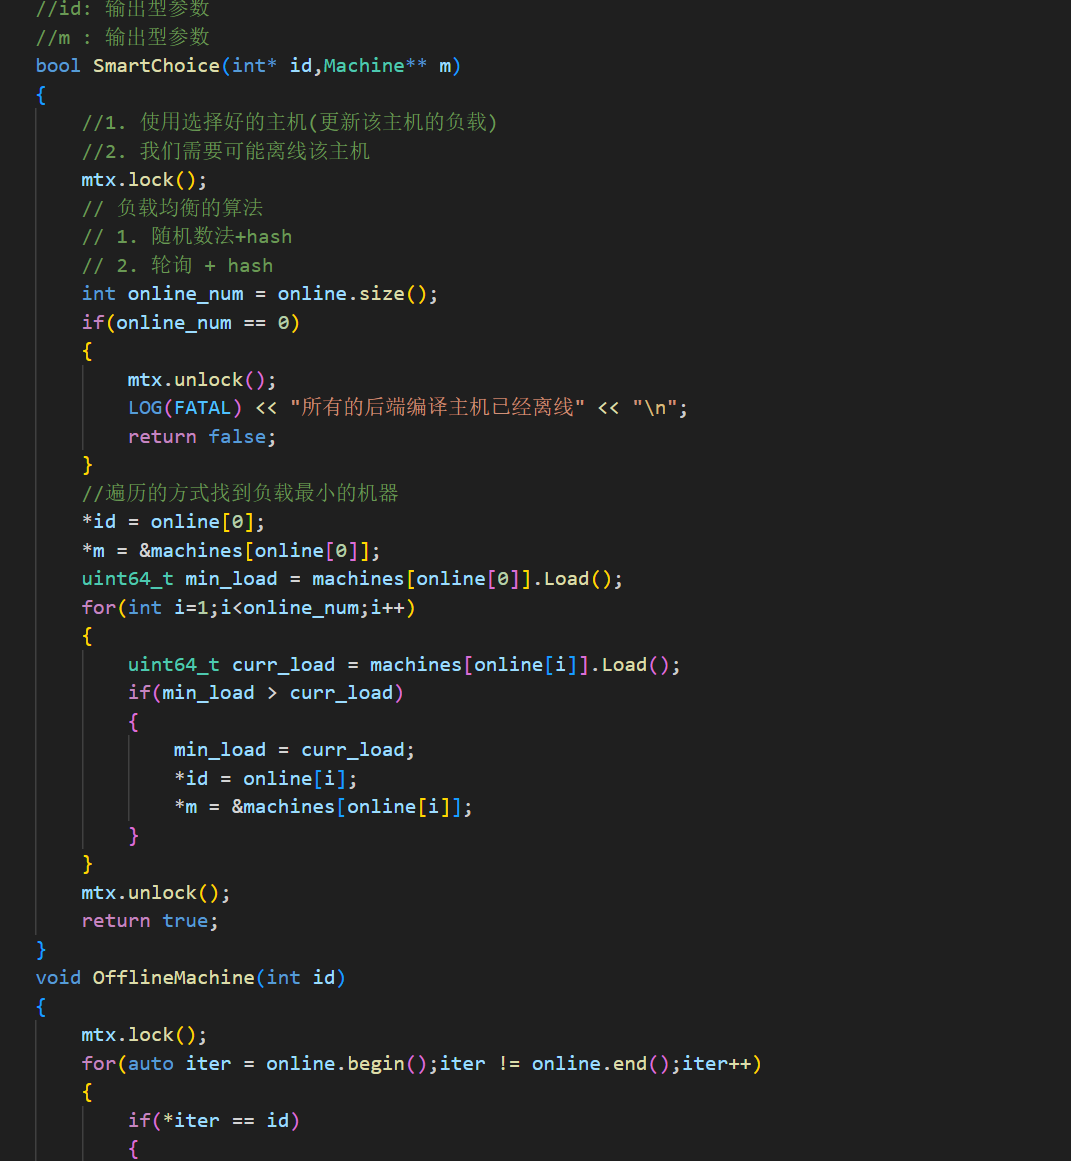
2.2SmartChoice()函数的完成
cpp
bool SmartChoice(int* id,Machine** m)
        {
            //1. 使用选择好的主机(更新该主机的负载)
            //2. 我们需要可能离线该主机
            mtx.lock();
            // 负载均衡的算法
            // 1. 随机数法+hash
            // 2. 轮询 + hash
            int online_num = online.size();
            if(online_num == 0)
            {
                mtx.unlock();
                LOG(FATAL) << "所有的后端编译主机已经离线" << "\n";
                return false;
            }
            //遍历的方式找到负载最小的机器
            *id = online[0];
            *m = &machines[online[0]];
            uint64_t min_load = machines[online[0]].Load();
            for(int i=0;i<online_num;i++)
            {
                uint64_t curr_load = machines[online[i]].Load();
                if(min_load > curr_load)
                {
                    min_load = curr_load;
                    *id = online[i];
                    *m = &machines[online[i]];
                }
            }
            mtx.unlock();
            return true;
        }
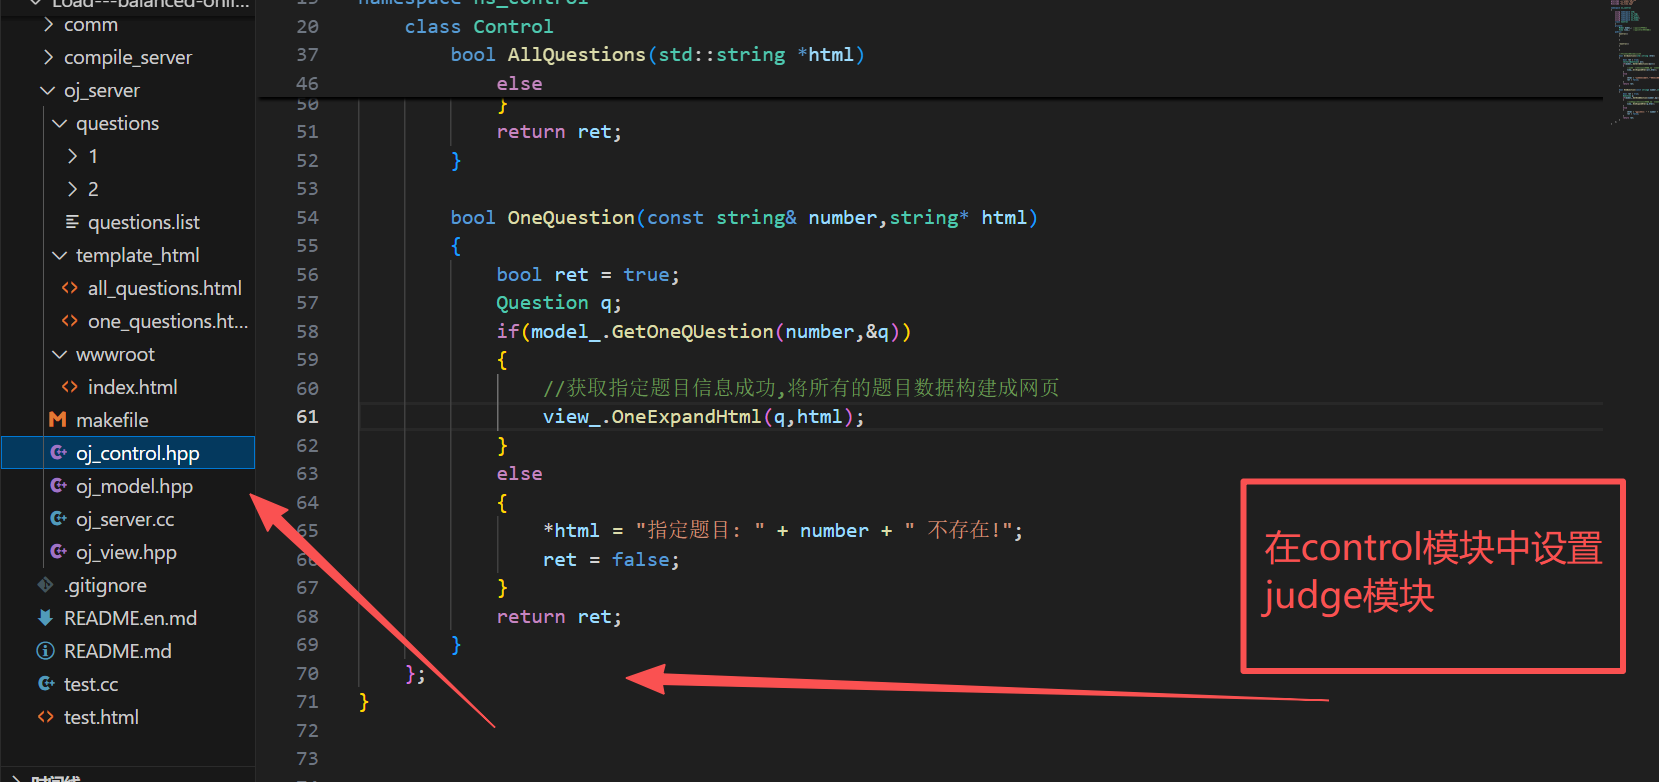
有了 加载模块 和 选择模块 ,我们现在可以开始编写judge模块
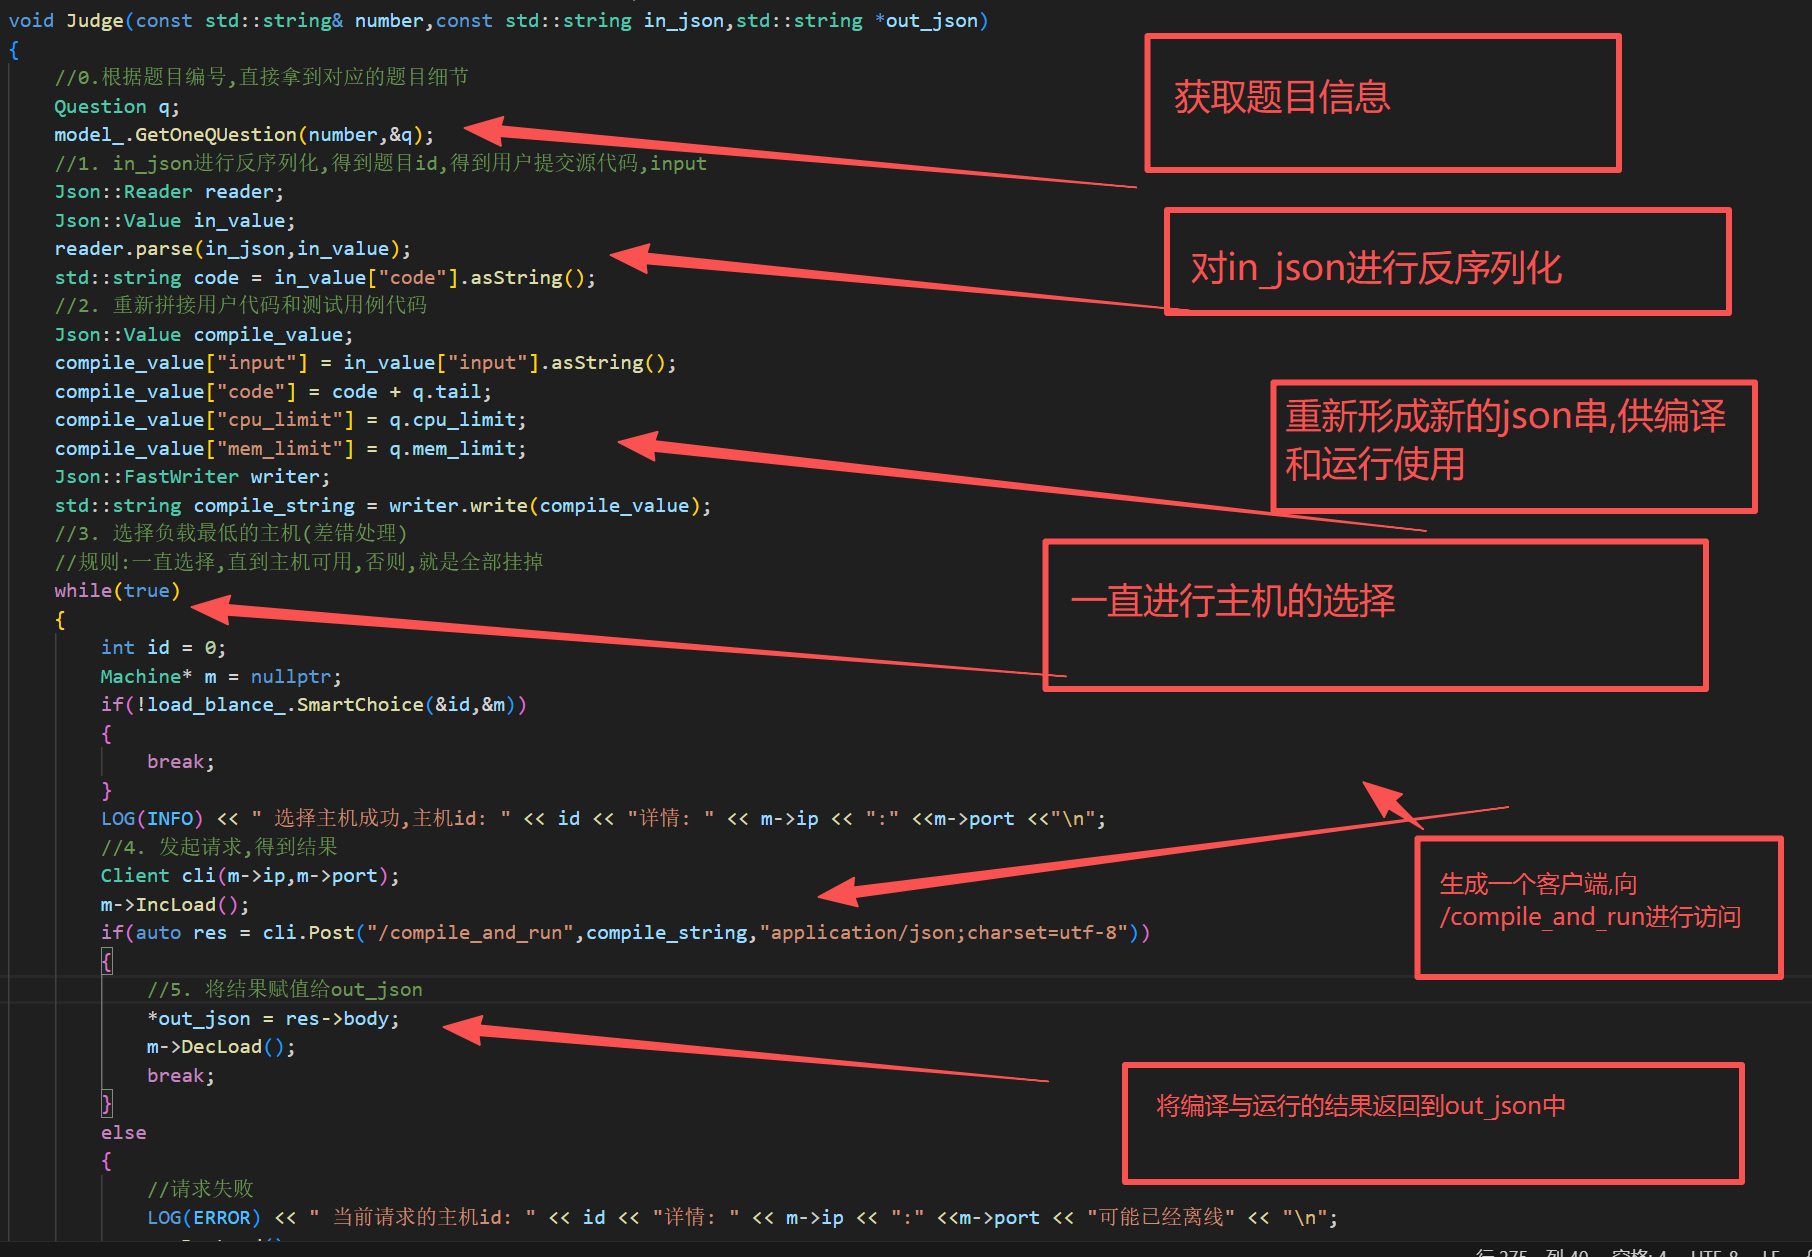
2.3Judge()函数编写
cpp
/******************************************************
* in_json:
* code : #include...
* input : ""
******************************************************/
void Judge(const std::string& number,const std::string in_json,std::string *out_json)
{
//0.根据题目编号,直接拿到对应的题目细节
Question q;
model_.GetOneQUestion(number,&q);
//1. in_json进行反序列化,得到题目id,得到用户提交源代码,input
Json::Reader reader;
Json::Value in_value;
reader.parse(in_json,in_value);
std::string code = in_value["code"].asString();
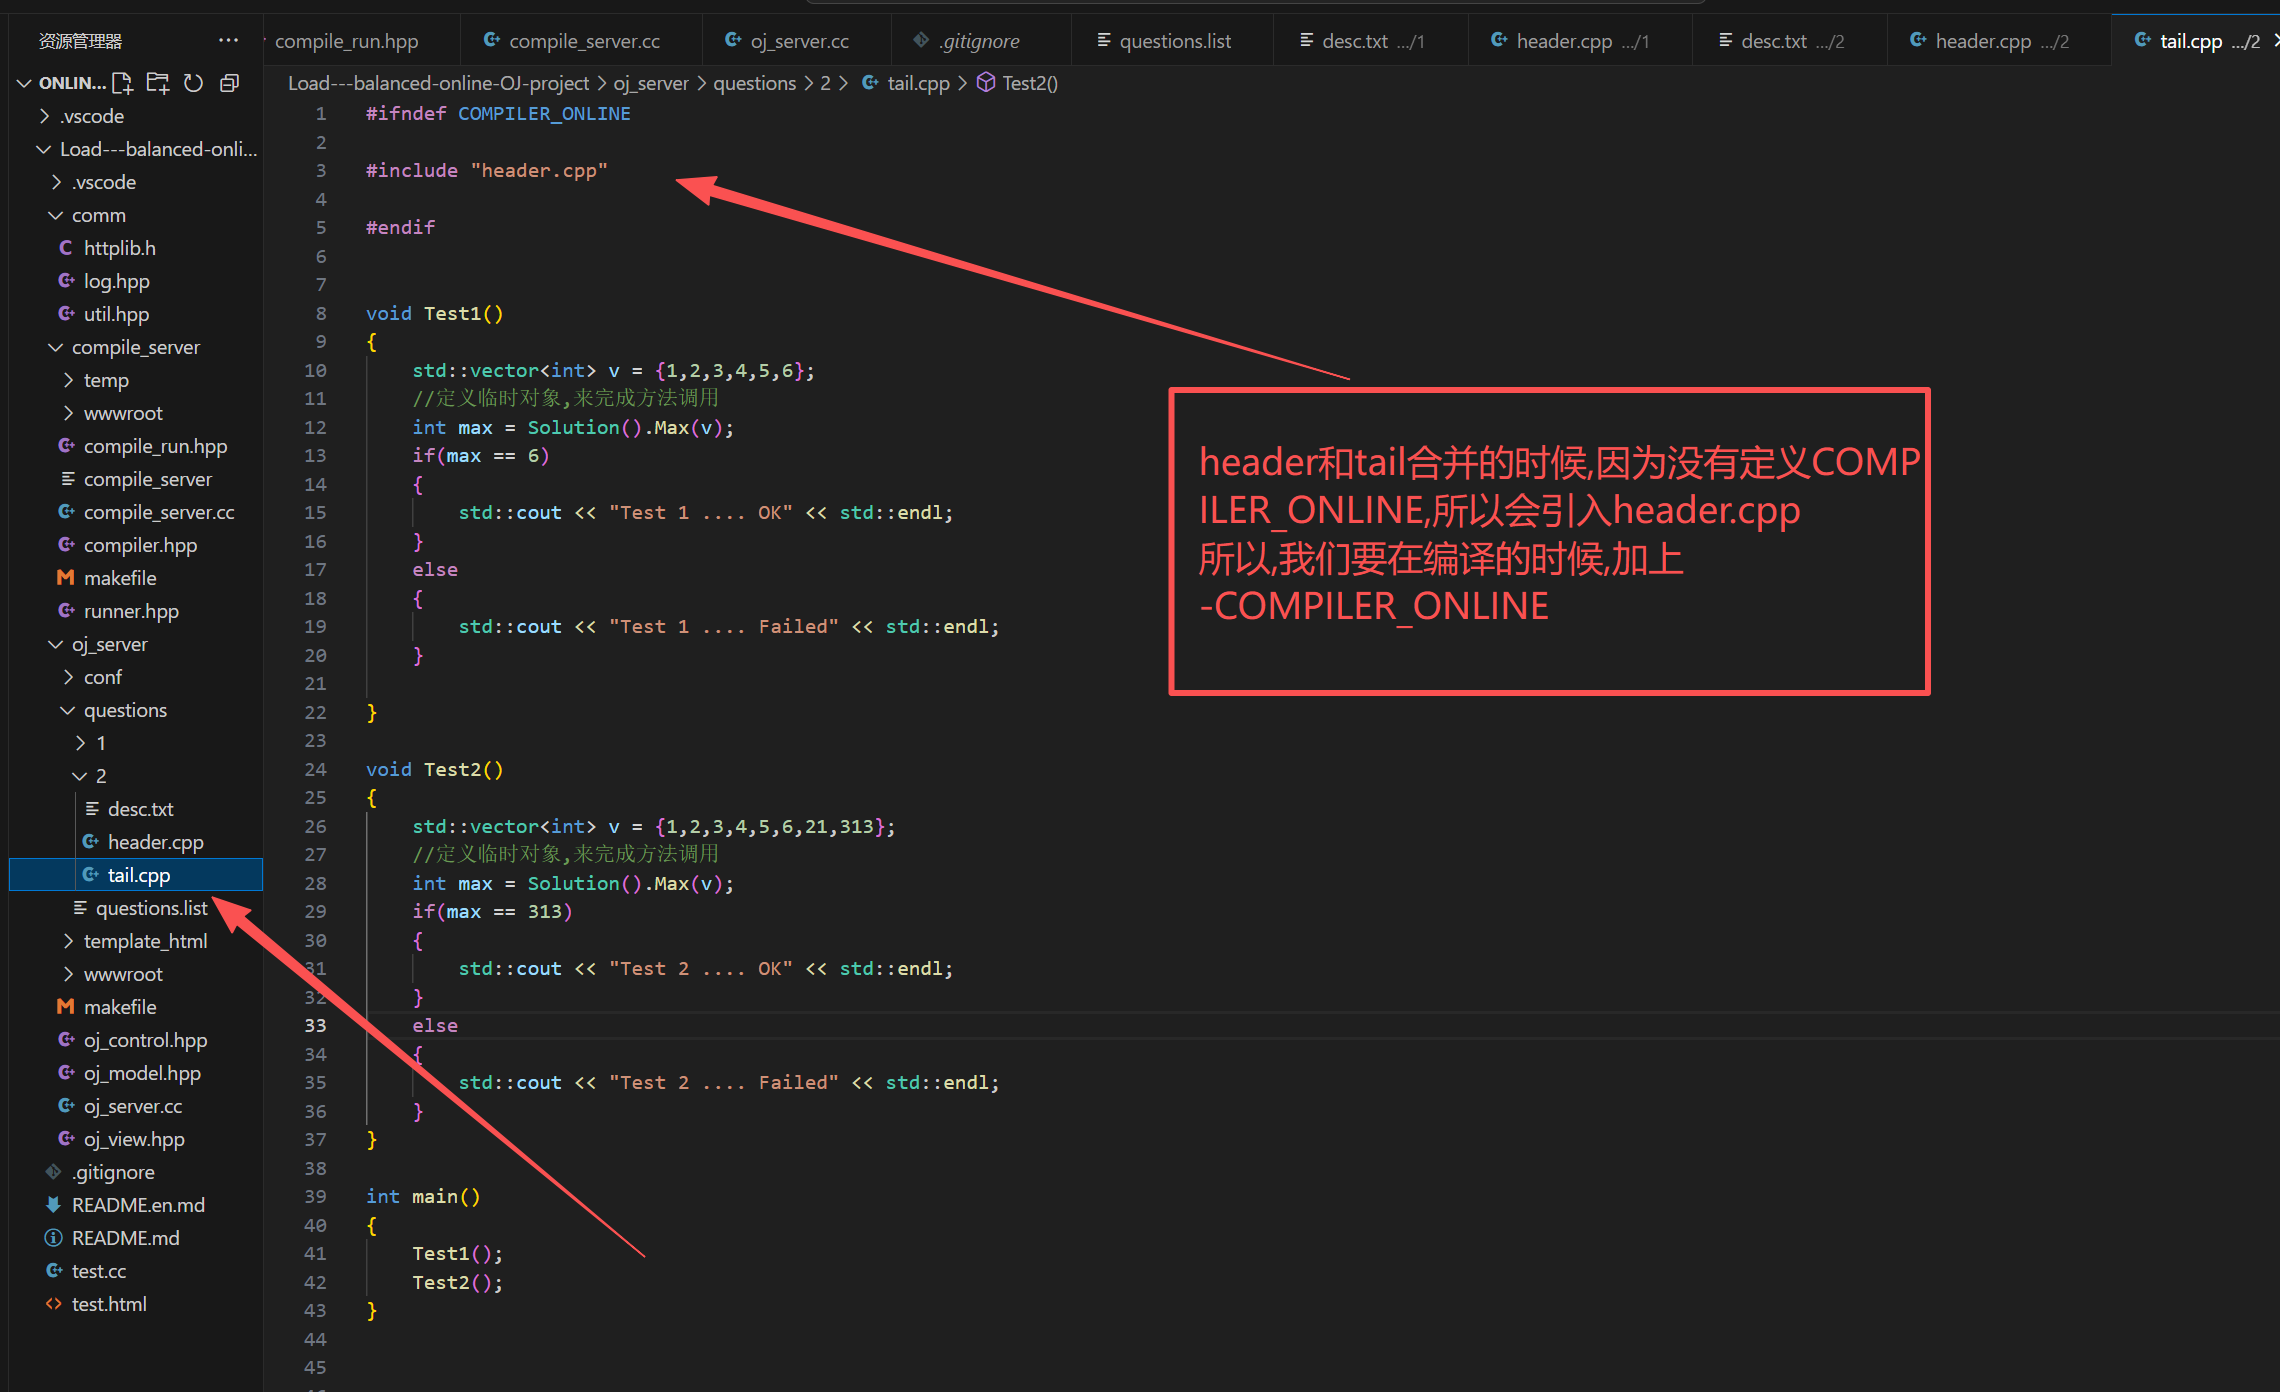
//2. 重新拼接用户代码和测试用例代码
Json::Value compile_value;
compile_value["input"] = in_value["input"].asString();
compile_value["code"] = code + q.tail;
compile_value["cpu_limit"] = q.cpu_limit;
compile_value["mem_limit"] = q.mem_limit;
Json::FastWriter writer;
std::string compile_string = writer.write(compile_value);
//3. 选择负载最低的主机(差错处理)
//规则:一直选择,直到主机可用,否则,就是全部挂掉
while(true)
{
int id = 0;
Machine* m = nullptr;
if(!load_blance_.SmartChoice(&id,&m))
{
break;
}
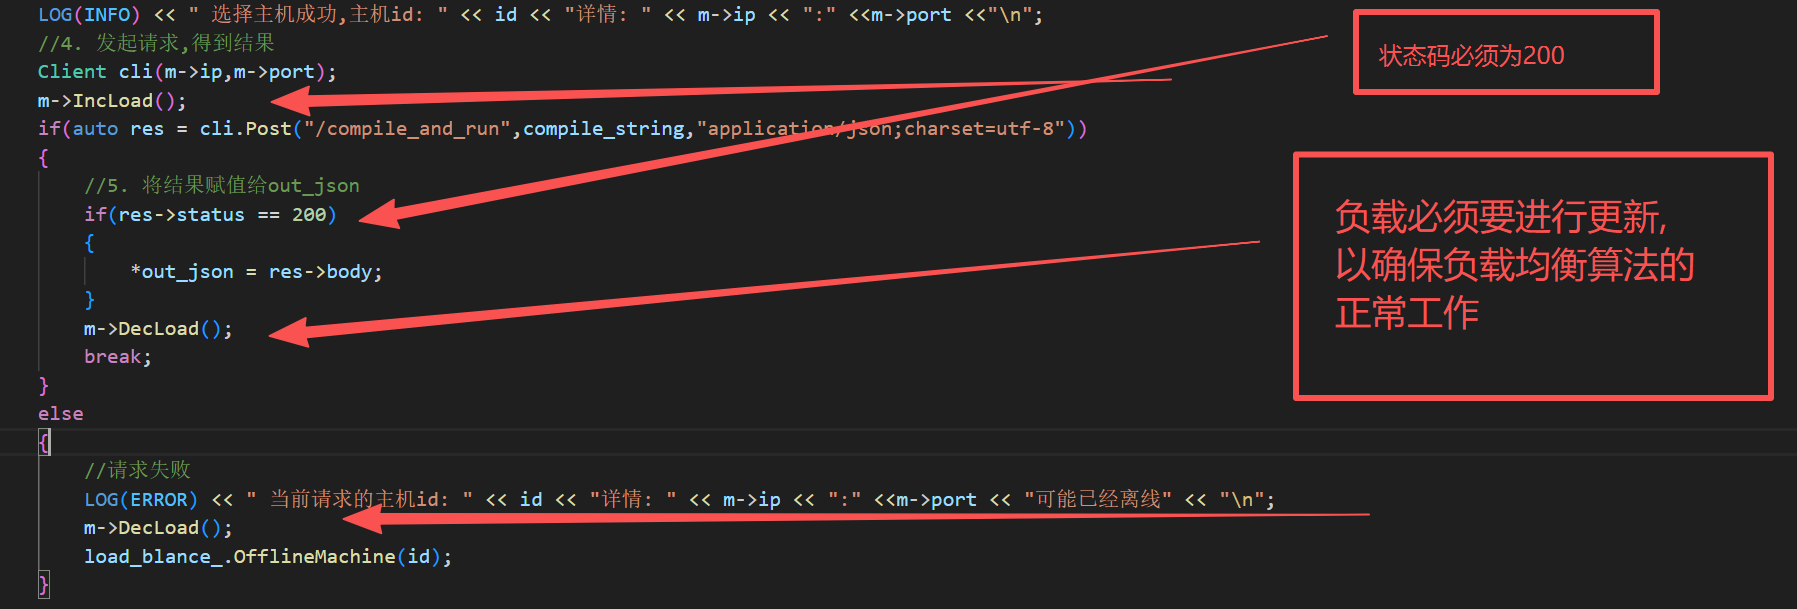
LOG(INFO) << " 选择主机成功,主机id: " << id << "详情: " << m->ip << ":" <<m->port <<"\n";
//4. 发起请求,得到结果
Client cli(m->ip,m->port);
m->IncLoad();
if(auto res = cli.Post("/compile_and_run",compile_string,"application/json;charset=utf-8"))
{
//5. 将结果赋值给out_json
if(res->status == 200)
{
*out_json = res->body;
m->DecLoad();
LOG(INFO) << "请求编译和运行服务成功... " << "\n";
break;
}
m->DecLoad();
}
else
{
//请求失败
LOG(ERROR) << " 当前请求的主机id: " << id << "详情: " << m->ip << ":" <<m->port << "可能已经离线" << "\n";
load_blance_.OfflineMachine(id);
load_blance_.ShowMachines();
}
}
}
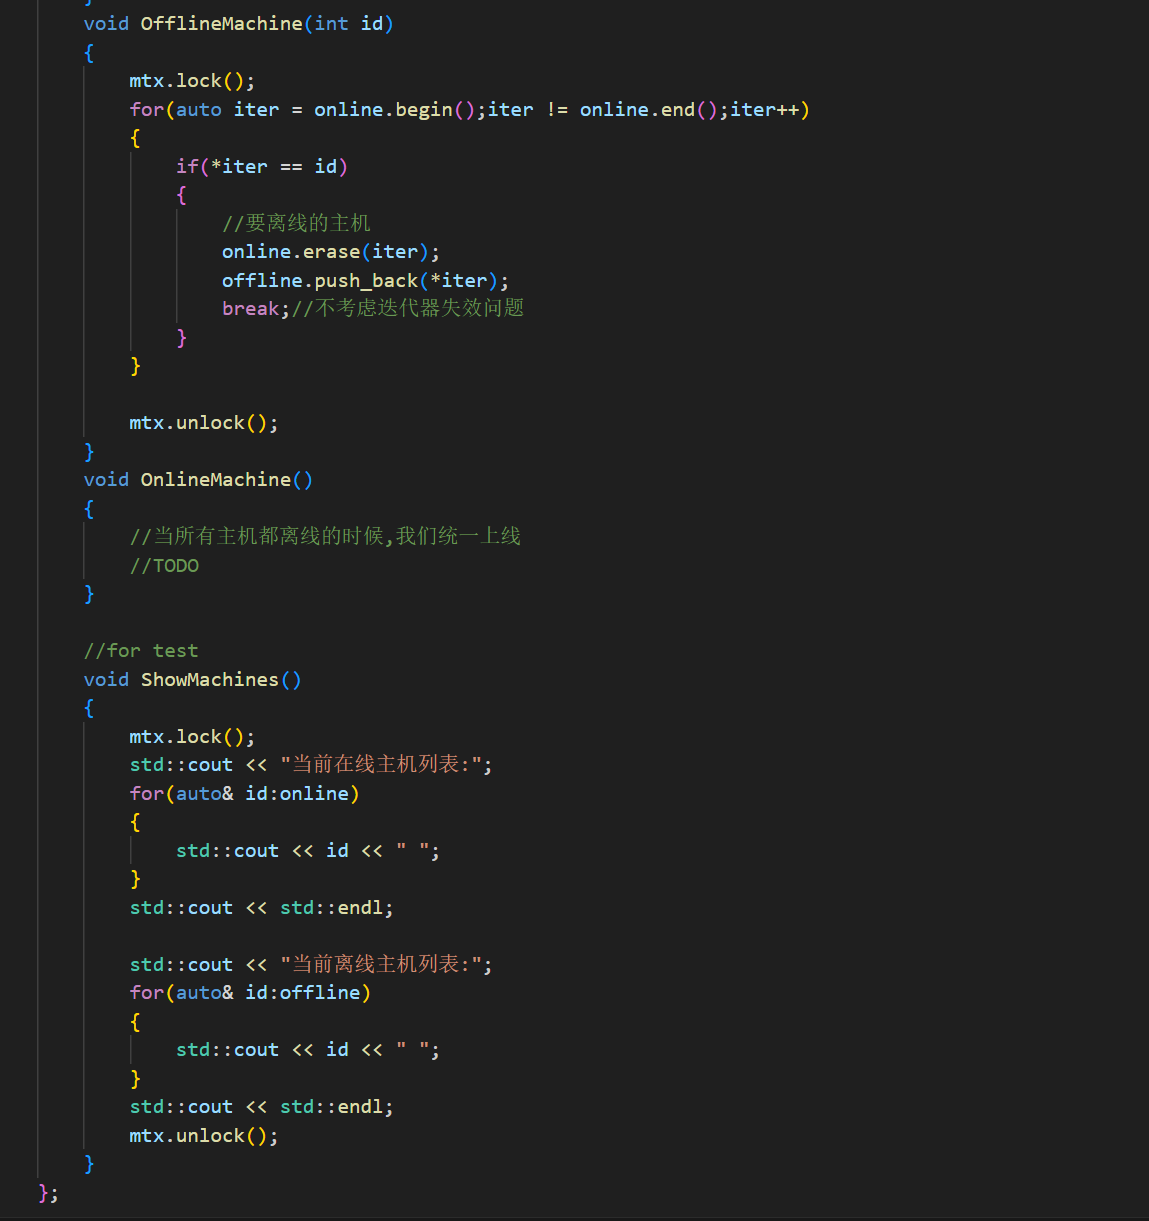
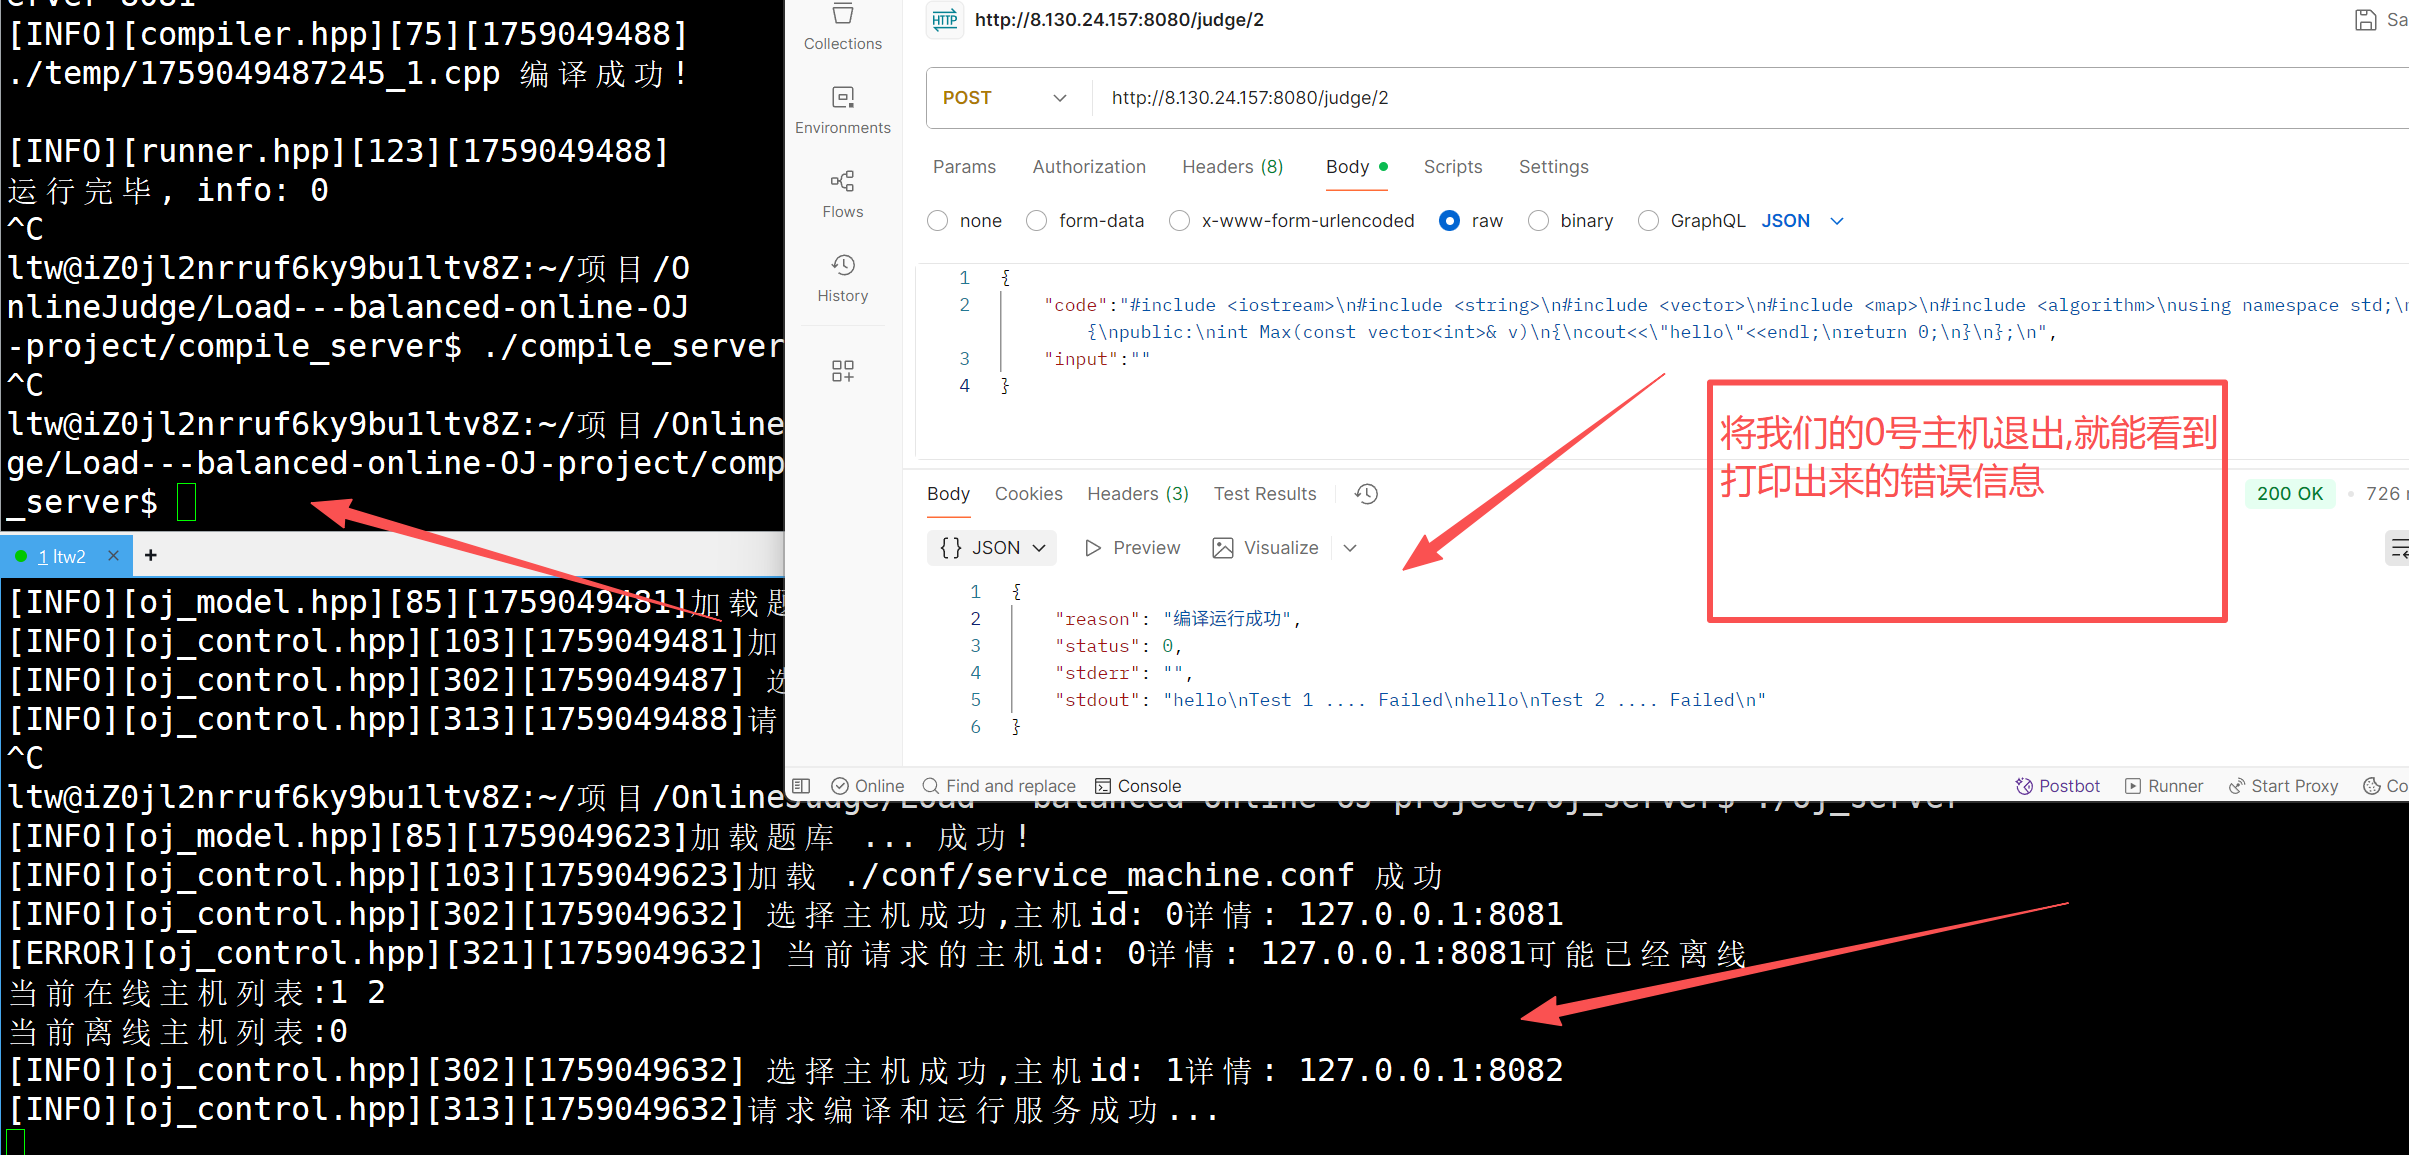
2.4OfflineMachine()函数的完成
cpp
void OfflineMachine(int id)
        {
            mtx.lock();
            for(auto iter = online.begin();iter != online.end();iter++)
            {
                if(*iter == id)
                {
                    //要离线的主机
                    online.erase(iter);
                    offline.push_back(id);
                    break;//不考虑迭代器失效问题
                }
            }

            mtx.unlock();
        }
为了测试时,能更好的看到我们离线和在线的主机,我们设计了一个ShowMachines()函数
2.5ShowMachines()函数的实现
cpp
//for test
        void ShowMachines()
        {
            mtx.lock();
            std::cout << "当前在线主机列表:";
            for(auto& id:online)
            {
                std::cout << id << " ";
            }
            std::cout << std::endl;

            std::cout << "当前离线主机列表:";
            for(auto& id:offline)
            {
                std::cout << id << " ";
            }
            std::cout << std::endl;
            mtx.unlock();
        }
目前为止 我们的LoadBlance类中,还有一个 OnlineMachine() 函数还没有实现
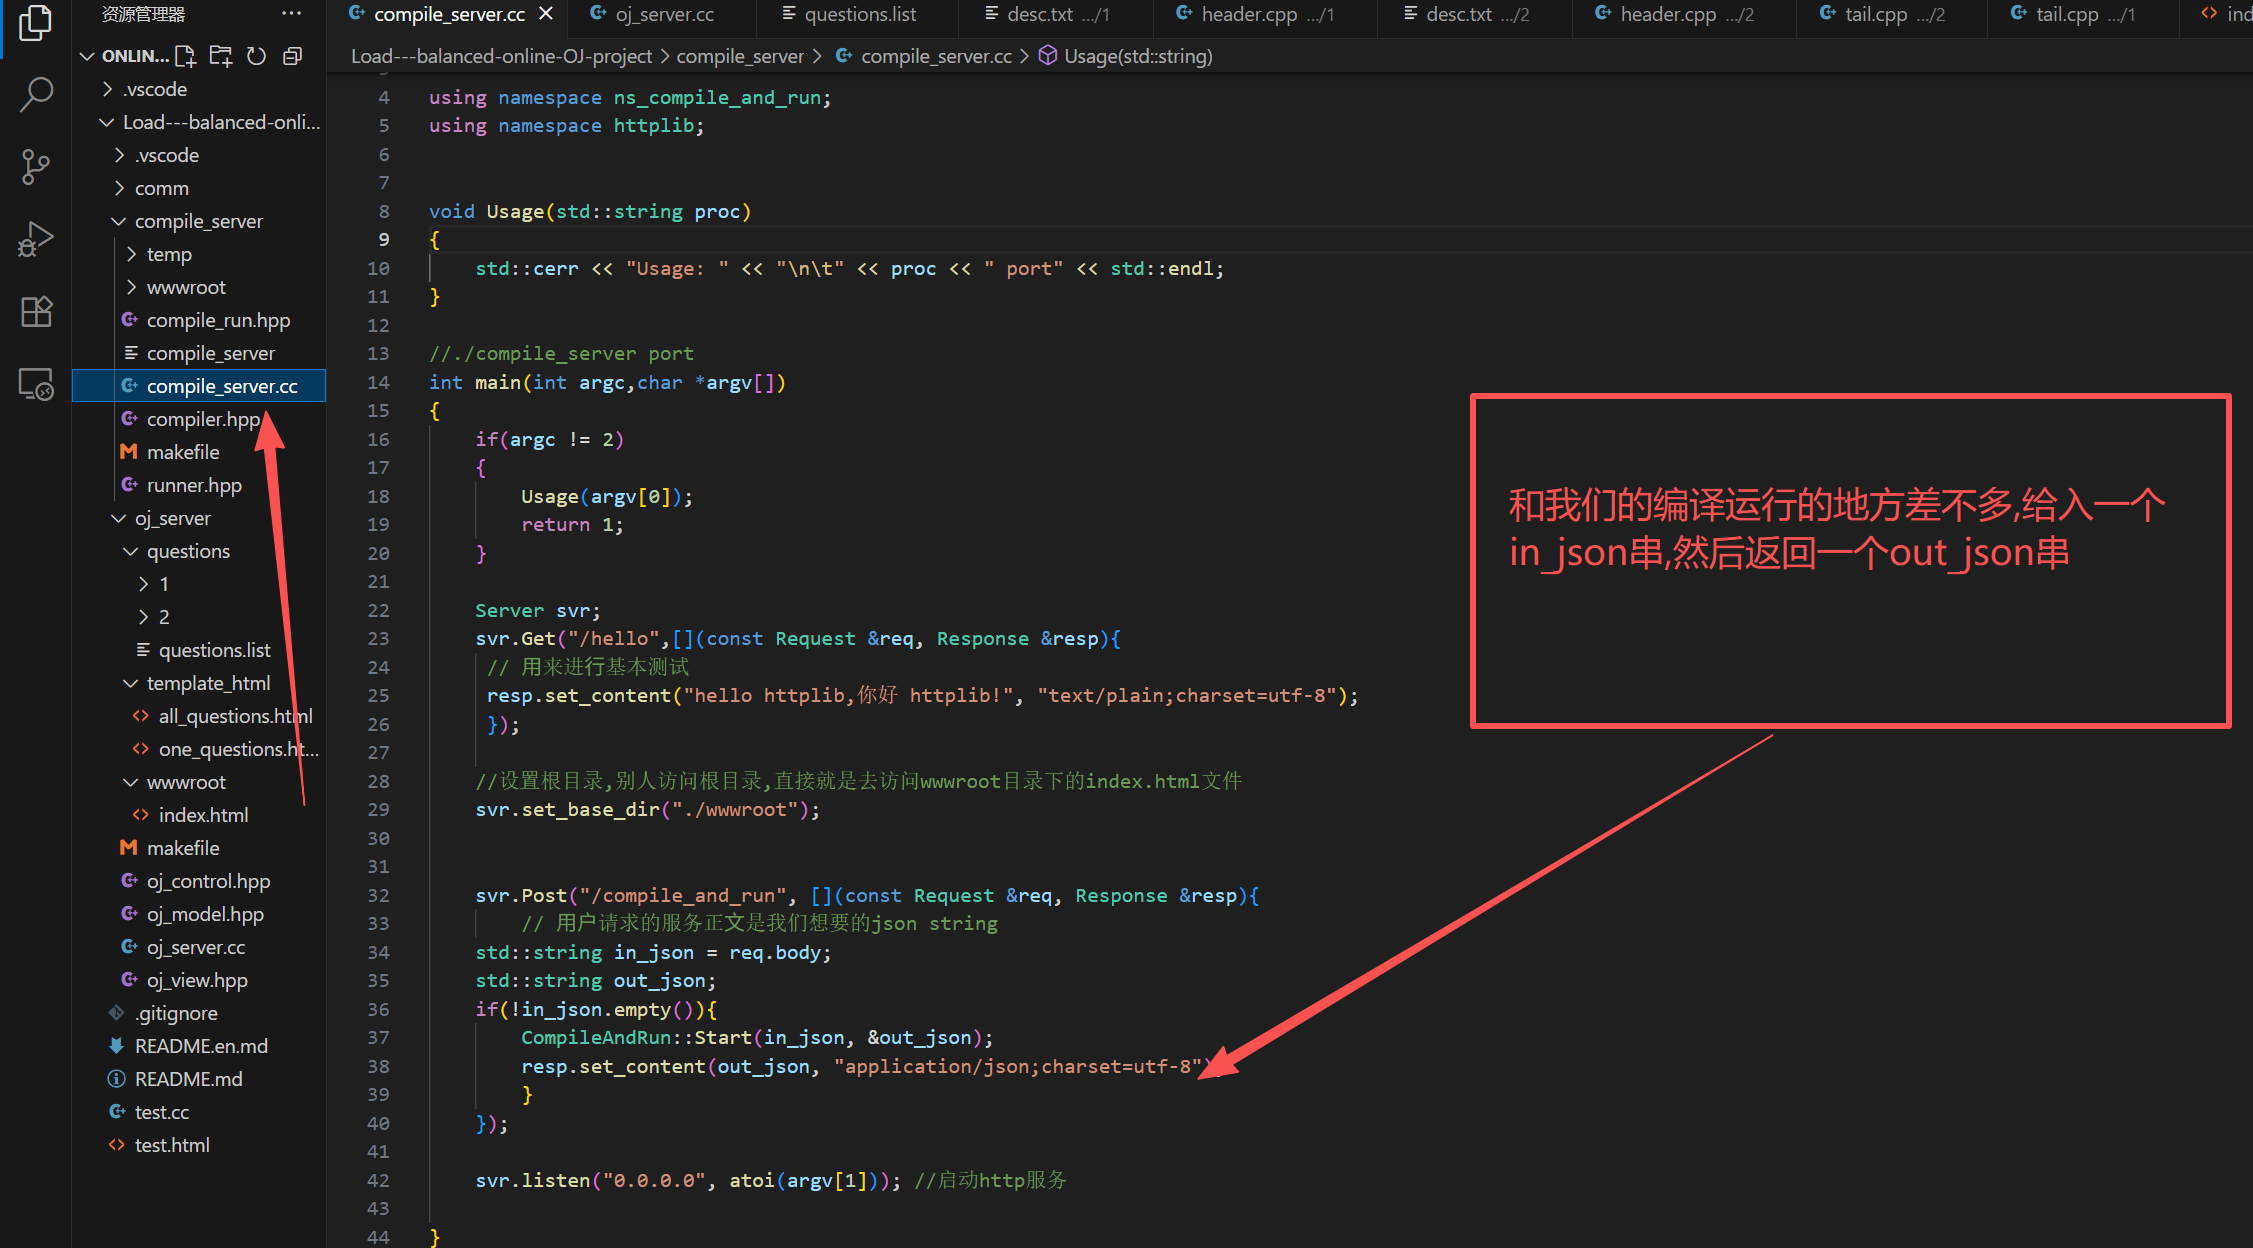
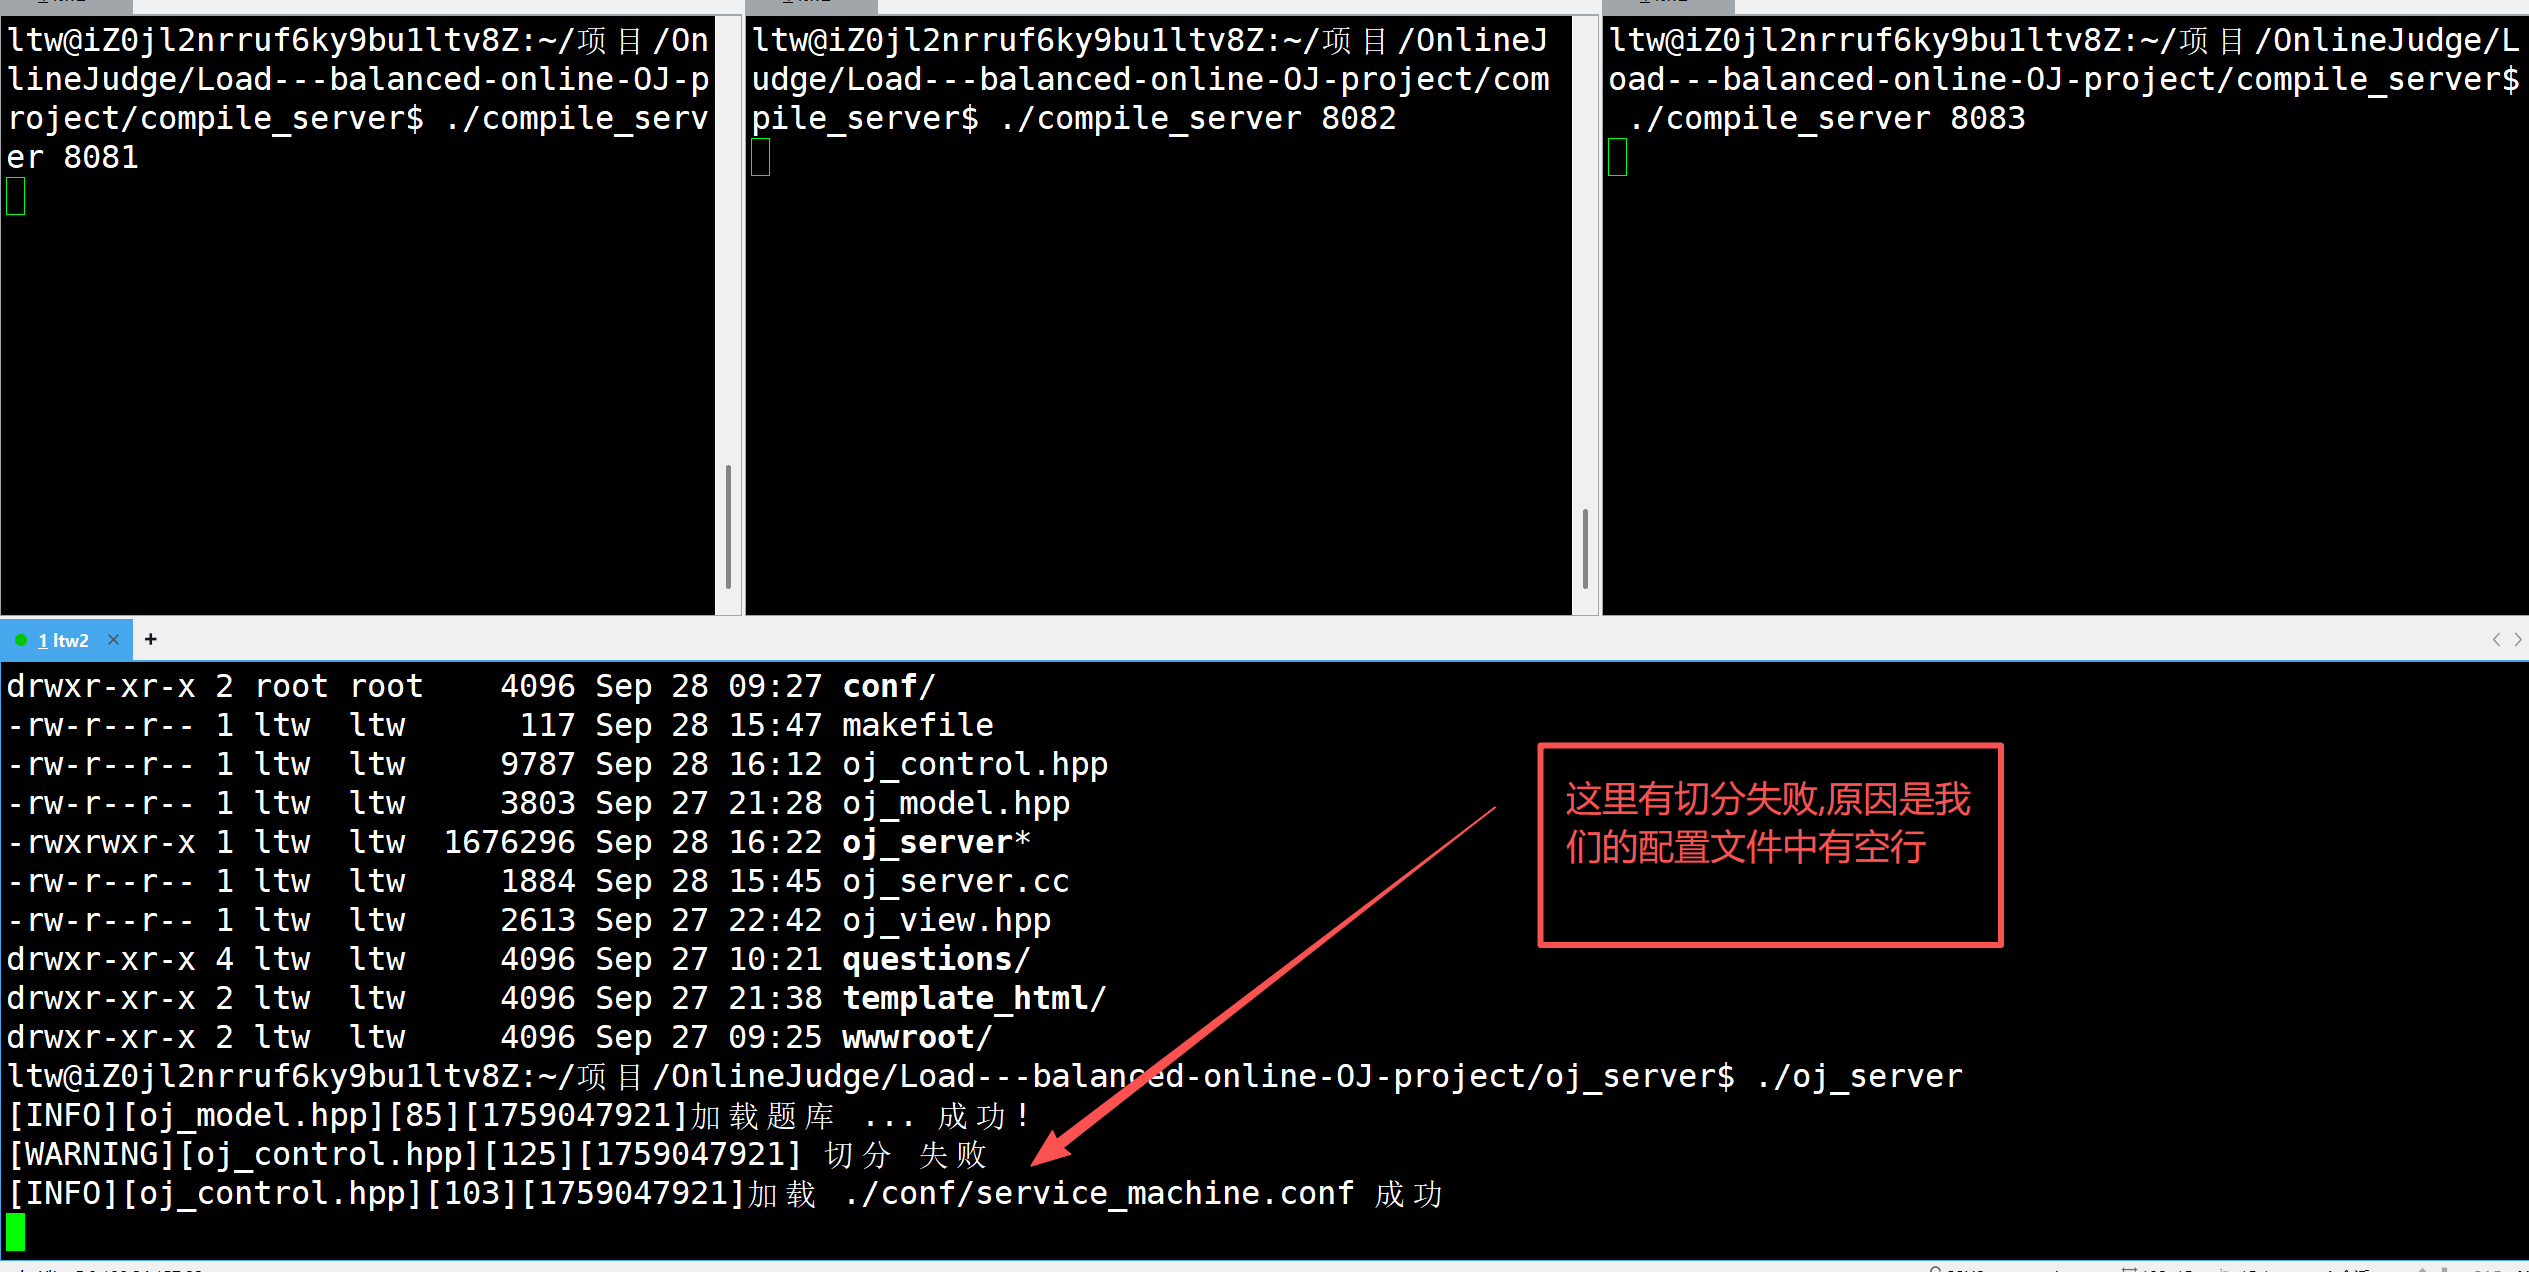
三.postman测试
首先先进行编译
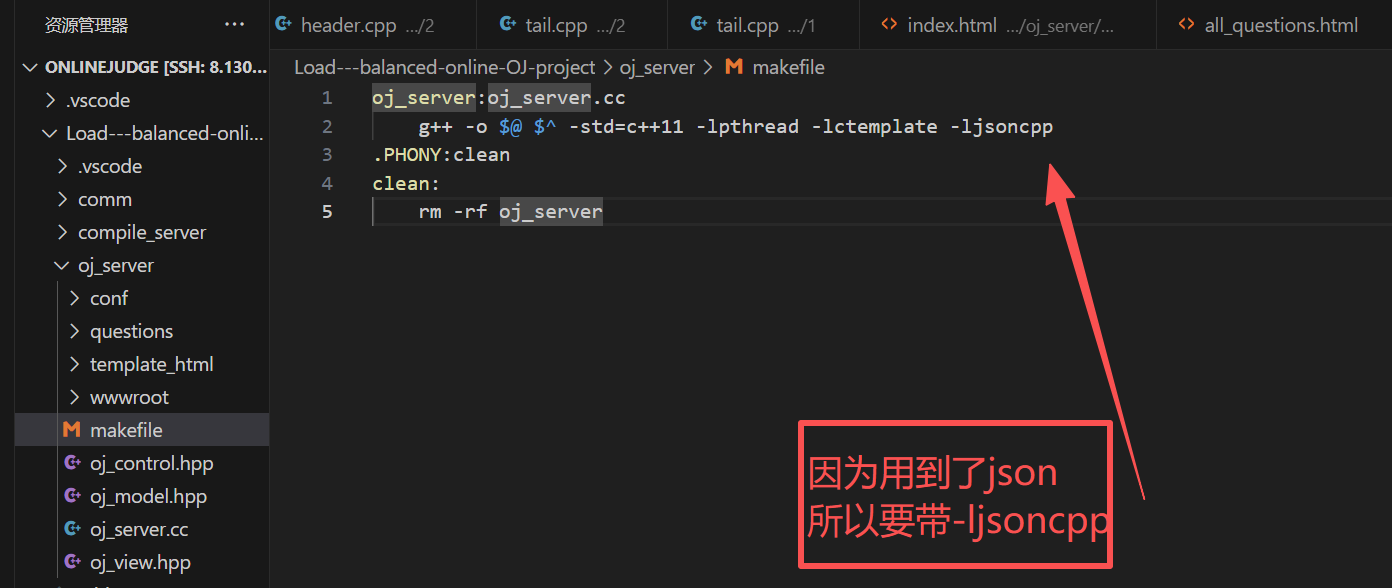
我们要将oj_server和compiler_server都要编译好


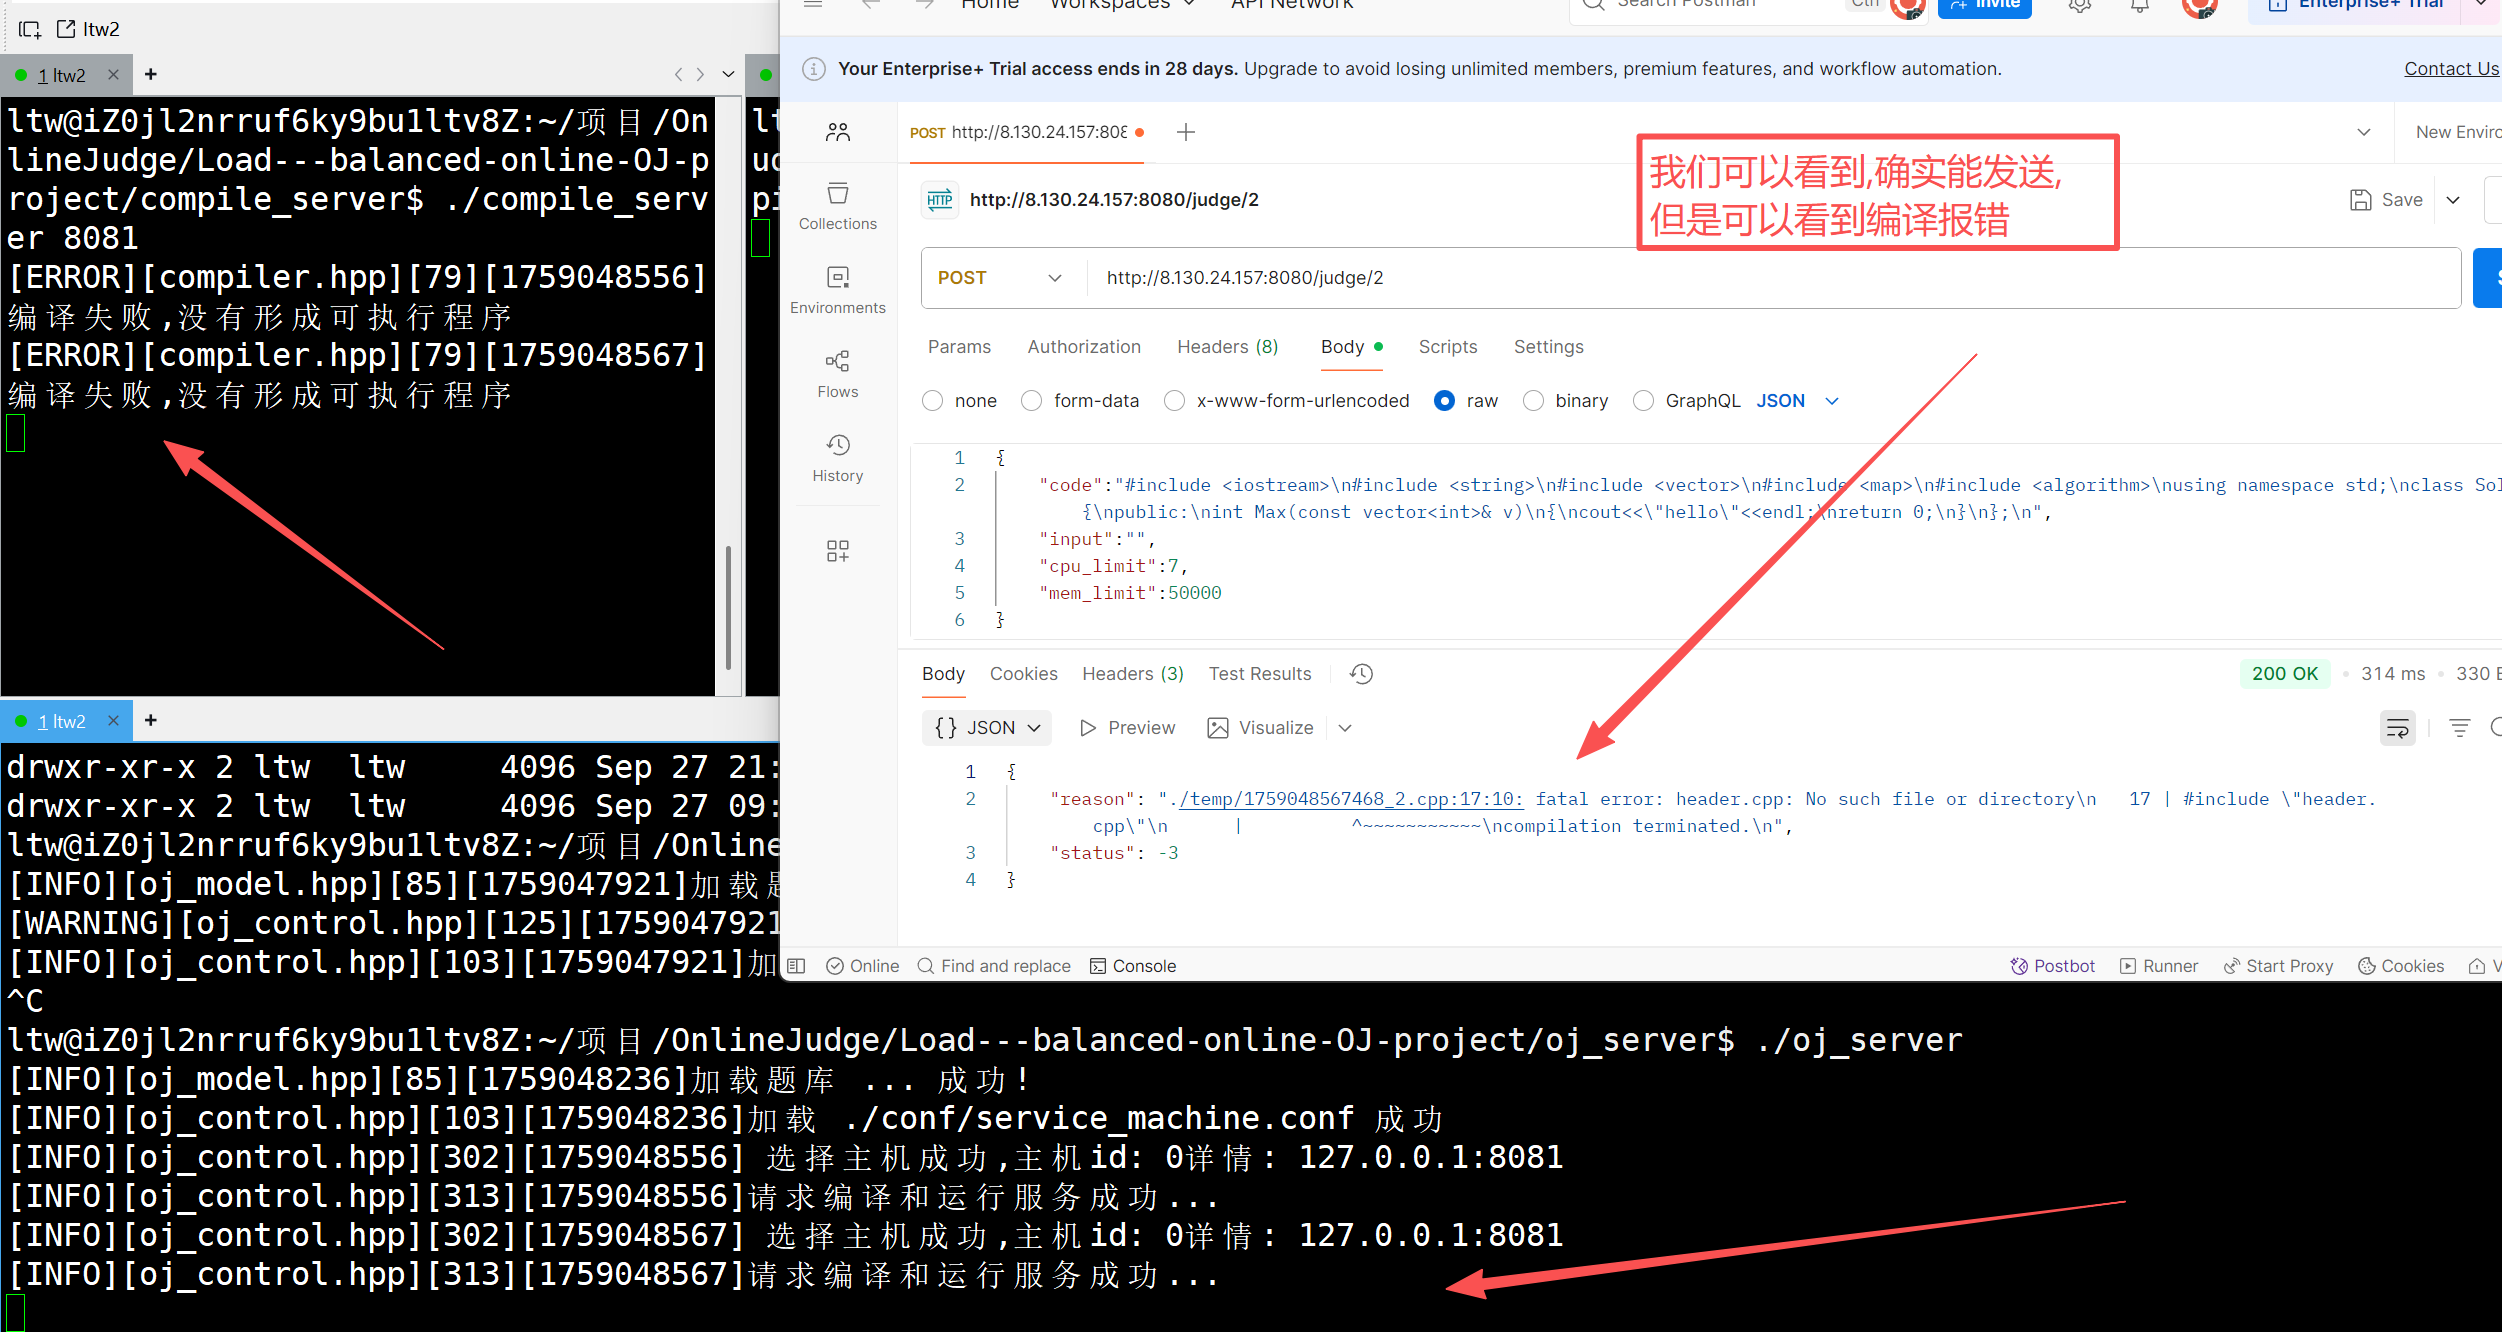
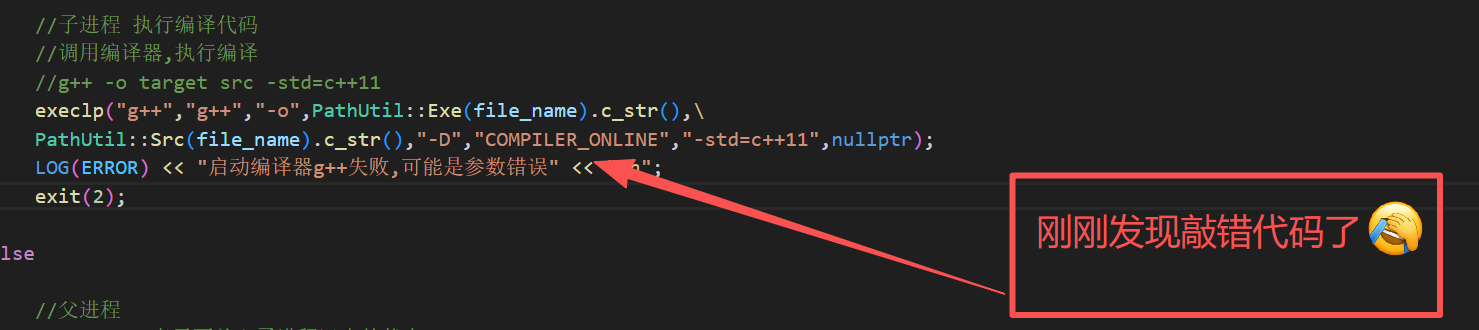
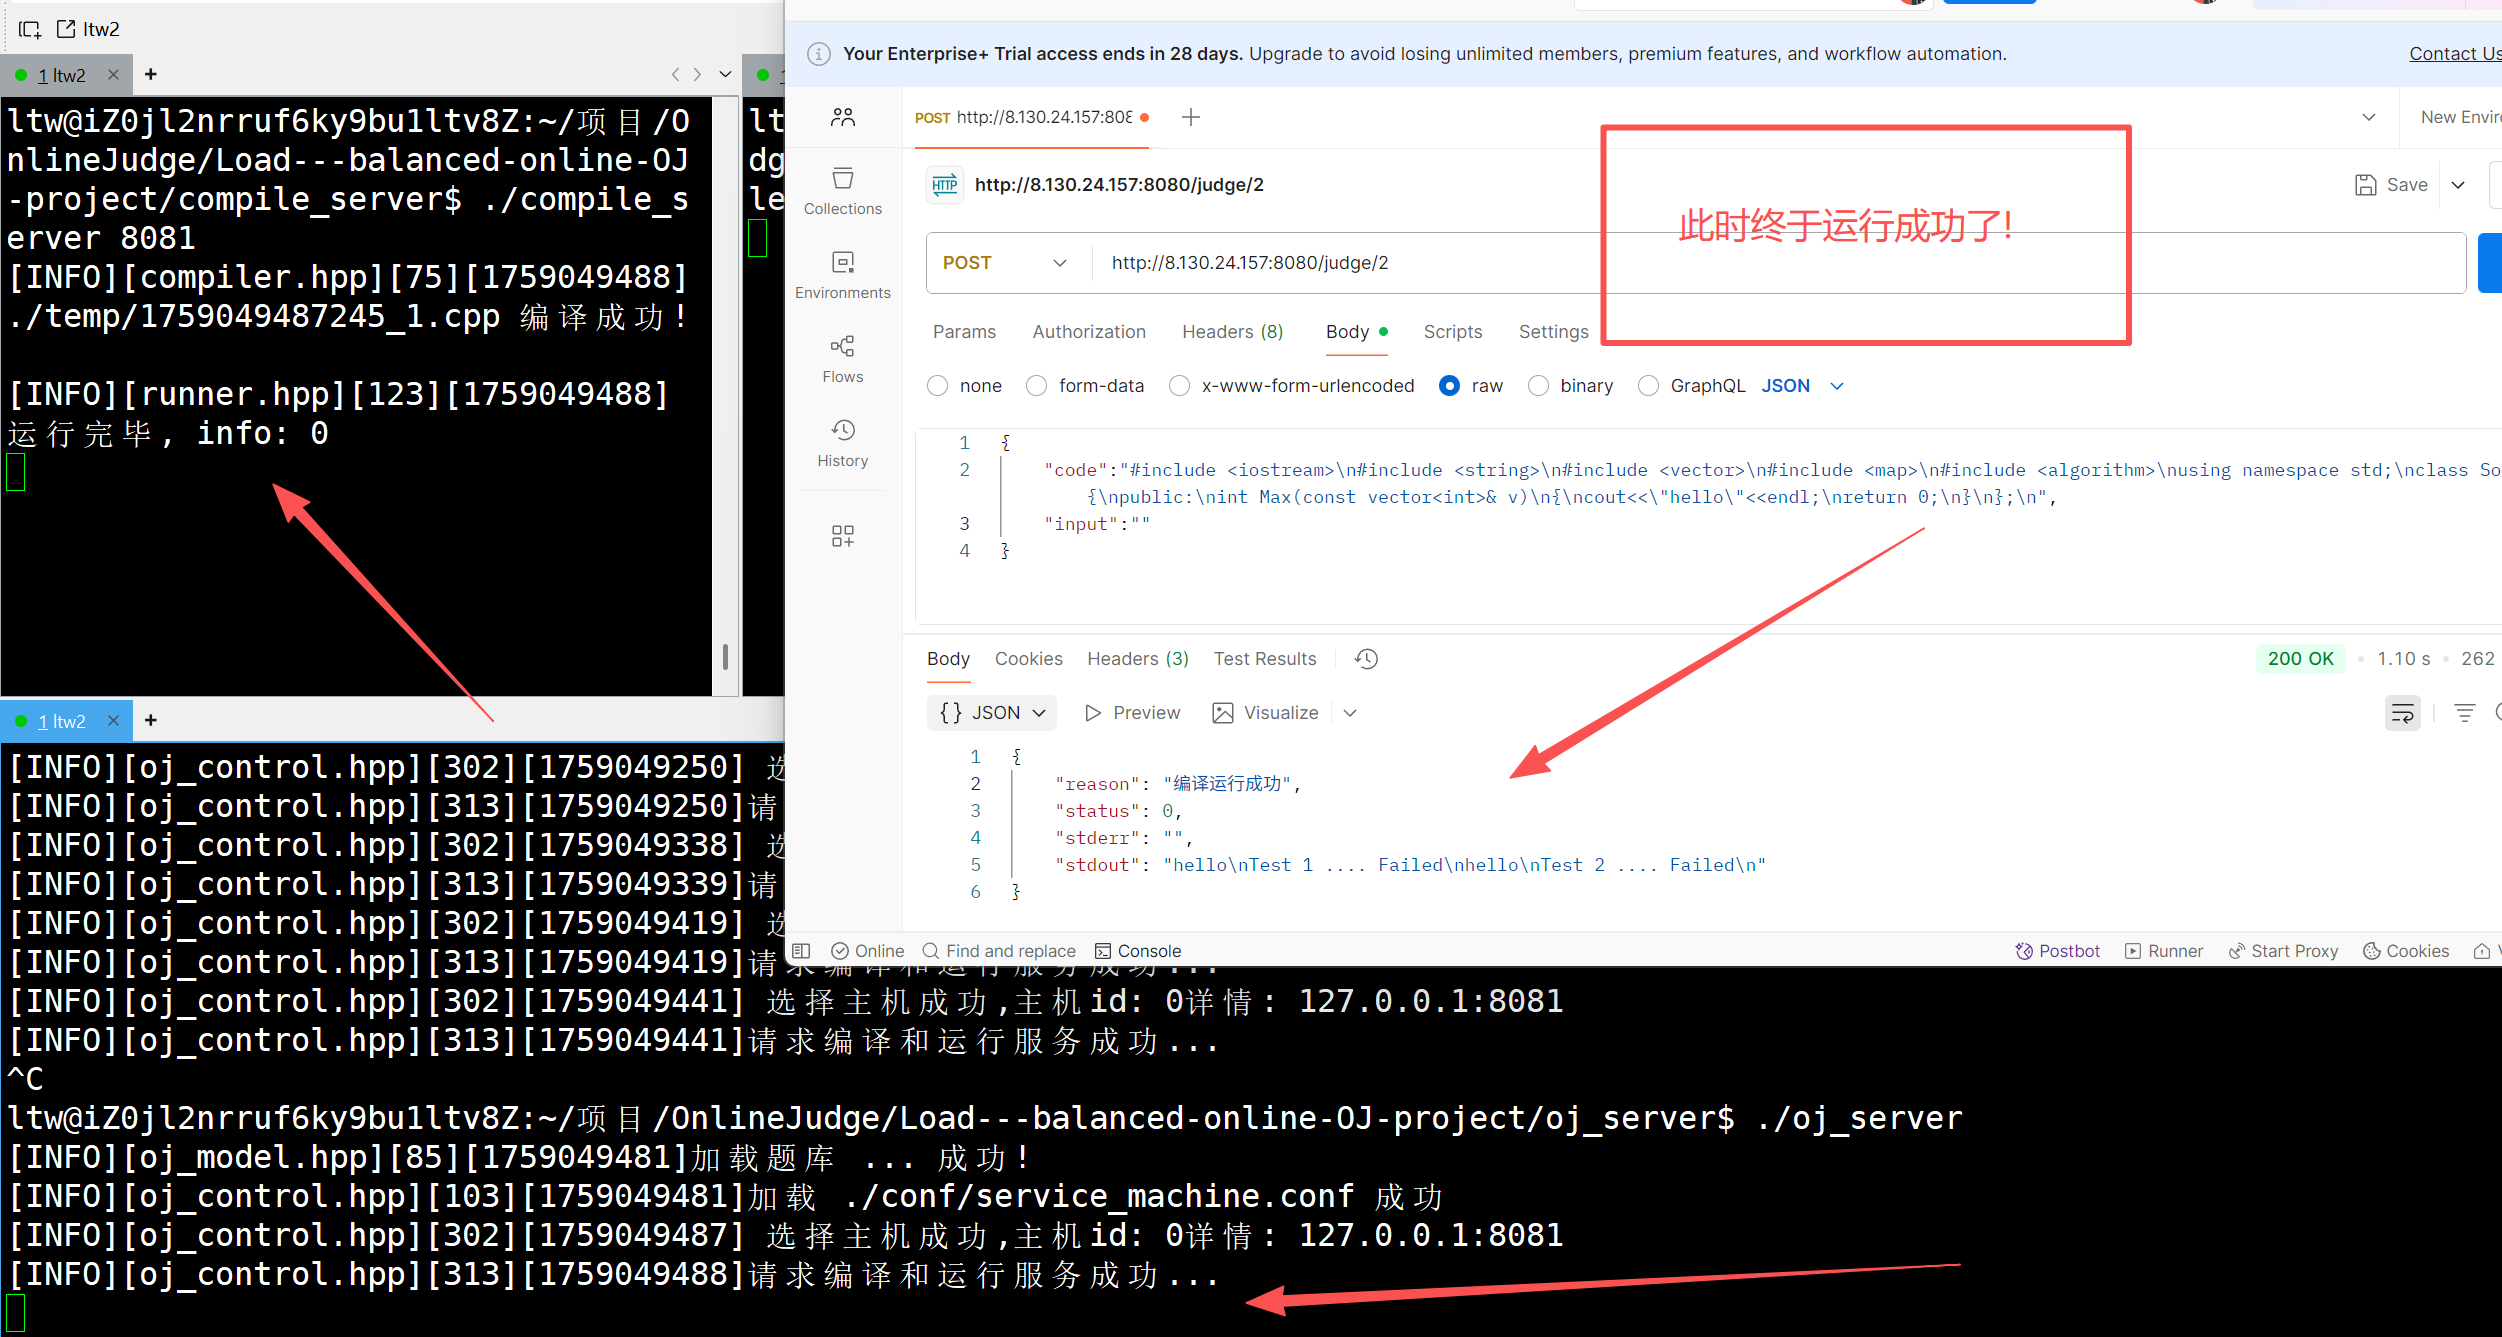
但是由于postman一次只能发送一条数据,还没办法检测我们的服务的抗压能力(后续用前端测试)
四.前端代码的编写
后端开发需要关系前端页面吗?不需要! 后续大家不想写,就直接复制粘贴即可
1.任何项目都要有前后端
2.后端虽然不关心页面,但是需要了解,前后端是如何进行交互的
一般编写页面的时候,需要三剑客:html , css , js
后续笔试面试,后续工作,后端不用管前端
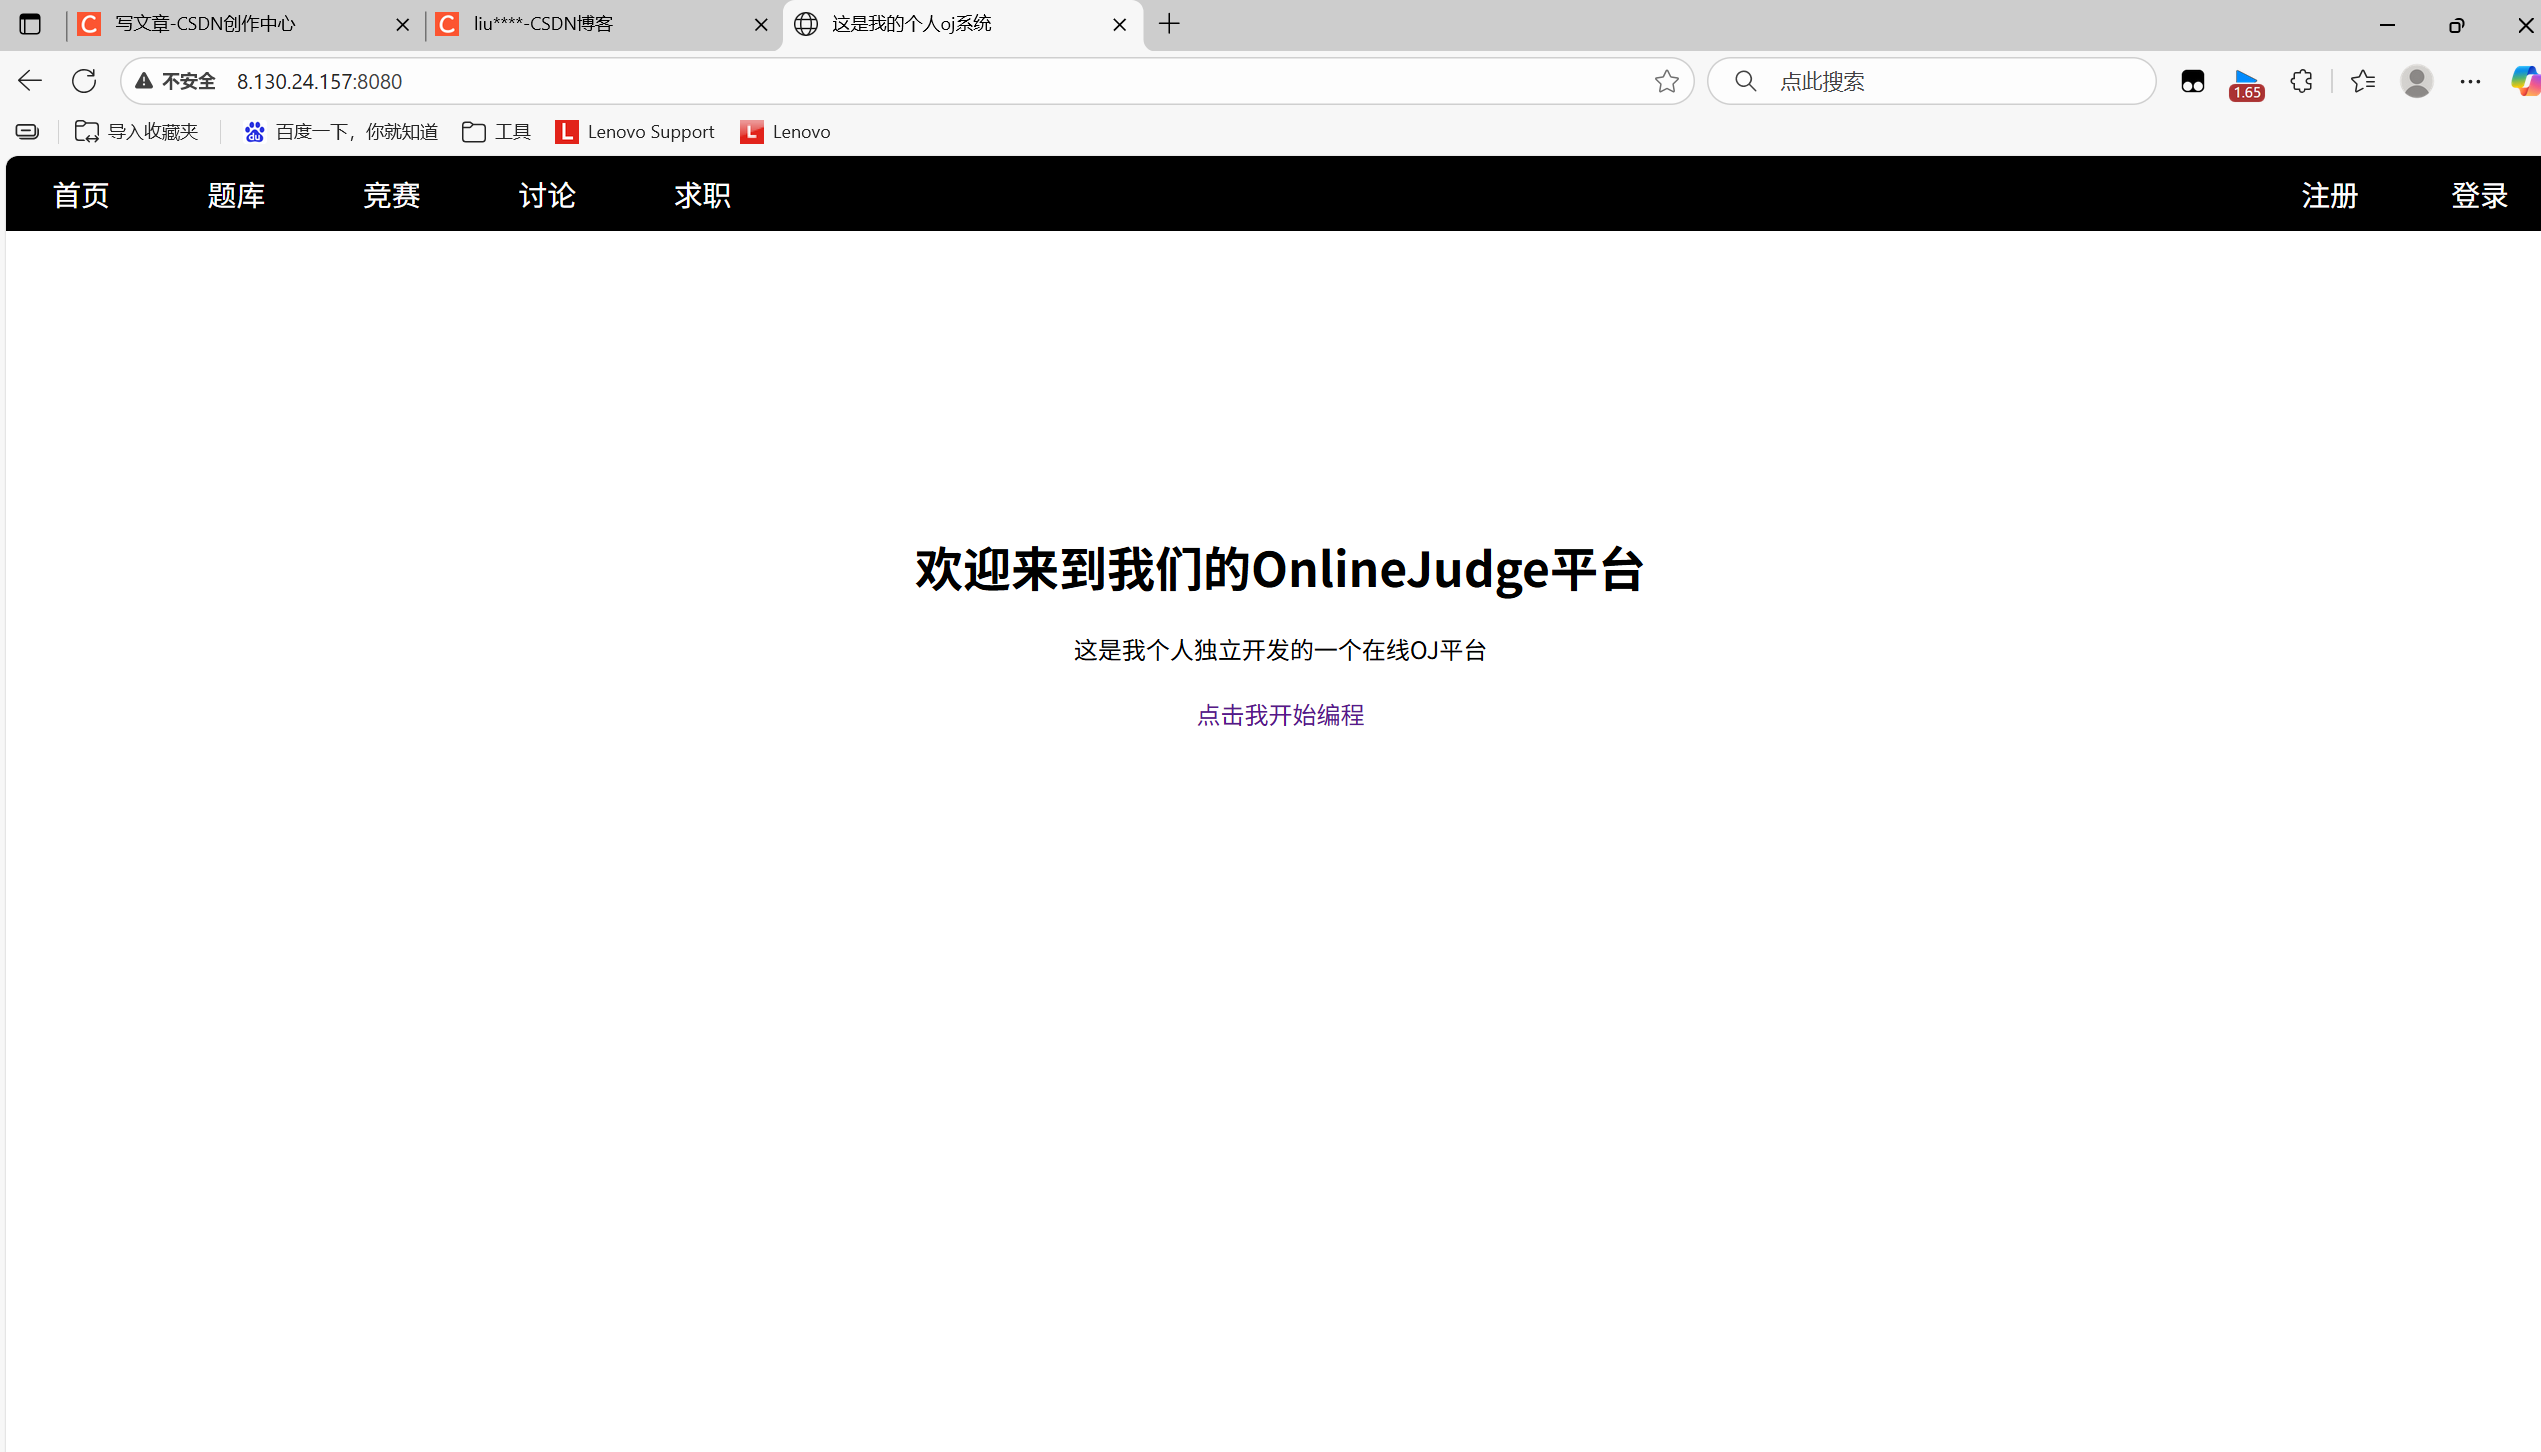
4.1丐版的首页
所谓对样式进行调整,本质上是对html中的标签样式进行调整
对html中的标签样式进行调整
1.选中标签
2.设置样式
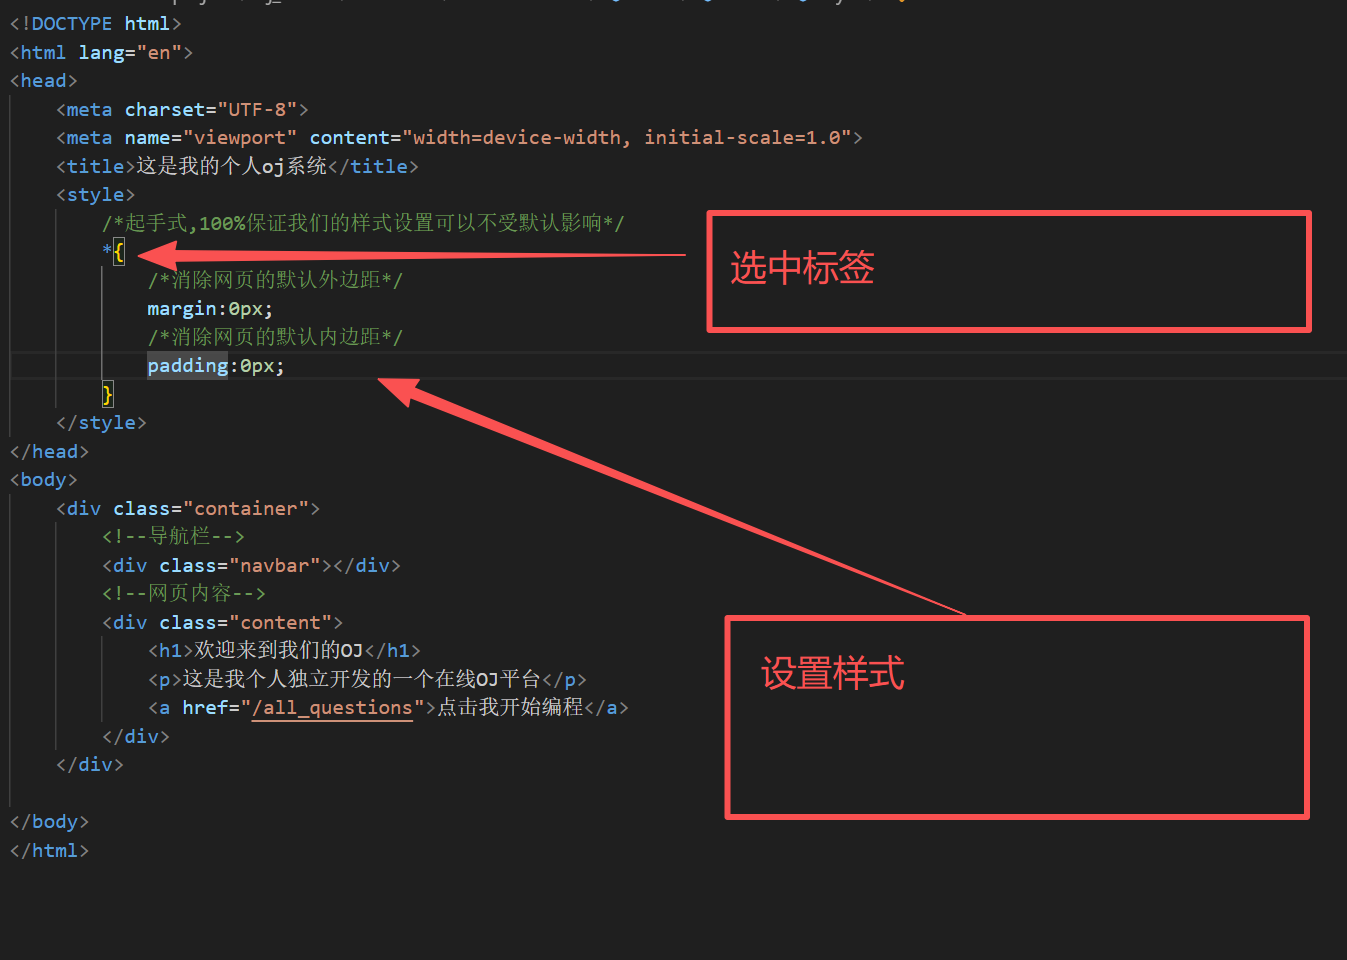
*号,表示通配符,下面的全部都会使用到这个
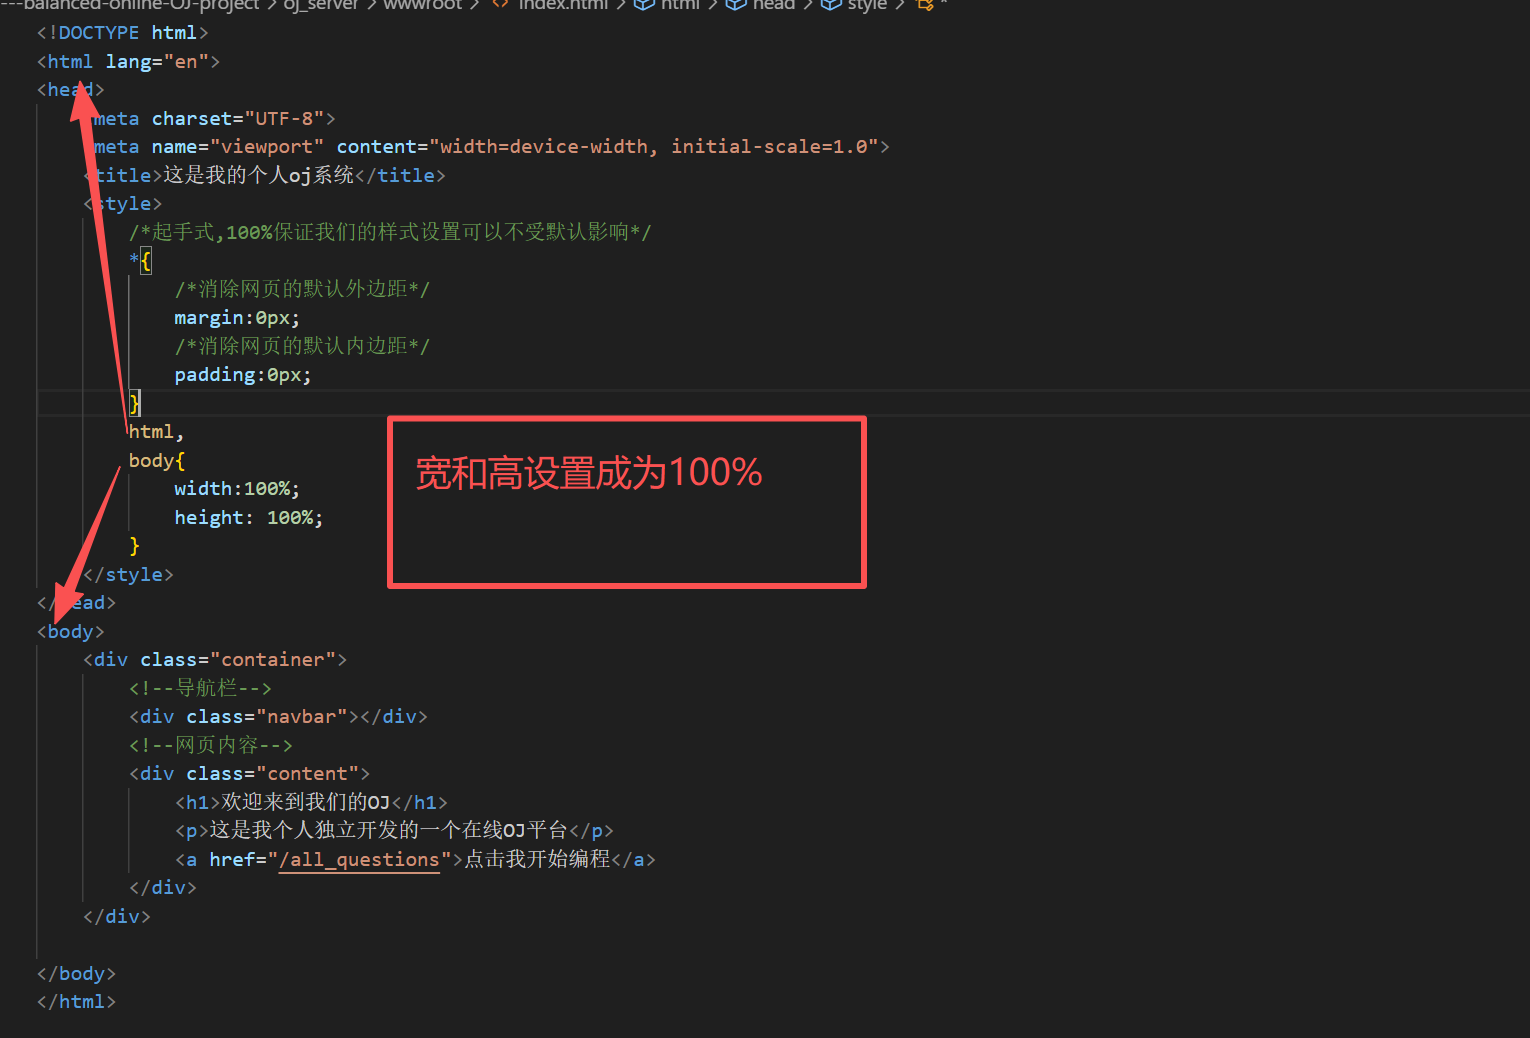
页面效果图:
代码实现:
html
<!DOCTYPE html>
<html lang="en">
<head>
<meta charset="UTF-8">
<meta name="viewport" content="width=device-width, initial-scale=1.0">
<title>这是我的个人oj系统</title>
<style>
/*起手式,100%保证我们的样式设置可以不受默认影响*/
*{
/*消除网页的默认外边距*/
margin:0px;
/*消除网页的默认内边距*/
padding:0px;
}
html,
body{
width:100%;
height: 100%;
}
.container .navbar{
width: 100%;
height: 50px;
background-color: black;
/* 给父级标签设置overflow,取消后续float带来的影响 */
overflow: hidden;
}
.container .navbar a{
/* 设置a标签是行内块元素 */
display: inline-block;
/* 设置a标签的宽度 */
width: 100px;
/* 设置字体颜色和大小 */
color: white;
font-size: larger;
/* 设置文字高度 */
line-height: 50px;
/* 去掉a标签的下划线 */
text-decoration: none;
/* 设置a标签的文字居中 */
text-align: center;
}
/*设置鼠标事件*/
.container .navbar a:hover{
background-color: green;
}
.container .navbar .login{
float: right;
}
.container .navbar .Register{
float: right;
}
.container .content{
/*设置标签的宽度,content内部只用800个像素点*/
width:800px;
/*用来调试*/
/* background-color: #ccc; */
/* 整体居中 上下,左右*/
margin: 0px auto;
/* 文字居中 */
text-align: center;
/*设置上外边距*/
margin-top: 200px;
}
.container .content .font_{
/*设置标签为块级原始,独占一行,可以设置高宽等属性*/
display: block;
/* 设置每一行的上外边距 */
margin-top: 20px;
/* 去掉a标签的下划线 */
text-decoration: none;
/* 设置字体大小 */
/* font-size: larger; */
}
</style>
</head>
<body>
<div class="container">
<!--导航栏,功能不实现-->
<div class="navbar">
<a href="#">首页</a>
<a href="/all_questions">题库</a>
<a href="#">竞赛</a>
<a href="#">讨论</a>
<a href="#">求职</a>
<a class="Register"href="#">登录</a>
<a class="login"href="#">注册</a>
</div>
<!--网页内容-->
<div class="content">
<h1 class="font_">欢迎来到我们的OnlineJudge平台</h1>
<p class="font_">这是我个人独立开发的一个在线OJ平台</p>
<a class="font_" href="/all_questions">点击我开始编程</a>
</div>
</div>
</body>
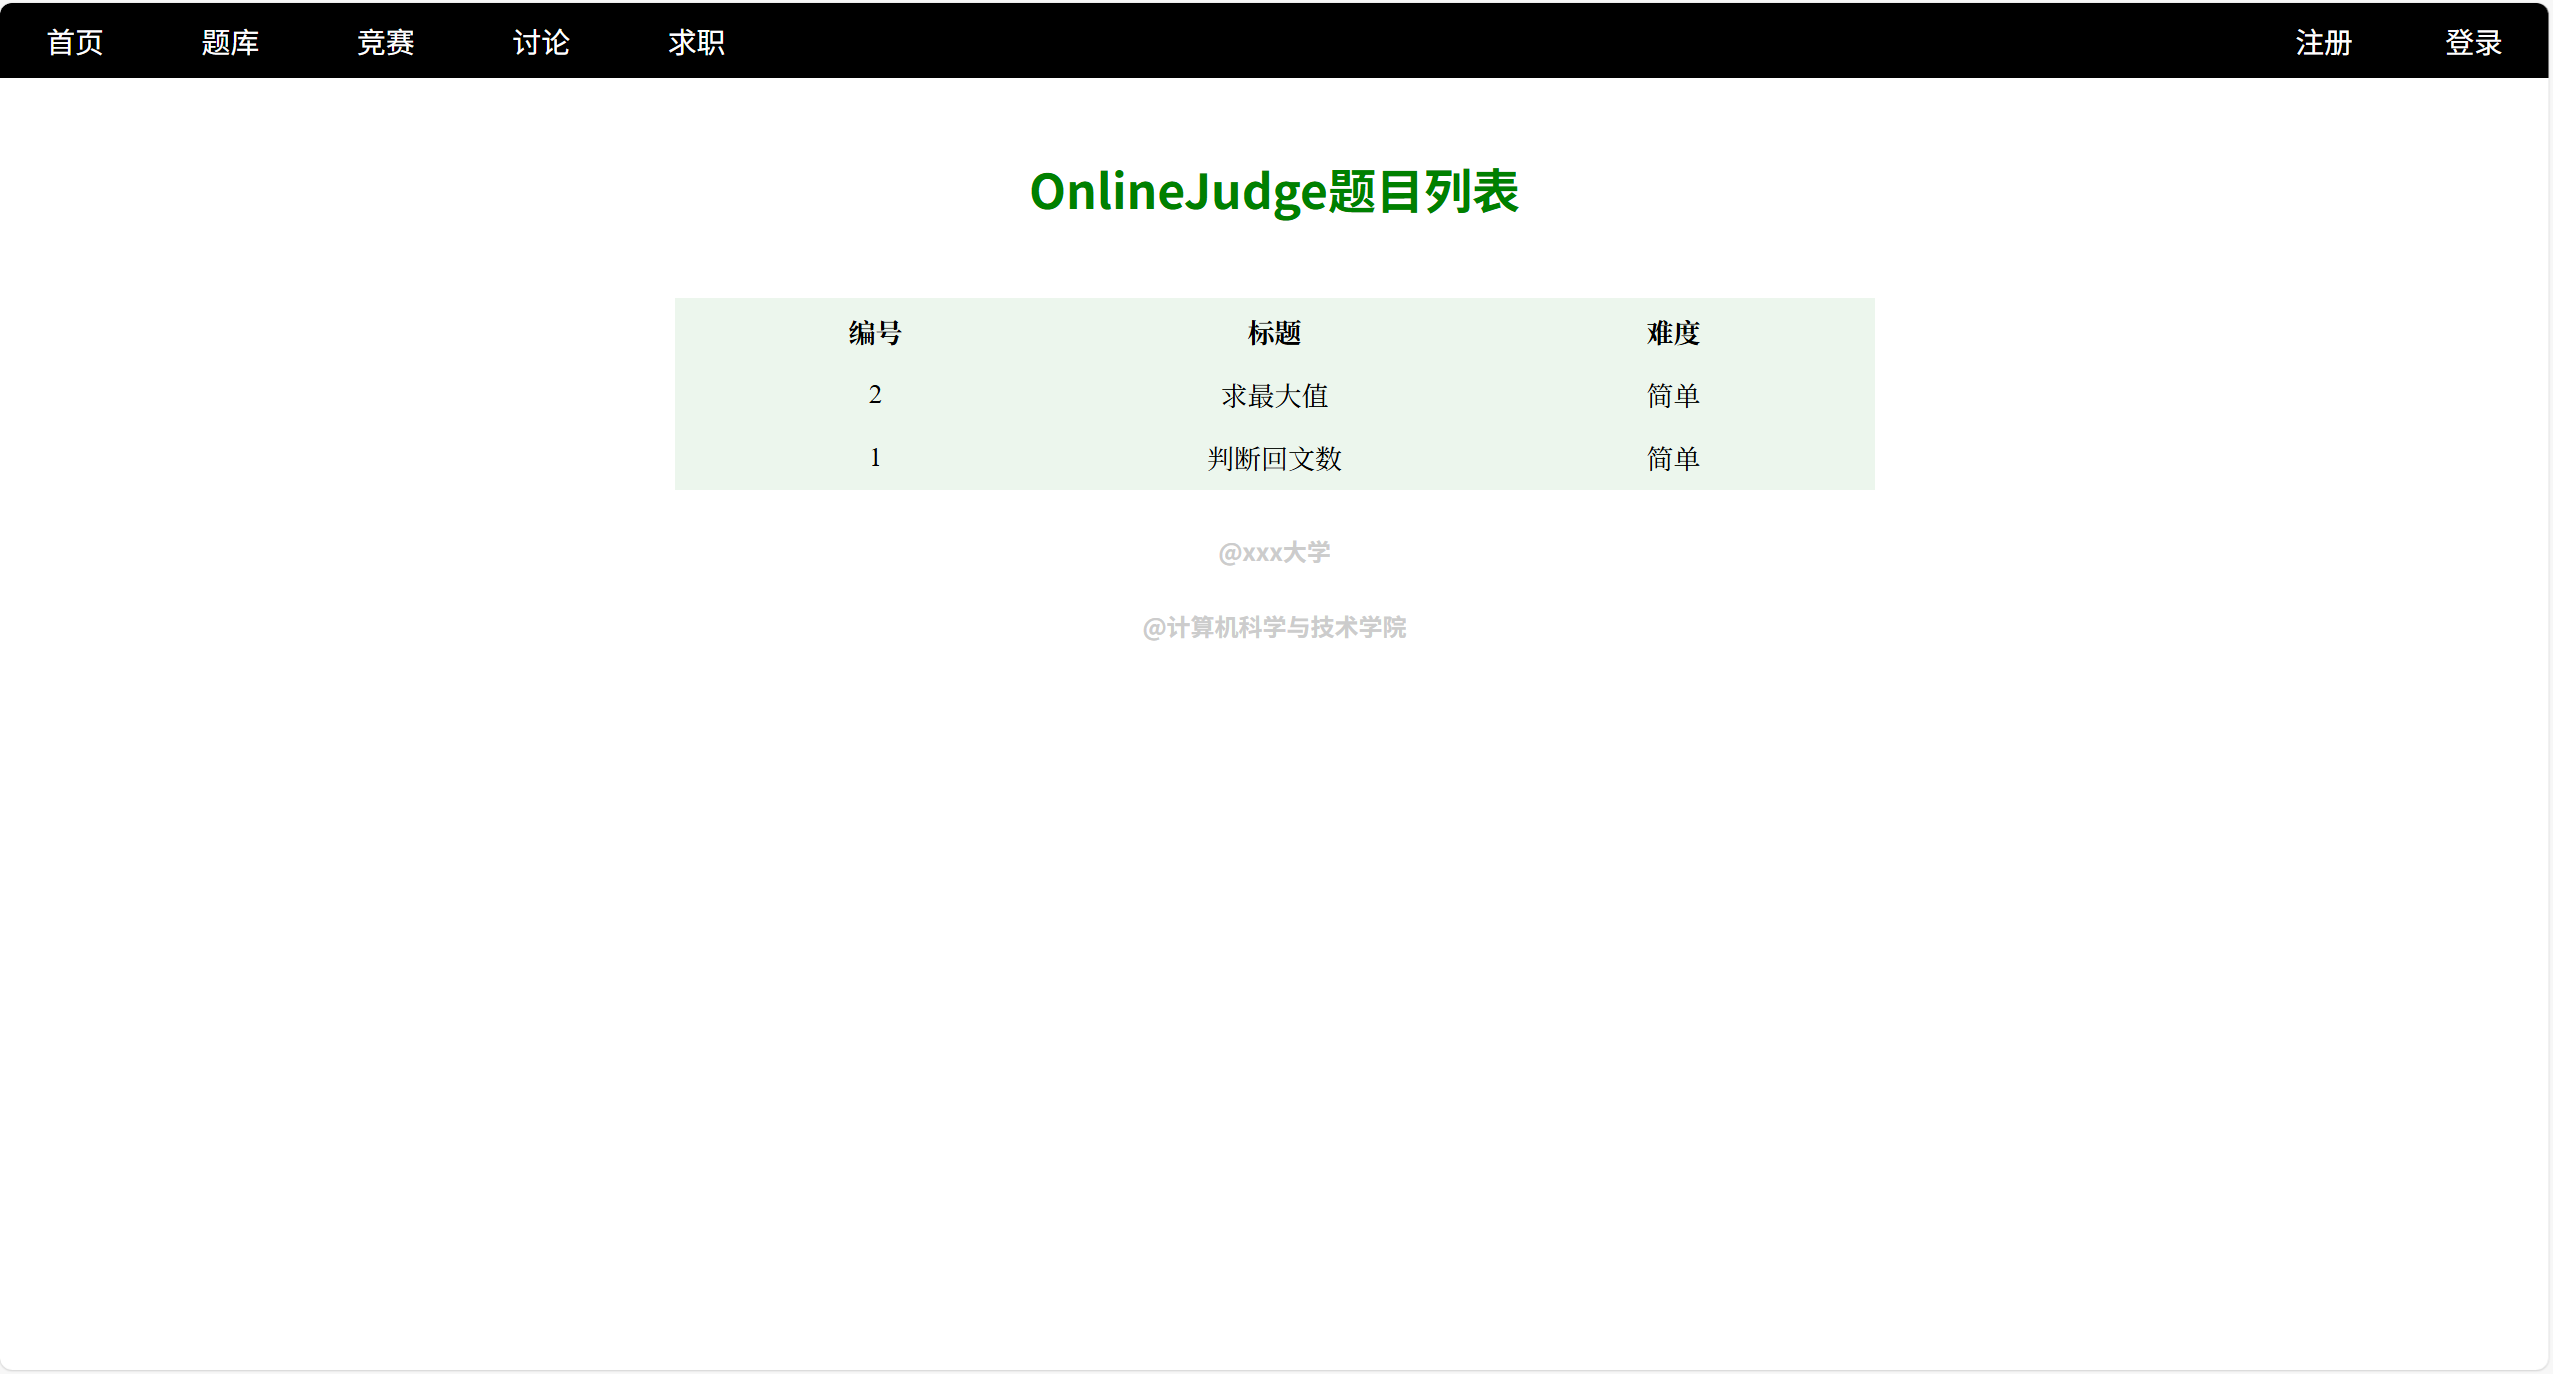
</html>4.2所有题目的列表
ctempalte渲染的网页,不能直接刷新,要重新启动程序,才能进行显示
网页效果
html
<!DOCTYPE html>
<html lang="en">
<head>
    <meta charset="UTF-8">
    <meta name="viewport" content="width=device-width, initial-scale=1.0">
    <title>在线OJ-题目列表</title>
    <style>
        /*起手式,100%保证我们的样式设置可以不受默认影响*/
        *{
            /*消除网页的默认外边距*/
            margin:0px;
            /*消除网页的默认内边距*/
            padding:0px;
        }
        html,
        body{
            width:100%;
            height: 100%;
        }
        .container .navbar{
            width: 100%;
            height: 50px;
            background-color: black;
            /* 给父级标签设置overflow,取消后续float带来的影响 */
            overflow: hidden;
        }
        .container .navbar a{
            /* 设置a标签是行内块元素 */
            display: inline-block;
            /* 设置a标签的宽度 */
            width: 100px;
            /* 设置字体颜色和大小 */
            color: white;
            font-size: larger;
            /* 设置文字高度 */
            line-height: 50px;
            /* 去掉a标签的下划线 */
            text-decoration: none;
            /* 设置a标签的文字居中 */
            text-align: center;
        }
        /*设置鼠标事件*/
        .container .navbar a:hover{
            background-color: green;
        }
        .container .navbar .login{
            float: right;
        }
        .container .navbar .Register{
            float: right;
        }

        .container .question_list{
            padding-top: 50px;
            width:800px;
            height:100%;
            margin:0px auto;
            /* background-color: #ccc; */
            text-align: center;
        }
        .container .question_list table{
            width:100%;
            font-size: larger;
            font-family:'Lucida Sans', 'Lucida Sans Regular', 'Lucida Grande', 'Lucida Sans Unicode', Geneva, Verdana, sans-serif;
            margin-top: 50px;
            background-color: rgb(236,246,237);
        }
        .container .question_list h1{
            color:green;
        }
        .container .question_list table .item{
            width: 100px;
            height: 40px;
            font-size: large;
            font-family: 'Times New Roman', Times, serif;
        }
        .container .question_list table .item a{
            text-decoration: none;
            color: black;
        }
        .container .question_list table .item a:hover{
            color: blue;
            font-size: larger;
            text-decoration: underline;
        }

        .container .footer{
            width: 100%;
            height: 50px;
            text-align: center;
            line-height: 50px;
            color:#ccc;
            margin-top: 15px;
        }
    </style>
</head>
<body>
    <div class="container">
        <div class="navbar">
            <a href="/">首页</a>
            <a href="/all_questions">题库</a>
            <a href="#">竞赛</a>
            <a href="#">讨论</a>
            <a href="#">求职</a>
            <a class="Register"href="#">登录</a>
            <a class="login"href="#">注册</a>
        </div>
        <div class="question_list">
            <h1>OnlineJudge题目列表</h1>
            <table>
                <tr>
                    <th class="item">编号</th>
                    <th class="item">标题</th>
                    <th class="item">难度</th>
                </tr>
                {{#question_list}}
                <tr>
                    <td class="item"><a href="/questions/{{number}}">{{number}}</a></td>
                    <td class="item"><a href="/questions/{{number}}">{{title}}</a></td>
                    <td class="item"><a href="/questions/{{number}}">{{star}}</a></td>
                </tr>
                {{/question_list}}
            </table>
        </div>
        <div class="footer">
            <h4>@xxx大学</h4>
            <h4>@计算机科学与技术学院</h4>
        </div>
    </div>
</body>
</html>
4.3指定题目的编写代码的页面 + 代码提交
代码编译器ace插件,直接引入就行
<script src="https://cdnjs.cloudflare.com/ajax/libs/ace/1.2.6/ace.js"type="text/javascript"charset="utf-8"></script>
<script src="https://cdnjs.cloudflare.com/ajax/libs/ace/1.2.6/extlanguage_tools.js"type="text/javascript"charset="utf-8">
</script>
html
<!DOCTYPE html>
<html lang="en">
<head>
    <meta charset="UTF-8">
    <meta name="viewport" content="width=device-width, initial-scale=1.0">
    <title>{{number}}.{{title}}</title>
    <!-- 引⼊ACE插件 -->
    <!-- 官⽹链接:https://ace.c9.io/ -->
    <!-- CDN链接:https://cdnjs.com/libraries/ace -->
    <!-- 使⽤介绍:https://www.iteye.com/blog/ybc77107-2296261 -->
    <!-- https://justcode.ikeepstudying.com/2016/05/ace-editor-%E5%9C%A8%E7%BA%BF%E4%BB%A3%E7%A0%81%E7%BC%96%E8%BE%91%E6%9E%81%E5%85%B6%E9%AB%98%E4%BA%AE/ -->
    <!-- 引入ACE CDN -->
    <script src="https://cdnjs.cloudflare.com/ajax/libs/ace/1.2.6/ace.js" type="text/javascript"charset="utf-8"></script>
    <script src="https://cdnjs.cloudflare.com/ajax/libs/ace/1.2.6/extlanguage_tools.js"type="text/javascript"charset="utf-8"></script>
    <style>
        * {
            margin: 0;
            padding: 0;
        }
        html,
        body {
            width: 100%;
            height: 100%;
        }
        div .ace_editor{
            width: 100%;
            height: 600px;
        }
    </style>
</head>
<body>
    <div class="navbar"></div>
    <div class="part1">
        <div class="left_desc">
            <h4>{{number}}.{{title}}.{{star}}</h4>
            <pre>{{desc}}</pre>
        </div>
        <div class="right_code">
            <pre id="code" class="ace_editor"><textarea class="ace_text-input">{{pre_code}}</textarea></pre>
        </div>
    </div>
    <div class="result">
        <button></button>
    </div>


    <script>
        //初始化对象
        editor = ace.edit("code");
        //设置⻛格和语⾔(更多⻛格和语⾔,请到github上相应⽬录查看)
        // 主题⼤全:http://www.manongjc.com/detail/25-cfpdrwkkivkikmk.html
        editor.setTheme("ace/theme/monokai");
        editor.session.setMode("ace/mode/c_cpp");
        // 字体⼤⼩
        editor.setFontSize(16);
        // 设置默认制表符的⼤⼩:
        editor.getSession().setTabSize(4);
        // 设置只读(true时只读,⽤于展⽰代码)
        editor.setReadOnly(false);
        // 启⽤提⽰菜单
        ace.require("ace/ext/language_tools");

        editor.setOptions({
            enableBasicAutocompletion: true,
            enableSnippets: true,
            enableLiveAutocompletion: true
        });
    </script>
</body>
</html>
未完待续