提示:本文内容仅供学习参考。Author: Jonnie Walker CGC
目录
前言
你好! 本文将向你展示NS4168单声道D 类音频功率放大器的基本使用!如果你考虑到成本此方案也是可以的。
建议在此之前你的了解什么I2S总线知识点,这里就不详细说明。我们将从硬件到软件向你介绍NS4168的具体使用步骤。具体内容往下看吧!
一、NS4168?
NS4168 是一款支持 I2S 数字音频信号输入且输出具有防失真功能的单声道 D 类音频功率放大器。 内置有数模转换器(DAC)和多级 D 类调制器,具备出色的音频性能。用 NS4168 的 I2S 数字音频串行接口传送至放大器,可以显著降低噪声源对所传输音频的影响。另外还避免了 MCU 主控芯片内置音频解码 DAC 所带来的噪声,最终获得较高的信噪比以及较小失真度。其闭环数字输入设计保留了数字放大器的优势,同时又具有极佳的 PSRR 和音频性能。与其它 D 类架构相比,采用扩频脉冲密度调制可实现较低的 EMI 干扰和最高的音频效率。
特性:
1.输出功率 Po:2.5W(VDD=5V, RL=4Ω)
2.工作电压范围:3.0V~5.5V
3.0.2%THD+N(VDD=5V, RL=4Ω, Po=1W)
4.80%的效率(VDD=5V, RL=4Ω, Po=2.5W)
5.默认 I2S 串行数字音频输入接口
6.支持宽范围采样速率:8kHz 至 96kHz
7.左右声道可选,通过 CTRL 管脚电平设置
8.无需输出滤波器的 Class D 放大器,输出防失真 NCN 功能
9.优异的"上电,掉电"噪声抑制,过流保护、过热保护、欠压保护,采用 ESOP8 封装
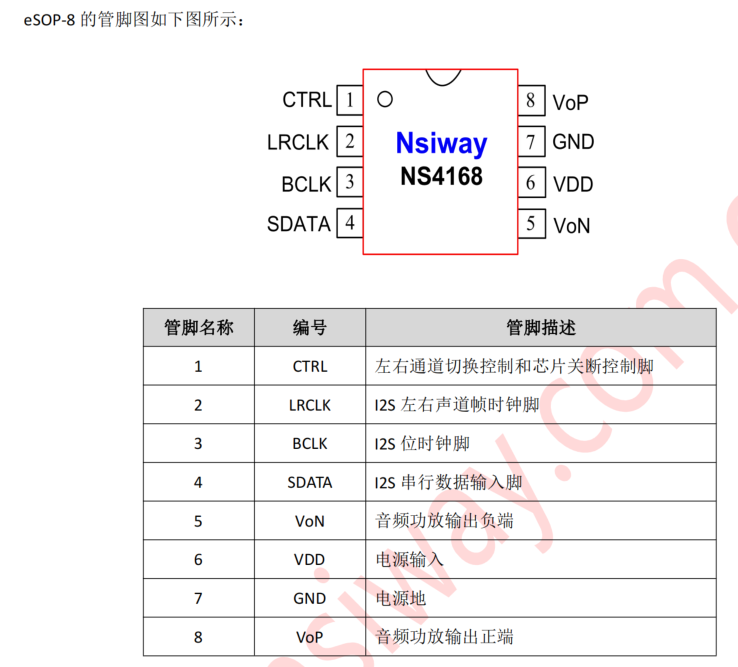
图1
二、测试步骤
1.硬件
1.ESP32C3开发板
2.NS4168模块
测试环境:ArduinoIDE-2.3.5
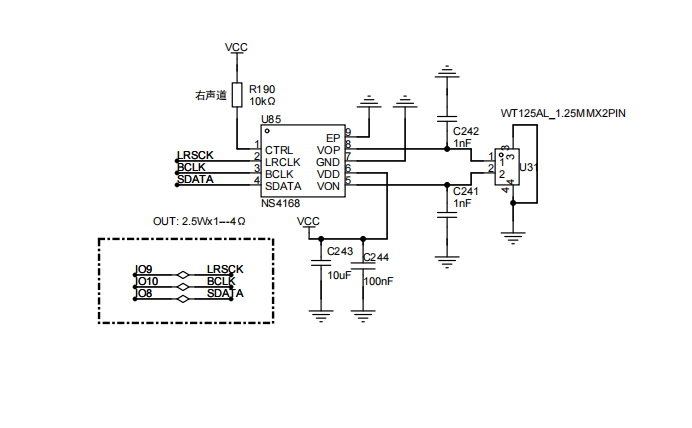
图2为本次测试使用的硬件电路如下图:
图2
注:
1.CTRL设置为右声道(图2)这里要根据程序做相应修改。
2.VCC = 5V (模块供电)
图3
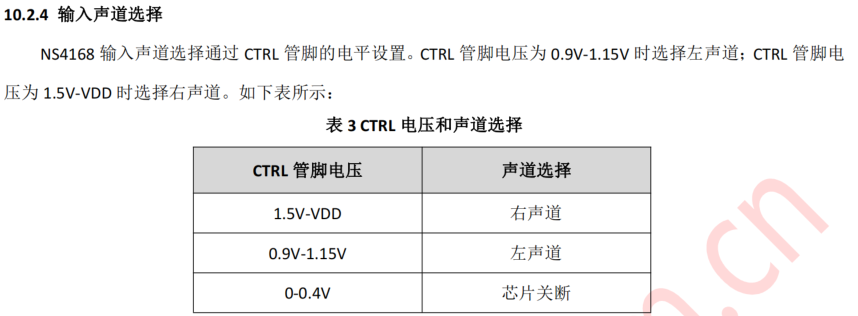
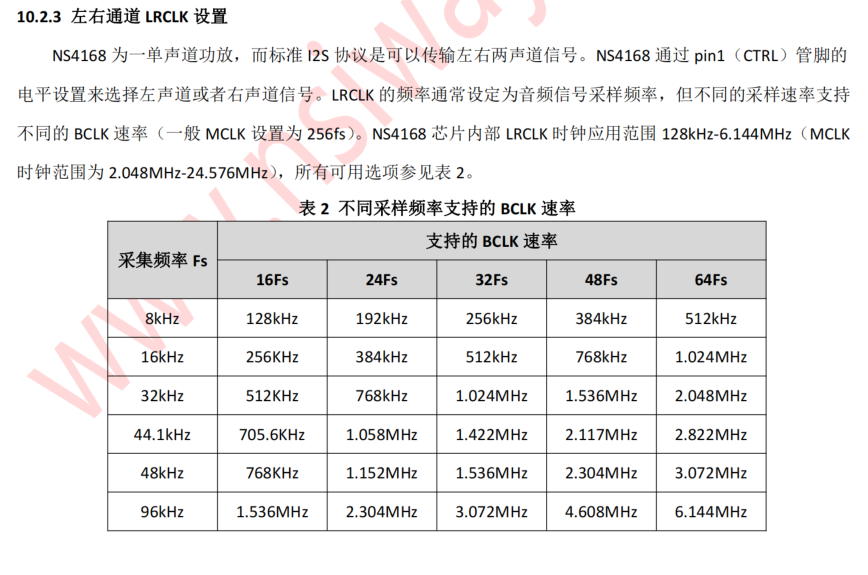
图4
2.软件
硬件我们大概了解了! 现在让我们看看软件吧!
在配置I2S时需要根据图2电路进行配置。CTRL:设置为右声道(图2)。
提示:如果配置不对可能就不会发出声音!程序中做了一些注释:
这里我们提供两个例程如下:
1.Demo_1
cpp
/**
 * @file   DTMF.ino
 * @author Jonnie Wlaker  CGC
 * @brief  NS4168_Test1
 * @version 0.1
 * @date 2025-09-22
 *
 * @copyright Copyright (c) 2025
 *
 */

#include <driver/i2s.h>
#include <math.h>

//ESP32C3--------I2S_NUM_0---------/
//There is only one independent set of I2S communication interfaces

#define I2S_BCLK   10   // BCLK
#define I2S_LRCK   9   // LRCLK
#define I2S_DOUT   8   // DATA


//ESP32S3--------I2S_NUM_0----I2S_NUM_1------/
//Choose any group at will
//The ESP32S3 has two independent I2S communication interfaces

//#define I2S_BCLK   17
//#define I2S_DOUT   18
//#define I2S_LRCK   16

// DTMF frequency table
int rowFreqs[4] = {697, 770, 852, 941};
int colFreqs[4] = {1209, 1336, 1477, 1633};

char keys[4][4] = {
  {'1','2','3','A'},
  {'4','5','6','B'},
  {'7','8','9','C'},
  {'*','0','#','D'}
};


// I2S configuration
i2s_config_t i2s_config = {
  .mode = (i2s_mode_t)(I2S_MODE_MASTER | I2S_MODE_TX),
  .sample_rate = 8000, //8000,16000,32000,48000 --------参考图4内容------/
  .bits_per_sample = I2S_BITS_PER_SAMPLE_16BIT,
  //.channel_format = I2S_CHANNEL_FMT_ONLY_LEFT,
  .channel_format = I2S_CHANNEL_FMT_ONLY_RIGHT,  //Configured as right channel. Pay special attention to this part
  .communication_format = I2S_COMM_FORMAT_I2S_MSB,
  .intr_alloc_flags = 0,
  .dma_buf_count = 8,
  .dma_buf_len = 64,
  .use_apll = false,
  .tx_desc_auto_clear = true,
  .fixed_mclk = 0
};

i2s_pin_config_t pin_config = {
  .bck_io_num = I2S_BCLK,
  .ws_io_num = I2S_LRCK,
  .data_out_num = I2S_DOUT,
  .data_in_num = I2S_PIN_NO_CHANGE
};


// Generate double tones
void playDTMF(int f1, int f2, int durationMs) {
  int sampleRate = 8000;
  int samples = (durationMs * sampleRate) / 1000;
  int16_t buffer[256];
  int idx = 0;

  for (int n = 0; n < samples; n++) {
    float t = (float)n / sampleRate;
    int16_t sample = (int16_t)((sin(2 * PI * f1 * t) + sin(2 * PI * f2 * t)) * 1500);
    buffer[idx++] = sample;

    if (idx >= 256) {
      size_t written;
      i2s_write(I2S_NUM_0, buffer, sizeof(buffer), &written, portMAX_DELAY);
      idx = 0;
    }
  }

  if (idx > 0) {
    size_t written;
    i2s_write(I2S_NUM_0, buffer, idx * sizeof(int16_t), &written, portMAX_DELAY);
  }
}

// Play DTMF by pressing the key
void playKey(char key) {
  for (int r = 0; r < 4; r++) {
    for (int c = 0; c < 4; c++) {
      if (keys[r][c] == key) {
        playDTMF(rowFreqs[r], colFreqs[c], 300); // Play for 300ms
        delay(50);
      }
    }
  }
}

void setup() {
  Serial.begin(115200);
  //init---------I2S------------/
  i2s_driver_install(I2S_NUM_0, &i2s_config, 0, NULL); //Default selection: I2S_NUM_0
  i2s_set_pin(I2S_NUM_0, &pin_config);
  i2s_zero_dma_buffer(I2S_NUM_0);


  Serial.println("Play the DTMF dial tone...");
}

void loop() {
 // Analog dialing: 1350#
  playKey('1');
  playKey('3');
  playKey('5');
  playKey('0');
  playKey('#');

  delay(2000);
}
2.Demo_2
cpp
/**
 * @file   Alice.ino
 * @author Jonnie Wlaker  CGC
 * @brief  NS4168_Test2
 * @version 0.1
 * @date 2025-09-22
 *
 * @copyright Copyright (c) 2025
 *
 */

#include <driver/i2s.h>

// I2S buffer size
#define I2S_BUFFER_SIZE 512

//ESP32C3--------I2S_NUM_0---------/
//There is only one independent set of I2S communication interfaces

#define I2S_BCLK   10   // BCLK
#define I2S_LRCK   9   // LRCLK
#define I2S_DOUT   8   // DATA


//ESP32S3--------I2S_NUM_0----I2S_NUM_1------/
//Choose any group at will
//The ESP32S3 has two independent I2S communication interfaces

//#define I2S_BCLK   17
//#define I2S_DOUT   18
//#define I2S_LRCK   16


//An array of pitch frequency (Hz) and duration (ms)
const int melody[] = {
    262, 250, 294, 250, 330, 250, 349, 250, 392, 500, 0, 250, 392, 500,
    349, 250, 330, 250, 294, 250, 262, 500, 0, 250, 262, 500, 294, 500,
    330, 500, 349, 500, 392, 1000
};


// I2S configuration
void setupI2S() {
  i2s_config_t i2s_config = {
      .mode = (i2s_mode_t)(I2S_MODE_MASTER | I2S_MODE_TX),
      .sample_rate = 8000, //8000,16000,32000,48000 -------参考图4内容--------/
      .bits_per_sample = I2S_BITS_PER_SAMPLE_16BIT,
       //.channel_format = I2S_CHANNEL_FMT_ONLY_LEFT,
      .channel_format  = I2S_CHANNEL_FMT_ALL_RIGHT,   //Configured as right channel. Pay special attention to this part
      .communication_format = I2S_COMM_FORMAT_I2S_MSB,
      .intr_alloc_flags = ESP_INTR_FLAG_LEVEL1,
      .dma_buf_count = 8,
      .dma_buf_len = I2S_BUFFER_SIZE,
      .use_apll = false,
      .tx_desc_auto_clear = true,
      .fixed_mclk = 0,
  };


  i2s_pin_config_t pin_config = {
      .bck_io_num = I2S_BCLK,    // BCLK
      .ws_io_num = I2S_LRCK,     // LRCLK
      .data_out_num = I2S_DOUT,  // DATA
      .data_in_num = I2S_PIN_NO_CHANGE,
  };


  // init I2S
  if (i2s_driver_install(I2S_NUM_0, &i2s_config, 0, NULL) != ESP_OK) {
    Serial.println("I2S driver initialization failed!");
    while (true);
  }

  if (i2s_set_pin(I2S_NUM_0, &pin_config) != ESP_OK) {
    Serial.println("The I2S pin setting failed!");
    while (true);
  }


  Serial.println("The I2S initialization was successful..........");
}


// Play a tone
void playTone(int frequency, int duration) {
  if (frequency == 0) {
    delay(duration);
    return;
  }


  const int sampleRate = 8000; // 采样率 //8000,16000,32000,48000
  const int sampleCount = (sampleRate * duration) / 1000; // 样本总数
  const float amplitude = 0.5 * INT16_MAX; // 振幅(50%)=1.0


  for (int i = 0; i < sampleCount; i++) {
    int16_t sample = (int16_t)(amplitude * sin(2.0 * PI * frequency * i / sampleRate));
    size_t bytes_written = 0;
    i2s_write(I2S_NUM_0, &sample, sizeof(sample), &bytes_written, portMAX_DELAY);
  }
}


void setup() {
  Serial.begin(115200);
  setupI2S();

  //Play only once
  Serial.println("Start playing the melody of <Alice> ");
  for (int i = 0; i < sizeof(melody) / sizeof(melody[0]); i += 2) {
    int frequency = melody[i];
    int duration = melody[i + 1];
    playTone(frequency, duration);
  }
  Serial.println("The melody has been played........");
}


void loop() {

}
那个测试程序都会发出不同频率声音!你可以亲自去测试一下!!!
总结
本文结合硬件与软件描述了NS4168的基本使用及硬件配置,通过ESP32C3的I2S总线输出音频数据让NS4168发出音频。由于I2S内容非常多这里就不仔细讲!(使用时由于I2S没有正确配置,导致无法输出声音,所以你使用时注意此部分)希望本文对你有所帮助。
非常感谢你能看到这里! CGC
注明:本文部分图片来自芯威科NS4168数据手册。