
C++专栏:C++_Yupureki的博客-CSDN博客
目录
[1. stack的基本使用](#1. stack的基本使用)
[1.1 栈的基本概念](#1.1 栈的基本概念)
[1.2 stack的基本使用](#1.2 stack的基本使用)
[1.3 栈的模拟实现](#1.3 栈的模拟实现)
[2. queue的基本使用](#2. queue的基本使用)
[2.1 队列的基本概念](#2.1 队列的基本概念)
[2.2 queue的基本使用](#2.2 queue的基本使用)
[2.3 队列的模拟实现](#2.3 队列的模拟实现)
[3. priority_queue(优先队列)深度解析](#3. priority_queue(优先队列)深度解析)
[3.1 优先队列的概念](#3.1 优先队列的概念)
[3.2 priority_queue的使用](#3.2 priority_queue的使用)
[4. 容器适配器深度理解](#4. 容器适配器深度理解)
[4.1 什么是容器适配器?](#4.1 什么是容器适配器?)
[4.2 为什么选择deque作为默认底层容器?](#4.2 为什么选择deque作为默认底层容器?)
[5. 非类型模板参数](#5. 非类型模板参数)
[5.1 基本概念](#5.1 基本概念)
[5.2 非类型参数的限制](#5.2 非类型参数的限制)
[6. 模板特化](#6. 模板特化)
[6.1 为什么需要模板特化?](#6.1 为什么需要模板特化?)
[6.2 函数模板特化](#6.2 函数模板特化)
[6.3 类模板特化](#6.3 类模板特化)
[6.3.1 全特化(Full Specialization)](#6.3.1 全特化(Full Specialization))
[6.3.2 偏特化(Partial Specialization)](#6.3.2 偏特化(Partial Specialization))
[7. 模板分离编译](#7. 模板分离编译)
[7.1 问题背景](#7.1 问题背景)
[7.2 问题原因分析](#7.2 问题原因分析)
[7.3 解决方案](#7.3 解决方案)
上一篇:从零开始的C++学习生活 8:list的入门使用-CSDN博客
stack和queue
前言
在C++标准模板库(STL)中,stack(栈)和queue(队列)作为两种经典的线性数据结构,虽然功能相对简单,却在算法设计和系统开发中扮演着不可或缺的角色。与vector、list等直接容器不同,它们属于容器适配器------通过封装其他容器来实现特定接口。
栈的"后进先出"(LIFO)和队列的"先进先出"(FIFO)特性,使得它们在解决特定类型问题时表现出色。无论是函数调用栈、表达式求值,还是任务调度、消息队列,都能看到它们的身影。
本文将深入探讨stack和queue的实现原理、使用技巧以及实际应用,帮助你全面掌握这两种重要的数据结构。
1. stack的基本使用
1.1 栈的基本概念
栈是一种后进先出(LIFO)的数据结构,只允许在容器的一端进行插入和删除操作。这就像一叠盘子,我们只能从最上面取放。
栈的核心操作:
-
push(): 元素入栈 -
pop(): 元素出栈 -
top(): 查看栈顶元素 -
empty(): 判断栈是否为空 -
size(): 获取栈中元素个数
1.2 stack的基本使用
stack相对于之前的string,vector和list,结构比较简单
cpp
#include <stack>
#include <iostream>
using namespace std;

void basicStackDemo() {
    stack<int> st;

    // 入栈操作
    st.push(1);
    st.push(2);
    st.push(3);

    cout << "栈大小: " << st.size() << endl;  // 3
    cout << "栈顶元素: " << st.top() << endl; // 3

    // 出栈操作
    st.pop();
    cout << "出栈后栈顶: " << st.top() << endl; // 2

    // 遍历栈(注意:栈没有迭代器,只能边pop边访问)
    while (!st.empty()) {
        cout << st.top() << " ";
        st.pop();
    }
    // 输出: 2 1
}
1.3 栈的模拟实现
由于栈比较简单,为了方便,我们可以调用其他的STL容器的功能函数来帮我们实现,下列的deque即为一个容器适配器,之后我们会初步讲解
cpp
#include <vector>
#include <deque>

namespace my {
    template<class T, class Container = std::deque<T>>
    class stack {
    private:
        Container _c;  // 底层容器

    public:
        // 构造函数
        stack() = default;

        // 容量操作
        bool empty() const { return _c.empty(); }
        size_t size() const { return _c.size(); }

        // 元素访问
        T& top() { return _c.back(); }
        const T& top() const { return _c.back(); }

        // 修改操作
        void push(const T& value) { _c.push_back(value); }
        void pop() { _c.pop_back(); }

        // 交换
        void swap(stack& other) { std::swap(_c, other._c); }
    };
}

// 使用示例
void testMyStack() {
    my::stack<int> st;
    st.push(1);
    st.push(2);
    st.push(3);

    while (!st.empty()) {
        cout << st.top() << " ";  // 3 2 1
        st.pop();
    }
}
2. queue的基本使用
2.1 队列的基本概念
队列是一种先进先出(FIFO)的数据结构,元素从队尾进入,从队头离开。这就像现实生活中的排队,先来的人先接受服务。
队列的核心操作:
-
push(): 元素入队 -
pop(): 元素出队 -
front(): 查看队头元素 -
back(): 查看队尾元素 -
empty(): 判断队列是否为空 -
size(): 获取队列元素个数
2.2 queue的基本使用
cpp
#include <queue>
#include <iostream>
using namespace std;

void basicQueueDemo() {
    queue<int> q;

    // 入队操作
    q.push(1);
    q.push(2);
    q.push(3);

    cout << "队列大小: " << q.size() << endl;    // 3
    cout << "队头元素: " << q.front() << endl;   // 1
    cout << "队尾元素: " << q.back() << endl;    // 3

    // 出队操作
    q.pop();
    cout << "出队后队头: " << q.front() << endl; // 2

    // 遍历队列
    while (!q.empty()) {
        cout << q.front() << " ";
        q.pop();
    }
    // 输出: 2 3
}
2.3 队列的模拟实现
cpp
#include <list>

namespace my {
    template<class T, class Container = std::list<T>>
    class queue {
    private:
        Container _c;

    public:
        queue() = default;

        // 容量操作
        bool empty() const { return _c.empty(); }
        size_t size() const { return _c.size(); }

        // 元素访问
        T& front() { return _c.front(); }
        const T& front() const { return _c.front(); }
        T& back() { return _c.back(); }
        const T& back() const { return _c.back(); }

        // 修改操作
        void push(const T& value) { _c.push_back(value); }
        void pop() { _c.pop_front(); }

        void swap(queue& other) { std::swap(_c, other._c); }
    };
}
3. priority_queue(优先队列)深度解析
3.1 优先队列的概念

优先队列是一种特殊的队列,元素出队的顺序不是按照入队顺序,而是按照元素的优先级。默认情况下,C++中的priority_queue是大顶堆。
因此priority_queue的底层结构为堆
由于priority_queue仍为队列,因此仍具有以下操作
empty():检测容器是否为空
size():返回容器中有效元素个数
front():返回容器中第一个元素的引用
push_back():在容器尾部插入元素
pop_back():删除容器尾部元素
标准容器类vector和deque满足这些需求。默认情况下,如果没有为特定的priority_queue 类实例化指定容器类,则使用vector。
3.2 priority_queue的使用
cpp
#include <queue>
#include <vector>
#include <functional>

void priorityQueueDemo() {
    // 默认大顶堆
    priority_queue<int> max_heap;
    max_heap.push(3);
    max_heap.push(1);
    max_heap.push(4);
    max_heap.push(2);

    cout << "大顶堆顶部: " << max_heap.top() << endl; // 4

    // 小顶堆
    priority_queue<int, vector<int>, greater<int>> min_heap;
    min_heap.push(3);
    min_heap.push(1);
    min_heap.push(4);
    min_heap.push(2);

    cout << "小顶堆顶部: " << min_heap.top() << endl; // 1
}
4. 容器适配器深度理解
4.1 什么是容器适配器?
容器适配器不是独立的容器,而是对现有容器的封装,提供特定的接口。可以简单理解为容器适配器是对于一个容器的特定功能的实现
例如stack实现先进后出,queue实现先进先出
而vector和list并不具有这些特征
STL中的容器适配器包括:
-
stack: 栈适配器 -
queue: 队列适配器 -
priority_queue: 优先队列适配器
其中stack和queue均使用的是deque
4.2 为什么选择deque作为默认底层容器?
cpp
// STL中的默认定义
template <class T, class Container = deque<T>> class stack;
template <class T, class Container = deque<T>> class queue;
deque(双端队列):是一种双开口的"连续"空间的数据结构,双开口的含义是:可以在头尾两端 进行插入和删除操作,且时间复杂度为O(1),与vector比较,头插效率高,不需要搬移元素;与 list比较,空间利用率比较高。
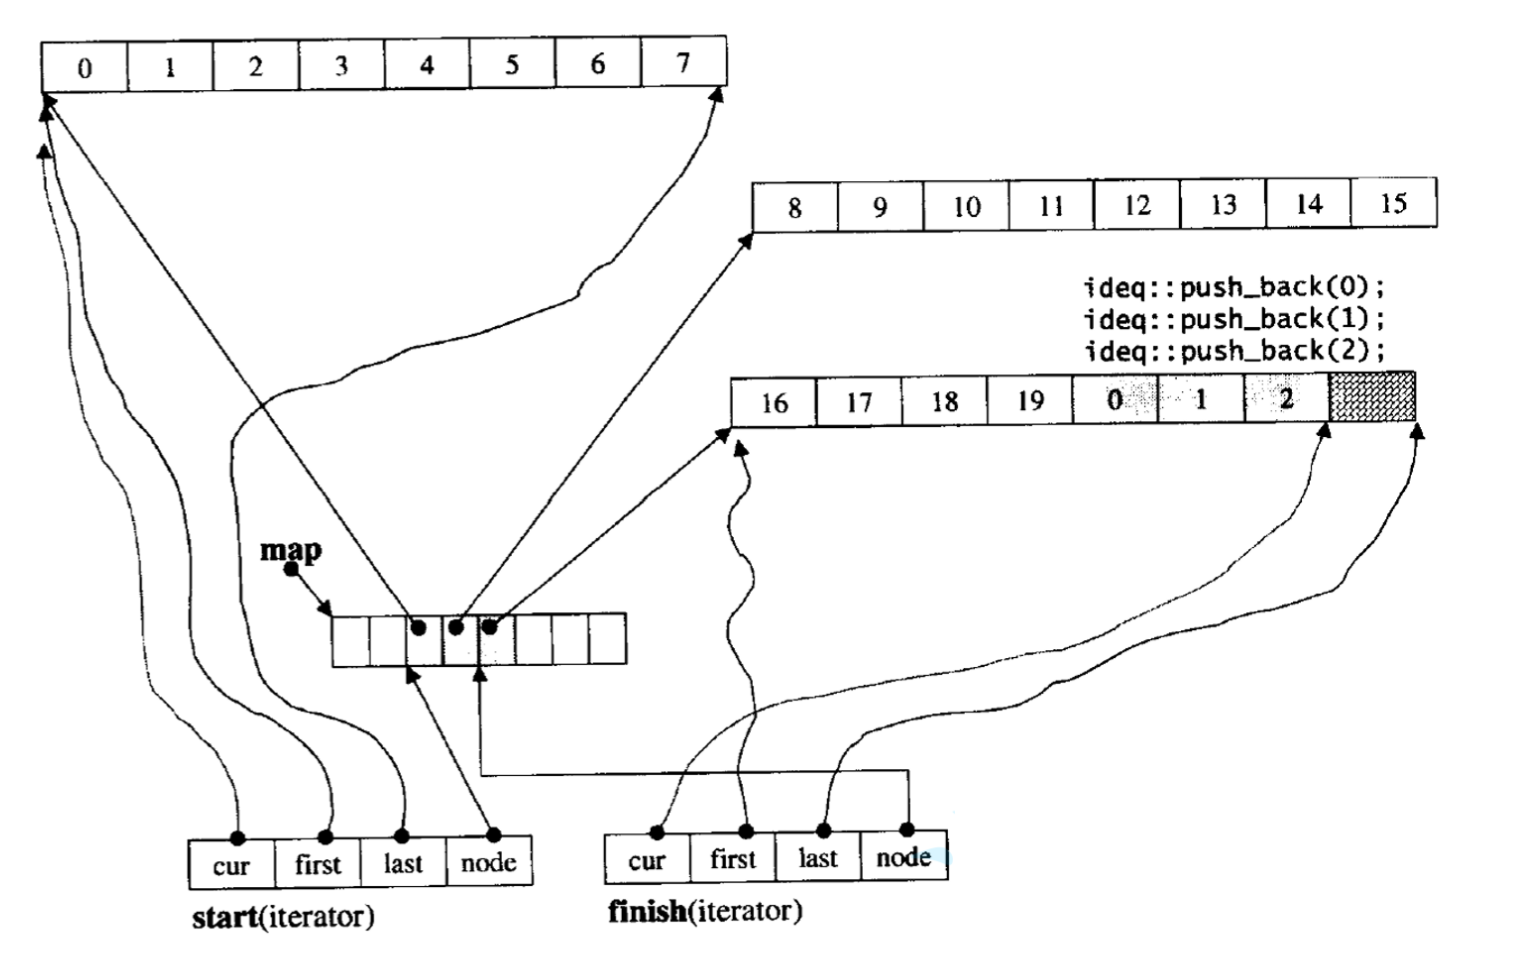
deque先是由一个中控台(map)构成,每个中控台节点包含cur,first,last,node四个指针
first代表一个数组的首地址
last代表一个数组的尾地址
cur则用来遍历数组中的元素
node代表该中控台节点的位置
因此deque结合了list和vector的优点,相当于几个数组 以链表的形式连接起来
选择deque的原因:
-
综合性能优秀:
-
头部尾部操作都是O(1)
-
不需要vector的扩容拷贝开销
-
比list缓存友好,内存局部性更好
-
-
适合适配器需求:
-
stack只需要
push_back、pop_back、back -
queue需要
push_back、pop_front、front、back -
deque完美支持这些操作
-
-
内存效率:
-
分段连续存储,扩容代价小
-
空间利用率高于list
-
结语
stack和queue作为C++ STL中的容器适配器,虽然接口简单,却在算法设计和系统开发中发挥着重要作用。通过本文的学习,我们应该:
-
理解栈和队列的基本特性和操作
-
掌握容器适配器的设计思想
-
熟悉优先队列的原理和使用
-
能够根据场景选择合适的容器
-
理解底层容器的选择策略
在实际开发中,当遇到具有LIFO或FIFO特性的问题时,不要忘记这些简单而强大的工具。它们往往能以最优雅的方式解决看似复杂的问题。
模板的上一篇:从零开始的C++学习生活 5:内存管理和模板初阶-CSDN博客
模板进阶
前言
在前一篇文章中,我们学习了模板的基础知识,了解了函数模板和类模板的基本用法。但在实际开发中,我们常常会遇到更复杂的场景:需要固定大小的容器、针对特定类型进行特殊处理、或者将模板代码分文件组织等。
C++模板系统提供了强大的进阶特性来解决这些问题,包括非类型模板参数、模板特化、以及处理分离编译的策略。这些特性让我们能够编写更加灵活、高效的泛型代码。
5. 非类型模板参数
5.1 基本概念
非类型模板参数允许我们使用常量作为模板参数,而不仅仅是类型。这使得我们可以在编译期确定某些值,生成更加特化的代码。
cpp
template<class T, size_t N = 10>  // N是非类型模板参数
class Array {
private:
    T _data[N];  // 使用N作为数组大小
    size_t _size = N;

public:
    size_t size() const { return _size; }
    T& operator[](size_t index) { return _data[index]; }
    const T& operator[](size_t index) const { return _data[index]; }
};

// 使用示例
void demo() {
    Array<int, 5> arr1;      // 创建大小为5的int数组
    Array<double, 10> arr2;  // 创建大小为10的double数组
    Array<char> arr3;        // 使用默认大小10
}
5.2 非类型参数的限制
注意:
-
浮点数 、类对象 以及字符串是不允许作为非类型模板参数的。
-
非类型的模板参数必须在编译期就能确认结果。
cpp
// 允许的类型:
template<int N> class A {};           // 整型
template<size_t N> class B {};        // 无符号整型
template<bool Flag> class C {};       // 布尔类型
template<int* Ptr> class D {};        // 指针类型
template<int (&Func)()> class E {};   // 函数引用

// 不允许的类型:
// template<double Value> class F {};    // 错误:浮点数不允许
// template<std::string Str> class G {}; // 错误:类对象不允许
// template<const char* Str> class H {}; // 错误:字符串字面量不允许
6. 模板特化
6.1 为什么需要模板特化?
假设我们实现一个判断是否相等的函数模板
cpp
// 通用模板
template<typename T>
bool equals(const T& a, const T& b) {
    return a == b;
}
模板提供了通用实现,但某些特定类型可能需要特殊处理:
对于浮点数,我们需要考虑精度问题
cpp
template<>
bool equals<double>(const double& a, const double& b) {
    return std::abs(a - b) < 1e-10;
}
对于字符串,我们需利用strcmp来比较大小
cpp
template<>
bool equals<const char*>(const char* const& a, const char* const& b) {
    return std::strcmp(a, b) == 0;
}
可以看到equals对于一些基本数据类型,如整型,字符的判断无误,但若是字符串甚至是自定义类型对比则不能草率地使用==来判断
因此对于这些特殊情况,我们需要以模板来专门实现几个函数
6.2 函数模板特化
函数模板特化允许我们为特定类型提供特殊实现:
函数模板的特化步骤:
-
必须要先有一个基础的函数模板
-
关键字template后面接一对空的尖括号<>
-
函数名后跟一对尖括号,尖括号中指定需要特化的类型
-
函数形参表: 必须要和模板函数的基础参数类型完全相同,如果不同编译器可能会报一些奇怪的错误。
cpp
// 基础函数模板
template<typename T>
int compare(const T& a, const T& b) {
    if (a < b) return -1;
    if (b < a) return 1;
    return 0;
}

// 特化版本:针对C风格字符串
template<>
int compare<const char*>(const char* const& a, const char* const& b) {
    return std::strcmp(a, b);
}

// 特化版本:针对double(处理浮点精度)
template<>
int compare<double>(const double& a, const double& b) {
    if (std::abs(a - b) < 1e-10) return 0;
    return a < b ? -1 : 1;
}注意:函数模板特化在实际开发中较少使用,通常更推荐使用函数重载:
cpp
// 使用重载代替特化(更简单清晰)
int compare(const char* a, const char* b) {
    return std::strcmp(a, b);
}
6.3 类模板特化
6.3.1 全特化(Full Specialization)
全特化是指为模板的所有参数都提供具体类型:
cpp
// 通用类模板
template<typename T1, typename T2>
class Pair {
private:
    T1 _first;
    T2 _second;

public:
    Pair(const T1& f, const T2& s) : _first(f), _second(s) {}

    void print() const {
        std::cout << "Generic: (" << _first << ", " << _second << ")" << std::endl;
    }
};

// 全特化:两个参数都是int
template<>
class Pair<int, int> {
private:
    int _first;
    int _second;

public:
    Pair(int f, int s) : _first(f), _second(s) {}

    void print() const {
        std::cout << "IntPair: (" << _first << ", " << _second << ")" << std::endl;
    }

    // 特化版本特有的方法
    int sum() const { return _first + _second; }
};

void demoFullSpecialization() {
    Pair<double, std::string> p1(3.14, "pi");
    Pair<int, int> p2(10, 20);

    p1.print();  // 输出: Generic: (3.14, pi)
    p2.print();  // 输出: IntPair: (10, 20)
    std::cout << "Sum: " << p2.sum() << std::endl;  // 输出: Sum: 30
}
6.3.2 偏特化(Partial Specialization)
偏特化是指只特化部分模板参数,或者对参数类型添加约束:
部分参数特化:
cpp
// 通用模板
template<typename T1, typename T2, typename T3>
class Triple {
public:
    Triple() { std::cout << "Triple<T1, T2, T3>" << std::endl; }
};

// 偏特化:第三个参数固定为int
template<typename T1, typename T2>
class Triple<T1, T2, int> {
public:
    Triple() { std::cout << "Triple<T1, T2, int>" << std::endl; }
};

// 偏特化:第二、三个参数固定
template<typename T1>
class Triple<T1, double, int> {
public:
    Triple() { std::cout << "Triple<T1, double, int>" << std::endl; }
};

void demoPartialSpecialization() {
    Triple<float, char, bool> t1;    // 通用版本
    Triple<float, char, int> t2;     // 第一个偏特化
    Triple<float, double, int> t3;   // 第二个偏特化
}
类型约束特化:
如果模板参数被特例化为指针 或引用,那么就会强制性调用含指针或引用的模板
cpp
//两个参数偏特化为指针类型
template <typename T1, typename T2>
class Data <T1*, T2*>
{
public:
     Data() {cout<<"Data<T1*, T2*>" <<endl;}
private:
     T1 _d1;
     T2 _d2;
 };
 //两个参数偏特化为引用类型
template <typename T1, typename T2>
 class Data <T1&, T2&>
 {
 public:
     Data(const T1& d1, const T2& d2)
     : _d1(d1)
     , _d2(d2)
     {
     cout<<"Data<T1&, T2&>" <<endl;
     }
 private:
 const T1 & _d1;
 const T2 & _d2;
};
     void test2 ()
    {
     Data<double , int> d1;     // 调用特化的int版本
    Data<int , double> d2;      // 调用基础的模板
    Data<int *, int*> d3;       // 调用特化的指针版本
    Data<int&, int&> d4(1, 2);  // 调用特化的指针版本
}
7. 模板分离编译
7.1 问题背景
当模板的声明和定义分离到不同文件时,会出现链接错误:
假设我们有一个头文件math_utils.h和两个原文件math_utils.cpp和main.cpp
cpp
// math_utils.h
template<typename T>
T add(const T& a, const T& b);
cpp
// math_utils.cpp
template<typename T>
T add(const T& a, const T& b) {
    return a + b;
}
cpp
// main.cpp
#include "math_utils.h"

int main() {
    int result = add(1, 2);  // 链接错误:undefined reference
    return 0;
}
7.2 问题原因分析
编译过程:
-
编译math_utils.cpp:编译器看到模板定义,但没有看到具体实例化,不会生成代码
-
编译main.cpp :编译器看到模板声明,生成对
add<int>的调用 -
链接阶段 :找不到
add<int>的实现,链接失败
原因:
模板之所以叫模板,就只是一张图纸,只有你需要才会构造出相应的函数实例
.h中的模板add为声明,编译器看见了因此main中的add不会报错,但当实际调用中无法找到add函数,但是math_utils.cpp中存在啊?实际上不存在,因为math_utils.cpp中的add函数为模板,在链接过程中add函数模板并没有生成相应的实例,因为math_utils.cpp中没有调用add函数,main.cpp无法远程在math_utils.cpp中用add模板,不然也没有链接这个过程
7.3 解决方案
方案1:声明和定义放在同一文件(推荐)
cpp
// math_utils.h
template<typename T>
T add(const T& a, const T& b) {
    return a + b;
}

// 或者使用.hpp后缀明确表示这是包含实现的头文件
// math_utils.hpp
方案2:显式实例化(不推荐)
结语
通过本文的学习,我们深入探讨了C++模板的进阶特性:
-
非类型模板参数:在编译期确定值,实现固定大小的容器和编译期计算
-
模板特化:为特定类型提供特殊实现,包括全特化和偏特化
-
分离编译问题:理解模板的编译模型,掌握正确的代码组织方式
这些进阶特性让我们能够编写更加高效、灵活的泛型代码。但需要注意的是,强大的能力也带来了复杂性,在实际项目中应该:
-
优先使用简单的模板特性
-
只在性能关键路径使用高级特性
-
保持代码的可读性和可维护性
-
充分测试各种特化版本