前言
最近,因为想做恶劣天气下的小目标检测,所以有必要学习一下相关方面的文章,IA-YOLO是21年的一篇论文,是我目前找到的最早的工作,这篇工作提出深度学习的目标检测方法虽然在传统的数据集上取得不错的成果,但在恶劣天气条件下的拍摄到的低质量图像中进行定位仍然有许多的问题,因此提出了IA-YOLO,它包括了可微图像处理模块DIP,其参数有一个小的CNN-PP卷积网络预测,采用弱监督方式使DIP增强图像来进行检测,可以用于正常天气和恶劣天气下的目标检测,在雾天和低光场景下都具有不错的效果。
论文地址:Image-Adaptive YOLO for Object Detection in Adverse Weather Conditions
代码:"Image-Adaptive YOLO for Object Detection in Adverse Weather Conditions (AAAI 2022)"
源代码采用的是tf实现的,这里我采用了torch进行复现。请注意仓库里面使用的yolov5n做为检测器,与原文有所区别。详情请见:target-detection/IA_YOLO at main · Auorui/target-detection
网络架构
在恶劣天气的影响下拍摄的图像,会收到天气信息的影响使目标检测变得更困难,IA-YOLO通过去除特定天气信息并进行图像自适应增强以达到提升检测的效果,主要由基于CNN的参数预测器、可微分图像处理模块DIP,主要是根据的YOLOv3改进的。
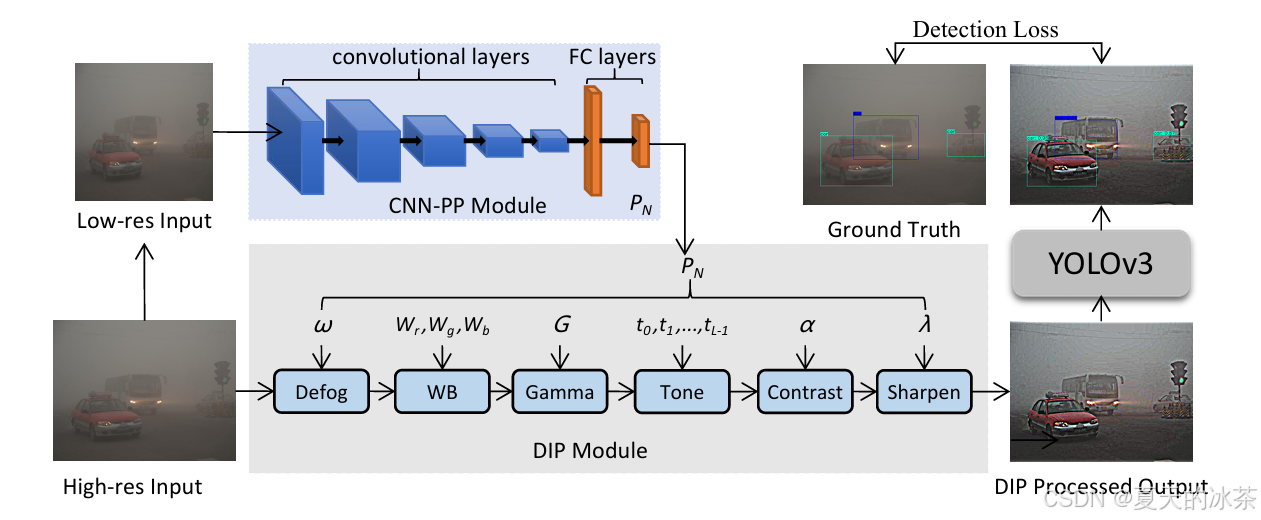
如上图,首先将输入图像resize成256×256的大小,将其输入CNN-PP以预测DIP的参数。然后,将DIP模块过滤后的图像作为YOLOv3检测器的输入。采用这种方式对输入的信息进行图像预处理,这样就能让CNN-PP学习DIP的参数,采用弱监督方式去自适应增强图像以进行目标检测。
CNN-PP模块
在图像信号处理中,通常采用一些可调滤波器来增强图像,但一般是依靠经验丰富的工程师通过visual inspection手动调整。但这种方式是昂贵且费力的,因此这里采用小型 CNN 作为参数预测器来估计超参数。
以雾场景为例,CNN-PP的目的是通过了解图像的全局内容(例如亮度、颜色和色调)以及雾的程度来预测DIP的参数。这些使用低分辨率的图像就能完成,进而应用这些参数到原图上,所以在设计的时候要让其参数的估计与分辨率无关,并且CNN-PP是依靠梯度优化的,通过反向传播训练网络,所以又要满足可微分性。
这个是一个很简单的网络结构,论文当中是这样描述的:
CNN-PP网络由5个卷积块和2个全连接层组成。每个卷积块包括一个步长为2的3×3卷积层和一个leaky Relu。最后的全连接层为DIP模块输出超参数。这五个卷积层的输出通道分别为16、32、32、32和32。当参数总数为15时,CNN-PP模型仅包含165K个参数。
python
import torch
import torch.nn as nn
import torch.nn.functional as F

class CNN_PP(nn.Module):
    """
    CNN-PP Module PyTorch Reproduction
    """
    def __init__(self, input_dim=3, output_dim=15):
        super(CNN_PP, self).__init__()
        self.conv_blocks = nn.Sequential(
            nn.Conv2d(input_dim, 16, kernel_size=3, stride=2, padding=1),
            nn.LeakyReLU(0.2),
            nn.Conv2d(16, 32, kernel_size=3, stride=2, padding=1),
            nn.LeakyReLU(0.2),
            nn.Conv2d(32, 32, kernel_size=3, stride=2, padding=1),
            nn.LeakyReLU(0.2),
            nn.Conv2d(32, 32, kernel_size=3, stride=2, padding=1),
            nn.LeakyReLU(0.2),
            nn.Conv2d(32, 32, kernel_size=3, stride=2, padding=1),
            nn.LeakyReLU(0.2),
        )
        self.fc = nn.Sequential(
            nn.Linear(32 * 8 * 8, 64),
            nn.LeakyReLU(0.2),
            nn.Linear(64, output_dim)
        )

    def forward(self, x):
        x = F.interpolate(x, size=(256, 256), mode='bilinear', align_corners=False)
        x = self.conv_blocks(x)
        x = x.view(x.size(0), -1)
        return self.fc(x)

if __name__ == "__main__":
    from torchsummary import summary
    device = torch.device("cuda" if torch.cuda.is_available() else "cpu")
    model = CNN_PP(output_dim=15).to(device)
    x = torch.randn(1, 3, 256, 256).to(device)
    out = model(x)
    print(out.shape)  # [1, 15]
    summary(model, input_size=(3, 256, 256))  # 约 165K
打印出来后也与原文所描述的一致,模型参数约为165K。此外我将低分辨率图在此模块的内部进行了,这样这个模块就仅仅是做参数的估计
python
torch.Size([1, 15])
----------------------------------------------------------------
        Layer (type)               Output Shape         Param #
================================================================
            Conv2d-1         [-1, 16, 128, 128]             448
         LeakyReLU-2         [-1, 16, 128, 128]               0
            Conv2d-3           [-1, 32, 64, 64]           4,640
         LeakyReLU-4           [-1, 32, 64, 64]               0
            Conv2d-5           [-1, 32, 32, 32]           9,248
         LeakyReLU-6           [-1, 32, 32, 32]               0
            Conv2d-7           [-1, 32, 16, 16]           9,248
         LeakyReLU-8           [-1, 32, 16, 16]               0
            Conv2d-9             [-1, 32, 8, 8]           9,248
        LeakyReLU-10             [-1, 32, 8, 8]               0
           Linear-11                   [-1, 64]         131,136
        LeakyReLU-12                   [-1, 64]               0
           Linear-13                   [-1, 15]             975
================================================================
Total params: 164,943
Trainable params: 164,943
Non-trainable params: 0
----------------------------------------------------------------
Input size (MB): 0.75
Forward/backward pass size (MB): 6.66
Params size (MB): 0.63
Estimated Total Size (MB): 8.04
----------------------------------------------------------------
DIP模块
DIP模块由六个具有可调节超参数的可微滤波器组成,包括Defog,White Balance,Gamma,Contrast,Tone,Sharpen。标准颜色和色调运算符(例如WB、Gamma、Contrast、Tone)可以表示为Pixel-wise filters。因此,滤波器可以分为Defog,Pixel-wise filters,Sharpen。
关于参数的估计部分,这里参考的是原作者给出的,我将代码重新整理了一下用于构成完整的模块。下面的当中的去雾模块我采用的是DCP算法,与原作者实现有些许差异,具体可看此处:
暗通道先验去雾算法实现_single image haze removal using dark channel prior-CSDN博客
这里共有15个参数,去雾的omega,白平衡的三个通道的参数,gamma增强的幂指数参数,色调的八个参数,以及对比度和锐化的两个参数。我将CNN_PP得到的15个参数约束过程写到了_parse_cnn_params当中。然后按照图示的顺序依次进行图像增强。
python
import torch
import torch.nn as nn
import torch.nn.functional as F
from IA_YOLO.iayolo.cnn_pp import CNN_PP


def rgb2lum(image):
    image = 0.27 * image[:, :, :, 0] + 0.67 * image[:, :, :, 1] + 0.06 * image[:, :, :, 2]
    return image[:, :, :, None]


def lerp(a, b, l):
    return (1 - l) * a + l * b


def tanh01(x):
    return (torch.tanh(x) + 1) / 2


def tanh_range(l, r, initial=None):
    def get_activation(left, right, initial):
        def activation(x):
            if initial is not None:
                bias = torch.atanh(2 * (initial - left) / (right - left) - 1)
            else:
                bias = 0
            return tanh01(x + bias) * (right - left) + left

        return activation

    return get_activation(l, r, initial)


class Dip(nn.Module):
    def __init__(self):
        super(Dip, self).__init__()
        self.t0 = 0.1
        self.top_percent = 0.1  # 用于估计大气光的像素百分比
        self.cnn_pp = CNN_PP(input_dim=3, output_dim=15)
        self.register_buffer('gaussian_kernel', self._create_gaussian_kernel())

    def _create_gaussian_kernel(self, sigma=5, device='cuda:0'):
        """创建高斯核"""
        radius = 12
        x = torch.arange(-radius, radius + 1, device=device, dtype=torch.float32)
        k = torch.exp(-0.5 * torch.square(x / sigma))
        k = k / torch.sum(k)
        kernel_2d = k.unsqueeze(1) * k.unsqueeze(0)  # [25, 25]
        kernel_2d = kernel_2d.unsqueeze(0).unsqueeze(0)  # [1, 1, 25, 25]
        kernel_2d = kernel_2d.repeat(3, 1, 1, 1)  # [3, 1, 25, 25]
        return kernel_2d

    def _apply_white_balance(self, image, param):
        """白平衡滤镜"""
        param = param * 1.0 / (0.27 * param[:, 0] +
                               0.67 * param[:, 1] + 0.06 * param[:, 2] + 1e-5)[:, None]
        return image * param[:, :, None, None]

    def _apply_defog(self, x, param):
        # https://blog.csdn.net/m0_62919535/article/details/148291799
        # 输入形状: (B, C, H, W),值域[0,1]
        if x.min() < 0:  # 检测到输入是[-1,1]范围
            x = (x + 1) / 2  # 转换到[0,1]
        dark = self.dark_channel(x)
        A = self.estimate_atmosphere(x, dark)
        if A.shape[1] != x.shape[1]:
            A = A[:, :x.shape[1], :, :]
        transmission = self.transmission(dark, param)
        if transmission.dim() == 3:
            transmission = transmission.unsqueeze(1)
        # 根据物理模型恢复图像
        J = (x - A) / transmission + A
        return torch.clamp(J, 0, 1)

    def _apply_gamma(self, image, param):
        param_1 = param.repeat([1, 3])
        return torch.pow(torch.max(image, torch.tensor(0.0001)), param_1[:, :, None, None])

    def _apply_tone(self, image, param):
        tone_curve = param
        tone_curve_sum = torch.sum(tone_curve, dim=-1) + 1e-30
        total_image = image * 0
        curve_steps = 8
        for i in range(curve_steps):
            total_image = total_image + torch.clip(image - 1.0 * i / curve_steps, 0, 1.0 / curve_steps) \
                          * param[:, :, :, :, i]
        total_image = total_image * curve_steps / tone_curve_sum
        return total_image

    def _apply_contrast(self, image, param):
        luminance = torch.min(torch.max(rgb2lum(image), torch.tensor(0.0)), torch.tensor(1.0))
        contrast_lum = -torch.cos(torch.pi * luminance) * 0.5 + 0.5
        contrast_image = image / (luminance + 1e-6) * contrast_lum
        return lerp(image, contrast_image, param[:, :, None, None])

    def _apply_sharpen(self, image, param):
        """锐化处理 - 修复高斯核创建问题"""
        device = image.device
        image = image.float()
        kernel_i = self._create_gaussian_kernel(5, device)

        # 使用卷积进行高斯模糊
        output = F.conv2d(image, weight=kernel_i, stride=1, groups=3, padding=12)
        img_out = (image - output) * param[:, None, None, :] + image
        return img_out

    def forward(self, x):
        params = self.cnn_pp(x)
        params = self._parse_cnn_params(params)
        image = x
        B, C, W, H = x.shape
        # 图像处理流程
        image = self._apply_defog(image, params['defog_omega'])
        image = self._apply_white_balance(image, params['white_balance'])
        image = self._apply_gamma(image, params['gamma_correction'])
        image = self._apply_tone(image, params['tone_curve_points'])
        image = self._apply_contrast(image, params['contrast_adjust'])
        image = self._apply_sharpen(image, params['sharpen_strength'])
        result_image = torch.sigmoid(image)
        return result_image

    def _parse_cnn_params(self, params):
        """解析 CNN_PP 输出的参数并应用约束"""
        batch_size = params.shape[0]

        # dark channel
        omega = tanh_range(*(0.1, 1.0))(params[:, 0:1])

        # wb
        wb_mask = torch.tensor(((0, 1, 1)), device=params.device).unsqueeze(0)
        features = params[:, 1:4] * wb_mask
        wb = torch.exp(tanh_range(-0.5, 0.5)(features))

        # gamma
        gamma_range_val = torch.tensor(3.0, device=params.device)
        log_gamma_range = torch.log(gamma_range_val)
        gamma = torch.exp(tanh_range(-log_gamma_range, log_gamma_range)(params[:, 4:5]))

        # tone
        tone_curve = torch.reshape(params[:, 5:13], shape=(-1, 1, 8))[:, None, None, :]
        tone_curve = tanh_range(*(0.5, 2))(tone_curve)

        # Contrast
        contrast = torch.tanh(params[:, 13:14])

        # sharpen
        sharpen = tanh_range(*(0.0, 5))(params[:, 14:15])

        params_dict = {
            'defog_omega': omega,
            'white_balance': wb,
            'gamma_correction': gamma,
            'tone_curve_points': tone_curve,
            'contrast_adjust': contrast,
            'sharpen_strength': sharpen
        }
        return params_dict

    def dark_channel(self, img):
        """计算暗通道 (B, C, H, W) -> (B, H, W)"""
        return torch.min(img, dim=1)[0]  # 取RGB通道最小值

    def estimate_atmosphere(self, img, dark_ch):
        """估计大气光A"""
        B, H, W = dark_ch.shape
        # 选择暗通道中前0.1%最亮的像素
        num_pixels = int(H * W * self.top_percent)
        flattened_dark = dark_ch.view(B, -1)
        indices = torch.topk(flattened_dark, num_pixels, dim=1)[1]
        # 获取原始图像中对应位置的像素
        atmosphere = []
        for b in range(B):
            selected_pixels = img[b, :, indices[b] // W, indices[b] % W]
            atmosphere.append(torch.max(selected_pixels, dim=1)[0])
        return torch.stack(atmosphere).unsqueeze(-1).unsqueeze(-1)

    def transmission(self, dark_ch, omega):
        """计算透射率图"""
        if omega.ndim == 2:
            omega = omega.view(-1, 1, 1)
        elif omega.ndim == 1:
            omega = omega.view(-1, 1, 1)
        transmission = 1 - omega * dark_ch
        return torch.clamp(transmission, min=self.t0, max=1.0)


if __name__ == "__main__":
    import cv2
    import numpy as np

    dip = Dip()
    haze = cv2.resize(cv2.imread(r'XR_Baidu_375.png'), (608, 608))
    image_tensor = torch.from_numpy(
        cv2.cvtColor(haze, cv2.COLOR_BGR2RGB)
    ).float() / 255.0
    image_tensor = image_tensor.permute(2, 0, 1).unsqueeze(0)

    tensor = dip(image_tensor)
    image = tensor.squeeze(0).permute(1, 2, 0).detach().cpu().numpy()
    image = np.clip(image * 255, 0, 255).astype(np.uint8)

    cv2.imshow("enhance", np.hstack([haze, image[..., ::-1]]))
    cv2.waitKey(0)
其中的一下关于维度的一些问题,我自己在跑下面的测试代码的时候不会出现问题,但是一旦训练就会报错,上面的代码是我经过多次修改后可以成功训练的模块,下图为我的测试代码:
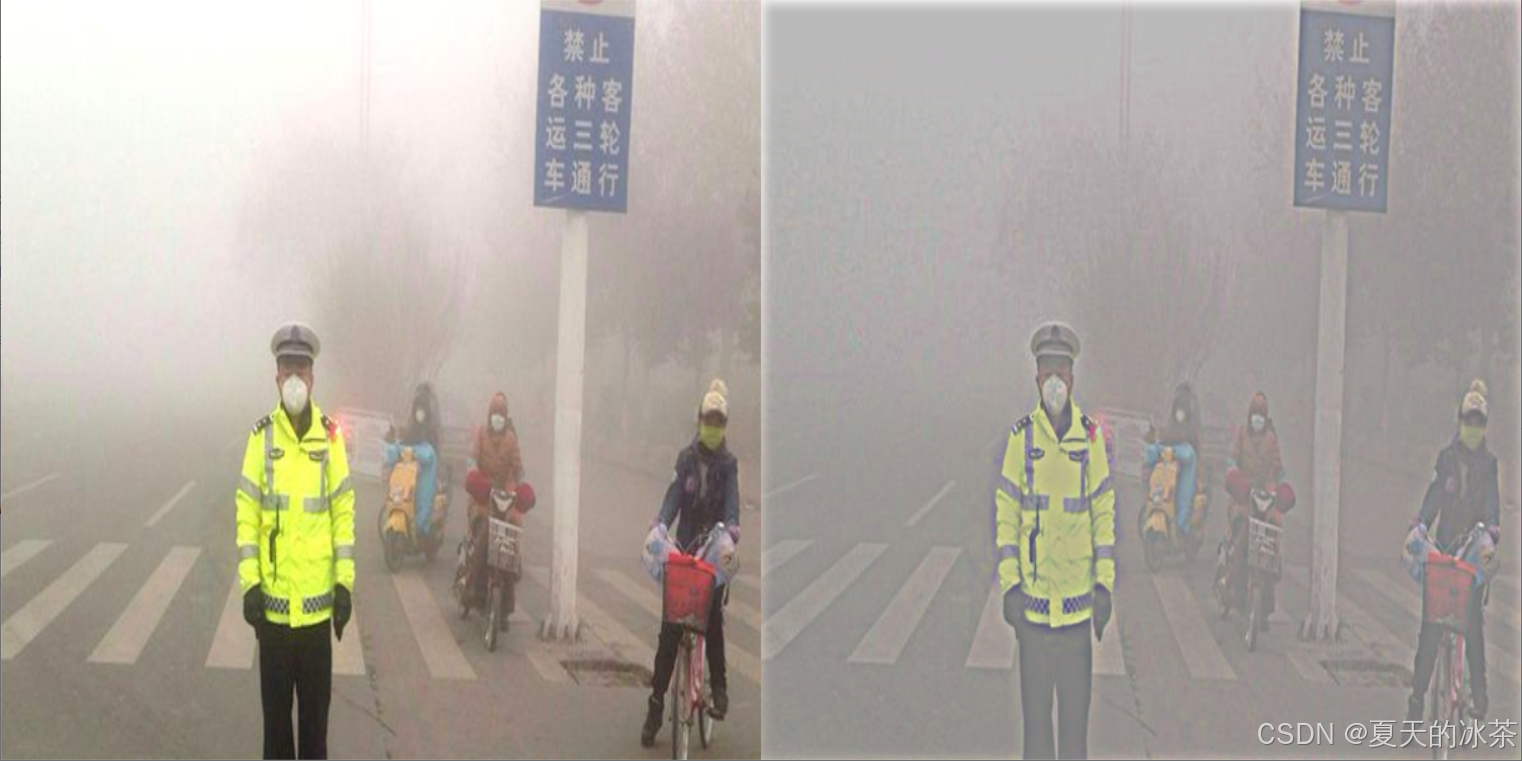
与论文当中的补充材料不会还有所差距,但这里我仅仅是测试的原模块,还是要看训练过后加载权重的增强效果。
简单来说该模块其实就是一个简单的图像增强模块,局限性比较的大,在RTTS数据集中一些正常的图像也经过该模块,很难说是否是真的有增强检测效果的功能,以及一些有雾图像的增强后是否真的对检测有增强也难说。
复现实验
这里先总述一下我这里的复现实验的修改之处:
1、原作者采用的是tf工程,这里我修改成立torch工程。
2、Dip的去雾存在输出结果不在0到1的范围内,会出现Nan的问题,这里是将之前的DCP拿来做修改,我自己想的是也能采用AODNet,该网络是将DCP的优化过程嵌入到网络当中,应该也能取得不错的效果
3、优化了Dip模块的位置,将其嵌入到backbone里面一起做梯度优化。
4、将原版的检测器yolov3修改为yolov5,并使用yolov5n作为在RTTS数据集上对比实验的对象。
5、参考论文修改了一些训练的参数hyps。
将Dip嵌入到backbone里面
此前我想的是重新修改一下训练脚本,然后将CNN_PP和Dip模块的模型权重分别保存,后面想到了更优的解决方案,就是在输入backbone前作图像增强就行了,但在第一个Conv前嵌入后又出现了维度不匹配的问题,后面我将Dip与CNN_PP都嵌入到第一个Conv里面就如愿解决了我的问题:
python
import torch
import torch.nn as nn
from IA_YOLO.iayolo.dip import Dip

class ConvWithIA(nn.Module):
    """
    将 IA_Preprocess 功能集成到第一个 Conv。
    输入: RGB 3通道
    输出: 原 Conv 输出通道数
    """
    def __init__(self, in_channels=3, out_channels=64, kernel_size=6, stride=2, padding=2):
        super().__init__()
        # 前置增强模块
        self.dip = Dip()
        # 原 Conv 模块
        self.conv = nn.Conv2d(in_channels, out_channels, kernel_size, stride, padding)
        self.bn = nn.BatchNorm2d(out_channels)
        self.act = nn.SiLU()

    def forward(self, x, return_enhanced=False):
        # IA_Preprocess
        enhanced = self.dip(x)
        enhanced = enhanced.to(self.conv.weight.dtype)
        # 原 Conv
        out = self.conv(enhanced)
        out = self.bn(out)
        out = self.act(out)
        if return_enhanced:
            return out, enhanced
        return out

if __name__=="__main__":
    import numpy as np
    # x = torch.randn(1, 3, 512, 512)
    # model = ConvWithIA()
    # with torch.no_grad():
    #     out = model(x)
    # print("Input shape: ", x.shape)
    # print("Output shape:", out.shape)
    from IA_YOLO.models.yolo import Model

    # n/s/m/l/x
    model = Model(r"E:\PythonProject\target_detection\IA_YOLO\models\iayolov5n.yaml")
    model.info(verbose=True)
其在yolo.py文件注册的方式与普通的Conv是一样的,下面是我修改后的配置文件iayolov5n:
python
# Ultralytics 🚀 AGPL-3.0 License - https://ultralytics.com/license

# Parameters
nc: 5 # number of classes
depth_multiple: 0.33 # model depth multiple
width_multiple: 0.25 # layer channel multiple
anchors:
  - [10, 13, 16, 30, 33, 23] # P3/8
  - [30, 61, 62, 45, 59, 119] # P4/16
  - [116, 90, 156, 198, 373, 326] # P5/32

# YOLOv5 v6.0 backbone
backbone:
  # [from, number, module, args]
  [
    [-1, 1, ConvWithIA, [64, 6, 2, 2]], # 0-P1/2
    [-1, 1, Conv, [128, 3, 2]], # 1-P2/4
    [-1, 3, C3, [128]],
    [-1, 1, Conv, [256, 3, 2]], # 3-P3/8
    [-1, 6, C3, [256]],
    [-1, 1, Conv, [512, 3, 2]], # 5-P4/16
    [-1, 9, C3, [512]],
    [-1, 1, Conv, [1024, 3, 2]], # 7-P5/32
    [-1, 3, C3, [1024]],
    [-1, 1, SPPF, [1024, 5]], # 9
  ]

# YOLOv5 v6.0 head
head: [
    [-1, 1, Conv, [512, 1, 1]],
    [-1, 1, nn.Upsample, [None, 2, "nearest"]],
    [[-1, 6], 1, Concat, [1]], # cat backbone P4
    [-1, 3, C3, [512, False]], # 13

    [-1, 1, Conv, [256, 1, 1]],
    [-1, 1, nn.Upsample, [None, 2, "nearest"]],
    [[-1, 4], 1, Concat, [1]], # cat backbone P3
    [-1, 3, C3, [256, False]], # 17 (P3/8-small)

    [-1, 1, Conv, [256, 3, 2]],
    [[-1, 14], 1, Concat, [1]], # cat head P4
    [-1, 3, C3, [512, False]], # 20 (P4/16-medium)

    [-1, 1, Conv, [512, 3, 2]],
    [[-1, 10], 1, Concat, [1]], # cat head P5
    [-1, 3, C3, [1024, False]], # 23 (P5/32-large)

    [[17, 20, 23], 1, Detect, [nc, anchors]], # Detect(P3, P4, P5)
  ]
适合恶劣天气训练的超参数
我针对IA-YOLO恶劣天气目标检测任务进行了以下主要改进,首先根据原论文的描述,这里修改了优化器并对学习率进行了调整,其次这里面我还禁用了Mosaic、Mixup和Copy-paste,避免小目标在拼接中丢失和恶劣天气图像特征混淆,然后保留了颜色增强、翻转以及几何变换,最后修改了一下损失函数的权重构建,主要是RTTS数据集存在类别不均的问题。
此文件命名为:hyp.ia-yolo.yaml
python
# Ultralytics 🚀 AGPL-3.0 License - https://ultralytics.com/license

# Hyperparameters for IA-YOLO恶劣天气小目标检测
# 根据论文配置:Adam优化器,学习率1e-4,batch_size=6,80epochs
# 禁用mosaic等对小目标检测有害的数据增强

lr0: 0.0001  # initial learning rate (Adam=1E-4,论文指定)
lrf: 0.01    # final OneCycleLR learning rate (lr0 * lrf)
momentum: 0.9  # Adam beta1 (论文使用Adam优化器)
weight_decay: 0.0001  # optimizer weight decay
warmup_epochs: 3.0 # warmup epochs (fractions ok)
warmup_momentum: 0.8 # warmup initial momentum
warmup_bias_lr: 0.00001 # warmup initial bias lr (与lr0保持一致比例)

# 损失函数权重调整 - 针对小目标检测
box: 0.06    # 稍微增加框损失权重,提高定位精度
cls: 0.4     # 降低分类损失权重
cls_pw: 1.0  # cls BCELoss positive_weight
obj: 1.2     # 增加目标检测损失权重,提高召回率
obj_pw: 1.0  # obj BCELoss positive_weight

# 训练参数调整
iou_t: 0.20  # IoU training threshold
anchor_t: 3.0  # 降低锚框匹配阈值,匹配更多小目标(从4.0降到3.0)
# anchors: 3  # anchors per output layer (0 to ignore)
fl_gamma: 0.0 # focal loss gamma (efficientDet default gamma=1.5)

# 数据增强 - 保留对恶劣天气检测有益的,禁用有害的
hsv_h: 0.015 # image HSV-Hue augmentation (fraction) - 保留
hsv_s: 0.7   # image HSV-Saturation augmentation (fraction) - 保留
hsv_v: 0.4   # image HSV-Value augmentation (fraction) - 保留

# 几何变换 - 适当减小幅度,避免小目标丢失
degrees: 5.0  # image rotation (+/- deg) - 小角度旋转
translate: 0.1 # image translation (+/- fraction)
scale: 0.2    # 减小缩放幅度,避免目标过小(从0.5降到0.2)
shear: 0.0    # image shear (+/- deg)
perspective: 0.0 # image perspective (+/- fraction), range 0-0.001

# 翻转增强 - 保留
flipud: 0.0   # image flip up-down (probability)
fliplr: 0.5   # image flip left-right (probability) - 保留

# 禁用对小目标检测有害的复杂数据增强
mosaic: 0.0   # 完全禁用mosaic - 对小目标检测有害
mixup: 0.0    # 禁用mixup - 对恶劣天气图像有害
copy_paste: 0.0 # 禁用copy-paste
RTTS数据清洗
本实验的数据集采用的是RTTS,下载路径为:RESIDE-β
下载好的数据需要进行清洗整理和数据划分,下面是统计内有xml文件的类别信息:
python
import os
import xml.etree.ElementTree as ET
from collections import Counter, defaultdict

def detailed_xml_analysis(xml_dir):
    """
    详细的XML文件分析,包括每个类别出现在多少个文件中
    """
    xml_files = [f for f in os.listdir(xml_dir) if f.lower().endswith('.xml')]

    if not xml_files:
        print("没有找到XML文件")
        return

    class_counter = Counter()  # 每个类别的总数量
    file_class_counter = defaultdict(set)  # 每个类别出现在哪些文件中
    total_objects = 0
    processed_files = 0

    print(f"分析 {len(xml_files)} 个XML文件...")

    for xml_file in xml_files:
        xml_path = os.path.join(xml_dir, xml_file)

        try:
            tree = ET.parse(xml_path)
            root = tree.getroot()

            file_classes = set()  # 当前文件中的类别

            for obj in root.findall('object'):
                class_name = obj.find('name').text
                if class_name:
                    class_counter[class_name] += 1
                    file_classes.add(class_name)
                    total_objects += 1

            # 记录每个类别出现在哪些文件中
            for class_name in file_classes:
                file_class_counter[class_name].add(xml_file)

            processed_files += 1

        except Exception as e:
            print(f"处理文件 {xml_file} 时出错: {e}")

    # 打印详细结果
    print(f"\n{'=' * 60}")
    print("XML文件详细分析结果")
    print(f"{'=' * 60}")
    print(f"处理文件数: {processed_files}/{len(xml_files)}")
    print(f"总目标数: {total_objects}")
    print(f"类别数: {len(class_counter)}")

    print(f"\n{'类别名称':<20} {'总数量':>8} {'文件数':>8} {'比例':>8} {'平均每文件':>10}")
    print(f"{'-' * 60}")

    for class_name, count in class_counter.most_common():
        file_count = len(file_class_counter[class_name])
        percentage = (count / total_objects) * 100
        avg_per_file = count / file_count if file_count > 0 else 0

        print(f"{class_name:<20} {count:>8} {file_count:>8} {percentage:>7.1f}% {avg_per_file:>9.1f}")

    print(f"{'-' * 60}")
    print(f"{'总计':<20} {total_objects:>8} {processed_files:>8} {'100.0':>7}%")

    return class_counter, file_class_counter

if __name__ == "__main__":
    xml_directory = r'E:\PythonProject\target_detection\data\RTTS\Annotations'  # 修改为你的XML目录

    if os.path.exists(xml_directory):
        detailed_xml_analysis(xml_directory)
    else:
        print(f"目录不存在: {xml_directory}")
python
分析 4322 个XML文件...

============================================================
XML文件详细分析结果
============================================================
处理文件数: 4322/4322
总目标数: 41203
类别数: 5

类别名称                总数量      文件数       比例      平均每文件
------------------------------------------------------------
car                     25317     2991    61.4%       8.5
person                  11366     2734    27.6%       4.2
bus                      2590     1201     6.3%       2.2
motorbike                1232      645     3.0%       1.9
bicycle                   698      412     1.7%       1.7
------------------------------------------------------------
总计                      41203     4322   100.0%
然后是xml转换成yolo格式的脚本:
python
import cv2
import os
import xml.etree.ElementTree as ET
from natsort import natsorted

def search_name_move_suffix(target_path, file_ext='png'):
    all_files = os.listdir(target_path)
    png_files = [file.split('.')[0] for file in all_files if file.lower().endswith(file_ext)]
    return natsorted(png_files)

def xml_to_yolo_txt(xml_path, txt_path, img_width, img_height, class_names):
    """
    将XML标注文件转换为YOLO格式的TXT文件

    Args:
        xml_path: XML文件路径
        txt_path: 输出的TXT文件路径
        img_width: 图像宽度
        img_height: 图像高度
        class_names: 类别名称列表
    """
    try:
        tree = ET.parse(xml_path)
        root = tree.getroot()

        with open(txt_path, 'w') as f:
            for obj in root.findall('object'):
                # 获取类别名称
                class_name = obj.find('name').text
                if class_name not in class_names:
                    continue

                class_id = class_names.index(class_name)

                # 获取边界框坐标
                bndbox = obj.find('bndbox')
                xmin = float(bndbox.find('xmin').text)
                ymin = float(bndbox.find('ymin').text)
                xmax = float(bndbox.find('xmax').text)
                ymax = float(bndbox.find('ymax').text)

                # 转换为YOLO格式 (中心点坐标和宽高,归一化到0-1)
                x_center = (xmin + xmax) / 2.0 / img_width
                y_center = (ymin + ymax) / 2.0 / img_height
                width = (xmax - xmin) / img_width
                height = (ymax - ymin) / img_height

                # 写入TXT文件
                f.write(f"{class_id} {x_center:.6f} {y_center:.6f} {width:.6f} {height:.6f}\n")

    except Exception as e:
        print(f"Error processing {xml_path}: {e}")


if __name__ == "__main__":
    rtts_images_dir = r'E:\PythonProject\target_detection\data\RTTS\JPEGImages'
    rtts_anns_dir = r'E:\PythonProject\target_detection\data\RTTS\Annotations'
    rtts_save_dir = r'E:\PythonProject\target_detection\data\RTTS\anns'
    os.makedirs(rtts_save_dir, exist_ok=True)
    # RTTS数据集的类别名称
    rtts_class_names = ['car', 'person', 'bus', 'motorbike', 'bicycle']
    rtts_file_list = search_name_move_suffix(rtts_images_dir, 'png')
    print(f"找到 {len(rtts_file_list)} 个图像文件")
    for image_name in rtts_file_list:
        image_path = os.path.join(rtts_images_dir, image_name + '.png')
        xml_path = os.path.join(rtts_anns_dir, image_name + '.xml')
        txt_path = os.path.join(rtts_save_dir, image_name + '.txt')
        if not os.path.exists(xml_path):
            print(f"警告: {xml_path} 不存在,跳过")
            continue
        image = cv2.imread(image_path)
        h, w, c = image.shape
        # 转换XML为YOLO TXT格式
        xml_to_yolo_txt(xml_path, txt_path, w, h, rtts_class_names)
        print(f"已转换: {image_name}")
    print("转换完成!")
我找了一下原文似乎没有给出划分的比例,这里我是采用的随机划分的方式:
python
import os
import shutil
import random
from natsort import natsorted

def search_name_move_suffix(target_path, file_ext='png'):
    """搜索指定扩展名的文件"""
    all_files = os.listdir(target_path)
    files = [file.split('.')[0] for file in all_files if file.lower().endswith(file_ext.lower())]
    return natsorted(files)


def split_and_reorganize_dataset(images_dir, labels_dir, output_dir, ratios=(0.7, 0.2, 0.1)):
    """
    按照比例分割数据集并重新组织目录结构

    Args:
        images_dir: 原始图像目录
        labels_dir: 原始标签目录
        output_dir: 输出根目录
        ratios: 训练集、验证集、测试集的比例
    """
    # 获取所有文件名(不带扩展名)
    image_files = search_name_move_suffix(images_dir, 'png')

    # 打乱文件列表
    random.shuffle(image_files)

    # 计算各集合的数量
    total_count = len(image_files)
    train_count = int(total_count * ratios[0])
    val_count = int(total_count * ratios[1])
    test_count = total_count - train_count - val_count

    print(f"数据集总数: {total_count}")
    print(f"训练集: {train_count} ({train_count / total_count * 100:.1f}%)")
    print(f"验证集: {val_count} ({val_count / total_count * 100:.1f}%)")
    print(f"测试集: {test_count} ({test_count / total_count * 100:.1f}%)")

    # 分割文件列表
    train_files = image_files[:train_count]
    val_files = image_files[train_count:train_count + val_count]
    test_files = image_files[train_count + val_count:]

    # 创建输出目录结构
    splits = ['train', 'val', 'test']
    for split in splits:
        os.makedirs(os.path.join(output_dir, split, 'images'), exist_ok=True)
        os.makedirs(os.path.join(output_dir, split, 'labels'), exist_ok=True)

    # 复制文件到新目录
    def copy_files(file_list, split_name):
        copied_count = 0
        for file_name in file_list:
            # 源文件路径
            src_image = os.path.join(images_dir, file_name + '.png')
            src_label = os.path.join(labels_dir, file_name + '.txt')

            # 目标文件路径
            dst_image = os.path.join(output_dir, split_name, 'images', file_name + '.png')
            dst_label = os.path.join(output_dir, split_name, 'labels', file_name + '.txt')

            # 复制图像文件
            if os.path.exists(src_image):
                shutil.copy2(src_image, dst_image)
                copied_count += 1
            else:
                print(f"警告: 图像文件不存在 {src_image}")

            # 复制标签文件
            if os.path.exists(src_label):
                shutil.copy2(src_label, dst_label)
            else:
                print(f"警告: 标签文件不存在 {src_label}")

        return copied_count

    # 复制各集合文件
    print("\n正在复制文件...")
    train_copied = copy_files(train_files, 'train')
    val_copied = copy_files(val_files, 'val')
    test_copied = copy_files(test_files, 'test')

    print(f"\n复制完成:")
    print(f"训练集: {train_copied} 个图像")
    print(f"验证集: {val_copied} 个图像")
    print(f"测试集: {test_copied} 个图像")

    return train_files, val_files, test_files


def create_data_yaml(output_dir, class_names, train_dir='train', val_dir='val', test_dir='test'):
    """
    创建YOLO格式的data.yaml配置文件
    """
    yaml_content = f"""# YOLO dataset configuration file
path: {os.path.abspath(output_dir)}  # dataset root dir
train: {train_dir}/images  # train images
val: {val_dir}/images  # val images
test: {test_dir}/images  # test images

# number of classes
nc: {len(class_names)}

# class names
names: {class_names}
"""

    yaml_path = os.path.join(output_dir, 'data.yaml')
    with open(yaml_path, 'w', encoding='utf-8') as f:
        f.write(yaml_content)

    print(f"配置文件已创建: {yaml_path}")
    return yaml_path


if __name__=="__main__":
    rtts_images_dir = r'E:\PythonProject\target_detection\data\RTTS\JPEGImages'
    rtts_labels_dir = r'E:\PythonProject\target_detection\data\RTTS\anns'  # 你之前转换的标签目录
    output_dir = r'E:\PythonProject\target_detection\data\RTTS_split'
    # RTTS数据集类别
    rtts_class_names = ['car', 'person', 'bus', 'motorbike', 'bicycle']
    random.seed(42)
    # 执行数据集分割和重组
    print("开始分割数据集...")
    train_files, val_files, test_files = split_and_reorganize_dataset(
        rtts_images_dir, rtts_labels_dir, output_dir
    )

    # 创建data.yaml配置文件
    create_data_yaml(output_dir, rtts_class_names)
    def save_file_lists(output_dir, train_files, val_files, test_files):
        """保存各集合的文件列表"""
        with open(os.path.join(output_dir, 'train.txt'), 'w') as f:
            for file in train_files:
                f.write(f"./{file}.png\n")

        with open(os.path.join(output_dir, 'val.txt'), 'w') as f:
            for file in val_files:
                f.write(f"./{file}.png\n")

        with open(os.path.join(output_dir, 'test.txt'), 'w') as f:
            for file in test_files:
                f.write(f"./{file}.png\n")


    save_file_lists(output_dir, train_files, val_files, test_files)
    print("文件列表已保存")
对比实验
训练的一些超参数遵循上面给出的hyp.ia-yolo.yaml文件,训练轮次为100轮,采用Adamw优化器,数据集采用RTTS。
yolov5n:
python
YOLOv5n summary: 157 layers, 1765930 parameters, 0 gradients, 4.1 GFLOPs
                 Class     Images  Instances          P          R      mAP50   mAP50-95: 100%|██████████| 108/108 [00:11<00:00,  9.59it/s]
                   all        864       7941      0.366      0.373      0.331      0.143
                   car        864       4865      0.341      0.675      0.578      0.269
                person        864       2152        0.4      0.542      0.507      0.225
                   bus        864        523      0.424      0.201      0.198     0.0858
             motorbike        864        283      0.504      0.284      0.285      0.105
               bicycle        864        118      0.158      0.161     0.0871     0.0287
iayolov5n:
python
iaYOLOv5n summary: 176 layers, 1930905 parameters, 0 gradients, 34.9 GFLOPs
                 Class     Images  Instances          P          R      mAP50   mAP50-95: 100%|██████████| 108/108 [00:17<00:00,  6.26it/s]
                   all        864       7941      0.372      0.364       0.34      0.153
                   car        864       4865      0.372      0.679      0.603      0.289
                person        864       2152      0.464      0.534      0.513      0.236
                   bus        864        523      0.435      0.209       0.23      0.103
             motorbike        864        283      0.454       0.27      0.268      0.108
               bicycle        864        118      0.134      0.127     0.0851     0.0281
从指标上来看,确实是有所提升,只是可惜原论文并没有提供RTTS的数据划分的文件,我只找到了一个./data/dataset_fog/RTTS_test.txt文件,但里面写的却是全部图像文件路径和标注数据。
可视化分析
这里我加载了权重后来看看DIP增强后的图像效果:
python
import torch
import cv2
import numpy as np
from IA_YOLO.iayolo import ConvWithIA
from IA_YOLO.models.yolo import Model

if __name__=="__main__":
    yaml_path = r"E:\PythonProject\target_detection\IA_YOLO\models\iayolov5n.yaml"
    weight_path = r"E:\PythonProject\target_detection\IA_YOLO\runs\train\exp3\weights\best.pt"

    model = Model(yaml_path)
    ckpt = torch.load(weight_path, map_location="cpu", weights_only=False)
    model.load_state_dict(ckpt["model"].float().state_dict(), strict=False)
    model.eval()

    first_module = model.model[0]
    if isinstance(first_module, ConvWithIA):
        print("Found ConvWithIA module")
    else:
        print(f"Warning: The first module is {type(first_module)}")

    img_path = r"E:\PythonProject\target_detection\data\RTTS_split\train\images\XR_Baidu_375.png"

    img = cv2.imread(img_path)
    img = cv2.cvtColor(img, cv2.COLOR_BGR2RGB)
    img_resized = cv2.resize(img, (512, 512))
    img_tensor = torch.from_numpy(img_resized).permute(2, 0, 1).unsqueeze(0).float() / 255.0

    with torch.no_grad():
        out, enhanced = first_module(img_tensor, return_enhanced=True)

    print(f"Input shape    : {img_tensor.shape}")
    print(f"Enhanced shape : {enhanced.shape}")
    print(f"Output shape   : {out.shape}")

    enhanced_np = torch.clamp(enhanced, 0, 1).squeeze(0).permute(1, 2, 0).cpu().numpy()
    enhanced_bgr = cv2.cvtColor((enhanced_np * 255).astype(np.uint8), cv2.COLOR_RGB2BGR)
    original_bgr = cv2.cvtColor(img_resized, cv2.COLOR_RGB2BGR)

    compare = np.hstack((original_bgr, enhanced_bgr))
    cv2.imshow("Original (Left) vs Enhanced (Right)", compare)
    cv2.waitKey(0)
    cv2.destroyAllWindows()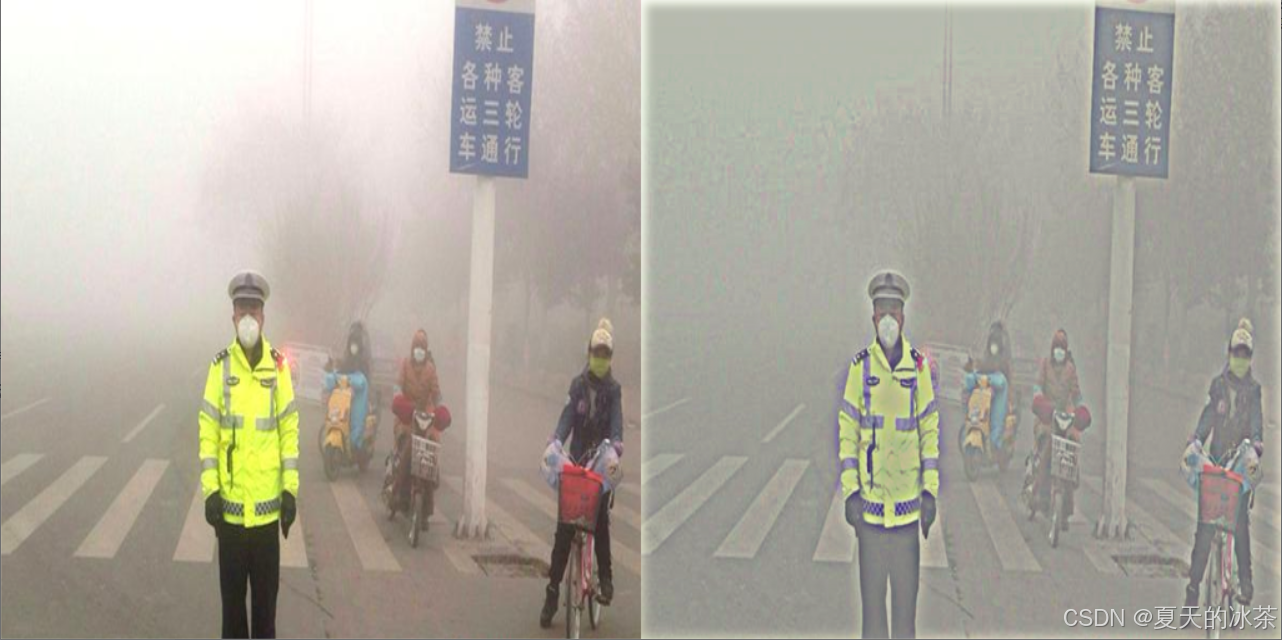
增强效果感觉有限,与原论文当中的补充材料还是有所差距

参考文章
【论文阅读笔记】用于恶劣天气条件下的目标检测的IA-YOLO(Image-Adaptive YOLO) | 适合雾天和低光照场景-CSDN博客
IA-YOLO项目中DIP模块的初级解读(生成带雾图片)-CSDN博客
https://mp.weixin.qq.com/s/GvXb3ZHZma9Hs0QeAWjJqQ
论文解读:ia-yolo | Image-Adaptive YOLO for Object Detection in Adverse Weather Conditions-CSDN博客