一、环境版本
OpenVINO 2025.3;
Python:3.11;
二、特性
1、YOLOv5 以后的新模型都可以正常推理,可以通用(只要是模型输出的数据定义不变即可),框架是按YOLOv13写的,模型使用yolov12s.pt;
2、输入参数通过命令行传入,方便对比不同模型;
3、输入输出的图像尺寸是根据传入模型动态读取的,适应不同输入尺寸的模型;
4、使用 LetterBox 进行前处理,防止图形畸变。
三、模型转换
onnx2openvino.py
python
import os
from openvino import convert_model, save_model
from openvino import Core

def onnx_to_ir(onnx_model_path, output_dir, model_name="converted_model"):
    """
    将ONNX模型转换为OpenVINO IR格式

    参数:
        onnx_model_path (str): ONNX模型文件路径
        output_dir (str): 输出目录路径
        model_name (str): 输出模型名称(不含扩展名)
    """
    try:
        # 检查输出目录是否存在,不存在则创建
        if not os.path.exists(output_dir):
            os.makedirs(output_dir)
            print(f"创建输出目录: {output_dir}")
        else:
            print(f"输出目录已存在: {output_dir}")

        # 转换ONNX模型为OpenVINO格式
        print("开始转换ONNX模型为IR格式...")
        ov_model = convert_model(onnx_model_path)

        # 构建完整的输出路径
        xml_path = os.path.join(output_dir, f"{model_name}.xml")
        bin_path = os.path.join(output_dir, f"{model_name}.bin")

        # 保存IR模型(生成.xml和.bin文件)
        save_model(ov_model, xml_path)
        print(f"模型转换成功!")
        print(f"XML文件: {xml_path}")
        print(f"BIN文件: {bin_path}")

        return xml_path, bin_path

    except Exception as e:
        print(f"转换过程中发生错误: {e}")
        return None, None

def verify_ir_model(xml_path):
    """
    验证转换后的IR模型是否可正常加载
    """
    try:
        core = Core()
        model = core.read_model(model=xml_path)
        compiled_model = core.compile_model(model=model, device_name="CPU")

        # 获取模型输入输出信息
        input_layer = model.input(0)
        output_layer = model.output(0)

        print("\n模型验证结果:")
        print(f"输入层: {input_layer}")
        print(f"输出层: {output_layer}")
        print("IR模型加载验证成功!")

        return True

    except Exception as e:
        print(f"模型验证失败: {e}")
        return False

if __name__ == "__main__":
    # 配置路径参数
    onnx_path = "./yolov12s.onnx"  # 替换为你的ONNX模型路径
    output_directory = "./"       # 替换为期望的输出目录
    output_model_name = "yolov12" # 输出模型名称

    # 执行转换
    xml_file, bin_file = onnx_to_ir(onnx_path, output_directory, output_model_name)

    # 验证转换结果
    if xml_file and bin_file:
        verify_ir_model(xml_file)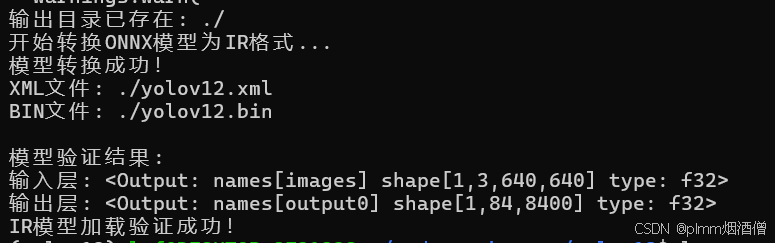
四、推理文件
openvino_infer.py
python
import cv2
import sys
import numpy as np
import openvino as ov
import time
import argparse
import traceback
class YOLOv13OpenVINO:
def __init__(self, model_xml: str, model_bin: str = None, device: str = "CPU",
conf_threshold: float = 0.5, iou_threshold: float = 0.5):
"""
初始化YOLOv13 OpenVINO推理器
"""
self.conf_threshold = conf_threshold
self.iou_threshold = iou_threshold
# 初始化OpenVINO核心
self.core = ov.Core()
# 可用设备检测
available_devices = self.core.available_devices
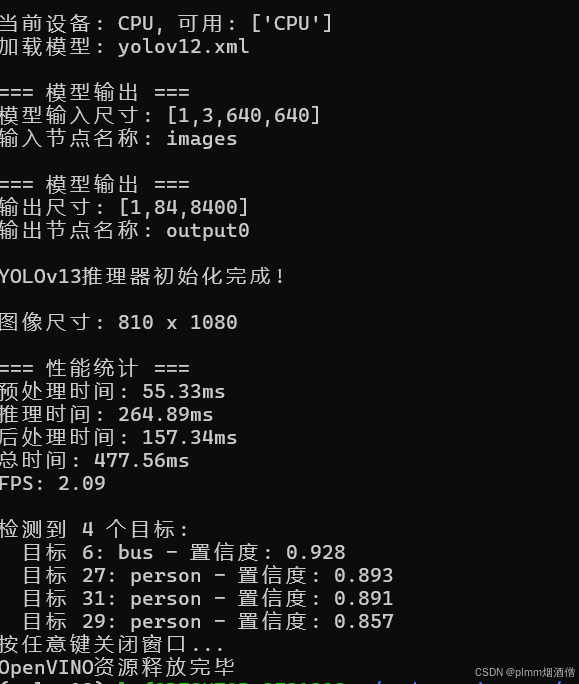
print(f"当前设备: {device}, 可用: {available_devices}")
# 如果未提供bin文件路径,则假设与xml同目录且同名
if model_bin is None:
import os
model_bin = model_xml.replace('.xml', '.bin')
# 加载模型
print(f"加载模型: {model_xml}")
self.model = self.core.read_model(model=model_xml, weights=model_bin)
# 编译模型
self.compiled_model = self.core.compile_model(self.model, device)
# 获取输入输出信息
self.input_layer = self.compiled_model.input(0)
self.output_layer = self.compiled_model.output(0)
# 获取输入尺寸 (通常为 [1, 3, H, W])
self.input_shape = self.input_layer.shape
self.batch_size, self.channels, self.height, self.width = self.input_shape
self.analyze_model_info()
# COCO数据集类别名称 (80个类别)
self.class_names = [
'person', 'bicycle', 'car', 'motorcycle', 'airplane', 'bus', 'train', 'truck',
'boat', 'traffic light', 'fire hydrant', 'stop sign', 'parking meter', 'bench',
'bird', 'cat', 'dog', 'horse', 'sheep', 'cow', 'elephant', 'bear', 'zebra',
'giraffe', 'backpack', 'umbrella', 'handbag', 'tie', 'suitcase', 'frisbee',
'skis', 'snowboard', 'sports ball', 'kite', 'baseball bat', 'baseball glove',
'skateboard', 'surfboard', 'tennis racket', 'bottle', 'wine glass', 'cup',
'fork', 'knife', 'spoon', 'bowl', 'banana', 'apple', 'sandwich', 'orange',
'broccoli', 'carrot', 'hot dog', 'pizza', 'donut', 'cake', 'chair', 'couch',
'potted plant', 'bed', 'dining table', 'toilet', 'tv', 'laptop', 'mouse',
'remote', 'keyboard', 'cell phone', 'microwave', 'oven', 'toaster', 'sink',
'refrigerator', 'book', 'clock', 'vase', 'scissors', 'teddy bear', 'hair drier',
'toothbrush'
]
# 为每个类别生成随机颜色
self.colors = np.random.uniform(0, 255, size=(len(self.class_names), 3))
print("\nYOLOv13推理器初始化完成!\n")
def __del__(self):
"""
析构函数,主动释放OpenVINO相关资源
"""
# print("正在释放OpenVINO资源...")
# 释放编译模型
if hasattr(self, 'compiled_model'):
del self.compiled_model
# print("✓ 已释放编译模型")
# 释放模型
if hasattr(self, 'model'):
del self.model
# print("✓ 已释放模型")
# 释放核心对象
if hasattr(self, 'core'):
del self.core
# print("✓ 已释放核心对象")
# 强制垃圾回收
import gc
gc.collect()
# print("✓ 垃圾回收完成")
print("OpenVINO资源释放完毕")
def analyze_model_info(self):
"""分析模型格式"""
print(f"\n=== 模型输出 ===")
print(f"模型输入尺寸: {self.input_shape}")
print(f"输入节点名称: {self.input_layer.any_name}")
print(f"\n=== 模型输出 ===")
print(f"输出尺寸: {self.output_layer.shape}")
print(f"输出节点名称: {self.output_layer.any_name}")
def preprocess(self, image: np.ndarray):
"""
图像预处理:调整大小、填充、归一化
"""
# 获取原始图像尺寸
self.img_height, self.img_width = image.shape[:2]
# 计算缩放比例并调整大小
r = min(self.width / self.img_width, self.height / self.img_height)
new_w, new_h = int(self.img_width * r), int(self.img_height * r)
# 调整图像大小
resized = cv2.resize(image, (new_w, new_h), interpolation=cv2.INTER_LINEAR)
# 创建画布并填充为灰色
canvas = np.full((self.height, self.width, 3), 114, dtype=np.uint8)
dh = (self.height - new_h) // 2
dw = (self.width - new_w) // 2
canvas[dh:dh+new_h, dw:dw+new_w] = resized
# 转换通道顺序: HWC to CHW
image_chw = canvas.transpose(2, 0, 1)
# 添加batch维度并转换为float32
image_batch = np.expand_dims(image_chw, 0).astype(np.float32)
# 归一化 [0, 255] -> [0, 1]
image_batch /= 255.0
return image_batch, r, (dw, dh)
def parse_yolo_output(self, output: np.ndarray, ratio, pad):
"""解析YOLO格式输出"""
outputs = np.transpose(np.squeeze(output[0]))
rows = outputs.shape[0]
dw, dh = pad
# 提取边界框信息
boxes = []
scores = []
class_ids = []
for i in range(rows):
# 从第5个开始取
classes_scores = outputs[i][4:]
max_score = np.amax(classes_scores)
# 如果置信度满足阈值
if max_score >= self.conf_threshold:
class_id = np.argmax(classes_scores)
x, y, w, h = outputs[i][0], outputs[i][1], outputs[i][2], outputs[i][3]
# 将中心点坐标转换回原始图像坐标系
center_x_original = (x - dw) / ratio
center_y_original = (y - dh) / ratio
w_original = w / ratio
h_original = h / ratio
# 计算边界框的左上角坐标
left = int(center_x_original - w_original / 2)
top = int(center_y_original - h_original / 2)
width = int(w_original)
height = int(h_original)
class_ids.append(class_id)
scores.append(max_score)
boxes.append([left, top, width, height])
return boxes, scores, class_ids
def postprocess(self, outputs: np.ndarray, ratio, pad):
"""
后处理: 解析模型输出并转换回原始图像坐标
"""
# 解析YOLO输出
boxes, scores, class_ids = self.parse_yolo_output(outputs, ratio, pad)
# 应用NMS
indices = cv2.dnn.NMSBoxes(boxes, scores, self.conf_threshold, self.iou_threshold)
return [boxes, scores, class_ids, indices]
def draw_detections(self, image: np.ndarray, detections):
"""
在图像上绘制检测结果
"""
result_image = image.copy()
boxes, scores, class_ids, indices = detections
for i in indices:
# Get the box, score, and class ID corresponding to the index
box = boxes[i]
score = scores[i]
cls_id = class_ids[i]
x1 = int(box[0])
y1 = int(box[1])
x2 = int(x1 + box[2])
y2 = int(y1 + box[3])
# 绘制边界框
color = self.colors[int(cls_id)]
cv2.rectangle(result_image, (x1, y1), (x2, y2), color, 2)
# 准备标签文本
label = f"{self.class_names[cls_id]}: {score:.2f}"
# 计算标签尺寸
label_size = cv2.getTextSize(label, cv2.FONT_HERSHEY_SIMPLEX, 0.5, 2)[0]
# 绘制标签背景
cv2.rectangle(result_image,
(x1, y1 - label_size[1] - 10),
(x1 + label_size[0], y1),
color, -1)
# 绘制标签文本
cv2.putText(result_image, label,
(x1, y1 - 5),
cv2.FONT_HERSHEY_SIMPLEX, 0.5, (255, 255, 255), 2)
return result_image
def print_detection_info(self, detections):
"""打印检测结果信息"""
boxes, scores, cls_id, indices = detections
print(f"\n检测到 {len(indices)} 个目标:")
for i in indices:
conf = scores[i]
cls_name = self.class_names[int(cls_id[i])] if int(cls_id[i]) < len(self.class_names) else "未知"
print(f" 目标 {i+1}: {cls_name} - 置信度: {conf:.3f}")
def print_detection_time(self, time_stats):
# 打印统计信息
total_time = sum(time_stats.values())
print(f"\n=== 性能统计 ===")
print(f"预处理时间: {time_stats['preprocess']*1000:.2f}ms")
print(f"推理时间: {time_stats['inference']*1000:.2f}ms")
print(f"后处理时间: {time_stats['postprocess']*1000:.2f}ms")
print(f"总时间: {total_time*1000:.2f}ms")
print(f"FPS: {1/total_time:.2f}")
def predict(self, image_path: str):
"""
执行完整的推理流程
"""
# 读取图像
image = cv2.imread(image_path)
if image is None:
print(f"错误: 无法读取图像 {image_path}")
return None, []
orig_image = image.copy()
orig_h, orig_w = image.shape[:2]
print(f"图像尺寸: {orig_w} x {orig_h}")
# 记录各阶段时间
time_stats = {}
# 1. 预处理
start_time = time.time()
input_tensor, ratio, pad = self.preprocess(image)
time_stats['preprocess'] = time.time() - start_time
# 2. 推理
start_time = time.time()
result = self.compiled_model([input_tensor])[self.output_layer]
time_stats['inference'] = time.time() - start_time
# 3. 后处理
start_time = time.time()
detections = self.postprocess(result, ratio, pad)
time_stats['postprocess'] = time.time() - start_time
# 4. 绘制结果
result_image = self.draw_detections(orig_image, detections)
return result_image, time_stats, detections
def main(model_xml, input_image, device='CPU', save_result=False, show_result=True):
"""
主函数: YOLOv13 OpenVINO推理
"""
# 创建推理器
try:
detector = YOLOv13OpenVINO(
model_xml=model_xml,
device=device,
conf_threshold=0.5,
iou_threshold=0.5
)
# 执行图像推理
result_image, time_stats, detections = detector.predict(input_image)
# 打印时间信息
detector.print_detection_time(time_stats)
# 打印检测信息
detector.print_detection_info(detections)
# 保存结果
if save_result:
output_path = "detection_result.jpg"
cv2.imwrite(output_path, result_image)
print(f"\n结果已保存至: {output_path}")
# 显示结果
if show_result:
cv2.imshow('YOLOv13 Detection Result', result_image)
print("按任意键关闭窗口...")
cv2.waitKey(0)
cv2.destroyAllWindows()
except Exception as e:
# print(f"错误: {e}")
traceback.print_exc()
print("请确保:")
print("1. 模型路径正确")
print("2. OpenVINO已正确安装")
print("3. 图像路径正确")
sys.exit(1)
if __name__ == "__main__":
# 设置命令行参数
parser = argparse.ArgumentParser(description='OpenVINO YOLO 推理')
parser.add_argument('--model_xml', type=str, required=True, help='模型 xml 文件路径')
parser.add_argument('--image', type=str, required=True, help='待检测图像')
parser.add_argument('--device', type=str, default="GPU", help='推理设备')
args = parser.parse_args()
main(args.model_xml, args.image, args.device)
sys.exit(0)五、推理结果
推理程序会检测支持的设备,支持较新的集显,我的另一台 i7-13700H笔记本是可以用集显GPU推理的。