MCP 由许多部分组成。 简而言之,客户端与服务器之间通过 JSON-RPC(JavaScript Object Notation -- Remote Procedure Call) 消息进行交互。JSON-RPC 消息 遵循 JSON-RPC 规范,这意味着它包含 jsonrpc、id、method 与 params 字段,且数据类型为 JSON。示例如下:
json
{
  "jsonrpc": "2.0",
  "id": 1,
  "method": "doSomething",
  "params": {
    "foo": "bar"
  }
}
小贴士: 使用下一代 Packt Reader 的 AI Code Explainer 与 Quick Copy 能提升编码体验。在该阅读器中点击 Copy 按钮(1)可快速复制代码到你的开发环境,或点击 Explain 按钮(2)让 AI 助手解释一段代码。
说明: 购买本书可免费使用下一代 Packt Reader。扫描二维码或访问 packtpub.com/unlock,按书名搜索并确认版本无误。
为便于理解、也让内容更有趣,本章将通过一个实现过程来解释协议 。因此,我们希望本章不仅仅是架构图,而是让你一窥其工作原理。如果你急于开始构建 MCP 服务器 ,可直接跳到第 3 章 ;若你想更深入理解 MCP 协议,请继续阅读,之后也可随时回看本章。
本章你将学习:
- MCP 中最常见的消息流 及其消息类型
- 底层 SDK 实现的大致工作方式
本章涵盖下列主题:
- 通过实现来理解协议
- MCP 中的传输层(Transports)
通过实现来理解协议
与其写成一章"干巴巴"的协议与消息类型说明,不如在实际实现流程 中讲解过程与消息流。随着流程说明,你会同时看到流程图 与对应代码。我们开始吧。
MCP 的传输层(Transports in MCP)
MCP 中"传输"的理念是:它定义了客户端与服务器如何通信 。MCP 对传输保持无关性(transport-agnostic) ,可运行在 HTTP、WebSocket、STDIO 等之上。传输层负责底层消息交换,交换的消息类型为 JSON-RPC。
MCP 支持一系列传输:
- STDIO(适合本地运行的服务器)
- 可流式(streamable)传输 :如 WebSockets 与 SSE(Server-Sent Events)
- 请求/响应(request/response)传输 :如 HTTP
对上述每种传输,有一个共同点:它们都基于流(streams) 。每种传输都会以类似如下方式暴露读/写流:
csharp
async with anyio.create_task_group() as tg:
    ...
    yield (read_stream, write_stream)
此外,还有一个所有传输都会使用的 BaseSession 类,用于发送原始 JSON-RPC 消息,其大致如下:
ruby
class BaseSession(
    Generic[
        SendRequestT,
        SendNotificationT,
        SendResultT,
        ReceiveRequestT,
        ReceiveNotificationT,
    ],
):
    ...
    def send_request():
        ...
    def send_notification():
        ...
    def response():
        ...
    def _send_response():
        ...
该类定义了诸如 send_request、send_notification 与 response 等方法,用于发送 JSON-RPC 消息。
STDIO 传输
好,现在我们从 STDIO 传输入手,来理解并实现 MCP 中的消息流。走起!
你一定熟悉在控制台看到消息或在控制台输入内容------这就是标准输入/输出(STDIN/STDOUT,合称 STDIO) 。那么我们如何在程序中利用这些流?我们先以服务器/客户端 的思路来考虑:客户端 向服务器 写入消息,服务器 再进行响应。下面看一个使用 STDIO 的极简服务器实现:
服务器需要监听标准输入(stdin)以接收传入消息。在 Python 中,你可以使用 sys.stdin 并对其迭代来获取下一条消息,例如:
arduino
import sys
for line in sys.stdin:
message = line.strip()我们还想区分纯文本消息 与 JSON-RPC 消息。纯文本消息可直接处理,而 JSON-RPC 消息需要解析并按 JSON-RPC 规范进行响应。我们可以用消息结构来识别 JSON-RPC 消息,例如:
arduino
if line.startswith('{"jsonrpc":'):
    json_message = json.loads(line)
# 处理该 JSON 消息此外,我们需要把响应发回给客户端 。可以用 print 并配合 sys.stdout.flush():
lua
print("message")
sys.stdout.flush()
现在确定了关键元素,我们来创建第一个服务器:
python
import sys
import json

while True:
    for line in sys.stdin:
        message = line.strip()
        if message == "hello":
            # 发消息给客户端
            print("hello there")
            sys.stdout.flush()  # 立刻刷新输出
        elif message.startswith('{"jsonrpc":'):
            # 按 JSON 解析
            json_message = json.loads(message)
            # 识别 JSON-RPC 消息类型并做相应处理
            match json_message['method']:
                case "tools/list":
                    response = {
                        "jsonrpc": "2.0",
                        "id": json_message["id"],
                        "result": ["tool1", "tool2"]
                    }
                    print(json.dumps(response))
                    sys.stdout.flush()
                    break
                case _:
                    print(f"Unknown method: {json_message['method']}")
                    sys.stdout.flush()
                    break
        elif message == "exit":
            print("Exiting server.")
            sys.stdout.flush()
            sys.exit(0)
        else:
            print(f"Unknown message: {message}")
在上面的代码中,我们完成了:
- 编写监听
sys.stdin的代码 - 若接收到
hello,则回应hello there;若接收到 JSON,则解析 并根据其method字段的不同值进行不同响应 - 加入了当接收到
exit文本时关闭程序的逻辑
注意我们多处使用如下打印与刷新:
lua
print(json.dumps(response))
sys.stdout.flush()
可以把它重构为一个 send_response 函数:
scss
def send_response(response):
    print(json.dumps(response))
    sys.stdout.flush()
这样服务器代码就变为:
python
# server.py
import sys
import json

def send_response(response):
    print(json.dumps(response))
    sys.stdout.flush()

while True:
    for line in sys.stdin:
        message = line.strip()
        if message == "hello":
            send_response("hello there")
        elif message.startswith('{"jsonrpc":'):
            json_message = json.loads(message)
            match json_message['method']:
                case "tools/list":
                    response = {
                        "jsonrpc": "2.0",
                        "id": json_message["id"],
                        "result": ["tool1", "tool2"]
                    }
                    send_response(response)
                    break
                case _:
                    send_response(f"Unknown method: {json_message['method']}")
                    break
        elif message == "exit":
            send_response("Exiting server.")
            sys.exit(0)
        else:
            send_response(f"Unknown message: {message}")
创建客户端
那么如何创建一个与之配合的客户端 ?客户端应能向服务器发送消息 ,并接收服务器的响应 。一种做法是:把服务器作为子进程 启动,客户端(父进程)通过标准输入/输出与之通信。
向服务器发送消息的方式是写入其 stdin ,并从其 stdout 读取响应。例如:
lua
proc.stdin.write(message)
proc.stdin.flush()
可将其封装为 send_message 函数:
ruby
def send_message(proc, message):
    proc.stdin.write(message)
    proc.stdin.flush()
在客户端代码中使用该函数:
python
# client.py
import subprocess
import json

# 启动子进程(服务器)
proc = subprocess.Popen(
    ['python3', 'server.py'],  # 替换为你的脚本路径
    stdin=subprocess.PIPE,
    stdout=subprocess.PIPE,
    text=True
)

list_tools_message = {
    "jsonrpc": "2.0",
    "id": 1,
    "method": "tools/list",
    "params": {}
}
message = 'hello\n'

def send_message(message):
    """向子进程发送一条消息。"""
    print(f'[CLIENT] Sending message to server... Message: {message.strip()}')
    proc.stdin.write(message)
    proc.stdin.flush()

def serialize_message(message):
    """将消息序列化为 JSON 文本行。"""
    return json.dumps(message) + '\n'

# 发送一条纯文本消息
send_message(message)
# 读取一行响应
response = proc.stdout.readline()
print('[SERVER]:', response.strip())

# 发送一条 JSON-RPC 消息
send_message(serialize_message(list_tools_message))
response = proc.stdout.readline()
print('[SERVER]:', response.strip())

# 关闭子进程(服务器)
send_message('exit\n')
proc.stdin.close()
exit_code = proc.wait()
print(f"Child exited with code {exit_code}")
你可以看到如下过程:
- 客户端 把服务器作为子进程 启动,并通过
send_message写入其stdin发送出站消息 - 相反方向,客户端通过
proc.stdout.readline()监听子进程的stdout来接收响应
这段代码是一个很好的起点,用以继续实现 MCP 与 STDIO 传输。实际上 MCP 的运作也大致如此,只不过 MCP 规定使用 JSON-RPC 消息 进行通信。接下来,我们会让它更接近 MCP 的形态。
MCP 与 STDIO 传输
上一节中的代码基本就像 MCP 的 STDIO 传输 在工作的样子。要想"完全一致",我们还需要让客户端与服务器交换 JSON-RPC 消息。那么,什么是 JSON-RPC 消息?
先看一个示例 jsonrpc 消息:
arduino
const listTools = {
    "jsonrpc": "2.0",
    "id": 1,
    "method": "tools/list",
    "params": {}
};
这里我们看到的是一条 JSON-RPC 消息 。之所以是 JSON-RPC,首先因为它是 JSON 格式 ,其次它包含名为 jsonrpc 的属性。此外,它还应包含 id 、method 与 params 属性。上面的 tools/list 消息是客户端发送给服务器的,请求服务器返回其可用工具;该命令用于确定服务器具备哪些工具。
那么,构建一个 MCP 服务器的第一步是什么?答案是初始化流程 ,也叫 握手(handshake) 。我们接下来就来实现它。
运行示例见仓库的 solutions 目录:
github.com/PacktPublis...
MCP 中的初始化流程
现在我们已有了简单的客户端与服务器代码,接下来应聚焦于 MCP 的初始化流程(也称握手)。
它在"万米视角"下长这样:
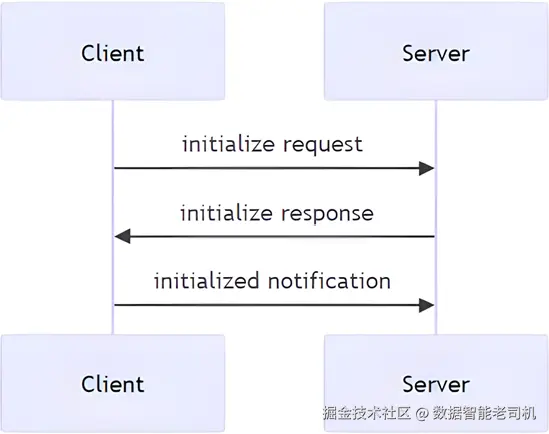
图 2.1 -- 初始化流程
其过程如下:
- 客户端发送
initialize请求,表示它希望了解服务器的能力。 - 服务器返回其能力------也就是它支持哪些功能。
- 客户端发送
initialized通知,告知服务器可以开始执行操作了。在这条通知之前,诸如列出/运行工具等其它消息都应返回错误,因为握手尚未完成。
下面分别看看每一步的消息:
客户端发送 initialize 请求
客户端发送给服务器的消息如下:
json
{
  "jsonrpc": "2.0",
  "id": 1,
  "method": "initialize",
  "params": {
    "protocolVersion": "2024-11-05",
    "capabilities": {
      "roots": {
        "listChanged": true
      },
      "sampling": {}
    },
    "clientInfo": {
      "name": "ExampleClient",
      "version": "1.0.0"
    }
  }
}
这是一次 initialize 消息,从 method 的值 initialize 可以看出。客户端还必须发送自己的 capabilities(能力) ,本例中包含 roots 与 sampling:
json
"capabilities": {
  "roots": {
    "listChanged": true
  },
  "sampling": {}
}
服务器返回 initialize 响应
服务器需要用相似的能力描述进行应答------例如它是否支持 tools、resources、prompts、notifications 等。典型响应如下:
json
{
  "jsonrpc": "2.0",
  "id": 1,
  "result": {
    "protocolVersion": "2024-11-05",
    "capabilities": {
      "logging": {},
      "prompts": {
        "listChanged": true
      },
      "resources": {
        "subscribe": true,
        "listChanged": true
      },
      "tools": {
        "listChanged": true
      }
    },
    "serverInfo": {
      "name": "ExampleServer",
      "version": "1.0.0"
    }
  }
}
注意响应中的 capabilities 属性,包含 logging、prompts、resources、tools 等。logging 表示服务器能向客户端发送日志(第 5 章会展示日志通知示例)。而 prompts、resources、tools 是服务器最基础的一组能力(第 3 章会进一步介绍)。
该响应帮助客户端判定能用/不能用 哪些能力,同时也提供协议版本 与服务器信息。
完成握手:客户端发送 initialized 通知
最后一步,客户端发送 initialized 消息。这是握手的最终消息 。一旦服务器收到,它就可以处理来自客户端的任意 JSON-RPC 消息 (tools、resources、prompts 等)。这条消息不需要服务器回包 ,但服务器需要记住已完成初始化。只有在完成初始化后,正常的操作(调用工具、提示等)才能进行。在此之前,几乎做不了什么。
消息如下(如你所见,它携带的信息不多,但对双方能否正常运作至关重要):
json
{
  "jsonrpc": "2.0",
  "method": "notifications/initialized"
}
我们该如何实现它?接着往下看。
实现初始化
上面往返交换了几条消息。实际上,客户端直接给服务器发一条 initialized 也能跑通,但更好的实践 是先通过 initialize 交换能力。
前一小节的客户端代码虽然能发送文本与 JSON-RPC 消息,但并未真正遵循初始化的流程。为此,我们需要修改客户端,让它正确执行初始化序列。序列完成后,客户端才能发送其他类型的消息(例如列出工具等)。
为客户端新增一个 connect 函数,确保它先询问服务器能力 ,然后发送初始化完成通知:
scss
# client.py
def connect():
    print("Connecting to the server...")
    # 1. 询问能力
    send_message(serialize_message(initialize_message))
    # 读取服务器响应
    response = proc.stdout.readline()
    print_response(response, prefix='[SERVER]: \n')
    # 2. 发送 initialized 通知,握手完成
    send_message(serialize_message(initialized_message))
实现说明:
- 新增
connect函数,先请求能力,再发送initialized通知。 - 调用链从派发
initialize开始,随后派发initialized,从而结束握手流程。
接着用一个 main 函数把流程再整理一下:
scss
def list_tools():
    # 3. 发送列出工具的 JSON-RPC 消息
    send_message(serialize_message(list_tools_message))
    response = proc.stdout.readline()
    print_response(response, prefix='[SERVER]: \n')

def close_server():
    send_message('exit\n')
    exit_code = proc.wait()
    print(f"Child exited with code {exit_code}")

def main():
    connect()
    list_tools()
    close_server()

main()
我们做了以下事情:
- 创建
main,它负责连接服务器、列出工具,并在完成后关闭连接。 - 定义
list_tools,发送特定的 JSON-RPC 消息请求服务器列出工具。 - 定义
close_server,向服务器发送退出消息。
服务器端的配合
服务器端需要相应地处理 这些消息:在未初始化 前,服务器应只接受 initialize 或 notifications/initialized 两种 method。初始化之前的其他消息 都应返回错误;初始化之后,才接受其他受支持的消息。
针对客户端在未初始化前尝试做其他事的情况,可写出如下处理:
lua
if method != "initialize" and method != "notifications/initialized":
    print(f"Server not initialized. Please send an 'initialized' "
          f"notification first. You sent {method}")
    sys.stdout.flush()
    continue
这段代码会停止进一步处理该消息,继续等待下一条。
对 initialize 与 notifications/initialized 的处理可以这样写:
lua
match method:
    case "notifications/initialized":
        # print("Server initialized successfully.")
        sys.stdout.flush()
        initialized = True
        break
    case "initialize":
        print(json.dumps(initializeResponse))
        sys.stdout.flush()
        # initialized = True
        break
        # should return capabilities
把这些拼起来,服务器的整体结构大致如下:
python
# server.py
# code omitted for brevity
elif message.startswith('{"jsonrpc":'):
  json_message = json.loads(message)
  method = json_message.get('method', '')
  if not initialized:
    if method != "initialize" and method != "notifications/initialized":
      print(f"Server not initialized. Please send an 'initialized' "
            f"notification first. You sent {method}")
      sys.stdout.flush()
      continue
    match method:
      case "notifications/initialized":
        # print("Server initialized successfully.")
        sys.stdout.flush()
        initialized = True
        break
      case "initialize":
        print(json.dumps(initializeResponse))
        sys.stdout.flush()
        # initialized = True
        break
        # should return capabilities
      case "tools/list":
        response = {
          "jsonrpc": "2.0",
          "id": json_message["id"],
          "result": ["tool1", "tool2"]
        }
        print(json.dumps(response))
        sys.stdout.flush()
        break
      case _:
        print(f"Unknown method: {json_message['method']}")
        sys.stdout.flush()
        break
作为练习,建议你按需要改进上述方案。比如把重复的打印与刷新重写成一个 send_response 方法:
scss
def send_response(response):
  print(json.dumps(response))
  sys.stdout.flush()
在上述代码中,我们完成了:
- 定义了一个
elif分支:若是 JSON-RPC 消息,则尝试路由到正确的处理逻辑; - 增加了初始化前 的检查:若尚未初始化且消息既不是能力请求也不是
notifications/initialized,则返回一条提示该消息类型不被接受的响应; - 初始化完成后,就可以接受诸如列出工具等消息,并相应返回工具列表。
可运行示例见 solutions 目录的 Initialization:
github.com/PacktPublis...
支持性特性(Supporting features)
现在我们的代码已经更健壮了,接下来来支持 tools(工具) 、resources(资源) 和 prompts(提示) 等特性。
你已经看到我们如何调用 connect 方法与服务器完成握手。之后,我们希望依次调用一个 tool、一个 resource 和一个 prompt,并在继续下一步动作前等待其响应。要实现这种行为,需要做到:
- 把消息放到流上(发送出去);
- 等待响应到达;
- 如果收到的是正常响应 就展示它;如果是通知(notification) ,就忽略它。来自服务器的通知通常是特殊消息或进度更新,我们会在下一节实现对通知的支持。
很好,计划有了。让我们回到 main 方法,看看现在有什么。
现在需要考虑如何处理一次 list_tools() 调用的响应,如下面的代码所示:
csharp
def main():
    connect()
    list_tools()
    close_server()
main()理想情况下,我们希望捕获响应 并对其做点事情,比如把这些工具存起来,以便稍后通过(计划要创建的)call_tool 方法来调用它们。
我们希望代码能写成这样:
css
def main():
    connect()
    tools = list_tools()
    call_tool(tools[0], args) # 需要为 call_tool 指定 args
    close_server()
main()此时我们需要捕获 list_tools 的响应 并打印 它。为此,服务器与客户端 都要做修改:客户端需要把响应保存到一个 tools 变量中;服务器需要识别收到的是一个"列出工具"的命令,并返回相应的 JSON-RPC 消息。
先看服务器端。这里我们需要新增一个 tools/list 分支,列出所有工具:
bash
# server.py
# code omitted for brevity
case "tools/list":

    response = {
        "jsonrpc": "2.0",
        "id": json_message["id"],
        "result": {
            "tools": [
                {
                    "name": "example_tool",
                    "description": "An example tool that does something.",
                    "inputSchema": {
                        "type": "object",
                        "properties": {
                            "arg1": {
                                "type": "string",
                                "description": "An example argument."
                            }
                        },
                        "required": ["arg1"]
                    }
                }
            ]
        }
    }
    print(json.dumps(response))
    sys.stdout.flush()
    break
需要强调的是:
tools属性:应当指向一个工具列表。inputSchema:该模式应描述该工具可接受的参数 以及是否必填 。在本例中工具名为example_tool,它只有一个必填参数arg1。
服务器端完成后,来看客户端。先定义 list_tools 方法:
ruby
# client.py
def list_tools():
    # 3. 发送列出工具的 JSON-RPC 消息
    send_message(serialize_message(list_tools_message))
    response = proc.stdout.readline()
    return json.loads(response)['result']['tools']
然后在 main 方法中使用 list_tools:
css
# client.py
tools = []
def main():
    connect()
    tool_response = list_tools()
    tools.extend(tool_response)

    print("Tools available:", tools)
在 main 中我们调用 list_tools,将返回的 tool_response 保存并加入到稍后会用到的 tools 列表里(例如要在服务器上调用其中某个工具)。
我们还需要支持如何调用某个工具。像之前一样,先加服务器端:
python
# server.py
case "tools/call":
    tool_name = json_message['params']['name']
    args = json_message['params']['args']
    # todo 生成对应工具调用的响应;真实实现应调用目标工具
    response = {
        "jsonrpc": "2.0",
        "id": json_message["id"],
        "result": {
            "properties": {
                "content": {
                    "description": "description of the content",
                    "items": [
                        { "type": "text", "text": f"Called tool
                            {tool_name} with arguments {args}" }
                    ]
                }
            }
        }
    }
    print(json.dumps(response))
    sys.stdout.flush()
    break
这里我们做了:
- 构造一条 JSON-RPC 消息;
- 在
result中加入properties,其下有content,而content.items数组包含若干文本块,用于描述调用该工具的结果。在更真实的实现中,应实际调用相应工具,并将其结果放在这里。
接下来处理客户端,需要一个 call_tool 方法:
ruby
# omitting code for brevity
def call_tool(tool_name, args):
    # 4. 调用一个工具
    tool_message = {
        "jsonrpc": "2.0",
        "method": "tools/call",
        "params": {
            "name": tool_name,
            "args": args
        },
        "id": 1
    }
    send_message(serialize_message(tool_message))
    response = proc.stdout.readline()
    return \
        json.loads(response)["result"]["properties"]["content"]["items"]
这里我们:
- 构造一条 JSON-RPC 消息,在其中传入
tool_name与args; - 解析响应并取出
items,它包含此次调用的关键信息。
在 main 方法中补充以下代码:
css
def main():
    connect()
    tool_response = list_tools()
    tools.extend(tool_response)

    print("Tools available:", tools)
    tool = tools[0]
    tool_call_response = call_tool(tool["name"],{"args1": "hello"})
    for content in tool_call_response:
        print_response(content['text'], prefix='[SERVER] tool response: \n')
    # print_response(tool_call_response['result'], prefix='[SERVER]: \n')
    # 调用工具时需要工具名和参数
    close_server()
这里我们:
- 使用工具名调用
call_tool,同时传入参数(此处为硬编码示例); - 遍历响应,打印我们在服务器端定义的文本块。
把所有部分连起来运行,输出中也应出现类似内容:
css
[CLIENT]:  {
  "jsonrpc": "2.0",
  "method": "tools/call",
  "params": {
    "name": "example_tool",
    "args": {
      "arg1": {
        "type": "string",
        "description": "An example argument."
      }
    }
  },
  "id": 1
}
[SERVER] tool response:
Called tool example_tool with arguments {'args1': 'hello'}很好!现在我们既能列出服务器上的工具 ,也能调用工具 。但需要指出的是:调用工具理应执行实际计算。目前我们只是打印"调用了哪个工具、用了什么参数"。这是不错的起点,但后续仍需进一步完善。
接下来进入通知(notifications) 。通知可以双向发送:既可以从服务器发往客户端,也可以从客户端发往服务器。
可运行示例见 solutions 目录的 Features :
github.com/PacktPublis...
通知、进度上报与重要更新
通知(notifications)可以由客户端 和服务器 彼此发送。通常用于告知某些重要事件发生------例如,耗时较长的工具调用 可能会上报进度 ;或者服务器 发送一条消息,报告其能力集发生变化。那么我们如何支持通知?主要有两个方面:
- 发送通知类型的消息(无论来自客户端还是服务器),其格式如下:
json
{
  "jsonrpc": "2.0",
  "method": "notifications/[type]",
  "params": {}
}
其中 [type] 通常为 cancelled 或 progress。完整类型规范见:
github.com/modelcontex...
-
通知的角色。
- 对客户端而言,通知是"额外信息",应当显示给用户(例如在 UI 中)以改善体验。
- 而从客户端发往服务器 的通知往往不同:例如,客户端会向服务器发送通知,将状态设为
"initialized"。
我们如何实现?其实大部分我们已经具备。接下来要在代码中增加:
- 由服务器发出通知:在等待工具调用结果期间,上报进度;
- 在客户端的
list_tools与call_tool中,**增加处理"到达的通知"**的逻辑。
客户端如何支持通知
ini
# client.py
# 省略无关代码
def list_tools():
    # 3. 发送列出工具的 JSON-RPC 消息
    send_message(serialize_message(list_tools_message))
    has_result = False
    while not has_result:
        response = proc.stdout.readline()
        # 检查是否有 result 字段,若有则跳出循环
        parsed_response = json.loads(response)
        if 'result' in parsed_response:
            has_result = True
            return parsed_response['result']['tools']
        else:
            # 这是通知,打印出来即可
print_response(response, prefix='[SERVER] notification: \n')这里我们重写了 list_tools ,增加了一个循环 :只要接收的不是最终结果(即不含 result 字段),就将其视为通知 并打印;一旦收到含有 result 的最终结果,就从函数返回。
服务器端如何配合
我们需要:
- 构造通知消息 。可以把它放在
utils/messages.py中:
makefile
# utils/messages.py
progress_notification = {
    "jsonrpc": "2.0",
    "method": "notifications/progress",
    "params": {
        "message": "Working on it..."
    }
}- 在需要之处派发通知 。演示起见,先在
tools/list分支里发送(仅为示例,实际更适用于耗时的工具调用场景):
bash
# server.py
# 省略无关代码
case "tools/list":
    # 先发进度通知,再发最终响应
    print(json.dumps(progress_notification))
sys.stdout.flush()需要说明:进度通知 更适合在调用工具 时使用,而不是"列出工具"。因为调用工具可能耗时较长。下面我们在调用工具的逻辑里也加上通知。
在客户端的 call_tool 中加入通知处理(与 list_tools 同样思路)
python
# client.py
# 省略无关代码
def call_tool(tool_name, args):
    # 4. 调用工具
    tool_message = {
        "jsonrpc": "2.0",
        "method": "tools/call",
        "params": {
            "name": tool_name,
            "args": args
        },
        "id": 1
    }
    has_result = False
    send_message(serialize_message(tool_message))
    while not has_result:
        response = proc.stdout.readline()
        parsed_response = json.loads(response)
        if 'result' in parsed_response:
            has_result = True
            return parsed_response["result"]["properties"]["content"]["items"]
        else:
            # 这是通知,打印出来即可
            print_response(response, prefix='[SERVER] notification: \n')
与 list_tools 一样,我们加入循环:在最终结果 到来之前,不断打印通知 。这里确实有些重复代码 ,将来可以提取到工具函数里。
服务器端在 tools/call 时发送进度通知
lua
# server.py
# 省略无关代码
case "tools/call":
    tool_name = json_message['params']['name']
    args = json_message['params']['args']
    print(json.dumps(progress_notification))
    sys.stdout.flush()
    print(json.dumps(progress_notification))
    sys.stdout.flush()
现在我们在处理 tools/call 的分支里发送了两次进度通知。
运行结果示例
再次运行后,你应能在输出末尾看到类似内容:
css
[SERVER] notification:
 {
  "jsonrpc": "2.0",
  "method": "notifications/progress",
  "params": {
    "message": "Working on it..."
  }
}
[SERVER] notification:
 {
  "jsonrpc": "2.0",
  "method": "notifications/progress",
  "params": {
    "message": "Working on it..."
  }
}
[SERVER] tool response:
Called tool example_tool with arguments {'args1': 'hello'}如你所见,两条通知会先于工具调用的最终响应到达。
从性能 角度看,如果把这当作一个 SDK 的实现,我们大概率会引入 asyncio ,以确保非阻塞。就"演示消息如何往返流动"的目的而言,当前实现足够用了,但仍有改进空间。
很好------我们已经实现了通知 并做了些重构 。接下来让我们看看 sampling(采样) 。
可运行示例见 solutions 目录的 Notifications :
github.com/PacktPublis...
采样(Sampling)------帮助服务器完成请求
Sampling(采样)是个很有意思的特性。它的含义是:服务器在对客户端说"我不会做这个"或"你更擅长做这个------请你帮我把这个请求完成"。更具体地说,服务器会请求客户端使用客户端自己的**大语言模型(LLM)**来完成该请求。
既然确定了服务器有时需要客户端来帮忙,那么客户端的帮助方式就是:向其本地/自带的 LLM 询问答案 ,然后把结果回传给服务器。
起点是什么?一种情况是:客户端调用了服务器上的某个工具 ,该工具在执行过程中生成了一条 sampling 请求。其流程可能如下:
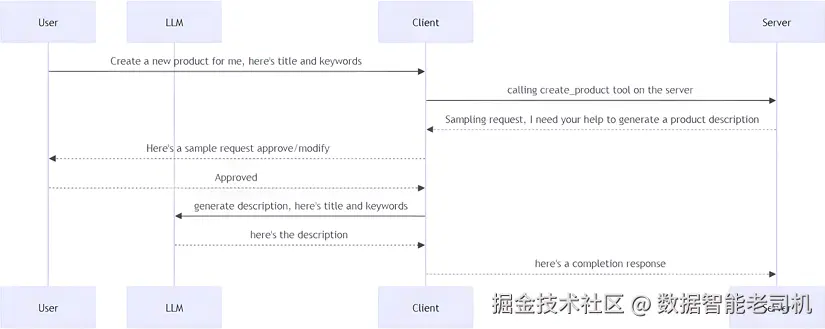
图 2.2 -- 采样流程,场景 1
小贴士:需要查看高清图?请在下一代 Packt Reader 或 PDF/ePub 中查看。购买本书可免费获得下一代 Reader 与 PDF/ePub。访问 packtpub.com/unlock ,按书名搜索并核对版本。
另一种情况是:外部服务 产生了某个事件,服务器在监听该事件。流程如下:
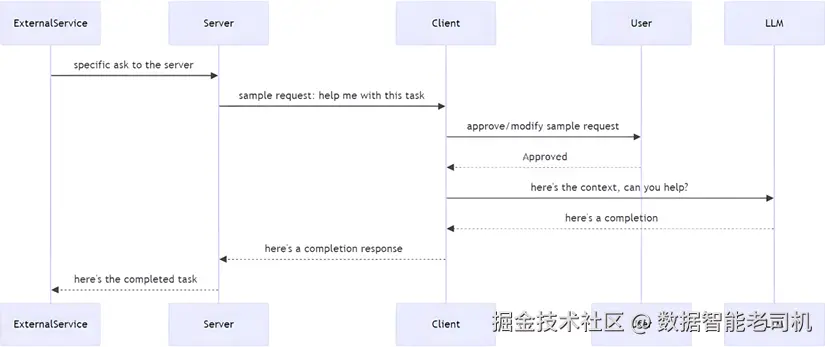
图 2.3 -- 采样流程,场景 2
从消息角度看,服务器发送给客户端的内容大致为:
swift
{
  "messages": [
    {
      "role": "user" | "assistant",
      "content": {
        "type": "text" | "image",
        "text": "..." ,                // 文本内容(当 type 为 text)
        "data": "...",                 // base64(当 type 为 image)
        "mimeType": "image/png"
      }
    }
  ],
  "modelPreferences": {
    "hints": [{ "name": "gpt-4o" }],  // 建议模型/家族
    "costPriority": 0.3,              // 0-1:越低越不在意成本
    "speedPriority": 0.6,             // 0-1:对时延的优先级
    "intelligencePriority": 0.9       // 0-1:对能力的优先级
  },
  "systemPrompt": "...",
  "includeContext": "none" | "thisServer" | "allServers",
  "temperature": 0.7,
  "maxTokens": 300,
  "stopSequences": ["\n\n"],
  "metadata": {}
}
上述请求中包含的信息要点:
messages:一段用户---助手 的对话,提供完成请求所需的上下文。modelPreferences:服务器可以给出偏好 ,如建议的模型名,以及对成本/速度/能力的侧重。- 还可能包含诸如 temperature 、maxTokens 等模型配置。需要强调:这些都是建议 ,客户端可以采纳也可以调整。
随后,客户端应返回一条**补全(completion)**消息,例如:
json
{
  "model": "gpt-4o",  // 实际使用的模型
  "stopReason": "endTurn" | "stopSequence" | "maxTokens" | "...",
  "role": "assistant",
  "content": {
    "type": "text",
    "text": "..."
  }
}
该响应涵盖的信息包括:
model:实际使用的模型(不必与服务器建议的一致)。stopReason:有助于得知是完整回答还是因其他原因提前停止。content:补全的主体内容。
示例场景:电商
这会在什么时候发生?例如:服务器在监听外部事件 ,而外部系统不停有新商品 注册进来。但在上架销售前,需要一段合格的商品描述 。这时,就可以请求客户端及其 LLM来生成描述。
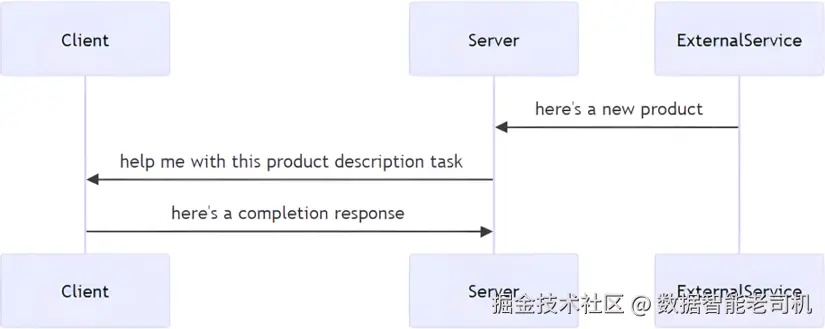
图 2.4 -- 电商场景流程
最终一步,服务器会记录、存储 并可能缓存该响应。
在该语境下,请求示例如下(来自服务器):
json
{
  "method": "sampling/createMessage",
  "params": {
    "messages": [
      {
        "role": "user",
        "content": {
          "type": "text",
          "text": "Create a selling product description for this sweater, keywords autumn, cozy, knitted"
        }
      }
    ],
    "systemPrompt": "You are a helpful assistant assisting with product descriptions",
    "includeContext": "thisServer",
    "maxTokens": 300
  }
}如你所见,我们此处只提供了上下文 ,并省略了模型与配置建议 (当然你也可以加上它们)。接下来就看客户端 如何解释该请求并响应了。
实现 Sampling
我们来在代码里实现 Sampling,用上面的商品描述场景来展示其用法。需要以下组件:
- 外部服务 :产生待描述的新商品 。该商品由别的系统注册,作为事件负载进入本服务器(这部分属场景代码)。
- 服务器 -- 采样请求 :具备发送 JSON-RPC 请求的能力。
- 客户端 -- 采样响应 :能监听 该消息类型,调用 LLM 并把响应回传服务器。
先看外部服务 。这并不属于 MCP 的一部分,但有助于理解如何整合一个外部产生日志/事件的组件:
我们添加一个外部服务用于注册新商品 。它以随机间隔 产生新商品,并发送给所有监听器:
python
# server.py
# 省略无关代码
class ProductStore:
    def __init__(self):
        self.started = False
        self.listeners = {}
        # 定时加入新商品

    def add_product(self):
        """添加商品并通知监听者。"""
        product = {
            "id": str(random.randint(10000, 99999)),
            "name": f"Product {random.randint(1, 100)}",
            "price": round(random.uniform(10.0, 100.0), 2),
            "keywords": [f"keyword{random.randint(1, 5)}"
                         for _ in range(random.randint(1, 3))]
        }
        self.dispatch_message("new_product", product)

    def start_product_queue_timer(self):
        """每隔一段时间向队列添加商品。"""
        def schedule_next():
            delay = random.uniform(1, 2)
            self.product_timer = threading.Timer(delay, self.add_product)
            self.product_timer.start()
        def add_twice():
            schedule_next()
            schedule_next()
        add_twice()

    def add_listener(self, message, callback):
        if not self.started:
            self.started = True
            self.start_product_queue_timer()
        callbacks = self.listeners.get(message, [])
        callbacks.append(callback)
        self.listeners[message] = callbacks

    def dispatch_message(self, message, payload):
        """向所有已注册监听者分发消息。"""
        callbacks = self.listeners.get(message, [])
        for callback in callbacks:
            callback(payload)
要点:
ProductStore:模拟一个外部事件源 (如长轮询某 API 或监听消息队列),在任意时刻发来需要补充描述的新商品。- 一些辅助方法 :
add_listener、dispatch_message、start_product_queue_timer等,后者用于定时投递商品。
接着与该 store 交互:先创建它,再注册监听器 。一旦有新商品,就向客户端派发采样请求:
python
def create_sampling_message(product):
    sampling_message = {
        "jsonrpc": "2.0",
        "id": 1,
        "method": "sampling/createMessage",
        "params": {
            "messages": [{
                "role": "system",
                "content": {
                    "type": "text",
                    "text": f"New product available: "
                            f"{product['name']} (ID: {product['id']}, "
                            f"Price: {product['price']}). Keywords: "
                            f"{', '.join(product['keywords'])}"
                }
            }],
            "systemPrompt": "You are a helpful assistant assisting with product descriptions",
            "includeContext": "thisServer",
            "maxTokens": 300
        }
    }
    return sampling_message

store = ProductStore()
store.add_listener("new_product",
lambda product: print(json.dumps(create_sampling_message(product))))我们还需要让服务器 具备接收客户端采样响应 的能力。为此需调整客户端架构 :目前客户端是主动发消息并等待响应 ;而采样响应可能随时到达 。解决办法是引入后台线程:
- 该线程监听
stdout; - 若有消息到达(来自服务器),就放入队列等待处理;
- 采样类消息 不入队,直接处理 ;通知 与普通响应 放入队列,由各自方法(如
list_tools、call_tool)按需处理。
线程设置示例:
python
# client.py
def listen_to_stdout():
    """监听子进程 stdout 并处理消息。"""
    while True:
        response = proc.stdout.readline()
        if not response:
            break
        try:
            parsed_response = json.loads(response)
            if is_sampling_message(parsed_response):
                handle_sampling_message(parsed_response)  # 采样消息:直接处理
            else:
                message_queue.put(response.strip())       # 其他消息:入队
        except json.JSONDecodeError:
            print("[THREAD] Non-JSON response received:", response.strip())

listener_thread = threading.Thread(target=listen_to_stdout, daemon=True)
listener_thread.start()
上述代码:
- 持续读取 stdout;
- 判断是否为采样消息 ,是则调用
handle_sampling_message;否则放入消息队列。
一些辅助方法:
python
def is_sampling_message(message):
    """判断是否为采样消息。"""
    return message.get('method', '').startswith('sampling')

def create_sampling_message(llm_response):
    """将 LLM 响应包装为采样回复。"""
    sampling_message = {
        "jsonrpc": "2.0",
        "result": {
            "content": {
                "text": llm_response
            }
        }
    }
    return sampling_message

def call_llm(message):
    return "LLM: " + message

def handle_sampling_message(message):
    """处理采样消息:调用 LLM 并回传结果。"""
    print("[CLIENT] Calling LLM to complete request", message)
    content = message['params']['messages'][0]['content']['text']
    llm_response = call_llm(content)                  # 真实实现应调用实际 LLM
    msg = create_sampling_message(llm_response)
    send_message(serialize_message(msg))              # 回传服务器(缓存/日志/存储)
尤其是 handle_sampling_message:它从服务器消息中取出内容文本 ,调用(此处桩实现的)call_llm,再把封装后的响应发回服务器。
由于我们现在依赖队列 来收消息,需要将 list_tools 与 call_tool 中读取消息的方式从读取流 改为从队列取:
vbscript
while not has_result:
    # response = proc.stdout.readline()
    response = message_queue.get()
以上就是 Sampling 的工作方式 :它通常起源于服务器侧的某个事件 ,向客户端求助 ,而客户端调用其 LLM 并回传结果 。务必强调:客户端不必严格按服务器指定的模型或配置执行 。应把服务器请求呈现在等价用户面前 ,允许人类介入(human-in-the-loop)来决定具体模型、参数与内容。
可运行示例见 solutions 目录 Sampling :
github.com/PacktPublis...
SSE 传输(SSE transport)
到目前为止,我们已经走过了 MCP 的大部分内容。那么 SSE 与 STDIO 有何不同 ?主要区别在于消息的传输方式 。在 STDIO 中,消息在本机的 stdin 与 stdout 流之间传递;而对 SSE 来说,消息通过 HTTP 在网络上传输 。这意味着诸如握手、初始化、调用工具 等一切关键流程,都需要被重新视作:客户端发起的 Web 请求 与服务器端的 Web 响应/推送。
从概念上讲,SSE 传输是以一个 Web 服务器的形式实现,并暴露两条路由:
/messages:处理传入的 MCP 消息;/sse:用于建立**事件流(streaming events)**连接。
高层示意如下:
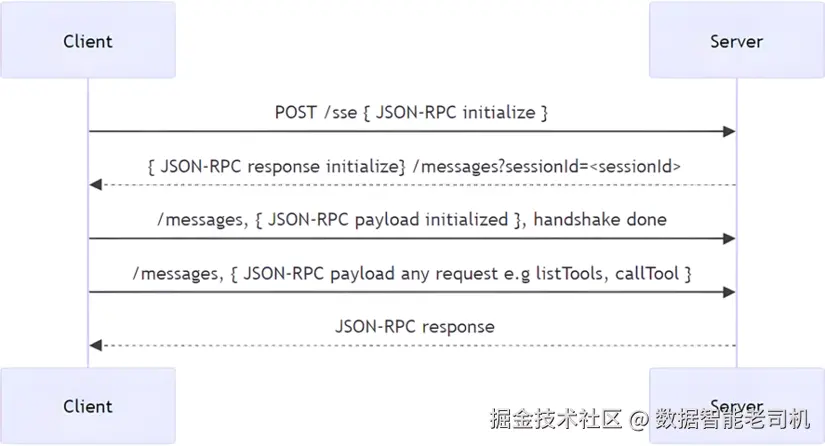
图 2.5 -- SSE 传输流程
我们会在第 4 章更详细地介绍 SSE。现在,你已经在"万米视角"上理解了它与 STDIO 的区别。
可流式 HTTP(Streamable HTTP)
Streamable HTTP 与 SSE 相似之处在于:MCP 服务器 可以通过一个 URL 在互联网上被访问。二者既有差异,也有共性,简要如下:
-
接受的内容类型:
- 二者的客户端都需要接受
text/event-stream。 - 对于 Streamable HTTP ,客户端还需要接受
application/json,因为服务器可以选择流式返回 或以 JSON 一次性返回 ;而 SSE 服务器始终 以text/event-stream发送内容。
- 二者的客户端都需要接受
-
请求方法形态:
- SSE 连接通常是长连接的
GET请求; - Streamable HTTP 一般是
POST。
- SSE 连接通常是长连接的
-
实现方式:
- 二者在实现上都与 SSE 类似,本质上都是一个 Web 服务器。
- 但在 MCP 语境下,Streamable HTTP 建议设置一条
/mcp路由,用于同时处理连接与消息 ,并且该路由应当是POST。
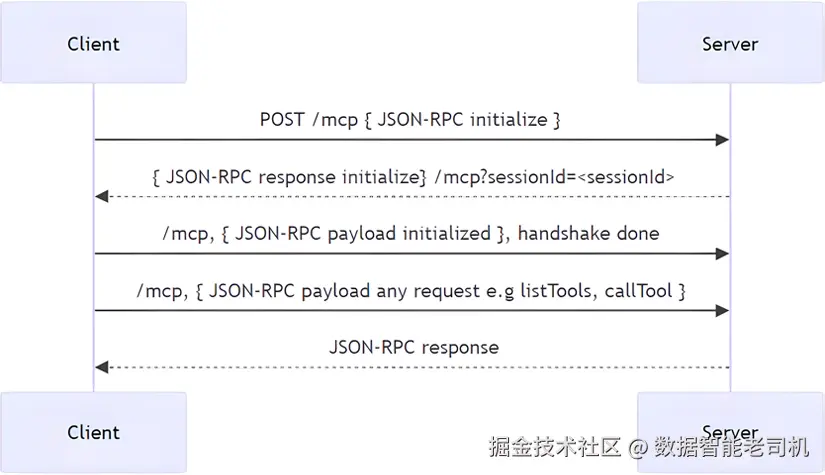
图 2.6 -- Streamable HTTP 流程
因此,就实现复杂度 而言,Streamable HTTP 比 SSE 更简单一些 ,因为你只需要维护一个端点 '/mcp' 。关于 Streamable HTTP 的更多内容会在第 5 章展开。
小结(Summary)
本章覆盖了相当多的信息。最重要的要点是:客户端与服务器的通信需要先完成初始化 ,之后才能进行进一步的操作。所幸,大多数 SDK 都会代管初始化 这一步,你通常只需要开始进行调用与列出工具等操作即可。
希望本章既对喜欢看流程图 的读者,也对偏好直接看代码 的读者,都有帮助。代码可运行 ,但在性能、可维护性 等方面仍有不少提升空间。建议动手试一试,参见 solutions 目录中的示例。
在下一章 ,我们将学习如何构建并测试 我们的第一个服务器 ;它会是上手 MCP 的一个很好起点。