3.1 电脑端接收数据(单片机发送)
(1)、Serial.c
cpp
#include "stm32f10x.h"                  // STM32F1系列标准库头文件
#include <stdio.h>                       // 标准输入输出库(支持fputc函数)
#include <stdarg.h>                      // 可变参数库(支持Serial_Printf的...参数)

/**
  * @brief  串口初始化函数(USART1,仅发送模式)
  * @param  无
  * @retval 无
  * @note   配置参数:9600波特率、8位数据位、1位停止位、无奇偶校验、无硬件流控
  *         硬件引脚:USART1_TX -> PA9(复用推挽输出)
  */
void Serial_Init(void)
{
    // 1. 使能相关外设时钟(USART1时钟 + GPIOA时钟)
    RCC_APB2PeriphClockCmd(RCC_APB2Periph_USART1, ENABLE);  // 使能USART1外设时钟(APB2总线)
    RCC_APB2PeriphClockCmd(RCC_APB2Periph_GPIOA, ENABLE);   // 使能GPIOA时钟(PA9为USART1_TX引脚)

    // 2. 配置TX引脚(PA9)为复用推挽输出模式
    GPIO_InitTypeDef GPIO_InitStructure;                    // GPIO初始化配置结构体
    GPIO_InitStructure.GPIO_Mode = GPIO_Mode_AF_PP;         // 复用推挽输出(串口TX需用复用模式)
    GPIO_InitStructure.GPIO_Pin = GPIO_Pin_9;               // 配置PA9引脚
    GPIO_InitStructure.GPIO_Speed = GPIO_Speed_50MHz;       // GPIO输出速度50MHz
    GPIO_Init(GPIOA, &GPIO_InitStructure);                  // 将配置应用到GPIOA端口

    // 3. 配置USART1串口参数
    USART_InitTypeDef USART_InitStructure;                  // USART初始化配置结构体
    USART_InitStructure.USART_BaudRate = 9600;              // 波特率:9600bps(每秒传输9600位)
    USART_InitStructure.USART_HardwareFlowControl = USART_HardwareFlowControl_None;  // 无硬件流控(不使用CTS/RTS引脚)
    USART_InitStructure.USART_Mode = USART_Mode_Tx;         // 工作模式:仅发送(Tx),若需接收则设为USART_Mode_Tx | USART_Mode_Rx
    USART_InitStructure.USART_Parity = USART_Parity_No;     // 无奇偶校验位(数据帧无校验位)
    USART_InitStructure.USART_StopBits = USART_StopBits_1;  // 1位停止位(数据帧结束标志)
    USART_InitStructure.USART_WordLength = USART_WordLength_8b;  // 8位数据位(每个数据帧包含8位有效数据)
    USART_Init(USART1, &USART_InitStructure);               // 将配置应用到USART1外设

    // 4. 使能USART1外设(串口初始化完成后,启用串口)
    USART_Cmd(USART1, ENABLE);
}

/**
  * @brief  串口发送单个字节
  * @param  Byte:要发送的8位无符号字节(范围:0~255)
  * @retval 无
  * @note   阻塞式发送:发送前等待发送数据寄存器为空,确保数据可靠发送
  */
void Serial_SendByte(uint8_t Byte)
{
    // 将字节写入USART1发送数据寄存器(TDR),硬件自动通过TX引脚发送
    USART_SendData(USART1, Byte);

    // 等待发送完成:查询TXE标志位(发送数据寄存器空)
    // TXE=RESET:数据未发送完成,继续等待;TXE=SET:数据已发送,寄存器空
    while (USART_GetFlagStatus(USART1, USART_FLAG_TXE) == RESET);
}

/**
  * @brief  串口发送字节数组
  * @param  Array:要发送的字节数组首地址(指针)
  * @param  Length:数组长度(要发送的字节个数)
  * @retval 无
  * @note   循环调用Serial_SendByte,逐个发送数组元素,阻塞式发送
  */
void Serial_SendArray(uint8_t *Array, uint16_t Length)
{
    uint16_t i;
    // 遍历数组,逐个发送每个字节
    for(i = 0; i < Length; i++)
    {
        Serial_SendByte(Array[i]);  // 调用单字节发送函数
    }
}

/**
  * @brief  串口发送ASCII字符串
  * @param  String:要发送的字符串首地址(指针)
  * @retval 无
  * @note   以'\0'(ASCII码0)为字符串结束标志,自动遍历发送所有字符
  */
void Serial_SendString(char *String)
{
    uint8_t i;
    // 循环发送,直到遇到字符串结束符'\0'
    for(i = 0; String[i] != 0; i++)
    {
        Serial_SendByte(String[i]);  // 每个字符本质是8位ASCII码,调用单字节发送
    }
}

/**
  * @brief  幂运算辅助函数(计算x的y次方)
  * @param  x:底数(如10)
  * @param  y:指数(如3,表示x^3)
  * @retval 计算结果(x^y)
  * @note   仅支持非负整数幂,用于Serial_SendNumber拆分数字每一位
  */
uint32_t Serial_Pow(uint32_t x, uint32_t y)
{
    uint32_t Result = 1;  // 结果初始值为1(任何数的0次方为1)
    while(y--)            // 循环y次,每次结果乘以x
    {
        Result *= x;
    }
    return Result;        // 返回x^y的结果
}

/**
  * @brief  串口发送无符号整数(转换为ASCII字符发送)
  * @param  Number:要发送的无符号整数(范围:0~4294967295)
  * @param  Length:要发送的数字位数(不足位数补前导0,超出位数截断高位)
  * @retval 无
  * @example Serial_SendNumber(123, 3) → 发送'1'、'2'、'3';Serial_SendNumber(45, 4) → 发送'0'、'0'、'4'、'5'
  */
void Serial_SendNumber(uint32_t Number, uint8_t Length)
{
    uint8_t i;
    // 遍历每一位,从高位到低位发送
    for(i = 0; i < Length; i++)
    {
        // 核心逻辑:拆分数字每一位并转换为ASCII码
        // 1. Number / Serial_Pow(10, Length-i-1):获取当前位的高位数值(如123/100=1)
        // 2. %10:提取当前位数字(如1%10=1)
        // 3. +0x30:转换为ASCII码(0~9对应ASCII码0x30~0x39)
        Serial_SendByte(Number / Serial_Pow(10, Length - i - 1) % 10 + 0x30);
    }
}

/**
  * @brief  重定向C标准库fputc函数(底层支撑printf串口输出)
  * @param  ch:要发送的字符(ASCII码值)
  * @param  f:标准库文件指针(兼容接口,无实际作用)
  * @retval ch:返回发送的字符(符合fputc函数标准接口要求)
  * @note   调用printf时,printf会自动循环调用fputc发送每个字符,此函数将字符转发到串口
  */
int fputc(int ch, FILE *f)
{
    Serial_SendByte(ch);  // 将fputc的字符通过串口发送
    return ch;            // 返回发送的字符,确保printf正常工作
}

/**
  * @brief  自定义格式化串口输出函数(类似printf,不依赖标准库也可使用)
  * @param  format:格式化字符串(含占位符,如%d、%s、%x等)
  * @param  ...:可变参数(对应format中的占位符,数量可变)
  * @retval 无
  * @example Serial_Printf("数值:%d,字符串:%s\r\n", 123, "Hello") → 发送格式化字符串
  */
void Serial_Printf(char *format, ...)
{
    char String[100];  // 缓存拼接后的完整字符串(最多支持99个有效字符)
    va_list arg;       // 可变参数列表指针(用于解析...中的参数)

    va_start(arg, format);  // 初始化可变参数列表,绑定到format后
    // 将格式化字符串+可变参数拼接为完整字符串,存入String数组
    vsprintf(String, format, arg);  // vsprintf支持可变参数格式化
    va_end(arg);            // 结束可变参数解析

    Serial_SendString(String);  // 发送拼接后的完整字符串
}
(2)、Serial.h
cpp
#ifndef __SERIAL_H
#define __SERIAL_H

#include <stdio.h>

void Serial_Init(void);
void Serial_SendByte(uint8_t Byte);
void Serial_SendArray(uint8_t *Array, uint16_t Length);
void Serial_SendString(char *String);
void Serial_SendNumber(uint32_t Number, uint8_t Length);
void Serial_Printf(char *format, ...);


#endif
(3)、main.c
cpp
#include "stm32f10x.h" // Device header
#include "Delay.h"
#include "Serial.h"
#include <stdio.h>
#include <stdarg.h>
int main(void)
{
Serial_Init();
// Serial_SendByte(0x41);
//
//
// uint8_t MyArray[] = {0x42, 0x43, 0x44, 0x45};
// Serial_SendArray(MyArray, 4);
// Serial_SendString("\r\nNum1=");
// Serial_SendNumber(111, 3);
//
// printf("\r\nNum2=%d", 222);
char String[100];
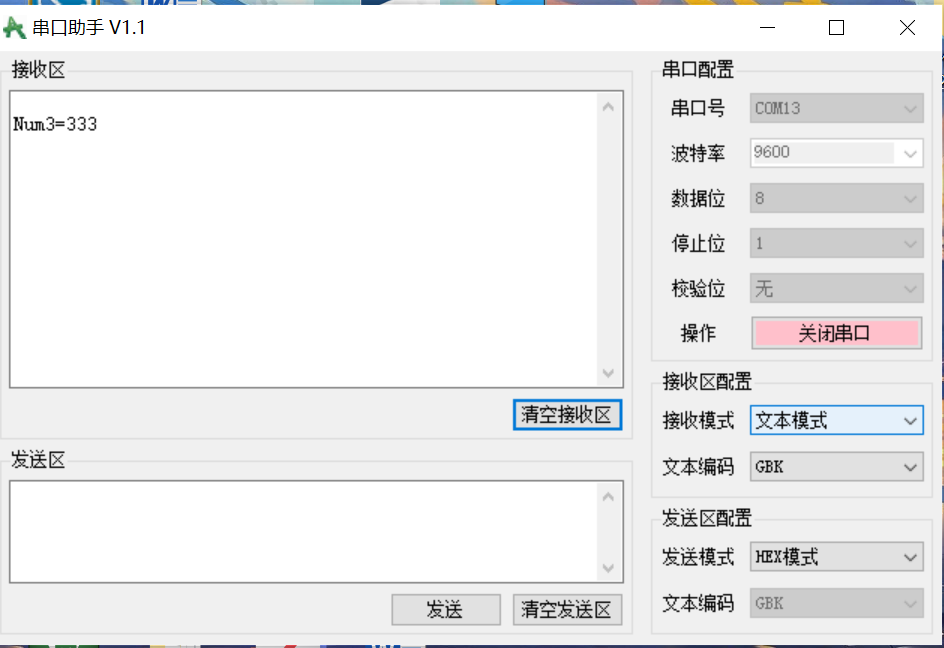
sprintf(String, "\r\nNum3=%d", 333);
Serial_SendString(String);
// Serial_Printf("\r\nNum4=%d", 444);
// Serial_Printf("\r\n");
while (1)
{
}
}注意事项:
串口通信时,要注意选择文本模式还是hex模式
串口助手的波特率不要选错。端口(USB-SERIAL-CH340)不要选错。
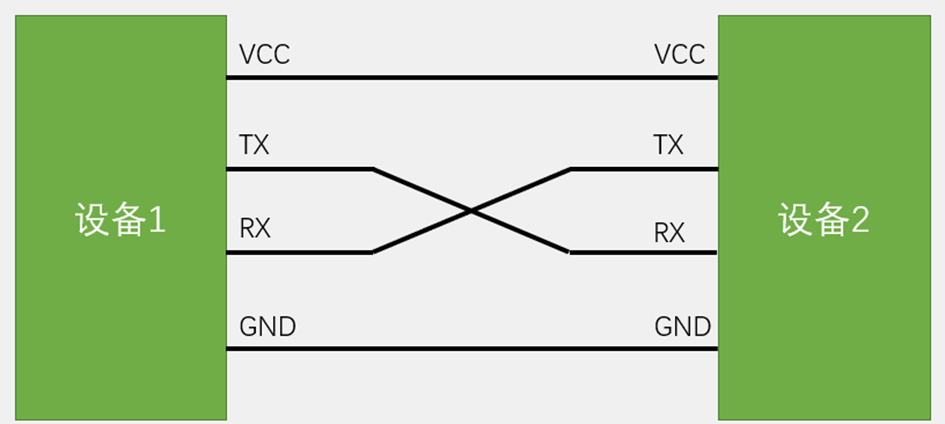
线不要插错(特别是TX、RX要交叉连接)。
· 是否有接收到数据,可以看USB转TTL模块外设的灯有没有闪烁。
记得打开串口助手中的打开串口
记得给小车复位
程序运行结果:
3.2 串口收发数据
(1)、main.c
cpp
#include "stm32f10x.h"                  // Device header
#include "Delay.h"
#include "Serial.h"

uint8_t RxData;			//定义用于接收串口数据的变量

int main(void)
{

	/*串口初始化*/
	Serial_Init();		//串口初始化
	// 发送数据给32
	// Serial_SendString("Hello STM32!\r\n");
	while (1)
	{
		if (Serial_GetRxFlag() == 1)			//检查串口接收数据的标志位
		{
			RxData = Serial_GetRxData();		//获取串口接收的数据
			Serial_SendByte(RxData);			//串口将收到的数据回传回去,用于测试
		}
	}
}
(2)、Serial.c
cpp
#include "stm32f10x.h"                  // Device header
#include <stdio.h>
#include <stdarg.h>

uint8_t Serial_RxData;		//定义串口接收的数据变量
uint8_t Serial_RxFlag;		//定义串口接收的标志位变量

/**
  * 函    数:串口初始化
  * 参    数:无
  * 返 回 值:无
  */
void Serial_Init(void)
{
	/*开启时钟*/
	RCC_APB2PeriphClockCmd(RCC_APB2Periph_USART1, ENABLE);	//开启USART1的时钟
	RCC_APB2PeriphClockCmd(RCC_APB2Periph_GPIOA, ENABLE);	//开启GPIOA的时钟

	/*GPIO初始化*/
	GPIO_InitTypeDef GPIO_InitStructure;
	GPIO_InitStructure.GPIO_Mode = GPIO_Mode_AF_PP;
	GPIO_InitStructure.GPIO_Pin = GPIO_Pin_9;
	GPIO_InitStructure.GPIO_Speed = GPIO_Speed_50MHz;
	GPIO_Init(GPIOA, &GPIO_InitStructure);					//将PA9引脚初始化为复用推挽输出

	GPIO_InitStructure.GPIO_Mode = GPIO_Mode_IPU;
	GPIO_InitStructure.GPIO_Pin = GPIO_Pin_10;
	GPIO_InitStructure.GPIO_Speed = GPIO_Speed_50MHz;
	GPIO_Init(GPIOA, &GPIO_InitStructure);					//将PA10引脚初始化为上拉输入

	/*USART初始化*/
	USART_InitTypeDef USART_InitStructure;					//定义结构体变量
	USART_InitStructure.USART_BaudRate = 9600;				//波特率
	USART_InitStructure.USART_HardwareFlowControl = USART_HardwareFlowControl_None;	//硬件流控制,不需要
	USART_InitStructure.USART_Mode = USART_Mode_Tx | USART_Mode_Rx;	//模式,发送模式和接收模式均选择
	USART_InitStructure.USART_Parity = USART_Parity_No;		//奇偶校验,不需要
	USART_InitStructure.USART_StopBits = USART_StopBits_1;	//停止位,选择1位
	USART_InitStructure.USART_WordLength = USART_WordLength_8b;		//字长,选择8位
	USART_Init(USART1, &USART_InitStructure);				//将结构体变量交给USART_Init,配置USART1

	/*中断输出配置*/
	USART_ITConfig(USART1, USART_IT_RXNE, ENABLE);			//开启串口接收数据的中断

	/*NVIC中断分组*/
	NVIC_PriorityGroupConfig(NVIC_PriorityGroup_2);			//配置NVIC为分组2

	/*NVIC配置*/
	NVIC_InitTypeDef NVIC_InitStructure;					//定义结构体变量
	NVIC_InitStructure.NVIC_IRQChannel = USART1_IRQn;		//选择配置NVIC的USART1线
	NVIC_InitStructure.NVIC_IRQChannelCmd = ENABLE;			//指定NVIC线路使能
	NVIC_InitStructure.NVIC_IRQChannelPreemptionPriority = 1;		//指定NVIC线路的抢占优先级为1
	NVIC_InitStructure.NVIC_IRQChannelSubPriority = 1;		//指定NVIC线路的响应优先级为1
	NVIC_Init(&NVIC_InitStructure);							//将结构体变量交给NVIC_Init,配置NVIC外设

	/*USART使能*/
	USART_Cmd(USART1, ENABLE);								//使能USART1,串口开始运行
}

/**
  * 函    数:串口发送一个字节
  * 参    数:Byte 要发送的一个字节
  * 返 回 值:无
  */
void Serial_SendByte(uint8_t Byte)
{
	USART_SendData(USART1, Byte);		//将字节数据写入数据寄存器,写入后USART自动生成时序波形
	while (USART_GetFlagStatus(USART1, USART_FLAG_TXE) == RESET);	//等待发送完成
	/*下次写入数据寄存器会自动清除发送完成标志位,故此循环后,无需清除标志位*/
}

/**
  * 函    数:串口发送一个数组
  * 参    数:Array 要发送数组的首地址
  * 参    数:Length 要发送数组的长度
  * 返 回 值:无
  */
void Serial_SendArray(uint8_t *Array, uint16_t Length)
{
	uint16_t i;
	for (i = 0; i < Length; i ++)		//遍历数组
	{
		Serial_SendByte(Array[i]);		//依次调用Serial_SendByte发送每个字节数据
	}
}

/**
  * 函    数:串口发送一个字符串
  * 参    数:String 要发送字符串的首地址
  * 返 回 值:无
  */
void Serial_SendString(char *String)
{
	uint8_t i;
	for (i = 0; String[i] != '\0'; i ++)//遍历字符数组(字符串),遇到字符串结束标志位后停止
	{
		Serial_SendByte(String[i]);		//依次调用Serial_SendByte发送每个字节数据
	}
}

/**
  * 函    数:次方函数(内部使用)
  * 返 回 值:返回值等于X的Y次方
  */
uint32_t Serial_Pow(uint32_t X, uint32_t Y)
{
	uint32_t Result = 1;	//设置结果初值为1
	while (Y --)			//执行Y次
	{
		Result *= X;		//将X累乘到结果
	}
	return Result;
}

/**
  * 函    数:串口发送数字
  * 参    数:Number 要发送的数字,范围:0~4294967295
  * 参    数:Length 要发送数字的长度,范围:0~10
  * 返 回 值:无
  */
void Serial_SendNumber(uint32_t Number, uint8_t Length)
{
	uint8_t i;
	for (i = 0; i < Length; i ++)		//根据数字长度遍历数字的每一位
	{
		Serial_SendByte(Number / Serial_Pow(10, Length - i - 1) % 10 + '0');	//依次调用Serial_SendByte发送每位数字
	}
}

/**
  * 函    数:使用printf需要重定向的底层函数
  * 参    数:保持原始格式即可,无需变动
  * 返 回 值:保持原始格式即可,无需变动
  */
int fputc(int ch, FILE *f)
{
	Serial_SendByte(ch);			//将printf的底层重定向到自己的发送字节函数
	return ch;
}

/**
  * 函    数:自己封装的prinf函数
  * 参    数:format 格式化字符串
  * 参    数:... 可变的参数列表
  * 返 回 值:无
  */
void Serial_Printf(char *format, ...)
{
	char String[100];				//定义字符数组
	va_list arg;					//定义可变参数列表数据类型的变量arg
	va_start(arg, format);			//从format开始,接收参数列表到arg变量
	vsprintf(String, format, arg);	//使用vsprintf打印格式化字符串和参数列表到字符数组中
	va_end(arg);					//结束变量arg
	Serial_SendString(String);		//串口发送字符数组(字符串)
}

/**
  * 函    数:获取串口接收标志位
  * 参    数:无
  * 返 回 值:串口接收标志位,范围:0~1,接收到数据后,标志位置1,读取后标志位自动清零
  */
uint8_t Serial_GetRxFlag(void)
{
	if (Serial_RxFlag == 1)			//如果标志位为1
	{
		Serial_RxFlag = 0;
		return 1;					//则返回1,并自动清零标志位
	}
	return 0;						//如果标志位为0,则返回0
}

/**
  * 函    数:获取串口接收的数据
  * 参    数:无
  * 返 回 值:接收的数据,范围:0~255
  */
uint8_t Serial_GetRxData(void)
{
	return Serial_RxData;			//返回接收的数据变量
}

/**
  * 函    数:USART1中断函数
  * 参    数:无
  * 返 回 值:无
  * 注意事项:此函数为中断函数,无需调用,中断触发后自动执行
  *           函数名为预留的指定名称,可以从启动文件复制
  *           请确保函数名正确,不能有任何差异,否则中断函数将不能进入
  */
void USART1_IRQHandler(void)
{
	if (USART_GetITStatus(USART1, USART_IT_RXNE) == SET)		//判断是否是USART1的接收事件触发的中断
	{
		Serial_RxData = USART_ReceiveData(USART1);				//读取数据寄存器,存放在接收的数据变量
		Serial_RxFlag = 1;										//置接收标志位变量为1
		USART_ClearITPendingBit(USART1, USART_IT_RXNE);			//清除USART1的RXNE标志位
																//读取数据寄存器会自动清除此标志位
																//如果已经读取了数据寄存器,也可以不执行此代码
	}
}
(3)、Serial.h
cpp
#ifndef __SERIAL_H
#define __SERIAL_H
#include <stdio.h>
void Serial_Init(void);
void Serial_SendByte(uint8_t Byte);
void Serial_SendArray(uint8_t *Array, uint16_t Length);
void Serial_SendString(char *String);
void Serial_SendNumber(uint32_t Number, uint8_t Length);
void Serial_Printf(char *format, ...);
uint8_t Serial_GetRxFlag(void);
uint8_t Serial_GetRxData(void);
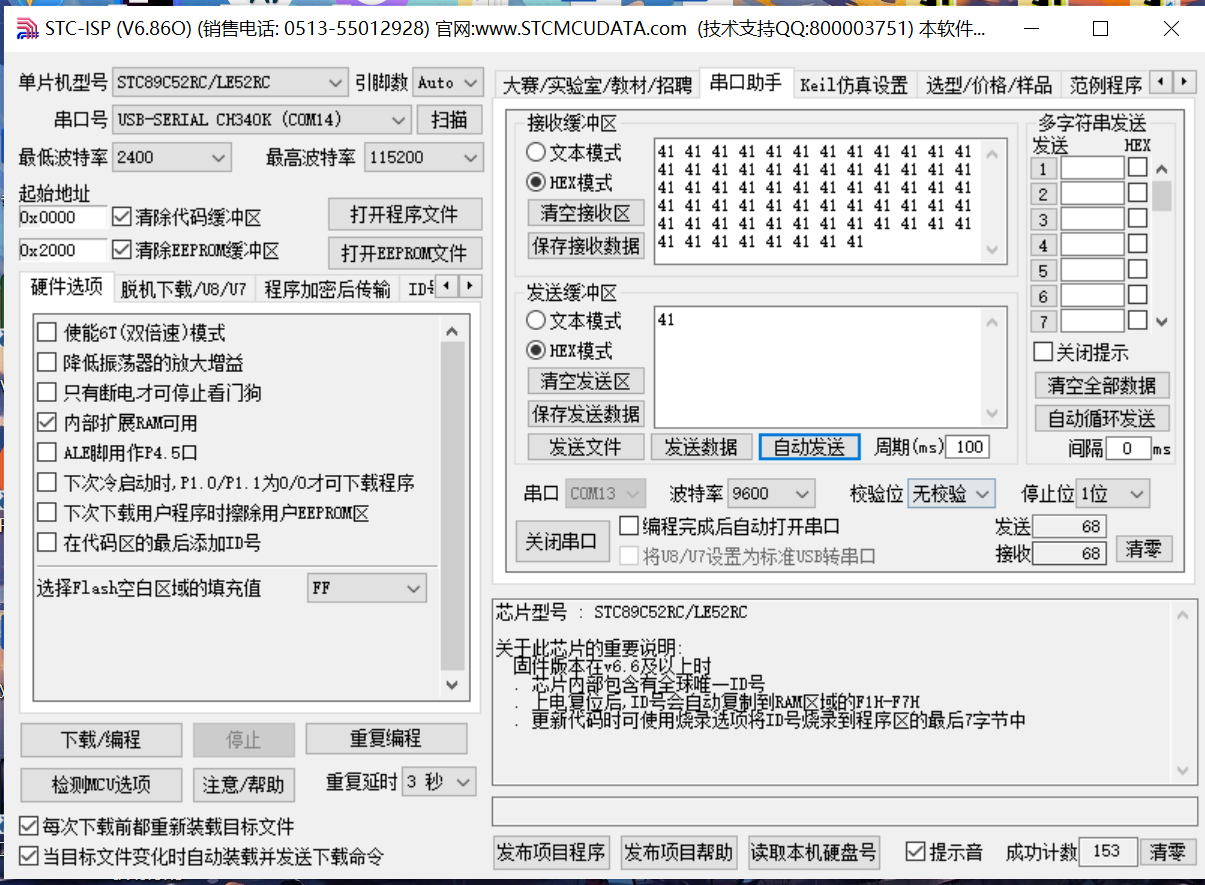
#endif实验现象:
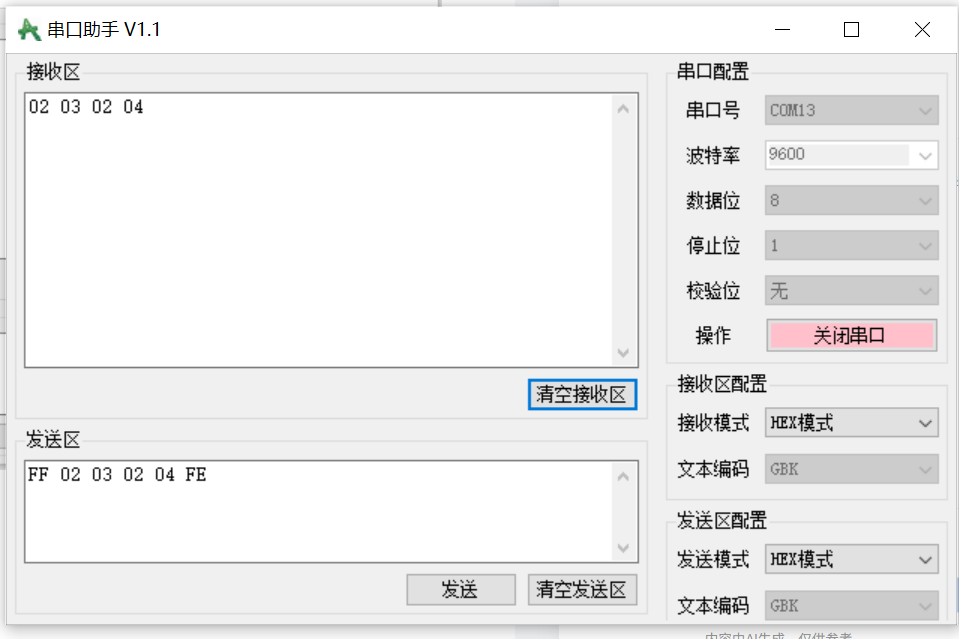
3.3 发送和接收HEX数据包
(1)、main.c
cpp
#include "stm32f10x.h"                  // Device header
#include "Delay.h"
#include "Serial.h"
#include "Key.h"

uint8_t KeyNum;			//定义用于接收按键键码的变量

int main(void)
{
	/*模块初始化*/

	Key_Init();			//按键初始化
	Serial_Init();		//串口初始化

	/*设置发送数据包数组的初始值,用于测试*/
	Serial_TxPacket[0] = 0x01;
	Serial_TxPacket[1] = 0x02;
	Serial_TxPacket[2] = 0x03;
	Serial_TxPacket[3] = 0x04;

	while (1)
	{
		KeyNum = Key_GetNum();			//获取按键键码
		if (KeyNum == 1)				//按键1按下
		{
			Serial_TxPacket[0] ++;		//测试数据自增
			Serial_TxPacket[1] ++;
			Serial_TxPacket[2] ++;
			Serial_TxPacket[3] ++;
		}
		else if(KeyNum == 2)
		{
		//串口发送数据包Serial_TxPacket
			Serial_SendPacket();
		}
		else if(KeyNum == 3)
		{
			if (Serial_GetRxFlag() == 1)	//如果接收到数据包
			{
				Serial_SendArray(Serial_RxPacket,4);
			}
			// 意思是没有收到数据
			else
			{
				Serial_SendByte(0x00);
			}
		}
	}
}
(2)、Serial.c
cpp
#include "stm32f10x.h"                  // Device header
#include <stdio.h>
#include <stdarg.h>

uint8_t Serial_TxPacket[4];				//定义发送数据包数组,数据包格式:FF 01 02 03 04 FE
uint8_t Serial_RxPacket[4];				//定义接收数据包数组
uint8_t Serial_RxFlag;					//定义接收数据包标志位

/**
  * 函    数:串口初始化
  * 参    数:无
  * 返 回 值:无
  */
void Serial_Init(void)
{
	/*开启时钟*/
	RCC_APB2PeriphClockCmd(RCC_APB2Periph_USART1, ENABLE);	//开启USART1的时钟
	RCC_APB2PeriphClockCmd(RCC_APB2Periph_GPIOA, ENABLE);	//开启GPIOA的时钟

	/*GPIO初始化*/
	GPIO_InitTypeDef GPIO_InitStructure;
	GPIO_InitStructure.GPIO_Mode = GPIO_Mode_AF_PP;
	GPIO_InitStructure.GPIO_Pin = GPIO_Pin_9;
	GPIO_InitStructure.GPIO_Speed = GPIO_Speed_50MHz;
	GPIO_Init(GPIOA, &GPIO_InitStructure);					//将PA9引脚初始化为复用推挽输出

	GPIO_InitStructure.GPIO_Mode = GPIO_Mode_IPU;
	GPIO_InitStructure.GPIO_Pin = GPIO_Pin_10;
	GPIO_InitStructure.GPIO_Speed = GPIO_Speed_50MHz;
	GPIO_Init(GPIOA, &GPIO_InitStructure);					//将PA10引脚初始化为上拉输入

	/*USART初始化*/
	USART_InitTypeDef USART_InitStructure;					//定义结构体变量
	USART_InitStructure.USART_BaudRate = 9600;				//波特率
	USART_InitStructure.USART_HardwareFlowControl = USART_HardwareFlowControl_None;	//硬件流控制,不需要
	USART_InitStructure.USART_Mode = USART_Mode_Tx | USART_Mode_Rx;	//模式,发送模式和接收模式均选择
	USART_InitStructure.USART_Parity = USART_Parity_No;		//奇偶校验,不需要
	USART_InitStructure.USART_StopBits = USART_StopBits_1;	//停止位,选择1位
	USART_InitStructure.USART_WordLength = USART_WordLength_8b;		//字长,选择8位
	USART_Init(USART1, &USART_InitStructure);				//将结构体变量交给USART_Init,配置USART1

	/*中断输出配置*/
	USART_ITConfig(USART1, USART_IT_RXNE, ENABLE);			//开启串口接收数据的中断

	/*NVIC中断分组*/
	NVIC_PriorityGroupConfig(NVIC_PriorityGroup_2);			//配置NVIC为分组2

	/*NVIC配置*/
	NVIC_InitTypeDef NVIC_InitStructure;					//定义结构体变量
	NVIC_InitStructure.NVIC_IRQChannel = USART1_IRQn;		//选择配置NVIC的USART1线
	NVIC_InitStructure.NVIC_IRQChannelCmd = ENABLE;			//指定NVIC线路使能
	NVIC_InitStructure.NVIC_IRQChannelPreemptionPriority = 1;		//指定NVIC线路的抢占优先级为1
	NVIC_InitStructure.NVIC_IRQChannelSubPriority = 1;		//指定NVIC线路的响应优先级为1
	NVIC_Init(&NVIC_InitStructure);							//将结构体变量交给NVIC_Init,配置NVIC外设

	/*USART使能*/
	USART_Cmd(USART1, ENABLE);								//使能USART1,串口开始运行
}

/**
  * 函    数:串口发送一个字节
  * 参    数:Byte 要发送的一个字节
  * 返 回 值:无
  */
void Serial_SendByte(uint8_t Byte)
{
	USART_SendData(USART1, Byte);		//将字节数据写入数据寄存器,写入后USART自动生成时序波形
	while (USART_GetFlagStatus(USART1, USART_FLAG_TXE) == RESET);	//等待发送完成
	/*下次写入数据寄存器会自动清除发送完成标志位,故此循环后,无需清除标志位*/
}

/**
  * 函    数:串口发送一个数组
  * 参    数:Array 要发送数组的首地址
  * 参    数:Length 要发送数组的长度
  * 返 回 值:无
  */
void Serial_SendArray(uint8_t *Array, uint16_t Length)
{
	uint16_t i;
	for (i = 0; i < Length; i ++)		//遍历数组
	{
		Serial_SendByte(Array[i]);		//依次调用Serial_SendByte发送每个字节数据
	}
}

/**
  * 函    数:串口发送一个字符串
  * 参    数:String 要发送字符串的首地址
  * 返 回 值:无
  */
void Serial_SendString(char *String)
{
	uint8_t i;
	for (i = 0; String[i] != '\0'; i ++)//遍历字符数组(字符串),遇到字符串结束标志位后停止
	{
		Serial_SendByte(String[i]);		//依次调用Serial_SendByte发送每个字节数据
	}
}

/**
  * 函    数:次方函数(内部使用)
  * 返 回 值:返回值等于X的Y次方
  */
uint32_t Serial_Pow(uint32_t X, uint32_t Y)
{
	uint32_t Result = 1;	//设置结果初值为1
	while (Y --)			//执行Y次
	{
		Result *= X;		//将X累乘到结果
	}
	return Result;
}

/**
  * 函    数:串口发送数字
  * 参    数:Number 要发送的数字,范围:0~4294967295
  * 参    数:Length 要发送数字的长度,范围:0~10
  * 返 回 值:无
  */
void Serial_SendNumber(uint32_t Number, uint8_t Length)
{
	uint8_t i;
	for (i = 0; i < Length; i ++)		//根据数字长度遍历数字的每一位
	{
		Serial_SendByte(Number / Serial_Pow(10, Length - i - 1) % 10 + '0');	//依次调用Serial_SendByte发送每位数字
	}
}

/**
  * 函    数:使用printf需要重定向的底层函数
  * 参    数:保持原始格式即可,无需变动
  * 返 回 值:保持原始格式即可,无需变动
  */
int fputc(int ch, FILE *f)
{
	Serial_SendByte(ch);			//将printf的底层重定向到自己的发送字节函数
	return ch;
}

/**
  * 函    数:自己封装的prinf函数
  * 参    数:format 格式化字符串
  * 参    数:... 可变的参数列表
  * 返 回 值:无
  */
void Serial_Printf(char *format, ...)
{
	char String[100];				//定义字符数组
	va_list arg;					//定义可变参数列表数据类型的变量arg
	va_start(arg, format);			//从format开始,接收参数列表到arg变量
	vsprintf(String, format, arg);	//使用vsprintf打印格式化字符串和参数列表到字符数组中
	va_end(arg);					//结束变量arg
	Serial_SendString(String);		//串口发送字符数组(字符串)
}

/**
  * 函    数:串口发送数据包
  * 参    数:无
  * 返 回 值:无
  * 说    明:调用此函数后,Serial_TxPacket数组的内容将加上包头(FF)包尾(FE)后,作为数据包发送出去
  */
void Serial_SendPacket(void)
{
	Serial_SendByte(0xFF);
	Serial_SendArray(Serial_TxPacket, 4);
	Serial_SendByte(0xFE);
}

/**
  * 函    数:获取串口接收数据包标志位
  * 参    数:无
  * 返 回 值:串口接收数据包标志位,范围:0~1,接收到数据包后,标志位置1,读取后标志位自动清零
  */
uint8_t Serial_GetRxFlag(void)
{
	if (Serial_RxFlag == 1)			//如果标志位为1
	{
		Serial_RxFlag = 0;
		return 1;					//则返回1,并自动清零标志位
	}
	return 0;						//如果标志位为0,则返回0
}

/**
  * 函    数:USART1中断函数
  * 参    数:无
  * 返 回 值:无
  * 注意事项:此函数为中断函数,无需调用,中断触发后自动执行
  *           函数名为预留的指定名称,可以从启动文件复制
  *           请确保函数名正确,不能有任何差异,否则中断函数将不能进入
  */
void USART1_IRQHandler(void)
{
	static uint8_t RxState = 0;		//定义表示当前状态机状态的静态变量
	static uint8_t pRxPacket = 0;	//定义表示当前接收数据位置的静态变量
	if (USART_GetITStatus(USART1, USART_IT_RXNE) == SET)		//判断是否是USART1的接收事件触发的中断
	{
		uint8_t RxData = USART_ReceiveData(USART1);				//读取数据寄存器,存放在接收的数据变量

		/*使用状态机的思路,依次处理数据包的不同部分*/

		/*当前状态为0,接收数据包包头*/
		if (RxState == 0)
		{
			if (RxData == 0xFF)			//如果数据确实是包头
			{
				RxState = 1;			//置下一个状态
				pRxPacket = 0;			//数据包的位置归零
			}
		}
		/*当前状态为1,接收数据包数据*/
		else if (RxState == 1)
		{
			Serial_RxPacket[pRxPacket] = RxData;	//将数据存入数据包数组的指定位置
			pRxPacket ++;				//数据包的位置自增
			if (pRxPacket >= 4)			//如果收够4个数据
			{
				RxState = 2;			//置下一个状态
			}
		}
		/*当前状态为2,接收数据包包尾*/
		else if (RxState == 2)
		{
			if (RxData == 0xFE)			//如果数据确实是包尾部
			{
				RxState = 0;			//状态归0
				Serial_RxFlag = 1;		//接收数据包标志位置1,成功接收一个数据包
			}
		}

		USART_ClearITPendingBit(USART1, USART_IT_RXNE);		//清除标志位
	}
}
(3)、Serial.h
cpp
#ifndef __SERIAL_H
#define __SERIAL_H

#include <stdio.h>

extern uint8_t Serial_TxPacket[];
extern uint8_t Serial_RxPacket[];

void Serial_Init(void);
void Serial_SendByte(uint8_t Byte);
void Serial_SendArray(uint8_t *Array, uint16_t Length);
void Serial_SendString(char *String);
void Serial_SendNumber(uint32_t Number, uint8_t Length);
void Serial_Printf(char *format, ...);

void Serial_SendPacket(void);
uint8_t Serial_GetRxFlag(void);

#endif
(4)、Key.c
cpp
#include "stm32f10x.h"                  // Device header
#include "Delay.h"
// 按键引脚定义
#define KEY1_PIN    GPIO_Pin_3
#define KEY1_PORT   GPIOG
#define KEY2_PIN    GPIO_Pin_4
#define KEY2_PORT   GPIOG
#define KEY3_PIN    GPIO_Pin_5
#define KEY3_PORT   GPIOG

void EXTI_Config(void);
void NVIC_Config(void);
/*****************************************
 * 步骤1:初始化按键GPIO(上拉输入模式)
 *****************************************/
void Key_Init(void) {
    GPIO_InitTypeDef GPIO_InitStruct;

    // 使能GPIOG时钟
    RCC_APB2PeriphClockCmd(RCC_APB2Periph_GPIOG, ENABLE);

    // 配置按键引脚为上拉输入
    GPIO_InitStruct.GPIO_Mode = GPIO_Mode_IPU;
    GPIO_InitStruct.GPIO_Pin = KEY1_PIN | KEY2_PIN | KEY3_PIN;
    GPIO_InitStruct.GPIO_Speed = GPIO_Speed_50MHz;
    GPIO_Init(KEY1_PORT, &GPIO_InitStruct);
}

uint8_t Key_GetNum(void){
	uint8_t ret = 0;

	if (GPIO_ReadInputDataBit(KEY1_PORT, KEY1_PIN) == 0)
	{
		Delay_ms(10);

		//等待按键抬起
		while(GPIO_ReadInputDataBit(KEY1_PORT, KEY1_PIN) == 0);

		Delay_ms(10);
		ret = 1;
	}
	else if(GPIO_ReadInputDataBit(KEY2_PORT, KEY2_PIN) == 0)
	{
		Delay_ms(10);

		//等待按键抬起
		while(GPIO_ReadInputDataBit(KEY2_PORT, KEY2_PIN) == 0);

		Delay_ms(10);
		ret = 2;
	}
	else if(GPIO_ReadInputDataBit(KEY3_PORT, KEY3_PIN) == 0){
		Delay_ms(10);

		//等待按键抬起
		while(GPIO_ReadInputDataBit(KEY3_PORT, KEY3_PIN) == 0);

		Delay_ms(10);
		ret = 3;
	}
	return ret;
}
(5)、key.h
cpp
#ifndef __KEY_H
#define __KEY_H

void Key_Init(void);
uint8_t Key_GetNum(void);

#endif
运行结果:
发送数据测试:
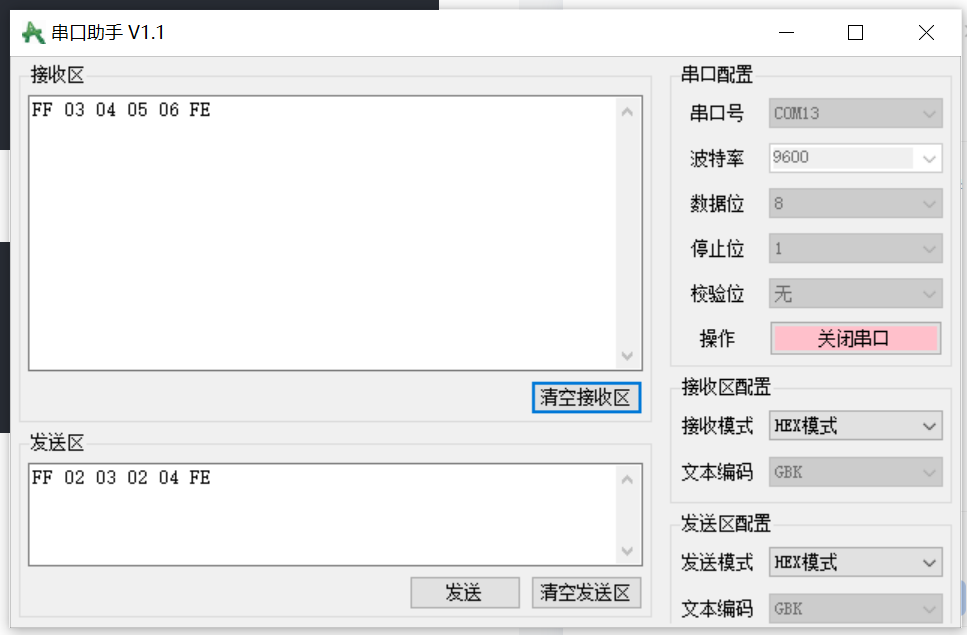
接收数据测试: