本文记录C++并发与多线程的知识,介绍并发,线程的概念,并介绍在多线程场景下, lock(),unlock(), unique_lock()和lock_guard()的使用。本章一共16节,本文记录1-6节。
文章目录
- [第13章 C++11 并发与多线程](#第13章 C++11 并发与多线程)
-
- [13.1 并发基本概念及实现,进程、线程基本概念](#13.1 并发基本概念及实现,进程、线程基本概念)
-
- [13.1.1 并发,进程,线程基本概念](#13.1.1 并发,进程,线程基本概念)
-
- [13.1.1.1. 并发概念](#13.1.1.1. 并发概念)
- [13.1.1.2. 可执行程序](#13.1.1.2. 可执行程序)
- [13.1.1.3. 进程](#13.1.1.3. 进程)
- [13.1.1.4. 线程](#13.1.1.4. 线程)
- [13.1.2 并发的实现方法](#13.1.2 并发的实现方法)
- [13.1.3 C++11新标准](#13.1.3 C++11新标准)
- [13.2 线程创建,开始及结束-线程用法:join,detach](#13.2 线程创建,开始及结束-线程用法:join,detach)
-
- [13.2.1 创建一个线程](#13.2.1 创建一个线程)
- [13.2.2 thread,join(), joinable()](#13.2.2 thread,join(), joinable())
- [13.2.3 detach() 分离主线程](#13.2.3 detach() 分离主线程)
- [13.2.4 子线程和主线程的内存关系](#13.2.4 子线程和主线程的内存关系)
- [13.2.5 使用detach()方法,传递引用存在的问题](#13.2.5 使用detach()方法,传递引用存在的问题)
- [13.3 线程传参解,detach坑,成员函数做线程函数](#13.3 线程传参解,detach坑,成员函数做线程函数)
-
- [13.3.1 detach()下,传递临时对象作为线程参数](#13.3.1 detach()下,传递临时对象作为线程参数)
-
- [13.3.1.1 要避免的陷阱:主线程资源被回收](#13.3.1.1 要避免的陷阱:主线程资源被回收)
- [13.3.1.2 给线程传递临时对象构造时机](#13.3.1.2 给线程传递临时对象构造时机)
- [13.3.1.3 获取线程id的方式](#13.3.1.3 获取线程id的方式)
- [13.3.1.4 使用引用,为什么多了一次拷贝构造](#13.3.1.4 使用引用,为什么多了一次拷贝构造)
- [13.3.2 用成员函数指针做线程函数](#13.3.2 用成员函数指针做线程函数)
- [13.4 创建多个线程、数据共享问题分析、案例代码](#13.4 创建多个线程、数据共享问题分析、案例代码)
-
- [13.4.1 创建和等待多个线程](#13.4.1 创建和等待多个线程)
- 13.4.2数据共享问题
-
- [13.4.2.1 只读的数据](#13.4.2.1 只读的数据)
- [13.4.2.2 有读有写数据](#13.4.2.2 有读有写数据)
- [13.4.3 其他案例](#13.4.3 其他案例)
- [13.5 互斥量概念、用法、死锁演示及解决详解](#13.5 互斥量概念、用法、死锁演示及解决详解)
-
- [13.5.1 互斥量mutex概念--保护共享数据](#13.5.1 互斥量mutex概念--保护共享数据)
- [13.5.2 互斥量用法 + lock_guard](#13.5.2 互斥量用法 + lock_guard)
-
- [13.5.2.1 lock() 和 unlock() 成对使用](#13.5.2.1 lock() 和 unlock() 成对使用)
- [13.5.2.2 lock_guard() 自动解锁](#13.5.2.2 lock_guard() 自动解锁)
- [13.5.3 死锁](#13.5.3 死锁)
-
- [13.5.3.1 不发生死锁代码](#13.5.3.1 不发生死锁代码)
- [13.5.3.2 发生死锁代码](#13.5.3.2 发生死锁代码)
- [13.5.4 lock_guard的使用](#13.5.4 lock_guard的使用)
- [13.6 unique_lock详解](#13.6 unique_lock详解)
-
- [13.6.1 unique_lock() 取代 lock_guard](#13.6.1 unique_lock() 取代 lock_guard)
- [13.6.2 unique_lock的第二个参数](#13.6.2 unique_lock的第二个参数)
-
- [13.6.2.1 adopt_lock](#13.6.2.1 adopt_lock)
- [13.6.2.2 try_to_lock()与owns_lock()配合使用](#13.6.2.2 try_to_lock()与owns_lock()配合使用)
- [13.6.2.3 defer_lock()](#13.6.2.3 defer_lock())
- [13.6.2.4 线程休眠的写法](#13.6.2.4 线程休眠的写法)
- [13.6.3 unique的成员函数](#13.6.3 unique的成员函数)
-
- [13.6.3.1 lock() 和unlock() 粒度](#13.6.3.1 lock() 和unlock() 粒度)
- [13.6.3.2 try_lock()](#13.6.3.2 try_lock())
- [13.6.3.3 release()](#13.6.3.3 release())
- [13.6.4 unique_lock所有权传递](#13.6.4 unique_lock所有权传递)
第13章 C++11 并发与多线程
13.1 并发基本概念及实现,进程、线程基本概念
13.1.1 并发,进程,线程基本概念
13.1.1.1. 并发概念
对于单核CPU,某时刻只能执行一个任务,但是每秒钟进行多次操作系统调度,这就是并发。并发的主要目的就是提高性能。
13.1.1.2. 可执行程序
是硬盘上保存的一个文件,windows下.exe linux a.out 具有可执行权限的程序。
13.1.1.3. 进程
可执行程序运行起来后,就是进程。
13.1.1.4. 线程
a) 每个进程都有一个主线程。进程启动后,主线程就启动了;进程的主线程来执行main()中的代码;当主线程执行完毕main中代码后,表示整个进程就执行完毕了。
c) 创建其他线程。创建的线程去执行其他代码。
d) 多线程的开销。多个线程并发执行,每个线程消耗1M独立的堆栈空间,而且线程切换要保存很多中间状态。所以线程不能太多,否则线程的切换会消耗本该属于其他线程的时间,降低效率。
e) 至于一个进程要创建多少个线程,很难评估和量化,需要在实际应用中调整和优化。
13.1.2 并发的实现方法
两种方法实现并发,多进程和多线程,推荐使用多线程。
在单独的进程中,创建多个线程实现并发。每个进程中的所有线程,共享内存;多线程的切换开销远远小于进程,但是共享内存带来新问题,数据一致性问题。
线程的开销小于进程的开销。
13.1.3 C++11新标准
C++11 支持了多线程,支持跨平台。
13.2 线程创建,开始及结束-线程用法:join,detach
- 程序运行起来后,生成了一个进程,进程的主线程自动运行。
- 主线程和次线程的开始和结束。主线程从main() 开始执行,次线程从绑定的函数开始执行,函数执行完毕后,次线程也就执行完了。
- 进程结束标志。 进程中的主线程执行完毕了,该进程就执行完毕了。如果其他线程还没有执行完毕,那么这些子线程会被强制终止。所以,一般情况下,想保持子线程的运行状态的话,那么就让主线程一直保持运行,不要让主线程退出。
13.2.1 创建一个线程
C++ 中使用 thread 创建一个线程。
cpp
void myPrint()
{
	cout << "新线程开始执行1" << endl;
	cout << "新线程开始执行2" << endl;
	cout << "新线程开始执行3" << endl;
	cout << "新线程开始执行4" << endl;
	cout << "新线程开始执行5" << endl;
	cout << "新线程结束执行" << endl;
}
void test ()
{
thread myobj(myPrint);
myobj.join();   // 阻塞主线程,阻塞到这里,当子线程执行完毕,主线程继续往下走。
if (myobj.joinable())
{
		cout << " true" << endl;
}
else
{
	cout << " false" << endl;
}
}
13.2.2 thread,join(), joinable()
- thread 是线程类,thread myObj就是类实例化的对象。
2 myPrint() 是次线程入口函数,次线程进入该函数开始,执行完该函数后,次线程结束。
3 join()就是阻塞主线程,等待所有次线程执行完毕后,再执行主线程。
4 joinable () 判断当前线程对象,是否可以使用join()方法;可以则返回true,否则返回false;
13.2.3 detach() 分离主线程
让主线程和次线程分离,那么次线程的资源由运行时库接管,接管之后,次线程的资源的释放工作由运行时库负责。
注意:detach() 之后就不能再使用 join()了。
cpp
	thread myobj(myPrint);
	myobj.join();   // 阻塞主线程,阻塞到这里,当子线程执行完毕,主线程继续往下走。
	if (myobj.joinable())
	{
		cout << " true" << endl;
	}
	else
	{
		cout << " false" << endl;
	}
当一个线程被分离(detach)后,就不能再对这个线程执行任何操作,也不能获取该线程的返回值,其生命周期就由C++运行时库自动管理了,当线程执行完毕后,运行库自动清理这个线程所使用的所有资源,包括线程的堆栈和内核资源。
当进程退出,也就是main()执行完毕,这个被分离的线程不论是否执行完毕,都会被释放。
13.2.4 子线程和主线程的内存关系
在C++中,主线程和子线程共享进程的地址空间,这意味着它们可以访问相同的全局变量和堆内存。然而,每个线程都有自己的栈内存,所以局部变量和函数参数在不同的线程之间是隔离的。
这种内存模型有一些重要的含义:
- 全局变量和堆内存:因为主线程和子线程共享全局变量和堆内存,所以一个线程可以修改另一个线程可以看到的数据。所以对于共享的数据,应该使用同步机制,比如使用互斥量(std::mutex)、条件变量(std::condition_variable)或其他同步原语来确保线程安全地访问共享数据。
- 栈内存:线程的栈空间类似于函数的栈栈空间,出作用于就会被析构。所以,在外部使用线程的栈空间地址。可以在线程中使用堆内存,开辟堆内存并返回。
- 线程局部存储:C++还提供了线程局部存储(Thread Local Storage,TLS),这是一种特殊类型的存储,每个线程都有自己的一份。你可以使用thread_local关键字来声明线程局部变量。这些变量在每个线程中都是唯一的,即使它们的名称和类型在所有线程中都是相同的。
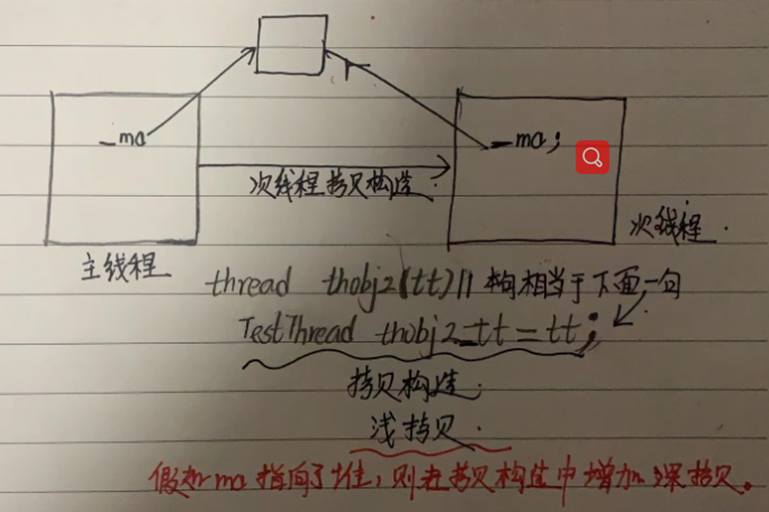
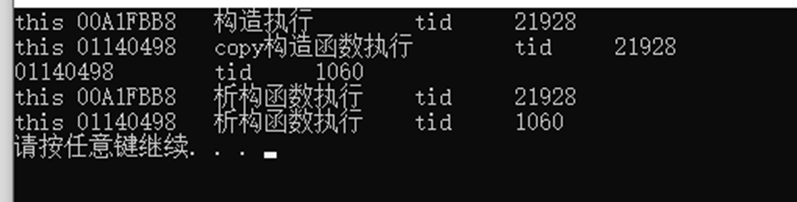
下面的例子,主线程创建了子线程,子线程复制了主线程的类的对象,次线程调用
拷贝构造函数重新复制一份,然后次线程结束后,析构;
但是线程的拷贝是浅拷贝,需要在类中实现拷贝构造函数的深拷贝。
cpp
class TestThread
{
public:
	explicit TestThread(int& i) :m_a(i)
	{
		cout << "构造函数执行 this	" << this << "	m_a =  " << m_a << endl;
	}
	TestThread(const TestThread& obj) :m_a(obj.m_a)
	{
		cout << "拷贝构造函数执行 this	" << this << "	m_a =  " << m_a << endl;
	}
	~TestThread()
	{
		cout << "析构函数执行 this	" << this << "	m_a =  " << m_a << endl;
	}

	void operator()(int j)
	{
		cout << "------新线程开始执行1" << endl;
		cout << "------新线程结束执行1" << endl;
	}
private:
	int &m_a;
};

void test02()
{
	cout << "====主线程开始========" << endl;

	int mj = 2;
	TestThread obj(mj);   // explicit TestThread(int& i) :m_a(i)
	thread t(obj, 2);     // TestThread(const TestThread& obj) :m_a(obj.m_a)
	if (t.joinable())	 //  线程的析构函数执行
	{
		t.join();
	}
	else
	{
		cout << "detached" << endl;
	}
	cout << "====主=线程结束========" << endl;  // 主线程的析构函数执行
}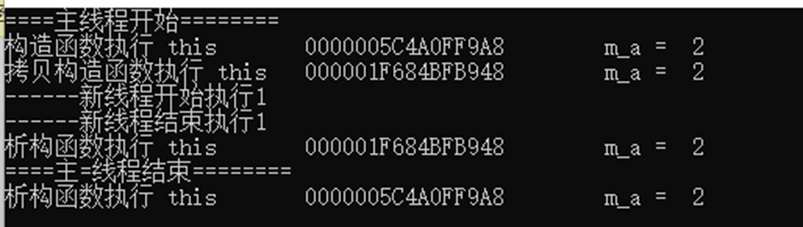
如果给次线程传递函数是operator() ,传递一个对象,那么在线程中会调用拷贝构造函数重新生成一个对象。也就是传递对象时,主线程和次线程独享对象空间。
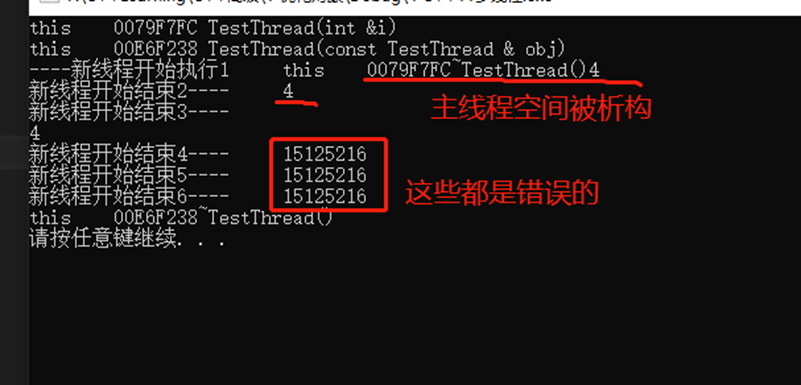
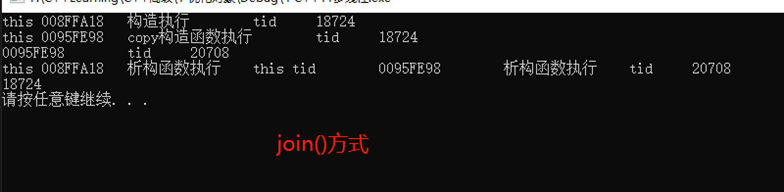
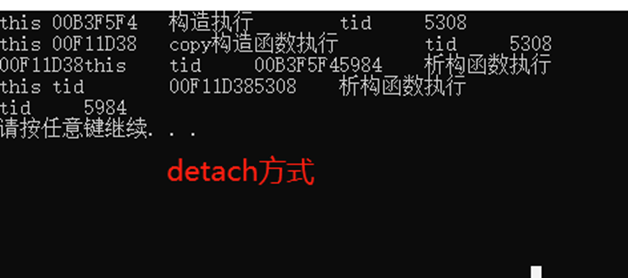
13.2.5 使用detach()方法,传递引用存在的问题
使用detach() + 对象传递引用后,因为主线程执行完毕后,主线程被析构,所以,主线程中的mj = 4被析构。
cpp
class TestThread
{
public:
	TestThread(int &i) :_ma(i)
	{

		cout << "this	" << this << " TestThread(int &i)" << endl;
	}

	TestThread(const TestThread & obj):_ma(obj._ma)
	{
		cout << "this	" << this << " TestThread(const TestThread & obj)" << endl;
	}
	~TestThread()
	{
		cout << "this	" << this << "~TestThread()" << endl;
	}
	void operator()()
	{
		cout << "----新线程开始执行1	" << _ma <<  endl;
		cout << "新线程开始结束2----	" << _ma << endl;
		cout << "新线程开始结束3----	" << _ma << endl;
		cout << "新线程开始结束4----	" << _ma << endl;
		cout << "新线程开始结束5----	" << _ma << endl;
		cout << "新线程开始结束6----	" << _ma << endl;
	}
private:
	int &_ma;
};
void test3()
{
	int mj = 4;
	TestThread tt(mj);
	thread thobj2(tt);
	thobj2.detach();

}
13.3 线程传参解,detach坑,成员函数做线程函数
13.3.1 detach()下,传递临时对象作为线程参数
13.3.1.1 要避免的陷阱:主线程资源被回收
下边这段代码,本希望将char数组 mybuf 自动转为string ,传递给线程函数,但是什么时候转呢?通过验证,存在主线程执行完毕后才会转,这时候,主线程中的mybuf已经被回收了。
结论:在给线程传递的对象需要隐士转换时候,一定要显示转换再传递。
原始代码
cpp
void myprint(const int i, const string &pmybuf)
{
	cout << i << endl;
	cout << pmybuf.c_str() << endl;
	return;
}

void test4()
{
	int mvar = 1;
	// int &mvary = mvar;
	char mybuf[] = "this is a test!";

	thread myobj(myprint, mvar, mybuf);
	myobj.detach();

	cout << "T love China!" << endl;
}
修改后
将传递的参数,转为临时对象传递给线程函数。
cpp
void test4()
{
	// 一  传递临时对象作为线程参数
	// 1.1 要避免的陷阱
	int mvar = 1;
	// int &mvary = mvar;
	char mybuf[] = "this is a test!";

	// thread myobj(myprint, mvar, mybuf);		// 错误方式
	thread myobj(myprint, mvar, string(mybuf));  // 这里将mybuf转换为 stirng对象,保证了线程安全
	myobj.detach();

	cout << "T love China!" << endl;
}
验证:传递临时对象在次线程函数中构造
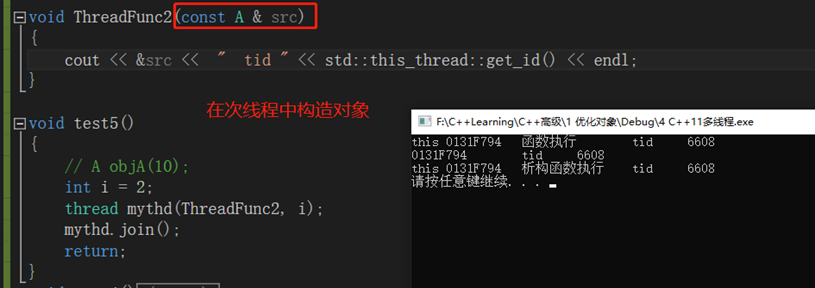
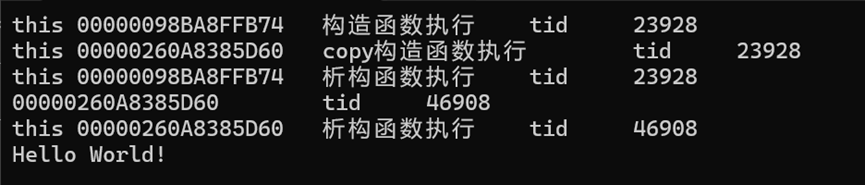
结论:主线程给次线程传递的参数为引用时候,并不会按引用传递。在次线程中又会调用拷贝构造函数,生成一份新的对象。
cpp
// 线程函数中的引用i是值传递
class A
{
public:
	A(int a) :_mi(a) { cout << "this " << this << "	函数执行	" << "tid	" << std::this_thread::get_id() << endl; }
	~A() { cout << "this " << this << "	析构函数执行	" << "tid	" << std::this_thread::get_id() << endl; }
	A(const A &src):_mi(src._mi)
	{
		cout << "this " << this << "	copy构造函数执行	" << "tid	" << std::this_thread::get_id() << endl;
	}
private:
	int _mi;
};

void ThreadFunc2(const A & src)
{
	cout << &src <<  "	tid	" << std::this_thread::get_id() << endl;
}

void test5()
{
	int i = 2;
	thread mythd(ThreadFunc2, i);
	mythd.join();
	return;
}

int main()
{
	test5();
	system("pause");
	return 1;
}
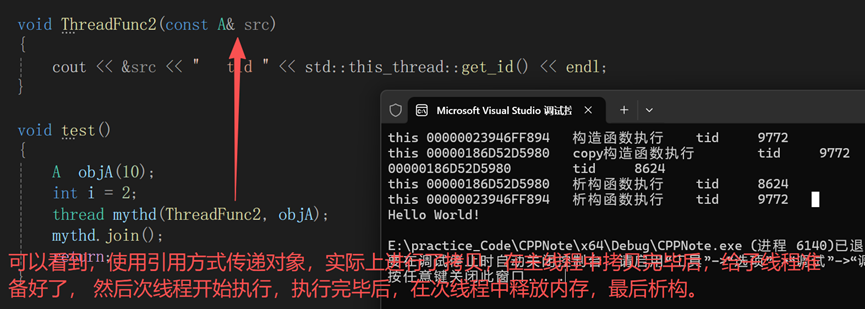
验证:主线程给次线程传递对象的引用,在次线程中会生成新对象吗?
结论:虽然传递引用,但是次线程并不会按照引用传递,相当于值传递,生成了一份新对象.
cpp
    class A
    {
    public:
        A(int a) :_mi(a)
        {
            cout << "this " << this << "	构造函数执行	" << "tid	" << std::this_thread::get_id() << endl;
        }
        ~A()
        {
            cout << "this " << this << "	析构函数执行	" << "tid	" << std::this_thread::get_id() << endl;
        }
        A(const A& src) :_mi(src._mi)
        {
            cout << "this " << this << "	copy构造函数执行	" << "tid	" << std::this_thread::get_id() << endl;
        }
    private:
        mutable int _mi;
    };

    void ThreadFunc2(const A& src)
    {
        cout << &src << "	tid	" << std::this_thread::get_id() << endl;
    }

    void test()
    {
        A  objA(10);
        int i = 2;
        thread mythd(ThreadFunc2, objA);
        mythd.join();
        return;
    }
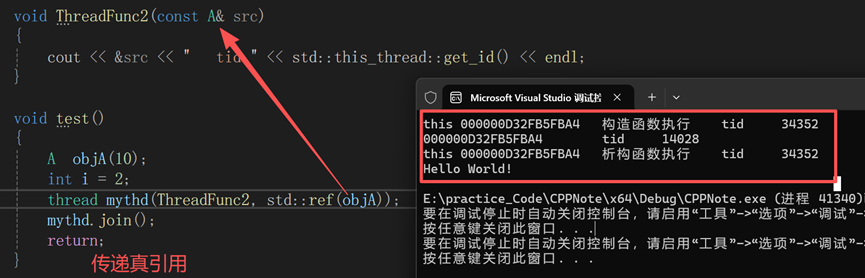
验证:使用std::ref传递真引用
结论:如果要在线程中传递引用,需要使用std::ref, 传递引用。
cpp
    class A
    {
    public:
        A(int a) :_mi(a)
        {
            cout << "this " << this << "	构造函数执行	" << "tid	" << std::this_thread::get_id() << endl;
        }
        ~A()
        {
            cout << "this " << this << "	析构函数执行	" << "tid	" << std::this_thread::get_id() << endl;
        }
        A(const A& src) :_mi(src._mi)
        {
            cout << "this " << this << "	copy构造函数执行	" << "tid	" << std::this_thread::get_id() << endl;
        }
    private:
        mutable int _mi;
    };

    void ThreadFunc2(const A& src)
    {
        cout << &src << "	tid	" << std::this_thread::get_id() << endl;
    }

    void test()
    {
        A  objA(10);
        int i = 2;
        thread mythd(ThreadFunc2, std::ref(objA));
        mythd.join();
        return;
    }
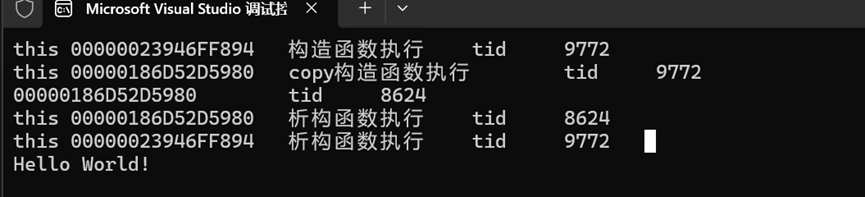
13.3.1.2 给线程传递临时对象构造时机
结论:传递临时对象,可以保证在主线程中构造对象,并传递给次线程,保证了安全。
传递临时对象流程:在主线程中生成临时对象,然后调用拷贝构造函数,给次线程准备好执行环境;然后次线程执行完毕后,调用析构函数,析构掉次线程中的对象;然后主线程也调用析构,析构掉主线程中的对象。
cpp
// 线程函数中的引用i是值传递,
    class A
    {
    public:
        A(int a) :_mi(a)
        {
            cout << "this " << this << "	构造函数执行	" << "tid	" << std::this_thread::get_id() << endl;
        }
        ~A()
        {
            cout << "this " << this << "	析构函数执行	" << "tid	" << std::this_thread::get_id() << endl;
        }
        A(const A& src) :_mi(src._mi)
        {
            cout << "this " << this << "	copy构造函数执行	" << "tid	" << std::this_thread::get_id() << endl;
        }
    private:
        mutable int _mi;
    };

    void ThreadFunc2(const A& src)
    {
        cout << &src << "	tid	" << std::this_thread::get_id() << endl;
    }

    void test()
    {
        int i = 2;
        thread mythd(ThreadFunc2, A(10));
        mythd.join();
        // 传递临时对象
    }
13.3.1.3 获取线程id的方式
cpp
std::this_thread::get_id()13.3.1.4 使用引用,为什么多了一次拷贝构造
理解:C++为了安全,在引用这里又生成了一个对象。
在传递对象时候,可以使用std::ref,传递的是真正的引用。
13.3.2 用成员函数指针做线程函数
结论:使用成员函数指针作为线程的函数,除了传递函数指针外,还需要传递对象的地址。

cpp
    class A
    {
    public:
        A(int a) :_mi(a)
        {
            cout << "this " << this << "	构造函数执行	" << "tid	" << std::this_thread::get_id() << endl;
        }
        ~A()
        {
            cout << "this " << this << "	析构函数执行	" << "tid	" << std::this_thread::get_id() << endl;
        }
        A(const A& src) :_mi(src._mi)
        {
            cout << "this " << this << "	copy构造函数执行	" << "tid	" << std::this_thread::get_id() << endl;
        }
        void fun()
        {
            cout << "fun 成员函数 执行了 " << std::this_thread::get_id()  << endl;
        }
    private:
        mutable int _mi;
    };

    void ThreadFunc2(const A& src)
    {
        cout << &src << "	tid	" << std::this_thread::get_id() << endl;
    }

    void test()
    {
        A  objA(10);
        int i = 2;
        thread mythd2(&A::fun, &objA);
        mythd2.join();
        return;
    }
13.4 创建多个线程、数据共享问题分析、案例代码
13.4.1 创建和等待多个线程
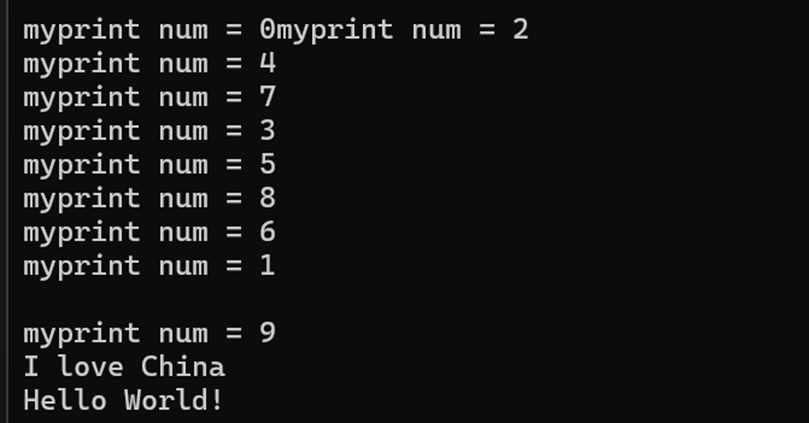
用vector数组存放10个线程,线程的入口函数相同。
执行下面的代码,出现如下问题:
- 多个线程执行顺序是乱的,这是操作系统调度器有关;
- 主线程等待子线程结束,最后主线程结束,使用了join()方法,更容易写出稳定的程序。
- 把thread对象放在容器中,thread数组,对创建大量的线程并对大量线程管理很方便。
cpp
void myprint(int num)
{
cout << "myprint num = " << num << endl;
}
void test()
{
//1 创建和等待多个线程
vector<thread> mythreads;
// 创建10个线程,线程入口函数统一使用myprint1
for (int i = 0; i < 10; ++i)
{
// thread t(myprint1,i);
mythreads.push_back(std::thread(myprint, i)); // 创建并开始执行10个线程
}
// 主线程等待10个线程
for (auto it = mythreads.begin(); it != mythreads.end(); ++it)
{
it->join();
}
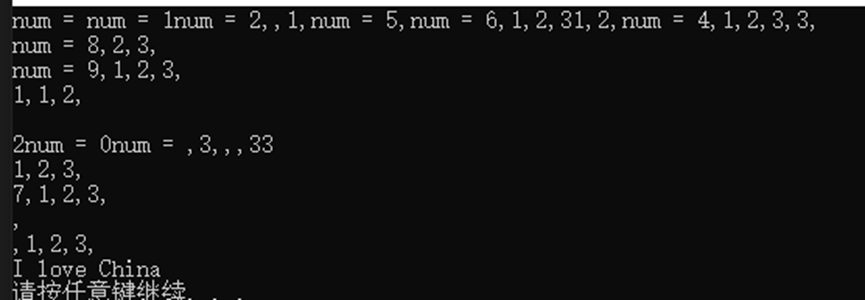
cout << "I love China" << endl;
}
13.4.2数据共享问题
13.4.2.1 只读的数据
创建10个线程,线程入口函数统一使用 myprint,创建并开始执行10个线程,这10个线程只读全局数据。
结论:10个线程都去读,不会出现问题。
cpp
    vector<int> vec{ 1,2,3 };
    void myprint(int num)
    {
        cout << "num = " << num << "," << vec[0] << "," << vec[1] << "," << vec[2] << "," << endl;
    }

    void test()
    {
        //1 创建和等待多个线程
        vector<thread> mythreads;
        // 创建10个线程,线程入口函数统一使用myprint1
        for (int i = 0; i < 10; ++i)
        {
            // thread t(myprint1,i);
            mythreads.push_back(std::thread(myprint, i));  // 创建并开始执行10个线程
        }

        // 主线程等待10个线程
        for (auto it = mythreads.begin(); it != mythreads.end(); ++it)
        {
            it->join();
        }
    }
13.4.2.2 有读有写数据
假如一共10个线程,2个写线程,8个读线程,如果不进行特别处理,程序会崩溃;
最简单的解决办法是:读时不写,写时不读。
下面的代码说明:如果读线程,不加empty()判断,程序会崩溃,如果加了empty()判空,条件满足,程序不会出现问题。
下面程序加了 empty() 也会出现问题。
修改方式见下节:
cpp
	class TestLock
	{
	public:
		// 存数据
		void inMessageQueue()
		{
			for (int i = 0; i < 10000; ++i)
			{
				cout << "i 入队列 " << i << endl;
				m_listRecMessage.push_back(i);
			}
		}

		void outMessageQueue()
		{
			for (int i = 0; i < 10000; ++i)
			{
				if (!m_listRecMessage.empty())
				{
					int command = m_listRecMessage.back();
					cout << "i 出队列了	" << command << endl;
					m_listRecMessage.pop_back();
				}
			}
		}

	private:
		list<int> m_listRecMessage;  // 链表
		mutex m_mutex;

	};

	void test()
	{
		TestLock testLock;
		thread t1(&TestLock::inMessageQueue, &testLock);
		thread t2(&TestLock::outMessageQueue, &testLock);
		t1.join();
		t2.join();

	}
上面的程序,只有写入线程在执行,而读出线程不执行。
13.4.3 其他案例
火车票例子:北京---深圳,火车站10个卖票窗口,1,2号窗口同时定99号座位,如果同时都买,出错!
解决方法: 假如1号订座位时候,2号窗口等着,直到1号窗口订票完毕,2号才能订。
13.5 互斥量概念、用法、死锁演示及解决详解
13.5.1 互斥量mutex概念--保护共享数据
保护数据共享:操作共享数据时候,先锁住,使用完毕,再解锁,这种锁机制就是互斥量。
互斥量是个类对象,对象.lock()方法,多个线程只有一个线程能lock()成功。如果锁成功,就执行下面的代码;如果锁失败,那么流程卡在lock(),不断尝试去Lock()。
13.5.2 互斥量用法 + lock_guard
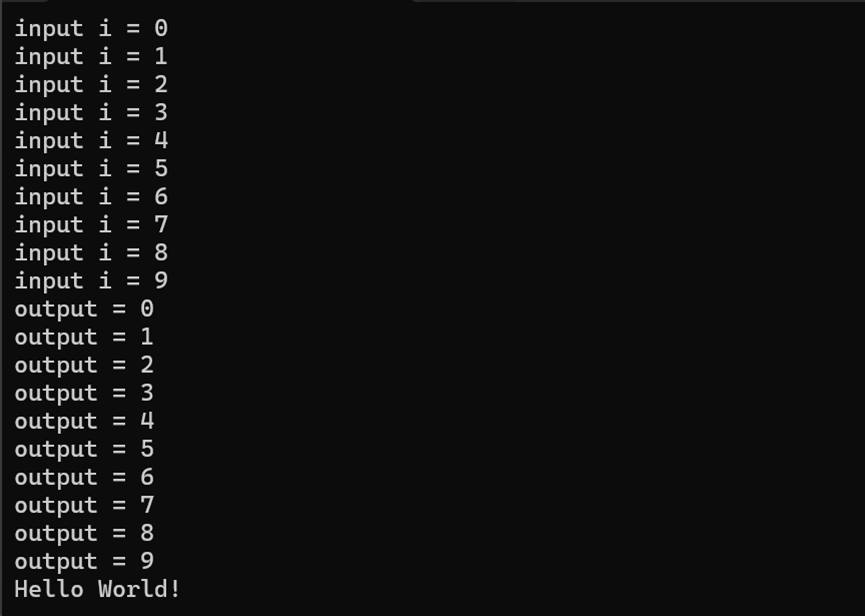
13.5.2.1 lock() 和 unlock() 成对使用
使用步骤:lock() 操作共享数据, unlock()
下面的代码使用了互斥量,可以解决线程读写共享内存的问题。
cpp
    class CReadWrite
    {
    public:
        void inMsgRecvQue()
        {
            for (int i = 0; i < 10; ++i)
            {
                mymutex.lock();
                RecMessage.emplace_back(i);
                cout << "input i = " << i << endl;
                mymutex.unlock();
            }
        }

        bool outMsgFunc(int& command)
        {
            mymutex.lock();
            if (!RecMessage.empty())
            {
                command = RecMessage.front();
                RecMessage.pop_front();
                mymutex.unlock();
                return true;
            }
            else
            {
                mymutex.unlock();
                return false;
            }
        }

        void outMsgRecQue()
        {
            int command = 0;
            bool flag = false;
            for (int i = 0; i < 10; ++i)
            {
                flag = outMsgFunc(command);
                if (flag)
                {
                    cout << "output = " << command << endl;
                }
                else
                {
                    cout << "队列为空 " << endl;
                }
            }
        }

    private:
        list<int> RecMessage;
        mutex     mymutex;
    };

    int test()
    {
        CReadWrite objC;
        thread t1(&CReadWrite::inMsgRecvQue, &objC);
        thread t2(&CReadWrite::outMsgRecQue, &objC);
        t1.join();
        t2.join();

        return 0;
    }
13.5.2.2 lock_guard() 自动解锁
lock和unlock()成对使用,但是为了防止unlock(),引入了std::lock_guard()类模板。原理是:lock_guard 构造时候执行 lock() ; 析构时候,执行 unlock()。
cpp
class CReadWrite
{
public:
	void inMsgRecvQue()
	{
		cout << "insert begin " << endl;
		for (int i = 0; i < 10000; ++i)
		{
			//mymutex.lock();
			lock_guard<mutex> lg(mymutex);
			RecMessage.emplace_back(i);
			cout << "input i = " << i << endl;
		//	mymutex.unlock();
		}
		cout << "insert end " << endl;
	}

	bool outMsgFunc(int& command)
	{
		lock_guard<mutex> lg(mymutex);
		//mymutex.lock();
		if (!RecMessage.empty())
		{
			command = RecMessage.front();
			RecMessage.pop_front();
			//mymutex.unlock();
			return true;
		}
		else
		{
			//mymutex.unlock();
			return false;
		}
	}

	void outMsgRecQue()
	{
		cout << "takeout begin " << endl;
		int command = 0;
		bool flag = false;
		for (int i = 0; i < 10000; ++i)
		{
			flag = outMsgFunc(command);
			if (flag)
			{
				cout << "command = " << command << endl;
			}
			else
			{
				cout << "队列为空 " << endl;
			}
		}
		cout << "takeout end " << endl;
	}

private:
	list<int> RecMessage;
	mutex mymutex;
};
13.5.3 死锁
死锁前提条件:1 有两个线程,2 每个线程都要锁两把锁,分别是金锁和银锁,
这两个线程执行操作,
不发生死锁的情况是:
A线程:金锁,银锁;
B线程:金锁,银锁。
A线程锁金锁后,即使进行上下文切换,B线程也开始所金锁,由于A线程已经锁住,所以B线程无法再次锁金锁,进行上下文切换,再次切换到A进程,A进程就可以锁银锁了。然后A就可以工作了。执行完毕A后,分别解开金锁和银锁,线程A就执行完毕了,线程B就可以成功上金锁,银锁了,上边的过程不存在发生死锁的情况。
发生死锁的情况:
A线程: 金锁,银锁;
B线程: 银锁,金锁;
分析:A线程锁金锁后,开始锁银锁;假如此时进行上下文切换,B线程开始执行,这是B开始锁银锁,然后尝试锁金锁,由于金锁已经被A线程锁住,所以B就不发成功锁金锁,线程B的CPU时间完毕后,切换到A线程。A线程开始锁银锁,但是银锁已经被B锁住,A也只好等待B解开银锁后,再上银锁;而B只好等待A处理完毕后,再次上金锁。两个线程处于这样的僵持状态,就是死锁。
13.5.3.1 不发生死锁代码
两个线程加锁的顺序相同。
cpp
class CReadWrite
{
public:
    void inMsgRecvQue()
    {
        for (int i = 0; i < 10; ++i)
        {
            mymutex1.lock();
            mymutex2.lock();

            RecMessage.emplace_back(i);

            cout << "input i = " << i << endl;
            mymutex1.unlock();
            mymutex2.unlock();
        }
    }

    bool outMsgFunc(int& command)
    {
        mymutex1.lock();
        mymutex2.lock();
        if (!RecMessage.empty())
        {
            command = RecMessage.front();
            RecMessage.pop_front();
            mymutex1.unlock();
            mymutex2.unlock();
            return true;
        }
        else
        {
            mymutex1.unlock();
            mymutex2.unlock();
            return false;
        }
    }

    void outMsgRecQue()
    {
        int command = 0;
        bool flag = false;
        for (int i = 0; i < 10; ++i)
        {
            flag = outMsgFunc(command);
            if (flag)
            {
                cout << "command = " << command << endl;
            }
            else
            {
                cout << "队列为空 " << endl;
            }
        }
    }

private:
    list<int> RecMessage;
    mutex mymutex1;
    mutex mymutex2;
};

void test()
{
    CReadWrite myCReadWrite;
    std::thread t1(&CReadWrite::inMsgRecvQue, &myCReadWrite);
    std::thread t2(&CReadWrite::outMsgRecQue, &myCReadWrite);
    t1.join();
    t2.join();
}
13.5.3.2 发生死锁代码
写线程加锁顺序:锁2和锁1;读线程加锁顺序,锁1和锁2。
cpp
class CReadWrite
{
public:
	void inMsgRecvQue()
	{
		cout << "insert begin " << endl;
		for (int i = 0; i < 1000; ++i)
		{
			mymutex2.lock();
			mymutex1.lock();

			RecMessage.emplace_back(i);
			cout << "input i = " << i << endl;
			mymutex1.unlock();
			mymutex2.unlock();
		}
		cout << "insert end " << endl;
	}

	bool outMsgFunc(int& command)
	{
		mymutex1.lock();
		mymutex2.lock();
		if (!RecMessage.empty())
		{
			command = RecMessage.front();
			RecMessage.pop_front();
			mymutex1.unlock();
			mymutex2.unlock();
			return true;
		}
		else
		{
			mymutex1.unlock();
			mymutex2.unlock();
			return false;
		}
	}

	void outMsgRecQue()
	{
		cout << "takeout begin " << endl;
		int command = 0;
		bool flag = false;
		for (int i = 0; i < 1000; ++i)
		{
			flag = outMsgFunc(command);
			if (flag)
			{
				cout << "command = " << command << endl;
			}
			else
			{
				cout << "队列为空 " << endl;
			}
		}
		cout << "takeout end " << endl;
	}

private:
	list<int> RecMessage;
	mutex mymutex1;
	mutex mymutex2;
};
只要线程A或者线程B加金锁和银锁的顺序发生变化,就会发生死锁。
13.5.4 lock_guard的使用
用两个 lock_guard 管两个互斥量时,如果构造用的是 std::adopt_lock,必须先用 std::lock(m1, m2) 把它们"同时"加锁,再用 lock_guard 接管所有权。
std::lock(m1, m2) 会一次性以无死锁算法获取多个互斥量,返回时二者均已上锁。
std::adopt_lock 的作用是"采用已有锁":告诉 lock_guard/unique_lock 构造函数,此互斥量已经被当前线程锁住了,构造时不要再加锁,只负责在析构时解锁。若传了 adopt_lock 但实际上没有先锁住,会导致未定义行为。
cpp
  class A
  {
  public:
      // 把收到的消息入到一个队列的线程
      void inMsgRecvQueue()
      {
          for (int i = 0; i < 10; i++)
          {
              lock(mytex1, mytex2);
              lock_guard<mutex> guard1(mytex1, std::adopt_lock);
              lock_guard<mutex> guard2(mytex2, std::adopt_lock);

              cout << "In = " << i << endl;
              msgRecvQueue.push_back(i);  // 收到10000个数据
          }
      }

      bool outMsgFunc(int& command)
      {
          mytex1.lock();
          mytex2.lock();
          if (!msgRecvQueue.empty())
          {
              //
              command = msgRecvQueue.front();  // 取出元素
              msgRecvQueue.pop_front();
              mytex1.unlock();
              mytex2.unlock();
              return true;
              // 这里考虑处理数据
          }
          else
          {
              cout << "消息队列是空" << endl;
              mytex1.unlock();
              mytex2.unlock();
              return false;
          }
      }

      // 把数据从消息队列中取出
      void outMsgRecQueue()
      {
          int command = 0;
          bool result = false;
          for (int i = 0; i < 10; i++)
          {
              result = outMsgFunc(command);
              if (result == true)
              {
                  cout << "Out = " << command << endl;
              }
          }
      }
  private:
      list<int> msgRecvQueue;
      mutex mytex1;
      mutex mytex2;
  };

  void test()
  {
      A objC;
      thread t1(&A::inMsgRecvQueue, &objC);
      thread t2(&A::outMsgRecQueue, &objC);
      t1.join();
      t2.join();
  }
13.6 unique_lock详解
13.6.1 unique_lock() 取代 lock_guard
unique_lock是个类模板,工作中一般使用lock_guard(推荐使用,因为Lock_guard效率更高);lock_guard取代了mutex的lock和unlock(构造中lock(),析构时unlock() )
在使用上,unique_lock() 和 lock_guard() 效果完全一样。
cpp
lock(mytex2, mytex1);
unique_lock<mutex> unique(mytex1, std::adopt_lock);
unique_lock<mutex> unique2(mytex2, std::adopt_lock);
注意: unique_lock 可以随时手动调用 unlock()解锁,不用非要得析构时解锁。
13.6.2 unique_lock的第二个参数
13.6.2.1 adopt_lock
lock_guard中,adopt_lock 表示这个互斥量已经被Lock()了,不需要再次lock()了,只需要在析构函数中 unlock() mutex即可。
cpp
class A06_1
{
public:
	// 把收到的消息入到一个队列的线程
	void inMsgRecvQueue()
	{
		for (int i = 0; i < 1000; i++)
		{
			//mytex.lock();
			mytex1.lock();
			unique_lock<mutex> guard1(mytex1, std::adopt_lock);

			//mytex1.lock();
			//mytex2.lock();
			cout << "In = " << i << endl;
			msgRecvQueue.push_back(i);  // 收到10000个数据
				//mytex.unlock();
				//mytex1.unlock();
				//mytex2.unlock();
		}
	}

	bool outMsgFunc(int & command)
	{
		//mytex.lock();
		mytex1.lock();
		unique_lock<mutex> guard1(mytex1, std::adopt_lock);
		// 当休息20秒,导致了 In也被卡20秒
		// std::chrono::milliseconds dura(20000);

		if (!msgRecvQueue.empty())
		{
			command = msgRecvQueue.front();  // 取出元素
			msgRecvQueue.pop_front();
			return true;
			// 这里考虑处理数据
		}
		else
		{
			cout << "消息队列是空" << endl;
			return false;
		}
	}

	// 把数据从消息队列中取出
	void outMsgRecQueue()
	{
		int command = 0;
		bool result = false;
		for (int i = 0; i < 1000; i++)
		{
			result = outMsgFunc(command);
			if (result == true)
			{
				cout << "Out = " << command << endl;
			}
		}
	}
private:
	list<int> msgRecvQueue;
	mutex mytex1;
	mutex mytex2;
};
void test06_1()
{
	lock(mytex2, mytex1);
	unique_lock<mutex> guard1(mytex1, std::adopt_lock);
	unique_lock<mutex> guard2(mytex2, std::adopt_lock);

	2.1 unique_lock() 第二个参数,
	lock_guard中,adopt_lock 表示这个互斥量已经被Lock()了,不需要再次lock()了。
	unique_lock() 第二个参数也可以指定为adopt_lock ,与lock_guard相同.
	*/
	// 为了解决线程被卡20秒的问题,出现了try_to_lock()
	A06_1 myobj;
	thread t1(&A06_1::inMsgRecvQueue, &myobj);
	thread t2(&A06_1::outMsgRecQueue, &myobj);
	t1.join();
	t2.join();
}
13.6.2.2 try_to_lock()与owns_lock()配合使用
在unique_lock()的第二个参数使用lock()的情况,就不用使用mutex对象先lock()了。第二个参数try_to_lock()意思是,owns_lock() 如果为真,表示线程可以拿到锁,如果owns_lock()为假,线程不会拿到锁,而是做其他事情,并不会因为被原地阻塞。
这种情况下使用 std::try_to_lock ,如果无法获取互斥量,就直接返回了,这样就不能保证1000次循环中,每次都能给队列赋值。
cpp
class CReadWrite2
{
public:
	void inMsgRecvQue()
	{
		cout << "insert begin " << endl;
		for (int i = 0; i < 1000; ++i)
		{
			unique_lock<mutex> lock(mymutex1, std::try_to_lock);
			// 尝试锁定互斥量而不阻塞线程,如果互斥量已经被锁定,try_to_lock() 会立即返回 false
			if (lock.owns_lock())
			{
				RecMessage.emplace_back(i);
				cout << "input i = " << i << endl;
			}
			else
			{
				cout << "输入线程无法锁定" << endl;
			}
		}
		cout << "insert end " << endl;
	}

	bool outMsgFunc(int& command)
	{
		unique_lock<mutex> lock(mymutex1, std::try_to_lock);
		if (lock.owns_lock())
		{
			if (!RecMessage.empty())
			{
				command = RecMessage.front();
				RecMessage.pop_front();
				return true;
			}
			else
			{
				return false;
			}
		}
		else
		{
			cout << "输出线程无法锁定" << endl;
		}
	}
	void outMsgRecQue()
	{
		cout << "takeout begin " << endl;
		int command = 0;
		bool flag = false;
		for (int i = 0; i < 1000; ++i)
		{
			flag = outMsgFunc(command);
			if (flag)
			{
				cout << "command = " << command << endl;
			}
			else
			{
				cout << "队列为空 " << endl;
			}
		}
		cout << "takeout end " << endl;
	}

private:
	list<int> RecMessage;
	mutex mymutex1;
	mutex mymutex2;
};
13.6.2.3 defer_lock()
用这个defer_lock前提是,不能自己先lock 否则会异常。
defer_lock() 意思是创建一个未锁定的unique_lock()对象,稍后手动锁定互斥锁。
cpp
在这里插入代码片    class A
    {
    public:
        // 把收到的消息入到一个队列的线程
        void inMsgRecvQueue()
        {
            for (int i = 0; i < 10; i++)
            {
                // 3 defer_lock 和 lock unlock的使用
                std::unique_lock<std::mutex> lk1(mutex1, std::defer_lock);
                std::unique_lock<std::mutex> lk2(mutex2, std::defer_lock);
                std::lock(lk1, lk2); // 成功后 lk1、lk2 都拥有锁
                cout << "input i = " << i << endl;
                msgRecvQueue.push_back(i);
            }
        }

        bool outMsgFunc(int& command)
        {
            std::unique_lock<std::mutex> guard1(mutex1, std::defer_lock);
            std::unique_lock<std::mutex> guard2(mutex2, std::defer_lock);
            std::lock(guard1, guard2); // 成功后 lk1、lk2 都拥有锁
            if (!msgRecvQueue.empty())
            {
                command = msgRecvQueue.front();  // 取出元素
                msgRecvQueue.pop_front();
                return true;
                // 这里考虑处理数据
            }
            else
            {
                cout << "消息队列是空" << endl;
                return false;
            }
        }

        // 把数据从消息队列中取出
        void outMsgRecQueue()
        {
            int command = 0;
            bool result = false;
            for (int i = 0; i < 10; i++)
            {
                result = outMsgFunc(command);
                if (result == true)
                {
                    cout << "Out = " << command << endl;
                }
            }
        }
    private:
        list<int> msgRecvQueue;
        mutex mutex1;
        mutex mutex2;
    };
    void test()
    {
        A myobj;
        thread t1(&A::inMsgRecvQueue, &myobj);
        thread t2(&A::outMsgRecQueue, &myobj);
        t1.join();
        t2.join();
    }
13.6.2.4 线程休眠的写法
cpp
    std::chrono::milliseconds dura(20000);
	  std::this_thread::sleep_for(dura);
		std::this_thread::get_id()
13.6.3 unique的成员函数
13.6.3.1 lock() 和unlock() 粒度
为什么有时候需要unlock():因为lock()锁住的代码段越少,执行语句就越少,整个程序运行效率越高。有人也把锁头锁住的代码多少称为锁的粒度。
要学会选择合适的粒度,粒度太细,可能漏掉共享数据的保护;粒度太粗,影响效率。
13.6.3.2 try_lock()
使用方式与上面相同。
13.6.3.3 release()
release() 返回它所管理的mutex对象指针,并释放所有权,unique_lock() 和 mutex不再有关系。
cpp
class A06_3
{
public:
	// 把收到的消息入到一个队列的线程
	void inMsgRecvQueue()
	{
		for (int i = 0; i < 1000; i++)
		{
			 // 4 release()
			unique_lock<mutex> unique1(mytex1);
			mutex *ptx = unique1.release();   // ptx就是mytex
			msgRecvQueue.push_back(i);
			ptx->unlock();
		}
	}

	bool outMsgFunc(int & command)
	{
		//mytex.lock();
		unique_lock<mutex> guard1(mytex1);
		//std::chrono::milliseconds dura(2000);
		//std::this_thread::sleep_for(dura);
		// adopt:
		// 当休息20秒,导致了 In也被卡20秒

		if (!msgRecvQueue.empty())
		{
			command = msgRecvQueue.front();  // 取出元素
			msgRecvQueue.pop_front();
			return true;
			// 这里考虑处理数据
		}
		else
		{
			cout << "消息队列是空" << endl;
			return false;
		}
	}

	// 把数据从消息队列中取出
	void outMsgRecQueue()
	{
		int command = 0;
		bool result = false;
		for (int i = 0; i < 1000; i++)
		{
			result = outMsgFunc(command);
			if (result == true)
			{
				cout << "Out = " << command << endl;
			}
		}
	}
private:
	list<int> msgRecvQueue;
	mutex mytex1;
	mutex mytex2;
};
void test06_3()
{
	A06_3 myobj;
	thread t1(&A06_3::inMsgRecvQueue, &myobj);
	thread t2(&A06_3::outMsgRecQueue, &myobj);
	t1.join();
	t2.join();
}
13.6.4 unique_lock所有权传递
cpp
unique_lock<mutex> unique1(mytex1); // unique_lock 和 mutex 绑定在一起了。unique1 可以将对mytex1的所有权转移给其他的unique_lock对象。
所有权的转移方法:使用std::move()和 return ;
cpp
class A06_4
{
public:
	// 把收到的消息入到一个队列的线程
	void inMsgRecvQueue()
	{
		for (int i = 0; i < 1000; i++)
		{
			// release(*) 使用
			unique_lock<mutex> unique1(mytex1);
			unique_lock<mutex> unique2(std::move(unique1));  // 所有权转移了,unique1是空了,unique2接管了unique1的所有权
			//mutex *ptx = unique1.release();
			msgRecvQueue.push_back(i);
			ptx->unlock();
		}
	}

	bool outMsgFunc(int & command)
	{
		//mytex.lock();
		unique_lock<mutex> guard1(mytex1);
		//std::chrono::milliseconds dura(2000);
		//std::this_thread::sleep_for(dura);
		// adopt:
		// 当休息20秒,导致了 In也被卡20秒

		if (!msgRecvQueue.empty())
		{
			command = msgRecvQueue.front();  // 取出元素
			msgRecvQueue.pop_front();

			return true;
			// 这里考虑处理数据
		}
		else
		{
			cout << "消息队列是空" << endl;

			return false;
		}
	}

	// 把数据从消息队列中取出
	void outMsgRecQueue()
	{
		int command = 0;
		bool result = false;
		for (int i = 0; i < 1000; i++)
		{
			result = outMsgFunc(command);
			if (result == true)
			{
				cout << "Out = " << command << endl;
			}
		}
	}
private:
	list<int> msgRecvQueue;
	mutex mytex1;
	mutex mytex2;
};