首先这篇博客主要讲解的是如何设计一个基于qt开发的点菜系统,这方面有很多内容会引用他人的文章需要继续学习他人的文章才会明白此文章是在讲解啥。
整体设计思路
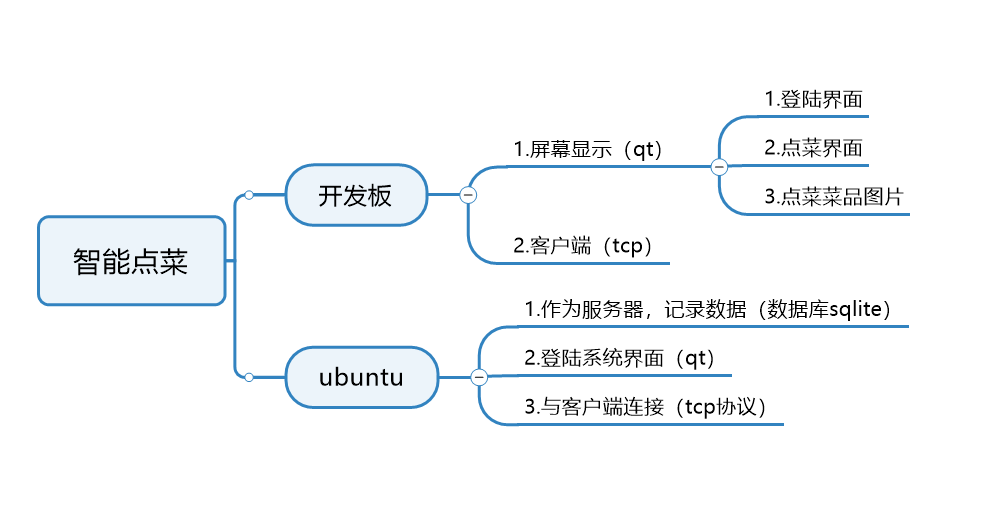
这张图其实很详细的介绍了点菜系统需要的技术,在开发板方面,也就是服务器端,首先屏幕显示也是基于qt开发,所有你的ubuntu qt开发的时候就得设置好其编译器和环境基于开发板的,同时你还需要另一套环境进行直接在开发板上测试不需要反反复复的在开发板上重装。屏幕显示部分还需要首先设置一个登陆界面当客户端也就是ubuntu或者电脑登陆完成后发送消息给开发板,告诉其可以点菜了否则还在此等待。点菜界面部分也就是需要设置一个输入人数餐桌号的界面后确认后进行菜品的选择。点菜图片是需要到网上下载并选择你想要的菜品图片比如辣椒炒肉、水煮活鱼等。开发板作为服务器需要与客户端ubuntu连接通讯协议采用tcp协议。
在ubuntu方面也就是客户端,需要用到数据库sqlite存储数据防止代码中断后数据就删除了,登陆界面也是qt开发,客户端与服务器通讯采用tcp协议。
首先第一部分了解tcp协议
了解一个协议最好的方式就是跟随老师学习。
此部分主要工作为tcp协议在Linux ubuntu 上的实操,tcp协议的详细介绍内容请参考韦东山相关教程百问网韦东山嵌入式Linux应用开发入门实验班5-3tcp示例
第一部分实操,主要是跟着韦老师学习,其实操课程。
首先下载代码放到Ubuntu中

首先你得知道作为Ubuntu中打开的程序是不需要makefile以及生成ko文件的,也就是其实你这文件代码也可以在win11的vscode中用编译器编译运行。
client.c
c
#include <sys/types.h>          /* See NOTES */
#include <sys/socket.h>
#include <string.h>
#include <sys/socket.h>
#include <netinet/in.h>
#include <arpa/inet.h>
#include <unistd.h>
#include <stdio.h>

/* socket
 * connect
 * send/recv
 */

#define SERVER_PORT 8888

int main(int argc, char **argv)
{
	int iSocketClient;
	struct sockaddr_in tSocketServerAddr;

	int iRet;
	unsigned char ucSendBuf[1000];
	int iSendLen;
	int iRecvLen;

	if (argc != 2)
	{
		printf("Usage:\n");
		printf("%s <server_ip>\n", argv[0]);
		return -1;
	}
	//  1.面向连接的TCP协议(SOCK_STREAM) 的Socket
	iSocketClient = socket(AF_INET, SOCK_STREAM, 0);

	tSocketServerAddr.sin_family      = AF_INET;
	tSocketServerAddr.sin_port        = htons(SERVER_PORT);  /* host to net, short */
 	//tSocketServerAddr.sin_addr.s_addr = INADDR_ANY;
 	if (0 == inet_aton(argv[1], &tSocketServerAddr.sin_addr))
 	{
		printf("invalid server_ip\n");
		return -1;
	}
	memset(tSocketServerAddr.sin_zero, 0, 8);

	// 2.连接服务器,设置好的服务器地址发起TCP连接请求
	iRet = connect(iSocketClient, (const struct sockaddr *)&tSocketServerAddr, sizeof(struct sockaddr));
	if (-1 == iRet)
	{
		printf("connect error!\n");
		return -1;
	}

	while (1)
	{
		if (fgets(ucSendBuf, 999, stdin))
		{   // 3.发送数据到服务器
			iSendLen = send(iSocketClient, ucSendBuf, strlen(ucSendBuf), 0);
			if (iSendLen <= 0)
			{   // 4
				close(iSocketClient);
				return -1;
			}
			// 接收服务器的回复并打印
			// recv函数等待并读取服务器返回的数据。这是一个阻塞调用
			iRecvLen = recv(iSocketClient, ucSendBuf, 999, 0);
			if (iRecvLen > 0)
			{
				ucSendBuf[iRecvLen] = '\0';
				printf("From server: %s\n", ucSendBuf);
			}
		}
	}

	return 0;
}
server.c
c
#include <sys/types.h>          /* See NOTES */
#include <sys/socket.h>
#include <string.h>
#include <sys/socket.h>
#include <netinet/in.h>
#include <arpa/inet.h>
#include <unistd.h>
#include <stdio.h>
#include <signal.h>


/* socket
 * bind
 * listen
 * accept
 * send/recv
 */
// 服务器监听的端口号(8888)
// BACKLOG定义了连接请求队列的最大长度
#define SERVER_PORT 8888
#define BACKLOG     10

int main(int argc, char **argv)
{
	int iSocketServer;
	int iSocketClient;
	struct sockaddr_in tSocketServerAddr;
	struct sockaddr_in tSocketClientAddr;
	int iRet;
	int iAddrLen;
	int cnt;

	int iRecvLen;
	unsigned char ucRecvBuf[1000];

	int iClientNum = -1;

	signal(SIGCHLD,SIG_IGN);
	// 1.创建一个使用 IPv4地址族(AF_INET) 和 面向连接的TCP协议(SOCK_STREAM) 的Socket
	iSocketServer = socket(AF_INET, SOCK_STREAM, 0);
	if (-1 == iSocketServer)
	{
		printf("socket error!\n");
		return -1;
	}

	tSocketServerAddr.sin_family      = AF_INET;
	tSocketServerAddr.sin_port        = htons(SERVER_PORT);  /* host to net, short */
 	tSocketServerAddr.sin_addr.s_addr = INADDR_ANY;
	memset(tSocketServerAddr.sin_zero, 0, 8);

	// 2.bind函数将创建的Socket与指定的IP地址和端口号绑定
	iRet = bind(iSocketServer, (const struct sockaddr *)&tSocketServerAddr, sizeof(struct sockaddr));
	if (-1 == iRet)
	{
		printf("bind error!\n");
		return -1;
	}

	// 3.服务器Socket开始监听来自客户端的连接请求
	iRet = listen(iSocketServer, BACKLOG);
	if (-1 == iRet)
	{
		printf("listen error!\n");
		return -1;
	}

	while (1)
	{
		iAddrLen = sizeof(struct sockaddr);
		// accept函数从连接请求队列中取出一个请求,为该连接创建一个新的Socket(iSocketClient)
		// 4.并获取客户端的地址信息。这是一个阻塞调用,直到有连接请求才会返回
		iSocketClient = accept(iSocketServer, (struct sockaddr *)&tSocketClientAddr, &iAddrLen);

		if (-1 != iSocketClient)  // 连接成功后,打印客户端信息
		{
			iClientNum++;
			printf("Get connect from client %d : %s\n",  iClientNum, inet_ntoa(tSocketClientAddr.sin_addr));
			if (!fork())
			{
				cnt = 0;
				/* 子进程的源码 */
				while (1)
				{
					/* 5.使用 recv函数读取客户端发送的数据 */
					iRecvLen = recv(iSocketClient, ucRecvBuf, 999, 0);
					if (iRecvLen <= 0)
					{
						close(iSocketClient);
						return -1;
					}
					else
					{
						ucRecvBuf[iRecvLen] = '\0';
						printf("Get Msg From Client %d: %s\n", iClientNum, ucRecvBuf);
						sprintf(ucRecvBuf, "Get Msg cnt %d", cnt++);
						// send函数向客户端发送一个带计数器的回应消息
						send(iSocketClient, ucRecvBuf, strlen(ucRecvBuf), 0);
					}
				}
			}
		}
	}
	// 6
	close(iSocketServer);
	return 0;
}
c
gcc -o server server.c
gcc -o client client.c
./server
./client 192.168.101.129
打开两个终端分别运行客户端、服务器端程序测试。

从图中可以看出,你得设置两个终端,一个做服务器,一个做客户端。设置ip时,可以任意指定其中的一个即可。
其次qt开发界面基础
这方面是基于Ubuntu 的qt开发的基础方面的知识。
首先安装ubuntu时我是跟着韦东山的此教程百问网韦东山嵌入式Linux应用开发入门实验班---编译烧录qt系统
跟着他的教程首先完成了最基础的实现,以上就不详细展开说了。

输入 chmod +x qt然后按一下 Tab键,终端会自动补全完整的文件名。
./qt-opensource-linux-x64-5.12.9.run
在学习的过程中我也遇到了一些问题,我的没有找到
在终端中的确没有找到此文件。

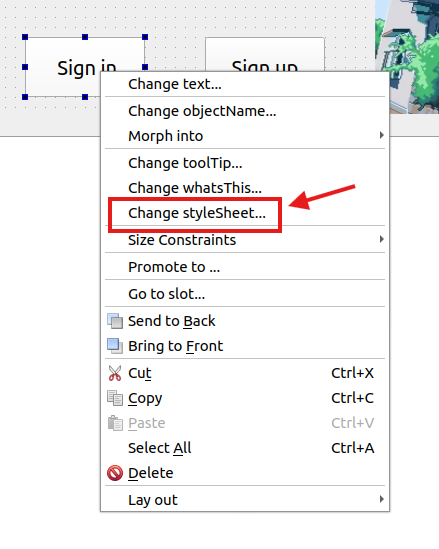
还有就是qt里面设置的slot最开始按的时候没反应,发现代码中文件名和设置的函数名得一模一样

如下图所示的设置。

以上就是我跟着他的时候出现的部分错误你看能不能帮你解决问题。
但是我们要明白,他编译的环境是针对开发板编译的都是32位的qmake也是win32位,如果想在ubuntu上测试会出现,以下这个错误。
c
02:23:09: Starting /home/book/QT_Project/build-server_jiemian-100ask_imx6ull-Debug/server_jiemian...
02:23:09: Failed to start program. Path or permissions wrong?
02:23:09: /home/book/QT_Project/build-server_jiemian-100ask_imx6ull-Debug/server_jiemian exited with code -1
02:23:09: The process failed to start. Either the invoked program "/home/book/QT_Project/build-server_jiemian-100ask_imx6ull-Debug/server_jiemian" is missing, or you may have insufficient permissions to invoke the program.
会发现miss找不到路径。Ubuntu上运行不了,但是下载到开发板上可以运行。
接下来你需要设置桌面版本也就是unbuntu版本。

到时候你想给开发板编译就选上面哪个,想在板子上运行就选下面这个。上面哪个C,C++编译器是32位的包括qt version也是。所以你如果要设置ubuntu的就得找到x86 64位的qmake 安装。
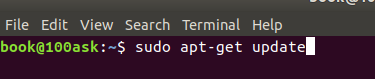
输入此命令更新库
c
sudo apt-get update
sudo apt-get install qt5-default
安装qmake
qmake --version查看版本,查看其安装路径,然后把路径放到Qt Version里面。保存Kits再新建一个。


然后编译后你的ubuntu就可以正常运行了。
你可以在debug处选择使用的编译器,等你在ubuntu上调好后就可以导入到开发板上直接使用了。
本人第一个qt界面是参考的这位博主的文章
具体详细步骤可以跟着他的来。
这也就是我在ubuintu上设计的第一个界面。
ui界面设计的时候选择这个将他的代码复制进去。


升级后的界面。
但在这个过程中我发现,我一直输入不了中文,后来才知道得安装qt支持的中文包。
安装Qt5的Fcitx前端插件:
在终端中执行以下命令:
c
sudo apt install fcitx-frontend-qt5安装后,文件通常在这里:
你可以用 ls命令检查一下是否存在:
c
/usr/lib/x86_64-linux-gnu/qt5/plugins/platforminputcontexts/libfcitxplatforminputcontextplugin.so
ls /usr/lib/x86_64-linux-gnu/qt5/plugins/platforminputcontexts/libfcitxplatforminputcontextplugin.so
将插件文件复制到Qt Creator的插件目录(这是解决问题的核心操作)
首先,需要找到您Qt Creator的安装路径。 如果您是通过Qt官方安装程序安装的,路径通常像这样:
/opt/Qt/Tools/QtCreator/lib/Qt/plugins/platforminputcontexts/
但是我的在:
/home/book/Qt5.12.9/Tools/QtCreator/lib/Qt/plugins/platforminputcontexts/
然后,使用cp命令复制文件(请将下面的路径替换为您电脑上真实的Qt安装路径):
c
sudo cp /usr/lib/x86_64-linux-gnu/qt5/plugins/platforminputcontexts/libfcitxplatforminputcontextplugin.so /home/book/Qt5.12.9/Tools/QtCreator/lib/Qt/plugins/platforminputcontexts/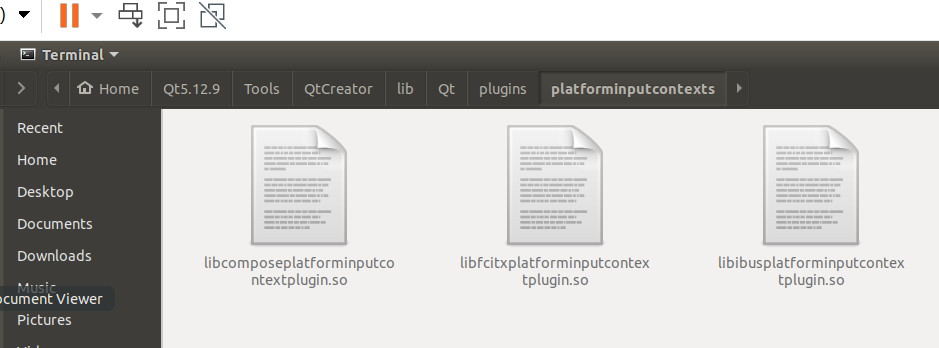
ctrl+空格就可以输入中文了
后续内容就是加载数据库,到时候和开发板数据相关联。


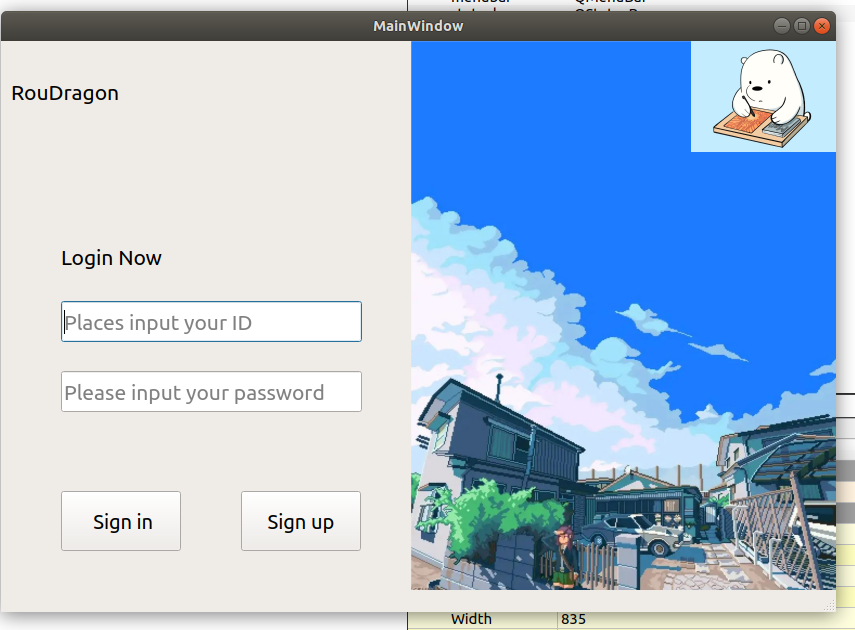
最后实现的登陆界面
详细代码主要涉及到注册界面、登陆界面。代码放在最后的链接中。
接下来就要涉及到点菜系统的整个开发了,客户端登陆可以直接使用以上界面。所以关键就是服务器端的点菜了。
首先我的mainwindow计划实现一个等待消息的界面,通过tcp协议接受begin_val后进入点菜界面的跳转。
mainwindow.h
cpp
#ifndef MAINWINDOW_H
#define MAINWINDOW_H

#include <QMainWindow>
#include <QTcpServer>
#include <QTcpSocket>
class desk_people_num;
QT_BEGIN_NAMESPACE
namespace Ui { class MainWindow; }
QT_END_NAMESPACE

class MainWindow : public QMainWindow
{
    Q_OBJECT

public:
    MainWindow(QWidget *parent = nullptr);
    ~MainWindow();

private slots:
    void onNewConnection();           // 处理新连接
    void onReadyRead();               // 处理接收数据
    void onSocketError(QAbstractSocket::SocketError error); // 处理socket错误

private:
    Ui::MainWindow *ui;
    QTcpServer *tcpServer;           // TCP服务器
    QTcpSocket *clientSocket;        // 客户端socket
    desk_people_num *deskPeopleWindow; // 第二个界面指针
    void setupTCPConnection();       // 设置TCP连接
    void switchToDeskPeopleNum();    // 切换到第二个界面
    void handleOrder();

public:
    QTcpSocket* getClientSocket() const { return clientSocket; }
    void sendResponseToClient(const QString &response);
};

// 全局变量声明
extern QTcpSocket* clientSocket;
extern desk_people_num* deskPeopleWindow;
#endif // MAINWINDOW_H
mainwindow.cpp
cpp
#include "mainwindow.h"
#include "ui_mainwindow.h"
#include <QGraphicsDropShadowEffect>
#include <QMessageBox>
#include <QDebug>
#include "desk_people_num.h"
#include "ui_desk_people_num.h"

// 定义全局变量
QTcpSocket* clientSocket = nullptr;  //初始化为nullptr
desk_people_num* deskPeopleWindow= nullptr;
MainWindow::MainWindow(QWidget *parent)
    : QMainWindow(parent)
    , ui(new Ui::MainWindow)
    , tcpServer(nullptr)
    , clientSocket(nullptr)
    , deskPeopleWindow(nullptr)
{
    ui->setupUi(this);
    //设置图片
    QPixmap *pix = new QPixmap(":/new/prefix1/diancai.jpg");
    QSize sz = ui->label_image->size();
    ui->label_image->setPixmap(pix->scaled(sz));

    //设置图片阴影效果
    QGraphicsDropShadowEffect *shadow = new QGraphicsDropShadowEffect(this);
    shadow->setOffset(-3, 0);
    shadow->setColor(QColor("#888888"));
    shadow->setBlurRadius(30);
    ui->label_image->setGraphicsEffect(shadow);

    // 设置TCP连接
    setupTCPConnection();
}

void MainWindow::setupTCPConnection()
{
    // 创建TCP服务器
    tcpServer = new QTcpServer(this);

    // 监听所有IP的8080端口(您可以根据需要修改端口号)
    //if (!tcpServer->listen(QHostAddress::Any, 8080)) {
    if (!tcpServer->listen(QHostAddress("192.168.101.129"), 8080)) {
        QMessageBox::critical(this, "TCP Server",
                             QString("无法启动服务器: %1").arg(tcpServer->errorString()));
        return;
    }

    // 连接新连接信号
    connect(tcpServer, &QTcpServer::newConnection, this, &MainWindow::onNewConnection);

    qDebug() << "TCP服务器已启动,监听端口: 8080";
}

void MainWindow::onNewConnection()
{
    // 如果有已连接的客户端,先断开
    if (clientSocket) {
        clientSocket->disconnectFromHost();
        clientSocket->deleteLater();
        clientSocket = nullptr;
        ::clientSocket = nullptr; // 同步全局变量
    }

    // 获取新连接
    clientSocket = tcpServer->nextPendingConnection();
    ::clientSocket = clientSocket; // 同步到全局变量

    // 连接信号槽
    connect(clientSocket, &QTcpSocket::readyRead, this, &MainWindow::onReadyRead);
    connect(clientSocket, QOverload<QAbstractSocket::SocketError>::of(&QTcpSocket::error),
            this, &MainWindow::onSocketError);

    qDebug() << "新的客户端连接:" << clientSocket->peerAddress().toString();
    qDebug() << "全局clientSocket地址:" << ::clientSocket;
    qDebug() << "成员clientSocket地址:" << clientSocket;
}

//static int begin_val=0;
void MainWindow::onReadyRead()
{
    if (!clientSocket) return;

    // 读取所有数据
    QByteArray data = clientSocket->readAll();
    QString message = QString::fromUtf8(data).trimmed();

    qDebug() << "接收到消息:" << message;

    // 检查是否为开始消息
    if (message == "begin_val") {
        // 向客户端发送"ok"响应
        sendResponseToClient("ok");
        qDebug() << "接收到开始消息,准备切换界面";
        switchToDeskPeopleNum();
    }
}

// 向客户端发送响应
void MainWindow::sendResponseToClient(const QString &response)
{
    if (clientSocket && clientSocket->state() == QAbstractSocket::ConnectedState) {
        QByteArray responseData = response.toUtf8();
        qint64 bytesWritten = clientSocket->write(responseData);

        if (bytesWritten == -1) {
            qDebug() << "发送响应失败:" << clientSocket->errorString();
        } else {
            // 确保数据被发送
            clientSocket->flush();
            qDebug() << "已向客户端发送响应:" << response;
        }
    } else {
        qDebug() << "客户端未连接,无法发送响应";
    }
}

void MainWindow::onSocketError(QAbstractSocket::SocketError error)
{
    Q_UNUSED(error)
    if (clientSocket) {
        qDebug() << "Socket错误:" << clientSocket->errorString();
    }
}

void MainWindow::switchToDeskPeopleNum()
{
    //this->close();  // 关界面
    this->hide();  // 改为隐藏而不是关闭
    desk_people_num *s = new desk_people_num;  //跳至singup界面
    s->show();

    qDebug() << "已切换到desk_people_num界面";
}

MainWindow::~MainWindow()
{
    if (tcpServer) {
        tcpServer->close();
    }
    if (clientSocket) {
        clientSocket->close();
    }
    delete ui;
}

// 在MainWindow的成员函数中
extern int g_deskNumber,g_peopleNumber;
void MainWindow::handleOrder()
{
    // 可以直接访问全局变量
    if (g_deskNumber > 0 && g_peopleNumber > 0) {
        qDebug() << "桌号:" << g_deskNumber << "人数:" << g_peopleNumber;

        // 发送到服务器或其他处理
        QString orderInfo = QString("桌号:%1,人数:%2").arg(g_deskNumber).arg(g_peopleNumber);
        //sendToServer(orderInfo);

        // 重置选择(可选)
        // g_deskNumber = 0;
        // g_peopleNumber = 0;
    } else {
        qDebug() << "请先选择桌号和人数";
    }
}
如图所示以上代码实现的就是这个界面。

同时我会开启tcp监听,当有连接后并发送消息给ubuntu服务器端时,向客户端返回消息ok。

我是通过正点原子的调试助手模拟发送。
完成以上部分后开始计划desk_people_num选桌号选人数的界面设计,当选好人数和桌号后按下确定跳转界面,当按下取消后界面数据清空重新选择。
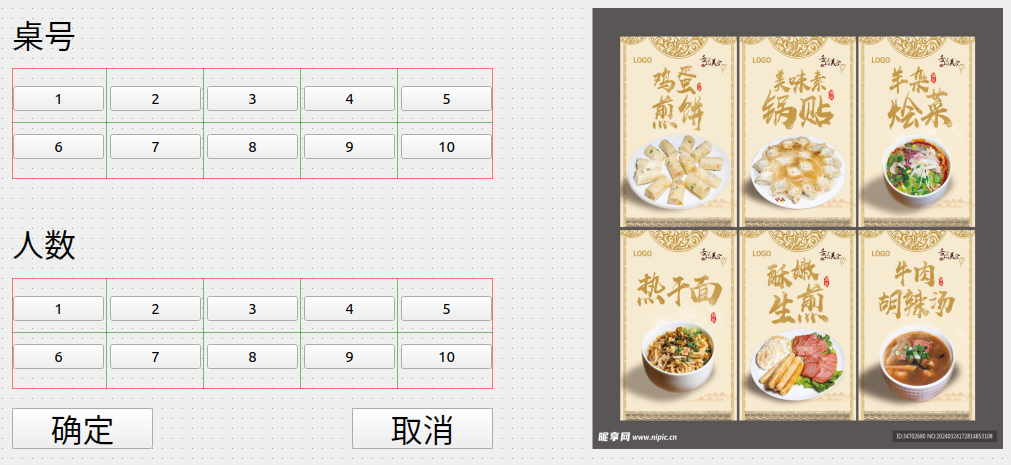
desk_people_num.h
cpp
#ifndef DESK_PEOPLE_NUM_H
#define DESK_PEOPLE_NUM_H

#include <QWidget>
#include <QDebug>
#include "xuancai.h"
namespace Ui {
class desk_people_num;
}

class desk_people_num : public QWidget
{
    Q_OBJECT

public:
    explicit desk_people_num(QWidget *parent = nullptr);
    ~desk_people_num();

private slots:


    void on_desk1_Button_clicked();

    void on_desk2_Button_clicked();

    void on_desk3_Button_clicked();

    void on_desk4_Button_clicked();

    void on_desk5_Button_clicked();

    void on_desk6_Button_clicked();

    void on_desk7_Button_clicked();

    void on_desk8_Button_clicked();

    void on_desk9_Button_clicked();

    void on_desk10_Button_clicked();

    void on_people1_Button_clicked();

    void on_people2_Button_clicked();

    void on_people3_Button_clicked();

    void on_people4_Button_clicked();

    void on_people5_Button_clicked();

    void on_people6_Button_clicked();

    void on_people7_Button_clicked();

    void on_people8_Button_clicked();

    void on_people9_Button_clicked();

    void on_ensureButton_clicked();

    void on_cancelButton_clicked();

private:
    Ui::desk_people_num *ui;
    // 当前选择的桌号和人数
    int currentDeskNumber;
    int currentPeopleNumber;

    // 更新按钮样式
    void updateDeskButtonsStyle();
    void updatePeopleButtonsStyle();
    void resetAllSelection();
};

#endif // DESK_PEOPLE_NUM_H
desk_people_num.cpp
cpp
#include "desk_people_num.h"
#include "ui_desk_people_num.h"
#include "xuancai.h"
// 定义全局变量
int g_deskNumber = 0;        // 初始值为0,表示未选择
int g_peopleNumber = 0;      // 初始值为0,表示未选择

desk_people_num::desk_people_num(QWidget *parent) :
    QWidget(parent),
    ui(new Ui::desk_people_num)
{
    ui->setupUi(this);
    // 初始化全局变量
    g_deskNumber = 0;
    g_peopleNumber = 0;
}


desk_people_num::~desk_people_num()
{
    delete ui;
}


void desk_people_num::updateDeskButtonsStyle()
{
    // 重置所有桌号按钮样式
    QList<QPushButton*> deskButtons = {
        ui->desk1_Button, ui->desk2_Button, ui->desk3_Button,
        ui->desk4_Button, ui->desk5_Button, ui->desk6_Button,
        ui->desk7_Button, ui->desk8_Button, ui->desk9_Button,
        ui->desk10_Button
    };

    for (int i = 0; i < deskButtons.size(); ++i) {
        if ((i + 1) == currentDeskNumber) {
            // 选中的按钮样式 - 绿色背景
            deskButtons[i]->setStyleSheet(
                "QPushButton {"
                "   background-color: #4CAF50;"
                "   color: white;"
                "   border: 2px solid #45a049;"
                "   border-radius: 5px;"
                "   font-weight: bold;"
                "}"
                "QPushButton:hover {"
                "   background-color: #45a049;"
                "}"
            );
        } else {
            // 未选中的按钮样式 - 灰色背景
            deskButtons[i]->setStyleSheet(
                "QPushButton {"
                "   background-color: #f0f0f0;"
                "   color: #333333;"
                "   border: 1px solid #cccccc;"
                "   border-radius: 5px;"
                "}"
                "QPushButton:hover {"
                "   background-color: #e0e0e0;"
                "}"
            );
        }
    }
}

void desk_people_num::updatePeopleButtonsStyle()
{
    // 重置所有人数按钮样式
    QList<QPushButton*> peopleButtons = {
        ui->people1_Button, ui->people2_Button, ui->people3_Button,
        ui->people4_Button, ui->people5_Button, ui->people6_Button,
        ui->people7_Button, ui->people8_Button, ui->people9_Button
    };

    for (int i = 0; i < peopleButtons.size(); ++i) {
        if ((i + 1) == currentPeopleNumber) {
            // 选中的按钮样式 - 蓝色背景
            peopleButtons[i]->setStyleSheet(
                "QPushButton {"
                "   background-color: #2196F3;"
                "   color: white;"
                "   border: 2px solid #0b7dda;"
                "   border-radius: 5px;"
                "   font-weight: bold;"
                "}"
                "QPushButton:hover {"
                "   background-color: #0b7dda;"
                "}"
            );
        } else {
            // 未选中的按钮样式 - 灰色背景
            peopleButtons[i]->setStyleSheet(
                "QPushButton {"
                "   background-color: #f0f0f0;"
                "   color: #333333;"
                "   border: 1px solid #cccccc;"
                "   border-radius: 5px;"
                "}"
                "QPushButton:hover {"
                "   background-color: #e0e0e0;"
                "}"
            );
        }
    }
}

// 重置所有选择
void desk_people_num::resetAllSelection()
{
    currentDeskNumber = 0;
    currentPeopleNumber = 0;
    g_deskNumber = 0;
    g_peopleNumber = 0;

    updateDeskButtonsStyle();
    updatePeopleButtonsStyle();

    qDebug() << "已重置所有选择: 桌号 =" << g_deskNumber << "人数 =" << g_peopleNumber;
}

void desk_people_num::on_desk1_Button_clicked()
{
    currentDeskNumber = 1; g_deskNumber = 1;
    updateDeskButtonsStyle();
    qDebug() << "选择桌号:" << g_deskNumber;
}

void desk_people_num::on_desk2_Button_clicked()
{
    currentDeskNumber = 2; g_deskNumber = 2;
    updateDeskButtonsStyle();
    qDebug() << "选择桌号:" << g_deskNumber;
}

void desk_people_num::on_desk3_Button_clicked()
{
    currentDeskNumber = 3; g_deskNumber = 3;
    updateDeskButtonsStyle();
    qDebug() << "选择桌号:" << g_deskNumber;
}

void desk_people_num::on_desk4_Button_clicked()
{
     currentDeskNumber = 4; g_deskNumber = 4;
     updateDeskButtonsStyle();
     qDebug() << "选择桌号:" << g_deskNumber;
}

void desk_people_num::on_desk5_Button_clicked()
{
    currentDeskNumber = 5; g_deskNumber = 5;
    updateDeskButtonsStyle();
    qDebug() << "选择桌号:" << g_deskNumber;
}

void desk_people_num::on_desk6_Button_clicked()
{
    currentDeskNumber = 6; g_deskNumber = 6;
    updateDeskButtonsStyle();
    qDebug() << "选择桌号:" << g_deskNumber;
}

void desk_people_num::on_desk7_Button_clicked()
{
    currentDeskNumber = 7; g_deskNumber = 7;
    updateDeskButtonsStyle();
    qDebug() << "选择桌号:" << g_deskNumber;
}

void desk_people_num::on_desk8_Button_clicked()
{
     currentDeskNumber = 8; g_deskNumber = 8;
     updateDeskButtonsStyle();
     qDebug() << "选择桌号:" << g_deskNumber;
}

void desk_people_num::on_desk9_Button_clicked()
{
    currentDeskNumber = 9; g_deskNumber = 9;
    updateDeskButtonsStyle();
    qDebug() << "选择桌号:" << g_deskNumber;
}

void desk_people_num::on_desk10_Button_clicked()
{
    currentDeskNumber = 10; g_deskNumber = 10;
    updateDeskButtonsStyle();
    qDebug() << "选择桌号:" << g_deskNumber;
}

void desk_people_num::on_people1_Button_clicked()
{
    currentPeopleNumber = 1; g_peopleNumber = 1;
    updatePeopleButtonsStyle();
    qDebug() << "选择人数:" << g_peopleNumber;
}

void desk_people_num::on_people2_Button_clicked()
{
    currentPeopleNumber = 2; g_peopleNumber = 2;
    updatePeopleButtonsStyle();
    qDebug() << "选择人数:" << g_peopleNumber;
}

void desk_people_num::on_people3_Button_clicked()
{
    currentPeopleNumber = 3; g_peopleNumber = 3;
    updatePeopleButtonsStyle();
    qDebug() << "选择人数:" << g_peopleNumber;
}

void desk_people_num::on_people4_Button_clicked()
{
    currentPeopleNumber = 4; g_peopleNumber = 4;
    updatePeopleButtonsStyle();
    qDebug() << "选择人数:" << g_peopleNumber;
}

void desk_people_num::on_people5_Button_clicked()
{
     currentPeopleNumber = 5; g_peopleNumber = 5;
     updatePeopleButtonsStyle();
     qDebug() << "选择人数:" << g_peopleNumber;
}

void desk_people_num::on_people6_Button_clicked()
{
    currentPeopleNumber = 6; g_peopleNumber = 6;
    updatePeopleButtonsStyle();
    qDebug() << "选择人数:" << g_peopleNumber;
}

void desk_people_num::on_people7_Button_clicked()
{
    currentPeopleNumber = 7; g_peopleNumber = 7;
    updatePeopleButtonsStyle();
    qDebug() << "选择人数:" << g_peopleNumber;
}

void desk_people_num::on_people8_Button_clicked()
{
    currentPeopleNumber = 8; g_peopleNumber = 8;
    updatePeopleButtonsStyle();
    qDebug() << "选择人数:" << g_peopleNumber;
}

void desk_people_num::on_people9_Button_clicked()
{
    currentPeopleNumber = 9; g_peopleNumber = 9;
    updatePeopleButtonsStyle();
    qDebug() << "选择人数:" << g_peopleNumber;
}

void desk_people_num::on_ensureButton_clicked()
{
   // 检查是否已选择桌号和人数
    if (g_deskNumber == 0 || g_peopleNumber == 0) {
        qDebug() << "请先选择桌号和人数";
        return;
    }

    qDebug() << "确定 - 桌号:" << g_deskNumber << "人数:" << g_peopleNumber;
    //this->close();  // 关界面
    this->hide();  // 改为隐藏而不是关闭
    xuancai *s = new xuancai;  //跳至xuancai界面
    s->show();
    qDebug() << "已切换到xuancai界面";
}

void desk_people_num::on_cancelButton_clicked()
{
    // 重置所有选择
    resetAllSelection();
    qDebug() << "取消 - 已清空所有选择";
}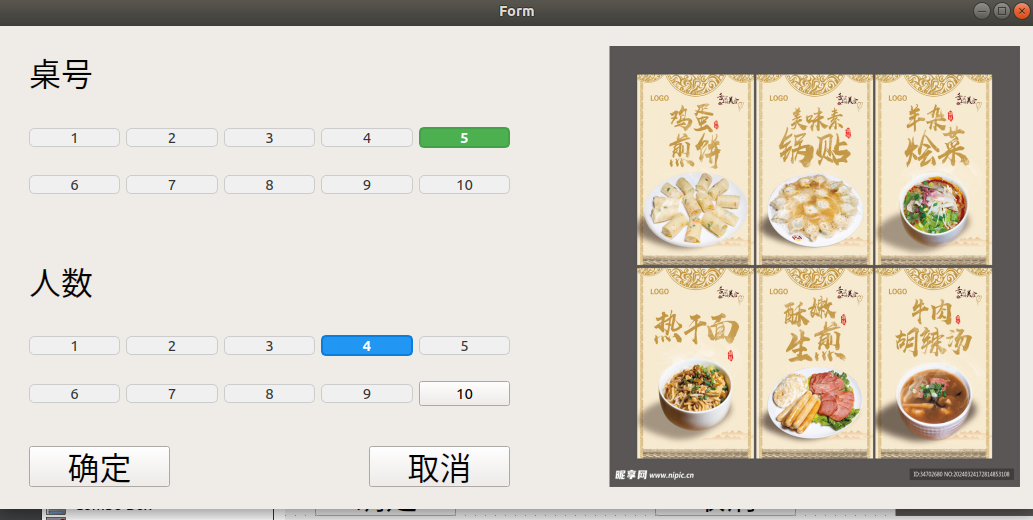
实现的界面效果以及代码如上。
第3部分也就是选菜界面了,直接上效果图,那个test按钮主要是用来发送测试tcp协议连接的。

xuancai.h
cpp
#ifndef XUANCAI_H
#define XUANCAI_H

#include <QWidget>
#include "mainwindow.h"
namespace Ui {
class xuancai;
}

class xuancai : public QWidget
{
    Q_OBJECT

public:
    explicit xuancai(QWidget *parent = nullptr);
    explicit xuancai(MainWindow* mainWindow, QWidget *parent = nullptr); // 传入MainWindow指针
    ~xuancai();

private slots:
    void on_feiniu_Button1_clicked();

    void on_feiniu_Button2_clicked();

    void on_fish_Button1_clicked();

    void on_fish_Button2_clicked();

    void on_xia_Button1_clicked();

    void on_xia_Button2_clicked();

    void on_doufu_Button1_clicked();

    void on_doufu_Button2_clicked();

    void on_ensureButton_clicked();

    void on_cancelButton_clicked();
    void on_testConnectionButton_clicked();
private:
    int beefCount = 0;    // 肥牛卷数量
    int fishCount = 0;    // 酸菜鱼数量
    int xiaCount = 0;     // 盐焗大虾数量
    int doufuCount = 0;    // 麻婆豆腐数量

    // 重置所有菜品数量
    void resetAllDishes();

    // 发送数据到TCP服务器
    void sendOrderToClient();  // 修改函数名,更清晰

private:
    Ui::xuancai *ui;

};

#endif // XUANCAI_H
xuancai.cpp
cpp
#include "xuancai.h"
#include "ui_xuancai.h"
#include <QTcpSocket>
#include <QMessageBox>
#include <QJsonObject>
#include <QJsonDocument>

xuancai::xuancai(QWidget *parent) :
    QWidget(parent),
    ui(new Ui::xuancai),
    beefCount(0),
    fishCount(0),
    xiaCount(0),
    doufuCount(0)
{
    ui->setupUi(this);

    // 初始化界面显示
    ui->beef_label->setText("0");
    ui->fish_label->setText("0");
    ui->xia_label->setText("0");
    ui->doufu_label->setText("0");

    qDebug() << "选菜界面初始化完成";
}

xuancai::~xuancai()
{
    delete ui;
}

void xuancai::resetAllDishes()
{
    beefCount = 0;
    fishCount = 0;
    xiaCount = 0;
    doufuCount = 0;

    ui->beef_label->setText("0");
    ui->fish_label->setText("0");
    ui->xia_label->setText("0");
    ui->doufu_label->setText("0");

    qDebug() << "所有菜品数量已重置";
}

// 模仿MainWindow的sendResponseToClient函数
void xuancai::sendOrderToClient()
{
    // 使用MainWindow中已建立的clientSocket
    if (clientSocket && clientSocket->state() == QAbstractSocket::ConnectedState) {

        // 创建JSON数据
        QJsonObject jsonData;
        jsonData["beef"] = beefCount;
        jsonData["doufu"] = doufuCount;
        jsonData["fish"] = fishCount;
        jsonData["xia"] = xiaCount;

        QJsonDocument doc(jsonData);
        QByteArray orderData = doc.toJson(QJsonDocument::Compact);

        qint64 bytesWritten = clientSocket->write(orderData);

        if (bytesWritten == -1) {
            qDebug() << "发送订单失败:" << clientSocket->errorString();
            QMessageBox::warning(this, "发送错误", "订单发送失败");
        } else {
            // 确保数据被发送
            clientSocket->flush();
            qDebug() << "已向客户端发送订单,字节数:" << bytesWritten;
            qDebug() << "发送的订单数据:" << orderData;
            QMessageBox::information(this, "成功", "菜品已提交到客户端");
        }
    } else {
        qDebug() << "客户端未连接,无法发送订单";
        QMessageBox::warning(this, "连接错误", "客户端未连接,请先建立连接");
    }
}

// 测试连接状态

void xuancai::on_testConnectionButton_clicked()
{
    qDebug() << "=== 开始TCP连接测试 ===";

    if (clientSocket && clientSocket->state() == QAbstractSocket::ConnectedState) {
        qDebug() << "TCP连接状态: 已连接";
        QMessageBox::information(this, "连接测试", "TCP连接测试成功!客户端已连接");
    } else {
        qDebug() << "TCP连接状态: 未连接";
        QMessageBox::critical(this, "连接测试", "TCP连接测试失败!客户端未连接");
    }

    qDebug() << "=== TCP连接测试结束 ===";
}

void xuancai::on_ensureButton_clicked()
{
    if (beefCount == 0 && fishCount == 0 && xiaCount == 0 && doufuCount == 0) {
        QMessageBox::information(this, "提示", "请至少选择一种菜品");
        return;
    }

    qDebug() << "=== 选择的菜品 ===";
    qDebug() << "牛肉:" << beefCount << "鱼肉:" << fishCount
             << "虾:" << xiaCount << "豆腐:" << doufuCount;

    // 使用MainWindow的客户端连接发送数据
    sendOrderToClient();
}

void xuancai::on_cancelButton_clicked()
{
    resetAllDishes();
}

// 菜品数量增减按钮(保持不变)
void xuancai::on_feiniu_Button2_clicked()
{
    beefCount++;
    ui->beef_label->setText(QString::number(beefCount));
}

void xuancai::on_fish_Button2_clicked()
{
    fishCount++;
    ui->fish_label->setText(QString::number(fishCount));
}

void xuancai::on_xia_Button2_clicked()
{
    xiaCount++;
    ui->xia_label->setText(QString::number(xiaCount));
}

void xuancai::on_doufu_Button2_clicked()
{
    doufuCount++;
    ui->doufu_label->setText(QString::number(doufuCount));
}

void xuancai::on_feiniu_Button1_clicked()
{
    if(beefCount > 0) {
        beefCount--;
        ui->beef_label->setText(QString::number(beefCount));
    }
}

void xuancai::on_fish_Button1_clicked()
{
    if(fishCount > 0) {
        fishCount--;
        ui->fish_label->setText(QString::number(fishCount));
    }
}

void xuancai::on_xia_Button1_clicked()
{
    if(xiaCount > 0) {
        xiaCount--;
        ui->xia_label->setText(QString::number(xiaCount));
    }
}

void xuancai::on_doufu_Button1_clicked()
{
    if(doufuCount > 0) {
        doufuCount--;
        ui->doufu_label->setText(QString::number(doufuCount));
    }
}
最后的测试效果和代码如图所示,构建tcp类的时候注意用全局变量,不然单个页面完成后它会销毁断开连接,这个问题卡了我挺久的。
确保你的网络连接没问题后再在开发板上测试。

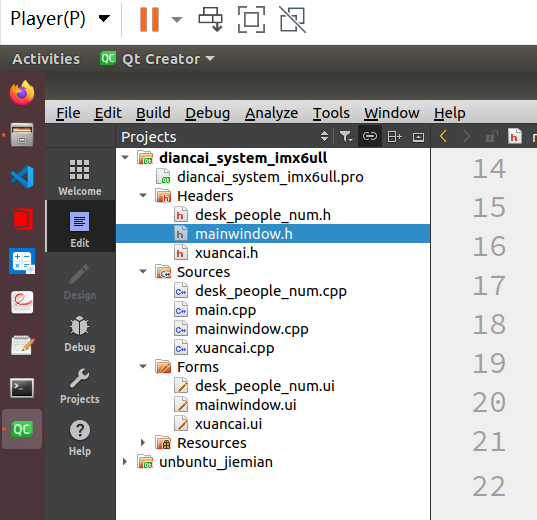
unbuntu_jiemian就是那个登陆注册的界面。diancai_system_imx6ull就是点菜系统界面。
通过网盘分享的文件:diancai_system_imx6ull.zip等2个文件
链接: https://pan.baidu.com/s/1SDu6y3SeMCb-EzpvP3hNPw?pwd=k4u4 提取码: k4u4