大家好,我是Edison。
MAF(Microsoft Agent Framwork)已经出来有一段时间,最近看到它的commit比较频繁,估计是为了在.NET Conf 2025发布1.0.0的正式版。预览版也并不妨碍我们的学习,那么从今天开始,我们就通过微软官方学习文档来一起进入MAF的世界吧。
MAF简单介绍
Microsoft Agent Framework (MAF) 是微软最新推出的统一的智能体开发框架,用于生成适用于 .NET 和 Python 的 AI Agent(智能体)和 Multi Agent Workflow(多智能体工作流)。 MAF 汇集了 Semantic Kernel 和 AutoGen 两个知名项目的优点,并扩展了其优势,同时添加了新功能。换句话说,它们由同一开发团队构建,是今后构建AI Agent的统一基础。
简而言之,MAF是微软推出的智能体开发的"终极武器"!
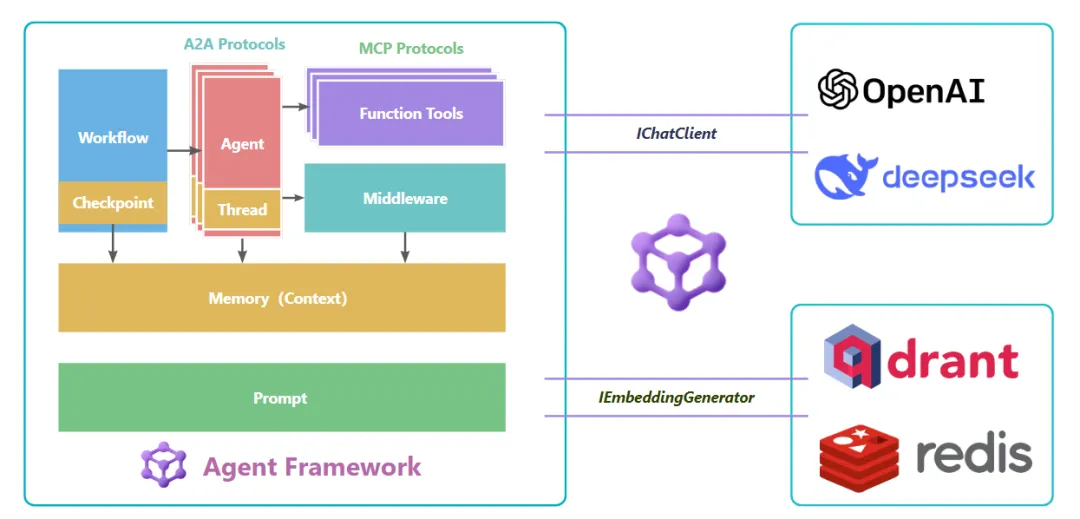
对于.NET技术栈的开发团队而言,其意义十分重大,它将已有的技术版图组合起来,形成一个AI时代的完整技术栈:
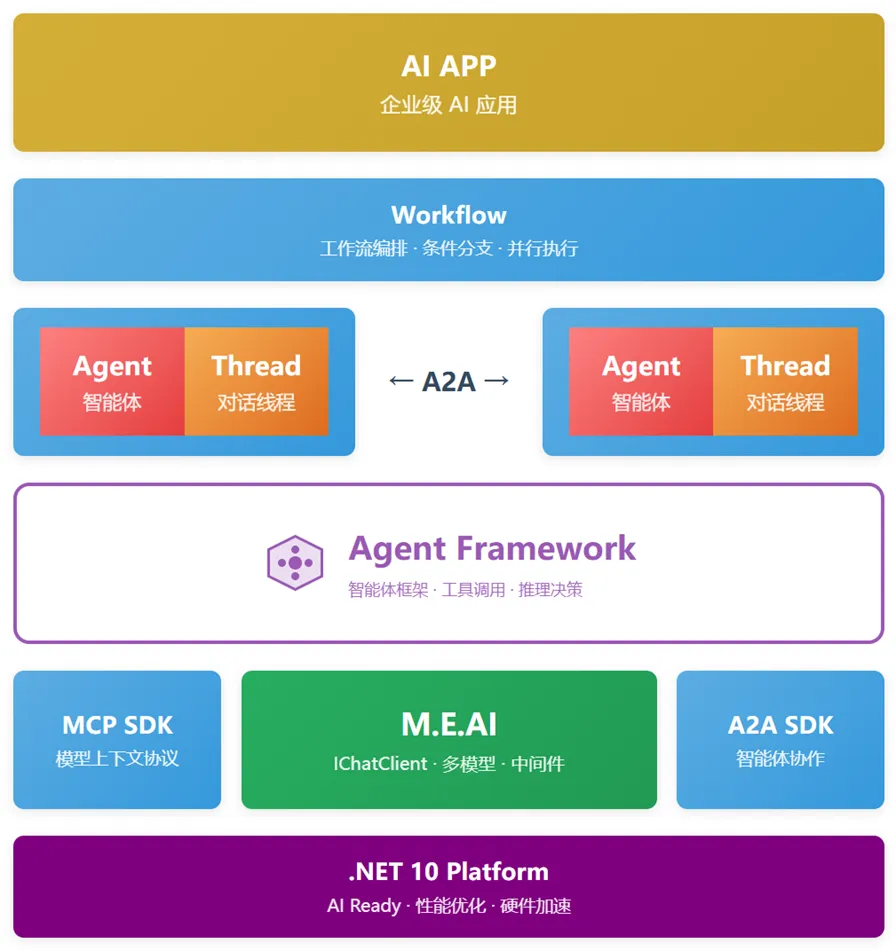
对于Edison所在的团队来说,.NET技术栈开发者可以使用MAF快速进入Agent开发领域,转型速度飞快。同时,在机器学习、模型训练 和 推理服务器(Inference Server)方面,我们也在使用Python来做,将各自的优势保留并发挥即可。
AI Agent是什么?
让我们再来看看AI Agent(又称为AI智能体)是什么,它其实是一个使用LLM来处理用户输入、做出决策、调用工具(MCP服务器)来执行并生成响应以完成某个具体的任务。
下图说明了AI Agent中的核心组件及其交互:
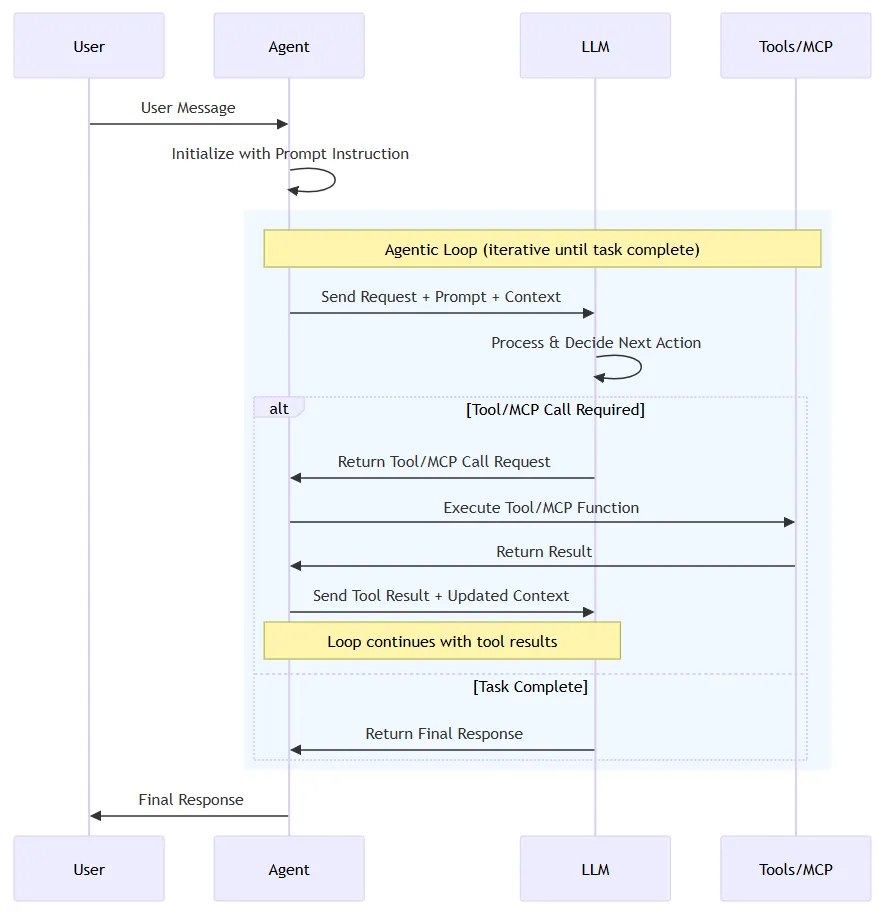
AI Agent适用于需要自主决策、规划试验 和 基于聊天 的用户交互应用程序,特别是对于输入任务非结构化且无法提前定义的情况,它们特别有用。这一类场景常见于客户支持、教育辅导、研究帮助等领域。
需要注意的是:AI Agent不适合高度结构化且要求严格遵循预定义规则的任务 。也就是说,如果应用程序预期有特定类型的输入,并且具有明确定义的作业顺序,则使用 AI Agent可能会带来不必要的不确定性、延迟和成本。
Workflow是什么?
Workflow即工作流,它可以表达预定义的作业序列,工作流旨在处理可能涉及多个AI Agent、人工交互 和 与外部系统的集成的复杂且长时间运行的进程。
很多时候,我们可以显示定义工作流的执行序列,从而更好地控制执行路径。
下图演示了链接两个AI Agent 和 一个函数方法 的工作流示例:
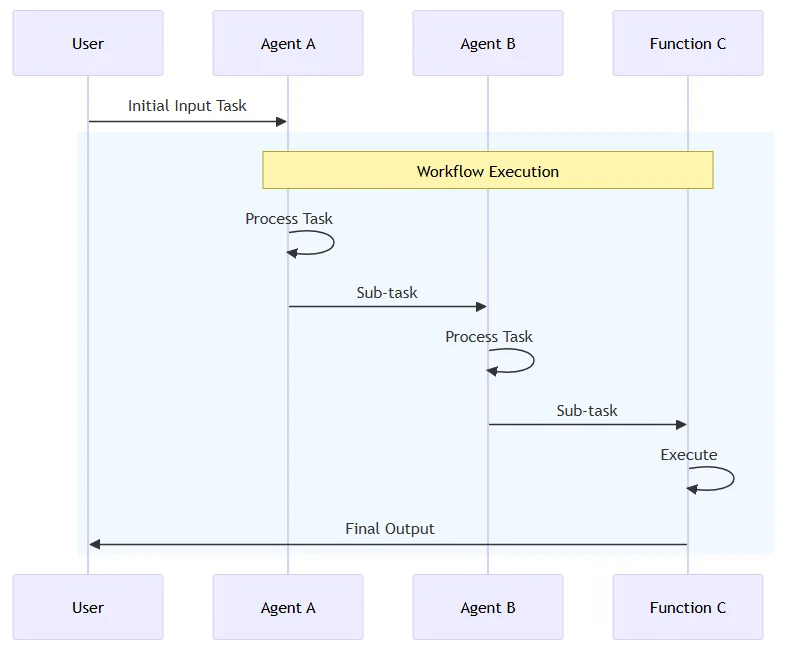
工作流提供了一种结构化方法,用于管理涉及多个步骤、决策点 和 与各种系统或Agent交互的复杂流程。
快速开始创建Agent
这里我们创建一个.NET控制台项目,安装以下组件包:
<PackageReference Include="Azure.AI.OpenAI" Version="2.5.0-beta.1" />
<PackageReference Include="Microsoft.Agents.AI.OpenAI" Version="1.0.0-preview.251110.1" />
假定我们有如下配置文件定义了我们可以用到的LLM API:
{
  "OpenAI": {
    "EndPoint": "https://api.siliconflow.cn",
    "ApiKey": "******************************",
    "ModelId": "Qwen/Qwen2.5-32B-Instruct"
  }
}
这里我们使用SiliconCloud提供的 Qwen2.5-32B-Instruct 模型,你可以通过这个URL注册账号:https://cloud.siliconflow.cn/i/DomqCefW 获取免费的Token来进行本次实验。
首先,我们加载配置文件到应用程序中:
// Load configuration
var config = new ConfigurationBuilder()
    .AddJsonFile($"appsettings.json", optional: false, reloadOnChange: true)
    .Build();
var openAIProvider = config.GetSection("OpenAI").Get<OpenAIProvider>();
其中,OpenAIProvider的类定义如下:
public sealed class OpenAIProvider
{
    public string ApiKey { get; init; } = string.Empty;
    public string ModelId { get; init; } = string.Empty;
    public string Endpoint { get; init; } = string.Empty;
}
Create Agent
其次,我们创建第一个Hello World的Agent:
var jokerAgent = new OpenAIClient(
        new ApiKeyCredential(openAIProvider.ApiKey),
        new OpenAIClientOptions { Endpoint = new Uri(openAIProvider.Endpoint) })
    .GetChatClient(openAIProvider.ModelId)
    .CreateAIAgent(instructions: "You are good at telling jokes.", name: "Joker");
然后,通过简单的一句RunAsync 或 RunStreamingAsync 即可完成一次交互:
// Method 1: RunAsync
Console.WriteLine(await jokerAgent.RunAsync("Tell me a joke about a pirate."));
// Method 2: RunStreamingAsync
await foreach (var update in jokerAgent.RunStreamingAsync("Tell me a joke about a car."))
{
    Console.Write(update);
}
最终的结果如下图所示,还挺幽默的:

那么,如果是用的AzureOpenAI呢?只需要换成下面即可:
var jokerAgent = new AzureOpenAIClient(
    new Uri(azureOpenAIProvider.Endpoint),
    new ApiKeyCredential(azureOpenAIProvider.ApiKey))
    .GetChatClient(azureOpenAIProvider.ModelId)
    .CreateAIAgent(instructions: "You are good at telling jokes.", name: "Joker");
Console.WriteLine(await jokerAgent.RunAsync("Tell me a joke about a pirate."));
多轮对话
我们还可以通过AgentThread这个特性来实现具有"短期记忆"的多轮对话:
var thread1 = jokerAgent.GetNewThread();
var thread2 = jokerAgent.GetNewThread();
Console.WriteLine(await jokerAgent.RunAsync("Tell me a joke about a pirate.", thread1) + Environment.NewLine);
Console.WriteLine(await jokerAgent.RunAsync("Now add some emojis to the joke and tell it in the voice of a pirate's parrot.", thread1) + Environment.NewLine);
Console.WriteLine(await jokerAgent.RunAsync("Tell me a joke about a robot.", thread2) + Environment.NewLine);
Console.WriteLine(await jokerAgent.RunAsync("Now add some emojis to the joke and tell it in the voice of a robot.", thread2) + Environment.NewLine);
函数调用
此外,在MAF中进行函数方法调用也是十分的轻松:
定义一个简单的函数方法:
public class WeatherServicePlugin
{
    [Description("Get current weather for a location")]
    public static async Task<string> GetCurrentWeatherAsync(string location)
    {
        return $"The weather in {location} is cloudy with a high of 15°C.";
    }
}
然后在创建Agent时将工具列表告诉Agent即可:
var agent = new OpenAIClient(
        new ApiKeyCredential(openAIProvider.ApiKey),
        new OpenAIClientOptions { Endpoint = new Uri(openAIProvider.Endpoint) })
    .GetChatClient(openAIProvider.ModelId)
    .CreateAIAgent(
    instructions: "You are a helpful assistant",
    tools: [AIFunctionFactory.Create(WeatherServicePlugin.GetCurrentWeatherAsync)]);
Console.WriteLine(await agent.RunAsync("Tell me the weather like in Chengdu?"));
最终显示的结果如下:

而在实际开发中,基于MAF和原有的ASP.NET Core框架,将依赖注入和生命周期管理纳入进来,可以实现更为强大的模块化力量。
人工审批的函数调用
相信我们在使用GitHub Copilot之类的编码智能体时会遇到,当它想要执行某个命令行或工具调用时会先征求你的审批,同意后它才会执行。其实,在Agent开发中,人工审批的工具调用也是一个常见的需求,而在MAF中,它也支持我们快速实现这个需求。
下面这个示例演示了如何实现人工审批的工具调用:
var weatherTool = AIFunctionFactory.Create(WeatherServicePlugin.GetCurrentWeatherAsync);
var approvalRequiredWeatherTool = new ApprovalRequiredAIFunction(weatherTool);
var agent = new OpenAIClient(
        new ApiKeyCredential(openAIProvider.ApiKey),
        new OpenAIClientOptions { Endpoint = new Uri(openAIProvider.Endpoint) })
    .GetChatClient(openAIProvider.ModelId)
    .CreateAIAgent(instructions: "You are a helpful assistant", tools: [approvalRequiredWeatherTool]);
var thread = agent.GetNewThread();
var response = await agent.RunAsync("Tell me the weather like in Chengdu?", thread);
var userInputRequests = response.UserInputRequests.ToList();
while(userInputRequests.Count > 0)
{
    // Ask the user to approve each function call request.
    var userInputResponses = userInputRequests
        .OfType<FunctionApprovalRequestContent>()
        .Select(functionApprovalRequest =>
        {
            Console.WriteLine($"The agent would like to invoke the following function, please reply Y to approve: Name {functionApprovalRequest.FunctionCall.Name}");
            return new ChatMessage(ChatRole.User, [functionApprovalRequest.CreateResponse(Console.ReadLine()?.Equals("Y", StringComparison.OrdinalIgnoreCase) ?? false)]);
        })
        .ToList();
    // Pass the user input responses back to the agent for further processing.
    response = await agent.RunAsync(userInputResponses, thread);
    userInputRequests = response.UserInputRequests.ToList();
}
Console.WriteLine(Environment.NewLine + $"Agent: {response}");
执行结果如下图所示:只有当我们人工输入Y确认后,它才会调用工具执行。

小结
本文介绍了MAF的基本功能,AI Agent和Workflow的基本概念,以及通过一个.NET控制台项目快速创建了一个Agent的代码示例。
下一篇,我们将继续MAF的学习。
示例源码
Github: https://github.com/EdisonTalk/MAFD
参考资料
Microsoft Learn,《Agent Framework Tutorials》