1 概述
参考《Single Root I/O Virtualization and Sharing Specification Revision 1.1》,
Within the industry, significant effort has been expended to increase the effective hardware resource utilization (i.e., application execution) through the use of virtualization technology. The Single Root I/O Virtualization and Sharing Specification (SR-IOV) defines extensions to the PCI Express (PCIe) specification suite to enable multiple System Images (SI) to share PCI hardware resources.
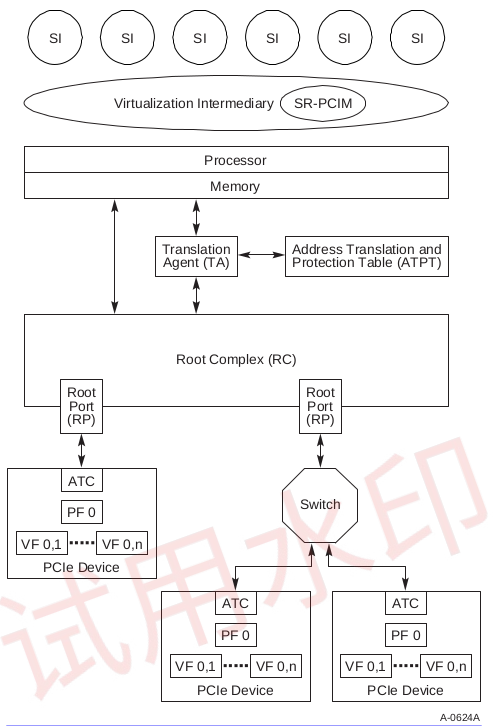
本质上,SRIOV提供了一种在硬件层面实现的资源共享方式;与在主机上通过软件方式实现资源共享不同,offload到硬件的实现方式对于主机的资源消耗更低,尤其是CPU资源。
2 实现
SR-IOV通过Extended Capability进行配置,

cpp
pci_iov_init()
---
	pos = pci_find_ext_capability(dev, PCI_EXT_CAP_ID_SRIOV);
	if (pos)
		return sriov_init(dev, pos);
---

#define PCI_EXT_CAP_ID_SRIOV	0x10	/* Single Root I/O Virtualization */
下面我们看下其中的关键域。
2.1 SR-IOV Control
其中两个关键位是:VF Enable和VF MSE;
VF Enable manages the assignment of VFs to the associated PF. If VF Enable is Set, ++the VFs associated with the PF are accessible in the PCI Express fabric.++
VF MSE controls memory space enable for all Active VFs associated with this PF, ++as with the Memory Space Enable bit in a Function's PCI Command registe++r. The default value for this bit is 0b.
cpp
sriov_enable()
---
	...
	pci_iov_set_numvfs(dev, nr_virtfn);
	iov->ctrl |= PCI_SRIOV_CTRL_VFE | PCI_SRIOV_CTRL_MSE; //VF MSE -- Memory Space Enable for Virtual Functions.
	pci_cfg_access_lock(dev);
	pci_write_config_word(dev, iov->pos + PCI_SRIOV_CTRL, iov->ctrl);
	msleep(100);
	pci_cfg_access_unlock(dev);
	...
---
在此之后,VF的config space和bar就可以被访问了。
另外,对于代码中的100ms,spec中也有描述。
To allow components to perform internal initialization, system software must wait for at least
100 ms after changing the VF Enable bit from a 0 to a 1, before it is permitted to issue
Configuration Requests to the VFs which are enabled by that VF Enable bit.
2.2 Bus/Device/Function
BDF用来路由对pci device config space的访问,
- Bus Number,8bits
- Device Number,5bits
- Function Number,3bits
cpp
PCI
RX   ->  PCI 总线 --+--------+-------+----
                   设备0    设备1    设备2

PCIe
                  ___
                /     \
          dev0 +  R X  + dev0
                \ ___ /
                   +
                  _|_
                /     \
               +  S W  + dev0
                \ ___ /
                   +
                  dev0
PCI,Device ID对应着总线上的一个槽位,总线上的每一个设备需要依赖仲裁器共享总线;在PCIe架构下,每个端口,无论是RX上的根端口,还是交换机上的下游端口,都可以认为是一个PCI总线,这个总线上不再链接多个设备,而是只有一个,所以,到PCIe后,设备号永远为0;于是,我们才可能放开device id的5个bits,合并到function中,每个设备就可以支持256个function,这便是ARI(Alternative Routing-ID Interpretatio),这也是实现SRIOV的基础。
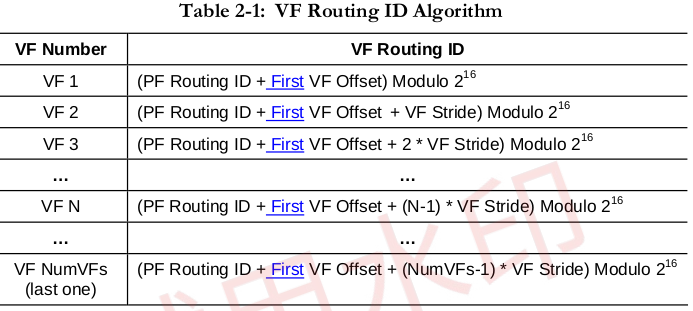
对于VF,它的BDF就可以在ARI的每个设备256个function的基础上实现,
PF routing ID + VF_offset + (n * VF_stride),参考下图:
在实际环境中,BDF的操作结果如下:
cpp
1a:00.0 Ethernet controller: Intel Corporation Ethernet Connection X722 for 1GbE (rev 09)
1a:00.1 Ethernet controller: Intel Corporation Ethernet Connection X722 for 1GbE (rev 09)
1a:00.2 Ethernet controller: Intel Corporation Ethernet Connection X722 for 1GbE (rev 09)
1a:00.3 Ethernet controller: Intel Corporation Ethernet Connection X722 for 1GbE (rev 09)
cat /sys/class/pci_bus/0000\:1a/device/0000\:1a\:00.0/sriov_offset
16
cat /sys/class/pci_bus/0000\:1a/device/0000\:1a\:00.0/sriov_stride
1
echo 4 > /sys/class/pci_bus/0000\:1a/device/0000\:1a\:00.0/sriov_numvfs
1a:00.0 Ethernet controller: Intel Corporation Ethernet Connection X722 for 1GbE (rev 09)
1a:00.1 Ethernet controller: Intel Corporation Ethernet Connection X722 for 1GbE (rev 09)
1a:00.2 Ethernet controller: Intel Corporation Ethernet Connection X722 for 1GbE (rev 09)
1a:00.3 Ethernet controller: Intel Corporation Ethernet Connection X722 for 1GbE (rev 09)
1a:02.0 Ethernet controller: Intel Corporation Ethernet Virtual Function 700 Series (rev 09)
1a:02.1 Ethernet controller: Intel Corporation Ethernet Virtual Function 700 Series (rev 09)
1a:02.2 Ethernet controller: Intel Corporation Ethernet Virtual Function 700 Series (rev 09)
1a:02.3 Ethernet controller: Intel Corporation Ethernet Virtual Function 700 Series (rev 09)
1a:00.0的4个VF在加上VF_offset和stride之后,最终的BDF是1a:02:0、1a:02:1、1a:02:2、1a:02:3。
2.3 BAR
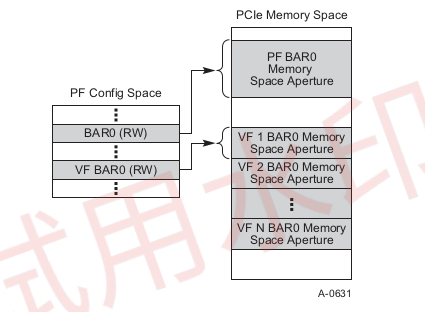
bars寄存器,VF bar0的基址是所有VF的bar0数组的基址,其他亦是如此;
cpp
sriov_enable()
  -> sriov_add_vfs()
	-> pci_iov_add_virtfn()
	   ---
		...
	for (i = 0; i < PCI_SRIOV_NUM_BARS; i++) {
		// dev is physfn pci_dev
		res = &dev->resource[i + PCI_IOV_RESOURCES];
		if (!res->parent)
			continue;
		virtfn->resource[i].name = pci_name(virtfn);
		virtfn->resource[i].flags = res->flags;
		size = pci_iov_resource_size(dev, i + PCI_IOV_RESOURCES); //dev->sriov->barsz[resno - PCI_IOV_RESOURCES]
		virtfn->resource[i].start = res->start + size * id;
		                                         ^^^^^^^^^^
		virtfn->resource[i].end = virtfn->resource[i].start + size - 1;
		rc = request_resource(res, &virtfn->resource[i]);
		BUG_ON(rc);
	}
		...
	   ---
2.4 VF创建
VF的创建过程如下,参考代码:
cpp
sriov_numvfs_store()
  -> pdev->driver->sriov_configure()
	 pci_sriov_configure_simple()
	   -> sriov_disable()

sriov_enable()
---
	...
	pci_iov_set_numvfs(dev, nr_virtfn);
	iov->ctrl |= PCI_SRIOV_CTRL_VFE | PCI_SRIOV_CTRL_MSE;
	pci_cfg_access_lock(dev);
	pci_write_config_word(dev, iov->pos + PCI_SRIOV_CTRL, iov->ctrl);
	msleep(100);
	pci_cfg_access_unlock(dev);

	rc = sriov_add_vfs(dev, initial);
	...
---

sriov_add_vfs()
  -> pci_iov_add_virtfn()
	 ---
		...
		virtfn = pci_alloc_dev(bus);
		...
		virtfn->devfn = pci_iov_virtfn_devfn(dev, id);
		virtfn->vendor = dev->vendor;
		virtfn->device = iov->vf_device;
		virtfn->is_virtfn = 1;
		virtfn->physfn = pci_dev_get(dev);
		...
		rc = pci_setup_device(virtfn);
		...
		for (i = 0; i < PCI_SRIOV_NUM_BARS; i++) {
			res = &dev->resource[i + PCI_IOV_RESOURCES];
			...
			virtfn->resource[i].name = pci_name(virtfn);
			virtfn->resource[i].flags = res->flags;
			size = pci_iov_resource_size(dev, i + PCI_IOV_RESOURCES);
			virtfn->resource[i].start = res->start + size * id;
			virtfn->resource[i].end = virtfn->resource[i].start + size - 1;
			...
		}
		...
		pci_device_add(virtfn, virtfn->bus);
		...
	 ---
其核心步骤分为两步:
- enable SRIOV control
- 创建VF设备