在计算机视觉领域,目标检测技术长期面临一个核心瓶颈:模型只能识别训练过的固定类别。传统检测模型如 YOLO、Faster R-CNN 等,在训练时依赖预定义的标签体系(如 COCO 数据集的 80 类物体),面对未见过的类别时往往束手无策。这种 "封闭世界" 的局限性,使得模型难以适应真实场景中千变万化的物体类型 ------ 从 "咖啡杯" 到 "复古唱片机",从 "流浪猫" 到 "无人机",现实世界的物体类别几乎是无限的。
随着 AIGC 技术的爆发,人们对视觉模型的期待已不止于 "识别已知",更追求 "理解未知"。例如:设计师需要工具自动识别图像中 "带有褶皱的红色窗帘",考古学家希望快速定位照片里 "残缺的陶片",普通人可能想让 AI 圈出视频中 "正在摇尾巴的小狗"。这些需求都指向同一个目标:让计算机像人类一样,通过自然语言描述就能理解并定位任意物体。
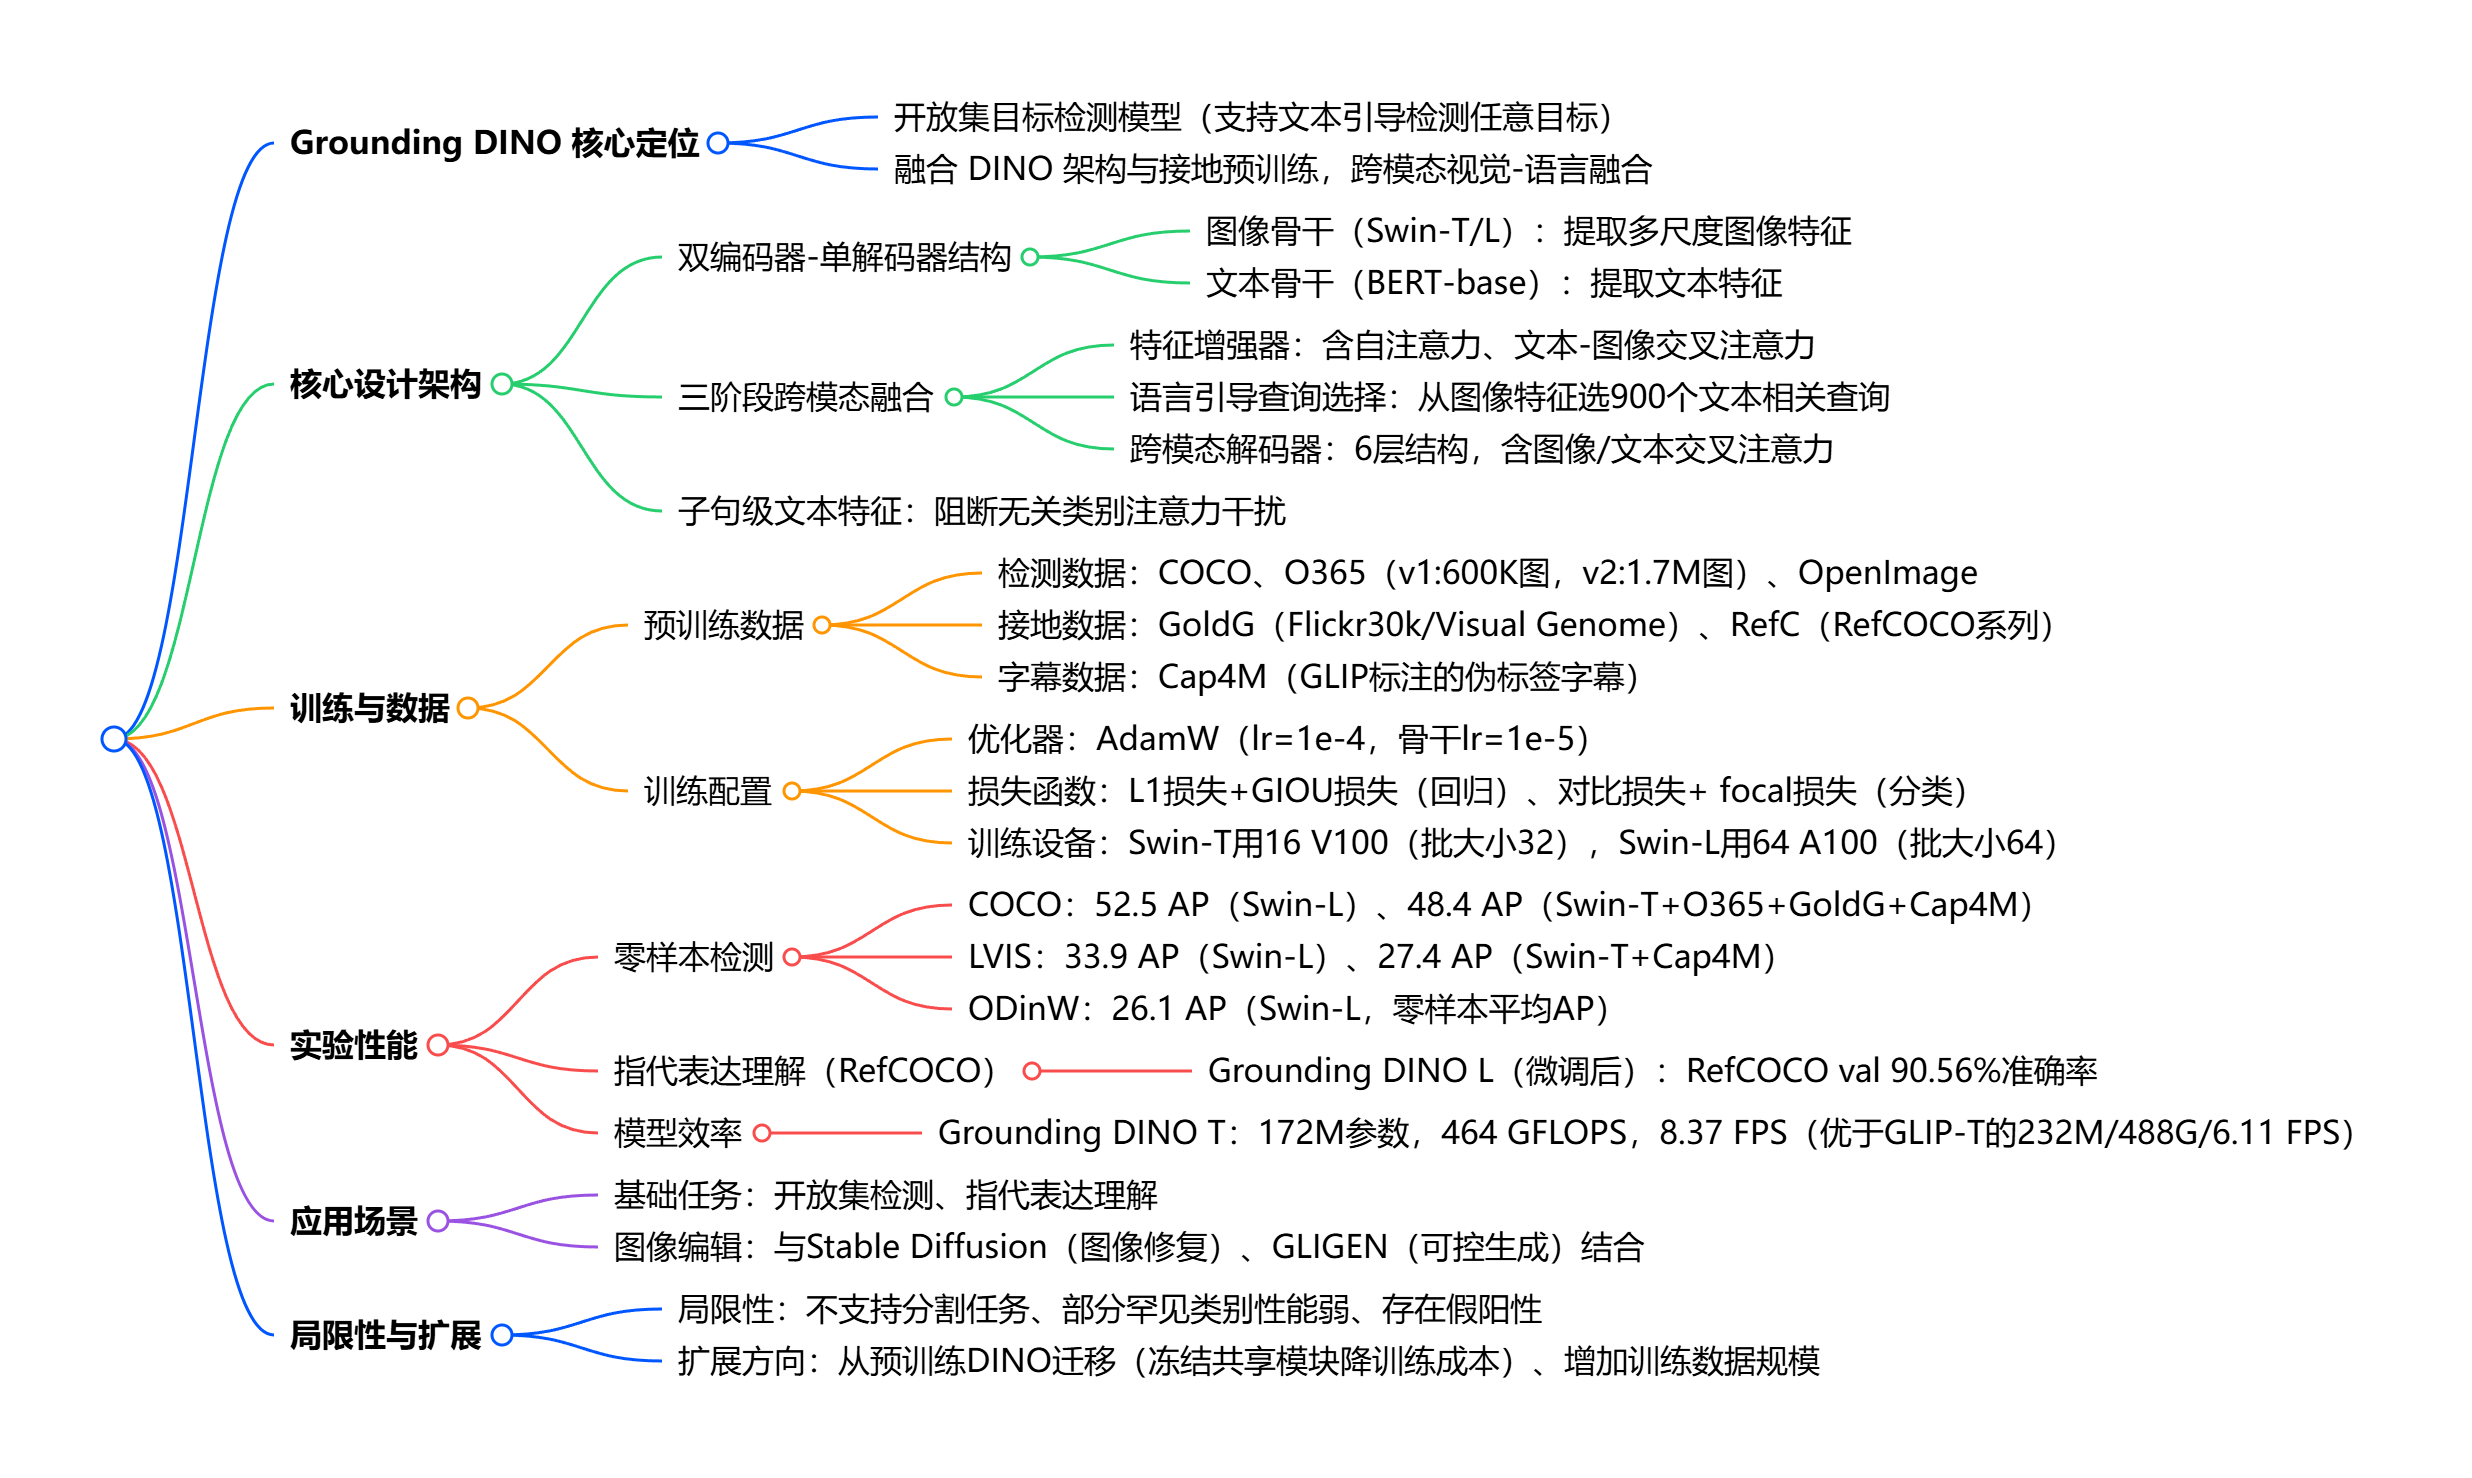
Grounding DINO 的出现,正是为了解决这一 "开放世界目标检测" 难题。它创新性地将 Transformer 架构与语言 - 图像跨模态理解结合,首次实现了 "用自然语言指挥目标检测" 的能力,彻底打破了传统模型对预定义类别的依赖。
技术核心
GroudingDINO的核心作用是通过自然语言提示(Text Prompt)直接检测图像中任意类别的物体,无需针对新类别重新训练。这种能力的关键在于模型的预训练方式:它在大规模图文对数据上学习 "语言概念" 与 "视觉特征" 的关联,从而具备了理解任意文本描述并映射到图像区域的能力。
模块部分:
- 文本 backbone:采用 BERT 等预训练语言模型,将输入的文本提示转换为语义向量;
- 图像 backbone:使用 Swin Transformer 提取图像的视觉特征;
- 特征增强器:融合文本与图像特征,强化跨模态关联;
- 语言引导查询选择:基于文本语义生成 "查询向量",精准定位图像中相关区域;
- 跨模态解码器:通过 Transformer 解码器,输出与文本对应的目标框和置信度。
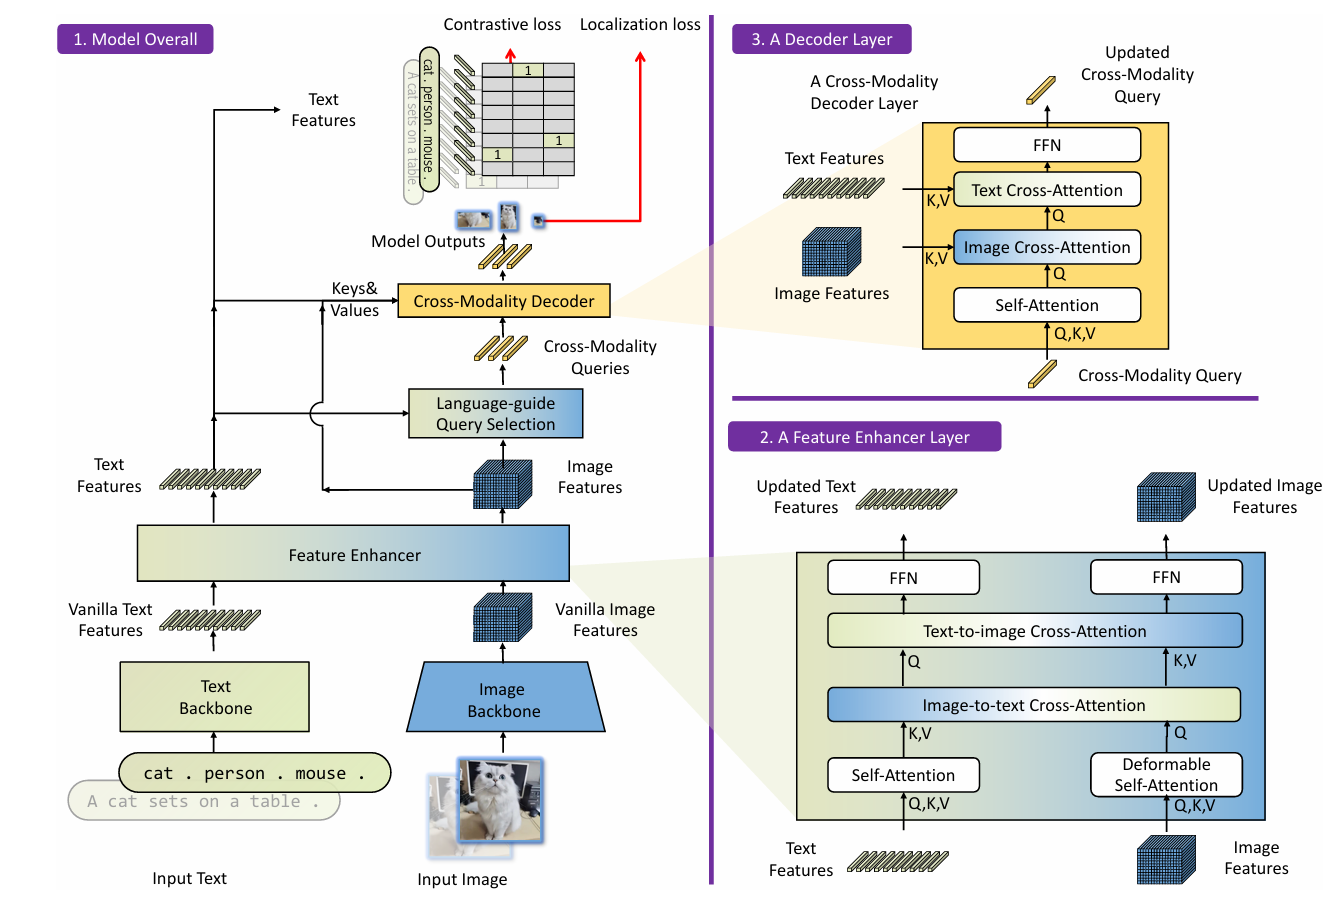
Grounding DINO是一个双encoder单decoder结构,它包含了一个image backbone 用于提取image feature、一个text backbone 用于提取text feature、一个feature enhancer 用于融合image和text feature、一个language-guide query selection 模块用于query初始化、一个cross-modality decoder用于bbox预测。
Grounding DINO 的开放集特性使其在多个领域具备变革性价值:
1、自动为图像生成任意类别的边界框标注(支持导出 COCO 格式),将数据标注效率提升 10 倍以上
2、可通过文本指令让 AI 自动定位并编辑图像元素
3、对提供 Gradio 网页界面(demo/gradio_app.py),可通过上传图像和输入文本提示,实时查看目标检测结果
下面来学习如何使用GroudingDINO。
1、搭建环境
首先克隆 Grounding DINO 仓库到本地:
git clone https://github.com/IDEA-Research/GroundingDINO.git
cd GroundingDINO/
pip install -e .
2、下载权重:
mkdir weights
cd weights
cd ..
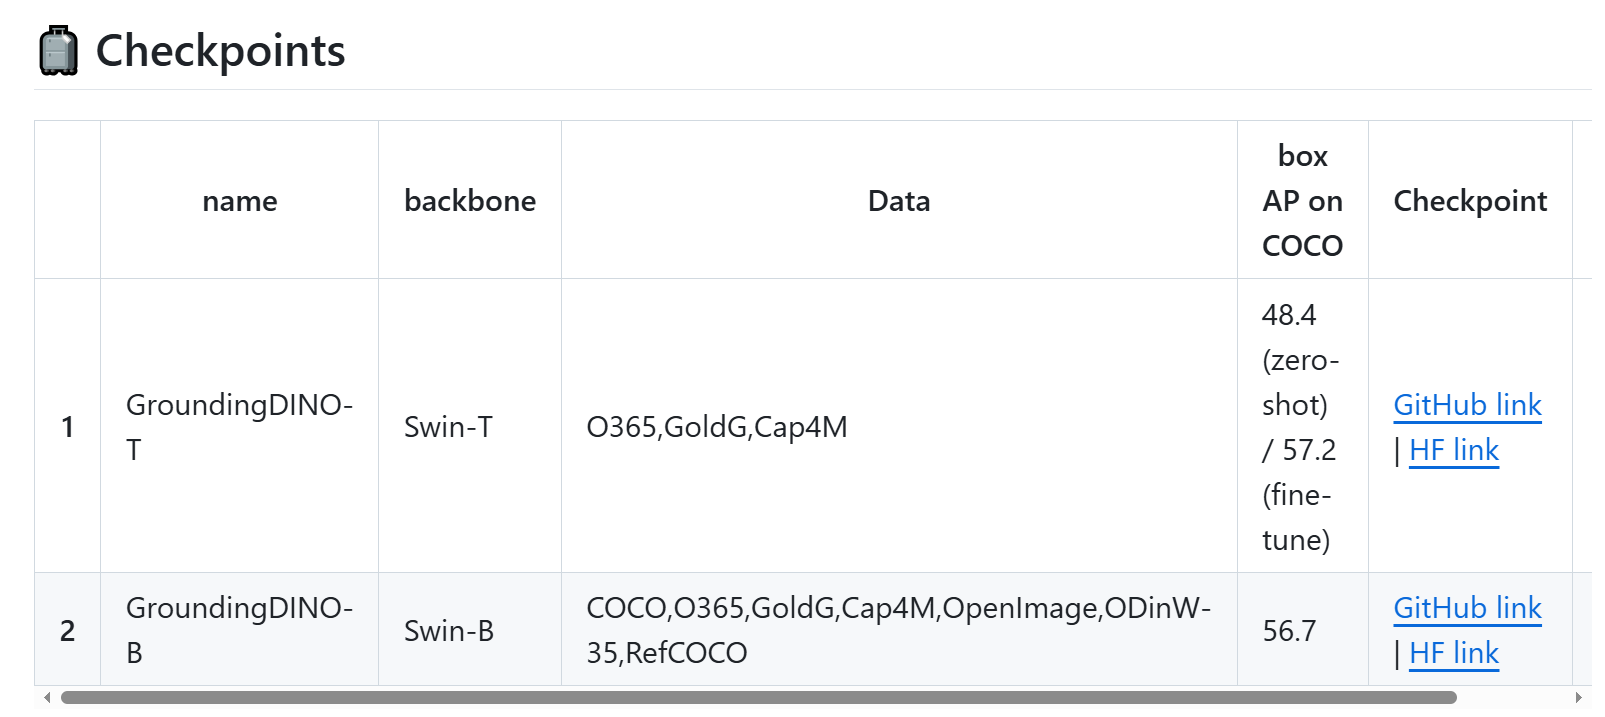
这两个都可以选,上面的代码选的是T版本
还有几个权重需要自行下载(在huggingface)
1、bert-base-uncased:https://huggingface.co/bert-base-uncased
2、Swin-Tiny Transformer视觉骨干网络:https://huggingface.co/microsoft/swin-tiny-patch4-window7-224
3、stable-diffusion-2-inpainting用于图像修复:
python
from atomgit_hub import snapshot_download


snapshot_download("hf_mirrors/ai-gitcode/stable-diffusion-2-inpainting",  local_dir = './stable-diffusion-2-inpainting')
3、然后,就可以运行Demo
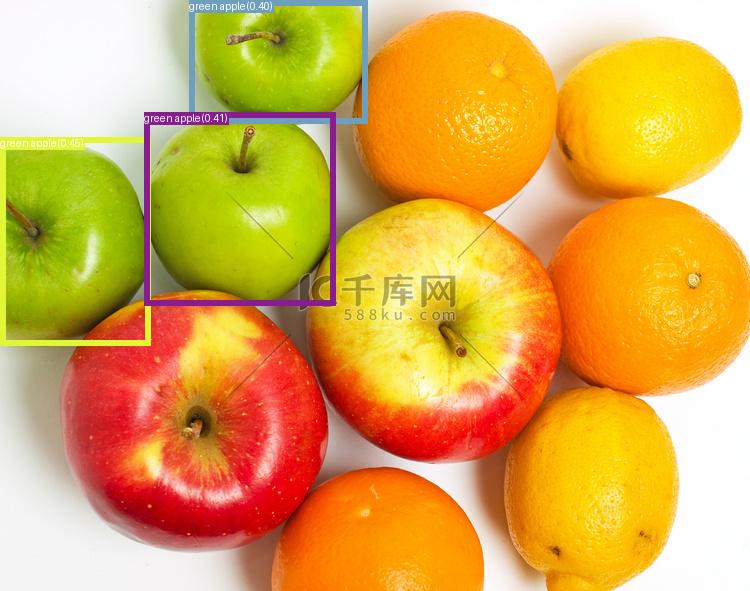
1、使用 demo/inference_on_a_image.py 对单张图像进行目标检测:
准备一张测试图像: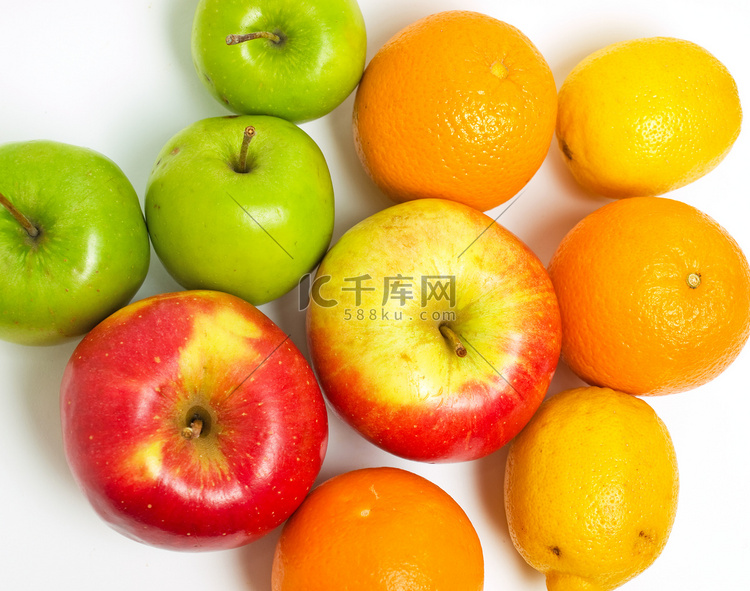
python
python demo/inference_on_a_image.py \
  --config_file ./groundingdino/config/GroundingDINO_SwinT_OGC.py \
  --checkpoint_path ./weights/groundingdino_swint_ogc.pth \
  --image_path ./demo/.asset/test.jpg \
  --text_prompt "green apple." \
  --output_dir ./outputs \
  --box_threshold 0.3 \
  --text_threshold 0.25
iamge_path换成图像路径,text_prompt用来描述需要检测的目标。
结果:
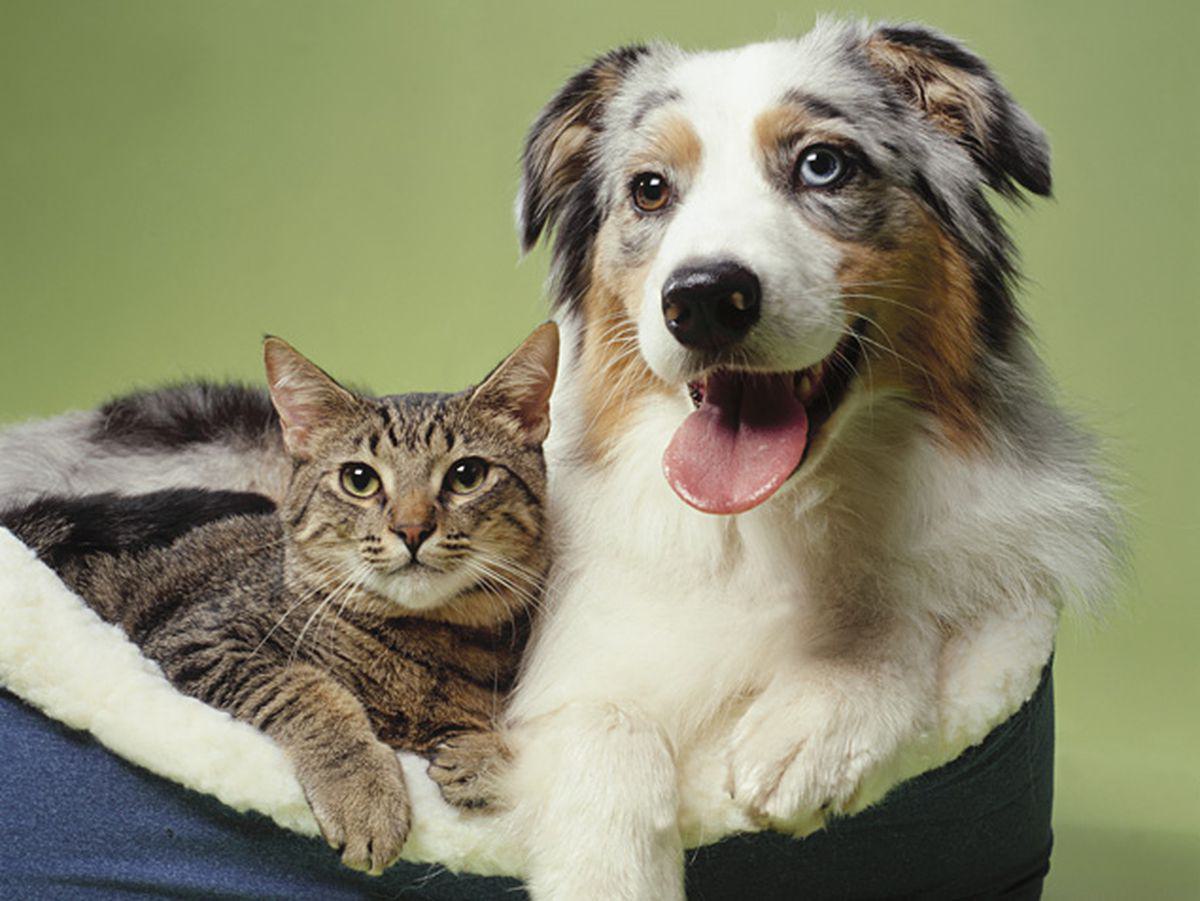
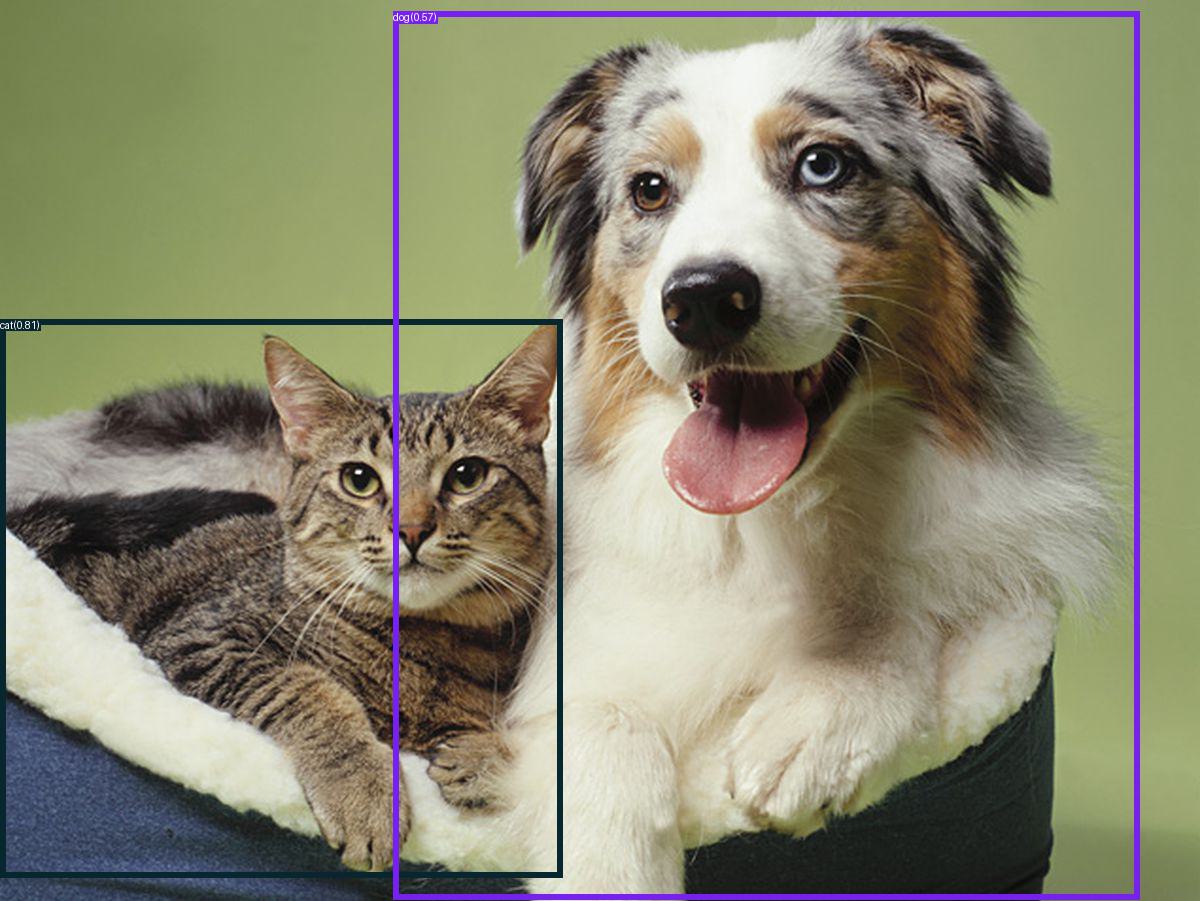
同样的,可以进行多目标检测,输入:
python
python demo/inference_on_a_image.py \
  --config_file ./groundingdino/config/GroundingDINO_SwinT_OGC.py \
  --checkpoint_path ./weights/groundingdino_swint_ogc.pth \
  --image_path ./demo/.asset/cat_dog.jpeg \
  --text_prompt "cat. dog." \
  --output_dir ./outputs \
  --box_threshold 0.3 \
  --text_threshold 0.25
结果:
2、图像编辑
这里用到下载的stable-diffusion-2-inpainting模型。我编写了一个脚本来快速实现。
python
import os
import cv2
import numpy as np
from PIL import Image
import torch
from torchvision.ops import box_convert

# 设置CUDA可见设备
os.environ["CUDA_VISIBLE_DEVICES"] = "0"

# 导入GroundingDINO相关模块
from groundingdino.models import build_model
from groundingdino.util.slconfig import SLConfig
from groundingdino.util.utils import clean_state_dict
from groundingdino.util.inference import load_image, predict

# 导入Stable Diffusion Inpainting相关模块
from diffusers import StableDiffusionInpaintPipeline

# 1. 加载GroundingDINO模型
def load_groundingdino_model():
    # 使用本地的GroundingDINO模型配置和权重路径
    local_config_path = "/home/star-jiyang/GroundingDINO/groundingdino/config/GroundingDINO_SwinT_OGC.py"
    local_weight_path = "/home/star-jiyang/GroundingDINO/weights/groundingdino_swint_ogc.pth"

    # 从本地配置文件构建模型
    args = SLConfig.fromfile(local_config_path)
    model = build_model(args)
    args.device = "cuda"

    # 加载本地模型权重
    checkpoint = torch.load(local_weight_path, map_location='cpu')
    log = model.load_state_dict(clean_state_dict(checkpoint['model']), strict=False)
    print("GroundingDINO模型加载完成 => {}".format(log))

    model.eval()
    return model.to("cuda")

# 2. 加载本地Stable Diffusion 2 Inpainting模型
def load_stable_diffusion_inpainting_model():
    # 使用本地下载的模型
    model_path = "/home/star-jiyang/GroundingDINO/stable-diffusion-2-inpainting"

    pipe = StableDiffusionInpaintPipeline.from_pretrained(
        model_path,
        torch_dtype=torch.float16,
        safety_checker=None,  # 禁用安全检查器以提高速度
    )

    pipe = pipe.to("cuda")
    print("Stable Diffusion 2 Inpainting模型加载完成")
    return pipe

# 3. 图像编辑函数
def edit_image(image_path, text_prompt, box_threshold=0.45, text_threshold=0.25, inpaint_prompt=""):
    # 加载图像
    image_source, image = load_image(image_path)

    # 使用GroundingDINO检测目标
    boxes, logits, phrases = predict(
        model=groundingdino_model,
        image=image,
        caption=text_prompt,
        box_threshold=box_threshold,
        text_threshold=text_threshold
    )

    if len(boxes) == 0:
        print("未检测到目标")
        return None

    print(f"检测到 {len(boxes)} 个目标: {phrases}")

    # 选择置信度最高的目标
    best_box_idx = logits.argmax().item()
    best_box = boxes[best_box_idx]
    best_phrase = phrases[best_box_idx]

    print(f"选择置信度最高的目标: {best_phrase}, 置信度: {logits[best_box_idx].item():.2f}")

    # 转换边界框格式 (cxcywh -> xywh)
    h, w, _ = image_source.shape
    boxes_xywh = box_convert(boxes=boxes, in_fmt="cxcywh", out_fmt="xywh")
    boxes_xywh = boxes_xywh * torch.Tensor([w, h, w, h])
    box = boxes_xywh[best_box_idx].numpy()

    # 创建掩码
    mask = np.zeros((h, w), dtype=np.uint8)
    x, y, box_w, box_h = box
    x, y = int(x), int(y)
    box_w, box_h = int(box_w), int(box_h)
    mask[y:y+box_h, x:x+box_w] = 255

    # 转换为PIL图像
    image_pil = Image.fromarray(image_source)
    mask_pil = Image.fromarray(mask)

    # 调整图像大小以适应Stable Diffusion (512x512)
    image_pil = image_pil.resize((512, 512))
    mask_pil = mask_pil.resize((512, 512))

    # 使用Stable Diffusion进行图像修复
    if not inpaint_prompt:
        inpaint_prompt = f"a {best_phrase}"

    print(f"使用提示词进行图像修复: {inpaint_prompt}")

    edited_image = stable_diffusion_pipe(
        prompt=inpaint_prompt,
        image=image_pil,
        mask_image=mask_pil,
        width=512,
        height=512,
        guidance_scale=7.5,
        num_inference_steps=50,
    ).images[0]

    return image_source, mask, edited_image, best_phrase

# 4. 主函数
if __name__ == "__main__":
    # 加载模型
    print("正在加载GroundingDINO模型...")
    groundingdino_model = load_groundingdino_model()

    print("\n正在加载Stable Diffusion 2 Inpainting模型...")
    stable_diffusion_pipe = load_stable_diffusion_inpainting_model()

    # 使用本地的示例图像
    local_image_path = "GroundingDINO/test_images/cat.jpg"

    if not os.path.exists(local_image_path):
        print(f"错误:本地图像文件不存在: {local_image_path}")
        exit(1)
    else:
        print(f"使用本地示例图像: {local_image_path}")

    # 定义编辑任务
    text_prompt = "the black cat"
    inpaint_prompt = "a cute white dog sitting on the grass"

    print(f"\n开始图像编辑任务:")
    print(f"- 检测提示词: {text_prompt}")
    print(f"- 修复提示词: {inpaint_prompt}")

    # 执行图像编辑
    original_image, mask, edited_image, detected_object = edit_image(
        local_image_path,
        text_prompt,
        box_threshold=0.45,
        text_threshold=0.25,
        inpaint_prompt=inpaint_prompt
    )

    if edited_image is not None:
        # 保存结果
        edited_image.save("edited_image.png")

        # 保存带有掩码的原始图像
        mask_visual = cv2.cvtColor(mask, cv2.COLOR_GRAY2BGR)
        mask_visual = cv2.resize(mask_visual, (original_image.shape[1], original_image.shape[0]))
        masked_image = cv2.addWeighted(original_image, 0.7, mask_visual, 0.3, 0)
        cv2.imwrite("masked_image.png", masked_image)

        print("\n图像编辑完成!")
        print(f"- 原始图像: {local_image_path}")
        print(f"- 带有掩码的图像: masked_image.png")
        print(f"- 编辑后的图像: edited_image.png")
    else:
        print("图像编辑失败")
输入:
根据提示词可以看到我想要将黑色的猫换成一条白色的狗,输出:
3、GroundingDINO还可以进行批量的自动化目标检测标注,大家可以使用create_coco_dataset.py进行尝试。这里不作演示。
GroundingDINO还可以与 Segment Anything(SAM)配合:对检测到的物体进行像素级分割,实现 "检测 + 分割" 一体化。总之,Grounding DINO 的出现,标志着目标检测从 "封闭类别" 迈向 "开放世界" 的重要突破。它不再局限于识别预设的物体类型,而是通过语言作为桥梁。
以上为全部内容!