重要提示:路径命名规范
⚠️ 强烈建议:所有文件路径和目录名使用纯ASCII字符(英文字母、数字、下划线、连字符),不要使用中文或其他非ASCII字符!
原因:
- VPP的CLI API(
cli_inband)只支持ASCII编码的字符串 - 包含非ASCII字符的路径会导致
UnicodeEncodeError: 'ascii' codec can't encode characters - 虽然可以通过手动执行CLI命令绕过,但自动化脚本会失败
正确示例:
- ✅ ./vpp/learning/acl_rules/www/eno1np0`
- ✅
learning/acl_rules/vpp_acl_setup.py
错误示例:
- ❌ ./vpp/learning/acl规则/www/eno1np0` (包含中文字符)
- ❌
learning/ACL配置/scripts/(包含中文字符)
前言
本文详细介绍如何在VMware虚拟机环境中配置VPP的ACL(访问控制列表)插件,实现基于IP地址和端口的访问控制。通过实际的操作步骤和原理说明,帮助读者理解ACL的工作机制和配置方法。
实验目标:
- 配置两个网卡:
- eno1np0:VPP虚拟机主网卡,IP地址 10.0.0.213,采用主机模式
- eno2np1:Linux测试机器网卡,IP地址 10.0.0.100,采用主机模式(充当其他主机)
- 在VMware配置主机模式,网段为:10.0.0.0/24
- Windows主机VMware网卡IP:10.0.0.1(默认)
- ACL规则配置:
- 10.0.0.1 (Windows主机) 可以HTTP访问 10.0.0.213:80
- 其他地址 不能HTTP访问 10.0.0.213:80
- 其他地址 可以ICMP访问 10.0.0.213
- 10.0.0.1 (Windows主机) 不能ICMP访问 10.0.0.213
- 启动HTTP静态页面服务
- 通过Windows主机(10.0.0.1)和Linux测试机器(10.0.0.100)测试验证ACL规则是否生效
一、环境准备
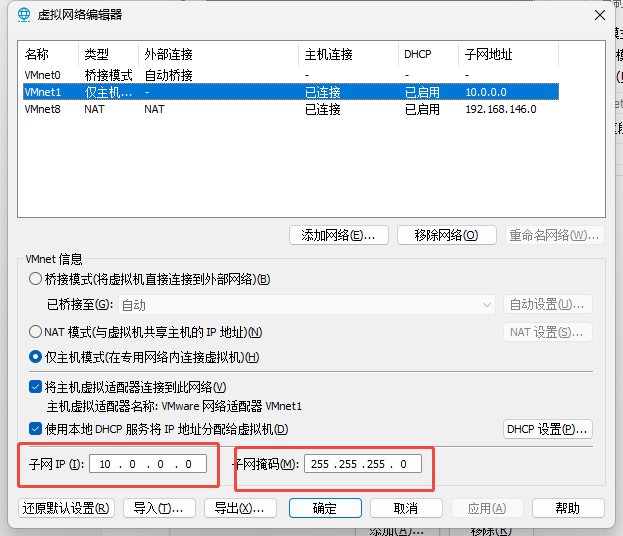
1.1 VMware网络配置
网口1:eno1np0(VPP虚拟机主网卡)
配置:
- 模式:主机模式(Host-Only)
- 网段:10.0.0.0/24
- IP地址:10.0.0.213/24
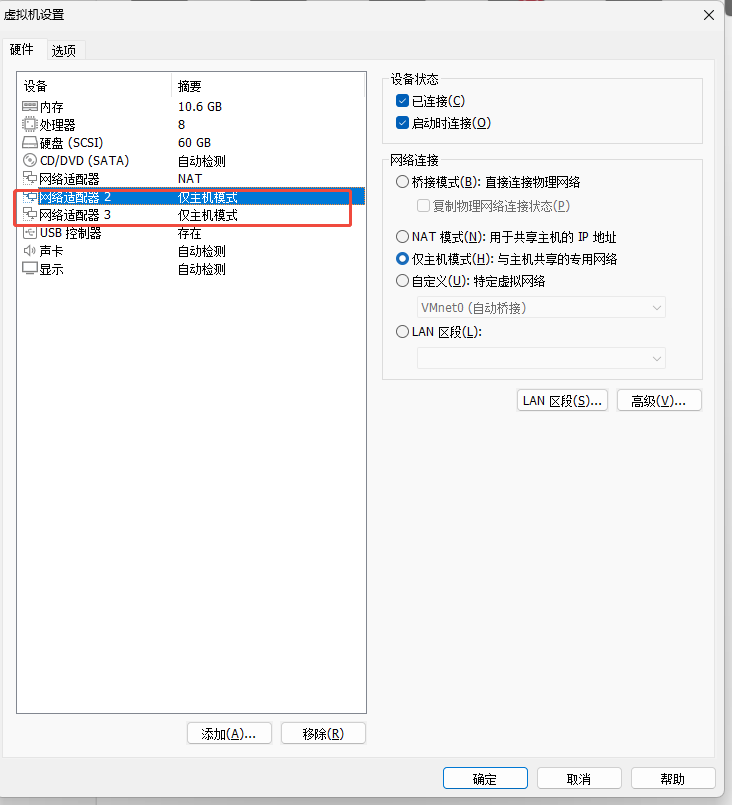
- 目的:VPP虚拟机的主网卡,用于提供HTTP服务网口2:eno2np1(Linux测试机器网卡)
配置:
- 模式:主机模式(Host-Only)
- 网段:10.0.0.0/24
- IP地址:10.0.0.100/24
- 目的:Linux测试机器网卡,充当"其他主机"用于测试ACL规则网络拓扑:
┌─────────────────────────────────────────────────────────┐
│              VMware主机模式网络 10.0.0.0/24              │
│                                                          │
│  ┌──────────────┐         ┌──────────────┐              │
│  │  Windows主机 │         │  VPP虚拟机   │              │
│  │ 10.0.0.1     │◄───────►│              │              │
│  │(VMware网卡)  │         │  eno1np0:    │              │
│  └──────────────┘         │  10.0.0.213   │              │
│                           └──────────────┘              │
│                                                          │
│  ┌──────────────┐         ┌──────────────┐              │
│  │ Linux测试机  │         │  VPP虚拟机   │              │
│  │ 10.0.0.100   │◄───────►│              │              │
│  │(eno2np1)     │         │  eno1np0:    │              │
│  └──────────────┘         │  10.0.0.213   │              │
│                           └──────────────┘              │
└──────────────────────────────────────────────────────────┘
vmware开启一个主机模式的虚拟网络
开启两个网卡
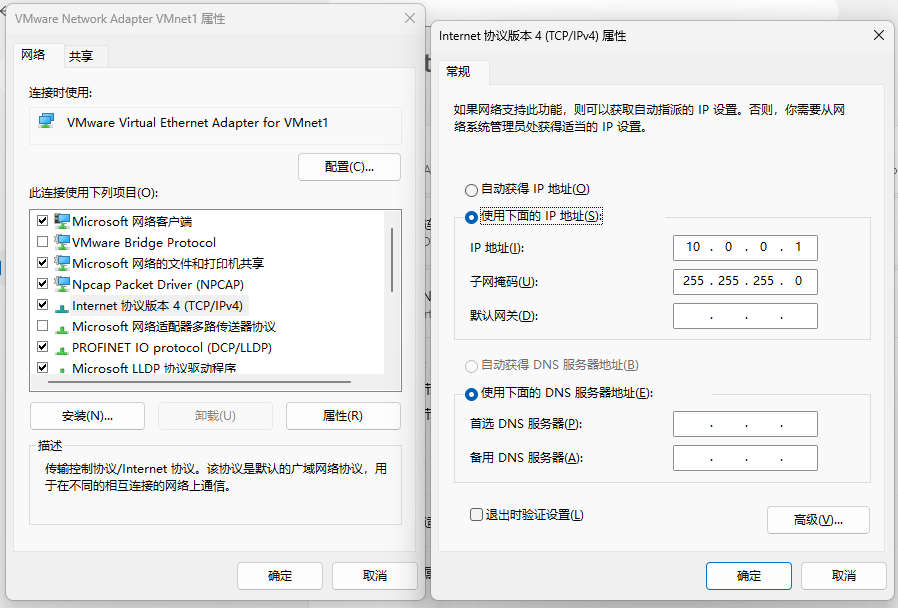
1.2 Windows主机网络配置
设置Windows主机的VMware网卡(VMnet)的IP地址:10.0.0.1(手动配置)
配置步骤:
- 打开"网络和共享中心" → "更改适配器设置"
- 找到VMware Virtual Ethernet Adapter(VMnet)
- 右键 → "属性" → "Internet协议版本4(TCP/IPv4)"
- 选择"使用下面的IP地址":
- IP地址:
10.0.0.1 - 子网掩码:
255.255.255.0 - 默认网关:留空
- IP地址:
- 点击"确定"保存
1.3 Linux测试机器网卡配置
在Linux虚拟机中配置第二个网卡(eno2np1)的IP地址:
bash
# 配置eno2np1的IP地址(不交给VPP管理,由Linux内核管理)
sudo ip addr add 10.0.0.100/24 dev eno2np1
sudo ip link set eno2np1 up

# 验证配置
ip addr show eno2np1注意:eno2np1不需要在vpp1.conf中配置,它由Linux内核管理,用于测试。
二、VPP基础配置
2.1 准备工作
bash
# 1. 在Linux虚拟机中关闭网卡eno1np0(交给VPP/DPDK管理,具体网卡名用ifconfig查看)
sudo ip link set eno1np0 down

# 2. 配置eno2np1(Linux测试机器网卡,不交给VPP,具体网卡名用ifconfig查看)
sudo ip addr add 10.0.0.100/24 dev eno2np1
sudo ip link set eno2np1 up

# 3. 加载VFIO模块(用于DPDK)
sudo modprobe vfio-pci
2.2 配置vpp1.conf
创建或编辑 vpp1.conf 配置文件:
ini
unix {
  nodaemon                    # 前台运行,方便查看日志
  cli-listen /run/vpp/cli.sock
}

api-trace { on }             # 启用 API 跟踪

dpdk {
  dev 0000:0b:00.0 { name eno1np0 }  # 绑定第一个网卡(根据实际PCI地址修改)
  no-multi-seg               # 关闭多段包(mlx5 推荐)
}

cpu {
  main-core 0                # 主核心
  corelist-workers 1         # Worker 核心
}

buffers {
  buffers-per-numa 131072    # 每个 NUMA 节点的缓冲区数量
  default data-size 2048     # 默认数据包大小
}

plugins {
  plugin dpdk_plugin.so { enable }
  plugin hs_plugin.so { enable }      # HostStack TCP 栈
  plugin app_plugin.so { enable }     # Echo server 命令
  plugin af_packet_plugin.so { enable }
  plugin acl_plugin.so { enable }     # ACL插件(必需)
  plugin http_static_plugin.so { enable }  # HTTP静态服务器插件
}

session {
  enable
}

socksvr {
  socket-name /run/vpp/api.sock
}

tcp {
  preallocated-connections 65535      # 预分配连接数(支持高并发)
}重要说明:
- 关闭网卡:Linux内核不再管理这些网卡,交给VPP/DPDK控制
- 加载VFIO:VFIO是用户空间驱动框架,允许VPP直接访问网卡硬件
- 启用ACL插件 :必须启用
acl_plugin.so才能使用ACL功能 - 启用HTTP静态服务器插件 :必须启用
http_static_plugin.so才能使用HTTP静态服务器
2.3 启动VPP
bash
sudo vpp -c ./vpp1.conf启动成功后,VPP会显示启动信息,并进入CLI模式。
三、使用自动化脚本配置
3.1 自动生成环境文件
我提供了一个Shell脚本 setup_acl_environment.sh,可以自动创建所有需要的文件和目录结构。
3.1.1 运行环境生成脚本
复制3.1.2章节内容,并在VPP根目录创建脚本setup_acl_environment.sh,粘贴内容,并执行:
bash
./setup_acl_environment.sh脚本会自动创建以下内容(生成后最好chmod 755 ./learning一下,因为vpp调用http网页时需要有读写权限,否则会崩溃):
- 目录结构:
learning/acl_rules/www/eno1np0/ - 文件:
vpp_acl_setup.py、index.html、acl_rules.json(需要手动填充内容)
3.1.2 环境生成脚本内容
bash
#!/bin/bash
#
# VPP ACL实战配置环境自动生成脚本
# 功能:自动创建所有需要的文件和目录结构
# 使用方法:在VPP根目录下执行此脚本
#
set -e # 遇到错误立即退出
# 获取脚本所在目录(VPP根目录)
VPP_ROOT="$(cd "$(dirname "${BASH_SOURCE[0]}")" && pwd)"
ACL_DIR="${VPP_ROOT}/learning/acl_rules"
echo "=========================================="
echo "VPP ACL实战配置环境生成脚本"
echo "=========================================="
echo "VPP根目录: ${VPP_ROOT}"
echo "ACL配置目录: ${ACL_DIR}"
# 1. 创建目录结构
echo "步骤1: 创建目录结构..."
mkdir -p "${ACL_DIR}/www/eno1np0"
echo " ✓ 创建目录: ${ACL_DIR}"
echo " ✓ 创建目录: ${ACL_DIR}/www/eno1np0"
# 2. 生成vpp_acl_setup.py脚本(占位符)
echo ""
echo "步骤2: 生成vpp_acl_setup.py脚本..."
cat > "${ACL_DIR}/vpp_acl_setup.py" << 'VPP_ACL_SETUP_EOF'
#!/usr/bin/env python3
"""
VPP ACL自动化配置脚本
功能:
1. 配置网卡IP地址和状态
2. 导入ACL规则
3. 绑定ACL到接口
4. 启动HTTP静态页面服务
基于VPP测试框架的正确实现方式
"""
import sys
import os
import json
import time
from ipaddress import IPv4Network, IPv6Network, ip_network
# 添加VPP Python API路径
script_dir = os.path.dirname(os.path.abspath(__file__))
vpp_root = os.path.dirname(os.path.dirname(script_dir))
sys.path.insert(0, os.path.join(vpp_root, 'src', 'vpp-api', 'python'))
try:
from vpp_papi import VPPApiClient
except ImportError:
print("Error: Cannot import vpp_papi. Please ensure VPP Python API is installed.")
sys.exit(1)
class VppAclSetup:
"""VPP ACL自动化配置类"""
def __init__(self, server_address="/run/vpp/api.sock"):
"""初始化"""
self.server_address = server_address
self.vpp = None
self.connected = False
def connect(self):
"""连接到VPP"""
import traceback
if not os.path.exists(self.server_address):
print(f"Error: API socket not found: {self.server_address}")
print("Please ensure VPP is running: sudo vpp -c vpp1.conf")
return False
try:
# 查找API目录
api_dirs = []
possible_dirs = [
'/usr/share/vpp/api',
'/usr/local/share/vpp/api',
os.path.join(vpp_root, 'build-root', 'install-vpp_debug-native', 'vpp', 'share', 'vpp', 'api'),
os.path.join(vpp_root, 'build-root', 'install-vpp-native', 'vpp', 'share', 'vpp', 'api'),
]
for api_dir in possible_dirs:
if os.path.isdir(api_dir):
for root, dirs, files in os.walk(api_dir):
if any(f.endswith('.api.json') for f in files):
api_dirs.append(api_dir)
break
if api_dirs:
break
print(f"Connecting to VPP at {self.server_address}...")
if api_dirs:
self.vpp = VPPApiClient(
apidir=api_dirs,
server_address=self.server_address,
use_socket=True
)
else:
self.vpp = VPPApiClient(server_address=self.server_address)
self.vpp.connect("acl-setup")
self.connected = True
print("✓ Connected to VPP")
return True
except Exception as e:
print(f"Failed to connect to VPP: {e}")
traceback.print_exc()
return False
def disconnect(self):
"""断开连接"""
if self.vpp and self.connected:
try:
self.vpp.disconnect()
self.connected = False
print("✓ Disconnected from VPP")
except:
pass
def get_interface_index(self, interface_name):
"""获取接口索引"""
try:
# 使用sw_interface_dump获取接口信息
interfaces = self.vpp.api.sw_interface_dump()
for iface in interfaces:
# 处理接口名称(可能是bytes或str)
try:
iface_name = iface.interface_name
if isinstance(iface_name, bytes):
iface_name = iface_name.decode('utf-8').rstrip('\x00')
else:
iface_name = str(iface_name).rstrip('\x00')
if iface_name == interface_name:
return iface.sw_if_index
except Exception as e:
# 如果单个接口处理失败,继续处理下一个
continue
# 如果没找到,打印所有接口名称用于调试
print(f" 可用接口列表:")
for iface in interfaces:
try:
name = iface.interface_name
if isinstance(name, bytes):
name = name.decode('utf-8').rstrip('\x00')
print(f" - {name} (sw_if_index: {iface.sw_if_index})")
except:
print(f" - <无法解析> (sw_if_index: {iface.sw_if_index})")
return None
except Exception as e:
print(f"Error getting interface index: {e}")
import traceback
traceback.print_exc()
return None
def configure_interface(self, interface_name, ip_address, prefix_len=24):
"""配置接口IP地址和状态"""
print(f"\n配置接口 {interface_name}...")
sw_if_index = self.get_interface_index(interface_name)
if sw_if_index is None:
print(f"✗ 接口 {interface_name} 不存在")
return False
try:
# 使用字符串格式的prefix,API会自动处理
prefix_str = f"{ip_address}/{prefix_len}"
# 设置IP地址 - 参考vpp_interface.py的实现
self.vpp.api.sw_interface_add_del_address(
sw_if_index=sw_if_index,
prefix=prefix_str, # 字符串格式,如"10.0.0.213/24"
is_add=True
)
print(f" ✓ 设置IP地址: {prefix_str}")
# 启用接口 - 参考vpp_memif.py的实现
self.vpp.api.sw_interface_set_flags(
sw_if_index=sw_if_index,
flags=1 # ADMIN_UP = 1
)
print(f" ✓ 启用接口")
return True
except Exception as e:
print(f" ✗ 配置失败: {e}")
import traceback
traceback.print_exc()
return False
def add_acl(self, tag, rules):
"""添加ACL规则 - 参考vpp_acl.py的实现"""
print(f"\n添加ACL规则: {tag}...")
try:
# 转换规则格式 - 参考AclRule.encode()的实现
vpp_rules = []
for rule in rules:
# 解析源和目标前缀 - 使用IPv4Network/IPv6Network对象
src_prefix_str = rule.get("src_prefix", "0.0.0.0/0")
dst_prefix_str = rule.get("dst_prefix", "0.0.0.0/0")
src_prefix = IPv4Network(src_prefix_str) if '/' in src_prefix_str else IPv4Network(f"{src_prefix_str}/32")
dst_prefix = IPv4Network(dst_prefix_str) if '/' in dst_prefix_str else IPv4Network(f"{dst_prefix_str}/32")
vpp_rule = {
"is_permit": rule.get("is_permit", 1),
"proto": rule.get("proto", 0),
"srcport_or_icmptype_first": rule.get("srcport_or_icmptype_first", 0),
"srcport_or_icmptype_last": rule.get("srcport_or_icmptype_last", 65535),
"dstport_or_icmpcode_first": rule.get("dstport_or_icmpcode_first", 0),
"dstport_or_icmpcode_last": rule.get("dstport_or_icmpcode_last", 65535),
"tcp_flags_mask": rule.get("tcp_flags_mask", 0),
"tcp_flags_value": rule.get("tcp_flags_value", 0),
"src_prefix": src_prefix, # IPv4Network对象,API会自动处理
"dst_prefix": dst_prefix, # IPv4Network对象,API会自动处理
}
vpp_rules.append(vpp_rule)
# 调用API - 参考VppAcl.add_vpp_config()的实现
# tag直接传递字符串,不需要encode
reply = self.vpp.api.acl_add_replace(
acl_index=0xFFFFFFFF, # 创建新ACL
tag=tag, # 字符串,API会自动处理
count=len(vpp_rules),
r=vpp_rules
)
if reply.retval == 0:
print(f" ✓ ACL创建成功,索引: {reply.acl_index}")
return reply.acl_index
else:
print(f" ✗ ACL创建失败: retval={reply.retval}")
return None
except Exception as e:
print(f" ✗ 添加ACL失败: {e}")
import traceback
traceback.print_exc()
return None
def bind_acl_to_interface(self, interface_name, acl_index, is_input=True):
"""绑定ACL到接口 - 参考VppAclInterface.add_vpp_config()的实现"""
print(f"\n绑定ACL到接口 {interface_name}...")
sw_if_index = self.get_interface_index(interface_name)
if sw_if_index is None:
print(f"✗ 接口 {interface_name} 不存在")
return False
try:
# 使用acl_interface_add_del API
self.vpp.api.acl_interface_add_del(
is_add=True,
is_input=is_input,
sw_if_index=sw_if_index,
acl_index=acl_index
)
direction = "输入" if is_input else "输出"
print(f" ✓ ACL {acl_index} 已绑定到接口 {interface_name} ({direction})")
return True
except Exception as e:
print(f" ✗ 绑定失败: {e}")
import traceback
traceback.print_exc()
return False
def start_http_server(self, ip_address, port, www_root):
"""启动HTTP静态服务器"""
print(f"\n启动HTTP服务器 {ip_address}:{port}...")
try:
# 重要:cli_inband API只接受ASCII编码的字符串
# 如果路径包含非ASCII字符(如中文),会导致编码错误
# 确保路径是ASCII编码
www_root_abs = os.path.abspath(www_root)
# 检查路径是否包含非ASCII字符
try:
www_root_abs.encode('ascii')
except UnicodeEncodeError:
print(f" ✗ 错误: 路径包含非ASCII字符,VPP CLI API不支持")
print(f" 路径: {www_root_abs}")
print(f" 请使用纯ASCII路径(不要包含中文等非ASCII字符)")
print(f" 请手动在VPP CLI中执行:")
print(f" http static server www-root <ASCII_PATH> uri tcp://{ip_address}/{port}")
return False
# 使用CLI命令启动HTTP服务器
# 命令格式: http static server www-root <path> uri tcp://<ip>/<port>
uri = f"tcp://{ip_address}/{port}"
cmd = f"http static server www-root {www_root_abs} uri {uri}"
# 通过API执行CLI命令
# cmd参数必须是ASCII编码的字符串(vpp_serializer.py:162使用.encode("ascii"))
try:
reply = self.vpp.api.cli_inband(cmd=cmd)
if reply and hasattr(reply, 'reply') and reply.reply:
result = reply.reply
if isinstance(result, bytes):
result = result.decode('utf-8')
if 'error' in result.lower():
print(f" ✗ 启动失败: {result}")
print(f" 提示: 请手动在VPP CLI中执行: {cmd}")
return False
else:
print(f" ✓ HTTP服务器已启动: http://{ip_address}:{port}")
print(f" 根目录: {www_root_abs}")
return True
else:
# 如果没有回复,假设命令已发送
print(f" ✓ HTTP服务器命令已发送")
print(f" 如果服务未启动,请手动在VPP CLI中执行:")
print(f" {cmd}")
return True
except (UnicodeEncodeError, AttributeError) as e:
# cli_inband API只支持ASCII编码
if isinstance(e, UnicodeEncodeError):
print(f" ✗ CLI命令包含非ASCII字符,无法通过API执行")
print(f" 请手动在VPP CLI中执行:")
print(f" http static server www-root {www_root_abs} uri {uri}")
else:
print(f" ⚠ CLI API不可用,请手动在VPP CLI中执行:")
print(f" {cmd}")
return True
except Exception as e:
print(f" ✗ 启动HTTP服务器失败: {e}")
print(f" 请手动在VPP CLI中执行:")
www_root_abs = os.path.abspath(www_root)
print(f" http static server www-root {www_root_abs} uri tcp://{ip_address}/{port}")
import traceback
traceback.print_exc()
return False
def run_setup(self):
"""执行完整配置"""
print("=" * 60)
print("VPP ACL自动化配置")
print("=" * 60)
# 1. 连接VPP
if not self.connect():
return False
try:
# 2. 配置接口
print("\n" + "=" * 60)
print("步骤1: 配置网卡")
print("=" * 60)
self.configure_interface("eno1np0", "10.0.0.213", 24)
time.sleep(1)
# 3. 加载ACL规则
print("\n" + "=" * 60)
print("步骤2: 导入ACL规则")
print("=" * 60)
acl_rules_file = os.path.join(script_dir, "acl_rules.json")
if not os.path.exists(acl_rules_file):
print(f"✗ ACL规则文件不存在: {acl_rules_file}")
return False
with open(acl_rules_file, 'r') as f:
acl_config = json.load(f)
acl_indices = {}
for acl_config_item in acl_config.get('acls', []):
tag = acl_config_item.get('tag')
rules = acl_config_item.get('rules', [])
if not tag or not rules:
continue
acl_index = self.add_acl(tag, rules)
if acl_index is not None:
acl_indices[tag] = acl_index
time.sleep(0.5)
# 4. 绑定ACL到接口
print("\n" + "=" * 60)
print("步骤3: 绑定ACL到接口")
print("=" * 60)
# eno1np0: 应用ACL规则
if "eno1np0-acl" in acl_indices:
self.bind_acl_to_interface("eno1np0", acl_indices["eno1np0-acl"], True)
# 5. 启动HTTP服务
print("\n" + "=" * 60)
print("步骤4: 启动HTTP静态服务器")
print("=" * 60)
www_root = os.path.join(script_dir, "www", "eno1np0")
self.start_http_server("10.0.0.213", 80, www_root)
# 完成
print("\n" + "=" * 60)
print("配置完成!")
print("=" * 60)
print("\n测试说明:")
print("ACL规则配置:")
print(" - 10.0.0.1 (Windows主机) 可以HTTP访问 10.0.0.213:80")
print(" - 其他地址 不能HTTP访问 10.0.0.213:80")
print(" - 其他地址 可以ICMP访问 10.0.0.213")
print(" - 10.0.0.1 (Windows主机) 不能ICMP访问 10.0.0.213")
print("\n测试命令:")
print(" # 从Windows主机(10.0.0.1)测试:")
print(" curl http://10.0.0.213 # 应该成功")
print(" ping 10.0.0.213 # 应该失败")
print(" # 从Linux测试机器(10.0.0.100)测试:")
print(" curl http://10.0.0.213 # 应该失败")
print(" ping 10.0.0.213 # 应该成功")
print("\n查看配置:")
print(" vppctl# show acl-plugin acl")
print(" vppctl# show acl-plugin interface")
print(" vppctl# show http static server")
return True
except Exception as e:
print(f"\n✗ 配置过程中出错: {e}")
import traceback
traceback.print_exc()
return False
finally:
self.disconnect()
def main():
"""主函数"""
setup = VppAclSetup()
success = setup.run_setup()
sys.exit(0 if success else 1)
if __name__ == '__main__':
main()
VPP_ACL_SETUP_EOF
chmod +x "${ACL_DIR}/vpp_acl_setup.py"
echo " ✓ 生成文件: ${ACL_DIR}/vpp_acl_setup.py"
# 3. 生成index.html(占位符)
echo ""
echo "步骤3: 生成index.html文件..."
cat > "${ACL_DIR}/www/eno1np0/index.html" << 'INDEX_HTML_EOF'
<!DOCTYPE html>
<html>
<head>
<title>Welcome - eno1np0</title>
<meta charset="UTF-8">
<style>
body {
font-family: Arial, sans-serif;
text-align: center;
padding: 50px;
background: linear-gradient(135deg, #4CAF50 0%, #45a049 100%);
color: white;
margin: 0;
min-height: 100vh;
display: flex;
flex-direction: column;
justify-content: center;
align-items: center;
}
.container {
background: rgba(255, 255, 255, 0.1);
padding: 40px;
border-radius: 20px;
box-shadow: 0 8px 32px rgba(0, 0, 0, 0.3);
backdrop-filter: blur(10px);
}
h1 {
font-size: 64px;
margin: 20px 0;
text-shadow: 2px 2px 4px rgba(0, 0, 0, 0.3);
}
p {
font-size: 24px;
margin: 15px 0;
line-height: 1.6;
}
.ip-address {
font-family: 'Courier New', monospace;
background: rgba(255, 255, 255, 0.2);
padding: 10px 20px;
border-radius: 10px;
display: inline-block;
margin: 10px 0;
}
.status {
font-size: 32px;
font-weight: bold;
margin: 20px 0;
}
</style>
</head>
<body>
<div class="container">
<h1>✅ Access Allowed!</h1>
<p class="status">ACL Rule: PERMIT</p>
<p>This is <span class="ip-address">eno1np0 (10.0.0.213)</span></p>
<p>Source IP: <span class="ip-address">10.0.0.1</span> is allowed to access this server</p>
<p>HTTP Port: 80</p>
<p style="margin-top: 30px; font-size: 18px; opacity: 0.9;">
VPP ACL实战配置 - 允许访问示例
</p>
</div>
</body>
</html>
INDEX_HTML_EOF
echo " ✓ 生成文件: ${ACL_DIR}/www/eno1np0/index.html"
# 4. 生成acl_rules.json(占位符)
echo ""
echo "步骤4: 生成acl_rules.json配置文件..."
cat > "${ACL_DIR}/acl_rules.json" << 'ACL_RULES_EOF'
{
"acls": [
{
"tag": "web-server-acl",
"acl_index": 4294967295,
"rules": [
{
"is_permit": 1,
"src_prefix": "0.0.0.0/0",
"dst_prefix": "192.168.1.100/32",
"proto": 6,
"srcport_or_icmptype_first": 0,
"srcport_or_icmptype_last": 65535,
"dstport_or_icmpcode_first": 80,
"dstport_or_icmpcode_last": 443,
"tcp_flags_mask": 0,
"tcp_flags_value": 0
},
{
"is_permit": 0,
"src_prefix": "10.0.0.0/8",
"dst_prefix": "192.168.1.100/32",
"proto": 0,
"srcport_or_icmptype_first": 0,
"srcport_or_icmptype_last": 0,
"dstport_or_icmpcode_first": 0,
"dstport_or_icmpcode_last": 0,
"tcp_flags_mask": 0,
"tcp_flags_value": 0
}
]
},
{
"tag": "ssh-access-acl",
"acl_index": 4294967295,
"rules": [
{
"is_permit": 1,
"src_prefix": "192.168.1.0/24",
"dst_prefix": "0.0.0.0/0",
"proto": 6,
"srcport_or_icmptype_first": 0,
"srcport_or_icmptype_last": 65535,
"dstport_or_icmpcode_first": 22,
"dstport_or_icmpcode_last": 22,
"tcp_flags_mask": 0,
"tcp_flags_value": 0
}
]
},
{
"tag": "dns-acl",
"acl_index": 4294967295,
"rules": [
{
"is_permit": 1,
"src_prefix": "0.0.0.0/0",
"dst_prefix": "8.8.8.8/32",
"proto": 17,
"srcport_or_icmptype_first": 0,
"srcport_or_icmptype_last": 65535,
"dstport_or_icmpcode_first": 53,
"dstport_or_icmpcode_last": 53,
"tcp_flags_mask": 0,
"tcp_flags_value": 0
},
{
"is_permit": 1,
"src_prefix": "0.0.0.0/0",
"dst_prefix": "8.8.4.4/32",
"proto": 17,
"srcport_or_icmptype_first": 0,
"srcport_or_icmptype_last": 65535,
"dstport_or_icmpcode_first": 53,
"dstport_or_icmpcode_last": 53,
"tcp_flags_mask": 0,
"tcp_flags_value": 0
}
]
}
]
}
ACL_RULES_EOF
echo " ✓ 生成文件: ${ACL_DIR}/acl_rules.json"
# 完成
echo ""
echo "=========================================="
echo "环境生成完成!"
echo "=========================================="
echo ""
echo "下一步操作:"
echo "1. 复制vpp_acl_setup.py的内容到: ${ACL_DIR}/vpp_acl_setup.py"
echo "2. 复制index.html的内容到: ${ACL_DIR}/www/eno1np0/index.html"
echo "3. 复制acl_rules.json的内容到: ${ACL_DIR}/acl_rules.json"
echo ""
echo "然后按照README.md中的说明进行配置和测试。"
echo ""注意:
- 脚本会在VPP根目录下创建
learning/acl_rules目录 vpp_acl_setup.py、index.html、acl_rules.json这三个文件会创建为占位符(空字符串),需要手动复制内容- 其他配置文件(
interfaces.json、acl_bindings.json)会自动生成完整内容
3.2 脚本功能说明
我们提供了一个自动化配置脚本 vpp_acl_setup.py,它可以:
- 配置网卡:设置网卡IP地址和状态
- 配置ACL规则:从JSON文件导入ACL规则
- 绑定ACL到接口:将ACL规则应用到指定接口
- 启动HTTP服务:启动HTTP静态页面服务
3.2 运行脚本
bash
cd learning/acl_rules
sudo python3 vpp_acl_setup.py
注意 :确保路径learning/acl_rules不包含非ASCII字符(如中文),否则CLI命令会失败。
脚本会自动执行以下操作:
- 配置eno1np0:IP 10.0.0.213/24,启用接口
- 导入ACL规则
- 绑定ACL到接口
- 启动HTTP静态页面服务
注意:eno2np1不需要脚本配置,它由Linux内核管理,IP地址为10.0.0.100/24。
3.3 手动配置(可选)
如果不想使用脚本,可以手动执行以下命令:
配置网卡(eno1np0)
bash
vppctl# set int ip addr eno1np0 10.0.0.213/24
vppctl# set int state eno1np0 up
四、ACL规则配置
4.1 ACL规则说明
我们创建了一个ACL规则集,包含4条规则,实现精细化的访问控制:
ACL规则集:eno1np0-acl
json
{
  "tag": "eno1np0-acl",
  "rules": [
    {
      "is_permit": 1,  // 规则1:允许
      "src_prefix": "10.0.0.1/32",  // Windows主机IP
      "dst_prefix": "10.0.0.213/32",  // eno1np0 IP
      "proto": 6,  // TCP协议
      "dstport_or_icmpcode_first": 80,  // HTTP端口
      "dstport_or_icmpcode_last": 80
    },
    {
      "is_permit": 0,  // 规则2:拒绝
      "src_prefix": "0.0.0.0/0",  // 所有源地址
      "dst_prefix": "10.0.0.213/32",
      "proto": 6,  // TCP协议
      "dstport_or_icmpcode_first": 80,  // HTTP端口
      "dstport_or_icmpcode_last": 80
    },
    {
      "is_permit": 0,  // 规则3:拒绝(更具体的规则,必须放在规则4之前)
      "src_prefix": "10.0.0.1/32",  // Windows主机IP
      "dst_prefix": "10.0.0.213/32",
      "proto": 1,  // ICMP协议
      "srcport_or_icmptype_first": 0,  // ICMP类型范围
      "srcport_or_icmptype_last": 255,
      "dstport_or_icmpcode_first": 0,  // ICMP代码范围
      "dstport_or_icmpcode_last": 255
    },
    {
      "is_permit": 1,  // 规则4:允许(更通用的规则,放在规则3之后)
      "src_prefix": "0.0.0.0/0",  // 所有源地址
      "dst_prefix": "10.0.0.213/32",
      "proto": 1,  // ICMP协议
      "srcport_or_icmptype_first": 0,  // ICMP类型范围
      "srcport_or_icmptype_last": 255,
      "dstport_or_icmpcode_first": 0,  // ICMP代码范围
      "dstport_or_icmpcode_last": 255
    }
  ]
}规则说明(按匹配顺序):
- 规则1:允许10.0.0.1访问10.0.0.213的80端口(HTTP)✅
- 规则2:拒绝其他所有地址访问10.0.0.213的80端口(HTTP)❌
- 规则3 :拒绝10.0.0.1 ICMP访问10.0.0.213(ping等)❌ (更具体的规则,必须在前)
- 规则4 :允许其他所有地址ICMP访问10.0.0.213(ping等)✅ (更通用的规则,必须在后)
匹配逻辑(first-match原则):
- 如果源IP是10.0.0.1且协议是TCP端口80 → 规则1匹配 → 允许
- 如果源IP不是10.0.0.1且协议是TCP端口80 → 规则2匹配 → 拒绝
- 如果源IP是10.0.0.1且协议是ICMP → 规则3匹配 → 拒绝(先匹配,规则4不会检查)
- 如果源IP不是10.0.0.1且协议是ICMP → 规则4匹配 → 允许
⚠️ 重要:规则顺序非常关键!因为VPP ACL使用first-match原则,更具体的规则(规则3)必须放在更通用的规则(规则4)之前,否则规则3永远不会被匹配到。
为什么规则1和规则2不冲突?
这是一个很好的问题!规则1和规则2看起来有冲突,但实际上不会,原因如下:
规则对比:
| 规则 | 源地址 | 目标地址 | 协议 | 端口 | 动作 |
|---|---|---|---|---|---|
| 规则1 | 10.0.0.1/32 | 10.0.0.213/32 | TCP | 80 | ✅ 允许 |
| 规则2 | 0.0.0.0/0 | 10.0.0.213/32 | TCP | 80 | ❌ 拒绝 |
为什么规则2的0.0.0.0/0不会匹配到10.0.0.1?
答案:规则2会匹配10.0.0.1,但由于first-match原则,规则1先匹配,所以规则2不会被检查!
详细匹配过程:
场景1:10.0.0.1发送TCP:80数据包
数据包:源IP=10.0.0.1, 目标IP=10.0.0.213, 协议=TCP, 端口=80

步骤1:检查规则1
  ├─ 源IP匹配? 10.0.0.1 == 10.0.0.1/32 ✅ 匹配
  ├─ 目标IP匹配? 10.0.0.213 == 10.0.0.213/32 ✅ 匹配
  ├─ 协议匹配? TCP == TCP ✅ 匹配
  ├─ 端口匹配? 80 == 80 ✅ 匹配
  └─ 结果:✅ 规则1完全匹配 → 动作:允许 → **停止检查,数据包通过**

步骤2:检查规则2
  └─ 由于规则1已匹配,**不再检查规则2**
场景2:10.0.0.100发送TCP:80数据包
数据包:源IP=10.0.0.100, 目标IP=10.0.0.213, 协议=TCP, 端口=80

步骤1:检查规则1
  ├─ 源IP匹配? 10.0.0.100 == 10.0.0.1/32 ❌ 不匹配
  └─ 结果:规则1不匹配 → **继续检查规则2**

步骤2:检查规则2
  ├─ 源IP匹配? 10.0.0.100 在 0.0.0.0/0 范围内 ✅ 匹配(0.0.0.0/0匹配所有IP)
  ├─ 目标IP匹配? 10.0.0.213 == 10.0.0.213/32 ✅ 匹配
  ├─ 协议匹配? TCP == TCP ✅ 匹配
  ├─ 端口匹配? 80 == 80 ✅ 匹配
└─ 结果:✅ 规则2完全匹配 → 动作:拒绝 → **停止检查,数据包被丢弃**关键点总结:
- 规则1更具体 :
10.0.0.1/32只匹配一个IP地址 - 规则2更通用 :
0.0.0.0/0匹配所有IP地址(包括10.0.0.1) - First-Match原则:VPP按顺序检查规则,第一个匹配的规则生效后立即停止
- 规则顺序很重要:更具体的规则必须放在更通用的规则之前
如果顺序颠倒会怎样?
如果规则2在规则1之前:
json
规则2: 拒绝 0.0.0.0/0 → TCP:80  ❌ (在前)
规则1: 允许 10.0.0.1 → TCP:80 ✅ (在后)结果:
- 10.0.0.1的数据包会先匹配规则2(因为0.0.0.0/0匹配所有IP)
- 规则1永远不会被检查
- 10.0.0.1的HTTP访问会被拒绝! ❌
这就是为什么规则1必须在规则2之前的原因!
4.2 ACL规则匹配顺序
VPP ACL使用first-match原则:
- 规则按顺序匹配
- 第一个匹配的规则生效
- 后续规则不再检查
重要:规则的顺序非常重要!应该将最具体的规则放在前面,通用的规则放在后面。
实际案例:
- ❌ 错误顺序 :规则3(允许所有地址ICMP)在规则4(拒绝10.0.0.1 ICMP)之前
- 结果:10.0.0.1的ICMP包会先匹配规则3,导致规则4永远不会生效
- ✅ 正确顺序 :规则3(拒绝10.0.0.1 ICMP)在规则4(允许所有地址ICMP)之前
- 结果:10.0.0.1的ICMP包先匹配规则3被拒绝,其他地址的ICMP包匹配规则4被允许
五、HTTP静态页面服务配置
5.1 创建HTML页面
我们创建了一个简单的HTML页面用于测试:
eno1np0的欢迎页面
文件:learning/acl_rules/www/eno1np0/index.html
html
<!DOCTYPE html>
<html>
<head>
    <title>Welcome - eno1np0</title>
    <style>
        body {
            font-family: Arial, sans-serif;
            text-align: center;
            padding: 50px;
            background-color: #4CAF50;
            color: white;
        }
        h1 { font-size: 48px; }
        p { font-size: 24px; }
    </style>
</head>
<body>
    <h1>✅ Access Allowed!</h1>
    <p>This is eno1np0 (10.0.0.213)</p>
    <p>ACL Rule: Allow 10.0.0.1</p>
</body>
</html>
5.2 启动HTTP服务
方法1:使用脚本自动启动
脚本会自动启动HTTP服务:
- eno1np0:
http://10.0.0.213:80
方法2:手动启动
bash
# 启动eno1np0的HTTP服务
vppctl# http static server www-root ./learning/acl_rules/www/eno1np0 uri tcp://10.0.0.213/80注意:VPP的HTTP静态服务器在同一时间只能启动一个实例。如果需要多个HTTP服务,需要使用不同的端口或IP地址。
重要:路径必须使用ASCII字符。如果路径包含非ASCII字符(如中文),请使用符号链接或重命名目录。
参数说明:
www-root:HTML文件所在的根目录uri:监听地址和端口,格式为tcp://IP地址/端口
六、功能测试
6.1 测试1:从10.0.0.1访问HTTP(应该成功)
在Windows主机(10.0.0.1)上执行:
bash
# 使用浏览器访问
http://10.0.0.213

# 或使用curl测试
curl http://10.0.0.213预期结果:
- ✅ 成功访问:显示绿色页面 "Access Allowed!"
- ✅ 页面内容:显示 "This is eno1np0 (10.0.0.213)"
- ✅ 原因:ACL规则1允许10.0.0.1访问10.0.0.213的80端口
6.2 测试2:从10.0.0.1进行ICMP(应该失败)
在Windows主机(10.0.0.1)上执行:
bash
ping 10.0.0.213预期结果:
- ❌ ping失败 :
请求超时或Destination host unreachable - ✅ 原因:ACL规则3拒绝10.0.0.1 ICMP访问10.0.0.213
6.3 测试3:从Linux测试机器访问HTTP(应该失败)
在Linux测试机器(10.0.0.100,eno2np1)上执行:
bash
curl http://10.0.0.213预期结果:
- ❌ 连接超时 :
curl: (7) Failed to connect to 10.0.0.213 port 80: Connection timed out - ✅ 原因:ACL规则2拒绝其他地址访问10.0.0.213的80端口
6.4 测试4:从Linux测试机器进行ICMP(应该成功)
在Linux测试机器(10.0.0.100,eno2np1)上执行:
bash
ping 10.0.0.213预期结果:
- ✅ ping成功:收到ICMP回复
- ✅ 原因:ACL规则4允许其他地址ICMP访问10.0.0.213
6.5 测试总结
| 源IP | 协议 | 端口/类型 | 预期结果 | 匹配规则 |
|---|---|---|---|---|
| 10.0.0.1 (Windows) | TCP | 80 | ✅ 允许 | 规则1 |
| 10.0.0.100 (Linux测试机) | TCP | 80 | ❌ 拒绝 | 规则2 |
| 10.0.0.100 (Linux测试机) | ICMP | - | ✅ 允许 | 规则4 |
| 10.0.0.1 (Windows) | ICMP | - | ❌ 拒绝 | 规则3 |
七、数据流向详解
7.1 允许访问的数据流(eno1np0)
┌─────────────────────────────────────────────────────────────────┐
│ 场景:Windows主机 (10.0.0.1) 访问 eno1np0 (10.0.0.213:80) │
└─────────────────────────────────────────────────────────────────┘

【请求数据包流向】

┌──────────────┐
│  Windows     │
│ 10.0.0.1 │
└──────┬───────┘
       │
       │ HTTP GET请求
       │ 源IP: 10.0.0.1
       │ 目标IP: 10.0.0.213
       │ 目标端口: 80
       ▼
┌──────────────────────────────────────────────────────────────┐
│              VMware主机模式网络 10.0.0.0/24                  │
└───────────────────┬──────────────────────────────────────────┘
                    │
                    ▼
┌──────────────────────────────────────────────────────────────┐
│  eno1np0 (10.0.0.213)                                      │
│  接收数据包:源10.0.0.1 → 目标10.0.0.213:80                  │
└───────────────────┬──────────────────────────────────────────┘
                    │
                    ▼
┌──────────────────────────────────────────────────────────────┐
│  VPP ACL处理(输入方向)                                      │
│  1. 匹配规则1:源10.0.0.1/32 → 目标10.0.0.213/32:80        │
│  2. 动作:PERMIT(允许)                                     │
│  3. 数据包继续转发                                           │
└───────────────────┬──────────────────────────────────────────┘
                    │
                    ▼
┌──────────────────────────────────────────────────────────────┐
│  HTTP静态服务器                                              │
│  1. 接收HTTP请求                                             │
│  2. 读取index.html文件                                       │
│  3. 返回HTTP响应                                             │
└───────────────────┬──────────────────────────────────────────┘
                    │
                    │ HTTP响应
                    │ 源IP: 10.0.0.213
                    │ 目标IP: 10.0.0.1
                    │ 源端口: 80
                    ▼
┌──────────────┐
│  Windows     │
│ 10.0.0.1 │ ← 收到响应,显示页面!
└──────────────┘
7.2 ICMP数据流(其他地址允许,10.0.0.1拒绝)
┌─────────────────────────────────────────────────────────────────┐
│ 场景1:Linux测试机器 (10.0.0.100) ping eno1np0 (10.0.0.213)    │
└─────────────────────────────────────────────────────────────────┘

【ICMP请求数据包流向】

┌──────────────┐
│ Linux测试机  │
│ 10.0.0.100   │
└──────┬───────┘
       │
       │ ICMP Echo Request
       │ 源IP: 10.0.0.100
       │ 目标IP: 10.0.0.213
       │
       ▼
┌──────────────────────────────────────────────────────────────┐
│  VPP ACL处理(输入方向)                                      │
│  1. 匹配规则4:源非10.0.0.1 → 目标10.0.0.213,ICMP        │
│  2. 动作:PERMIT(允许)                                      │
│  3. ICMP包继续处理                                            │
└───────────────────┬──────────────────────────────────────────┘
                    │
                    │ ICMP Echo Reply
                    │
                    ▼
┌──────────────┐
│ Linux测试机  │
│ 10.0.0.100   │ ← ping成功!
└──────────────┘

┌─────────────────────────────────────────────────────────────────┐
│ 场景2:Windows主机 (10.0.0.1) ping eno1np0 (10.0.0.213) │
└─────────────────────────────────────────────────────────────────┘

【ICMP请求数据包流向】

┌──────────────┐
│  Windows     │
│ 10.0.0.1 │
└──────┬───────┘
       │
       │ ICMP Echo Request
       │ 源IP: 10.0.0.1
       │ 目标IP: 10.0.0.213
       │
       ▼
┌──────────────────────────────────────────────────────────────┐
│  VPP ACL处理(输入方向)                                      │
│  1. 匹配规则3:源10.0.0.1/32 → 目标10.0.0.213/32,ICMP    │
│  2. 动作:DENY(拒绝)                                        │
│  3. ICMP包被丢弃                                              │
│  4. 不发送任何响应                                           │
└───────────────────┬──────────────────────────────────────────┘
                    │
                    │ (数据包被丢弃,无响应)
                    │
                    ▼
┌──────────────┐
│  Windows     │
│ 10.0.0.1 │ ← ping失败,超时!
└──────────────┘
此时查看vpp的节点流向图可以看到节点acl-plugin-in-ip4-fa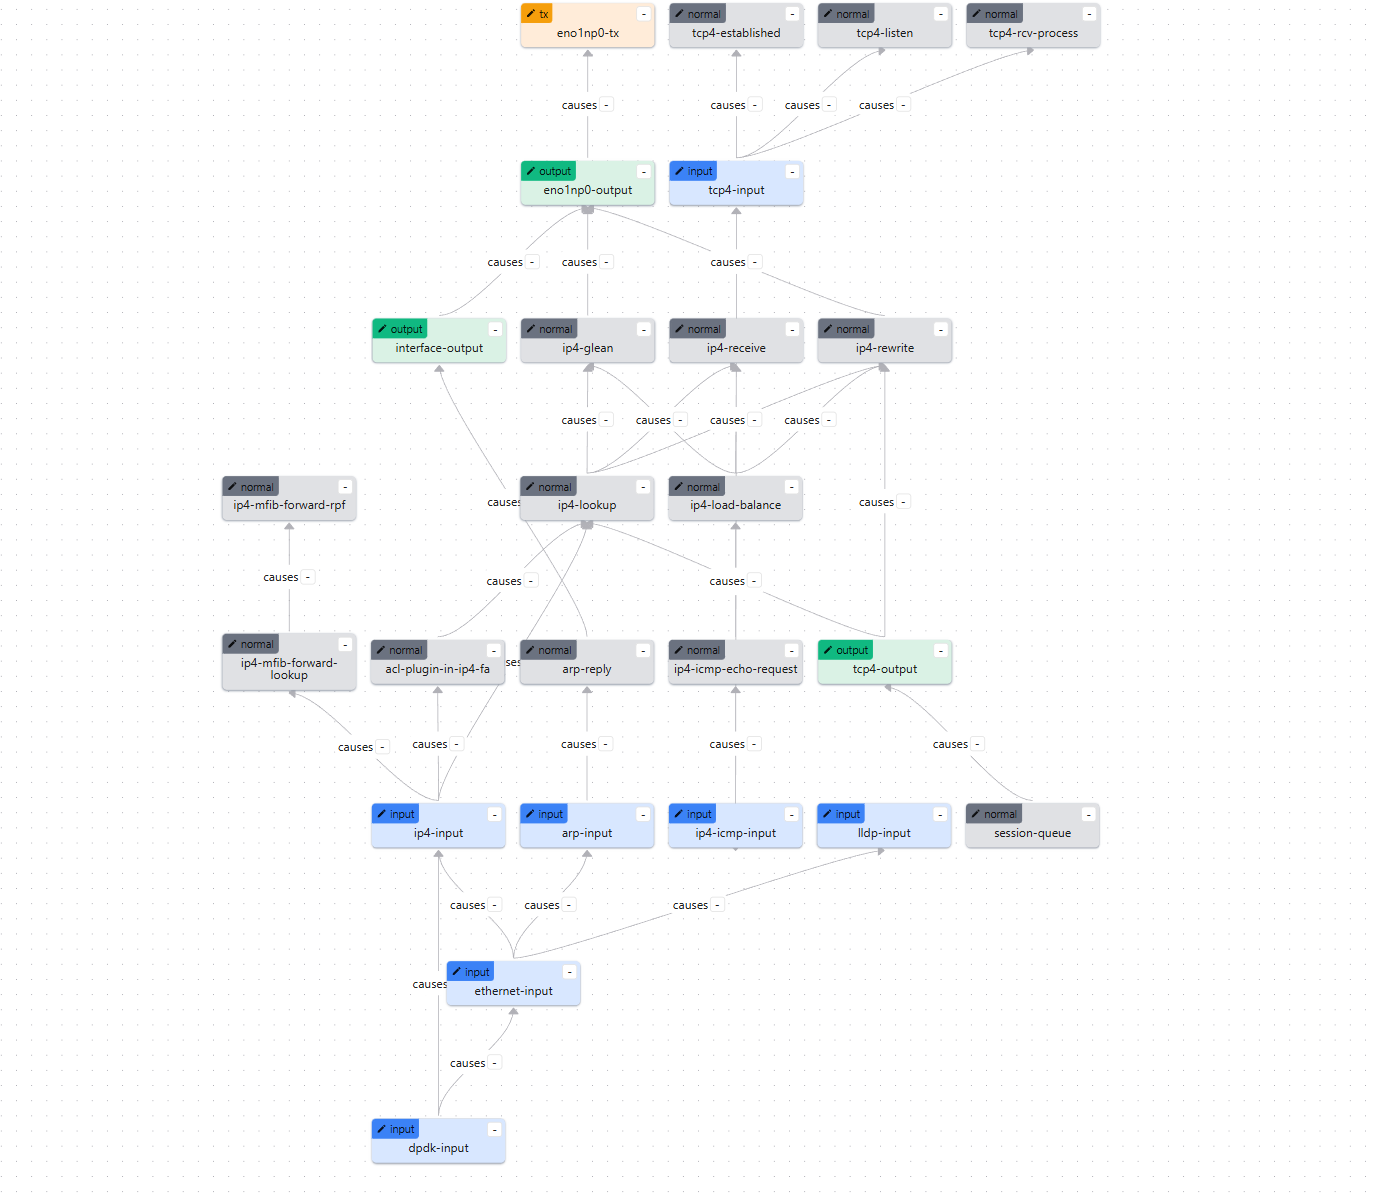
八、ACL规则验证和调试
8.1 查看ACL配置
bash
# 查看所有ACL规则
vppctl# show acl-plugin acl

# 查看接口的ACL绑定
vppctl# show acl-plugin interface

# 查看ACL统计信息
vppctl# show acl-plugin tables
8.2 查看ACL匹配统计
bash
# 查看ACL计数器(如果启用)
vppctl# show acl-plugin statistics
8.3 测试ACL规则
可以使用 ping 测试ICMP ACL规则:
bash
# 从Windows主机(10.0.0.1)ping eno1np0(应该失败)
ping 10.0.0.213

# 从Linux测试机器(10.0.0.100)ping eno1np0(应该成功)
ping 10.0.0.213注意:我们的ACL规则同时控制了TCP端口80和ICMP协议,实现了精细化的访问控制。
九、常见问题排查
9.1 问题1:无法连接到VPP API
症状:脚本报错 "Failed to connect to VPP"
解决方案:
bash
# 1. 检查VPP是否运行
ps aux | grep vpp

# 2. 检查API socket是否存在
ls -la /run/vpp/api.sock

# 3. 检查权限
sudo chmod 666 /run/vpp/api.sock  # 临时解决方案
# 或配置vpp组权限(推荐)
9.2 问题2:HTTP服务无法访问
症状:浏览器无法访问HTTP页面
解决方案:
bash
# 1. 检查HTTP服务是否启动
vppctl# show http static server

# 2. 检查接口状态
vppctl# show int

# 3. 检查IP地址配置
vppctl# show int addr

# 4. 检查ACL规则是否正确应用
vppctl# show acl-plugin interface
9.3 问题3:ACL规则不生效
症状:配置了ACL规则,但流量仍然可以通过
解决方案:
bash
# 1. 确认ACL已绑定到接口
vppctl# show acl-plugin interface

# 2. 检查ACL规则顺序(first-match原则)
vppctl# show acl-plugin acl

# 3. 确认规则方向(input/output)
vppctl# show acl-plugin interface detail
9.4 问题4:Windows主机无法访问
症状:Windows主机无法ping通虚拟机
解决方案:
bash
# 1. 检查Windows主机IP地址
ipconfig  # Windows命令行

# 2. 检查虚拟机网卡状态
vppctl# show int

# 3. 检查路由表
vppctl# show ip fib

# 4. 检查防火墙设置(Windows和Linux)
十、总结
10.1 实验成果
通过本次实验,我们成功实现了:
- ✅ 网卡配置:网卡采用桥接模式,与Windows主机互联
- ✅ ACL规则配置 :实现了基于源IP、协议和端口的精细化访问控制
- HTTP访问控制:10.0.0.1允许,其他地址拒绝
- ICMP访问控制:其他地址允许,10.0.0.1拒绝
- ✅ HTTP服务部署:在网卡上部署了HTTP静态页面服务
- ✅ 访问控制验证:验证了ACL规则的正确性和有效性
10.2 关键知识点
-
ACL规则匹配:
- 使用first-match原则
- 规则顺序非常重要
- 可以基于源IP、目标IP、协议、端口等字段匹配
-
ACL动作:
- PERMIT(1):允许数据包通过
- DENY(0):拒绝数据包,直接丢弃
-
接口绑定:
- ACL可以绑定到接口的输入方向(ingress)
- ACL可以绑定到接口的输出方向(egress)
- 可以同时绑定多个ACL规则
-
HTTP静态服务器:
- VPP提供了内置的HTTP静态服务器
- 可以绑定到特定IP地址和端口
- 支持静态HTML文件服务
10.3 扩展实验
可以尝试以下扩展实验:
-
添加更多ACL规则:
- 允许特定IP范围访问
- 允许特定端口范围
- 添加UDP规则
- 添加更多ICMP类型和代码的规则
-
测试不同协议:
- UDP服务
- HTTPS服务(需要TLS配置)
-
性能测试:
- 测试ACL对性能的影响
- 测试大量规则时的性能
-
有状态ACL:
- 使用PERMIT_REFLECT实现有状态ACL
- 自动创建反向会话
附录
A. 配置文件位置
- VPP配置文件:
vpp1.conf - ACL规则文件:
learning/acl_rules/acl_rules.json - 接口配置文件:
learning/acl_rules/interfaces.json - ACL绑定文件:
learning/acl_rules/acl_bindings.json - 配置脚本:
learning/acl_rules/vpp_acl_setup.py - HTML页面:
learning/acl_rules/www/
注意:所有路径使用ASCII字符,避免使用中文路径。
B. 参考命令速查
bash
# VPP CLI命令
vppctl# show int                    # 显示接口
vppctl# show int addr               # 显示接口IP地址
vppctl# show acl-plugin acl         # 显示ACL规则
vppctl# show acl-plugin interface   # 显示ACL接口绑定
vppctl# show http static server    # 显示HTTP服务器状态

# Linux命令
sudo ip link set eno1np0 down      # 关闭网卡
sudo modprobe vfio-pci             # 加载VFIO模块
sudo vpp -c vpp1.conf              # 启动VPP

# Python脚本
sudo python3 vpp_acl_setup.py      # 运行配置脚本
C. 相关文档
- VPP ACL配置说明:
VPP_ACL配置说明.md - VPP NAT44-EI实战指南:
VPP_NAT44-EI实战配置指南.md - VPP官方文档:https://fd.io/vpp/
实验完成! 🎉
通过本次实验,您应该已经掌握了VPP ACL的基本配置和使用方法。如有问题,请参考常见问题排查部分或查阅相关文档。