一、适用场景
适用场景:小车差速/定位、微型机械臂关节、门栓/阀门微调、以步进精度做角度控制的低速场合、嵌入式 PWM/GPIO/驱动练习与教学。
二、器材清单
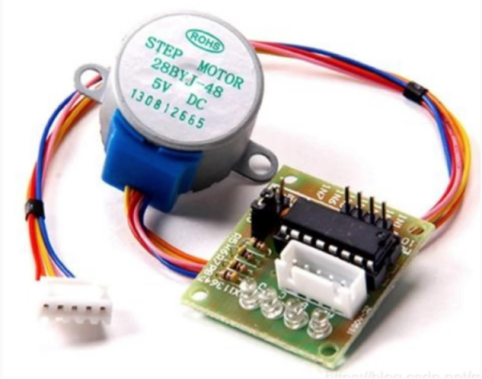
28BYJ-48 步进电机(常见 5V 带减速箱)×1
ULN2003 驱动板(或等效达林顿阵列驱动)×1
stm32f103(或其它 STM32)开发板 ×1
稳定 5V 电源(电机供电)×1
若干杜邦线
三、工作原理(要点)
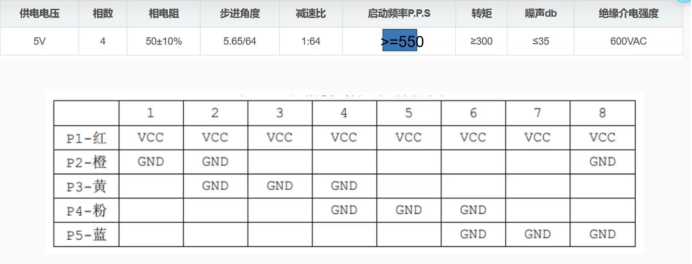
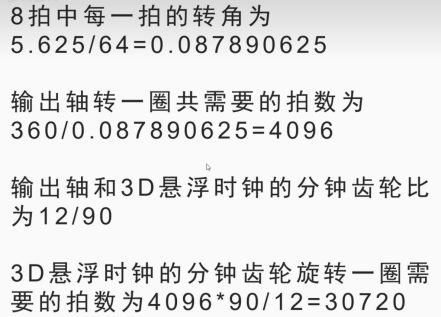
电机与减速比:28BYJ-48 通常为单极四相步进电机,电机本体步距角常为 5.625°,电机轴每转需 360 / 5.625 = 64 步;电机带一级减速箱(典型标称 64:1),因此输出轴每转步数约 64 × 64 = 4096 步(不同厂家有细微差异,实际以传动箱标注/测量为准)。
推导(数位检算):360 / 5.625 = 64;64 × 64 = 4096;输出角度 = 360 / 4096 ≈ 0.087890625°/步。
驱动方式:ULN2003 板是 NPN 达林顿阵列,按输入 IN1..IN4 对应线圈缠绕的通电次序做开闭即可驱动。ULN2003 为下拉(SINK)驱动:板子将线圈另一端接到电源正极,IN 引脚接高时导通到地流过线圈。板上通常带有反向二极管/保护。
常用驱动序列:常见有三种序列------单相激励(wave drive,4 步)、双相激励(full step,4 步但两相同时通电)、半步(half-step,8 步,兼顾扭矩和平滑)。半步常用于平衡分辨率与扭矩。
步进控制思想:通过改变步序索引(加/减)并在步与步之间等待适当延时来产生转速;在启动/停止时做加减速(ramp)可避免漏步。
四、接线示意
VCC → +5V
GND → GND
标准库
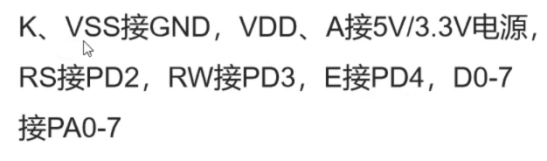
HAL库
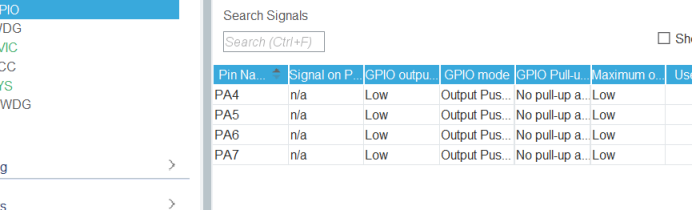
IN1-4--PA4-7
五、示例代码
标准库
cpp
#include "stm32f10x.h"
#include "oled.h"
#include "bsp_SysTick.h"


void emGPIO_Init(void);
unsigned int z_step[8]={0x0070,0x0030,0x0050,0x0090,0x00d0,0x00c0,0x00e0,0x0060};
unsigned int f_step[8]={0x0060,0x00e0,0x00c0,0x00d0,0x0090,0x0050,0x0030,0x0070};
int main()
{
	int step=0;
	SysTick_Init();
	emGPIO_Init();
	while(1)
	{
		if(step>=8)
			step=0;
		GPIO_Write(GPIOD,z_step[step]);
		Delay_us(1850);
		step++;
	}

//	return 0;
}

void emGPIO_Init(void)
{
 	GPIO_InitTypeDef  PD;

	RCC_APB2PeriphClockCmd(RCC_APB2Periph_GPIOD, ENABLE);
	PD.GPIO_Pin = GPIO_Pin_4|GPIO_Pin_5|GPIO_Pin_6|GPIO_Pin_7;
 	PD.GPIO_Mode = GPIO_Mode_Out_PP;
	PD.GPIO_Speed = GPIO_Speed_50MHz;
 	GPIO_Init(GPIOD, &PD);
}
HAL库
cpp
/* USER CODE BEGIN Header */
/**
  ******************************************************************************
  * @file           : main.c
  * @brief          : Main program body
  ******************************************************************************
  * @attention
  *
  * Copyright (c) 2025 STMicroelectronics.
  * All rights reserved.
  *
  * This software is licensed under terms that can be found in the LICENSE file
  * in the root directory of this software component.
  * If no LICENSE file comes with this software, it is provided AS-IS.
  *
  ******************************************************************************
  */
/* USER CODE END Header */
/* Includes ------------------------------------------------------------------*/
#include "main.h"

/* Private includes ----------------------------------------------------------*/
/* USER CODE BEGIN Includes */

/* USER CODE END Includes */

/* Private typedef -----------------------------------------------------------*/
/* USER CODE BEGIN PTD */

/* USER CODE END PTD */

/* Private define ------------------------------------------------------------*/
/* USER CODE BEGIN PD */

/* USER CODE END PD */

/* Private macro -------------------------------------------------------------*/
/* USER CODE BEGIN PM */

/* USER CODE END PM */

/* Private variables ---------------------------------------------------------*/

/* USER CODE BEGIN PV */

/* USER CODE END PV */

/* Private function prototypes -----------------------------------------------*/
void SystemClock_Config(void);
static void MX_GPIO_Init(void);
/* USER CODE BEGIN PFP */

/* USER CODE END PFP */

/* Private user code ---------------------------------------------------------*/
/* USER CODE BEGIN 0 */
unsigned int z_step[8]={0x0070,0x0030,0x0050,0x0090,0x00d0,0x00c0,0x00e0,0x0060};
unsigned int f_step[8]={0x0060,0x00e0,0x00c0,0x00d0,0x0090,0x0050,0x0030,0x0070};
int step=0;
/* USER CODE END 0 */

/**
  * @brief  The application entry point.
  * @retval int
  */
int main(void)
{

  /* USER CODE BEGIN 1 */

  /* USER CODE END 1 */

  /* MCU Configuration--------------------------------------------------------*/

  /* Reset of all peripherals, Initializes the Flash interface and the Systick. */
  HAL_Init();

  /* USER CODE BEGIN Init */

  /* USER CODE END Init */

  /* Configure the system clock */
  SystemClock_Config();

  /* USER CODE BEGIN SysInit */

  /* USER CODE END SysInit */

  /* Initialize all configured peripherals */
  MX_GPIO_Init();
  /* USER CODE BEGIN 2 */

  /* USER CODE END 2 */

  /* Infinite loop */
  /* USER CODE BEGIN WHILE */
  while (1)
  {
		if(step>=8)
			step=0;
		GPIOA->ODR = z_step[step];
		HAL_Delay(2);
		step++;
    /* USER CODE END WHILE */

    /* USER CODE BEGIN 3 */
  }
  /* USER CODE END 3 */
}
六、讲解视频