文章目录
-
- 理解"一切皆文件"与缓冲区机制:Linux文件系统的设计哲学
- 一、深入理解"一切皆文件"
-
- [1.1 为什么需要统一抽象](#1.1 为什么需要统一抽象)
- [1.2 file结构体剖析](#1.2 file结构体剖析)
-
- [1.2.1 file结构体源码](#1.2.1 file结构体源码)
- [1.3 file_operations结构体](#1.3 file_operations结构体)
-
- [1.3.1 file_operations源码](#1.3.1 file_operations源码)
- [1.3.2 不同设备的file_operations](#1.3.2 不同设备的file_operations)
- [1.4 抽象的威力](#1.4 抽象的威力)
- [1.5 完整的数据流图](#1.5 完整的数据流图)
- 二、缓冲区机制
-
- [2.1 什么是缓冲区](#2.1 什么是缓冲区)
- [2.2 为什么需要缓冲区](#2.2 为什么需要缓冲区)
-
- [2.2.1 减少系统调用次数](#2.2.1 减少系统调用次数)
- [2.2.2 协调CPU与外设的速度差异](#2.2.2 协调CPU与外设的速度差异)
- [2.3 缓冲区的三种类型](#2.3 缓冲区的三种类型)
-
- [2.3.1 全缓冲(Full Buffering)](#2.3.1 全缓冲(Full Buffering))
- [2.3.2 行缓冲(Line Buffering)](#2.3.2 行缓冲(Line Buffering))
- [2.3.3 无缓冲(No Buffering)](#2.3.3 无缓冲(No Buffering))
- [2.4 缓冲区刷新时机](#2.4 缓冲区刷新时机)
- 三、fork与缓冲区的陷阱
-
- [3.1 经典问题重现](#3.1 经典问题重现)
- [3.2 原因分析](#3.2 原因分析)
-
- [3.2.1 输出到屏幕时](#3.2.1 输出到屏幕时)
- [3.2.2 重定向到文件时](#3.2.2 重定向到文件时)
- [3.2.3 图解](#3.2.3 图解)
- [3.3 用户级缓冲区 vs 内核级缓冲区](#3.3 用户级缓冲区 vs 内核级缓冲区)
- 四、FILE结构体揭秘
-
- [4.1 FILE与fd的关系](#4.1 FILE与fd的关系)
- [4.2 FILE结构体源码分析](#4.2 FILE结构体源码分析)
- [4.3 库函数封装系统调用](#4.3 库函数封装系统调用)
- 五、自己实现简易IO库
-
- [5.1 设计思路](#5.1 设计思路)
- [5.2 头文件:my_stdio.h](#5.2 头文件:my_stdio.h)
- [5.3 实现:my_stdio.c](#5.3 实现:my_stdio.c)
-
- [5.3.1 mfopen实现](#5.3.1 mfopen实现)
- [5.3.2 mfflush实现](#5.3.2 mfflush实现)
- [5.3.3 mfwrite实现](#5.3.3 mfwrite实现)
- [5.3.4 mfclose实现](#5.3.4 mfclose实现)
- [5.4 测试程序:main.c](#5.4 测试程序:main.c)
- [5.5 编译和运行](#5.5 编译和运行)
- [5.6 验证缓冲区效果](#5.6 验证缓冲区效果)
- 六、总结与展望
理解"一切皆文件"与缓冲区机制:Linux文件系统的设计哲学
💬 欢迎讨论:这是Linux系统编程系列的第八篇文章。在上一篇中,我们理解了文件描述符的本质,并实现了shell的重定向功能。但为什么Linux说"一切皆文件"?为什么printf有缓冲区而write没有?FILE结构体和fd是什么关系?本篇将深入理解Linux的文件抽象哲学和缓冲区机制,并自己动手实现一个简易的IO库。
👍 点赞、收藏与分享:这篇文章包含了操作系统设计哲学、内核数据结构剖析和完整的IO库实现,如果对你有帮助,请点赞、收藏并分享!
🚀 循序渐进:建议先学习前七篇文章,特别是第七篇的文件描述符原理,这样理解本篇会更轻松。
一、深入理解"一切皆文件"
1.1 为什么需要统一抽象
在上一篇文章中,我们提到Linux的设计哲学:"一切皆文件"。但为什么要这样设计呢?
让我们先看看没有统一抽象的世界是什么样的:
Windows早期的做法:
c
// 操作磁盘文件
HANDLE hFile = CreateFile(...);
ReadFile(hFile, buffer, size, ...);
WriteFile(hFile, buffer, size, ...);
CloseHandle(hFile);

// 操作串口
HANDLE hSerial = CreateFile("\\\\.\\COM1", ...);
// 使用特殊的API
SetupComm(hSerial, ...);
SetCommState(hSerial, ...);

// 操作网络
SOCKET sock = socket(...);
// 又是不同的API
recv(sock, buffer, size, ...);
send(sock, buffer, size, ...);
closesocket(sock);

// 操作管道
HANDLE hPipe = CreateNamedPipe(...);
// 还是不同的API...
问题显而易见:
- 每种设备都有专门的API
- 开发者需要学习多套接口
- 代码难以复用
- 系统复杂度高
Linux的做法:
c
// 操作磁盘文件
int fd = open("file.txt", O_RDONLY);
read(fd, buffer, size);
write(fd, buffer, size);
close(fd);

// 操作串口
int fd = open("/dev/ttyS0", O_RDWR);
read(fd, buffer, size);  // 同样的API!
write(fd, buffer, size);
close(fd);

// 操作网络
int sockfd = socket(...);
read(sockfd, buffer, size);  // 还是同样的API!
write(sockfd, buffer, size);
close(sockfd);

// 操作管道
int pipefd[2];
pipe(pipefd);
read(pipefd[0], buffer, size);  // 依然是同样的API!
write(pipefd[1], buffer, size);
close(pipefd[0]);
close(pipefd[1]);
优势:
- ✅ 统一的接口:read、write、close
- ✅ 易于学习和使用
- ✅ 代码高度复用
- ✅ 系统设计优雅
这就是"一切皆文件"的威力!
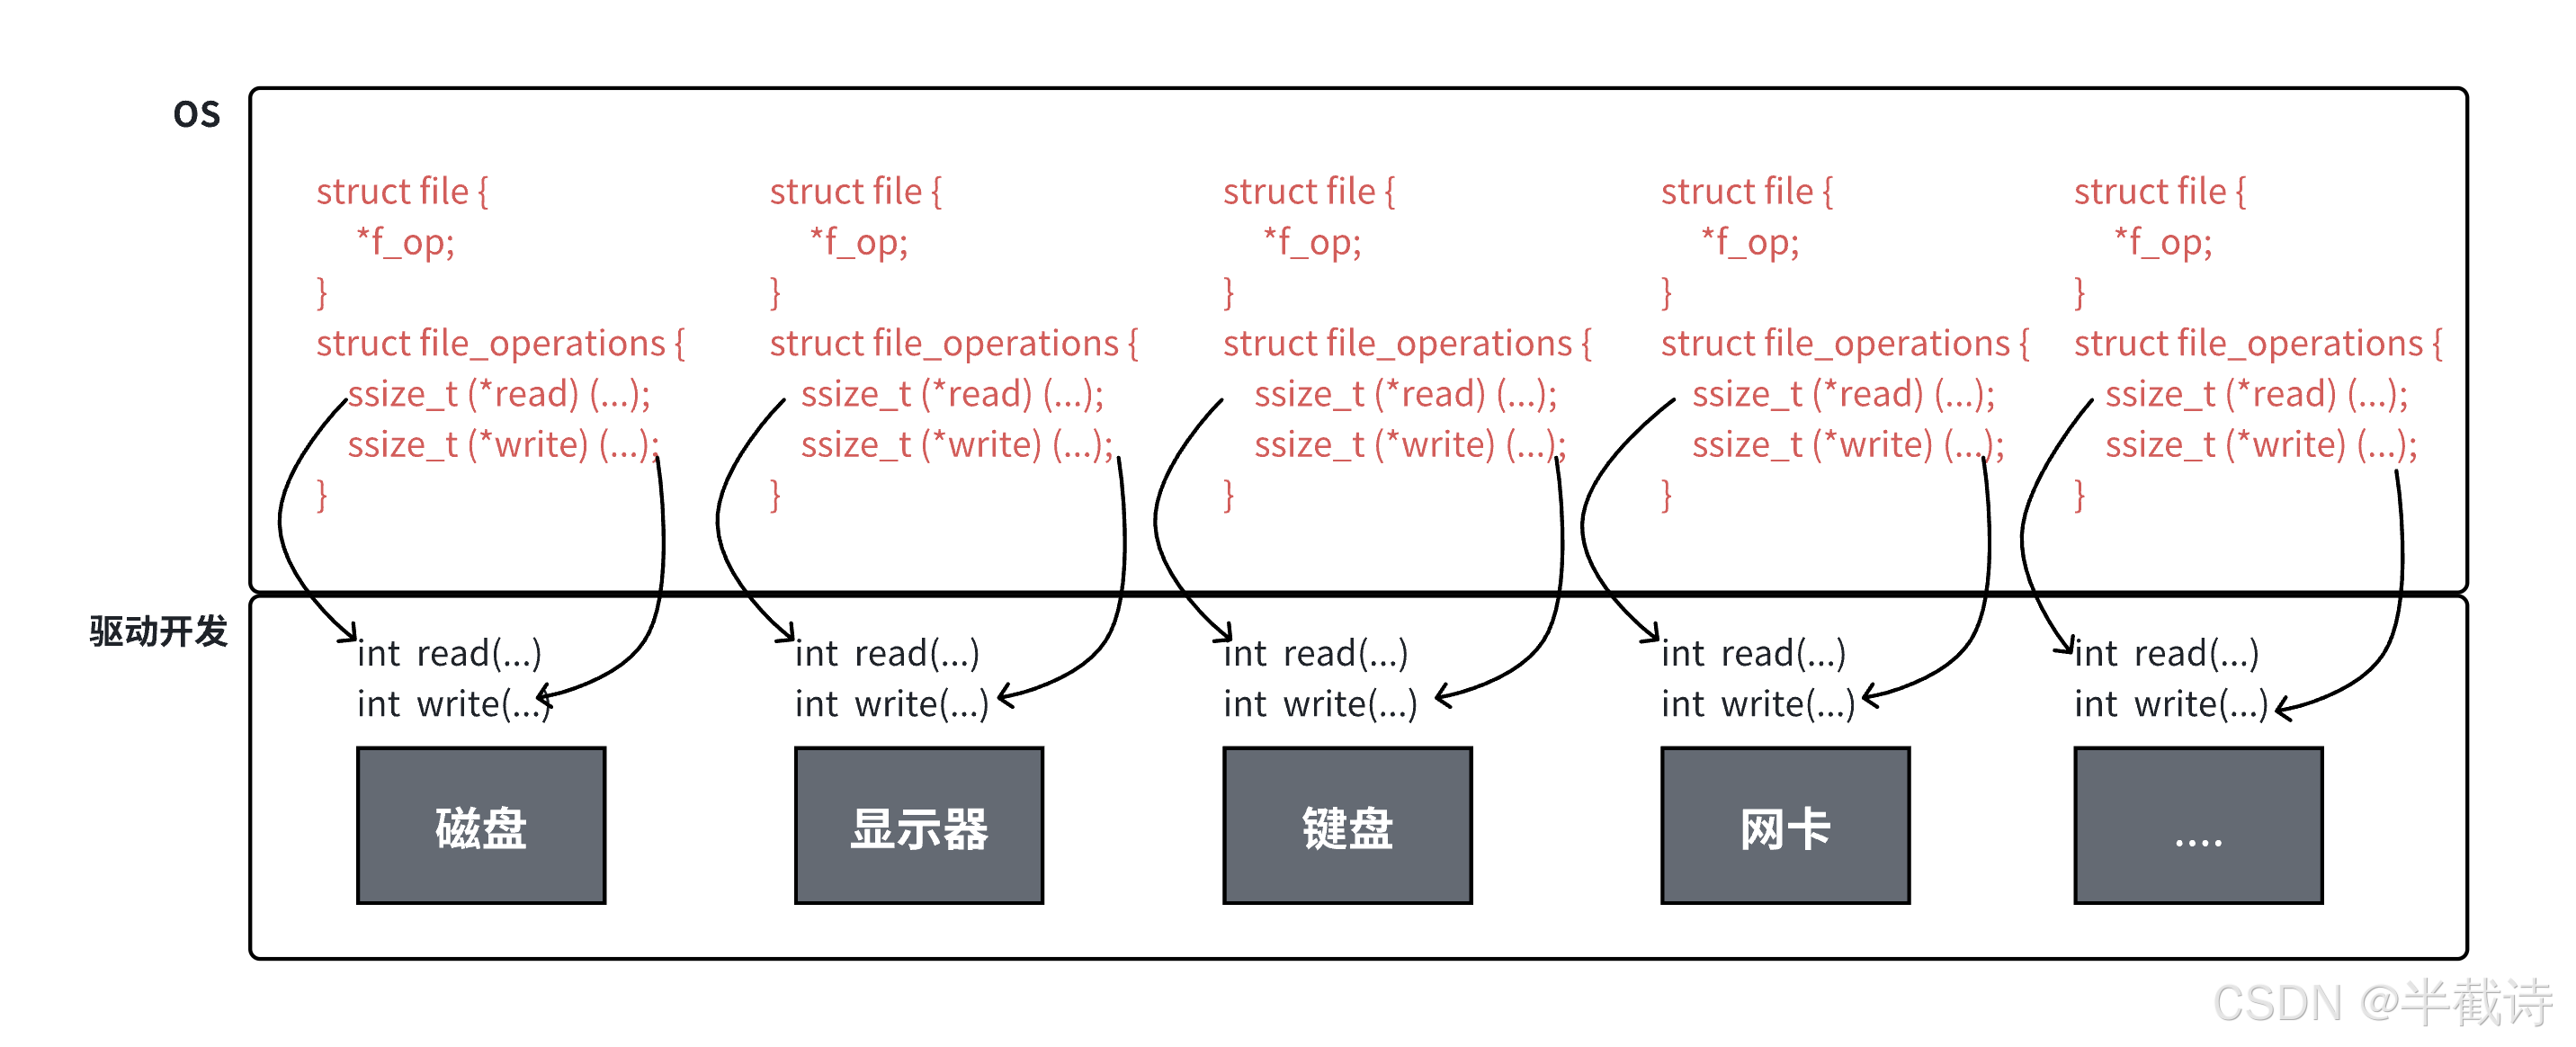
1.2 file结构体剖析
那么,Linux是如何实现这种统一抽象的呢?核心在于struct file结构体。
在上一篇文章中,我们知道:
bash
进程PCB → files_struct → fd_array[] → struct file → 设备现在让我们更加深入研究struct file的内部结构。
1.2.1 file结构体源码
c
// 位置:/usr/src/kernels/.../include/linux/fs.h
struct file {
    union {
        struct llist_node   fu_llist;
        struct rcu_head     fu_rcuhead;
    } f_u;

    struct path             f_path;        // 文件路径
    struct inode            *f_inode;      // 指向inode
    const struct file_operations *f_op;    // 文件操作函数指针表(核心!)

    spinlock_t              f_lock;
    atomic_long_t           f_count;       // 引用计数
    unsigned int            f_flags;       // 打开标志(O_RDONLY等)
    fmode_t                 f_mode;        // 访问模式
    struct mutex            f_pos_lock;
    loff_t                  f_pos;         // 当前读写位置
    struct fown_struct      f_owner;
    const struct cred       *f_cred;
    struct file_ra_state    f_ra;

    u64                     f_version;

    // ... 其他字段
} __attribute__((aligned(4)));
关键字段解释:
| 字段 | 说明 |
|---|---|
| f_inode | 指向磁盘上文件的inode,包含文件元数据 |
| f_op | 指向file_operations结构体,包含设备驱动函数 |
| f_flags | 文件打开标志:O_RDONLY、O_WRONLY、O_RDWR、O_APPEND等 |
| f_mode | 文件访问模式:FMODE_READ、FMODE_WRITE等 |
| f_pos | 当前读写位置(偏移量) |
| f_count | 引用计数,表示有多少个文件描述符指向这个file对象 |
其中,f_op指针是"一切皆文件"的核心!
1.3 file_operations结构体
file_operations是一个巨大的函数指针表,定义了对文件的所有操作方法。
1.3.1 file_operations源码
c
// 位置:/usr/src/kernels/.../include/linux/fs.h
struct file_operations {
    struct module *owner;

    loff_t (*llseek) (struct file *, loff_t, int);
    // 改变文件读写位置

    ssize_t (*read) (struct file *, char __user *, size_t, loff_t *);
    // 读取数据

    ssize_t (*write) (struct file *, const char __user *, size_t, loff_t *);
    // 写入数据

    ssize_t (*aio_read) (struct kiocb *, const struct iovec *, unsigned long, loff_t);
    // 异步读取

    ssize_t (*aio_write) (struct kiocb *, const struct iovec *, unsigned long, loff_t);
    // 异步写入

    int (*readdir) (struct file *, void *, filldir_t);
    // 读取目录(仅用于目录文件)

    unsigned int (*poll) (struct file *, struct poll_table_struct *);
    // I/O多路复用

    long (*unlocked_ioctl) (struct file *, unsigned int, unsigned long);
    // 设备控制

    long (*compat_ioctl) (struct file *, unsigned int, unsigned long);
    // 兼容的设备控制

    int (*mmap) (struct file *, struct vm_area_struct *);
    // 内存映射

    int (*open) (struct inode *, struct file *);
    // 打开文件

    int (*flush) (struct file *, fl_owner_t id);
    // 刷新缓冲区

    int (*release) (struct inode *, struct file *);
    // 关闭文件

    int (*fsync) (struct file *, loff_t, loff_t, int datasync);
    // 同步文件数据到磁盘

    int (*aio_fsync) (struct kiocb *, int datasync);
    // 异步同步

    int (*fasync) (int, struct file *, int);
    // 异步通知

    int (*lock) (struct file *, int, struct file_lock *);
    // 文件加锁

    ssize_t (*sendpage) (struct file *, struct page *, int, size_t, loff_t *, int);
    // 发送页面

    unsigned long (*get_unmapped_area)(struct file *, unsigned long, unsigned long, unsigned long, unsigned long);
    // 获取未映射区域

    int (*check_flags)(int);
    // 检查标志

    int (*flock) (struct file *, int, struct file_lock *);
    // 文件锁

    ssize_t (*splice_write)(struct pipe_inode_info *, struct file *, loff_t *, size_t, unsigned int);
    // 管道写入

    ssize_t (*splice_read)(struct file *, loff_t *, struct pipe_inode_info *, size_t, unsigned int);
    // 管道读取

    int (*setlease)(struct file *, long, struct file_lock **);
    // 设置租约

    long (*fallocate)(struct file *file, int mode, loff_t offset, loff_t len);
    // 预分配空间

    // ... 还有其他函数指针
};
核心思想:每种设备都实现自己的file_operations!
1.3.2 不同设备的file_operations
让我们看几个例子:
1. 普通文件(ext4文件系统):
c
// 简化版本
const struct file_operations ext4_file_operations = {
    .llseek     = ext4_llseek,
    .read       = do_sync_read,
    .write      = do_sync_write,
    .aio_read   = generic_file_aio_read,
    .aio_write  = ext4_file_write,
    .mmap       = ext4_file_mmap,
    .open       = ext4_file_open,
    .release    = ext4_release_file,
    .fsync      = ext4_sync_file,
    // ...
};
2. 终端设备(tty):
c
const struct file_operations tty_fops = {
    .llseek     = no_llseek,
    .read       = tty_read,        // 终端的读取方法
    .write      = tty_write,       // 终端的写入方法
    .poll       = tty_poll,
    .unlocked_ioctl = tty_ioctl,
    .open       = tty_open,
    .release    = tty_release,
    .fasync     = tty_fasync,
    // ...
};
3. 管道(pipe):
c
const struct file_operations pipefifo_fops = {
    .open       = fifo_open,
    .llseek     = no_llseek,
    .read       = do_sync_read,
    .aio_read   = pipe_read,      // 管道的读取方法
    .write      = do_sync_write,
    .aio_write  = pipe_write,     // 管道的写入方法
    .poll       = pipe_poll,
    .unlocked_ioctl = pipe_ioctl,
    .release    = pipe_release,
    // ...
};
1.4 抽象的威力
现在我们可以理解"一切皆文件"的实现原理了!
当用户调用read(fd, buf, size)时,内核的工作流程:
bash
1. 根据fd从进程的fd_array中找到对应的struct file
   file = current->files->fd_array[fd]

2. 从file中取出f_op指针
   ops = file->f_op

3. 调用f_op中的read函数指针
   result = ops->read(file, buf, size, &file->f_pos)

4. read函数指针指向设备驱动的实现
   - 如果是磁盘文件:调用ext4_read
   - 如果是终端:调用tty_read
   - 如果是管道:调用pipe_read
   - 如果是网络:调用sock_read
用伪代码表示:
c
// 系统调用read的实现
ssize_t sys_read(int fd, char *buf, size_t count) {
    // 1. 检查fd合法性
    if (fd < 0 || fd >= NR_OPEN) return -EBADF;

    // 2. 获取file对象
    struct file *file = current->files->fd_array[fd];
    if (!file) return -EBADF;

    // 3. 获取file_operations
    const struct file_operations *fops = file->f_op;
    if (!fops || !fops->read) return -EINVAL;

    // 4. 调用设备驱动的read方法
    return fops->read(file, buf, count, &file->f_pos);
}
这就是面向对象的思想在C语言中的应用!
struct file相当于基类file_operations相当于虚函数表- 不同设备实现自己的"虚函数"
1.5 完整的数据流图
让我们用一张完整的图来总结:
bash
用户空间
┌──────────────────────────────────────────────────┐
│  应用程序                                          │
│  read(fd, buf, size)                              │
└────────────────────┬─────────────────────────────┘
                     ↓ 系统调用
═══════════════════════════════════════════════════
内核空间
┌────────────────────┴─────────────────────────────┐
│  系统调用层                                        │
│  sys_read(fd, buf, size)                          │
└────────────────────┬─────────────────────────────┘
                     ↓
┌────────────────────┴─────────────────────────────┐
│  VFS (Virtual File System) 虚拟文件系统            │
│                                                   │
│  1. 根据fd找到file对象                            │
│     file = current->files->fd_array[fd]          │
│                                                   │
│  2. 调用file的操作方法                            │
│     file->f_op->read(...)                        │
└────────────────────┬─────────────────────────────┘
                     ↓
        ┌────────────┴──────────────┐
        │  file->f_op指向哪里?      │
        └────────────┬──────────────┘
                     ↓
     ┌───────────────┼───────────────┐
     │               │               │
     ↓               ↓               ↓
┌─────────┐   ┌──────────┐   ┌──────────┐
│ext4_fops│   │ tty_fops │   │pipe_fops │
│         │   │          │   │          │
│ .read   │   │  .read   │   │  .read   │
│ .write  │   │  .write  │   │  .write  │
│ .open   │   │  .open   │   │  .open   │
└────┬────┘   └─────┬────┘   └─────┬────┘
     │              │              │
     ↓              ↓              ↓
┌─────────┐   ┌──────────┐   ┌──────────┐
│ 磁盘    │   │  终端    │   │  管道    │
│ 文件    │   │  设备    │   │  缓冲区  │
└─────────┘   └──────────┘   └──────────┘
这就是"一切皆文件"的完整实现机制!
二、缓冲区机制
2.1 什么是缓冲区
缓冲区(Buffer)是内存空间的一部分,用于临时存储输入或输出的数据。
bash
没有缓冲区:
┌────────┐                    ┌────────┐
│        │  每次写1字节        │        │
│ 进程   ├───────────────────→│  磁盘  │
│        │  需要1次系统调用     │        │
└────────┘                    └────────┘
           写100字节需要100次系统调用!

有缓冲区:
┌────────┐     ┌──────────┐     ┌────────┐
│        │     │          │     │        │
│ 进程   ├────→│ 缓冲区   ├────→│  磁盘  │
│        │     │  4KB     │     │        │
└────────┘     └──────────┘     └────────┘
   多次写入      积累到一定       一次性
   到缓冲区      大小后刷新       写入磁盘
                 只需1次系统调用!
2.2 为什么需要缓冲区
2.2.1 减少系统调用次数
系统调用的开销很大:
- 需要从用户态切换到内核态
- 需要保存和恢复进程上下文
- 涉及到权限检查、参数验证等
2.2.2 协调CPU与外设的速度差异
bash
CPU速度:   几GHz,每秒数十亿次操作
内存速度:  几十纳秒访问延迟
磁盘速度:  几毫秒访问延迟(慢1000000倍!)

如果CPU每次都等待磁盘:
┌────┐       ┌──────┐
│CPU │───────│ 磁盘 │
└────┘  等待  └──────┘
  ↓
 等待磁盘完成(浪费CPU时间)

使用缓冲区:
┌────┐  快速写入  ┌────────┐
│CPU │─────────→ │ 缓冲区 │
└────┘           └────┬───┘
  ↓                   │
继续执行其他任务       │ 后台慢慢刷新
                      ↓
                  ┌──────┐
                  │ 磁盘 │
                  └──────┘
2.3 缓冲区的三种类型
标准I/O库提供了三种缓冲策略:
2.3.1 全缓冲(Full Buffering)
特点:
- 当缓冲区填满时才进行I/O操作
- 适用于磁盘文件
- 默认缓冲区大小通常为4KB或8KB
示例:
c
FILE *fp = fopen("file.txt", "w");

// 以下写入都在缓冲区中,不会立即写入磁盘
for(int i = 0; i < 100; i++) {
    fprintf(fp, "Line %d\n", i);
}

// 只有当:
// 1. 缓冲区满了
// 2. 调用fflush(fp)
// 3. 调用fclose(fp)
// 才会真正写入磁盘

fclose(fp);  // 此时才写入磁盘
2.3.2 行缓冲(Line Buffering)
特点:
- 遇到换行符
\n时才进行I/O操作 - 适用于终端设备(stdin、stdout)
- 或者缓冲区满了也会刷新
示例:
c
// stdout默认是行缓冲
printf("Hello");      // 没有\n,停在缓冲区
printf(" World");     // 没有\n,停在缓冲区
printf("!\n");        // 遇到\n,刷新缓冲区,输出"Hello World!\n"

// 特殊情况
printf("Very long line without newline...");  // 如果超过缓冲区大小,也会刷新
2.3.3 无缓冲(No Buffering)
特点:
- 不使用缓冲区,立即进行I/O操作
- 适用于标准错误(stderr)
- 确保错误信息能立即显示
示例:
c
// stderr是无缓冲的
fprintf(stderr, "Error!");  // 立即输出,不等待\n
2.4 缓冲区刷新时机
缓冲区的数据什么时候会被刷新到设备?
1. 缓冲区满了
c
FILE *fp = fopen("file.txt", "w");
// 假设缓冲区大小为4096字节
for(int i = 0; i < 1000; i++) {
    fprintf(fp, "This is line %d\n", i);  // 当写入超过4096字节时自动刷新
}
fclose(fp);
2. 遇到换行符(行缓冲)
c
printf("Hello\n"); // 遇到\n,立即刷新3. 手动调用fflush
c
printf("Progress: %d%%", 50);
fflush(stdout);  // 手动刷新,立即显示
4. 关闭文件
c
FILE *fp = fopen("file.txt", "w");
fprintf(fp, "Hello");  // 在缓冲区中
fclose(fp);            // 关闭时自动刷新
5. 程序正常退出
c
int main() {
    printf("Hello");  // 在缓冲区中
    return 0;         // 程序退出时自动刷新所有缓冲区
}
6. 缓冲区类型改变
c
FILE *fp = fopen("file.txt", "w");
fprintf(fp, "Hello");

// 重定向后,缓冲策略可能改变,触发刷新
freopen("file2.txt", "w", fp);
三、fork与缓冲区的陷阱
现在我们来看一个经典的问题,它能帮助我们深入理解缓冲区。
3.1 经典问题重现
c
#include <stdio.h>
#include <string.h>
#include <unistd.h>

int main() {
    const char *msg0 = "hello printf\n";
    const char *msg1 = "hello fwrite\n";
    const char *msg2 = "hello write\n";

    printf("%s", msg0);
    fwrite(msg1, strlen(msg1), 1, stdout);
    write(1, msg2, strlen(msg2));

    fork();

    return 0;
}
输出到屏幕:
bash
./test
hello printf
hello fwrite
hello write
一切正常,每条消息输出一次。
输出重定向到文件:
bash
./test > file.txt
cat file.txt
hello write
hello printf
hello fwrite
hello printf
hello fwrite
惊讶吗? printf和fwrite的输出出现了两次,而write只出现一次!
3.2 原因分析
让我们一步步分析:
3.2.1 输出到屏幕时
bash
1. printf("hello printf\n")
   → 写入stdout的缓冲区
   → stdout是行缓冲
   → 遇到\n,立即刷新
   → 数据写入屏幕
   → 缓冲区清空

2. fwrite("hello fwrite\n", ...)
   → 写入stdout的缓冲区
   → 遇到\n,立即刷新
   → 数据写入屏幕
   → 缓冲区清空

3. write(1, "hello write\n", ...)
   → 没有缓冲区,直接系统调用
   → 数据写入屏幕

4. fork()
   → 此时缓冲区是空的
   → 子进程继承了空缓冲区

5. return 0
   → 父子进程各自退出
   → 因为缓冲区是空的,没有数据需要刷新
结果:每条消息输出一次。
3.2.2 重定向到文件时
baash测
1. printf("hello printf\n")
   → 写入stdout的缓冲区
   → stdout变成全缓冲(因为重定向到文件)
   → 不会立即刷新(即使有\n)
   → 数据停留在缓冲区!

2. fwrite("hello fwrite\n", ...)
   → 写入stdout的缓冲区
   → 数据停留在缓冲区!

3. write(1, "hello write\n", ...)
   → 没有缓冲区,直接系统调用
   → 数据立即写入file.txt

4. fork()
   → 父进程的缓冲区中有:
     "hello printf\nhello fwrite\n"
   → 子进程通过写时拷贝获得缓冲区的副本:
     "hello printf\nhello fwrite\n"

5. return 0
   → 父进程退出,刷新缓冲区
     → 写入"hello printf\nhello fwrite\n"
   → 子进程退出,刷新缓冲区
     → 写入"hello printf\nhello fwrite\n"
结果:printf和fwrite的输出出现两次!
3.2.3 图解
bash
重定向到文件时的时间线:

时刻1:执行printf
┌─────────────────┐
│ 父进程缓冲区     │
│ "hello printf\n"│
└─────────────────┘

时刻2:执行fwrite
┌──────────────────────────┐
│ 父进程缓冲区              │
│ "hello printf\n"         │
│ "hello fwrite\n"         │
└──────────────────────────┘

时刻3:执行write
┌──────────────────────────┐
│ 父进程缓冲区              │
│ "hello printf\n"         │
│ "hello fwrite\n"         │
└──────────────────────────┘
              ↓
    直接写入file.txt
    "hello write\n"

时刻4:fork
┌──────────────────────────┐     ┌──────────────────────────┐
│ 父进程缓冲区              │     │ 子进程缓冲区(拷贝)      │
│ "hello printf\n"         │     │ "hello printf\n"         │
│ "hello fwrite\n"         │     │ "hello fwrite\n"         │
└──────────────────────────┘     └──────────────────────────┘

时刻5:父进程退出
┌──────────────────────────┐
│ 父进程缓冲区              │
│ "hello printf\n"         │  刷新到file.txt
│ "hello fwrite\n"         │  ──────────→
└──────────────────────────┘

时刻6:子进程退出
                            ┌──────────────────────────┐
                            │ 子进程缓冲区              │
              刷新到file.txt │ "hello printf\n"         │
              ←────────────  │ "hello fwrite\n"         │
                            └──────────────────────────┘

最终file.txt内容:
hello write\n        ← write直接写入
hello printf\n       ← 父进程刷新
hello fwrite\n
hello printf\n       ← 子进程刷新
hello fwrite\n
3.3 用户级缓冲区 vs 内核级缓冲区
需要注意,缓冲区有两个层次:
1. 用户级缓冲区(User-level Buffer)
- 由C标准库(libc)提供
- 在进程的用户空间中
- printf、fwrite使用的就是用户级缓冲区
- fork时会被拷贝
2. 内核级缓冲区(Kernel-level Buffer)
- 由操作系统内核提供
- 在内核空间中
- 用于磁盘I/O的缓存(Page Cache)
- fork不会拷贝(因为在内核空间)
bash
用户空间:
┌─────────────────────────────────┐
│  进程                            │
│                                 │
│  ┌───────────────────────────┐  │
│  │  用户级缓冲区              │  │  ← printf、fwrite使用
│  │  (由C标准库提供)           │  │
│  └───────────────────────────┘  │
└─────────────┬───────────────────┘
              │ write系统调用
              ↓
═════════════════════════════════════
内核空间:
┌─────────────┴───────────────────┐
│  ┌───────────────────────────┐  │
│  │  内核级缓冲区              │  │  ← 操作系统提供
│  │  (Page Cache)              │  │
│  └───────────┬───────────────┘  │
└──────────────┼──────────────────┘
               ↓
          ┌─────────┐
          │  磁盘   │
          └─────────┘
总结:
语言层面的缓冲区本质上是用户态的一段普通内存数组,位于进程的虚拟地址空间中,由语言运行时或标准库通过普通代码分配和管理。它并不是操作系统机制,而是为了优化 I/O 行为而存在的用户态抽象。
当进程调用 fork() 创建子进程时,内核会为子进程重新分配并深拷贝内存管理相关的内核数据结构 ,包括 mm_struct 以及描述各段虚拟地址空间的 vm_area_struct。在这一层面上,父子进程拥有彼此独立的内存管理结构。
与此同时,父子进程的页表最初指向相同的物理内存页 ,并通过写时拷贝(Copy-On-Write, COW)机制进行保护。因此,语言层缓冲区对应的物理内存实际只存在一份,但父子进程在各自的虚拟地址空间中都可以看到完全一致的缓冲区内容,直到其中一方对该内存页执行写操作,才会触发物理页的复制。
当语言缓冲区写满或显式调用刷新操作(如 fflush、flush 等)时,语言运行时会通过系统调用(如 write)将数据从用户态缓冲区拷贝到内核缓冲区。系统调用成功返回,意味着数据已经被内核接管,后续何时以及以何种方式真正写入磁盘,则完全由操作系统和文件系统的刷新与回写机制决定。
在用户程序的视角下,我们通常不关心操作系统内部的刷盘细节,而是将数据成功拷贝到内核缓冲区 视为"写入完成"。在这一工程抽象前提下,语言层缓冲区的核心作用并不在于改变数据最终如何落盘,而在于通过在用户态聚合多次小规模写操作,显著减少用户态到内核态的系统调用次数,从而降低 I/O 的固定开销并提升整体性能。
四、FILE结构体揭秘
4.1 FILE与fd的关系
我们知道:
- C标准库使用
FILE*:fopen、fread、fwrite - 系统调用使用
int fd:open、read、write
那它们是什么关系呢?答案:FILE结构体内部封装了fd。
4.2 FILE结构体源码分析
c
// typedef定义
typedef struct _IO_FILE FILE;

// 结构体定义(简化版)
struct _IO_FILE {
    int _flags;              // 标志位

    // 缓冲区相关
    char *_IO_read_ptr;      // 当前读指针
    char *_IO_read_end;      // 读缓冲区结束位置
    char *_IO_read_base;     // 读缓冲区起始位置

    char *_IO_write_base;    // 写缓冲区起始位置
    char *_IO_write_ptr;     // 当前写指针
    char *_IO_write_end;     // 写缓冲区结束位置

    char *_IO_buf_base;      // 缓冲区起始位置
    char *_IO_buf_end;       // 缓冲区结束位置

    // 备份区域
    char *_IO_save_base;
    char *_IO_backup_base;
    char *_IO_save_end;

    struct _IO_marker *_markers;
    struct _IO_FILE *_chain;

    int _fileno;             // 文件描述符!(关键!)
    int _flags2;
    _IO_off_t _old_offset;

    unsigned short _cur_column;
    signed char _vtable_offset;
    char _shortbuf[1];

    _IO_lock_t *_lock;
};
关键字段:
| 字段 | 说明 |
|---|---|
_fileno |
封装的文件描述符(fd) |
_IO_buf_base |
缓冲区起始地址 |
_IO_buf_end |
缓冲区结束地址 |
_IO_write_ptr |
当前写入位置 |
_IO_read_ptr |
当前读取位置 |
_flags |
文件状态标志 |
验证:
c
#include <stdio.h>

int main() {
    FILE *fp = fopen("test.txt", "w");

    // FILE结构体中的_fileno字段就是文件描述符
    printf("FILE* fp's fd: %d\n", fileno(fp));

    fclose(fp);
    return 0;
}
输出:
bash
FILE* fp's fd: 34.3 库函数封装系统调用
现在我们可以理解库函数和系统调用的关系了:
bash
fopen("file.txt", "w")
    ↓
    1. 调用open系统调用
       fd = open("file.txt", O_WRONLY | O_CREAT | O_TRUNC, 0644)

    2. 分配FILE结构体
       FILE *fp = malloc(sizeof(FILE))

    3. 初始化FILE结构体
       fp->_fileno = fd              // 保存fd
       fp->_IO_buf_base = malloc(BUFSIZ)  // 分配缓冲区
       fp->_IO_write_ptr = fp->_IO_buf_base
       // ...

    4. 返回FILE*指针
       return fp
fwrite的工作流程:
c
fwrite(buf, size, count, fp)
    ↓
    1. 检查缓冲区是否有空间
       available = fp->_IO_buf_end - fp->_IO_write_ptr

    2. 如果有空间,写入缓冲区
       memcpy(fp->_IO_write_ptr, buf, size * count)
       fp->_IO_write_ptr += size * count

    3. 如果缓冲区满了,刷新
       write(fp->_fileno, fp->_IO_buf_base, buffered_size)
       fp->_IO_write_ptr = fp->_IO_buf_base  // 重置指针

    4. 返回写入的项数
       return count
对比:
bash
C标准库(fwrite):
应用程序 → 用户级缓冲区 → write系统调用 → 内核 → 磁盘
         (减少系统调用)

系统调用(write):
应用程序 → write系统调用 → 内核 → 磁盘
         (每次都进入内核)
五、自己实现简易IO库
现在让我们自己动手,实现一个简易的I/O库,加深对缓冲区机制的理解!
5.1 设计思路
我们要实现的功能:
c
mFILE *mfopen(const char *filename, const char *mode);
int mfwrite(const void *ptr, int num, mFILE *stream);
void mfflush(mFILE *stream);
void mfclose(mFILE *stream);
设计要点:
- 定义mFILE结构体,封装fd和缓冲区
- mfopen调用open系统调用
- mfwrite先写入缓冲区,满了才刷新
- mfflush调用write刷新缓冲区
- mfclose先刷新,再关闭fd
5.2 头文件:my_stdio.h
c
#pragma once

#define SIZE 1024

#define FLUSH_NONE 0
#define FLUSH_LINE 1
#define FLUSH_FULL 2

struct IO_FILE {
    int flag;                 // 刷新方式
    int fileno;               // 文件描述符
    char outbuffer[SIZE];     // 输出缓冲区
    int cap;                  // 缓冲区容量
    int size;                 // 当前使用大小
};

typedef struct IO_FILE mFILE;

mFILE *mfopen(const char *filename, const char *mode);
int mfwrite(const void *ptr, int num, mFILE *stream);
void mfflush(mFILE *stream);
void mfclose(mFILE *stream);
5.3 实现:my_stdio.c
5.3.1 mfopen实现
c
#include "my_stdio.h"
#include <string.h>
#include <stdlib.h>
#include <sys/stat.h>
#include <sys/types.h>
#include <fcntl.h>
#include <unistd.h>

mFILE *mfopen(const char *filename, const char *mode) {
    int fd = -1;

    // 根据模式打开文件
    if(strcmp(mode, "r") == 0) {
        fd = open(filename, O_RDONLY);
    }
    else if(strcmp(mode, "w") == 0) {
        fd = open(filename, O_CREAT | O_WRONLY | O_TRUNC, 0666);
    }
    else if(strcmp(mode, "a") == 0) {
        fd = open(filename, O_CREAT | O_WRONLY | O_APPEND, 0666);
    }

    if(fd < 0) return NULL;

    // 分配mFILE结构体
    mFILE *mf = (mFILE*)malloc(sizeof(mFILE));
    if(!mf) {
        close(fd);
        return NULL;
    }

    // 初始化mFILE
    mf->fileno = fd;
    mf->flag = FLUSH_LINE;  // 默认行缓冲
    mf->size = 0;
    mf->cap = SIZE;

    return mf;
}
5.3.2 mfflush实现
c
void mfflush(mFILE *stream) {
    if(stream->size > 0) {
        // 写入内核文件缓冲区
        write(stream->fileno, stream->outbuffer, stream->size);

        // 同步到磁盘(可选)
        fsync(stream->fileno);

        // 清空缓冲区
        stream->size = 0;
    }
}
实际 libc 的 fflush 只刷新到内核缓冲区,是否落盘由内核决定; 这里调用 fsync 是为了教学中"可观察的持久化效果"。
5.3.3 mfwrite实现
c
int mfwrite(const void *ptr, int num, mFILE *stream) {
    // 1. 拷贝数据到缓冲区
    memcpy(stream->outbuffer + stream->size, ptr, num);
    stream->size += num;

    // 2. 检测是否需要刷新
    if(stream->flag == FLUSH_LINE) {
        // 行缓冲:检查是否有换行符
        if(stream->size > 0 && stream->outbuffer[stream->size - 1] == '\n') {
            mfflush(stream);
        }
    }
    else if(stream->flag == FLUSH_FULL) {
        // 全缓冲:检查是否满了
        if(stream->size >= stream->cap) {
            mfflush(stream);
        }
    }
    // FLUSH_NONE:不刷新

    return num;
}
5.3.4 mfclose实现
c
void mfclose(mFILE *stream) {
    // 1. 刷新缓冲区
    if(stream->size > 0) {
        mfflush(stream);
    }

    // 2. 关闭文件描述符
    close(stream->fileno);

    // 3. 释放mFILE结构体
    free(stream);
}
5.4 测试程序:main.c
c
#include "my_stdio.h"
#include <stdio.h>
#include <string.h>
#include <unistd.h>

int main() {
    // 打开文件(追加模式)
    mFILE *fp = mfopen("./log.txt", "a");
    if(fp == NULL) {
        printf("mfopen failed\n");
        return 1;
    }

    // 写入10行数据
    int cnt = 10;
    while(cnt) {
        printf("Writing line %d\n", cnt);

        char buffer[64];
        snprintf(buffer, sizeof(buffer), "hello message, number is: %d\n", cnt);

        cnt--;

        // 写入我们的缓冲区
        mfwrite(buffer, strlen(buffer), fp);

        // 手动刷新(可选)
        // mfflush(fp);

        sleep(1);
    }

    // 关闭文件(会自动刷新)
    mfclose(fp);

    return 0;
}
5.5 编译和运行
编译:
bash
gcc -c my_stdio.c -o my_stdio.o
gcc -c main.c -o main.o
gcc my_stdio.o main.o -o test
或者使用Makefile:
makefile
test: my_stdio.o main.o
	gcc my_stdio.o main.o -o test

my_stdio.o: my_stdio.c my_stdio.h
	gcc -c my_stdio.c

main.o: main.c my_stdio.h
	gcc -c main.c

clean:
	rm -f *.o test log.txt
运行:
bash
./test
Writing line 10
Writing line 9
Writing line 8
Writing line 7
Writing line 6
Writing line 5
Writing line 4
Writing line 3
Writing line 2
Writing line 1

$ cat log.txt
hello message, number is: 10
hello message, number is: 9
hello message, number is: 8
hello message, number is: 7
hello message, number is: 6
hello message, number is: 5
hello message, number is: 4
hello message, number is: 3
hello message, number is: 2
hello message, number is: 1
5.6 验证缓冲区效果
让我们修改main.c,观察缓冲区的作用:
c
#include "my_stdio.h"
#include <stdio.h>
#include <string.h>
#include <unistd.h>
#include <signal.h>

int main() {
    mFILE *fp = mfopen("./log.txt", "w");
    if(fp == NULL) {
        printf("mfopen failed\n");
        return 1;
    }

    // 写入一些数据(没有换行符)
    mfwrite("hello", 5, fp);
    mfwrite(" ", 1, fp);
    mfwrite("world", 5, fp);

    printf("Data written to buffer\n");
    printf("Press Ctrl+C to exit (data will be lost!)\n");
    printf("Or wait 5 seconds (data will be flushed)\n");

    sleep(5);

    // 5秒后刷新
    printf("Flushing buffer...\n");
    mfflush(fp);

    printf("Data written to file\n");

    sleep(10);

    mfclose(fp);
    return 0;
}
测试1:正常退出
bash
./test
Data written to buffer
Press Ctrl+C to exit (data will be lost!)
Or wait 5 seconds (data will be flushed)
Flushing buffer...
Data written to file

cat log.txt
hello world
测试2:Ctrl+C中断
bash
./test
Data written to buffer
Press Ctrl+C to exit (data will be lost!)
Or wait 5 seconds (data will be flushed)
^C

cat log.txt
# 文件是空的!数据在缓冲区中丢失了
这就是缓冲区的特点:数据先在内存中,只有刷新后才会持久化。
六、总结与展望
通过本篇文章,我们深入理解了Linux文件系统的设计哲学和缓冲区机制:
核心知识点:
-
"一切皆文件"的实现原理
- 通过
file_operations函数指针表 - 不同设备实现自己的操作方法
- VFS提供统一的接口
- 面向对象思想在C语言中的应用
- 通过
-
缓冲区机制
- 三种类型:全缓冲、行缓冲、无缓冲
- 作用:减少系统调用、协调CPU与外设速度
- 刷新时机:满了、换行、手动、关闭、退出
-
fork与缓冲区陷阱
- 重定向改变缓冲策略
- fork拷贝用户级缓冲区
- 导致数据重复输出
-
FILE结构体
- 封装了fd
- 提供了用户级缓冲区
- 库函数 = 系统调用 + 缓冲区
-
自己实现IO库
- 理解了缓冲区的工作原理
- 理解了库函数与系统调用的关系
重要原理图:
bash
一切皆文件的实现:
read(fd) → VFS → file->f_op->read → 设备驱动 → 硬件设备
                  ↓
            ext4_read / tty_read / pipe_read / sock_read
bash
缓冲区的层次:
应用程序
    ↓
用户级缓冲区(C标准库提供)← printf、fwrite
    ↓
系统调用(write)
    ↓
内核级缓冲区(Page Cache)← 操作系统提供
    ↓
磁盘设备
至此,我们已经完整学习了Linux文件I/O的核心知识。在后续的文章中,我们将学习更高级的主题:
- 管道(pipe):进程间通信的基础
- dup和dup2的深入应用:实现管道重定向
- 文件系统:inode、目录项、软硬链接
- 高级I/O:select、poll、epoll
💡 思考题:
- 为什么stderr要设计成无缓冲?如果stderr也有缓冲区会有什么问题?
- 如何给我们的mFILE添加输入缓冲区(实现mfread)?
- C++的iostream也有缓冲区吗?它和C的FILE缓冲区有什么关系?
- 如果程序异常崩溃(段错误),缓冲区中的数据会丢失吗?
以上就是关于"一切皆文件"与缓冲区机制的全部内容!至此,基础IO章节完结!下一章我们将学习文件系统等更多内容!