一、什么是Function Call
2023年6月13日 OpenAI 公布了 Function Call(函数调用) 功能,Function Call 允许开发者向 GPT-4 和 GPT-3.5-turbo 模型描述函数,模型会智能地选择输出一个包含调用这些函数参数的JSON对象。这是一种更可靠地将 GPT 的功能与外部工具和 API 相连接的新方法。
那么 Function Call 可以解决大模型什么问题:
-
信息实时性:大模型训练时使用的数据集往往有时间限制,无法包含最新的信息,如最新的新闻、实时股价等。通过Function Call,模型可以实时获取最新数据,提供更加时效的服务。
-
数据局限性:模型的训练数据量庞大但有限,无法覆盖所有可能的查询,如医学、法律等领域的专业咨询。Function Call允许模型调用外部数据库或API,获取特定领域的详细信息。
-
功能扩展性:大模型虽然功能强大,但不可能内置所有可能需要的功能。通过Function Call,可以轻松扩展模型能力,如调用外部工具进行复杂计算、数据分析等。
GPT4 及 GPT-3.5-turbo 模型之所以能够使用函数Function Call 功能,是因为这些模型经过训练,不仅可以检测到何时需要调用函数(根据用户的输入),并且又可以回复符合函数参数的 JSON对象,而不是直接返回常规的文本。
目前支持Function Call功能的模型除了GPT模型外,国内的模型也支持,如:百度文心一言,ChatGLM3-6B、讯飞星火3.0等。
二、Function Call工作原理
举例分别对比有无Function Call功能时GPT模型工作流程的差异:
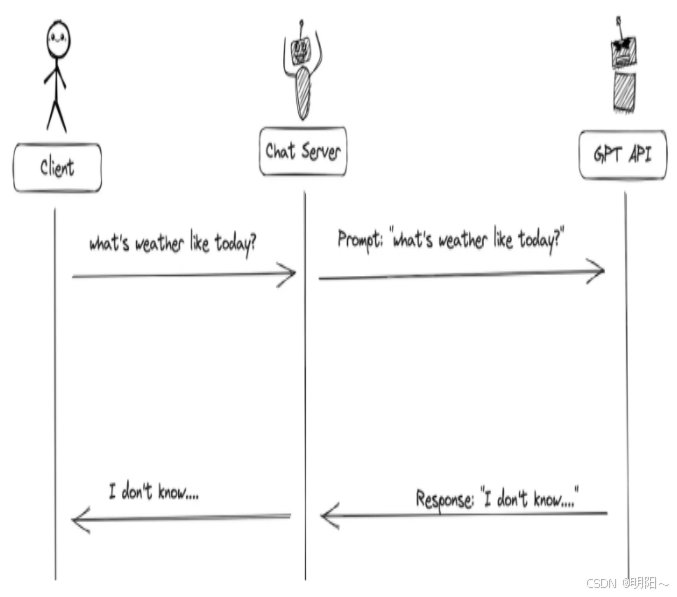
1、当没有函数调用(funciton call)时候,我们调用GPT构建AI应用的模式非常简单。
-
主要步骤:
-
用户(client)发请求给我们的服务(chat server)
-
我们的服务(chat server)给GPT提示词
-
重复执行
-
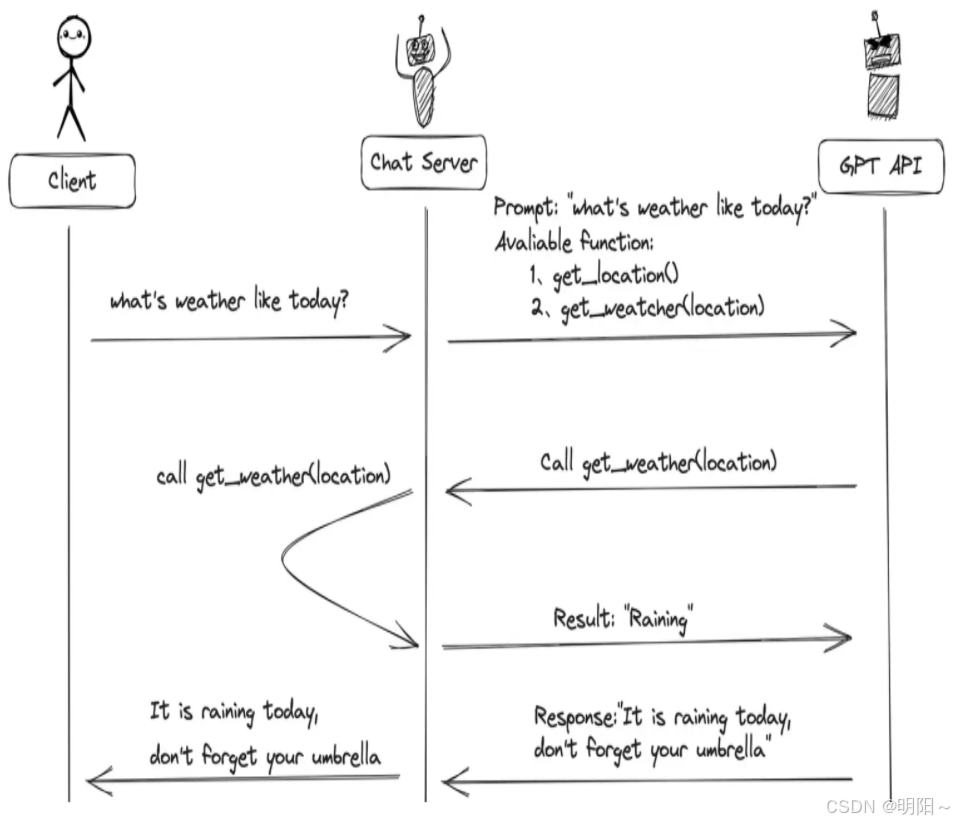
2、当有函数调用(funciton call)时候,我们调用GPT构建AI应用的模式比之前要复杂一些。
-
主要步骤:
-
用户(client)发请求提示词,chat server将提示词和可以调用的函数发送给大模型
-
GPT模型根据用户的提示词,判断是用普通文本还是函数调用的格式响应我们的服务(chat server)
-
如果是函数调用格式,那么chat server就会执行这个函数,并且将结果返回给GPT
-
然后模型使用提供的数据,用连贯的文本回答
-
需要注意的是,大模型的Function Call 不会执行任何函数调用,仅返回调用函数所需要的参数 。开发者可以利用模型输出的参数在应用中执行函数调用。
核心概念
Function Call 不是真正的"执行":
大模型本身不会实际运行任何函数代码
它只是理解意图 并生成调用参数
真正的执行需要开发者在应用层面完成
工作流程
1、开发者定义函数:告诉模型有哪些可用函数及其参数格式
pythonfunctions = [{ "name": "get_weather", "description": "获取城市天气", "parameters": { "city": {"type": "string", "description": "城市名称"} } }]2、模型分析并返回参数:当用户说"北京天气怎么样"
python{ "function": "get_weather", "arguments": {"city": "北京"} }3、开发者执行函数:根据模型返回的信息,在代码中调用真实函数
pythonif response.function == "get_weather": result = get_weather(city="北京") # 真正执行为什么这样设计?
安全性:模型无法直接操作系统或数据库
灵活性:开发者可以控制是否执行、如何执行
可靠性:避免模型直接执行带来的不可预测风险
简单说:模型是"参谋"(出主意),开发者是"执行者"(做决策并行动)。
三、Function Call使用方式
(一)自定义tool结构
以下代码是通过自定义 json格式的工具schema。
1、导包
python
from langchain_openai import ChatOpenAI
from langchain_core.messages import HumanMessage, ToolMessage
from agent_learn.config import Config
conf = Config()2、定义外部函数
python
# todo: 第一步:定义工具函数
def add(a: int, b: int) -> int:
"""
将数字a与数字b相加
Args:
a: 第一个数字
b: 第二个数字
"""
return a + b
def multiply(a: int, b: int) -> int:
"""
将数字a与数字b相乘
Args:
a: 第一个数字
b: 第二个数字
"""
return a * b3、描述函数功能
为了向模型描述外部函数库,需要向 tools 字段传入可以调用的函数列表。参数如下表:
| 参数名称 | 类型 | 是否必填 | 参数说明 |
|---|---|---|---|
| type | String | 是 | 设置为function |
| function | Object | 是 | |
| name | String | 是 | 函数名称 |
| description | String | 是 | 用于描述函数功能,模型会根据这段描述决定函数调用方式。 |
| parameters | Object | 是 | parameters字段需要传入一个Json Schema对象,以准确地定义函数所接受的参数。若调用函数时不需要传入参数,省略该参数即可。 |
| required | 否 | 指定哪些属性在数据中必须被包含。 |
说明如下:
python
# 定义 JSON 格式的工具 schema
tools = [
    {
        "type": "function",
        "function": {
            "name": "add",
            "description": "将数字a与数字b相加",
            "parameters": {
                "type": "object",
                "properties": {
                    "a": {
                        "type": "integer",
                        "description": "第一个数字"
                    },
                    "b": {
                        "type": "integer",
                        "description": "第二个数字"
                    }
                },
                "required": ["a", "b"]
            }
        }
    },
    {
        "type": "function",
        "function": {
            "name": "multiply",
            "description": "将数字a与数字b相乘",
            "parameters": {
                "type": "object",
                "properties": {
                    "a": {
                        "type": "integer",
                        "description": "第一个数字"
                    },
                    "b": {
                        "type": "integer",
                        "description": "第二个数字"
                    }
                },
                "required": ["a", "b"]
            }
        }
    }
]
4、模型实例化
为方便使用配置,需要创建Config类。
python
class Config:
    def __init__(self):
        self.base_url = 'https://dashscope.aliyuncs.com/compatible-mode/v1'
        self.api_key = 'sk-67320312aa3e4f16assdfsess0d7'
        self.model_name = 'qwen-plus'
实例化模型的代码如下:
python
# todo: 第二步:初始化模型
llm = ChatOpenAI(base_url=conf.base_url,
                 api_key=conf.api_key,
                 model=conf.model_name,
                 temperature=0.1)
# 绑定工具,允许模型自动选择工具
llm_with_tools = llm.bind_tools(tools, tool_choice="auto")
5、模型调用
python
# todo: 第三步:调用回复
query = "2+1等于多少?"
messages = [HumanMessage(query)]
try:
# todo: 第一次调用
ai_msg = llm_with_tools.invoke(messages)
messages.append(ai_msg)
print(f"\n第一轮调用后结果:\n{messages}")
# 处理工具调用
# 判断消息中是否有tool_calls,以判断工具是否被调用
if hasattr(ai_msg, 'tool_calls') and ai_msg.tool_calls:
for tool_call in ai_msg.tool_calls:
# todo: 处理工具调用
selected_tool = {"add": add, "multiply": multiply}[tool_call["name"].lower()]
tool_output = selected_tool(**tool_call["args"])
messages.append(ToolMessage(content=tool_output, tool_call_id=tool_call["id"]))
print(f"\n第二轮 message中增加tool_output 之后:\n{messages}")
# todo: 第二次调用,将工具结果传回模型以生成最终回答
final_response = llm_with_tools.invoke(messages)
print(f"\n最终模型响应:\n{final_response.content}")
else:
print("模型未生成工具调用,直接返回文本:")
print(ai_msg.content)
except Exception as e:
print(f"模型调用失败: {str(e)}")6、完整代码
python
from langchain_openai import ChatOpenAI
from langchain_core.messages import HumanMessage, ToolMessage
from agent_learn.config import Config
conf = Config()
# todo: 第一步:定义工具函数
def add(a: int, b: int) -> int:
"""
将数字a与数字b相加
Args:
a: 第一个数字
b: 第二个数字
"""
return a + b
def multiply(a: int, b: int) -> int:
"""
将数字a与数字b相乘
Args:
a: 第一个数字
b: 第二个数字
"""
return a * b
# 定义 JSON 格式的工具 schema
tools = [
{
"type": "function",
"function": {
"name": "add",
"description": "将数字a与数字b相加",
"parameters": {
"type": "object",
"properties": {
"a": {
"type": "integer",
"description": "第一个数字"
},
"b": {
"type": "integer",
"description": "第二个数字"
}
},
"required": ["a", "b"]
}
}
},
{
"type": "function",
"function": {
"name": "multiply",
"description": "将数字a与数字b相乘",
"parameters": {
"type": "object",
"properties": {
"a": {
"type": "integer",
"description": "第一个数字"
},
"b": {
"type": "integer",
"description": "第二个数字"
}
},
"required": ["a", "b"]
}
}
}
]
# todo: 第二步:初始化模型
llm = ChatOpenAI(base_url=conf.base_url,
api_key=conf.api_key,
model=conf.model_name,
temperature=0.1)
# 绑定工具,允许模型自动选择工具
llm_with_tools = llm.bind_tools(tools, tool_choice="auto")
# todo: 第三步:调用回复
query = "2+1等于多少?"
messages = [HumanMessage(query)]
try:
# todo: 第一次调用
ai_msg = llm_with_tools.invoke(messages)
messages.append(ai_msg)
print(f"\n第一轮调用后结果:\n{messages}")
# 处理工具调用
# 判断消息中是否有tool_calls,以判断工具是否被调用
if hasattr(ai_msg, 'tool_calls') and ai_msg.tool_calls:
for tool_call in ai_msg.tool_calls:
# todo: 处理工具调用
selected_tool = {"add": add, "multiply": multiply}[tool_call["name"].lower()]
tool_output = selected_tool(**tool_call["args"])
messages.append(ToolMessage(content=tool_output, tool_call_id=tool_call["id"]))
print(f"\n第二轮 message中增加tool_output 之后:\n{messages}")
# todo: 第二次调用,将工具结果传回模型以生成最终回答
final_response = llm_with_tools.invoke(messages)
print(f"\n最终模型响应:\n{final_response.content}")
else:
print("模型未生成工具调用,直接返回文本:")
print(ai_msg.content)
except Exception as e:
print(f"模型调用失败: {str(e)}")注意:
pythonllm.invoke(messages, tools=tools, ...): 绑定方式: 直接在 .invoke() 调用中传入 tools 参数。这是一种临时、一次性的绑定方式,仅对本次调用有效。 调用方式: 如果你想再次调用模型并使用工具,你必须在下一次 .invoke() 调用中再次传递 tools 参数。 适用场景: 适用于简单、单次的工具调用需求
(二)装饰器tool方式
以下是代码通过装饰器@tool的方式进行工具定义:
定义方式 :通过 @tool 装饰器直接装饰一个普通的 Python 函数,比如 add 和 multiply。
工作原理 :@tool 装饰器会自动根据函数签名(如 a: int, b: int)和文档字符串生成一个完整的工具定义(schema),包括工具名称、描述和参数结构。
优势:
-
简洁高效:这是最简单、最 Pythonic 的方式,几乎不需要额外的样板代码。你只需编写核心函数逻辑,工具定义部分由框架自动处理。
-
自动化:LangChain 的工具系统会自动处理工具的封装和调用,包括基本的参数类型验证。
代码如下:
python
from langchain_openai import ChatOpenAI
from langchain_core.messages import HumanMessage, ToolMessage
from langchain_core.tools import tool
from agent_learn.config import Config
conf = Config()
# todo: 第一步:定义工具函数
@tool
def add(a: int, b: int) -> int:
"""
将数字a与数字b相加
Args:
a: 第一个数字
b: 第二个数字
"""
return a + b
@tool
def multiply(a: int, b: int) -> int:
"""
将数字a与数字b相乘
Args:
a: 第一个数字
b: 第二个数字
"""
return a * b
# 定义 JSON 格式的工具 schema
tools = [add, multiply]
# todo: 第二步:初始化模型
llm = ChatOpenAI(base_url=conf.base_url,
api_key=conf.api_key,
model=conf.model_name,
temperature=0.1)
# 绑定工具,允许模型自动选择工具
llm_with_tools = llm.bind_tools(tools, tool_choice="auto")
# todo: 第三步:调用回复
query = "2+1等于多少?"
messages = [HumanMessage(query)]
try:
# todo: 第一次调用
ai_msg = llm_with_tools.invoke(messages)
messages.append(ai_msg)
print(f"\n第一轮调用后结果:\n{messages}")
# 处理工具调用
# 判断消息中是否有tool_calls,以判断工具是否被调用
if hasattr(ai_msg, 'tool_calls') and ai_msg.tool_calls:
for tool_call in ai_msg.tool_calls:
# todo: 处理工具调用
selected_tool = {"add": add, "multiply": multiply}[tool_call["name"].lower()]
tool_output = selected_tool.invoke(tool_call["args"]) # 需要使用invoke进行调用
messages.append(ToolMessage(content=tool_output, tool_call_id=tool_call["id"]))
print(f"\n第二轮 message中增加tool_output 之后:\n{messages}")
# todo: 第二次调用,将工具结果传回模型以生成最终回答
final_response = llm_with_tools.invoke(messages)
print(f"\n最终模型响应:\n{final_response.content}")
else:
print("模型未生成工具调用,直接返回文本:")
print(ai_msg.content)
except Exception as e:
print(f"模型调用失败: {str(e)}")(三)pydantic的tool方式
通过严格数据校验pydantic进行工具定义:
定义方式 :创建一个继承自 BaseModel 的类,用类型注解和 Field 定义工具的参数。同时,需要在类中手动实现一个 invoke 方法来包含工具的执行逻辑。
工作原理:
-
数据验证 :Pydantic 提供了强大的数据验证功能。当工具被调用时,它会自动验证传入的参数是否符合你在
BaseModel中定义的类型和约束。 -
手动实现 :与
@tool不同,Pydantic 本身不提供工具的执行逻辑。因此,你必须显式地编写invoke方法来处理参数并返回结果。
优势:
-
强大的数据验证 :Pydantic 提供了比
@tool更细粒度和更丰富的参数验证功能,可以定义更复杂的约束。 -
高度可控 :由于
invoke方法是手动实现的,你可以完全控制工具的执行逻辑,例如添加复杂的预处理、错误处理或自定义逻辑。 -
清晰的结构:工具的参数定义和执行逻辑被封装在一个类中,使得代码结构更加清晰。
代码如下:
python
from langchain_openai import ChatOpenAI
from langchain_core.messages import HumanMessage, ToolMessage
from langchain_core.tools import tool
"""
Pydantic 是一个 Python 库,用于数据验证和序列化。
它通过使用 Python 类型注解(type hints)来定义数据模型,
并提供强大的数据验证功能。Pydantic 基于 Python 的 dataclasses 和 typing 模块,
允许开发者定义结构化的数据模型,并自动验证输入数据是否符合指定的类型和约束。
"""
from pydantic.v1 import BaseModel, Field
from agent_learn.config import Config
conf = Config()
# todo: 第一步:定义工具函数
class Add(BaseModel):
"""
将两个数字相加
"""
a: int = Field(..., description="第一个数字")
b: int = Field(..., description="第二个数字")
def invoke(self, args):
# 验证参数
tool_instance = self.__class__(**args) # 自动验证 a 和 b
return tool_instance.a + tool_instance.b
class Multiply(BaseModel):
"""
将两个数字相乘
"""
a: int = Field(..., description="第一个数字")
b: int = Field(..., description="第二个数字")
def invoke(self, args):
# 验证参数
tool_instance = self.__class__(**args) # 自动验证 a 和 b
return tool_instance.a * tool_instance.b
# 定义 JSON 格式的工具 schema
tools = [Add, Multiply]
# todo: 第二步:初始化模型
llm = ChatOpenAI(base_url=conf.base_url,
api_key=conf.api_key,
model=conf.model_name,
temperature=0.1)
# 绑定工具,允许模型自动选择工具
llm_with_tools = llm.bind_tools(tools, tool_choice="auto")
# todo: 第三步:调用回复
query = "2+1等于多少?"
messages = [HumanMessage(query)]
try:
# todo: 第一次调用
ai_msg = llm_with_tools.invoke(messages)
messages.append(ai_msg)
print(f"\n第一轮调用后结果:\n{messages}")
# 处理工具调用
# 判断消息中是否有tool_calls,以判断工具是否被调用
if hasattr(ai_msg, 'tool_calls') and ai_msg.tool_calls:
for tool_call in ai_msg.tool_calls:
# todo: 处理工具调用
selected_tool = {"add": Add, "multiply": Multiply}[tool_call["name"].lower()]
# 实例化工具类并调用 invoke
tool_instance = selected_tool(**tool_call["args"])
tool_output = tool_instance.invoke(tool_call["args"])
messages.append(ToolMessage(content=tool_output, tool_call_id=tool_call["id"]))
print(f"\n第二轮 message中增加tool_output 之后:\n{messages}")
# todo: 第二次调用,将工具结果传回模型以生成最终回答
final_response = llm_with_tools.invoke(messages)
print(f"\n最终模型响应:\n{final_response.content}")
else:
print("模型未生成工具调用,直接返回文本:")
print(ai_msg.content)
except Exception as e:
print(f"模型调用失败: {str(e)}")(四)三种使用方式总结
| 特性 | JSON Schema | @tool 装饰器 | Pydantic |
|---|---|---|---|
| 定义方式 | 手动编写 Python 字典(JSON Schema) | 装饰 Python 函数 | 继承 Pydantic BaseModel |
| 自动化程度 | 低:完全手动定义和分发 | 高:自动生成 Schema 和调用逻辑 | 中等:自动验证数据,但需手动实现 invoke |
| 数据验证 | 需要手动验证或依赖外部库 | 基础类型检查 | 强大:提供丰富的验证功能 |
| 适用场景 | 需要与其他系统集成、通用性和最大灵活性的场景 | 快速开发、简单工具、原型验证 | 需要复杂数据验证、清晰结构和自定义逻辑的场景 |
四、Agent调用tool
Agent(智能体)是一种能够感知环境、进行决策和执行动作的智能实体。从大模型的角度来看,Agent其实就是基于大模型的语义理解和推理能力,让大模型拥有解决复杂问题时的任务规划能力,并调用外部工具来执行各种任务,并且能够保留"记忆"的一个智能体。
Agent = 大模型 + 任务规划(Planning) + 使用外部工具执行任务(Tools&Action) + 记忆(Memory)
Agent的核心就是大模型,它调用工具的方式通常通过Function Call实现,不够很多的Agent框架对内部的调用过程进行了封装,所以更易使用。
代码如下:
python
from langchain.agents import initialize_agent, AgentType
from langchain_openai import ChatOpenAI
from langchain_core.tools import tool
from agent_learn.config import Config
conf = Config()
# todo: 第一步:定义工具函数
@tool
def add(a: int, b: int) -> int:
"""
将数字a与数字b相加
Args:
a: 第一个数字
b: 第二个数字
"""
return a + b
@tool
def multiply(a: int, b: int) -> int:
"""
将数字a与数字b相乘
Args:
a: 第一个数字
b: 第二个数字
"""
return a * b
# 加载工具
tools = [add, multiply]
# todo: 第二步:初始化模型
llm = ChatOpenAI(base_url=conf.base_url,
api_key=conf.api_key,
model=conf.model_name,
temperature=0.1)
# todo: 第三步:创建Agent
agent = initialize_agent(tools, llm, AgentType.STRUCTURED_CHAT_ZERO_SHOT_REACT_DESCRIPTION, verbose=True)
# todo: 第四步:调用Agent
query = "2+1等于多少?"
result = agent.invoke(query)
print(f'result: {result["output"]}')