一、问题背景
在做人脸关键点(Landmark)时,很多人会选择 MediaPipe FaceLandmarker,原因很简单:
-
精度高
-
速度快
-
提供 468 点级别的人脸几何结构
但在多脸场景下,MediaPipe 有一个非常让人头疼的限制:
人脸数量必须在初始化时固定(
num_faces)
这意味着:
-
num_faces=1→ 多人场景会漏脸 -
num_faces=N→ 浪费算力,且 N 很难预估 -
无法根据画面动态变化
这是一个结构性限制,不是使用方式问题。
二、常见但不理想的解决方案
❌ 方案一:把 num_faces 设得很大
-
浪费算力
-
延迟明显
-
移动端基本不可用
❌ 方案二:多实例 MediaPipe
-
初始化成本极高
-
线程/资源管理复杂
-
工程不可维护
三、核心思路:职责分离(YOLO 负责"有多少脸")
关键转折点在于一个认知改变:
MediaPipe 并不擅长「找脸」,它擅长的是「精细 landmark」
于是,整个系统被拆成两层:
第一层:YOLO(负责"有几张脸")
-
动态检测
-
多脸支持
-
自带 tracking(
track_id)
第二层:MediaPipe(永远只处理一张脸)
-
num_faces=1 -
只对 ROI 做 landmark
-
永远不会漏
四、整体架构
原始帧 │ ▼ YOLO 人脸检测 + Track │ ├─ Face 1 ROI → MediaPipe → Landmark ├─ Face 2 ROI → MediaPipe → Landmark └─ Face N ROI → MediaPipe → Landmark
关键点:
-
MediaPipe 每次只看到「一张脸」
-
不存在"人脸数量不够"的问题
-
YOLO 的 tracking 保证跨帧一致性
五、实现细节
1️⃣ YOLO 负责多脸 + tracking
results = self.yolo.track( frame, persist=True, verbose=False, device=device )[0]-
自动分配
track_id -
每一张脸有稳定身份
2️⃣ 对每个检测框裁剪 ROI
face_crop = frame[y1:y2, x1:x2]只把人脸区域送给 MediaPipe。
3️⃣ MediaPipe 永远只 detect 一张脸
options = vision.FaceLandmarkerOptions( base_options=base_options, num_faces=1 )因为输入本身已经保证是单脸。
4️⃣ Landmark 映射回原图坐标系
px = int(x1 + lm.x * face_w) py = int(y1 + lm.y * face_h)MediaPipe 输出是 ROI 内归一化坐标,需要映射回全图。
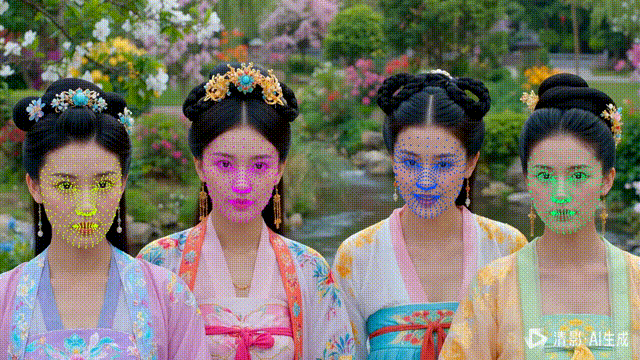
六、单脸单色:让可视化真正"可读"
为了避免多脸场景中 landmark 混乱,引入了一个非常实用的小技巧:
同一个
track_id→ 同一种满饱和度颜色
def _color_by_track_id(self, track_id): hue = int((track_id * 37) % 180) hsv = np.uint8([[[hue, 255, 255]]]) bgr = cv2.cvtColor(hsv, cv2.COLOR_HSV2BGR)[0][0] return int(bgr[0]), int(bgr[1]), int(bgr[2])优点:
-
颜色稳定
-
高对比度
-
非随机、不脏
七、完整代码示例
特点
原始 frame 不被修改
YOLO + MediaPipe 解耦
多脸稳定 landmark
import cv2

import numpy as np

from ultralytics import YOLO


import mediapipe as mp

from mediapipe.tasks import python

from mediapipe.tasks.python import vision


class YOLOFaceMove:

    """

    YOLO 多脸检测 + MediaPipe landmark(二合一)

    - YOLO 提供 ROI + track_id

    - MediaPipe 只 detect

    - 原始 frame 不变

    - 同一张脸 = 同一种满饱和度颜色

    """


    def __init__(

        self,

        yolo_model_path="yolov11l-face.pt",

        mp_model_path="文件地址/face_landmarker.task",

        device="cuda"

    ):

        # ---------- YOLO ----------

        self.yolo = YOLO(yolo_model_path).to(device)

        self.device = device


        # ---------- MediaPipe ----------

        base_options = python.BaseOptions(model_asset_path=mp_model_path)

        options = vision.FaceLandmarkerOptions(

            base_options=base_options,

            num_faces=1

        )

        self.detector = vision.FaceLandmarker.create_from_options(options)


    # =====================================================

    # MediaPipe detect(只 detect)

    # =====================================================

    def _detect_face(self, face_bgr):

        mp_image = mp.Image(

            image_format=mp.ImageFormat.SRGB,

            data=cv2.cvtColor(face_bgr, cv2.COLOR_BGR2RGB)

        )

        return self.detector.detect(mp_image)


    # =====================================================

    # 根据 track_id 生成稳定满饱和度颜色

    # =====================================================

    def _color_by_track_id(self, track_id):

        """

        使用 HSV,保证高饱和、高亮度

        """

        if track_id is None:

            hue = 0

        else:

            hue = int((track_id * 37) % 180)  # 打散颜色


        hsv = np.uint8([[[hue, 255, 255]]])

        bgr = cv2.cvtColor(hsv, cv2.COLOR_HSV2BGR)[0][0]

        return int(bgr[0]), int(bgr[1]), int(bgr[2])


    # =====================================================

    # landmark 映射并绘制到原图(单脸单色)

    # =====================================================

    def _draw_landmarks_on_frame(self, frame, detection_result, box, color):

        x1, y1, x2, y2 = box

        face_w = x2 - x1

        face_h = y2 - y1


        h_img, w_img, _ = frame.shape


        for face_landmarks in detection_result.face_landmarks:

            for lm in face_landmarks:

                px = int(x1 + lm.x * face_w)

                py = int(y1 + lm.y * face_h)


                if 0 <= px < w_img and 0 <= py < h_img:

                    cv2.circle(

                        frame,

                        (px, py),

                        2,

                        color,

                        -1,

                        cv2.LINE_AA

                    )


    # =====================================================

    # 对外唯一入口(device 必须存在)

    # =====================================================

    def do(self, frame, device):

        if frame is None:

            return None


        h, w, _ = frame.shape

        output = frame.copy()


        results = self.yolo.track(

            frame,

            persist=True,

            verbose=False,

            device=device

        )[0]


        if results.boxes is None:

            return output


        boxes = results.boxes.xyxy.cpu().numpy()


        # track_id 可能为空

        track_ids = (

            results.boxes.id.cpu().numpy()

            if results.boxes.id is not None

            else [None] * len(boxes)

        )


        for box, track_id in zip(boxes, track_ids):

            x1, y1, x2, y2 = map(int, box)


            # 防越界

            x1 = max(0, x1)

            y1 = max(0, y1)

            x2 = min(w, x2)

            y2 = min(h, y2)


            face_crop = frame[y1:y2, x1:x2]

            if face_crop.size == 0:

                continue


            detection_result = self._detect_face(face_crop)


            if not detection_result.face_landmarks:

                continue


            color = self._color_by_track_id(track_id)


            # ⭐ 只画点,不动原图

            self._draw_landmarks_on_frame(

                output,

                detection_result,

                (x1, y1, x2, y2),

                color

            )


        return output
八、总结
这套方案的本质不是"技巧",而是系统设计上的职责划分:
-
YOLO:动态数量、定位、身份
-
MediaPipe:单体精细几何
最终结果是:
-
没有 num_faces 的限制
-
性能稳定
-
结构清晰
-
工程可扩展
九、下一步可以做什么?
在这个结构上,你可以非常自然地继续扩展:
-
表情 / Blendshape
-
头部姿态
-
视线方向
-
Landmark 时序稳定滤波
-
人脸 ID 绑定业务逻辑
对 PiscTrace or PiscCode感兴趣?更多精彩内容请移步官网看看~🔗 PiscTrace