博主使用云服务器训练,配置环境版本为:PyTorch2.3.0、Python3.12、CUDA12.1,GPU4090 24GB;本次使用数据集是20G,考虑后续打包传输建议给到220G+、直接文件传输需要给到120G+。
0 运行流程
0.1 Grounded-SAM2
(1)Grounding DINO
根据输入的指令(如猫、狗)在图中描出检测框;
(2)SAM2
根据(1)中描出的检测框进行精确分割(如猫的轮廓);
(3)DINO V2
语义理解,将(2)中分割出来物体进行特征向量提取,从而进行同类相似度区分(如同样是猫,不同品种区分)。
0.1 Depth Anything V2
目前最强单目深度估计(Monocular Depth Estimation)模型,给一张普通的 2D 照片,它能算出图中每个像素点离你有多远,并生成一张深度图(Depth Map)。
1 环境配置
1.1 创建并激活虚拟环境
conda create -n envs
source ~/.bashrc
conda activate envs
1.2 安装Python3.12
conda install python=3.12
1.3 安装基础算力支持
pythonpip install torch==2.3.1 torchvision==0.18.1 torchaudio==2.3.1 --index-url https://download.pytorch.org/whl/cu121
2 安装Grounded-SAM2
python# 基础工具 apt-get update && apt-get install -y libgl1-mesa-glx libglib2.0-0 # 下载代码 cd /root/autodl-tmp source /etc/network_turbo git clone https://github.com/IDEA-Research/Grounded-SAM-2.git cd Grounded-SAM-2 # 依赖 pip install -e . # 安装 export CUDA_HOME=/usr/local/cuda-12.1 pip install --no-build-isolation -e grounding_dino
3 安装Depth Anything V2
pythoncd /root/autodl-tmp git clone https://github.com/DepthAnything/Depth-Anything-V2.git cd Depth-Anything-V2 pip install -e . pip install -r requirements.txt
4 下载权重文件
pythonmkdir -p /root/autodl-tmp/checkpoints cd /root/autodl-tmp/checkpoints # 1. 下载 SAM 2 权重 (Large版本,分割最准) wget https://hf-mirror.com/facebook/sam2-hiera-large/resolve/main/sam2_hiera_large.pt # 2. 下载 Grounding DINO 权重 wget https://hf-mirror.com/ShilongLiu/GroundingDINO/resolve/main/groundingdino_swint_ogc.pth # 3. 下载 Depth Anything V2 权重 wget https://hf-mirror.com/depth-anything/Depth-Anything-V2-Large/resolve/main/depth_anything_v2_vitl.pth # 4. 下载 BERT 权重 pip install modelscope python -c "from modelscope import snapshot_download; snapshot_download('google-bert/bert-base-uncased', local_dir='./bert-base-uncased')"
5 导入数据集并解压缩
可以使用Filezilla拖拽压缩包到~/root/autodl-tmp/路径下,但实测传输太慢;
AutoDL可以使用公网网盘进行传输,教程:https://www.autodl.com/docs/netdisk/
pythoncd ~/ unzip W01_13Hz_winter_seq1_shortLoop.zip解压换成自己的文件名。
6 编写运行脚本
cd ~/root/autodl-tmp/
touch pipeline_v1.py
vim pipeline_v1.py
PS.VIM用法:i进入编辑,复制下面代码,esc退出,:wq保存。
pythonimport gc import os os.environ["SAM2_BUILD_CUDA"] = "1" os.environ["CUDA_HOME"] = "/usr/local/cuda" import sys from unittest.mock import MagicMock # 让Python把 python-box 当作 configbox 使用 try: import configbox except ImportError: import box sys.modules["configbox"] = MagicMock() sys.modules["configbox"].ConfigBox = box.Box print("✅ 已通过 python-box 模拟 ConfigBox") import cv2 import numpy as np import torch from tqdm import tqdm from PIL import Image from torchvision import transforms # --- 路径配置增强 --- BASE_DIR = "/root/autodl-tmp" # 添加各仓库路径 sys.path.append(os.path.join(BASE_DIR, "Depth-Anything-V2")) sys.path.append(os.path.join(BASE_DIR, "Grounded-SAM-2")) sys.path.append(os.path.join(BASE_DIR, "Grounded-SAM-2/grounding_dino")) # 导入组件 from depth_anything_v2.dpt import DepthAnythingV2 from sam2.build_sam import build_sam2 from sam2.sam2_image_predictor import SAM2ImagePredictor from groundingdino.util.inference import load_model, load_image, predict, annotate # 文件夹配置 IMG_DIR = "/root/autodl-tmp/W01_13Hz/images_cam2_sr22555667" MASK_OUT = "/root/autodl-tmp/mask_folder" DEPTH_OUT = "/root/autodl-tmp/depth_folder" CKPT_DIR = "/root/autodl-tmp/checkpoints" os.makedirs(MASK_OUT, exist_ok=True) os.makedirs(DEPTH_OUT, exist_ok=True) def custom_load_image(image_path): # 用 PIL 打开 pil_img = Image.open(image_path).convert("RGB") # 获取原始尺寸 w, h = pil_img.size # 转换为 DINO Tensor transform = transforms.Compose([ transforms.Resize((800, 1333), interpolation=transforms.InterpolationMode.BICUBIC), transforms.ToTensor(), transforms.Normalize([0.485, 0.456, 0.406], [0.229, 0.224, 0.225]), ]) image_processed = transform(pil_img) # image_source 用于 SAM2 和 DepthAnything (转为 numpy) image_source = np.array(pil_img) # 注意:Depth Anything 通常需要 RGB,但 SAM2 和 OpenCV 需要 BGR # 我们这里保持 RGB,在写入时再处理 return image_source, image_processed def process(): import logging logging.getLogger("CIFAR10").setLevel(logging.ERROR) # 屏蔽 DINO 可能触发的无关日志 device = "cuda" if torch.cuda.is_available() else "cpu" print(f"🚀 使用设备: {device}") # 1. 加载模型逻辑 (保持你的加载部分不变...) BERT_LOCAL_PATH = "/root/autodl-tmp/checkpoints/bert-base-uncased" depth_model = DepthAnythingV2(encoder='vitl', features=256, out_channels=[256, 512, 1024, 1024]) depth_model.load_state_dict(torch.load(f"{CKPT_DIR}/depth_anything_v2_vitl.pth", map_location='cpu')) depth_model.to(device).eval() from groundingdino.util.slconfig import SLConfig from groundingdino.models import build_model as build_dino_model from groundingdino.util.utils import clean_state_dict dino_config_path = "/root/autodl-tmp/Grounded-SAM-2/grounding_dino/groundingdino/config/GroundingDINO_SwinT_OGC.py" dino_checkpoint_path = f"{CKPT_DIR}/groundingdino_swint_ogc.pth" args = SLConfig.fromfile(dino_config_path) args.device = device args.text_encoder_type = BERT_LOCAL_PATH dino_model = build_dino_model(args) checkpoint = torch.load(dino_checkpoint_path, map_location="cpu") dino_model.load_state_dict(clean_state_dict(checkpoint["model"]), strict=False) dino_model.to(device).eval() print("✅ Grounding DINO 离线权重加载成功") sam2_checkpoint = f"{CKPT_DIR}/sam2_hiera_large.pt" sam2_model = build_sam2("sam2_hiera_l.yaml", sam2_checkpoint, device=device) sam2_predictor = SAM2ImagePredictor(sam2_model) TEXT_PROMPT = "tree . trunk . ground . bush ." images = sorted([f for f in os.listdir(IMG_DIR) if f.endswith(('.jpg', '.png'))]) print(f"开始批处理 {len(images)} 张 FinnForest 图片...") with torch.inference_mode(): for img_name in tqdm(images): img_path = os.path.join(IMG_DIR, img_name) try: # 1. 使用兼容模式读取图片 image_source, image_processed = custom_load_image(img_path) except Exception as e: print(f"❌ 严重损坏,PIL也读不动: {img_name}, 错误: {e}") continue # 2. 深度图生成 depth = depth_model.infer_image(image_source) np.save(os.path.join(DEPTH_OUT, img_name.replace(".png", ".npy")), depth) # 3. DINO 预测 boxes, confidences, labels = predict( model=dino_model, image=image_processed, caption=TEXT_PROMPT, box_threshold=0.15, text_threshold=0.15, device=device ) # 4. 掩码生成 h, w, _ = image_source.shape mask_save_path = os.path.join(MASK_OUT, img_name) if boxes is not None and len(boxes) > 0: # --- 补全这段 SAM2 核心逻辑 --- if len(boxes) > 10: boxes = boxes[:10] # 注意:SAM2 内部通常期望 BGR 格式的 numpy 数组 # 我们之前的 image_source 是 RGB,这里转一下 image_source_bgr = cv2.cvtColor(image_source, cv2.COLOR_RGB2BGR) sam2_predictor.set_image(image_source_bgr) boxes_unnorm = boxes * torch.Tensor([w, h, w, h]) masks, _, _ = sam2_predictor.predict( point_coords=None, point_labels=None, box=boxes_unnorm.numpy(), multimask_output=False, ) # 1. 确保 combined_mask 是二维的 (H, W) combined_mask = np.any(masks, axis=0) # 如果是 (1, H, W),把它变成 (H, W) if combined_mask.ndim == 3: combined_mask = combined_mask.squeeze() # 2. 转为 uint8 类型 (0-255) combined_mask = combined_mask.astype(np.uint8) * 255 # 3. 现在 PIL 就能处理了 Image.fromarray(combined_mask).save(mask_save_path) # 改用 PIL 保存,完全不给 OpenCV 报错的机会 Image.fromarray(combined_mask).save(mask_save_path) else: # 保存全黑图 black_mask = np.zeros((h, w), dtype=np.uint8) Image.fromarray(black_mask).save(mask_save_path) # 5. 清理 (必须保留,防止 OOM) del depth, image_processed, boxes if 'masks' in locals(): del masks if 'combined_mask' in locals(): del combined_mask torch.cuda.empty_cache() gc.collect() if __name__ == "__main__": process()
7 图像处理
pythoncd /root/autodl-tmp/ export PYTHONPATH=$PYTHONPATH:/root/autodl-tmp/Grounded-SAM-2/grounding_dino nohup python pipeline_v1.py > pipeline_log.txt 2>&1 & tail -f pipeline_log.txt
python#终止训练进程 ps -ef | grep pipeline_v1.py | grep -v grep | awk '{print $2}' | xargs kill -9 #清理文件包内内容 rm -rf /root/autodl-tmp/mask_folder/* rm -rf /root/autodl-tmp/depth_folder/*
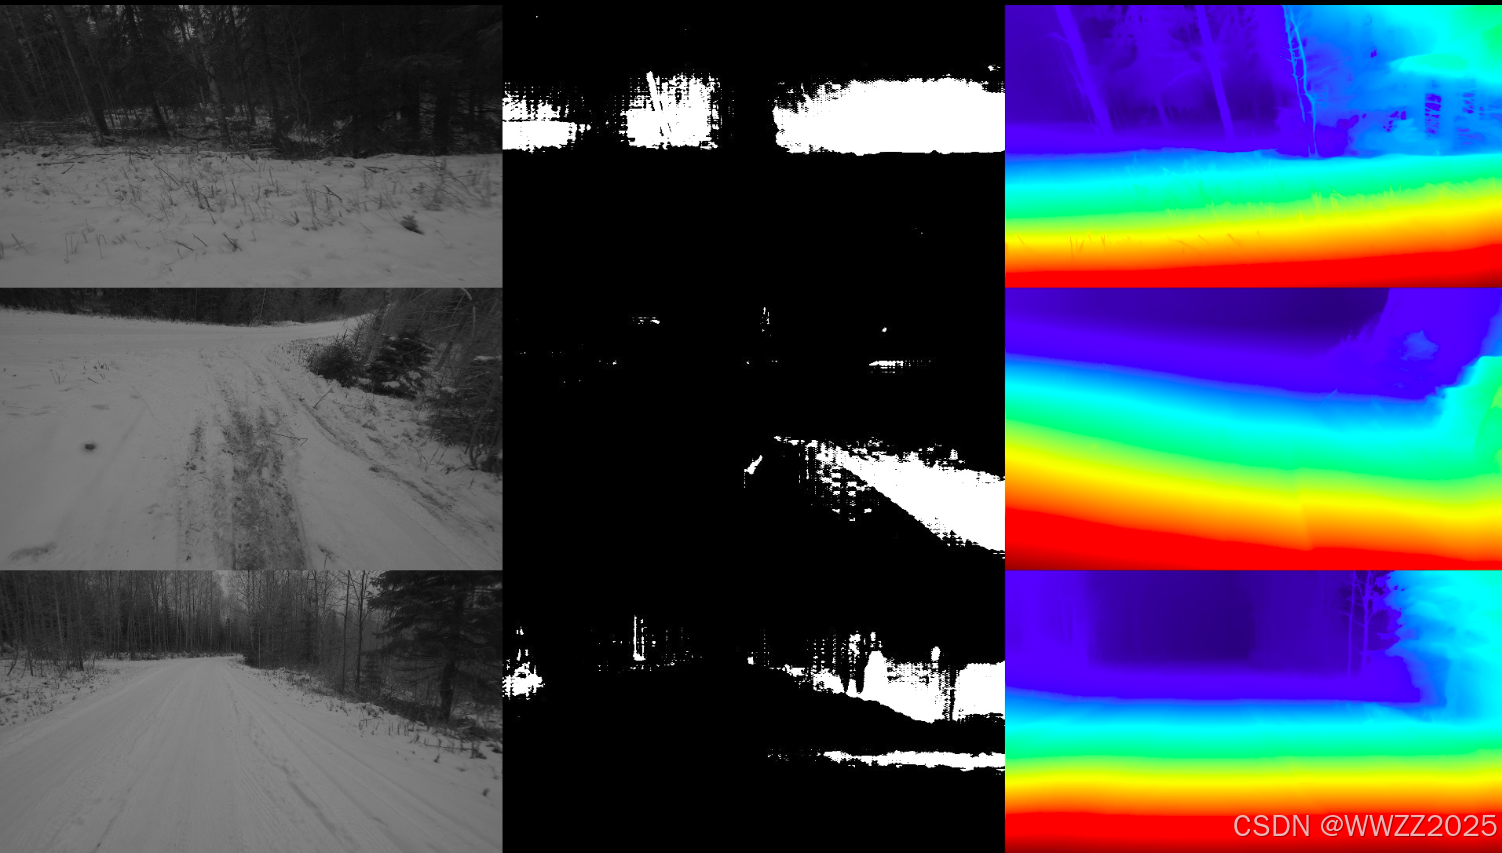
8 结果抽查
pythonimport cv2 import numpy as np import os import random from PIL import Image # 路径配置 IMG_DIR = "/root/autodl-tmp/W01_13Hz/images_cam2_sr22555667" MASK_DIR = "/root/autodl-tmp/mask_folder" DEPTH_DIR = "/root/autodl-tmp/depth_folder" SAVE_PATH = "/root/autodl-tmp/quality_check.jpg" images = [f for f in os.listdir(MASK_DIR) if f.endswith('.png')] samples = random.sample(images, 3) # 随机抽3张 combined_rows = [] for name in samples: # 1. 加载原图 img = cv2.imread(os.path.join(IMG_DIR, name)) img = cv2.resize(img, (640, 360)) # 2. 加载 Mask mask = cv2.imread(os.path.join(MASK_DIR, name), cv2.IMREAD_GRAYSCALE) mask = cv2.resize(mask, (640, 360)) mask_3ch = cv2.cvtColor(mask, cv2.COLOR_GRAY2BGR) # 3. 加载深度图并归一化(方便显示) depth = np.load(os.path.join(DEPTH_DIR, name.replace('.png', '.npy'))) depth_min, depth_max = depth.min(), depth.max() depth_norm = (depth - depth_min) / (depth_max - depth_min + 1e-5) * 255 depth_viz = cv2.applyColorMap(depth_norm.astype(np.uint8), cv2.COLORMAP_JET) depth_viz = cv2.resize(depth_viz, (640, 360)) # 横向拼接:原图 | 掩码 | 深度 row = np.hstack((img, mask_3ch, depth_viz)) combined_rows.append(row) # 纵向拼接并保存 final_img = np.vstack(combined_rows) cv2.imwrite(SAVE_PATH, final_img) print(f"✅ 抽检图已保存至: {SAVE_PATH}")
9 数据导出
9.1 建立通讯
博主传回百度网盘为例,该过程时间较长。
pythonpip install bypy bypy info此时会弹出一个URL链接,将链接中授权码复制到终端即可建立通讯。
9.2 文件传输
传输掩码:
pythonbypy syncup /root/autodl-tmp/mask_folder mask_folder --on-dup skip传输深度图:
pythonnohup bypy syncup /root/autodl-tmp/depth_folder depth_folder --on-dup skip > /root/autodl-tmp/sync_final.log 2>&1 &传输过程时间较久,博主80+GB传输了12h。