项目环境准备
环境准备说明:
本阶段共使用虚拟机6台,操作系统使用RockyLinux8.6
环境准备要求:
- 最小化安装即可
- 配置好主机名和IP地址
- 搭建好yum源
- 关闭防火墙和SELinux!!!
项目主机列表
| 主机名 | IP地址 | 规格 | 角色 | 服务 |
|---|---|---|---|---|
| Programer | 192.168.88.10/24 | 1vCPUs+1GiB+20G | 程序员主机 | Git |
| GitLab | 192.168.88.20/24 | 2vCPUs+4GiB+20G | 内部代码托管平台 | GitLab |
| Jenkins | 192.168.88.30/24 | 2vCPUs+2GiB+20G | 持续集成工具 | Jenkins |
| Services | 192.168.88.50/24 | 2vCPUs+4GiB+20G | 应用服务器 | RabbitMQ MySQL Elasticsearch Redis |
| Backend | 192.168.88.60/24 | 2vCPUs+2GiB+20G | 后端服务器 | HIS后端jar包 |
| Fontend | 192.168.88.70/24 | 1vCPUs+1GiB+20G | 前端服务器 | Nginx |
Git安装
Programer主机安装Git
#安装中文支持(选做)
root@Programer \~# echo $LANG #查看当前系统语言及编码
en_US.UTF-8
root@Programer \~# yum -y install langpacks-zh_CN.noarch #安装中文支持
root@Programer \~# vim /etc/locale.conf #配置系统使用中文及编码
LANG="zh_CN.UTF-8"
root@Programer \~# reboot #重启使语言配置生效
root@Programer \~# echo $LANG #确认使用中文编码
zh_CN.UTF-8
root@Programer \~#
#yum源中集成了Git软件包,使用yum安装Git
root@Programer \~# yum clean all; yum repolist -v #插件yum源是否可用
...
Total packages: 8,265
root@Programer \~# yum -y install git #使用yum安装Git
...
Complete!
root@Programer \~#git --version #查看Git版本
git version 2.31.1
root@Programer \~# git --help #查看Git命令帮助信息
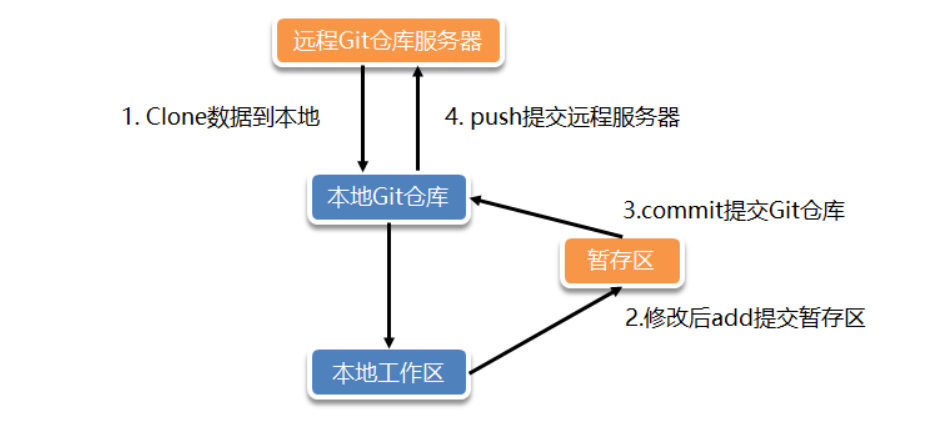
Git版本库操作
Git工作流程
Git基础配置
- Git基础配置
--local: 仓库级(仓库目录下.git/config)
--global: 全局级(~/.gitconfig)
--system: 系统级(/etc/gitconfig)
root@Programer \~# git config --global user.name mark #设置用户名
root@Programer \~#git config --global user.email mark@tedu.cn #设置用户邮箱
root@Programer \~# git config --global init.defaultBranch master #设置版本库默认分支
root@Programer \~#git config --list #查看已有Git配置
user.name=mark
init.defaultbranch=master
root@Programer \~# cat ~/.gitconfig #查看Git配置持久化文件
user
name = mark
email = mark@tedu.cn
init
defaultBranch = master
root@Programer \~#
Git创建版本库
- Git初始化空版本库
#使用Git命令初始化空版本库
root@Programer \~# ls
root@Programer \~# git init myproject #初始化空版本库
已初始化空的 Git 仓库于 /root/myproject/.git/
root@Programer \~# ls #确认版本库已创建
myproject
root@Programer \~# ls -a myproject/
. .. .git
root@Programer \~# ls -a myproject/.git/
. .. branches config description HEAD hooks info objects refs
root@Programer \~#
- 将已有目录制作成版本库
#将已有目录制作成Git版本库
root@Programer \~# mkdir mytest #创建空目录
root@Programer \~# ls -a mytest/
. ..
root@Programer \~# cd mytest/
root@Programer mytest# git init #将已有目录制作成Git版本库
已初始化空的 Git 仓库于 /root/mytest/.git/
root@Programer mytest# ls -a
. .. .git
root@Programer mytest# ls -a .git/
. .. branches config description HEAD hooks info objects refs
root@Programer mytest# cd
root@Programer \~#
Git版本库操作
#熟悉Git基础命令使用
root@Programer \~# cd myproject/
root@Programer myproject# git status #查看Git本地仓库状态
位于分支 master
尚无提交
无文件要提交(创建/拷贝文件并使用 "git add" 建立跟踪)
root@Programer myproject#echo "Learning Git" >> readme.md #创建readme文件
root@Programer myproject# git status #查看Git本地仓库状态
位于分支 master
尚无提交
未跟踪的文件:
(使用 "git add <文件>..." 以包含要提交的内容)
提交为空,但是存在尚未跟踪的文件(使用 "git add" 建立跟踪)
root@Programer myproject# git add readme.md #将文件信息添加到暂存区
root@Programer myproject#git status #查看Git本地仓库状态
位于分支 master
尚无提交
要提交的变更:
(使用 "git rm --cached <文件>..." 以取消暂存)
新文件: readme.md
root@Programer myproject# git commit -m "add readme" #将暂存区文件提交到本地仓库
master(根提交) 09d8603 add readme
1 file changed, 1 insertion(+)
create mode 100644 readme.md
root@Programer myproject# git status
位于分支 master
无文件要提交,干净的工作区
root@Programer myproject#
Git版本库查询
#查看本地Git版本库信息
root@Programer myproject# git log #本地版本库提交记录(详细)
commit 09d8603547b7f7c6cf5b2850dd241d4b8b799b74 (HEAD -> master)
Author: mark <mark@tedu.cn>
Date: Wed Feb 22 15:00:46 2023 +0800
add readme
root@Programer myproject# git log --pretty=oneline #本地版本库提交记录(简略)
09d8603547b7f7c6cf5b2850dd241d4b8b799b74 (HEAD -> master) add readme
root@Programer myproject#git log --oneline #本地版本库提交记录(极简)
09d8603 (HEAD -> master) add readme
root@Programer myproject#
Git练习(生成多个版本)
#数量掌握Git本地版本库操作
root@Programer \~# cd myproject/
root@Programer myproject# echo 123 > test.txt #新建test.txt文件
root@Programer myproject#git add test.txt #将test.txt添加到暂存区
root@Programer myproject# git commit -m "add test.txt" #生成新版本
master 27466f7 add test.txt
1 file changed, 1 insertion(+)
create mode 100644 test.txt
root@Programer myproject# echo 456 > test.txt #修改test.txt文件
root@Programer myproject# git add . #将修改文件添加到暂存区
root@Programer myproject# git commit -m "modify test.txt" #生成新版本
master 58cdf79 modify test.txt
1 file changed, 1 insertion(+), 1 deletion(-)
root@Programer myproject# echo 789 > test.txt #修改test.txt文件
root@Programer myproject# git add ./ #将修改文件添加到暂存区
root@Programer myproject# git commit -m "done test.txt" #生成新版本
master 0f44bf0 done test.txt
1 file changed, 1 insertion(+), 1 deletion(-)
root@Programer myproject# git log --pretty=oneline #查看本地提交记录(简略)
0f44bf04834eac643a0d56901039cec73128d3cc (HEAD -> master) done test.txt
58cdf7905a95a956fc65da264aab827fc7290dbf modify test.txt
27466f79df8e0cbfd3f8f2349143e054db8ac693 add test.txt
09d8603547b7f7c6cf5b2850dd241d4b8b799b74 add readme
root@Programer myproject# git log --oneline #查看本地提交记录(极简)
0f44bf0 (HEAD -> master) done test.txt
58cdf79 modify test.txt
27466f7 add test.txt
09d8603 add readme
root@Programer myproject#
Git指针操作
查看Git指针信息
#使用git log命令查看HEAD指针
root@Programer \~# cd myproject/
root@Programer myproject# git log --pretty=oneline #查看Git指针
0f44bf04834eac643a0d56901039cec73128d3cc (HEAD -> master) done test.txt
58cdf7905a95a956fc65da264aab827fc7290dbf modify test.txt
27466f79df8e0cbfd3f8f2349143e054db8ac693 add test.txt
09d8603547b7f7c6cf5b2850dd241d4b8b799b74 add readme
root@Programer myproject# cat test.txt #查看文件内容
789
root@Programer myproject#
利用指针实现Git版本还原
#reset子命令用于版本还原
root@Programer myproject#git reset --hard 58cdf7905a #还原到指定版本
HEAD 现在位于 58cdf79 modify test.txt
root@Programer myproject# git log --oneline #确认HEAD指针移动
58cdf79 (HEAD -> master) modify test.txt
27466f7 add test.txt
09d8603 add readme
root@Programer myproject# cat test.txt #查看文件内容
456
root@Programer myproject#
#reflog子命令用于获取HEAD指针移动轨迹
root@Programer myproject#git reflog
58cdf79 (HEAD -> master) HEAD@{0}: reset: moving to 58cdf79
0f44bf0 HEAD@{1}: commit: done test.txt
58cdf79 (HEAD -> master) HEAD@{2}: commit: modify test.txt
27466f7 HEAD@{3}: commit: add test.txt
09d8603 HEAD@{4}: commit (initial): add readme
root@Programer myproject#git reset --hard 0f44bf0
HEAD 现在位于 0f44bf0 done test.txt
root@Programer myproject# git log --oneline
0f44bf0 (HEAD -> master) done test.txt
58cdf79 modify test.txt
27466f7 add test.txt
09d8603 add readme
root@Programer myproject# git reflog
0f44bf0 (HEAD -> master) HEAD@{0}: reset: moving to 0f44bf0
58cdf79 HEAD@{1}: reset: moving to 58cdf79
0f44bf0 (HEAD -> master) HEAD@{2}: commit: done test.txt
58cdf79 HEAD@{3}: commit: modify test.txt
27466f7 HEAD@{4}: commit: add test.txt
09d8603 HEAD@{5}: commit (initial): add readme
root@Programer myproject# cat test.txt
789
Git分支操作
Git分支管理
#查看当前分支信息,branch子命令
root@Programer \~# cd myproject/
root@Programer myproject# git status #查看本地Git仓库信息
位于分支 master
无文件要提交,干净的工作区
root@Programer myproject#git branch -v #查看分支信息
* master 0f44bf0 done test.txt
root@Programer myproject#
#创建分支
root@Programer myproject# git branch hotfix #创建hotfix分支
root@Programer myproject# git branch feature #创建feature分支
root@Programer myproject# git branch -v #查看分支信息
feature 0f44bf0 done test.txt
hotfix 0f44bf0 done test.txt
* master 0f44bf0 done test.txt
root@Programer myproject#
#切换分支,checkout子命令
root@Programer myproject# git branch -v #查看分支信息
feature 0f44bf0 done test.txt
hotfix 0f44bf0 done test.txt
* master 0f44bf0 done test.txt
root@Programer myproject# git checkout hotfix #切换分支
切换到分支 'hotfix'
root@Programer myproject# git branch -v #查看分支信息
feature 0f44bf0 done test.txt
* hotfix 0f44bf0 done test.txt
master 0f44bf0 done test.txt
root@Programer myproject#git checkout feature #切换分支
切换到分支 'feature'
root@Programer myproject#git branch -v #查看分支信息
* feature 0f44bf0 done test.txt
hotfix 0f44bf0 done test.txt
master 0f44bf0 done test.txt
root@Programer myproject#
#删除分支
root@Programer myproject# git branch develop #创建develop分支
root@Programer myproject#git branch -v
develop 0f44bf0 done test.txt
* feature 0f44bf0 done test.txt
hotfix 0f44bf0 done test.txt
master 0f44bf0 done test.txt
root@Programer myproject# git branch -d develop #删除develop分支
已删除分支 develop(曾为 0f44bf0)。
root@Programer myproject#
Git合并分支
#无冲突分支合并
root@Programer \~# cd myproject/
root@Programer myproject#git checkout hotfix #切换到hotfix分支
切换到分支 'hotfix'
root@Programer myproject#echo haha > haha.txt #创建haha文件
root@Programer myproject# git add ./ #添加haha到暂存区
root@Programer myproject#git commit -m "add haha.txt" #生成新版本
hotfix 108cf46 add haha.txt
1 file changed, 1 insertion(+)
create mode 100644 haha.txt
root@Programer myproject# ls
haha.txt readme.md test.txt
root@Programer myproject# cat haha.txt
haha
root@Programer myproject# git checkout master #切换到master分支
切换到分支 'master'
root@Programer myproject# echo xixi > xixi.txt #创建xixi文件
root@Programer myproject# git add ./ #添加xixi到暂存区
root@Programer myproject# git commit -m "add xixi.txt" #生成新版本
master 32f0842 add xixi.txt
1 file changed, 1 insertion(+)
create mode 100644 xixi.txt
root@Programer myproject# ls
readme.md test.txt xixi.txt
root@Programer myproject# git branch -v #切换到master分支
feature 0f44bf0 done test.txt
hotfix 108cf46 add haha.txt
* master 32f0842 add xixi.txt
root@Programer myproject# git merge hotfix #合并hotfix分支到master分支
Merge made by the 'recursive' strategy.
haha.txt | 1 +
1 file changed, 1 insertion(+)
create mode 100644 haha.txt
root@Programer myproject# ls #确认文件
haha.txt readme.md test.txt xixi.txt
root@Programer myproject# cat haha.txt
haha
root@Programer myproject# cat xixi.txt
xixi
root@Programer myproject#
#有冲突分支合并(修改不同分支中相同文件的相同行)
root@Programer myproject# git branch -v #查看分支
feature 0f44bf0 done test.txt
hotfix 108cf46 add haha.txt
* master b4bea28 Merge branch 'hotfix' 合并hotfix分支
root@Programer myproject# git checkout hotfix #切换到hotfix分支
切换到分支 'hotfix'
root@Programer myproject#echo "hahaha" > a.txt #创建a.txt文件
root@Programer myproject# git add . #添加到暂存区
root@Programer myproject# git commit -m "hotfix" #生成新版本
hotfix af8a04b hotfix
1 file changed, 1 insertion(+)
create mode 100644 a.txt
root@Programer myproject# git checkout master #切换到master分支
切换到分支 'master'
root@Programer myproject#echo "xixixi" > a.txt #创建a.txt
root@Programer myproject# git add . #添加到暂存区
root@Programer myproject# git commit -m "master" #生成新版本
master f556200 master
1 file changed, 1 insertion(+)
create mode 100644 a.txt
root@Programer myproject#git merge hotfix #合并hotfix分支到master分支
冲突(add/add):合并冲突于 a.txt
自动合并 a.txt
自动合并失败,修正冲突然后提交修正的结果。 #文件冲突,合并失败,手工解决
root@Programer myproject# cat a.txt
<<<<<<< HEAD
xixixi
=======
hahaha
>>>>>>> hotfix
root@Programer myproject# vim a.txt #手工解决冲突
root@Programer myproject# cat a.txt
xixixi
hahaha
root@Programer myproject# git add ./ #添加到暂存区
root@Programer myproject# git commit -m "resolv conflict"#生成新版本,解决冲突
master 2a6f272 resolv conflict
root@Programer myproject#
Git标签操作
Git标签管理
#使用tag子命令管理标签
root@Programer \~# cd myproject/
root@Programer myproject# git tag #查看已有标签
root@Programer myproject#git tag v1 #创建v1标签
root@Programer myproject# git tag #查看已有标签
v1
root@Programer myproject# git tag v2 #创建v2标签
root@Programer myproject# git tag #查看已有标签
v1
v2
root@Programer myproject#git tag -d v2 #删除v2标签
已删除标签 'v2'(曾为 2a6f272)
root@Programer myproject#
GitLab服务器搭建
使用rpm包本地部署GitLab服务器
#确认GitLab主机硬件配置
root@GitLab \~# free -m
total used free shared buff/cache available
Mem: 3896 113 3691 8 90 3615
Swap: 0 0 0
#安装解压软件
root@GitLab \~#yum -y install unzip
#解压实验素材(提前从server1主机/linux-soft/s3/PROJECT02.zip拷贝的资料)
root@GitLab \~# unzip PROJECT02.zip
#查看解压的素材资料
root@GitLab \~# ls PROJECT02/GitLab/
gitlab-ce-12.4.6-ce.0.el7.x86_64.rpm
#安装GitLab软件包,强制忽略依赖安装
root@GitLab \~# rpm -ivh --nodeps gitlab-ce-12.4.6-ce.0.el7.x86_64.rpm
#重载GitLab配置(需要耐心等待)
root@GitLab \~# gitlab-ctl reconfigure
...
Running handlers:
Running handlers complete
Chef Client finished, 527/1423 resources updated in 02 minutes 05 seconds
gitlab Reconfigured!
#重启GitLab相关服务
root@GitLab \~#gitlab-ctl restart
ok: run: alertmanager: (pid 1975) 0s //报警服务
ok: run: gitaly: (pid 1986) 1s //Git后台服务
ok: run: gitlab-exporter: (pid 2014) 0s //Prometheus数据采集器
ok: run: gitlab-workhorse: (pid 2020) 1s //反向代理服务器
ok: run: grafana: (pid 2117) 0s //数据可视化服务
ok: run: logrotate: (pid 2129) 0s //日志文件管理服务
ok: run: nginx: (pid 2135) 1s //静态WEB服务
ok: run: node-exporter: (pid 2142) 0s //Prometheus数据采集器
ok: run: postgres-exporter: (pid 2148) 1s //Prometheus数据采集器
ok: run: postgresql: (pid 2159) 0s //数据库服务
ok: run: prometheus: (pid 2168) 0s //Prometheus监控服务
ok: run: redis: (pid 2178) 1s //缓存数据库服务
ok: run: redis-exporter: (pid 2183) 0s //Prometheus数据采集器
ok: run: sidekiq: (pid 2192) 0s //异步执行队列服务
ok: run: unicorn: (pid 2203) 0s //Rails托管WEB服务
root@GitLab \~#
GitLab使用
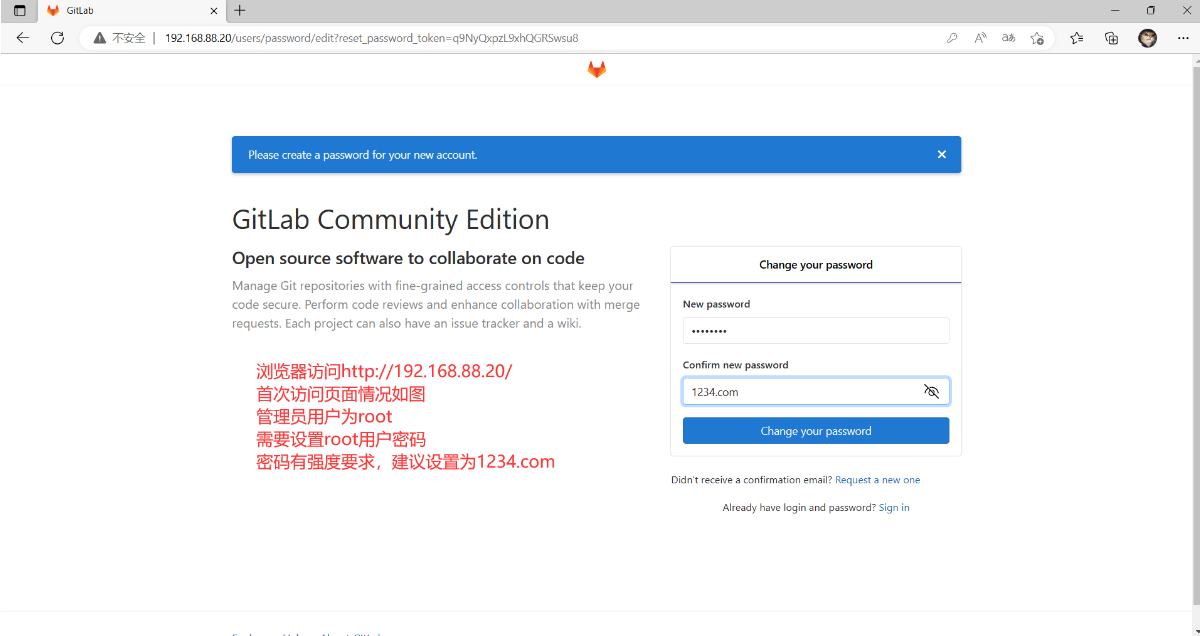
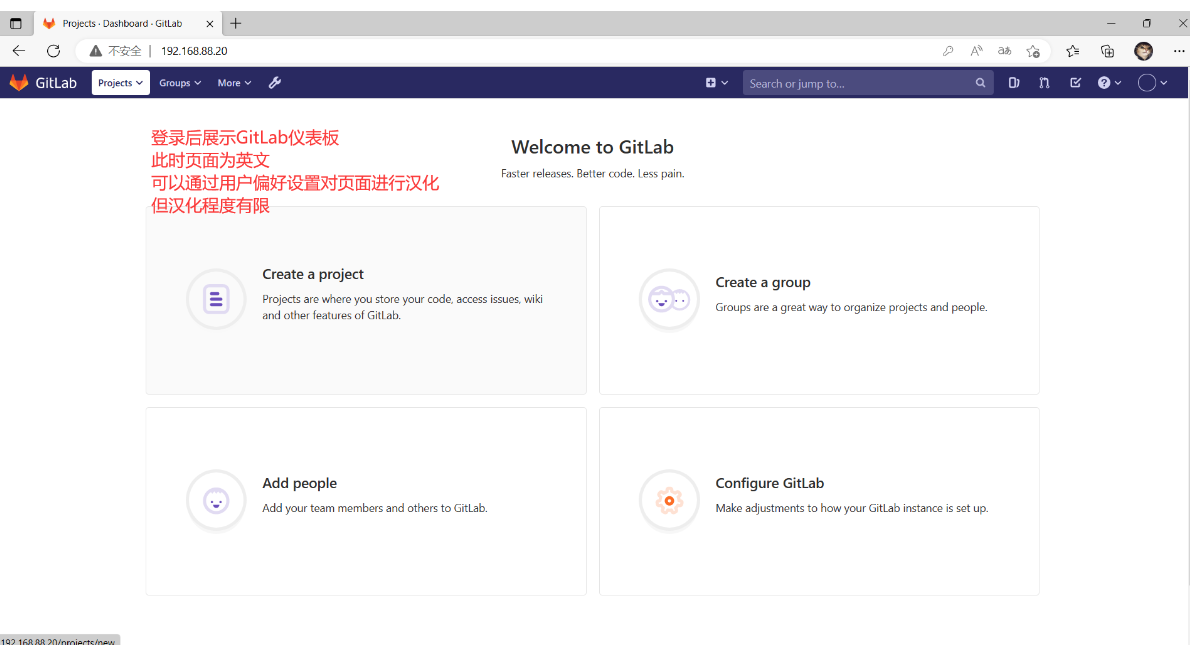
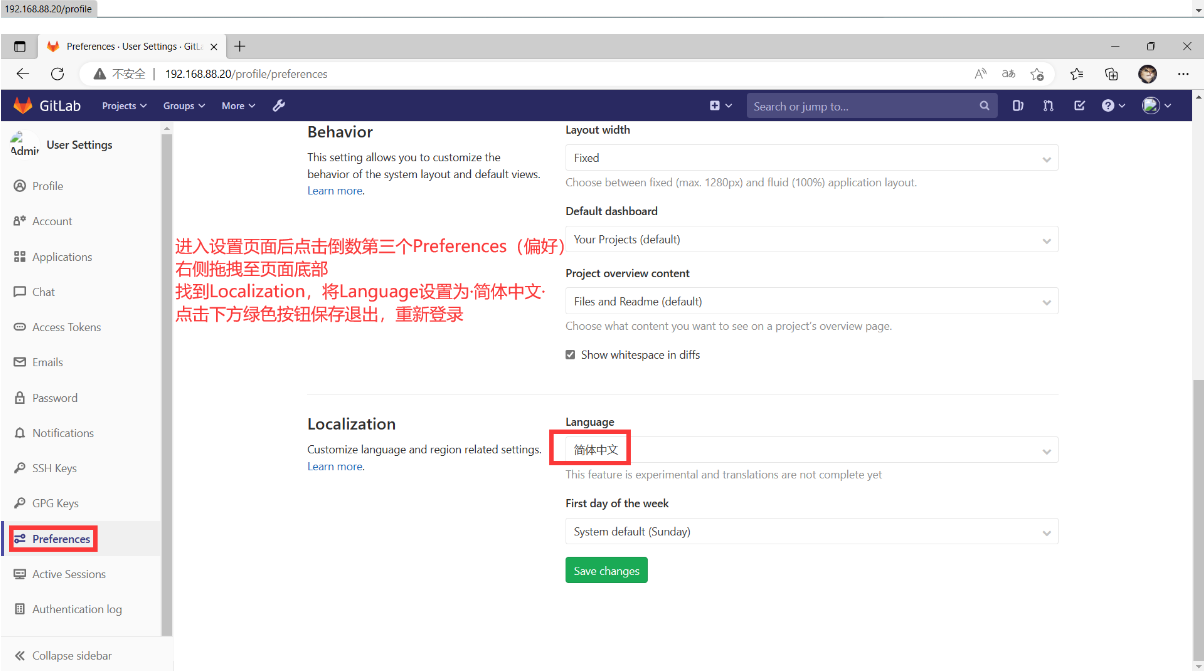
GitLab初始化
GitLab服务器中组成员的角色有
Guest:发表评论、不能读写版本库
Reporter:可以克隆代码,不能提交
Developer:可以克隆代码、开发、提交、push
Maintainer:可以创建项目、添加 tag 、保护分支、添加项目成员、编辑项目
Owner:可以设置项目的访问权限、删除项目、迁移项目、管理组成员、开发组可以赋予这个权限
#GitLab主机确认80端口被监听
root@GitLab \~# ss -anptul | grep :80
tcp LISTEN 0 511 0.0.0.0:80 0.0.0.0:* users:(("nginx",pid=11166,fd=7),("nginx",pid=11165,fd=7),("nginx",pid=11164,fd=7))
root@GitLab \~#
#浏览器访问: http://192.168.88.20/

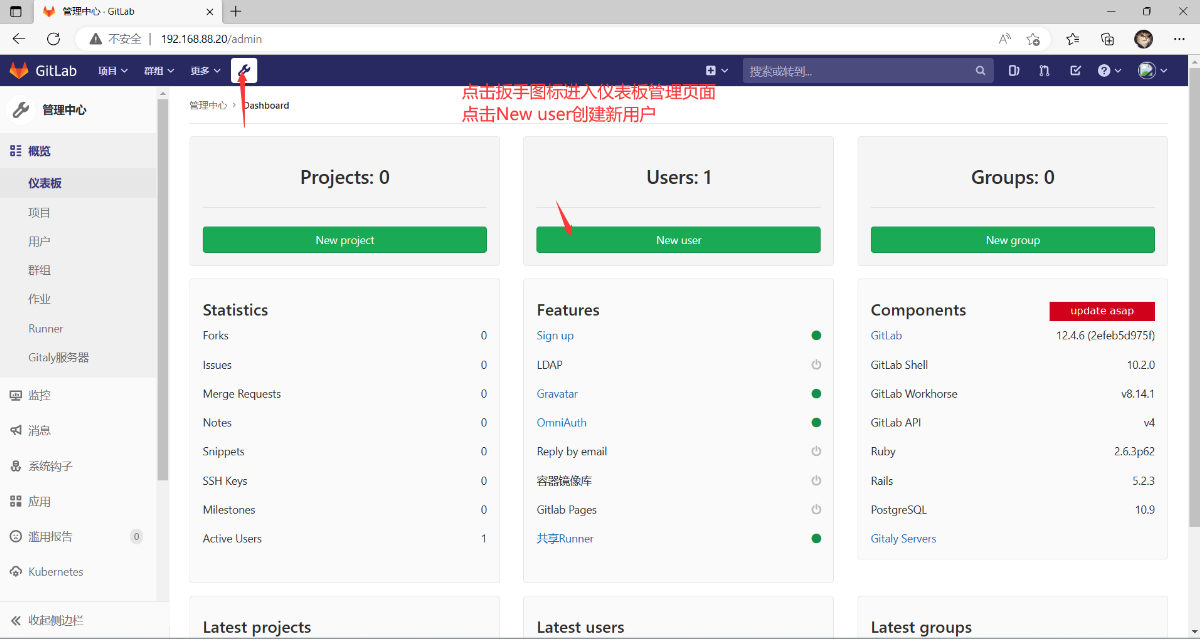
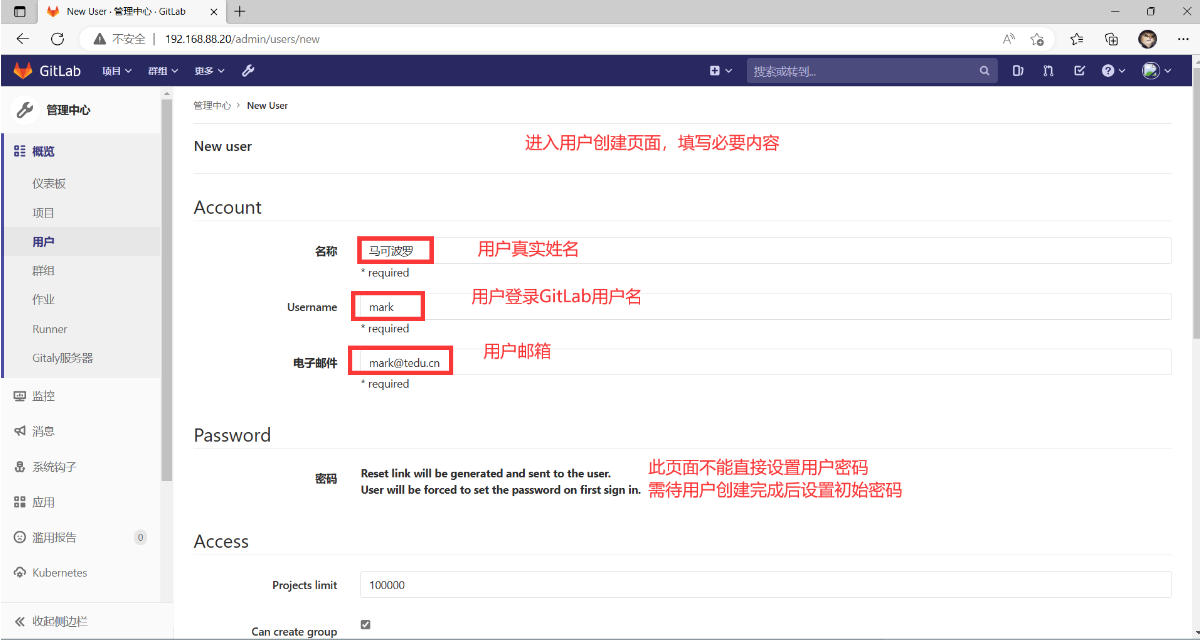
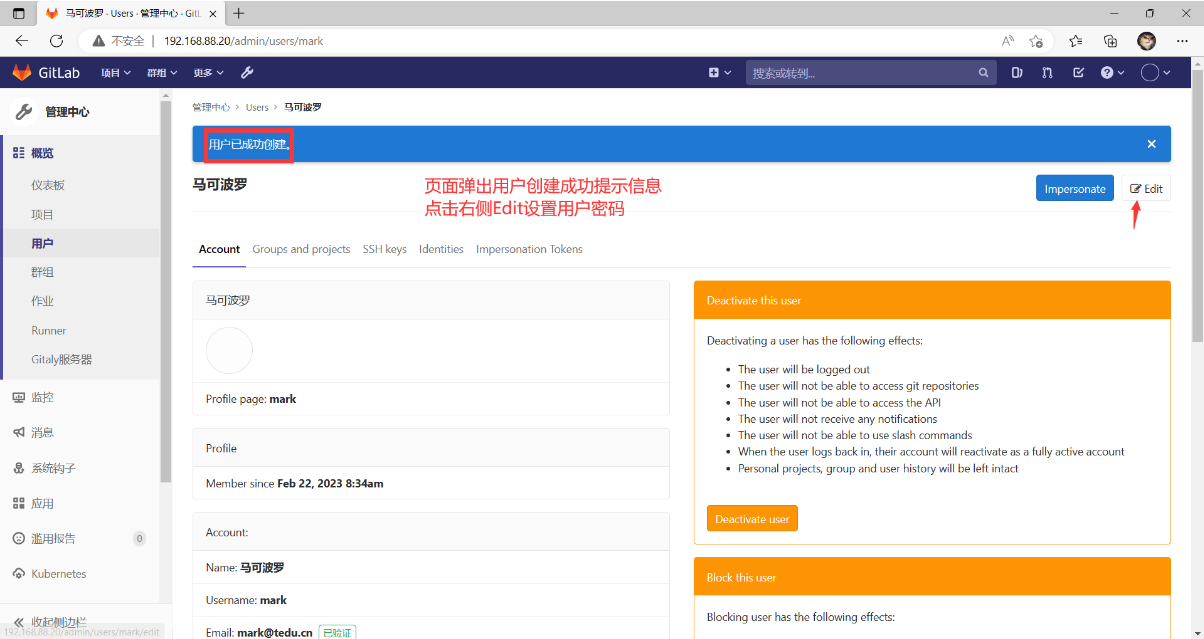
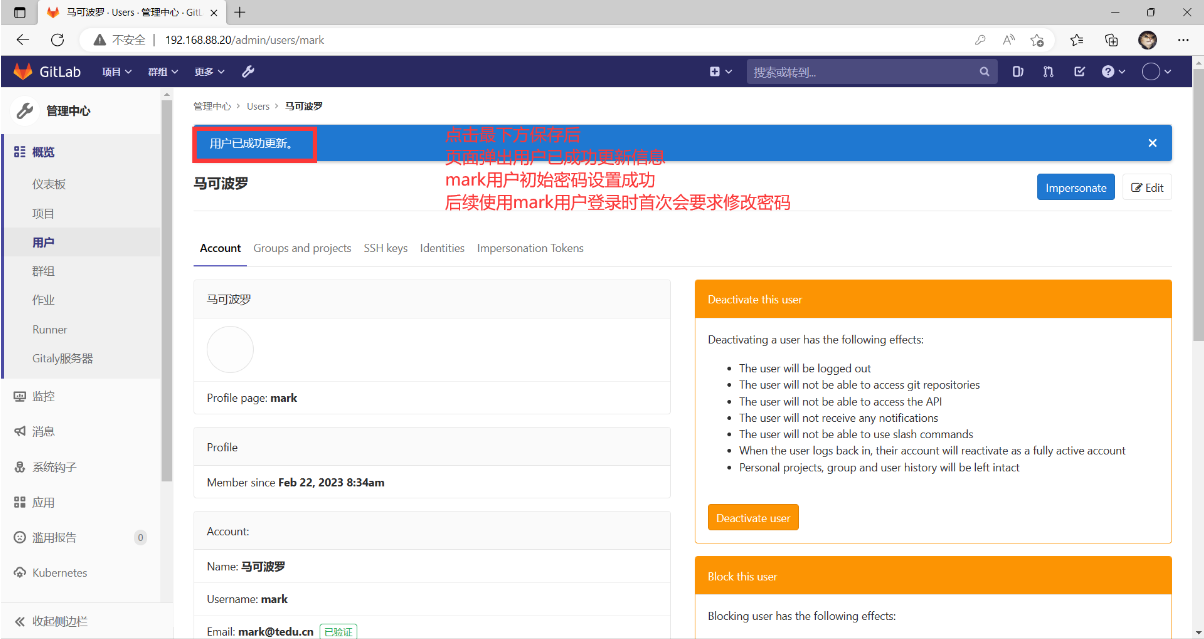
GitLab用户管理


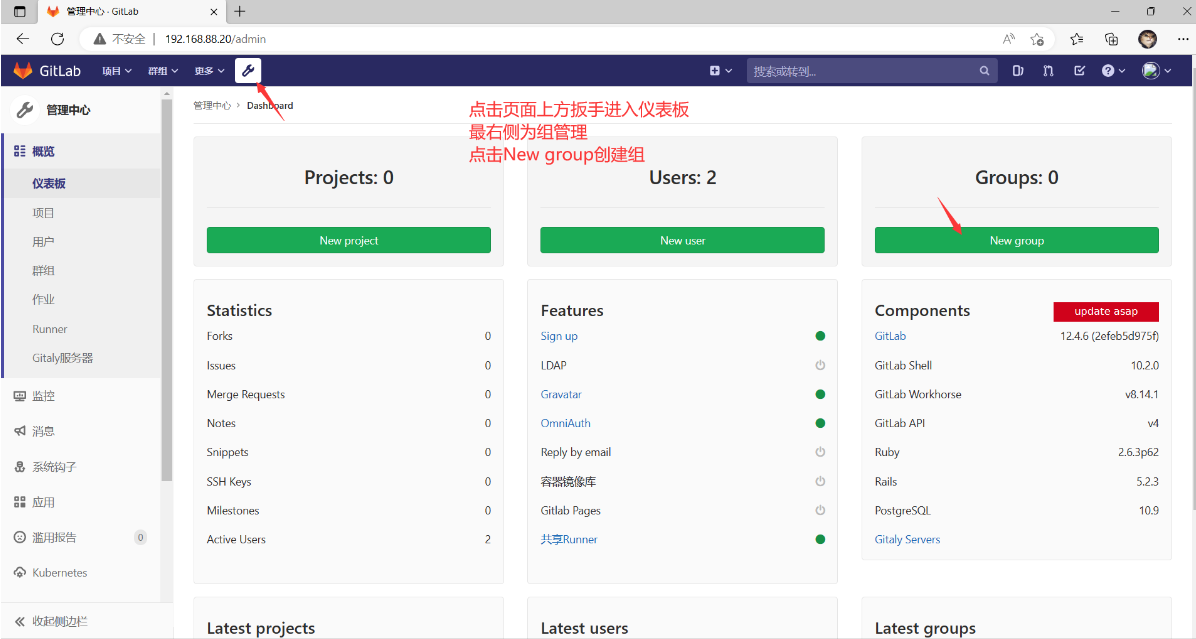
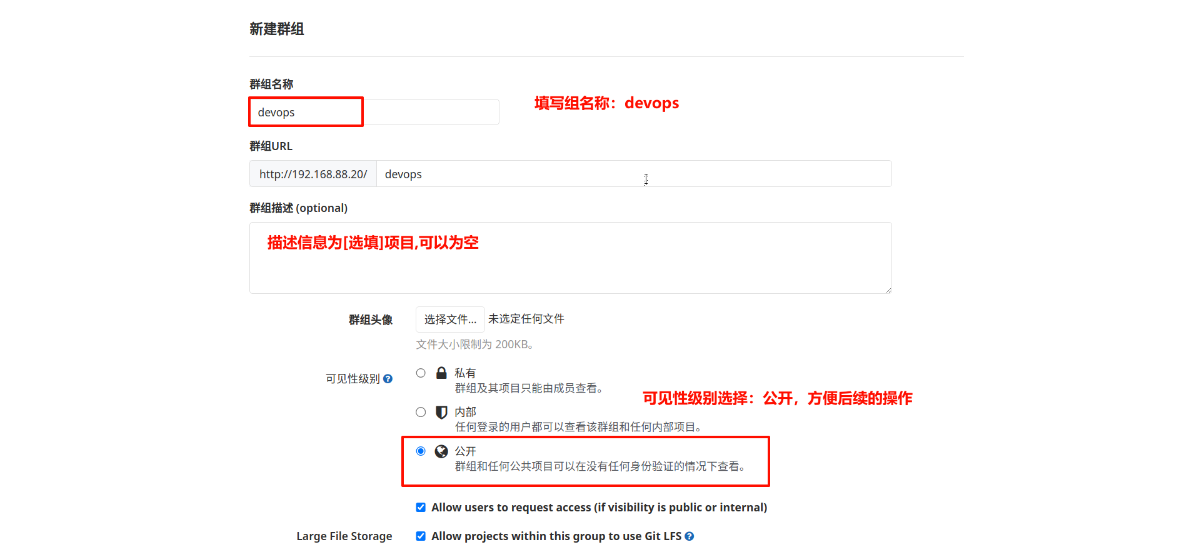
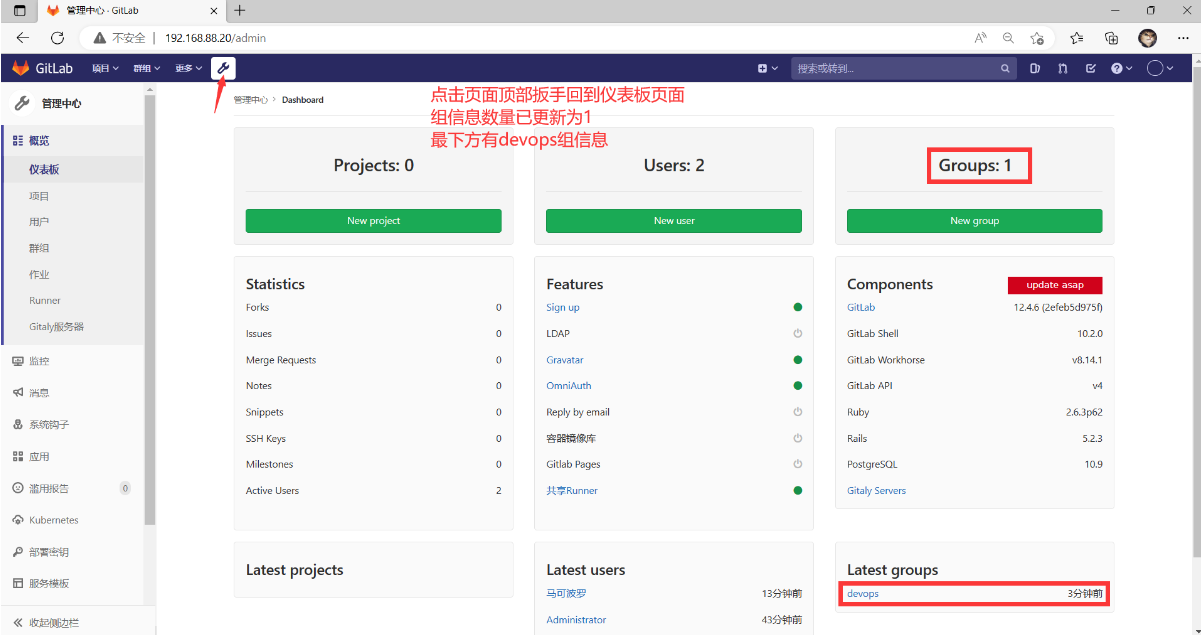
GitLab组管理

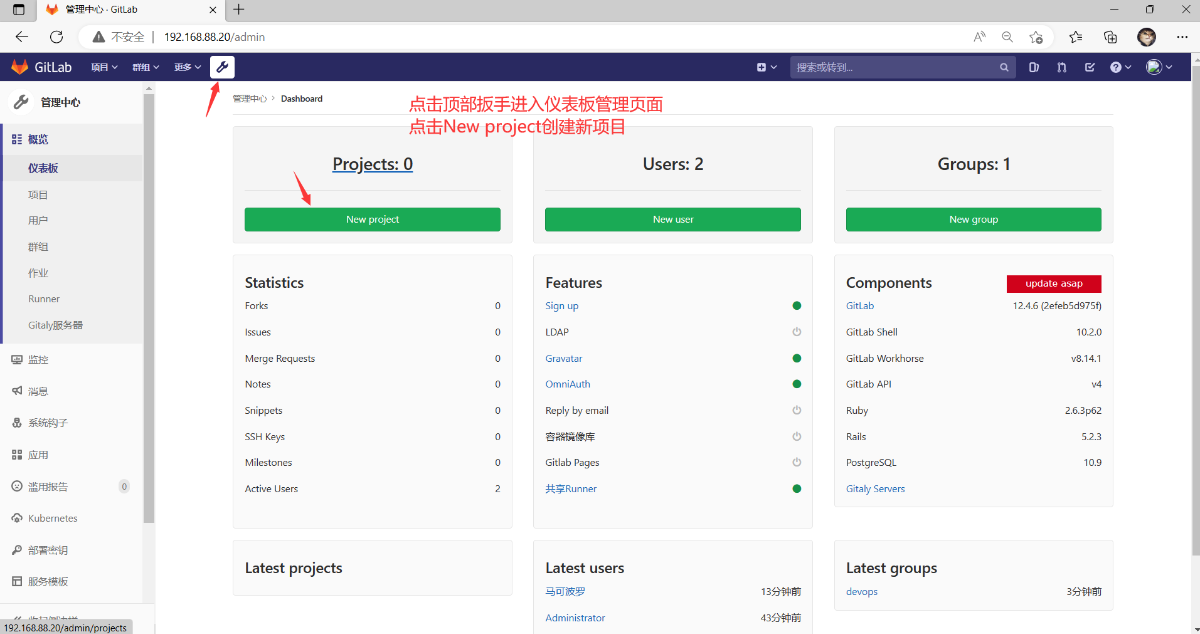
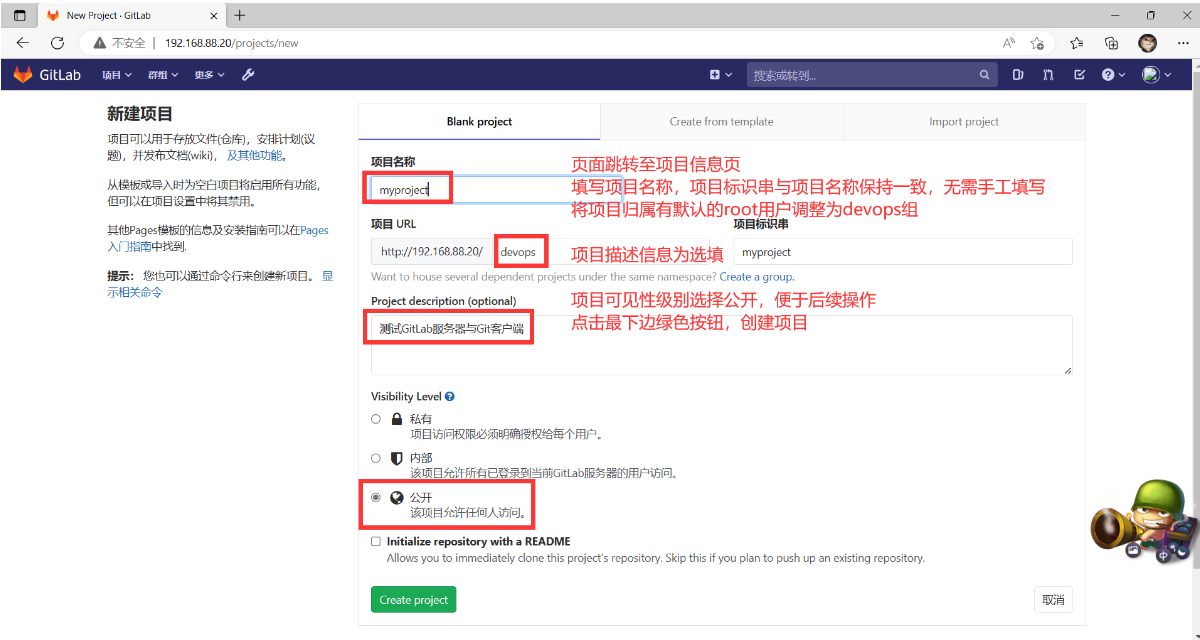
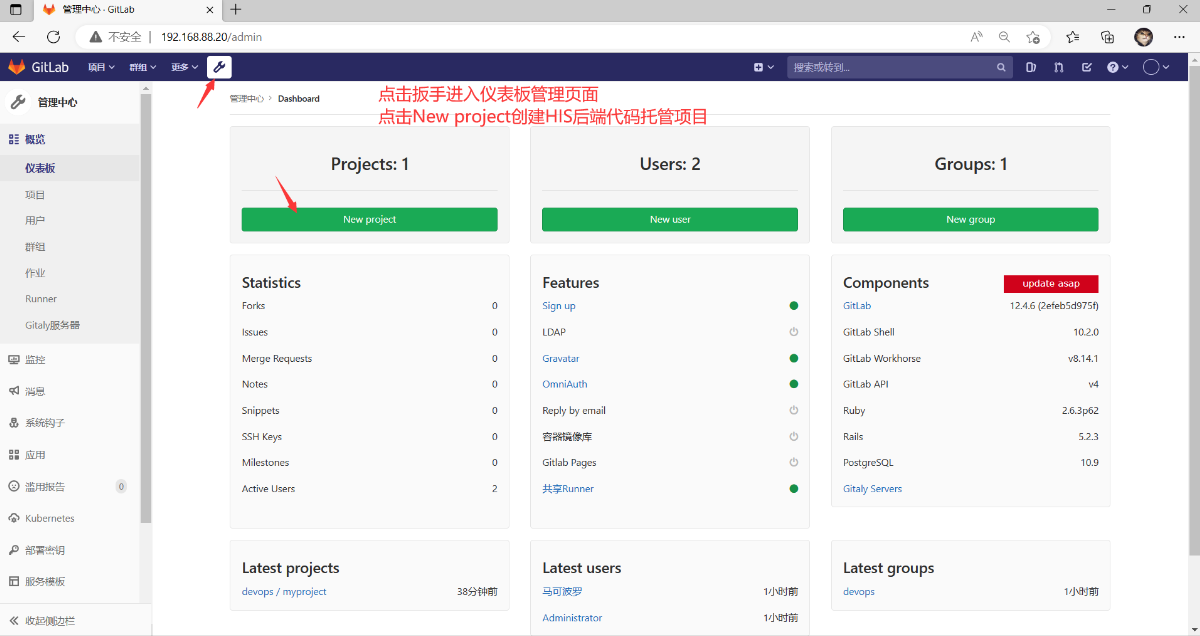
GitLab项目管理

代码托管
关联Programer主机myproject仓库与GitLab服务器上myproject项目
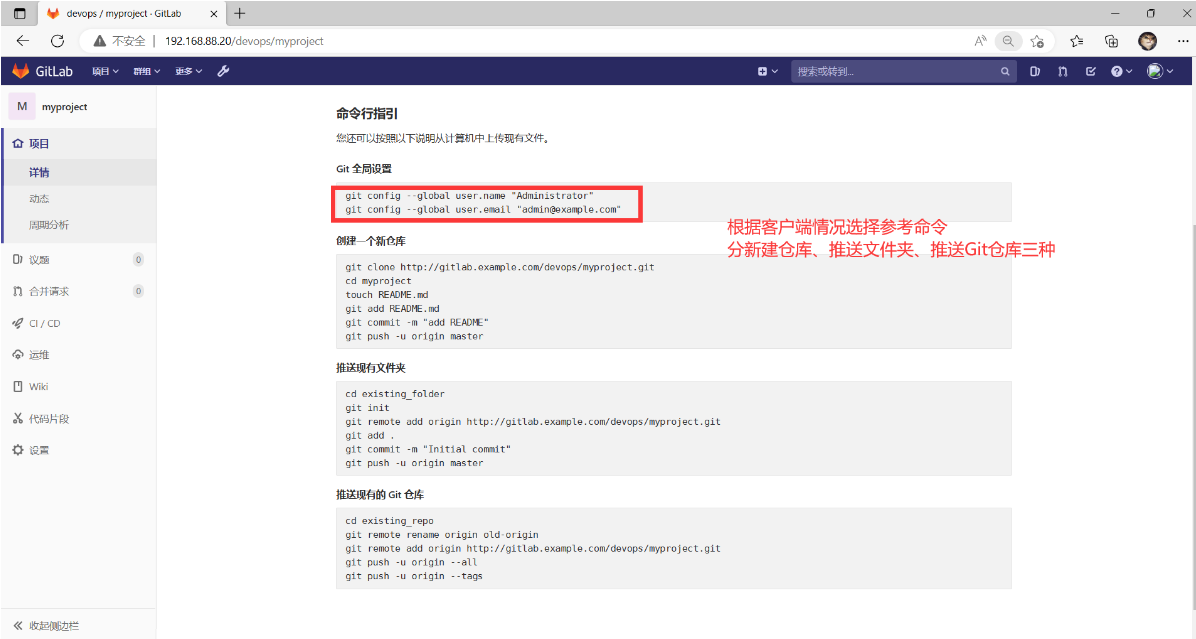
#参考提示命令"推送已有Git仓库部分"
root@Programer \~# cd myproject/
root@Programer myproject# git remote -v #查看远程仓库关联信息
root@Programer myproject# git remote add origin http://192.168.88.20/devops/myproject.git #关联远程项目
root@Programer myproject# git remote -v #查看远程想看关联信息
origin http://192.168.88.20/devops/myproject.git (fetch)
origin http://192.168.88.20/devops/myproject.git (push)
root@Programer myproject# git push -u origin --all #推送本地仓库所有分支
Username for 'http://192.168.88.20': mark #用户名
Password for 'http://mark@192.168.88.20': #密码
枚举对象中: 29, 完成.
对象计数中: 100% (29/29), 完成.
使用 2 个线程进行压缩
压缩对象中: 100% (19/19), 完成.
写入对象中: 100% (29/29), 2.21 KiB | 2.21 MiB/s, 完成.
总共 29(差异 5),复用 0(差异 0),包复用 0
remote:
remote: To create a merge request for feature, visit:
remote: http://gitlab.example.com/devops/myproject/merge_requests/new?merge_request[source_branch]=feature
remote:
remote: To create a merge request for hotfix, visit:
remote: http://gitlab.example.com/devops/myproject/merge_requests/new?merge_request[source_branch]=hotfix
remote:
To http://192.168.88.20/devops/myproject.git
* new branch feature -> feature
* new branch hotfix -> hotfix
* new branch master -> master
分支 'feature' 设置为跟踪来自 'origin' 的远程分支 'feature'。
分支 'hotfix' 设置为跟踪来自 'origin' 的远程分支 'hotfix'。
分支 'master' 设置为跟踪来自 'origin' 的远程分支 'master'。
root@Programer myproject#git push -u origin --tags #推送本地仓库所有标签
Username for 'http://192.168.88.20': mark #用户名
Password for 'http://mark@192.168.88.20': #密码
总共 0(差异 0),复用 0(差异 0),包复用 0
To http://192.168.88.20/devops/myproject.git
* new tag v1 -> v1
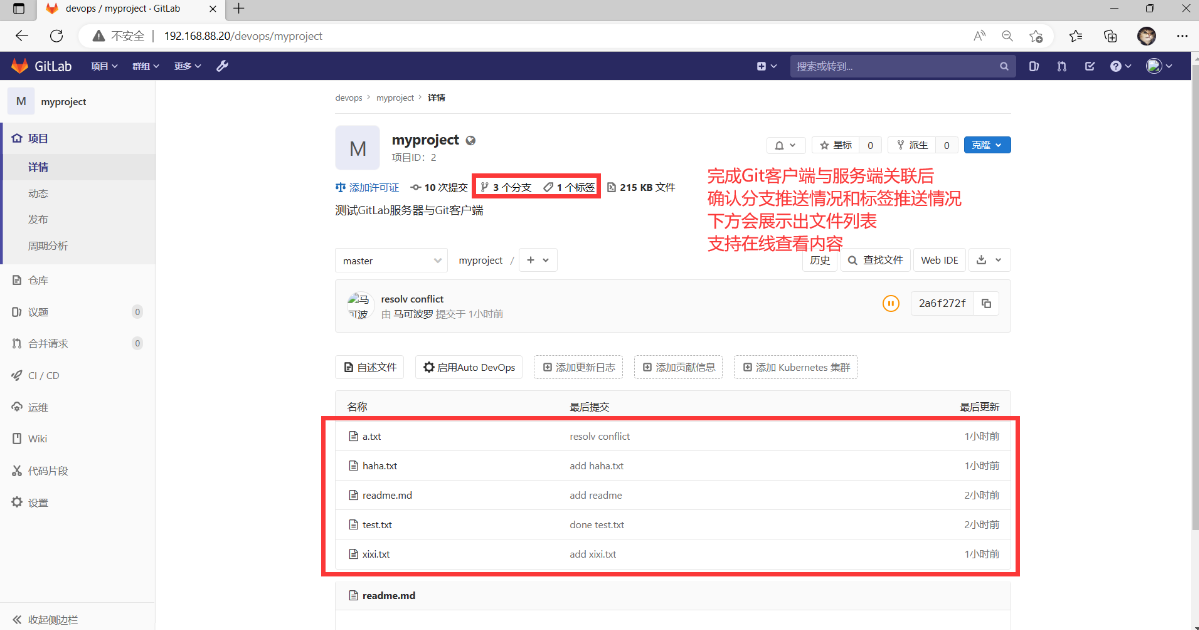
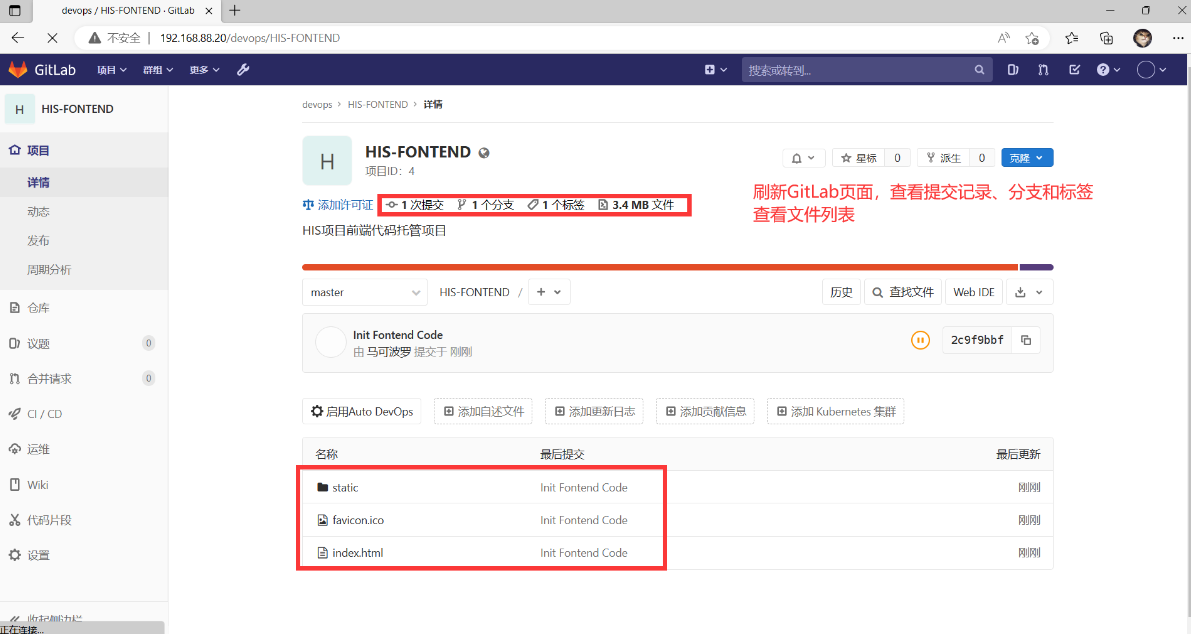
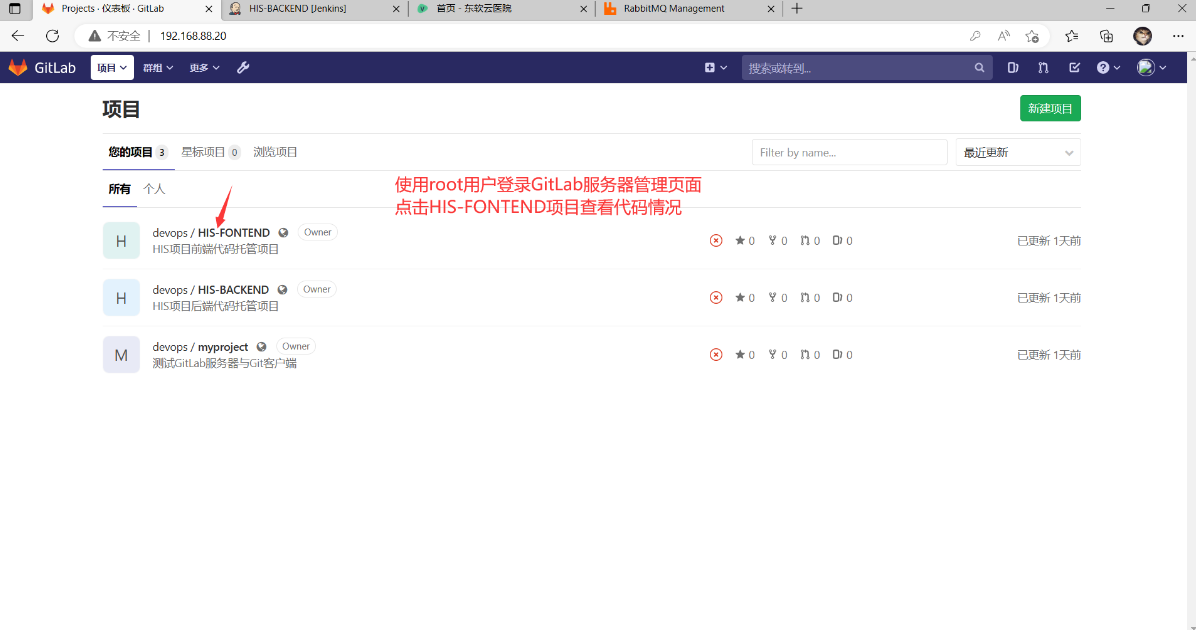
登录GitLab项目管理页面查看推送情况(http://192.168.88.20/devops/myproject)
HTTP方式免密推送
#每次推送都需要认证,可以设置免密推送
#store:永久存储
#cache:默认缓存15分钟,期间无需认证,可通过cache --timeout=3600设置超时时间
#git remote add origin http://name:pass@192.168.88.20/devops/myproject.git
#持久保存密码
root@Programer myproject# git config --global credential.helper store
root@Programer myproject#git push #推送代码(本次需要认证)
Username for 'http://192.168.88.20': mark #用户名
Password for 'http://mark@192.168.88.20': #密码
Everything up-to-date
root@Programer myproject# git push #再次推送测试免密
Everything up-to-date
root@Programer myproject# cat ~/.git-credentials
HIS项目代码托管
- HIS项目代码准备
#Programer主机准备HIS代码
root@Programer \~# ls PROJECT02/Case/HIS/HIS.zip
HIS.zip
#解压医疗下项目的代码
root@Programer \~# unzip PROJECT02/Case/HIS/HIS.zip
root@Programer \~# ls HIS
HIS-BACKEND #HIS项目后端代码,SpringBoot框架编写
HIS-CONFIG #HIS项目后端程序运行配置文件
HIS-FONTEND #HIS项目前端代码(已编译)
HIS-FONTEND-DEPENDENCY #HIS项目前端代码编译依赖库(npm库)
HIS-FONTEND-SOURCECODE #HIS项目前端代码(未编译,VUE框架编写)
HIS-SQL #HIS项目数据库SQL文件
root@Programer \~#
- HIS后端代码托管
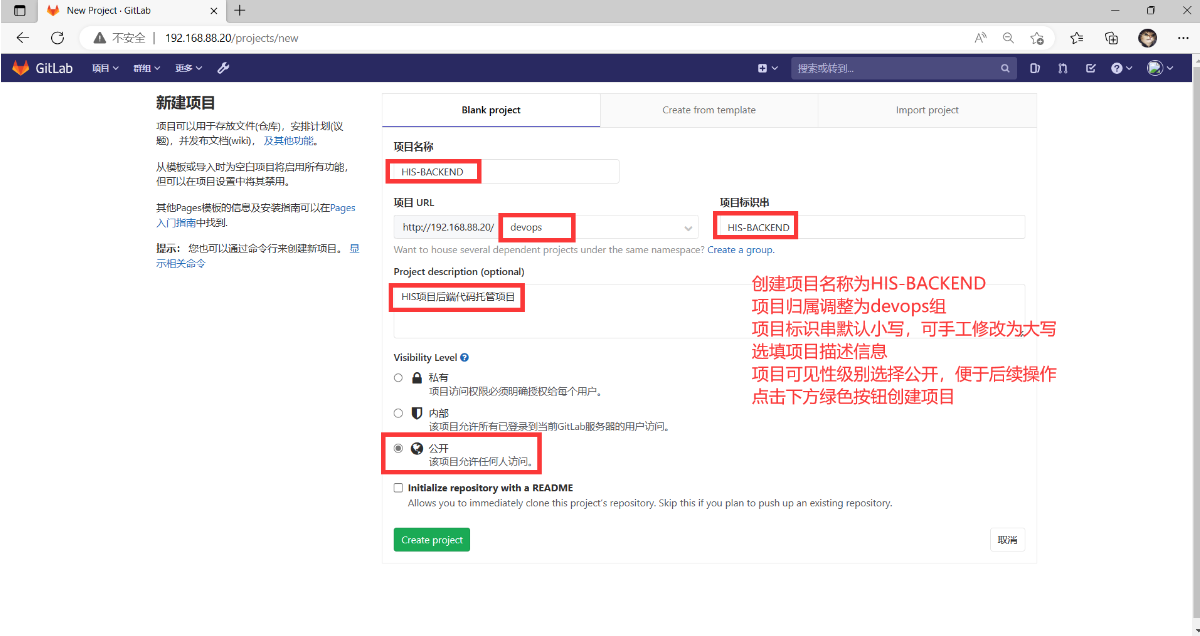
#关联GitLab服务器HIS-BACKEND项目与Programer主机HIS-BACKEND代码
root@Programer \~#cd HIS/HIS-BACKEND/
root@Programer HIS-BACKEND# git init #初始化仓库
已初始化空的 Git 仓库于 /root/HIS/HIS-BACKEND/.git/
root@Programer HIS-BACKEND# git remote add origin http://192.168.88.20/devops/HIS-BACKEND.git #关联本地与远程
root@Programer HIS-BACKEND# git remote -v
origin http://192.168.88.20/devops/HIS-BACKEND.git (fetch)
origin http://192.168.88.20/devops/HIS-BACKEND.git (push)
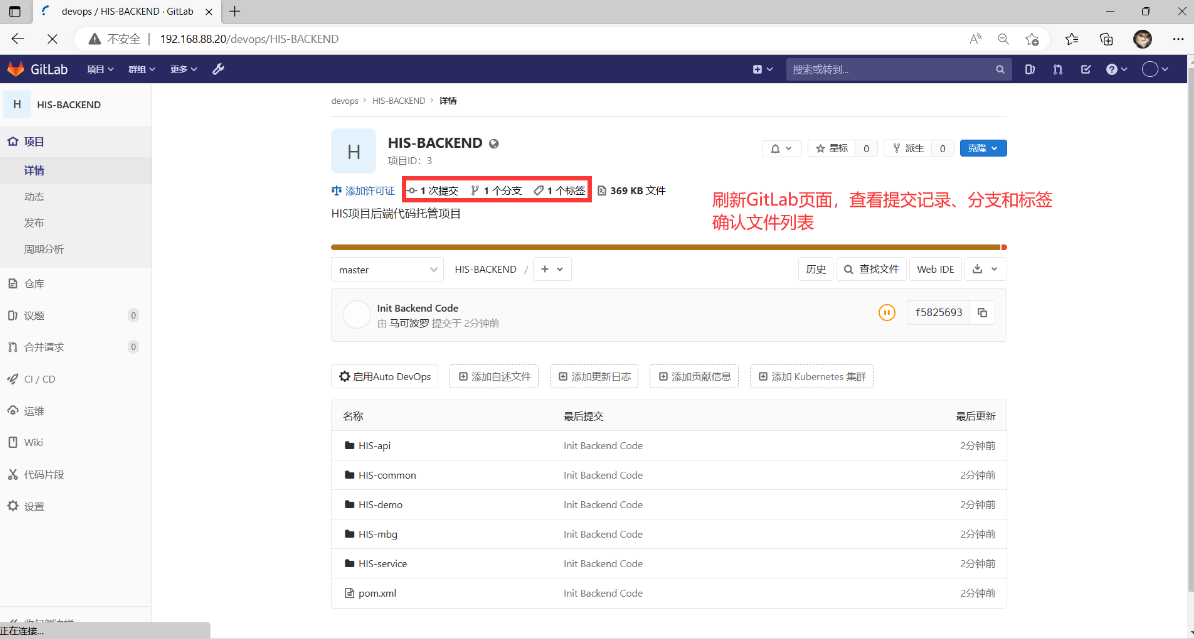
root@Programer HIS-BACKEND# git add ./ #添加代码到暂存区
root@Programer HIS-BACKEND# git commit -m "Init Backend Code" #提交本地版本库
root@Programer HIS-BACKEND# git tag v1 #创建v1标签
root@Programer HIS-BACKEND#git push -u origin --all #推送本地所有分支
root@Programer HIS-BACKEND#git push -u origin --tags #推送本地所有标签
总共 0(差异 0),复用 0(差异 0),包复用 0
To http://192.168.88.20/devops/HIS-BACKEND.git
* new tag v1 -> v1
- HIS前端代码托管
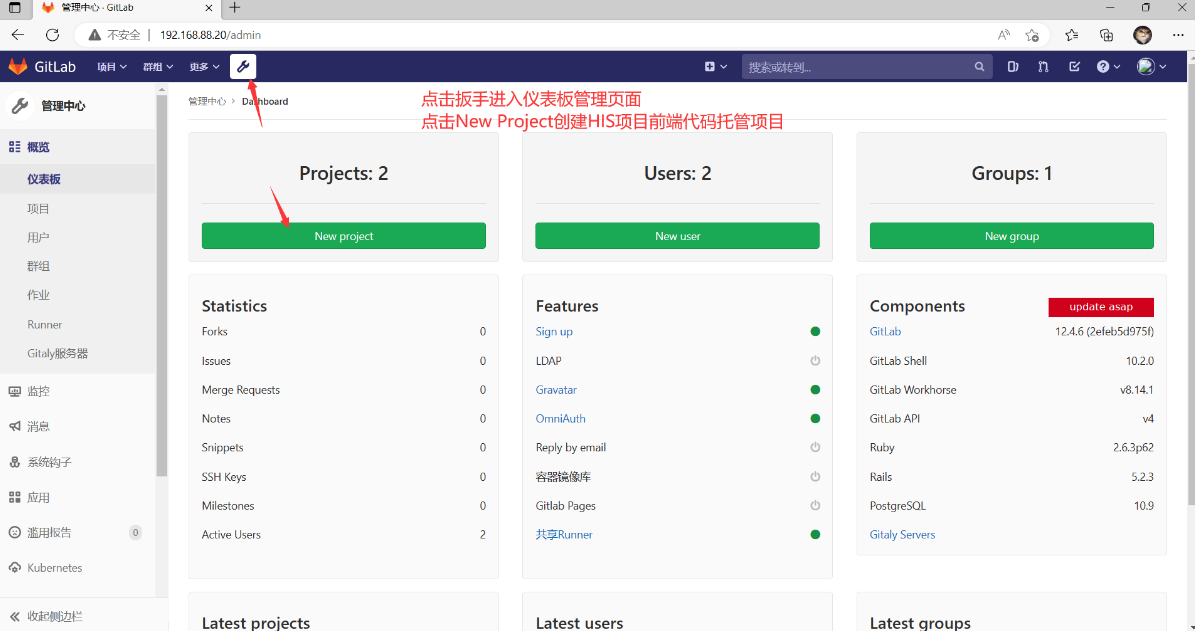

#关联GitLab服务器HIS-FONTEND项目与Programer主机HIS-FONTEND代码
root@Programer HIS-BACKEND# cd
root@Programer \~# cd HIS/HIS-FONTEND
#初始化仓库
root@Programer HIS-FONTEND#git init
已初始化空的 Git 仓库于 /root/HIS/HIS-FONTEND/.git/
#关联本地与远程
root@Programer HIS-FONTEND#git remote add origin \
root@Programer HIS-FONTEND# git remote -v
origin http://192.168.88.20/devops/HIS-FONTEND.git (fetch)
origin http://192.168.88.20/devops/HIS-FONTEND.git (push)
root@Programer HIS-FONTEND#git add ./ #添加文件到暂存区
root@Programer HIS-FONTEND#git commit -m "Init Fontend Code"#提交到本地版本库
root@Programer HIS-FONTEND# git tag v1 #创建v1标签
root@Programer HIS-FONTEND# git push -u origin --all #推送所有分支
root@Programer HIS-FONTEND# git push -u origin --tags #推送所有标签
总共 0(差异 0),复用 0(差异 0),包复用 0
To http://192.168.88.20/devops/HIS-FONTEND.git
* new tag v1 -> v1
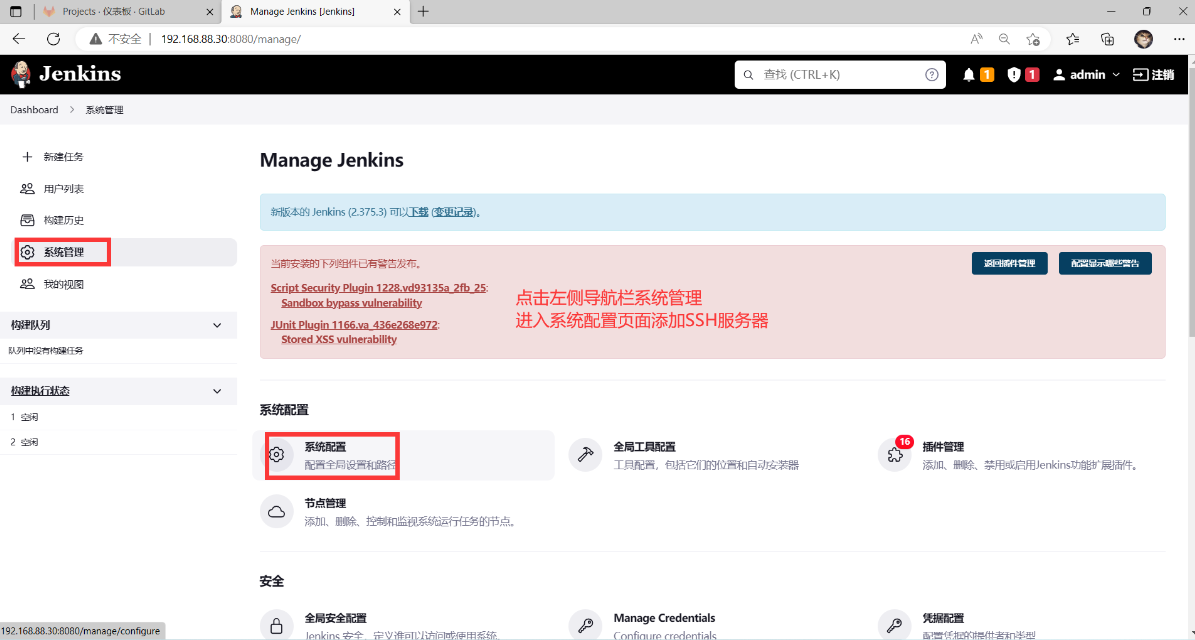
Jenkins部署
Jenkins安装部署
#Jenkins主机安装OpenJDK11环境
root@Jenkins \~# yum -y install java-11-openjdk-devel.x86_64
root@Jenkins \~#java -version
openjdk version "11.0.15" 2022-04-19 LTS
OpenJDK Runtime Environment 18.9 (build 11.0.15+9-LTS)
OpenJDK 64-Bit Server VM 18.9 (build 11.0.15+9-LTS, mixed mode, sharing)
#安装工具相关软件(Git用于拉取代码、postfix用于发邮件)
root@Jenkins \~# yum -y install git postfix
#安装解压软件,并解压素材(提前从server1主机/linux-soft/s3/PROJECT02.zip拷贝的资料)
root@Jenkins \~# yum -y install unzip
root@Jenkins \~# unzip PROJECT02.zip
#查看软件包
root@Jenkins \~# ls PROJECT02/Jenkins/
apache-maven-3.6.3-bin.tar.gz jenkins-2.361.4-1.1.noarch.rpm jenkins_plugins.tar.gz
#安装Jenkins
root@jenkins \~# yum -y localinstall \PROJECT02/Jenkins/jenkins-2.361.4-1.1.noarch.rpm
#启动Jenkins服务
root@Jenkins \~# systemctl enable jenkins.service #设置Jenkins开机自启动
root@Jenkins \~# systemctl start jenkins.service #启动Jenkins服务器
root@Jenkins \~# ss -antpul | grep java #确认8080端口被监听
tcp LISTEN 0 50 *:8080 *:* users:(("java",pid=13602,fd=8))
root@Jenkins \~#
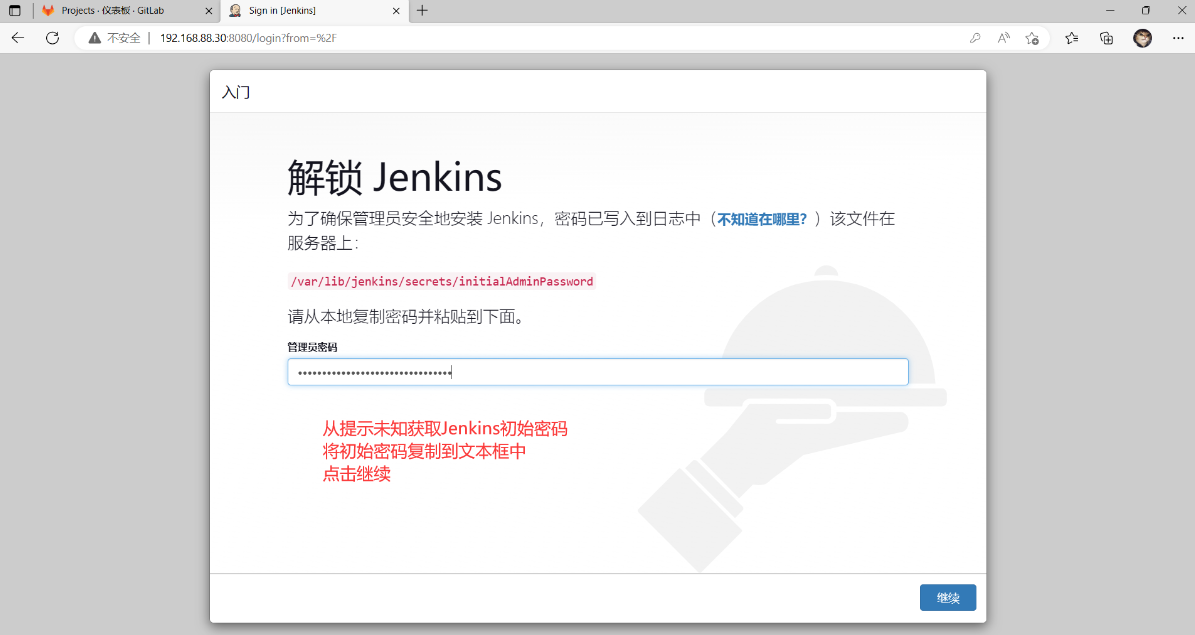
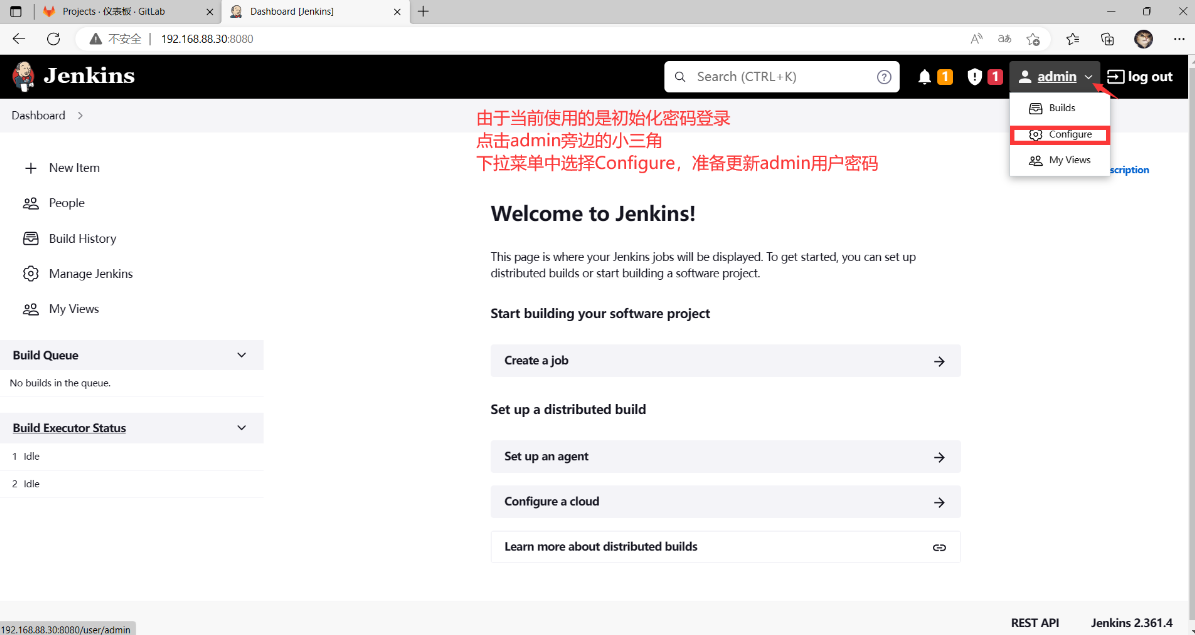
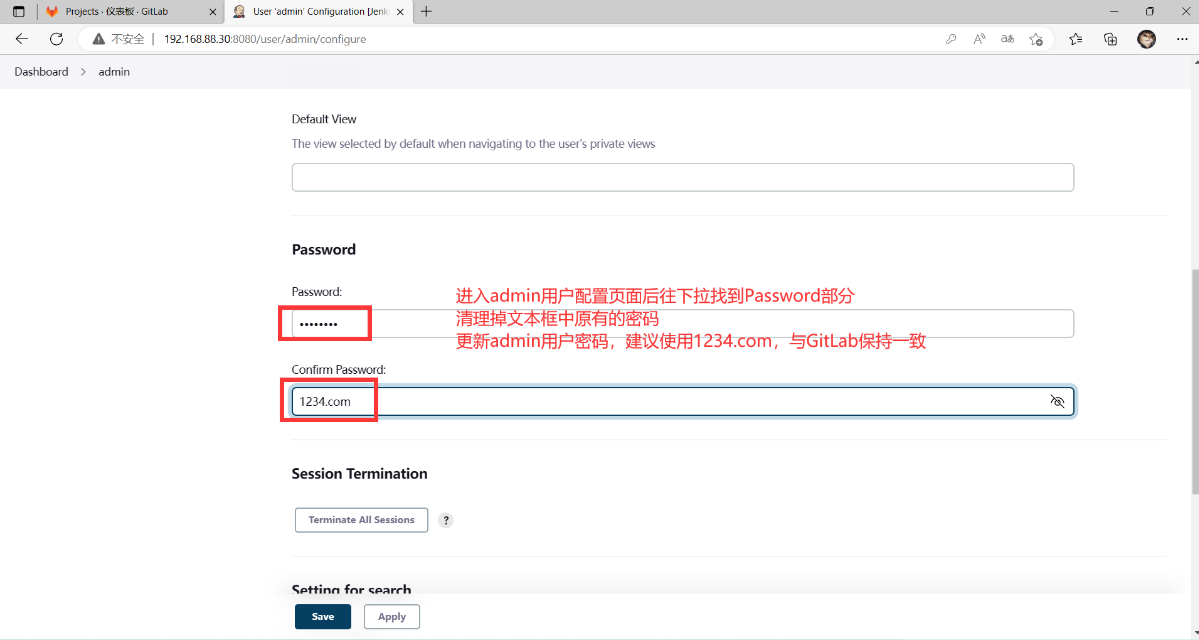
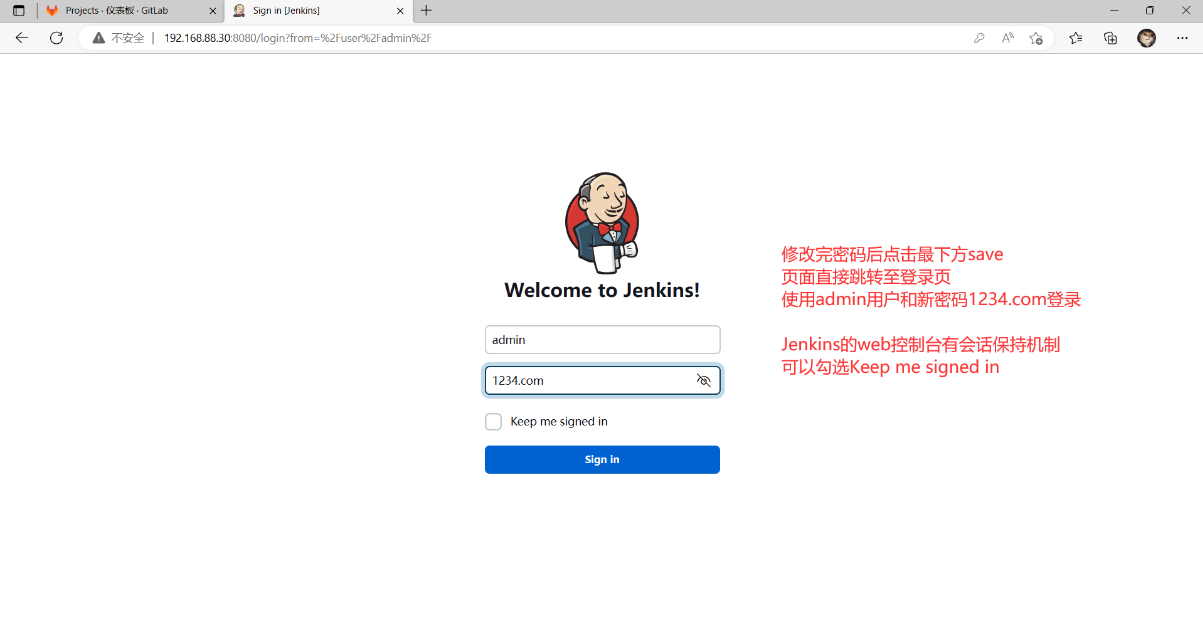
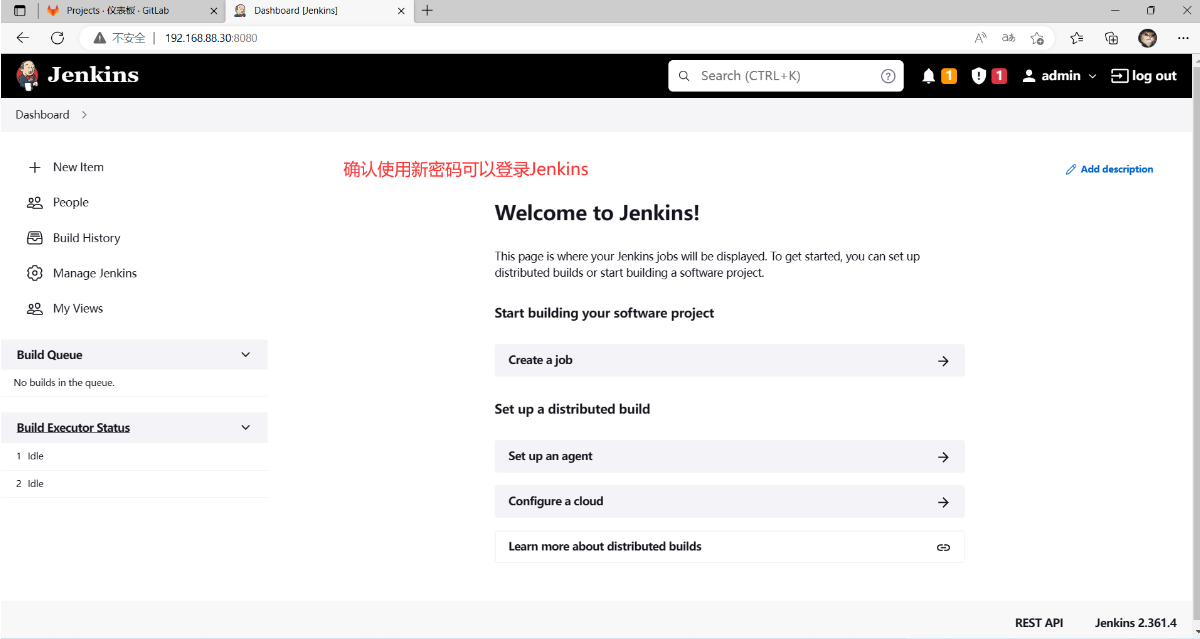
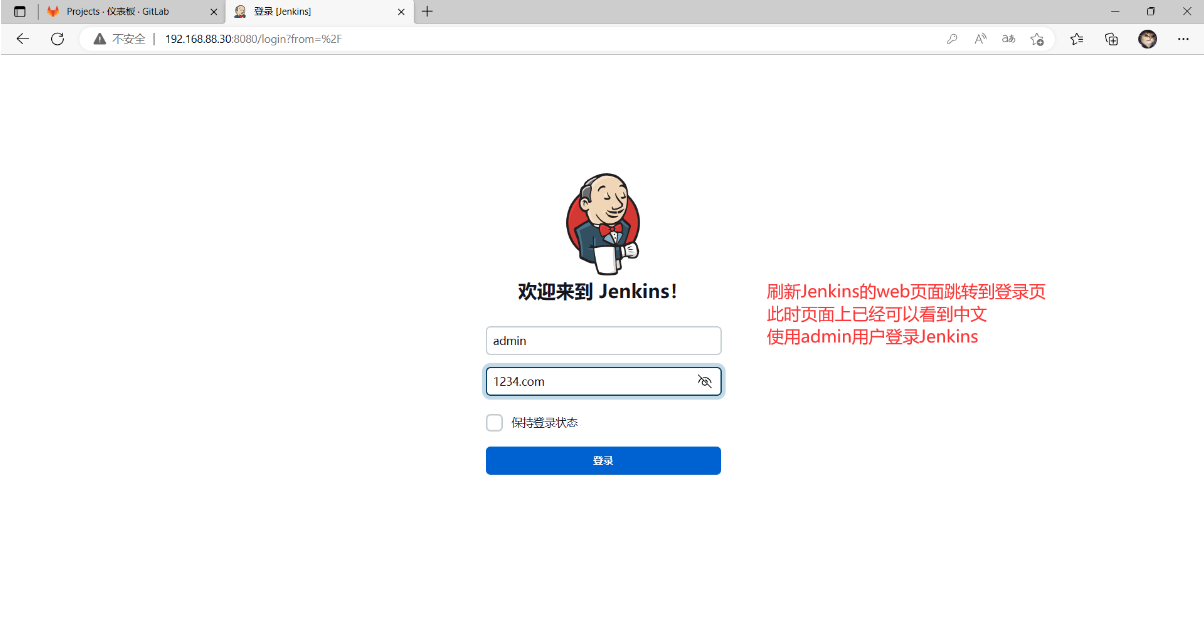
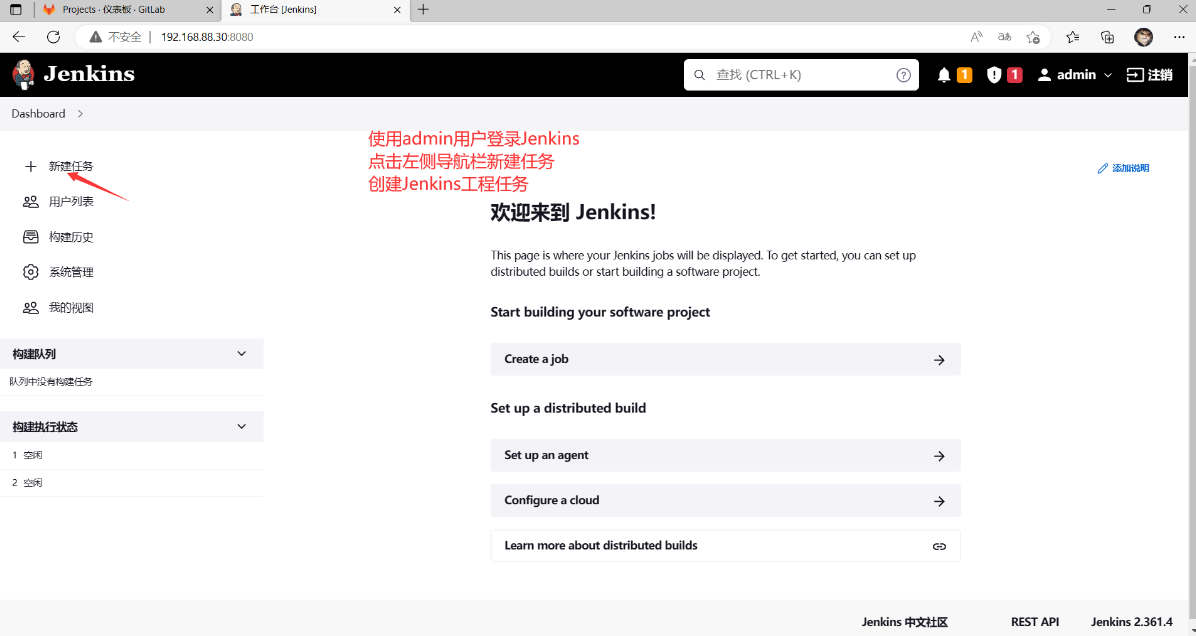
Jenkins初始化
#获取Jenkins初始密码
root@Jenkins \~# cat /var/lib/jenkins/secrets/initialAdminPassword
1aaf609acf3843a8aaf17e8b1f22e8ea
root@Jenkins \~#
#浏览器访问: http://192.168.88.30:8080/
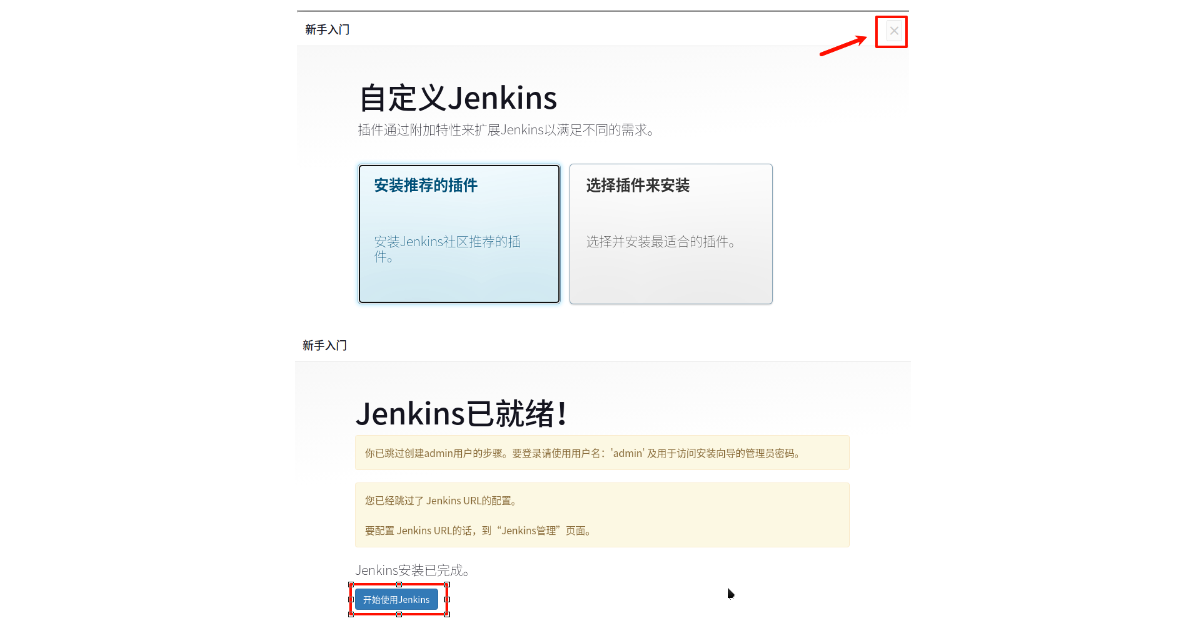
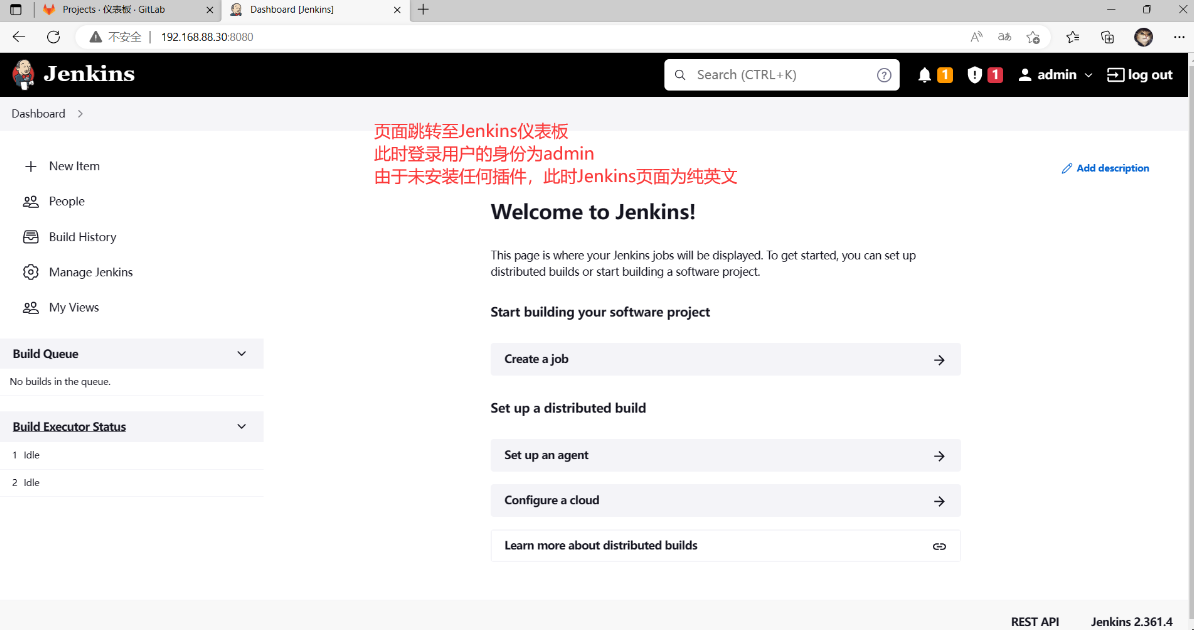
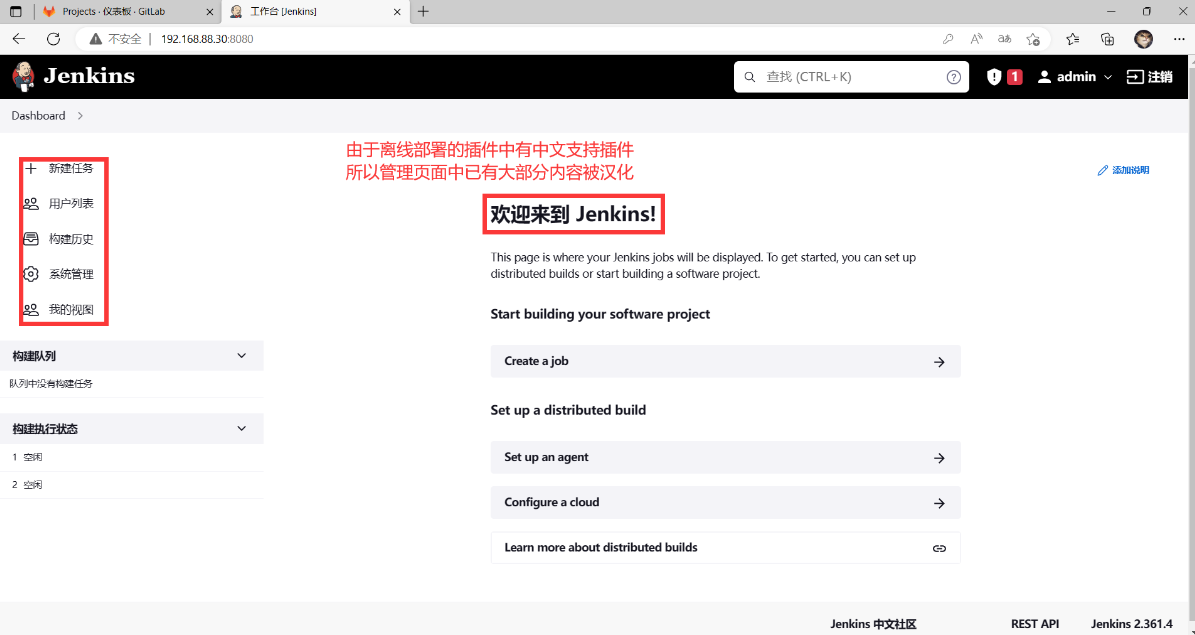
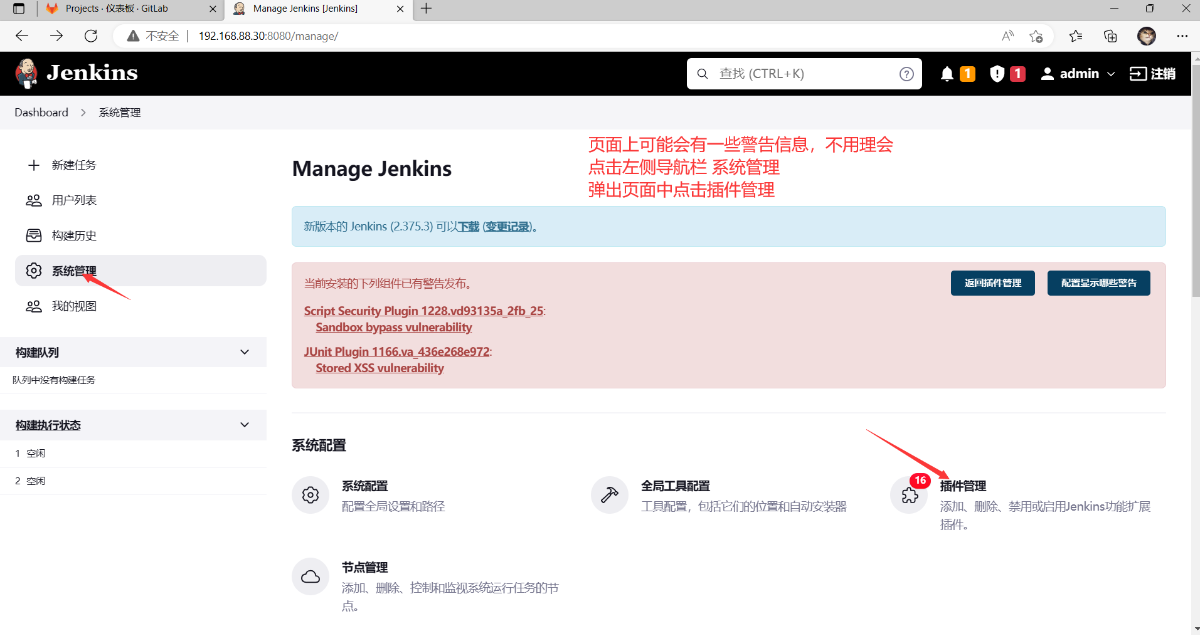
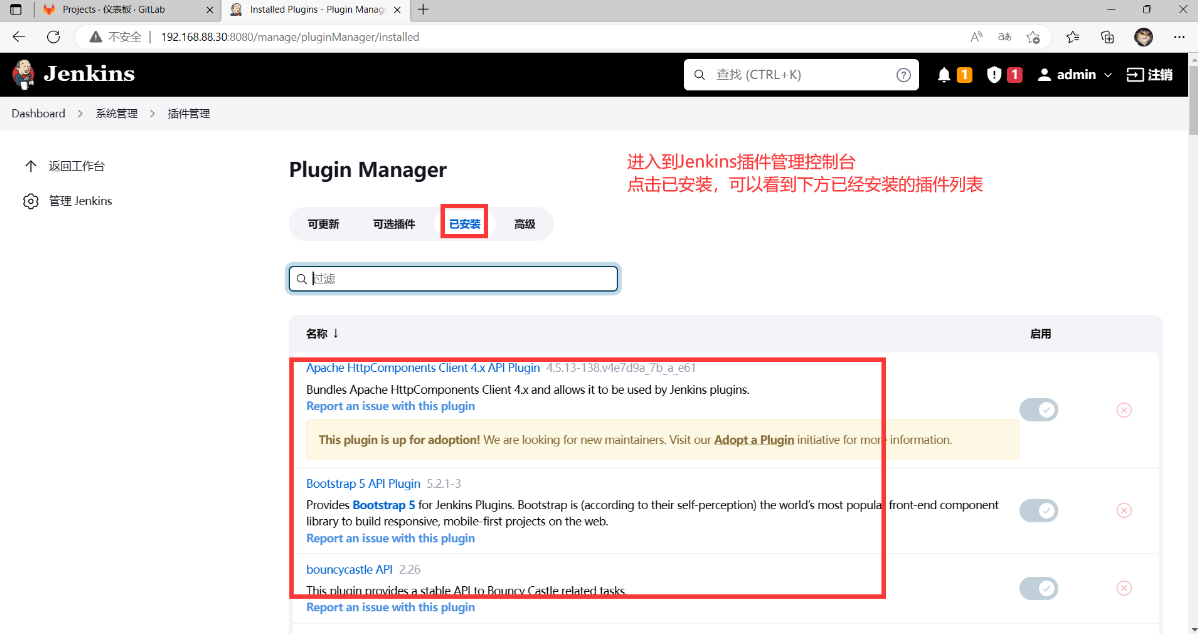
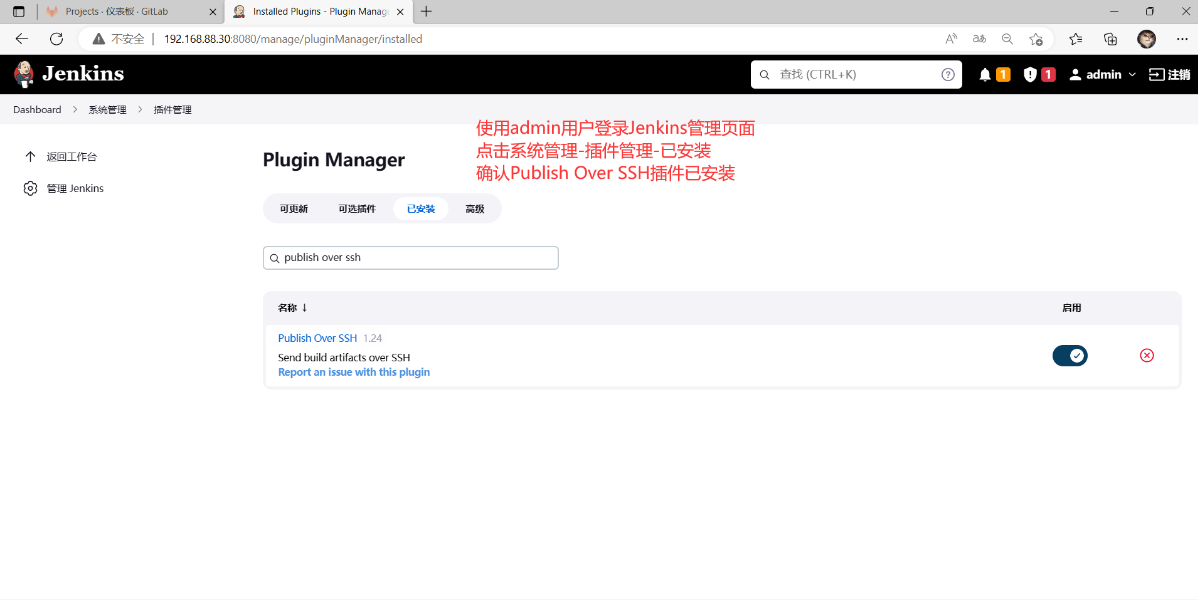
离线部署Jenkins插件
#离线部署Jenkins插件
root@Jenkins \~# ls /var/lib/jenkins/plugins/ #空目录,没有任何插件
root@Jenkins \~#ls PROJECT02/Jenkins/
apache-maven-3.6.3-bin.tar.gz jenkins-2.361.4-1.1.noarch.rpm jenkins_plugins.tar.gz
#解压Jenkins插件,保留文件归属(-P绝对路径解压,-p保留权限)
root@Jenkins \~# tar -xPpf PROJECT02/Jenkins/jenkins_plugins.tar.gz -C /
root@Jenkins \~# ls -l /var/lib/jenkins/plugins/ #确认该目录下文件归属
root@Jenkins \~#systemctl restart jenkins.service #重启Jenkins加载插件
root@Jenkins \~#ss -antpul | grep java
tcp LISTEN 0 50 *:8080 *:* users:(("java",pid=13917,fd=8))
root@Jenkins \~#
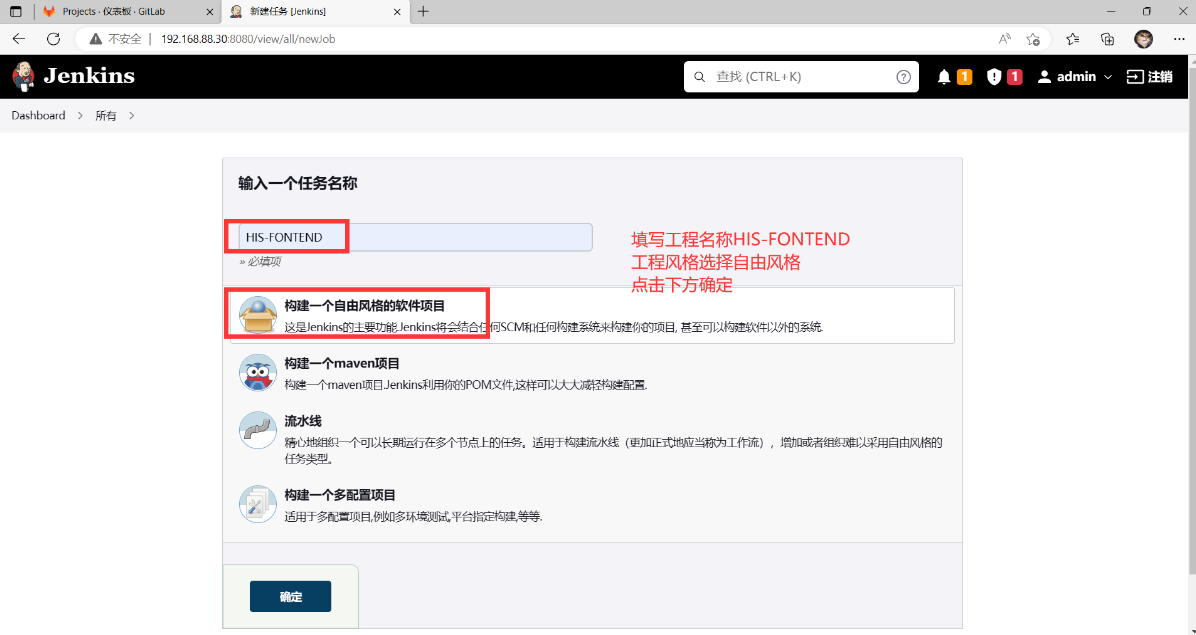
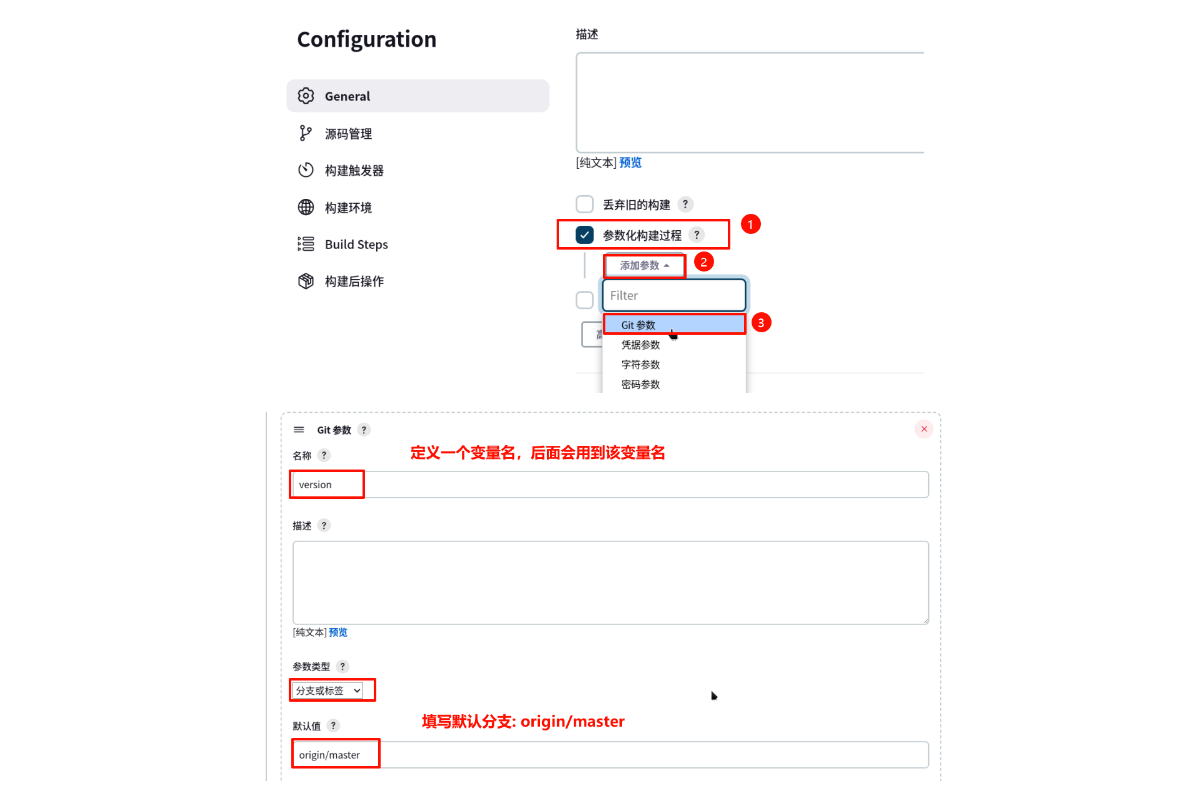
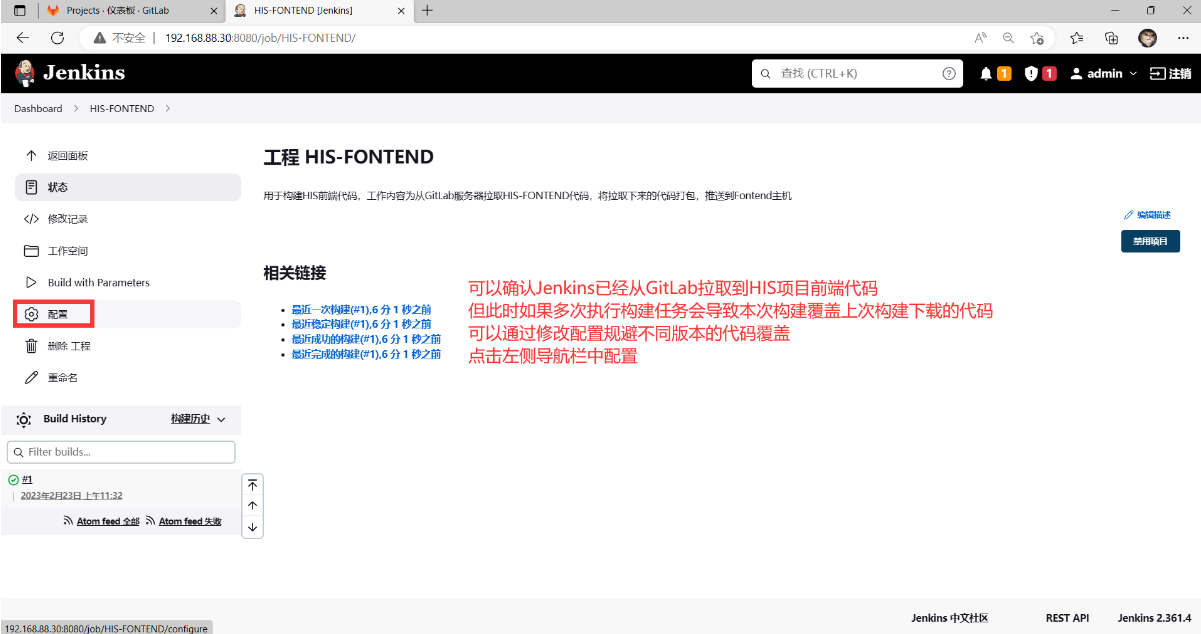
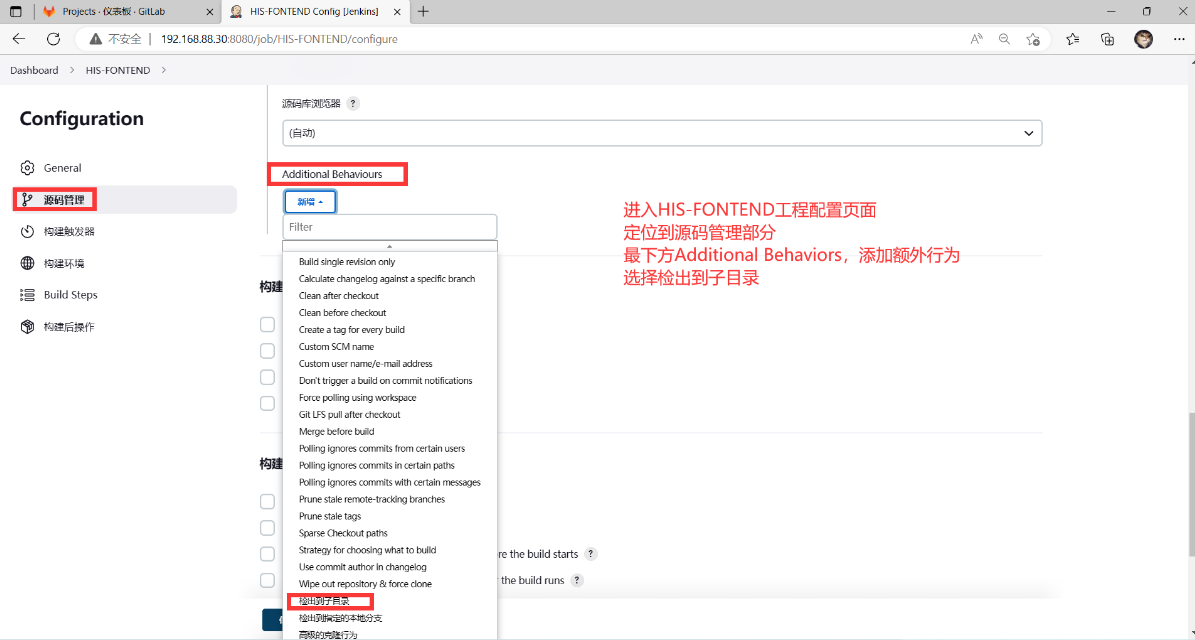
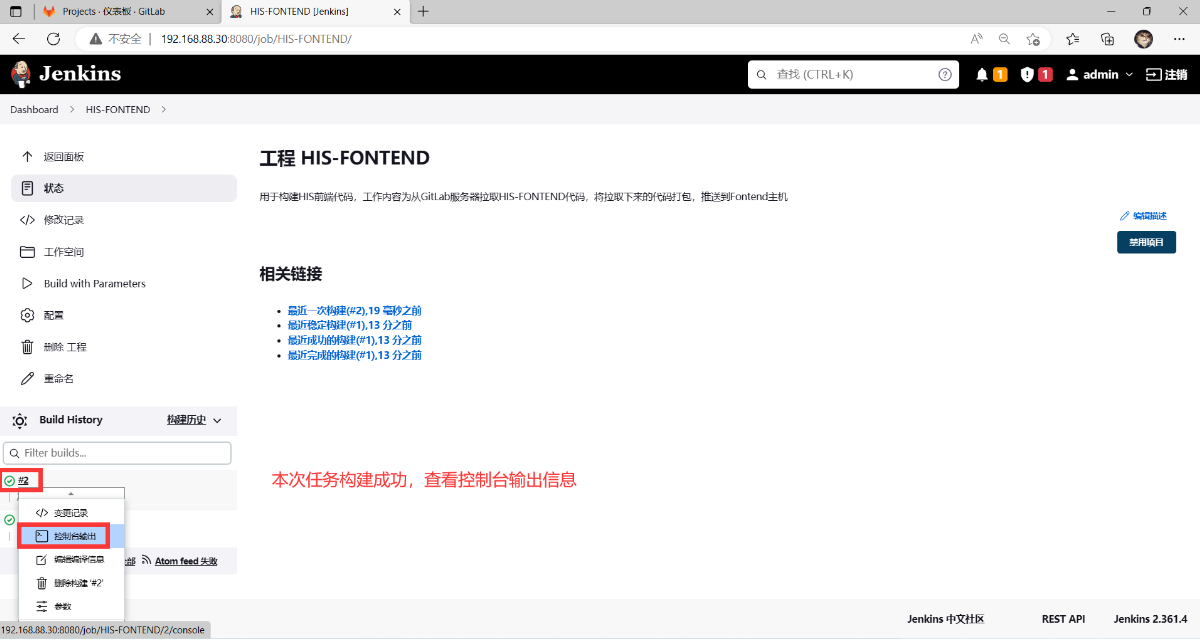
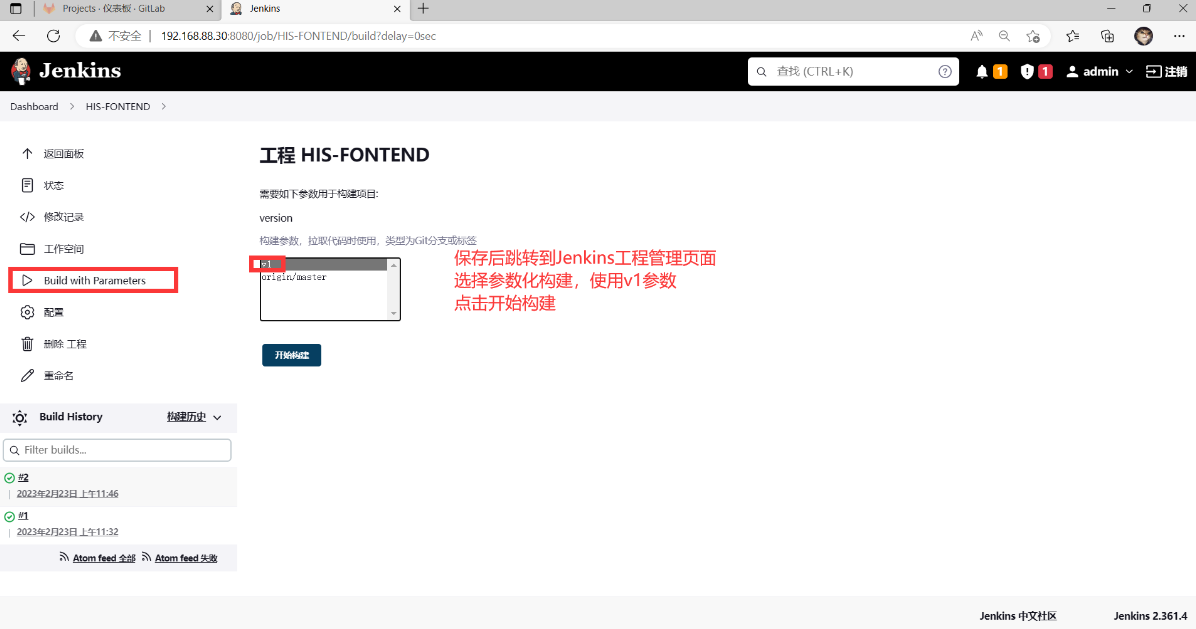
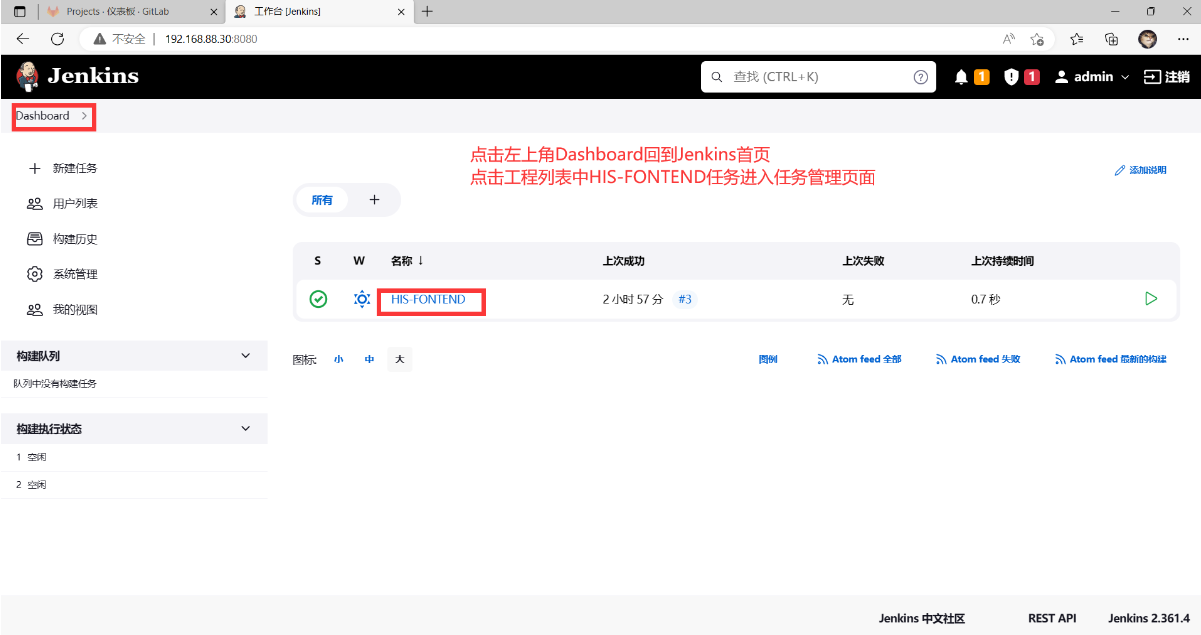
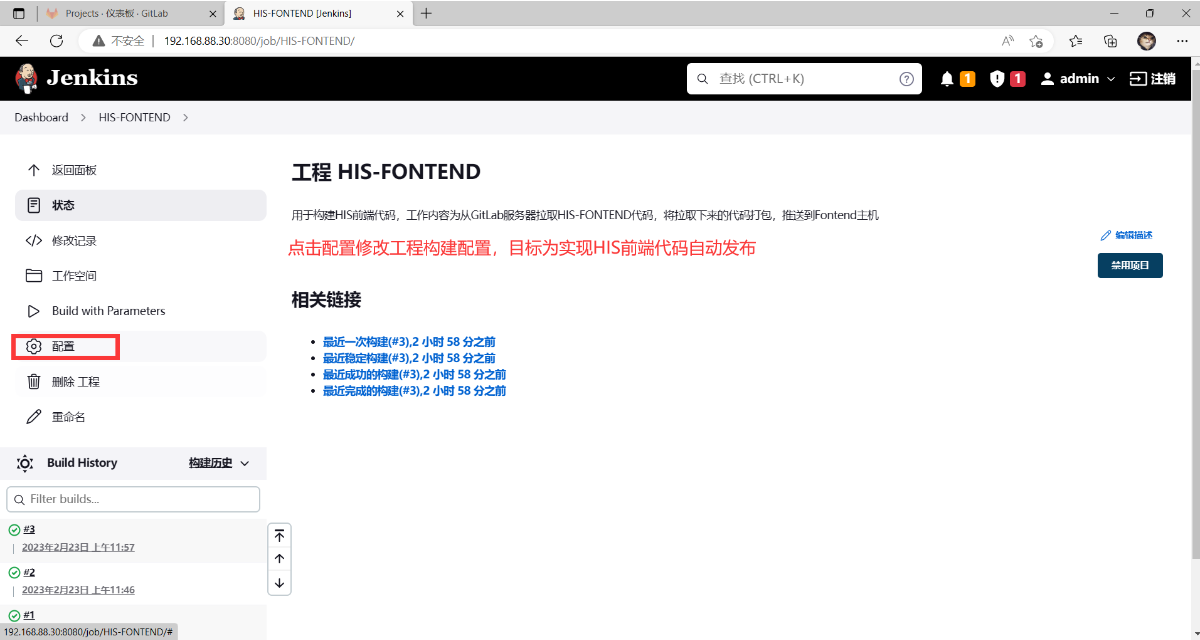
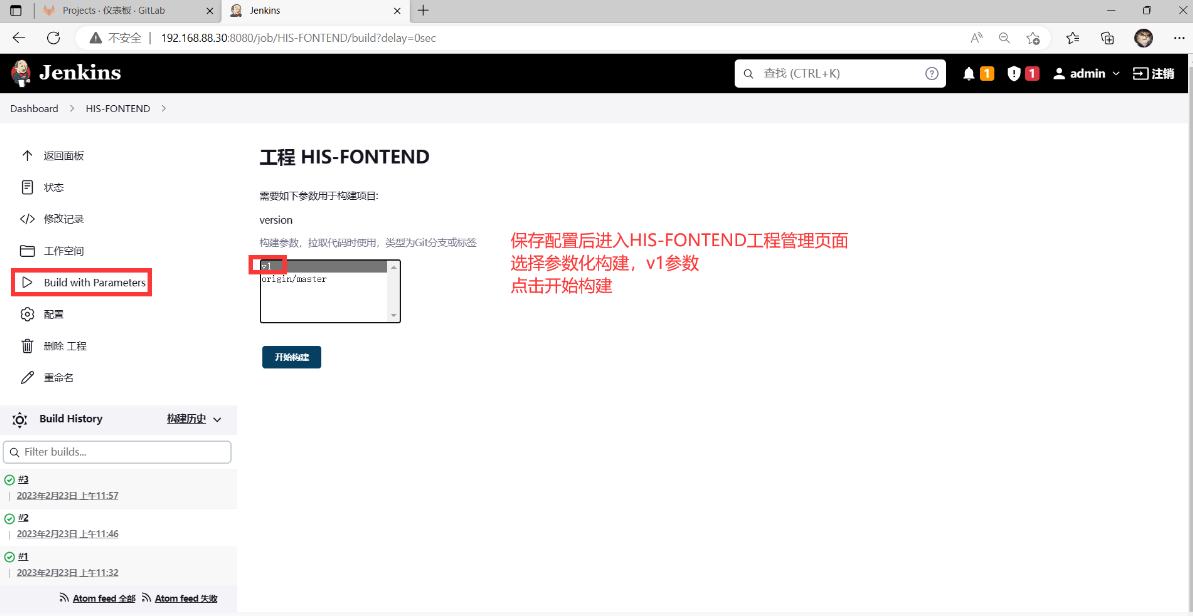
Jenkins工程构建
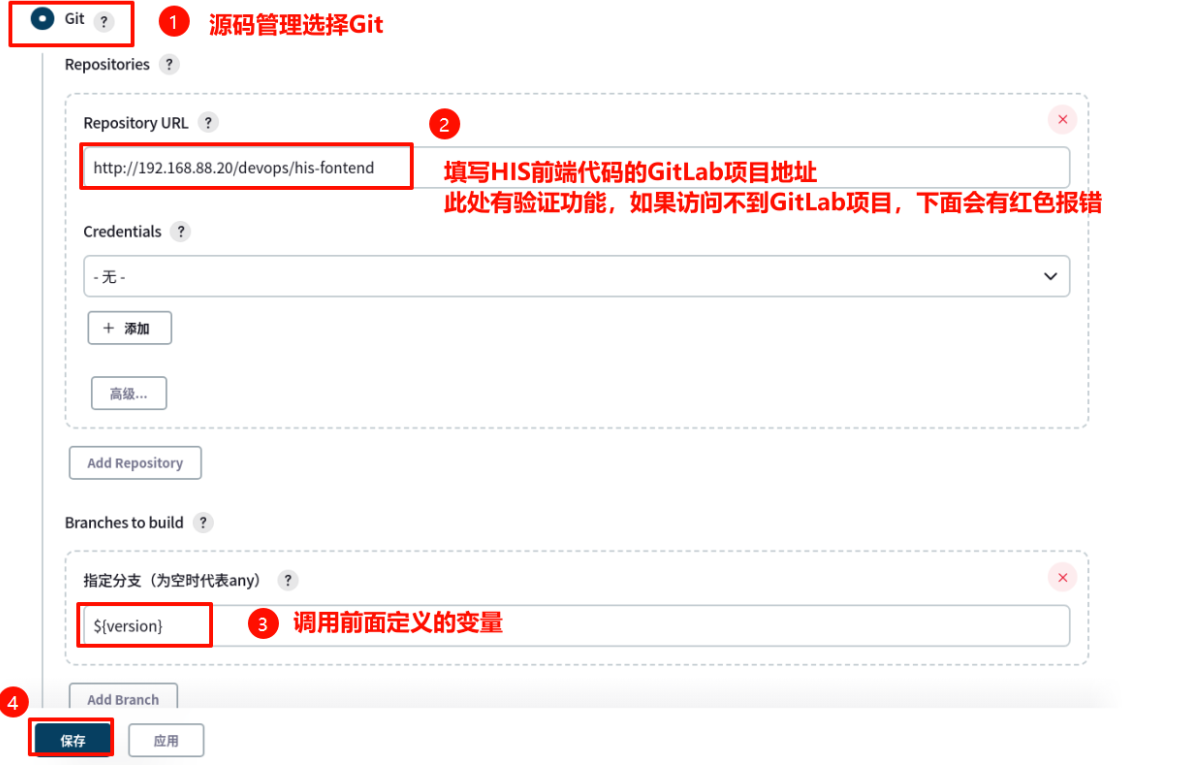
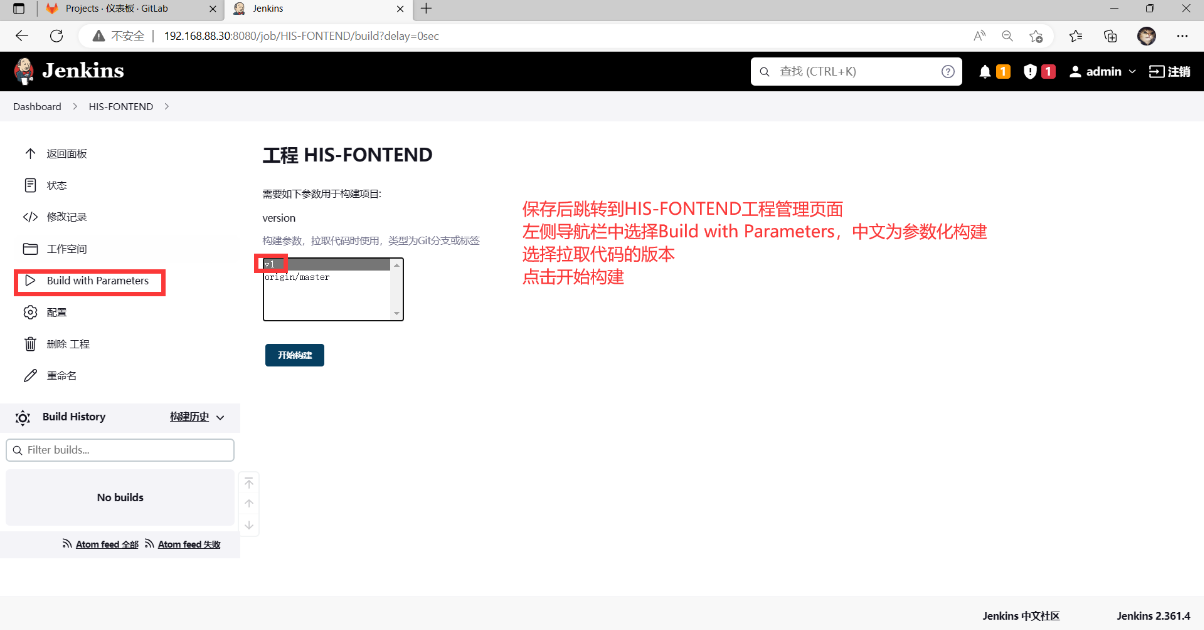
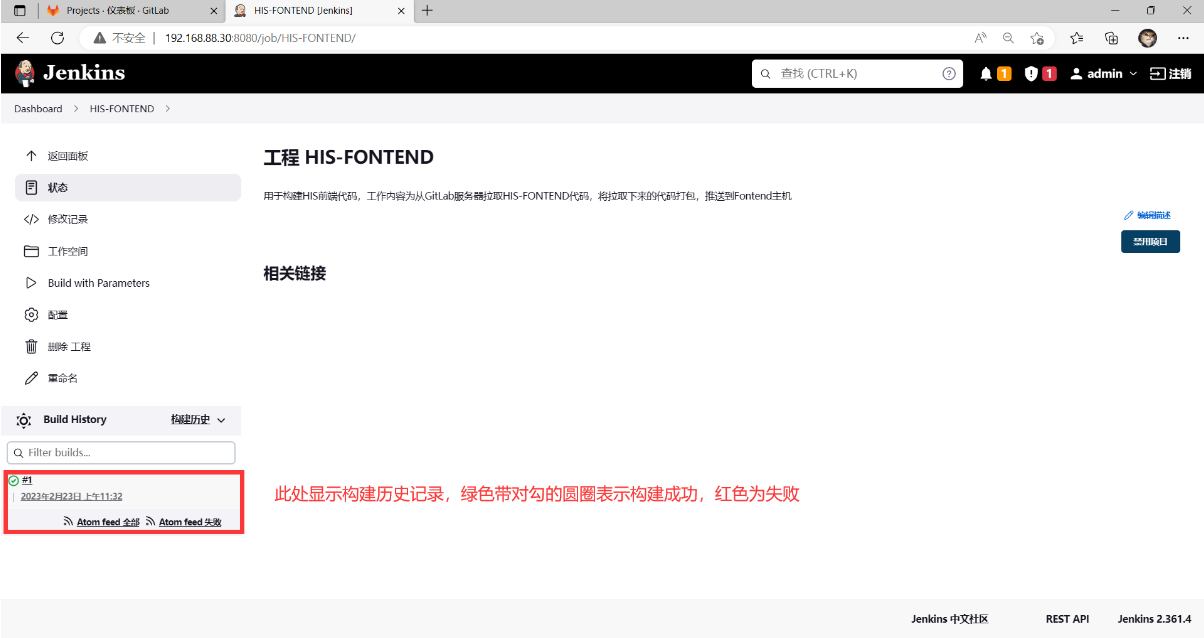
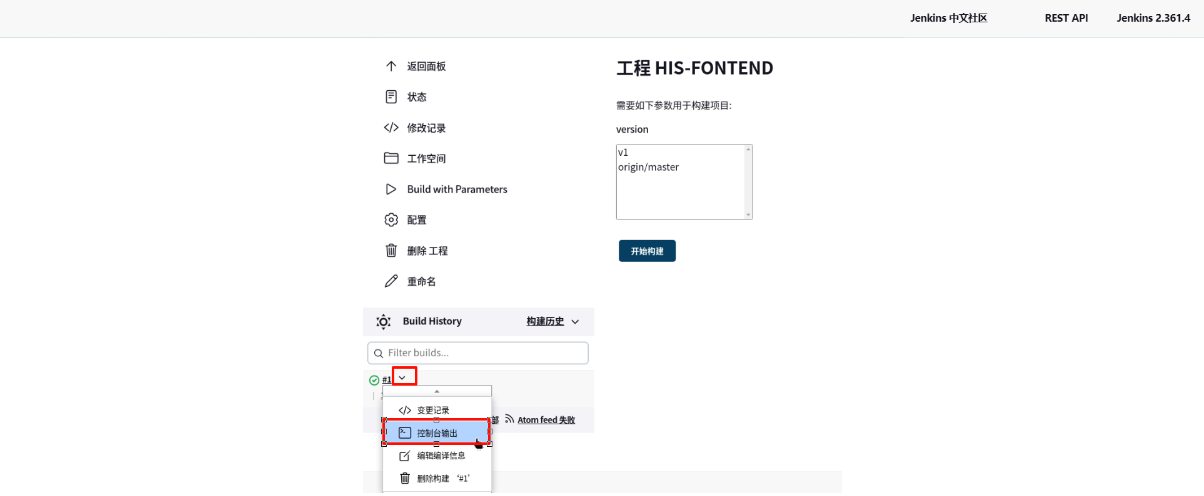
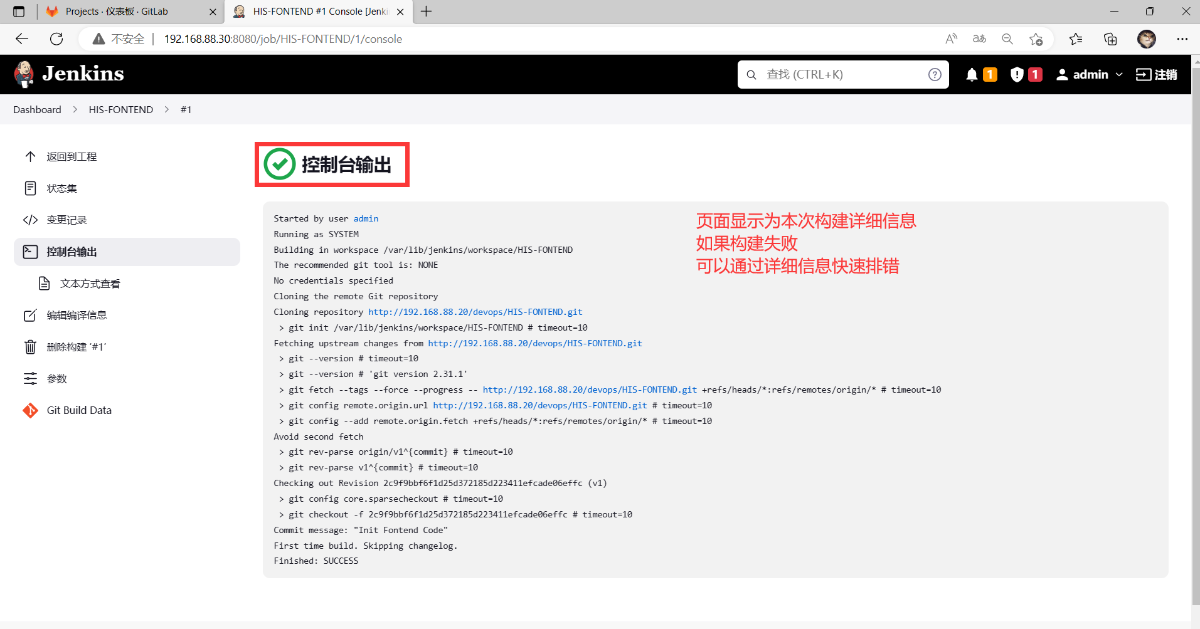
#确认代码拉取情况
root@Jenkins \~#ls /var/lib/jenkins/workspace/ #Jenkins工作目录
HIS-FONTEND
root@Jenkins \~#ls /var/lib/jenkins/workspace/HIS-FONTEND/ #确认HIS-FONTEND代码拉取
favicon.ico index.html static
root@Jenkins \~# rm -rf /var/lib/jenkins/workspace/* #清理Jenkins工作目录
root@Jenkins \~#

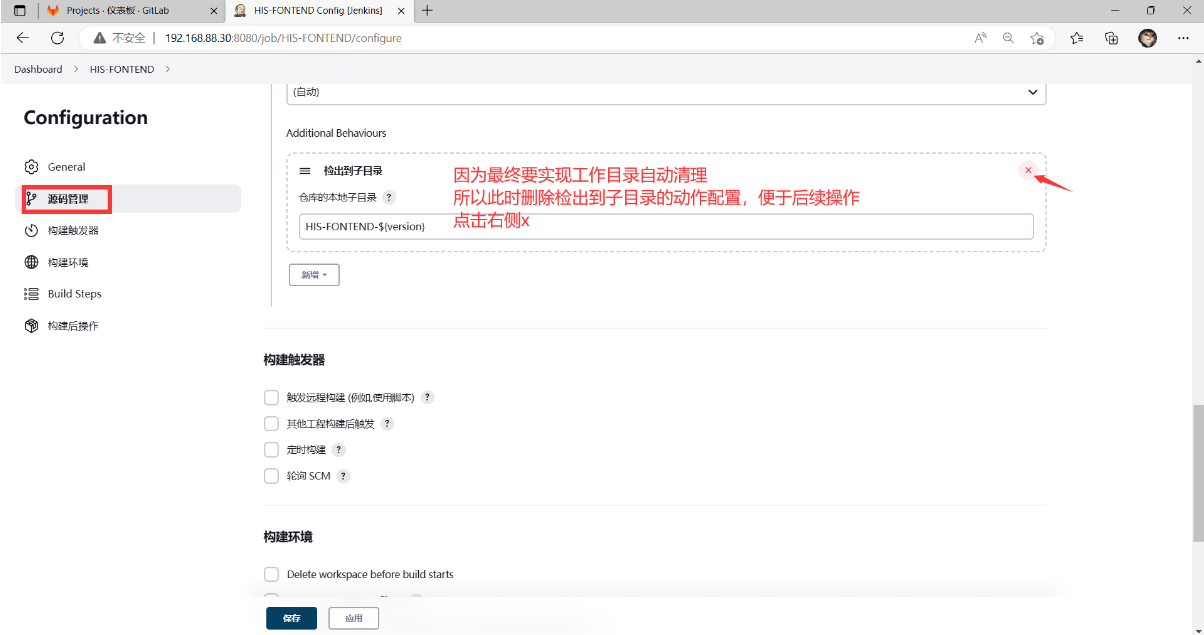
#确认代码拉取情况
root@Jenkins \~# ls /var/lib/jenkins/workspace/ #Jenkins工作目录
HIS-FONTEND
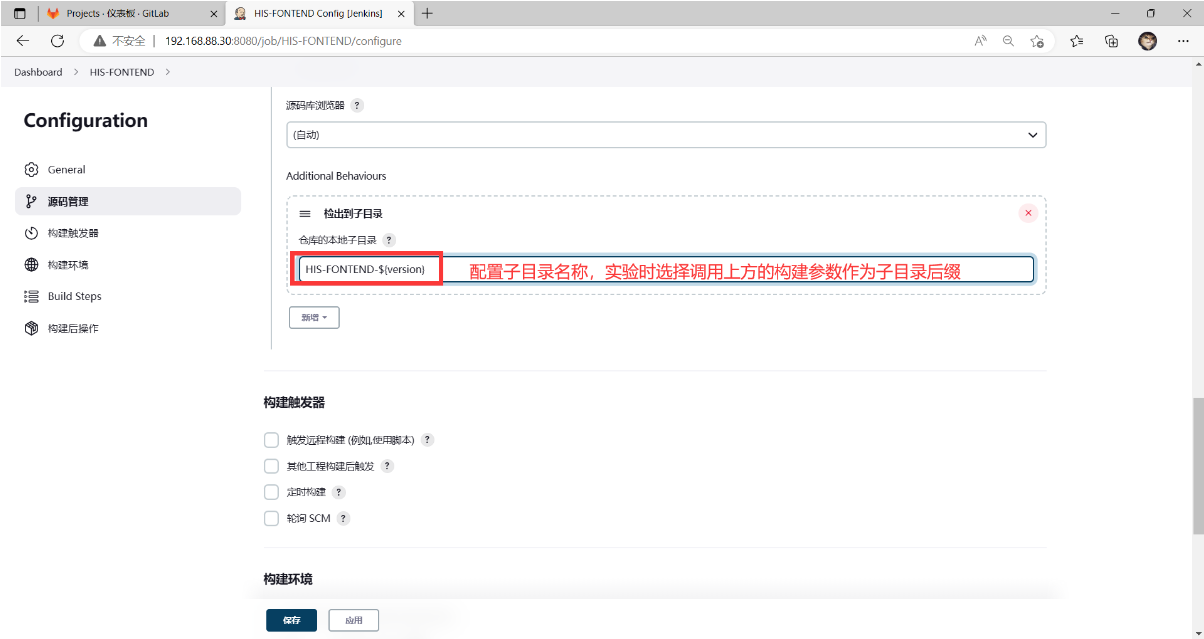
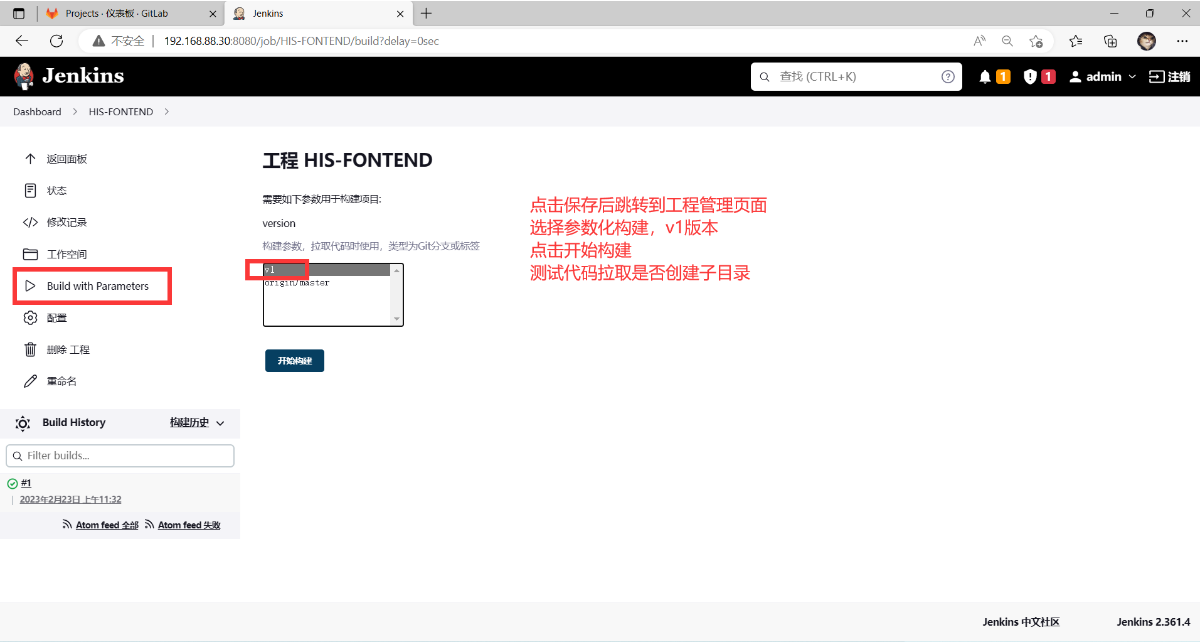
root@Jenkins \~# ls /var/lib/jenkins/workspace/HIS-FONTEND/ #确认拉取到子目录
HIS-FONTEND-v1
root@Jenkins \~# ls /var/lib/jenkins/workspace/HIS-FONTEND/HIS-FONTEND-v1/
favicon.ico index.html static
root@Jenkins \~# rm -rf /var/lib/jenkins/workspace/* #清理Jenkins工作目录
root@Jenkins \~#
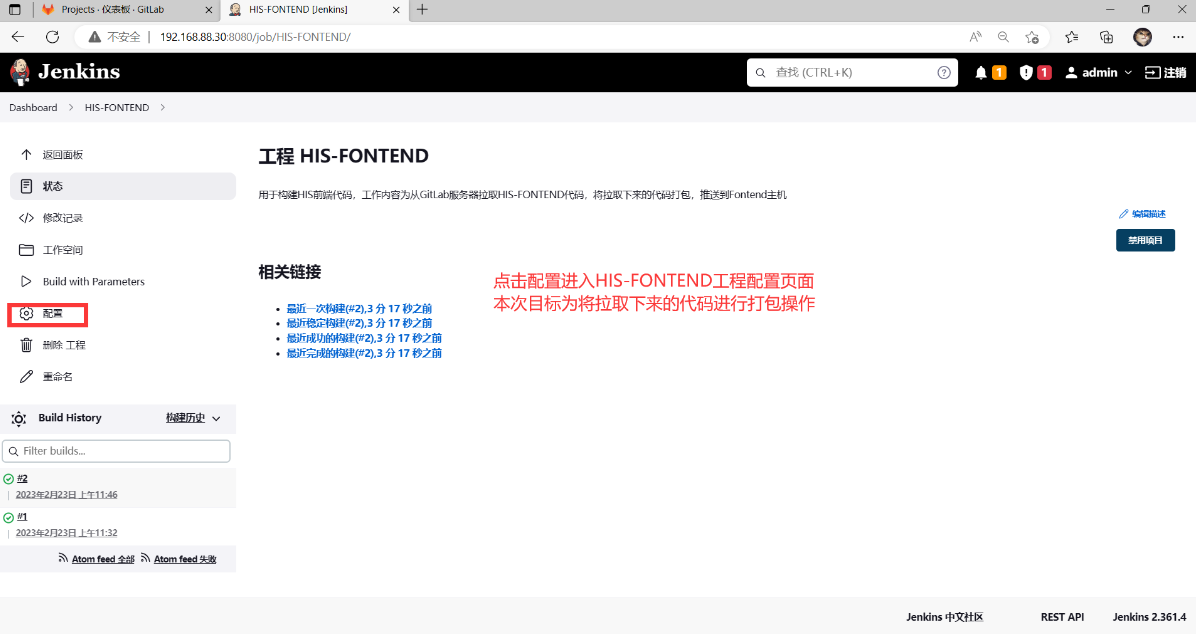
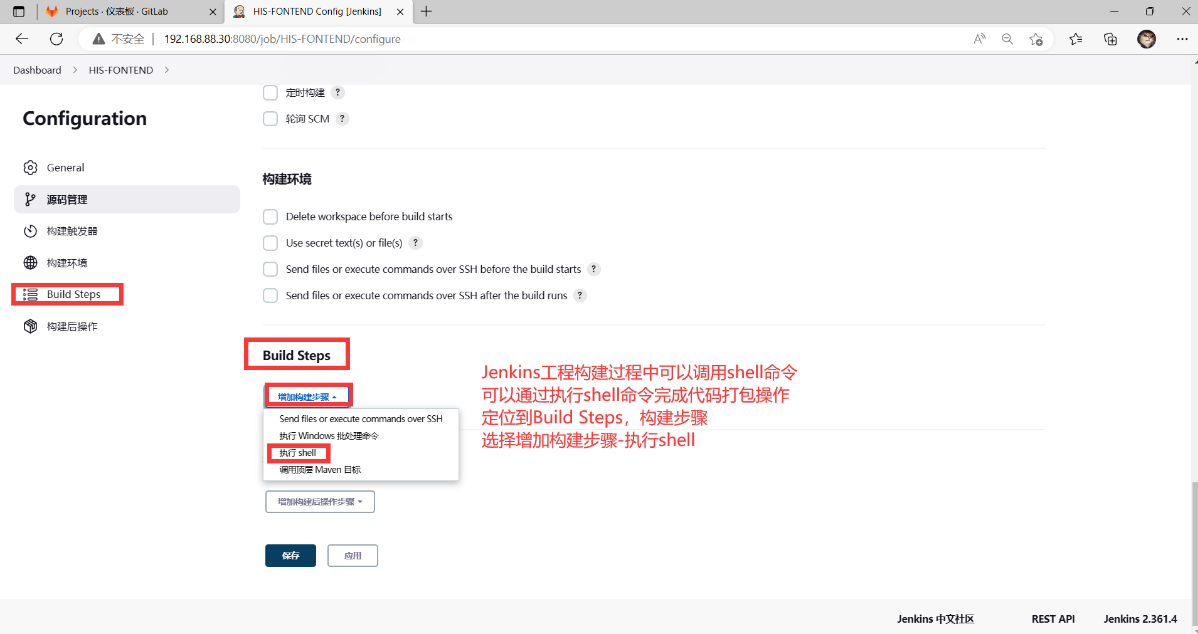

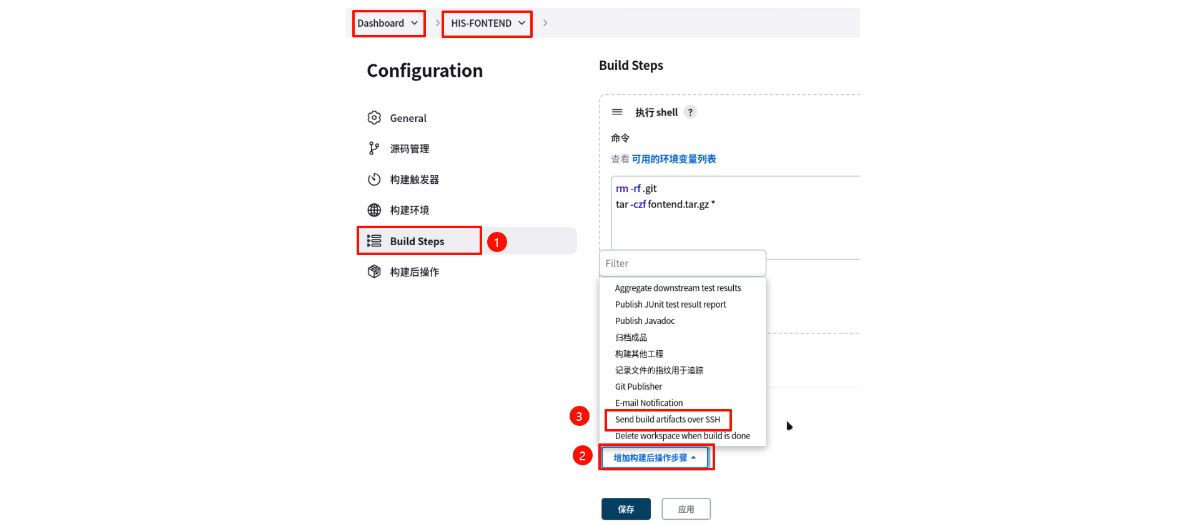
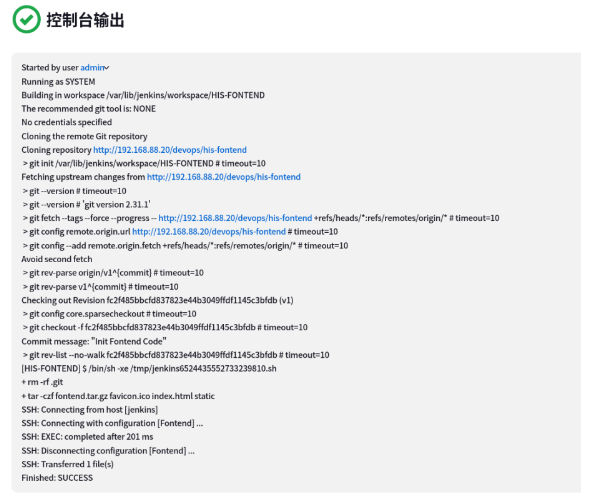
#填写到Jenkins中HIS-FONTEND工程的构建过程shell语句
rm -rf .git #删除拉取到Jenkins本地目录中的版本库
tar -zcf fontend.tar.gz * #对代码进行打包操作
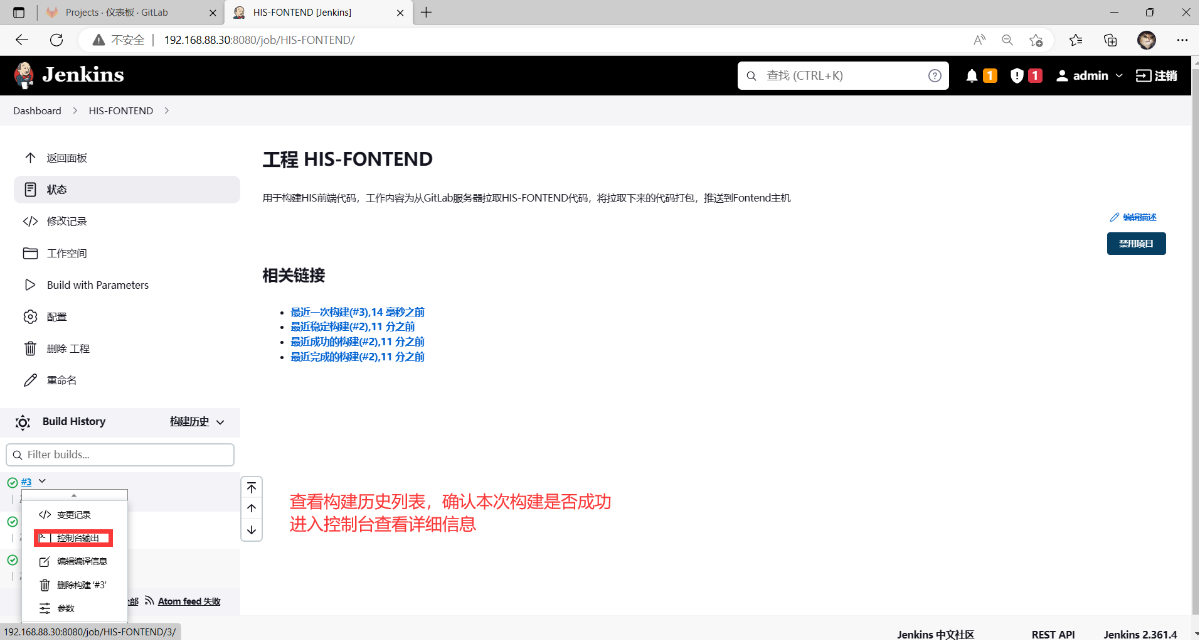
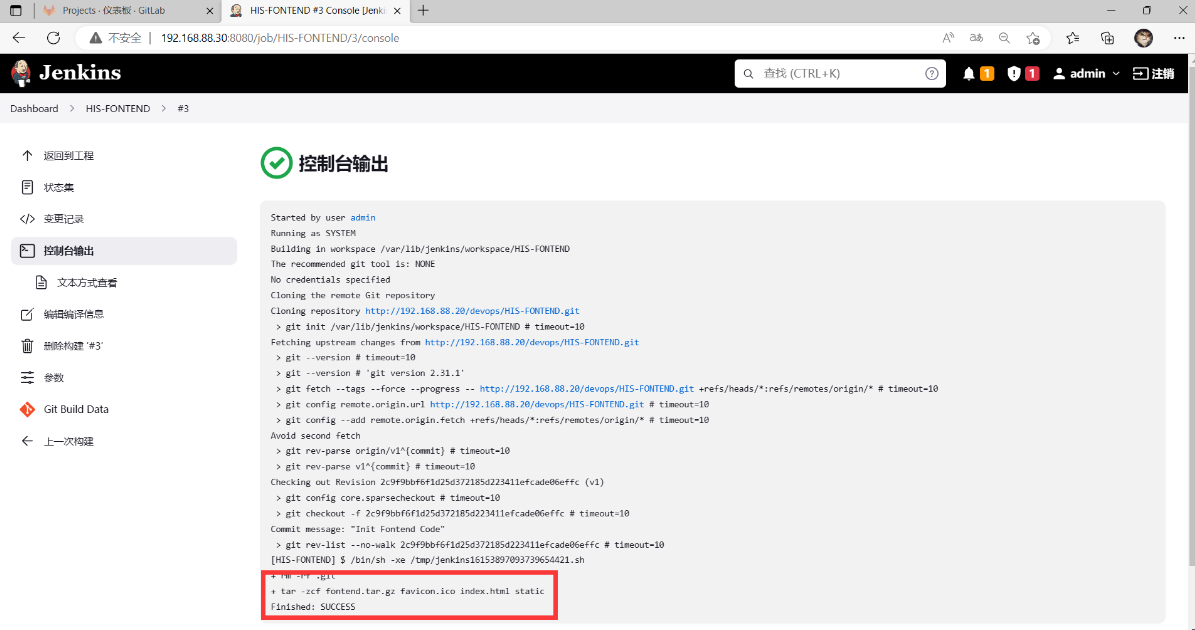
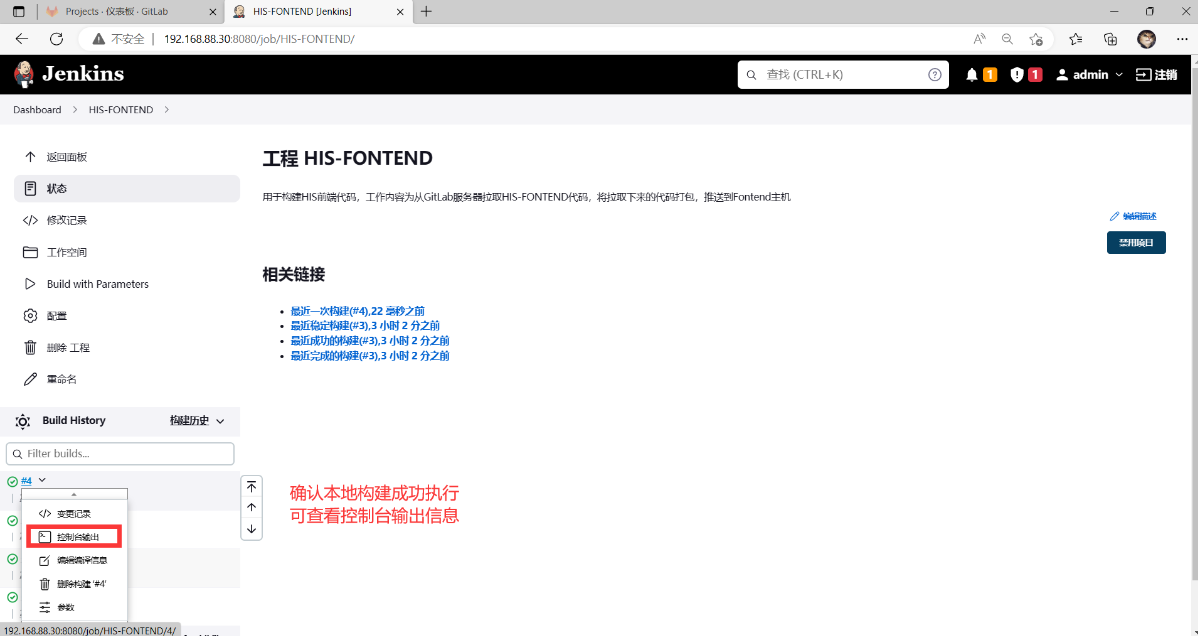
#确认HIS-FONTEND构建结果
root@Jenkins \~# ls /var/lib/jenkins/workspace/
HIS-FONTEND
root@Jenkins \~# ls /var/lib/jenkins/workspace/HIS-FONTEND/ #目录下有代码tar包
favicon.ico fontend.tar.gz index.html static
root@Jenkins \~# rm -rf /var/lib/jenkins/workspace/* #清理Jenkins工作目录
root@Jenkins \~#
HIS前端代码测试
Fontend主机部署Nginx
#HIS前端代码为编译后代码,可直接部署在nginx上查看效果
#安装nginx软件
root@Fontend \~# yum -y install nginx
#查看默认nginx网页根目录资料
root@Fontend \~# ls /usr/share/nginx/html/
#设置nginx服务开机自启动,并立刻启动服务
root@Fontend \~# systemctl enable nginx --now
root@Fontend \~# ss -antpul | grep nginx
tcp LISTEN 0 128 0.0.0.0:80 0.0.0.0:* users:(("nginx",pid=11255,fd=6),("nginx",pid=11254,fd=6),("nginx",pid=11253,fd=6))
root@Fontend \~# curl http://localhost/ #访问测试
Jenkins代码自动发布

上图中Exec command命令代码如下:
#!/bin/bash
cd /usr/share/nginx/html/
tar -xf fontend.tar.gz
rm -rf fontend.tar.gz
#Jenkins主机确认HIS前端代码拉取及打包情况
root@Jenkins \~# ls /var/lib/jenkins/workspace/HIS-FONTEND/
favicon.ico fontend.tar.gz index.html static
#Fontend主机确认代码包推送情况
root@Fontend \~# ls /usr/share/nginx/html/
favicon.ico index.html static
#访问Fontend主机测试前端页面展示效果 http://192.168.88.70/

Elasticsearch部署
Elasticsearch服务部署
#OpenJDK环境部署
root@Services \~# yum -y install java-1.8.0-openjdk-devel
...
Complete!
#安装解压软件,解压实验素材(提前从server1主机/linux-soft/s3/PROJECT02.zip拷贝的资料)
root@Services \~# yum -y install unzip
root@Services \~# unzip PROJECT02.zip
#安装Elasticsearch服务
root@Services \~#ls PROJECT02/Elasticsearch/
accounts.json data.sh elasticsearch-6.8.0.rpm elasticsearch-analysis-ik-6.8.0.zip elasticsearch-head.tar logs.jsonl
root@Services \~# yum -y localinstall \PROJECT02/Elasticsearch/elasticsearch-6.8.0.rpm
#配置Elasticsearch服务
root@Services \~# vim /etc/elasticsearch/elasticsearch.yml
node.name: Services #23行,ES节点名称
path.data: /var/lib/elasticsearch #33行,ES数据存储路径
path.logs: /var/log/elasticsearch #37行,ES日志存储路径
network.host: 0.0.0.0 #55行,监听地址
http.port: 9200 #59行,HTTP端口
http.cors.enabled: true #60行,开启HTTP跨域访问支持
http.cors.allow-origin: "*" #61行,允许跨域的访问范围
#启动Elasticsearch服务,设置服务开机自启动
root@Services \~# systemctl enable elasticsearch --now
root@Services \~# ss -antpul | grep java
tcp LISTEN 0 128 *:9200 *:* users:(("java",pid=9847,fd=209))
tcp LISTEN 0 128 *:9300 *:* users:(("java",pid=9847,fd=196))
#测试Elasticsearch服务
root@Services \~#curl http://localhost:9200/ #访问9200端口,返回一段json数据
{
"name" : "Services",
"cluster_name" : "elasticsearch",
"cluster_uuid" : "1cf7N861QBC_C0RE8gm0OA",
"version" : {
"number" : "6.8.0",
"build_flavor" : "default",
"build_type" : "rpm",
"build_hash" : "65b6179",
"build_date" : "2019-05-15T20:06:13.172855Z",
"build_snapshot" : false,
"lucene_version" : "7.7.0",
"minimum_wire_compatibility_version" : "5.6.0",
"minimum_index_compatibility_version" : "5.0.0"
},
"tagline" : "You Know, for Search"
}
root@Services \~#
Elasticsearch插件部署
Elasticsearch插件安装方式
#插件安装方法
#方式一:从官网下载ES插件,通常为ZIP格式,解压到/usr/share/elasticsearch/plugins/目录
#方式二:使用elasticsearch-plugin命令
#elasticsearch-plugin install file://path/xx.zip
#elasticsearch-plugin install http://addresss/xx
#elasticsearch-plugin install ftp://address/xx
#方式三:容器
IK分词器插件
#查看插件列表
root@Services \~# /usr/share/elasticsearch/bin/elasticsearch-plugin list
#本地IK分词器插件(unzip -d选项可以指定解压路径)
root@Services \~# mkdir /usr/share/elasticsearch/plugins/analysis-ik
root@Services \~# unzip \PROJECT02/Elasticsearch/elasticsearch-analysis-ik-6.8.0.zip \
-d /usr/share/elasticsearch/plugins/analysis-ik/
#查看插件列表
root@Services \~# /usr/share/elasticsearch/bin/elasticsearch-plugin list
analysis-ik
#重启服务加载插件,测试IK分词器
root@Services \~# systemctl restart elasticsearch
root@Services \~# curl -H "Content-Type: application/json" -XPOST
http://localhost:9200/_analyze?pretty -d '
{
"analyzer": "standard",
"text": "华为手机"
}'
#测试标准分词,返回结果如下
{
"tokens" : [
{
"token" : "华",
"start_offset" : 0,
"end_offset" : 1,
"type" : "<IDEOGRAPHIC>",
"position" : 0
},
{
"token" : "为",
"start_offset" : 1,
"end_offset" : 2,
"type" : "<IDEOGRAPHIC>",
"position" : 1
},
{
"token" : "手",
"start_offset" : 2,
"end_offset" : 3,
"type" : "<IDEOGRAPHIC>",
"position" : 2
},
{
"token" : "机",
"start_offset" : 3,
"end_offset" : 4,
"type" : "<IDEOGRAPHIC>",
"position" : 3
}
]
}
root@Services \~#curl -H "Content-Type: application/json" -XPOST http://localhost:9200/_analyze?pretty -d '
{
"analyzer": "ik_smart",
"text": "华为手机"
}'
#测试IK分词器,返回结果如下
{
"tokens" : [
{
"token" : "华为",
"start_offset" : 0,
"end_offset" : 2,
"type" : "CN_WORD",
"position" : 0
},
{
"token" : "手机",
"start_offset" : 2,
"end_offset" : 4,
"type" : "CN_WORD",
"position" : 1
}
]
}
HEAD插件(容器部署)
#安装podman工具
root@Services \~#yum -y install podman
Complete!
#查看本地已有镜像
root@Services \~#podman images
REPOSITORY TAG IMAGE ID CREATED SIZE
#导入ES-HEAD插件镜像
root@Services \~# podman load -i PROJECT02/Elasticsearch/elasticsearch-head.tar
root@Services \~# podman images #确认ES-HEAD镜像已导入
REPOSITORY TAG IMAGE ID CREATED SIZE
localhost/elasticsearch-head latest d008a8ccd029 7 weeks ago 862 MB
#查看有运行的容器,应为空
root@Services \~# podman ps
CONTAINER ID IMAGE COMMAND CREATED STATUS PORTS NAMES
#启动ES-HEAD容器
root@Services \~# podman run -d --name es-head --hostname es-head -p 9100:9100 localhost/elasticsearch-head:latest #后台运行ES-HEAD容器
f222cb764271574148d31b184bd0aebda419ce3ebd43843c0ff8f1f4dc6ba53c
#确认ES-HEAD容器已运行
root@Services \~# podman ps
CONTAINER ID IMAGE COMMAND CREATED STATUS PORTS NAMES
f222cb764271 localhost/elasticsearch-head:latest /bin/sh -c grunt ... 2 seconds ago Up 2 seconds ago 0.0.0.0:9100->9100/tcp es-head
root@Services \~#ss -antpul | grep 9100 #确认9100端口被监听
tcp LISTEN 0 128 0.0.0.0:9100 0.0.0.0:* users:(("conmon",pid=12651,fd=5))
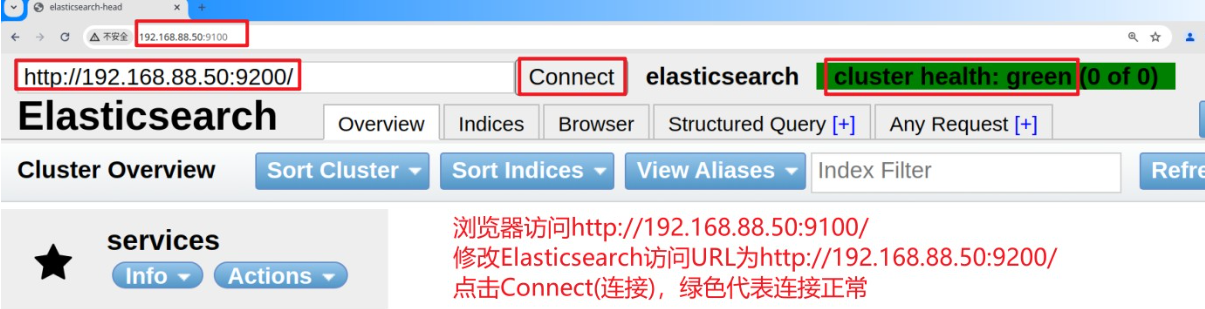
#测试访问Elasticsearch-HEAD插件:http://192.168.88.50:9100/
Elasticsearch API
Elasticsearch常用API
#测试指定API
root@Services \~# curl -H "Content-Type: application/json" -XGET http://localhost:9200/_cat/health
#返回结果如下:
1677142976 09:02:56 elasticsearch green 1 1 0 0 0 0 0 0 - 100.0%
root@Services \~# curl -H "Content-Type: application/json" -XGET http://localhost:9200/_cat/health?v
#返回结果如下
epoch timestamp cluster status node.total node.data shards pri relo init unassign pending_tasks max_task_wait_time active_shards_percent
1677142979 09:02:59 elasticsearch green 1 1 0 0 0 0 0 0 - 100.0%
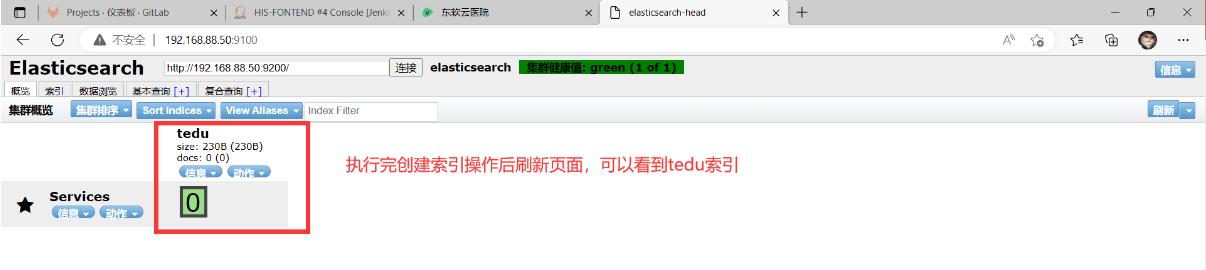
#创建索引(必做练习)
root@Services \~# curl -H "Content-Type: application/json" -XPUT http://localhost:9200/tedu/ -d '
{ "settings": {
"index": {
"number_of_shards": 1,
"number_of_replicas": 0
}
}
}'
#返回结果如下:
{"acknowledged":true,"shards_acknowledged":true,"index":"tedu"}root@Services \~#
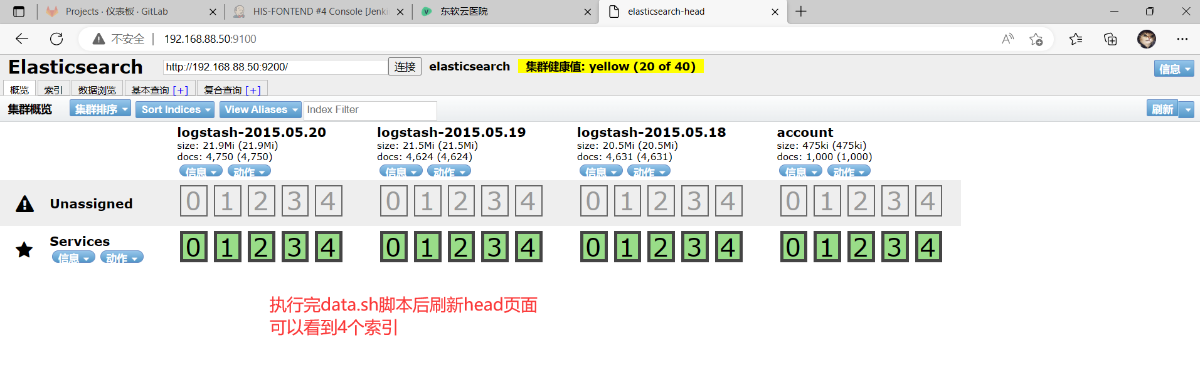
#调用API批量导入数据
root@Services \~# cd PROJECT02/Elasticsearch/
root@Services Elasticsearch# ls data.sh logs.jsonl accounts.json
accounts.json data.sh logs.jsonl
root@Services Elasticsearch# cat data.sh
#!/bin/bash
curl -H "Content-Type: application/json" -XPUT http://localhost:9200/account/user/_bulk --data-binary @accounts.json
curl -H "Content-Type: application/json" -XPUT http://localhost:9200/_bulk --data-binary @logs.jsonl
root@Services \~# bash data.sh
RabbitMQ服务
RabbitMQ部署
#安装Erlang
root@Services \~#ls PROJECT02/RabbitMQ/
erlang-25.2-1.el8.x86_64.rpm pika-1.3.1-py3-none-any.whl rabbitmq_demo.tar.gz RabbitMQ.py rabbitmq-server-3.11.5-1.el8.noarch.rpm
root@Services \~#cd PROJECT02/RabbitMQ/
root@Services RabbitMQ# yum -y localinstall erlang-25.2-1.el8.x86_64.rpm
#安装RabbitMQ
root@Service RabbitMQ#yum -y localinstall rabbitmq-server-3.11.5-1.el8.noarch.rpm
#启动RabbitMQ服务,并设置开机自启动
root@Service RabbitMQ#systemctl enable rabbitmq-server --now
root@Service RabbitMQ# ss -antpul | grep :5672 #确认5672端口监听
tcp LISTEN 0 128 *:5672 *:* users:(("beam.smp",pid=13298,fd=35))
#查看RabbitMQ服务状态
root@Services \~# rabbitmqctl status
Status of node rabbit@Services ...
Runtime
OS PID: 13298
OS: Linux
Uptime (seconds): 15
Is under maintenance?: false
RabbitMQ version: 3.11.5
RabbitMQ release series support status: supported
Node name: rabbit@Services
Erlang configuration: Erlang/OTP 25 erts-13.1.3 source 64-bit smp:2:2
... ...
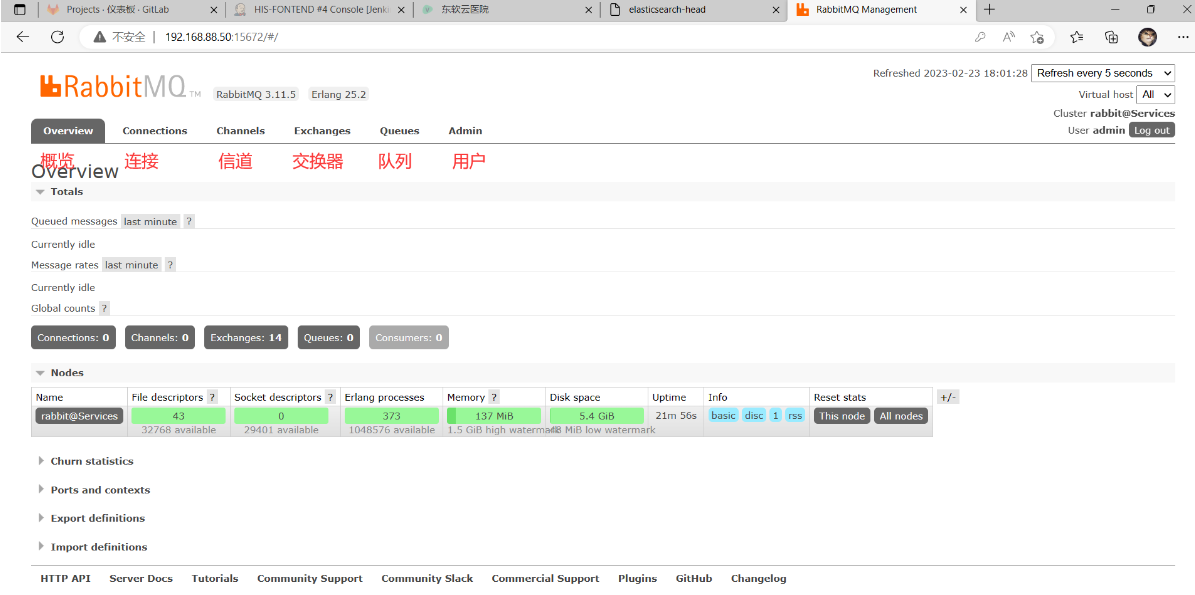
#启用RabbitMQ网页管理插件
root@Services \~# rabbitmq-plugins list #列出所有插件
root@Services \~#rabbitmq-plugins enable rabbitmq_management #启动网页管理插件
Enabling plugins on node rabbit@Services:
rabbitmq_management
The following plugins have been configured:
rabbitmq_management
rabbitmq_management_agent
rabbitmq_web_dispatch
Applying plugin configuration to rabbit@Services...
The following plugins have been enabled:
rabbitmq_management
rabbitmq_management_agent
rabbitmq_web_dispatch
started 3 plugins.
root@Services \~# rabbitmq-plugins list
Listing plugins with pattern ".*" ...
Configured: E = explicitly enabled; e = implicitly enabled
| Status: * = running on rabbit@Services
|/
rabbitmq_amqp1_0 3.11.5
rabbitmq_auth_backend_cache 3.11.5
rabbitmq_auth_backend_http 3.11.5
rabbitmq_auth_backend_ldap 3.11.5
rabbitmq_auth_backend_oauth2 3.11.5
rabbitmq_auth_mechanism_ssl 3.11.5
rabbitmq_consistent_hash_exchange 3.11.5
rabbitmq_event_exchange 3.11.5
rabbitmq_federation 3.11.5
rabbitmq_federation_management 3.11.5
rabbitmq_jms_topic_exchange 3.11.5
E\* rabbitmq_management 3.11.5
e\* rabbitmq_management_agent 3.11.5
rabbitmq_mqtt 3.11.5
rabbitmq_peer_discovery_aws 3.11.5
rabbitmq_peer_discovery_common 3.11.5
rabbitmq_peer_discovery_consul 3.11.5
rabbitmq_peer_discovery_etcd 3.11.5
rabbitmq_peer_discovery_k8s 3.11.5
rabbitmq_prometheus 3.11.5
rabbitmq_random_exchange 3.11.5
rabbitmq_recent_history_exchange 3.11.5
rabbitmq_sharding 3.11.5
rabbitmq_shovel 3.11.5
rabbitmq_shovel_management 3.11.5
rabbitmq_stomp 3.11.5
rabbitmq_stream 3.11.5
rabbitmq_stream_management 3.11.5
rabbitmq_top 3.11.5
rabbitmq_tracing 3.11.5
rabbitmq_trust_store 3.11.5
e\* rabbitmq_web_dispatch 3.11.5
rabbitmq_web_mqtt 3.11.5
rabbitmq_web_mqtt_examples 3.11.5
rabbitmq_web_stomp 3.11.5
rabbitmq_web_stomp_examples 3.11.5
root@Services \~# ss -antpul | grep :15672
tcp LISTEN 0 128 0.0.0.0:15672 0.0.0.0:* users:(("beam.smp",pid=13298,fd=37))
root@Services \~#
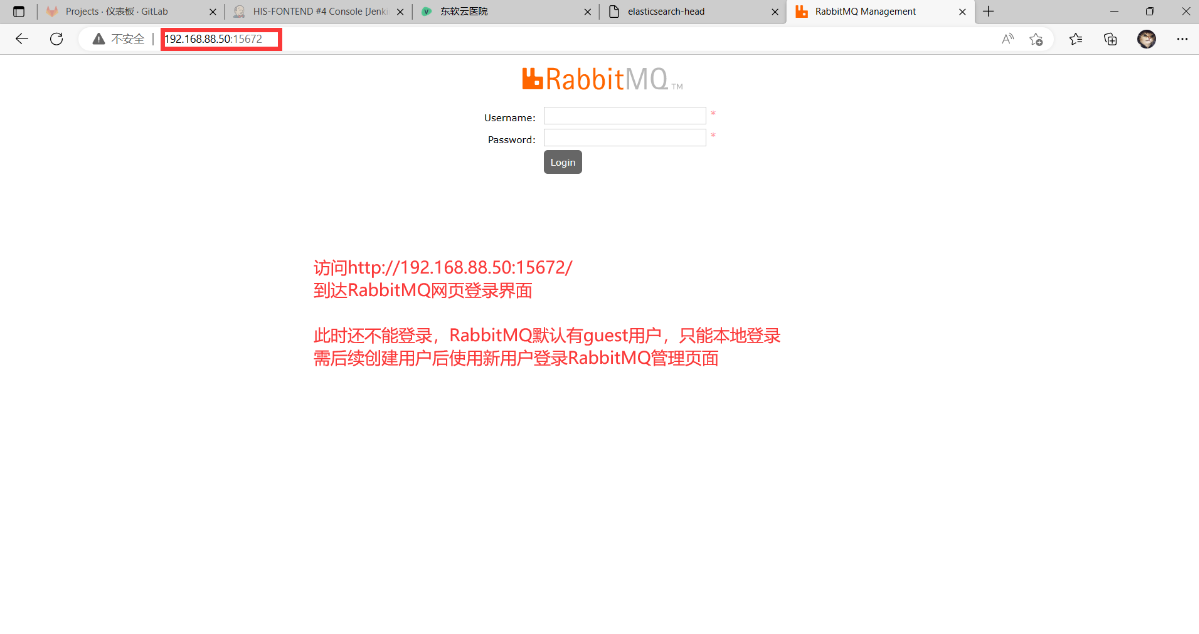
#访问RabbitMQ管理页面: http://192.168.88.50:15672/
RabbitMQ服务应用
- 用户管理
#RabbitMQ创建用户
root@Services \~#rabbitmqctl list_users #列出RabbitMQ已有用户
Listing users ...
user tags
guest administrator
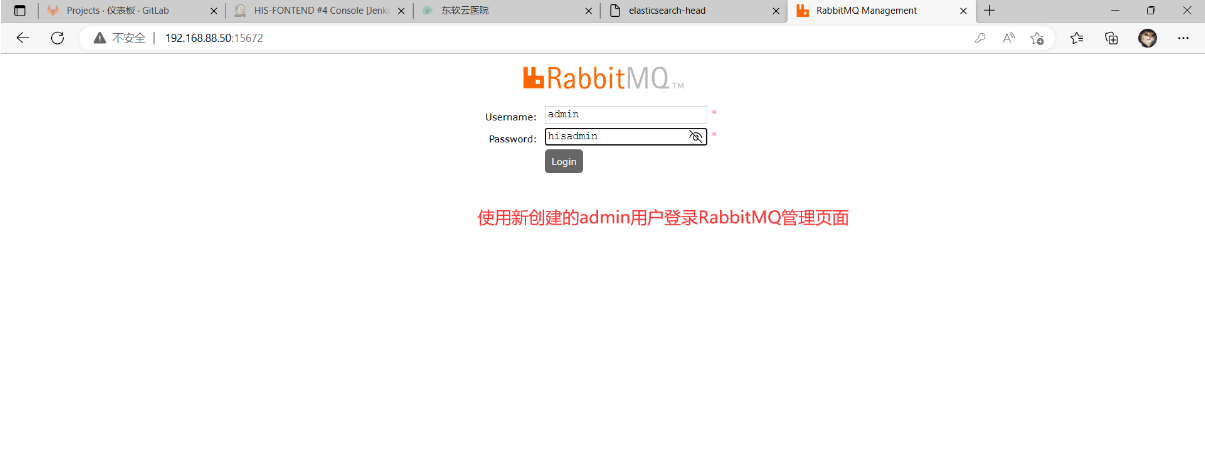
root@Services \~# rabbitmqctl add_user admin #添加admin用户
Adding user "admin" ...
Password:
hisadmin #密码必须设置为hisadmin,为后续项目使用
root@Services \~# rabbitmqctl list_users #列出RabbitMQ已有用户
Listing users ...
user tags
admin \[\]
guest administrator
root@Services \~#
- 用户标签管理
#RabbitMQ用户标签解析
#超级管理员(administrator)
#可登陆管理控制台,可查看所有的信息,并且可以对用户,策略(policy)进行操作。
#监控者(monitoring)
#可登陆管理控制台,同时可以查看rabbitmq节点的相关信息(进程数,内存使用情况,磁盘使用情况等)
#策略制定者(policymaker)
#可登陆管理控制台, 同时可以对policy进行管理。但无法查看节点的相关信息(上图红框标识的部分)。
#普通管理者(management)
#仅可登陆管理控制台,无法看到节点信息,也无法对策略进行管理。
#其他(guest)
#无法登陆管理控制台,通常就是普通的生产者和消费者
#给admin用户添加administrator标签
root@Services \~# rabbitmqctl set_user_tags admin administrator
Setting tags for user "admin" to administrator ...
root@Services \~# rabbitmqctl list_users
Listing users ...
user tags
admin administrator
guest administrator
root@Services \~#
- 虚拟主机管理
#创建/his虚拟主机
root@Services \~# rabbitmqctl list_vhosts #列出已有虚拟主机
Listing vhosts ...
name
/
root@Services \~#rabbitmqctl add_vhost /his #创建/his虚拟主机,后续项目使用
Adding vhost "/his" ...
root@Services \~# rabbitmqctl list_vhosts #列出已有虚拟主机
Listing vhosts ...
name
/his
/
root@Services \~#
- 设置用户访问虚拟主机权限
#设置admin用户对/his虚拟主机有所有权限
root@Services \~# rabbitmqctl list_user_permissions admin #查看admin用户权限
Listing permissions for user "admin" ...
#设置权限
root@Services \~# rabbitmqctl set_permissions -p /his admin ".*" ".*" ".*"
Setting permissions for user "admin" in vhost "/his" ...
root@Services \~# rabbitmqctl list_user_permissions admin #查看admin用户权限
Listing permissions for user "admin" ...
vhost configure write read
/his .* .* .*
数据库服务部署 *
MySQL部署
#安装MySQL服务
root@Services \~#yum -y install mysql mysql-server mysql-devel
#启动MySQL服务,并设置开机自启动
root@Services \~# systemctl enable mysqld --now #设置MySQL服务开机自启动
root@Services \~#ss -antpul | grep mysql #确认3306端口被监听
tcp LISTEN 0 70 *:33060 *:* users:(("mysqld",pid=6875,fd=22))
tcp LISTEN 0 128 *:3306 *:* users:(("mysqld",pid=6875,fd=25))
#初始化MySQL服务,创建HIS项目数据库,创建数据库账户并授权
root@Services \~# mysql
mysql> CREATE DATABASE his;
mysql> CREATE USER 'his'@'192.168.88.60' IDENTIFIED BY 'hisadmin';
mysql> GRANT ALL ON his.* TO 'his'@'192.168.88.60';
mysql> SHOW GRANTS FOR 'his'@'192.168.88.60';
+----------------------------------------------------------+
| Grants for his@192.168.88.60 |
+----------------------------------------------------------+
| GRANT USAGE ON *.* TO `his`@`192.168.88.60` |
| GRANT ALL PRIVILEGES ON `his`.* TO `his`@`192.168.88.60` |
+----------------------------------------------------------+
mysql> exit
#解压项目资料
root@Services \~# unzip PROJECT02/Case/HIS/HIS.zip
root@Service \~# ls HIS/HIS-SQL/
his.sql
#导入HIS项目SQL,验证
root@Services \~# mysql his < HIS/HIS-SQL/his.sql
root@Services \~# mysql -e "show tables from his;"
+----------------------------------+
| Tables_in_his |
+----------------------------------+
| bms_bills_record |
| bms_invoice_exp |
| bms_invoice_record |
| bms_operator_settle_record |
| bms_settlement_cat |
| dms_case_history |
| dms_case_model |
| dms_case_model_catalog |
| dms_dise |
| dms_dise_catalog |
| dms_dosage |
| dms_drug |
| dms_drug_model |
| dms_drug_refund_item_record |
| dms_herbal_item_record |
| dms_herbal_model_item |
| dms_herbal_prescription_record |
| dms_medicine_item_record |
| dms_medicine_model_item |
| dms_medicine_prescription_record |
| dms_non_drug |
| dms_non_drug_item_record |
| dms_non_drug_model |
| dms_registration |
| pms_patient |
| sms_dept |
| sms_description |
| sms_frequent_used |
| sms_login_log |
| sms_permission |
| sms_registration_rank |
| sms_role |
| sms_role_permission_relation |
| sms_skd |
| sms_skd_rule |
| sms_skd_rule_item |
| sms_staff |
| sms_workload_record |
+----------------------------------+
Redis部署
#安装Redis服务
root@Services \~# yum -y install redis
#配置Redis服务
root@Services \~#vim /etc/redis.conf
bind 0.0.0.0 #69行,监听本地所有网络
protected-mode no #88行,关闭保护模式(允许其他主机访问本机数据库)
daemonize yes #136行,以守护进程方式运行
requirepass hisadmin #507行,设置redis访问密码
#启动Redis服务,并设置开机自启动
root@Services \~# systemctl enable redis --now
root@Services \~# ss -antpul | grep redis #确认6379端口被监听
tcp LISTEN 0 128 0.0.0.0:6379 0.0.0.0:* users:(("redis-server",pid=7839,fd=6))
root@Services \~#
#测试Redis服务
root@Services \~# redis-cli -h localhost -p 6379 -a hisadmin info
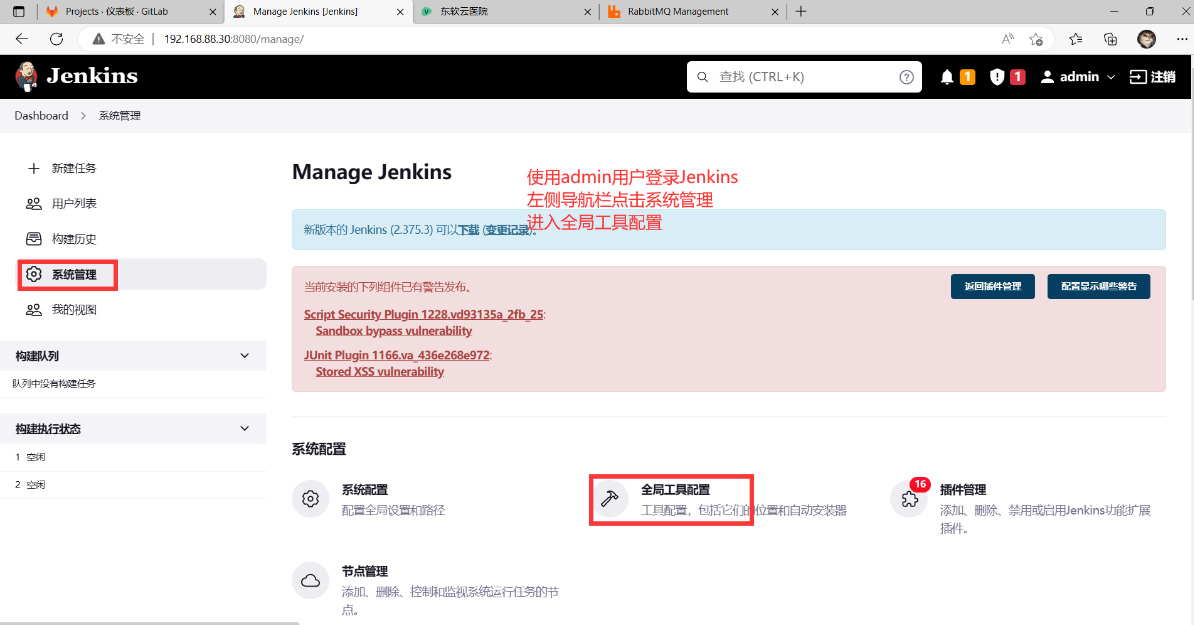
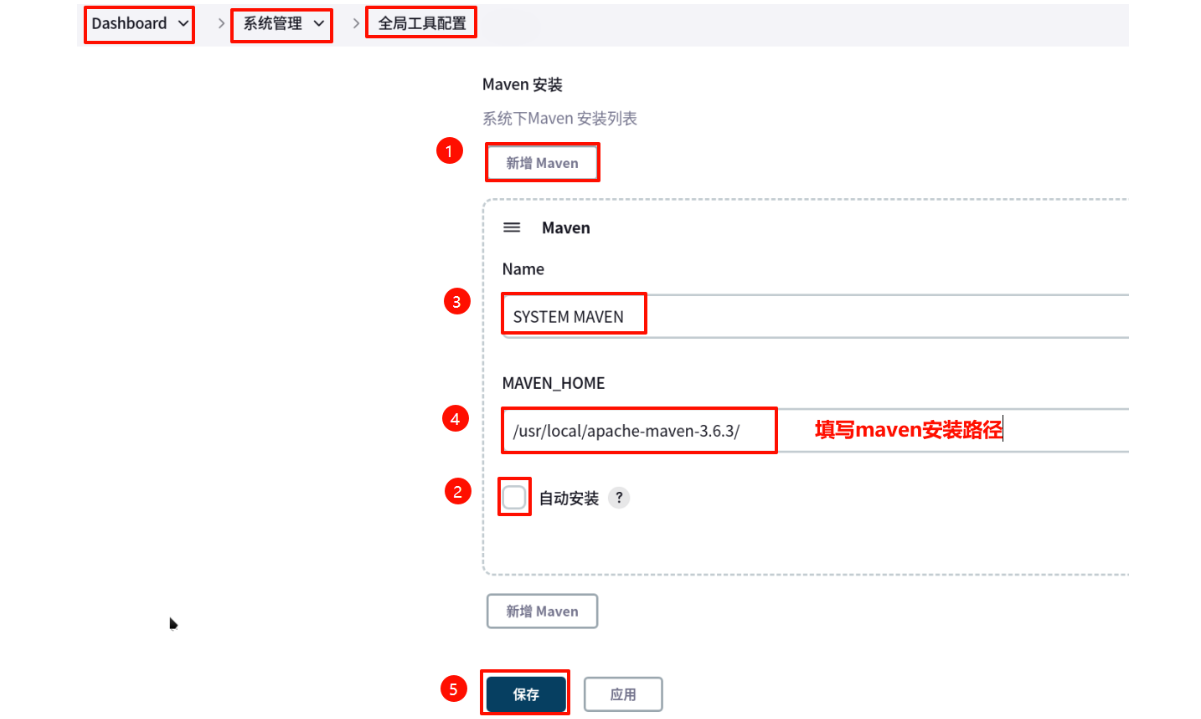
Jenkins全局工具配置
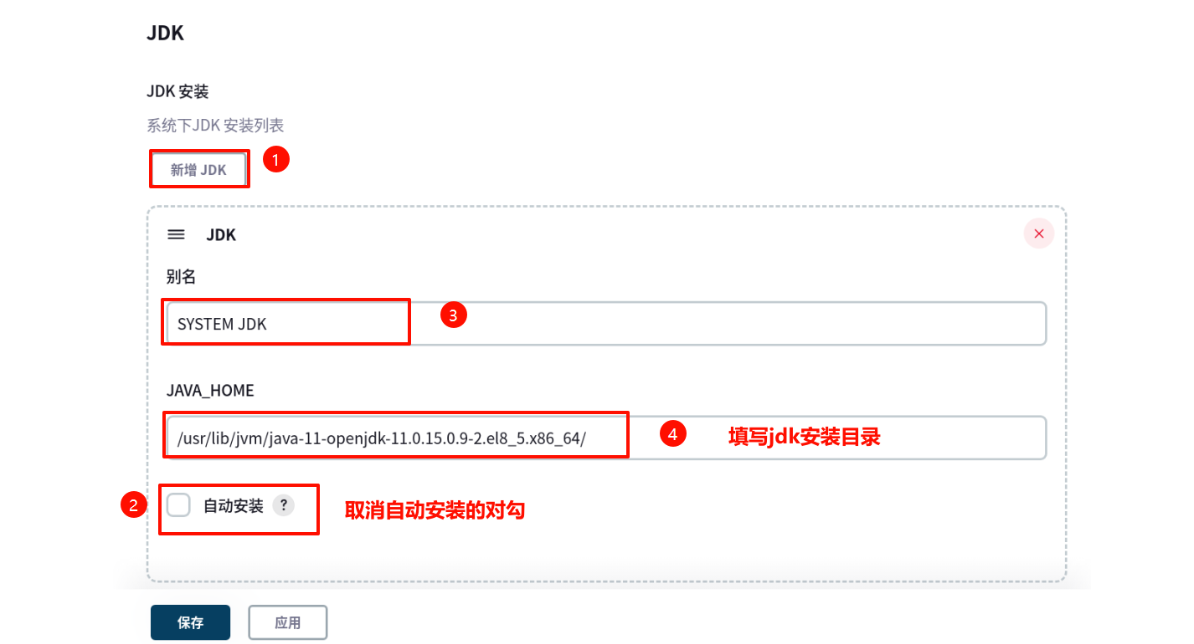
配置JDK环境
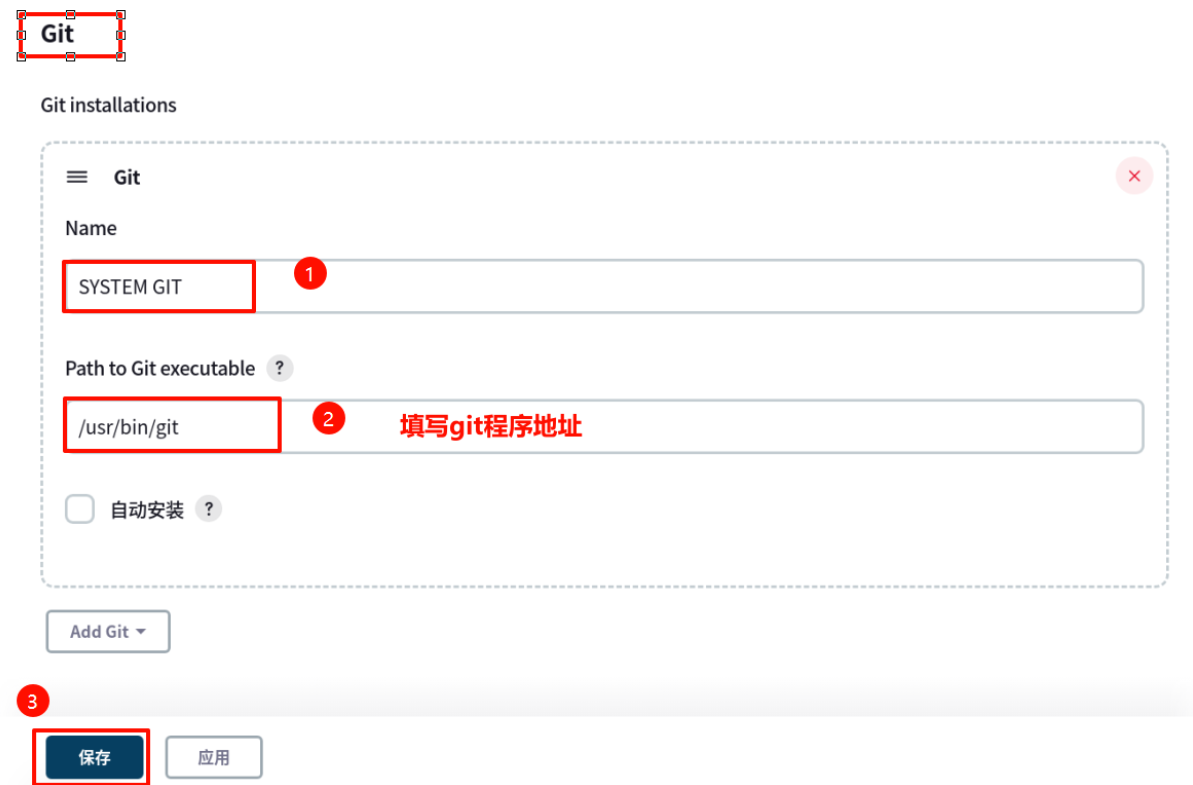
配置Git工具
配置Maven工具
#Jenkins主机安装Maven(-C指定解压路径)
root@Jenkins \~# tar -xf PROJECT02/Jenkins/apache-maven-3.6.3-bin.tar.gz \
-C /usr/local/
root@Jenkins \~# ls /usr/local/apache-maven-3.6.3/
#部署Maven本地仓库
root@Jenkins \~# ls PROJECT02/Case/HIS/HIS.zip node-v16.13.0-linux-x64.tar.gz repository.tar.gz
root@Jenkins \~# tar -xpPf PROJECT02/Case/HIS/repository.tar.gz -C /
root@Jenkins \~# ls /var/lib/jenkins/.m2/
repository
root@Jenkins \~# ls /var/lib/jenkins/.m2/repository/
aopalliance classworlds commons-beanutils commons-io de joda-time net
backport-util-concurrent cn commons-codec commons-lang io junit org
ch com commons-collections commons-logging javax mysql
root@Jenkins \~#
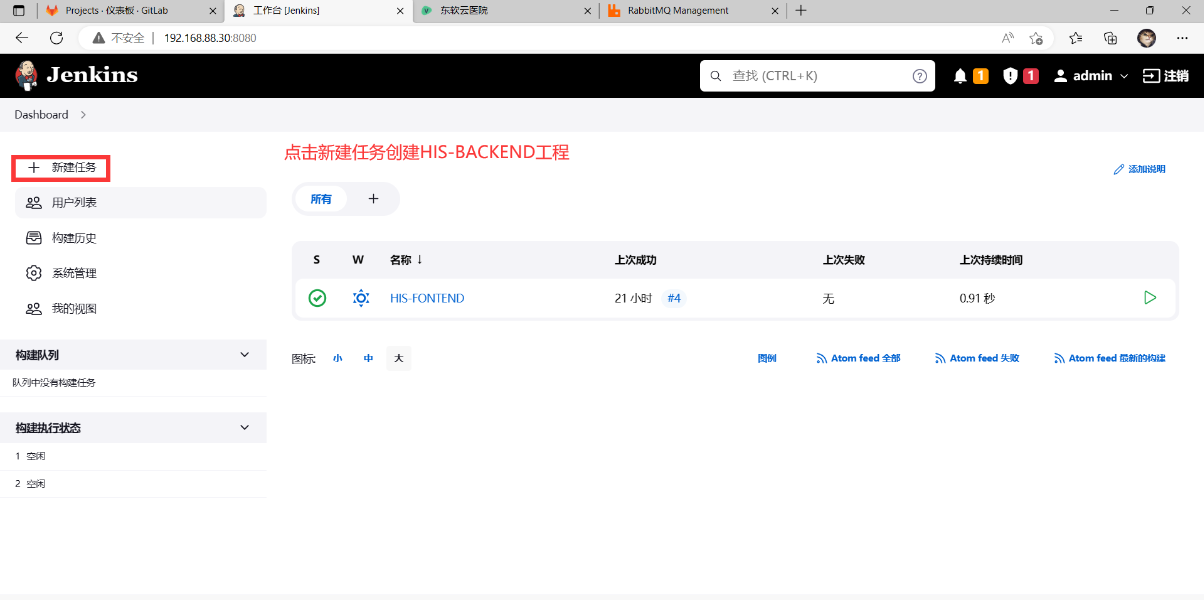
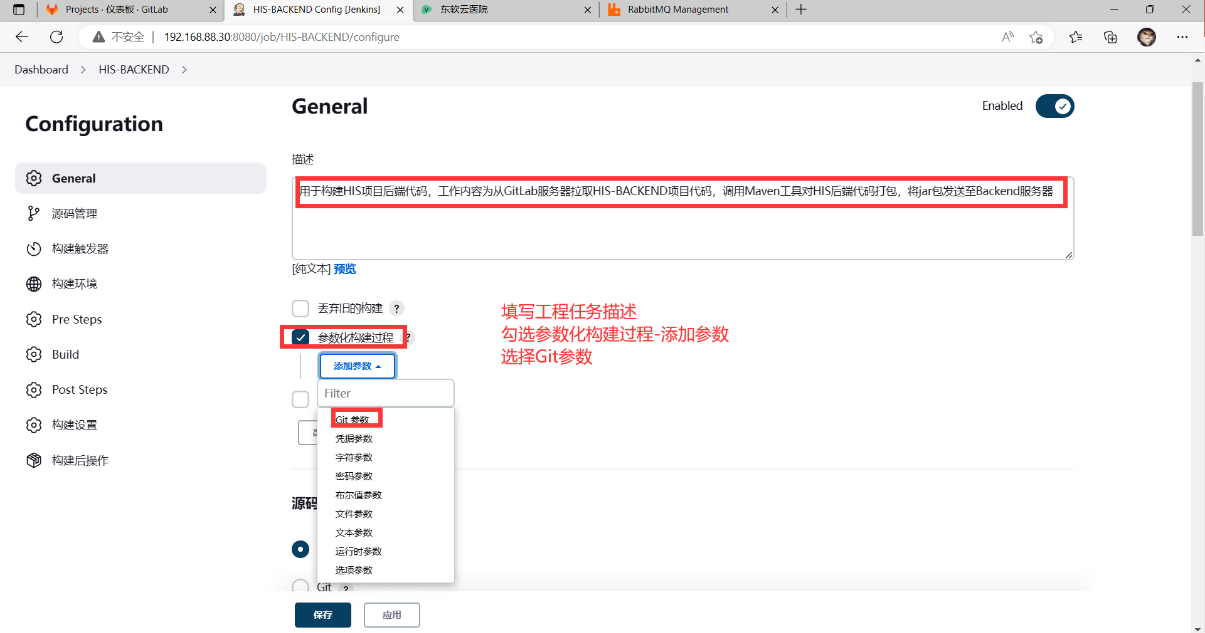
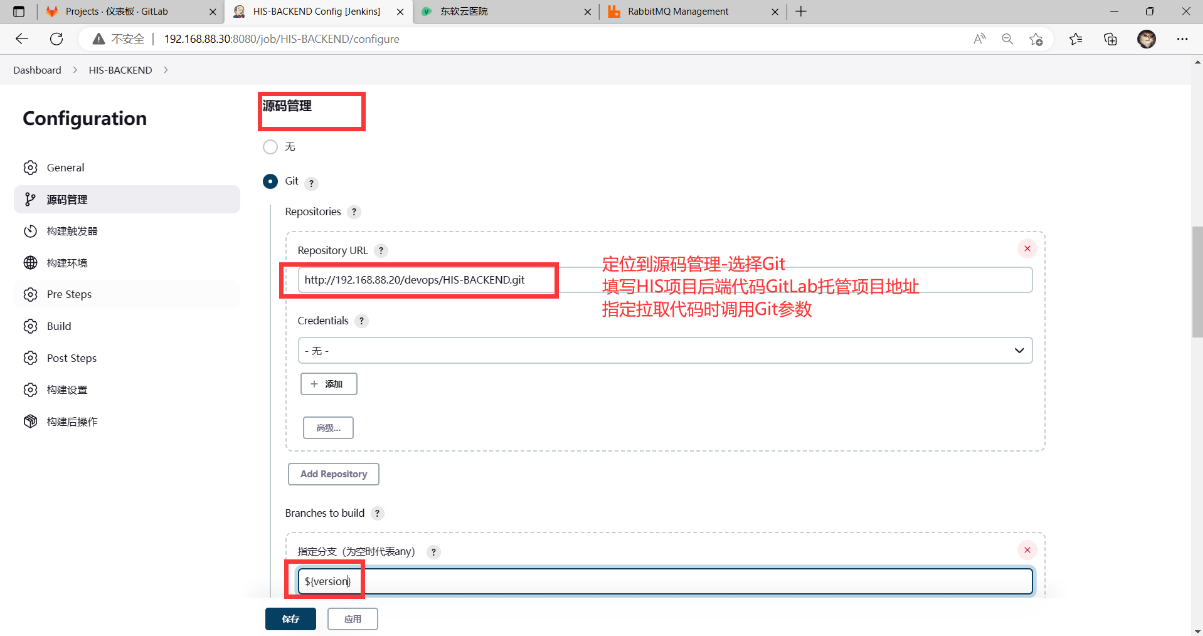
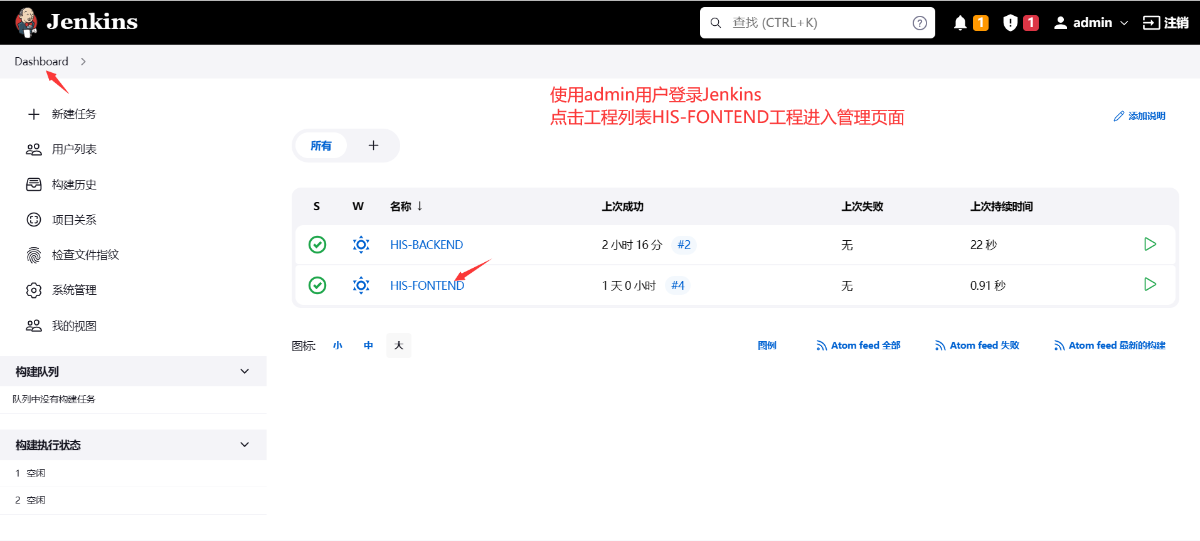
Jenkins后端工程构建
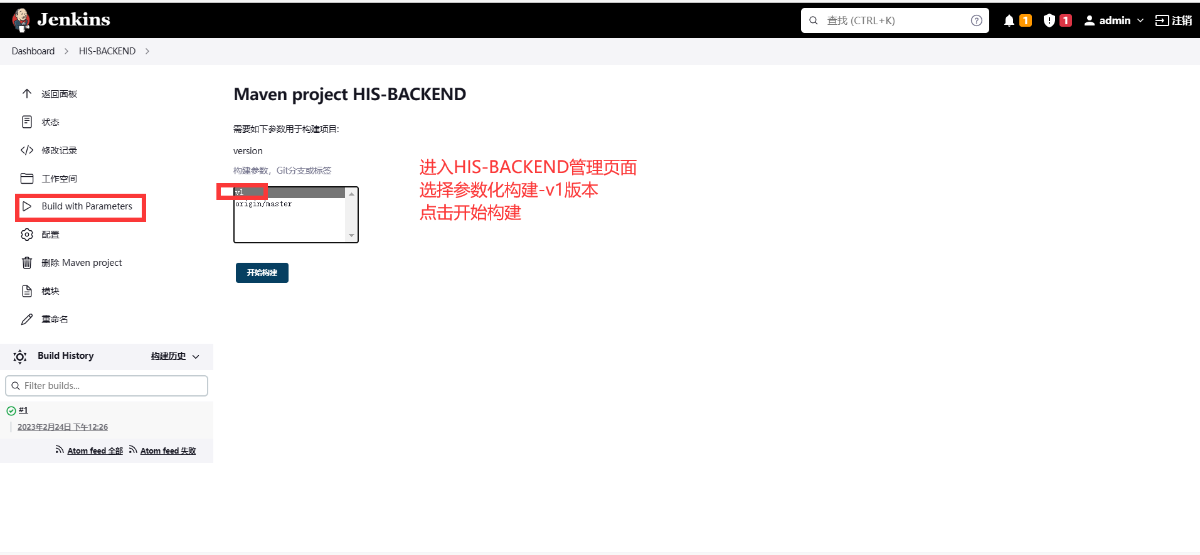
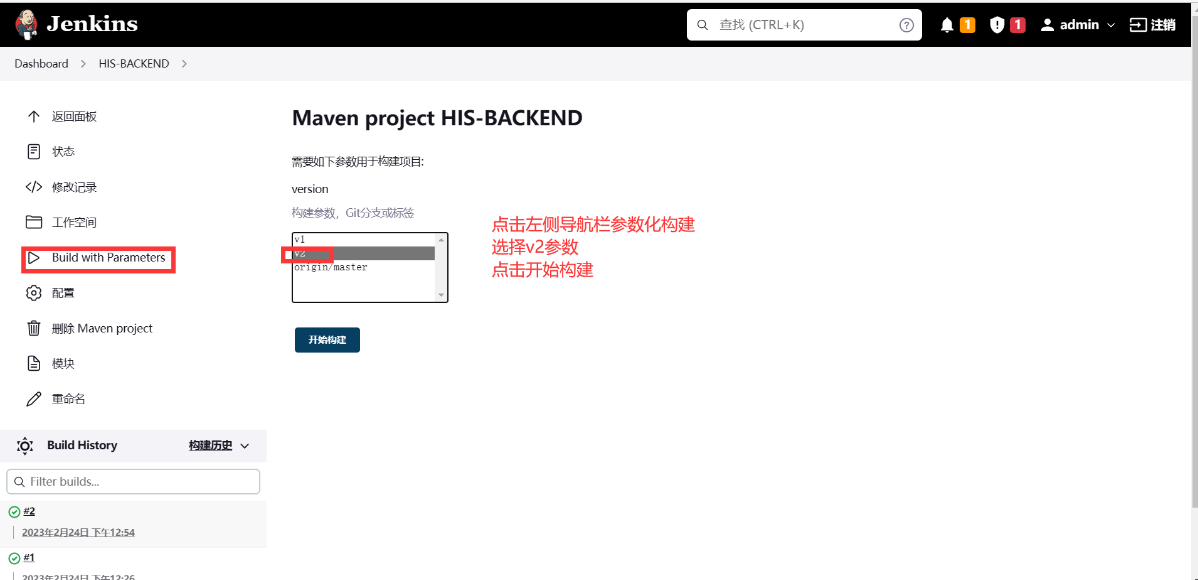
Jenkins中创建HIS-BACKEND工程
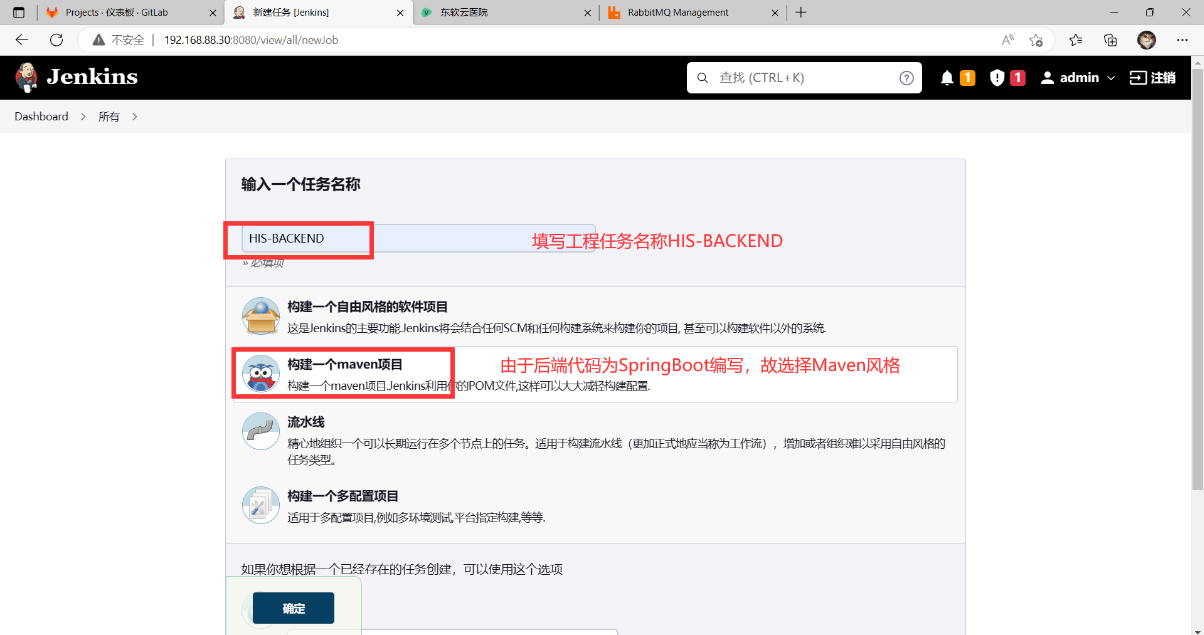
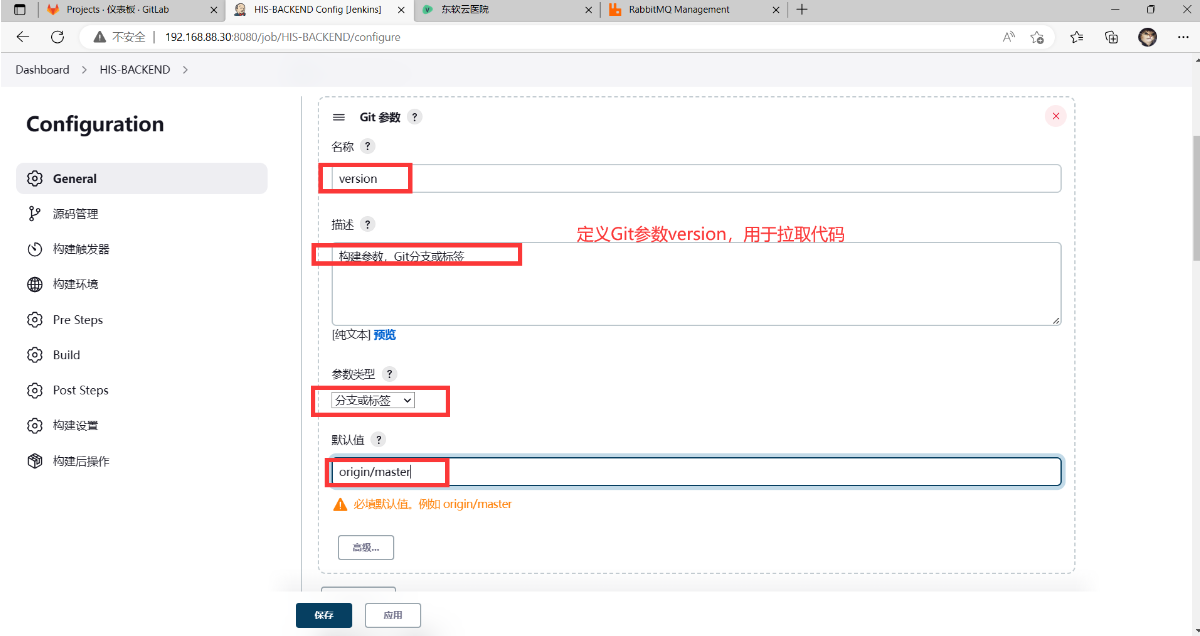
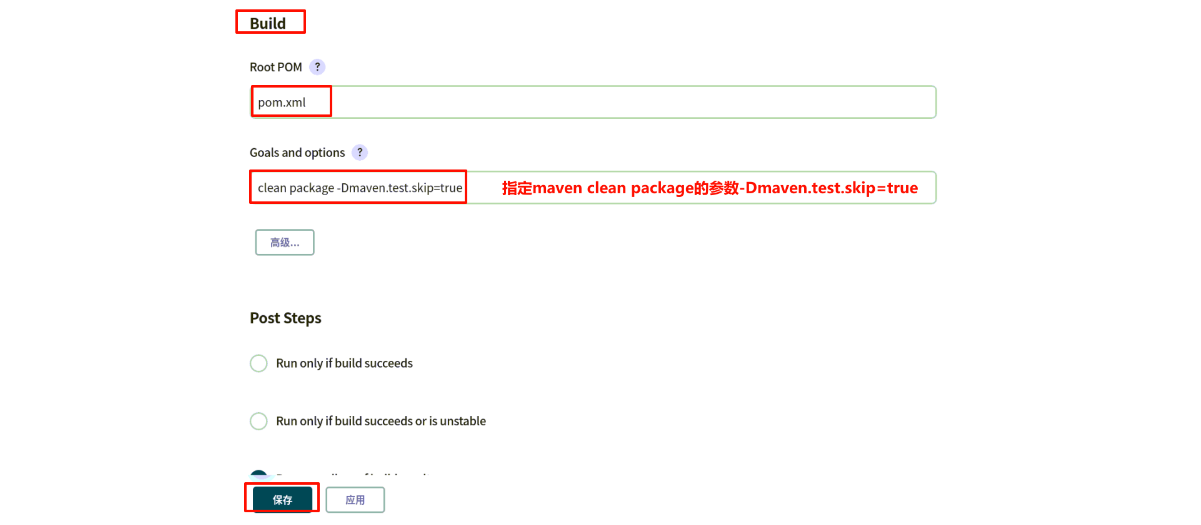
#Maven打包参数:Maven执行打包操作时需要调用pom.xml文件,所以需要指定pom.xml文件位置
clean package -Dmaven.test.skip=true #清理旧文件、跳过测试直接打包
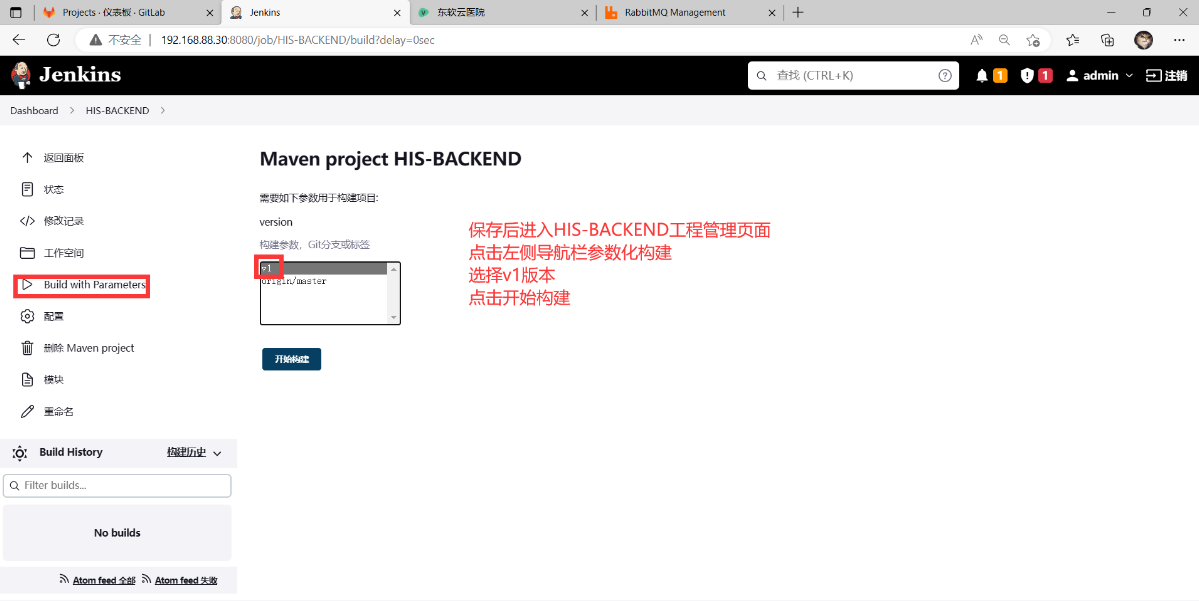
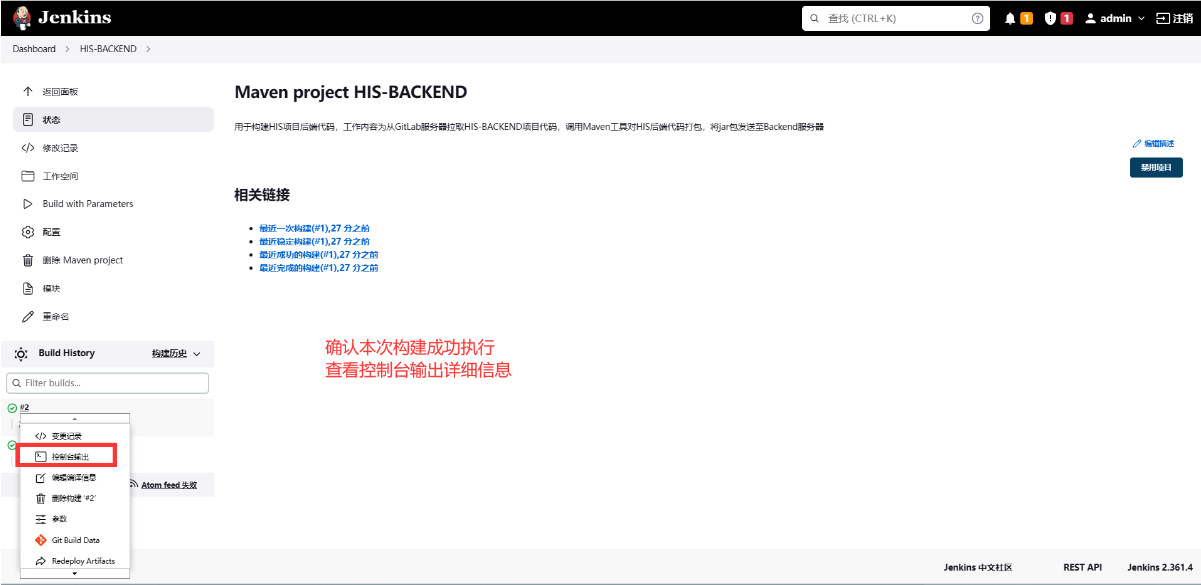
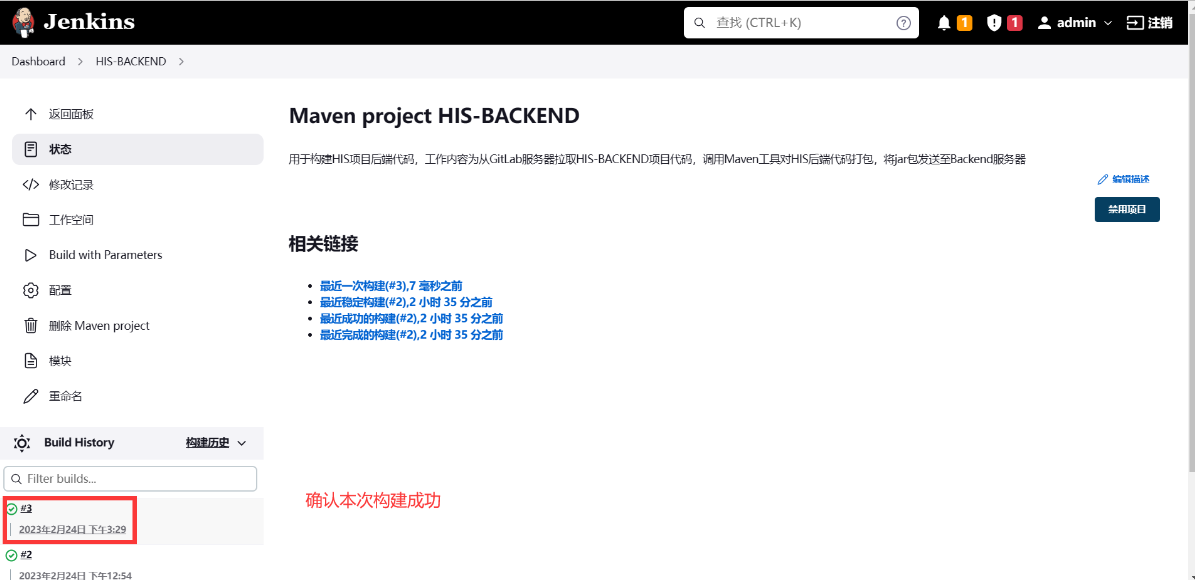
测试HIS-BACKEND工程构建
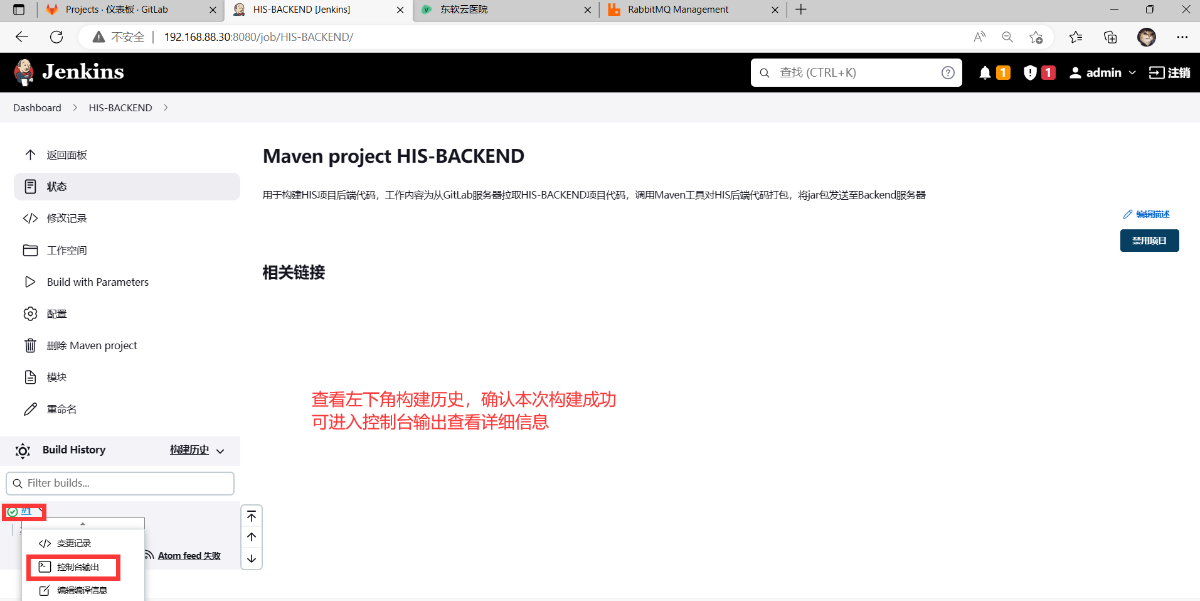
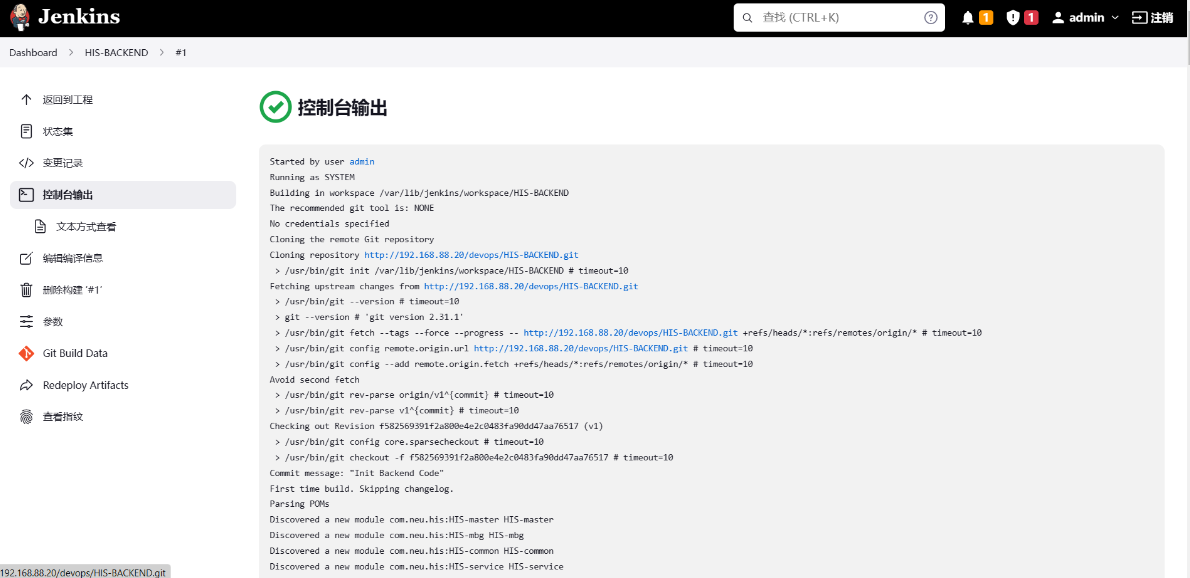
#Jenkins主机确认HIS-BACKEND构建情况
root@Jenkins \~# ls /var/lib/jenkins/workspace/ #确认拉取HIS-BACKEND代码
HIS-BACKEND HIS-FONTEND
root@Jenkins \~# ls /var/lib/jenkins/workspace/HIS-BACKEND/HIS-api HIS-common HIS-demo HIS-mbg HIS-service pom.xml
root@Jenkins \~# ls /var/lib/jenkins/workspace/HIS-BACKEND/HIS-api/mvnw mvnw.cmd pom.xml src target
root@Jenkins \~# ls /var/lib/jenkins/workspace/HIS-BACKEND/HIS-api/target/ #确认打包
classes generated-sources HIS-api-1.0-SNAPSHOT.jar HIS-api-1.0-SNAPSHOT.jar.original maven-archiver maven-status
root@Jenkins \~#
#清理HIS-BACKEND本次构建
root@Jenkins \~# rm -rf /var/lib/jenkins/workspace/HIS-BACKEND/
root@Jenkins \~#
Jenkins后端自动发布
Backend主机部署
- 部署OpenJDK环境
#安装OpenJDK-1.8
root@Backend \~# yum -y install java-1.8.0-openjdk-devel
- 部署jar包运行配置文件
#HIS项目采用外置配置文件方式
root@Backend \~# mkdir /opt/his/
root@Backend \~# yum -y install unzip
root@Backend \~# unzip PROJECT02.zip
root@Backend \~# unzip PROJECT02/Case/HIS/HIS.zip
root@Backend \~# ls HIS/HIS-CONFIG/
application-prod.yml application.yml
root@Backend \~# scp HIS/HIS-CONFIG/*.yml /opt/his/
root@Backend \~# ls /opt/his/
application-prod.yml application.yml
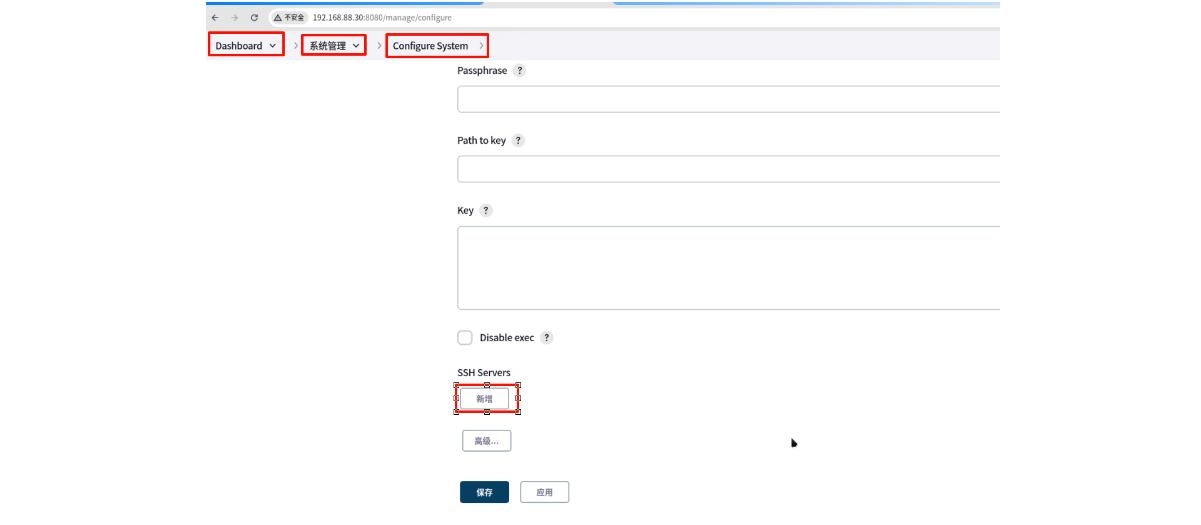
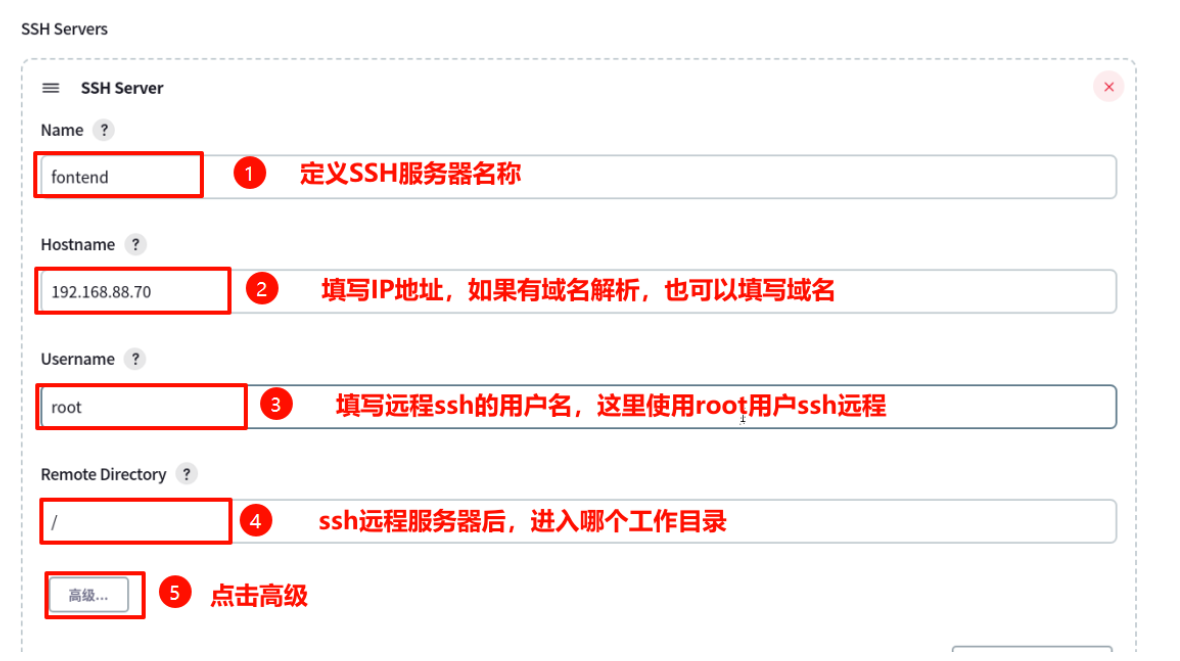
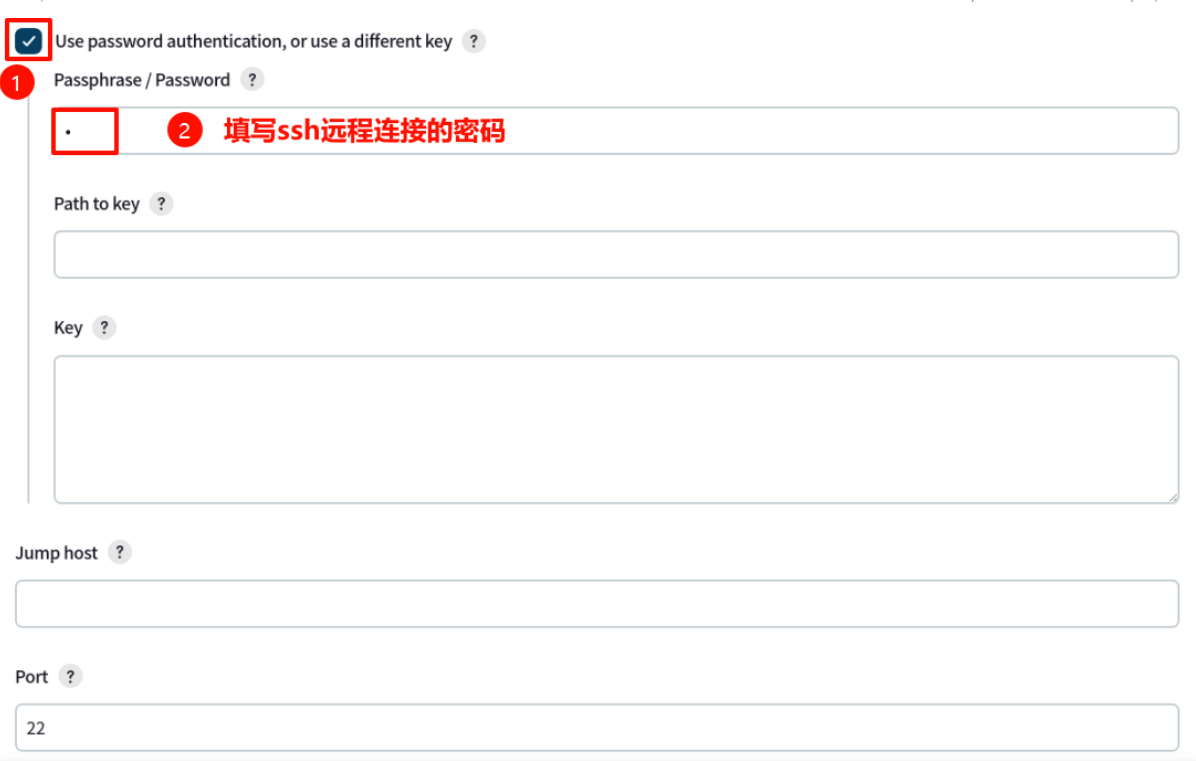
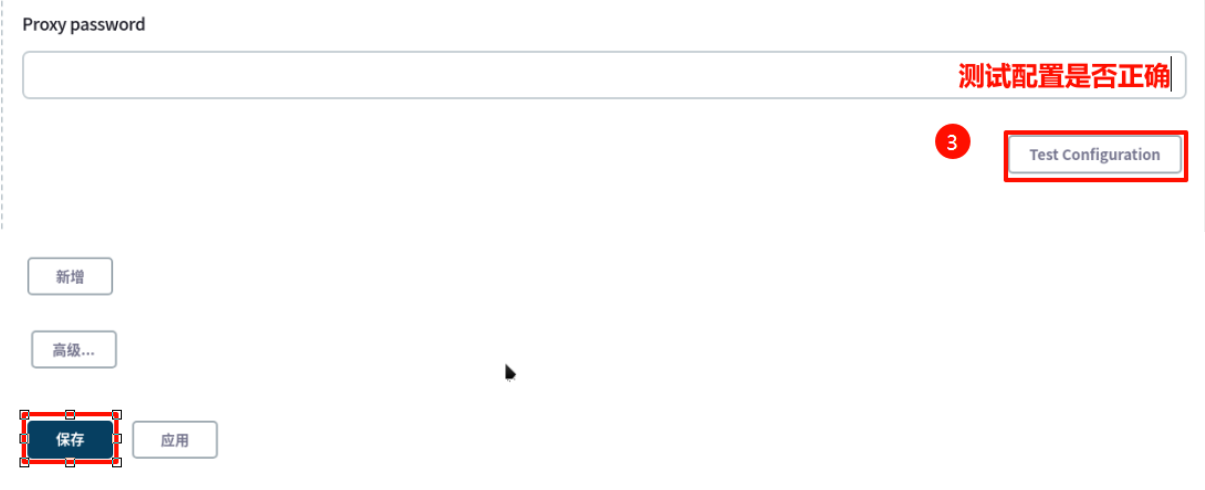
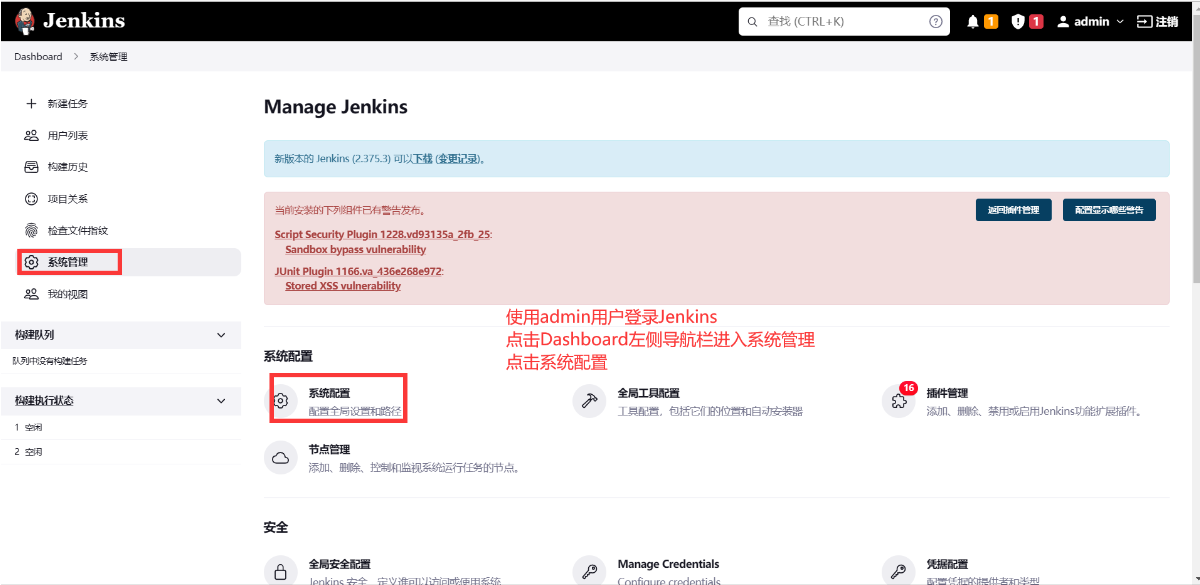
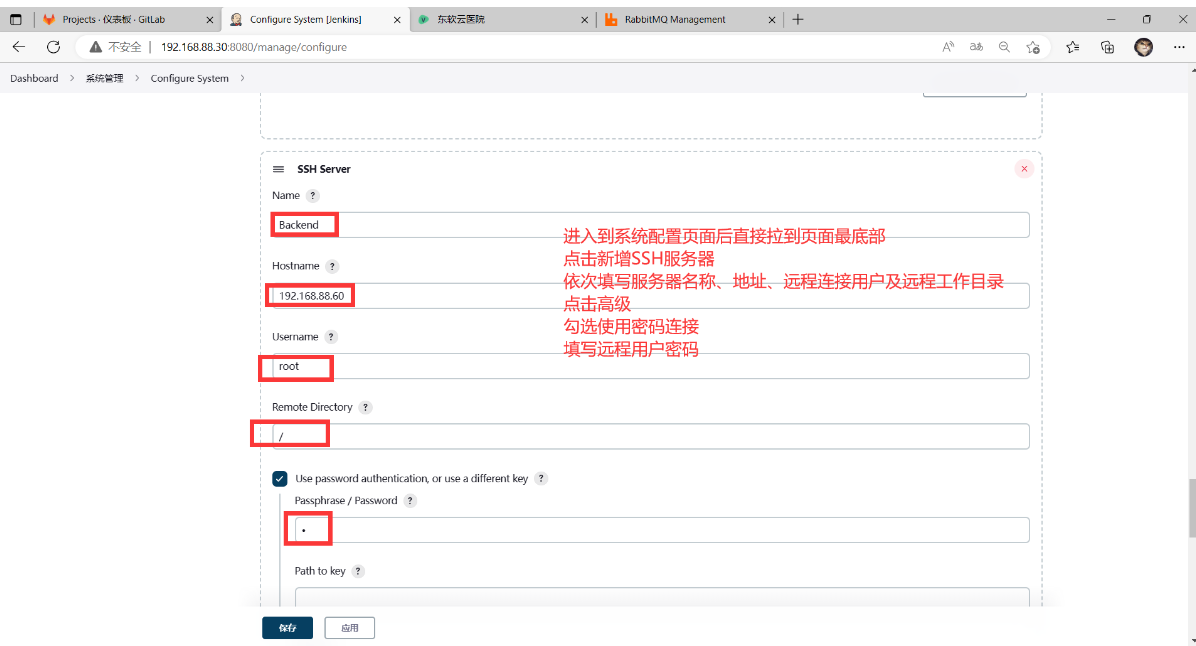
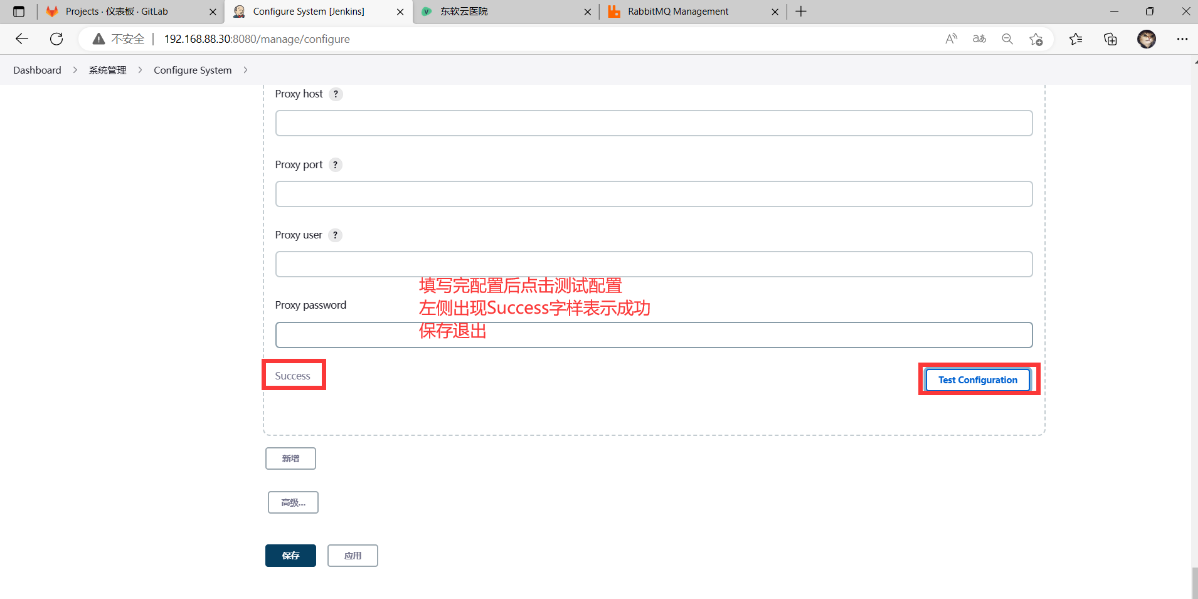
添加SSH服务器
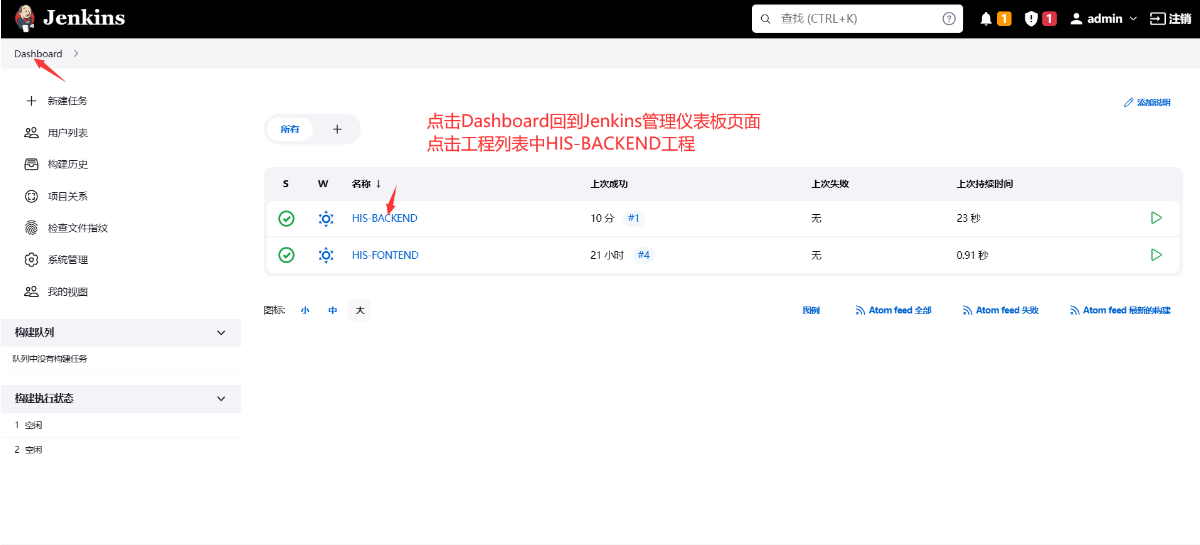
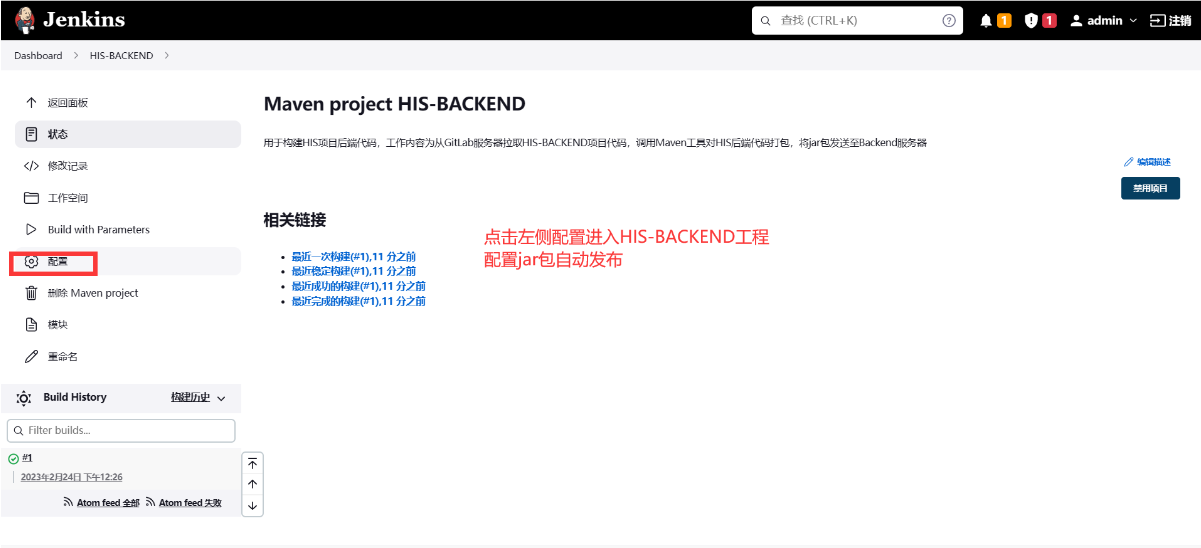
HIS-BACKEND工程配置自动发布

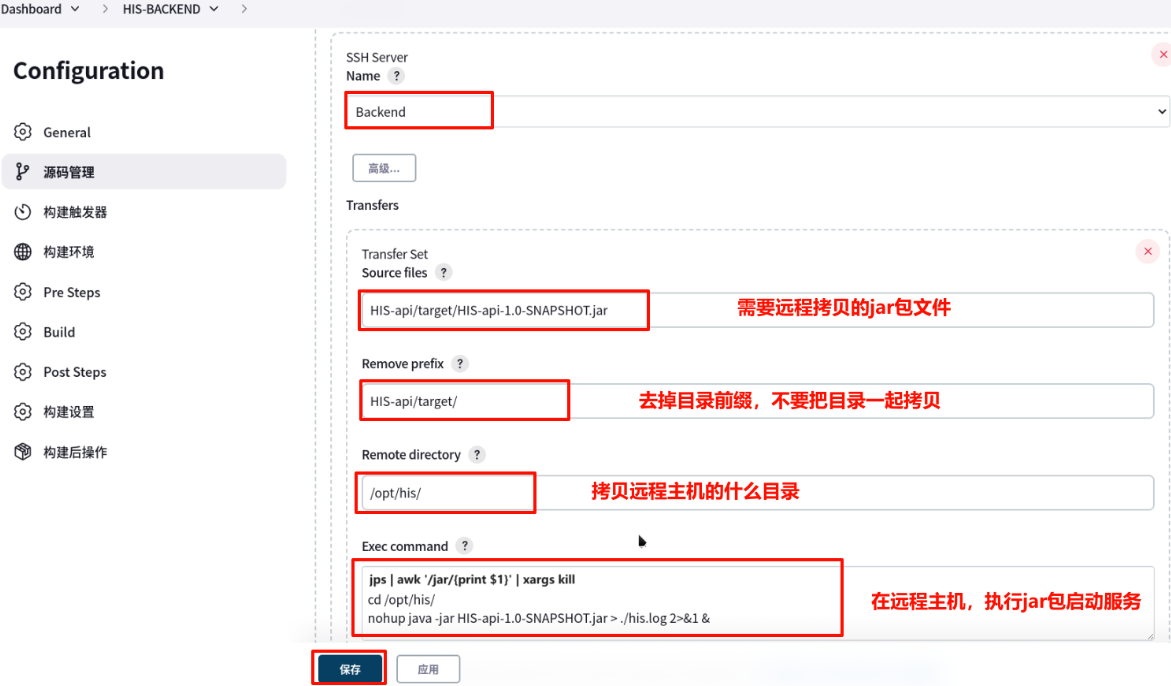
上图中Exec command代码如下:
#!/bin/bash
jps | awk '/jar/{print $1}' | xargs kill
cd /opt/his/
nohup java -jar HIS-api-1.0-SNAPSHOT.jar > ./his.log 2>&1 &
HIS-BACKEND工程自动发布测试
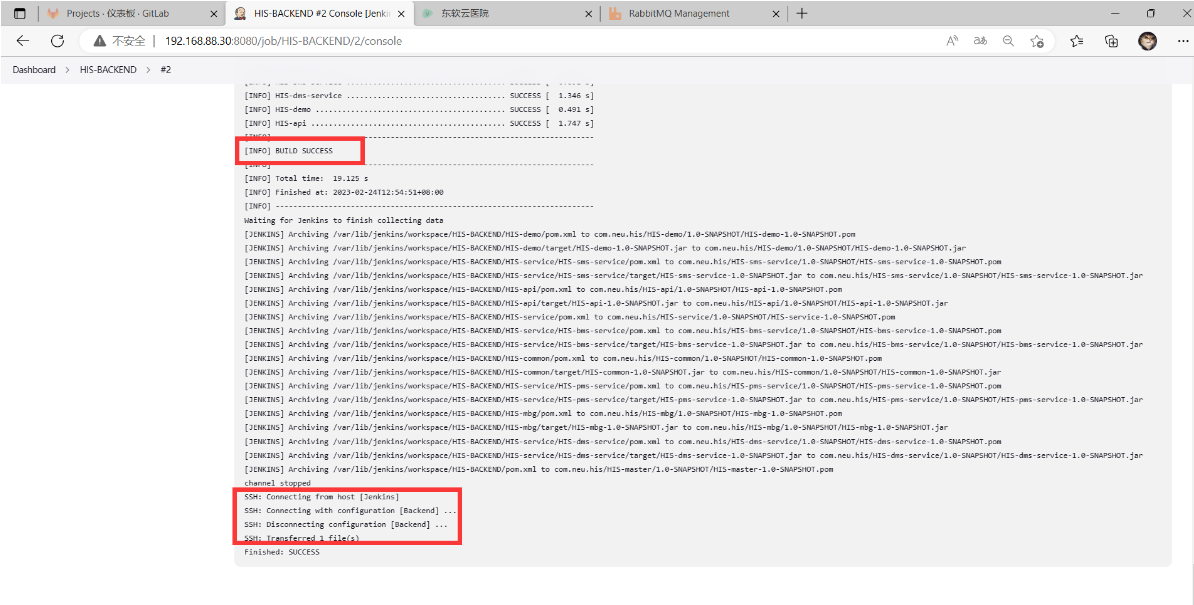
#Jenkins主机确认HIS-BACKEND打包成功
root@Jenkins \~# ls /var/lib/jenkins/workspace/HIS-BACKEND/HIS-api/target/HIS-api-1.0-SNAPSHOT.jar
/var/lib/jenkins/workspace/HIS-BACKEND/HIS-api/target/HIS-api-1.0-SNAPSHOT.jar
root@Jenkins \~#
#Backend主机确认jar包发布情况
root@Backend \~# ls /opt/his/
application-prod.yml application.yml HIS-api-1.0-SNAPSHOT.jar
root@Backend \~# ss -antpu | grep :8888 #确认8888端口被监听
tcp LISTEN 0 100 *:8888 *:* users:(("java",pid=9629,fd=63))
root@Backend \~# ss -antpu | grep java
#测试服务状态
root@Backend \~# curl http://localhost:8888/actuator/health?pretty
{"status":"UP","details":{"rabbit":{"status":"UP","details":{"version":"3.11.5"}},"diskSpace":{"status":"UP","details":{"total":10725883904,"free":8431407104,"threshold":10485760}},"db":{"status":"UP","details":{"database":"MySQL","hello":1}},"elasticsearch":{"status":"UP","details":{"clusterName":"elasticsearch","numberOfNodes":1,"numberOfDataNodes":1,"activePrimaryShards":22,"activeShards":22,"relocatingShards":0,"initializingShards":0,"unassignedShards":20}},"elasticsearchRest":{"status":"UP","details":{"cluster_name":"elasticsearch","status":"yellow","timed_out":false,"number_of_nodes":1,"number_of_data_nodes":1,"active_primary_shards":22,"active_shards":22,"relocating_shards":0,"initializing_shards":0,"unassigned_shards":20,"delayed_unassigned_shards":0,"number_of_pending_tasks":0,"number_of_in_flight_fetch":0,"task_max_waiting_in_queue_millis":0,"active_shards_percent_as_number":52.38095238095239}},"redis":{"status":"UP","details":{"version":"5.0.3"}}}}
HIS项目展示
配置Nginx前后端交互
#修改nginx配置文件,实现前后端分离
root@Fontend \~# vim /etc/nginx/nginx.conf
#在49行,手动添加如下3行内容
location /prod-api/ {
proxy_pass http://192.168.88.60:8888/;
}
root@Fontend \~# systemctl restart nginx #重启nginx服务
root@Fontend \~# ss -antpul | grep nginx
tcp LISTEN 0 128 0.0.0.0:80 0.0.0.0:* users:(("nginx",pid=952,fd=6),("nginx",pid=951,fd=6),("nginx",pid=950,fd=6))
root@Fontend \~#
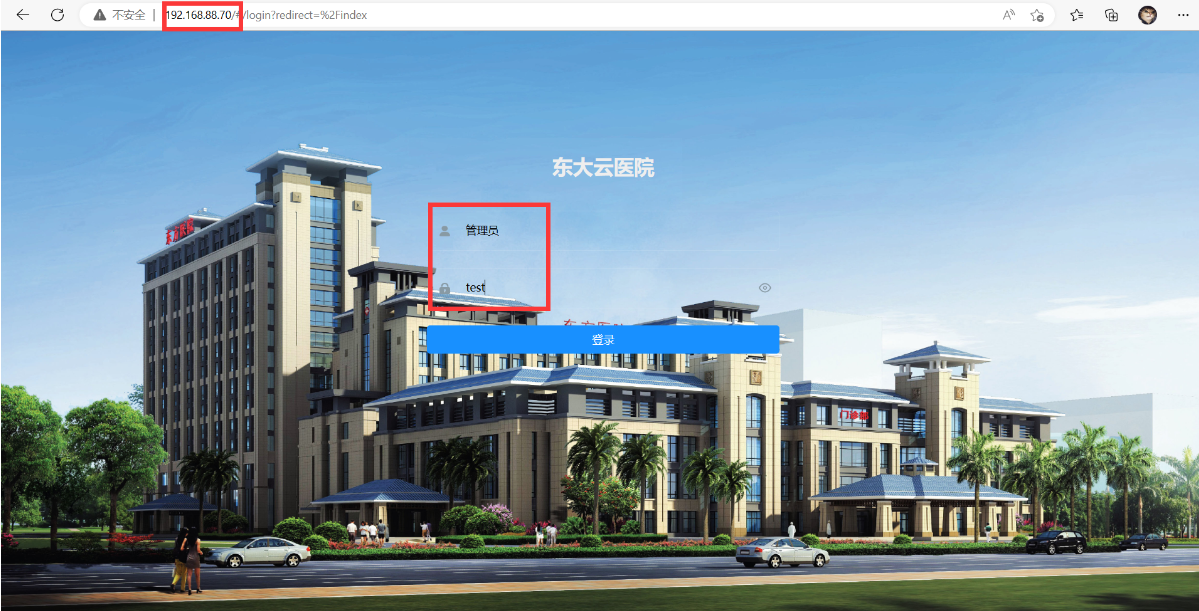
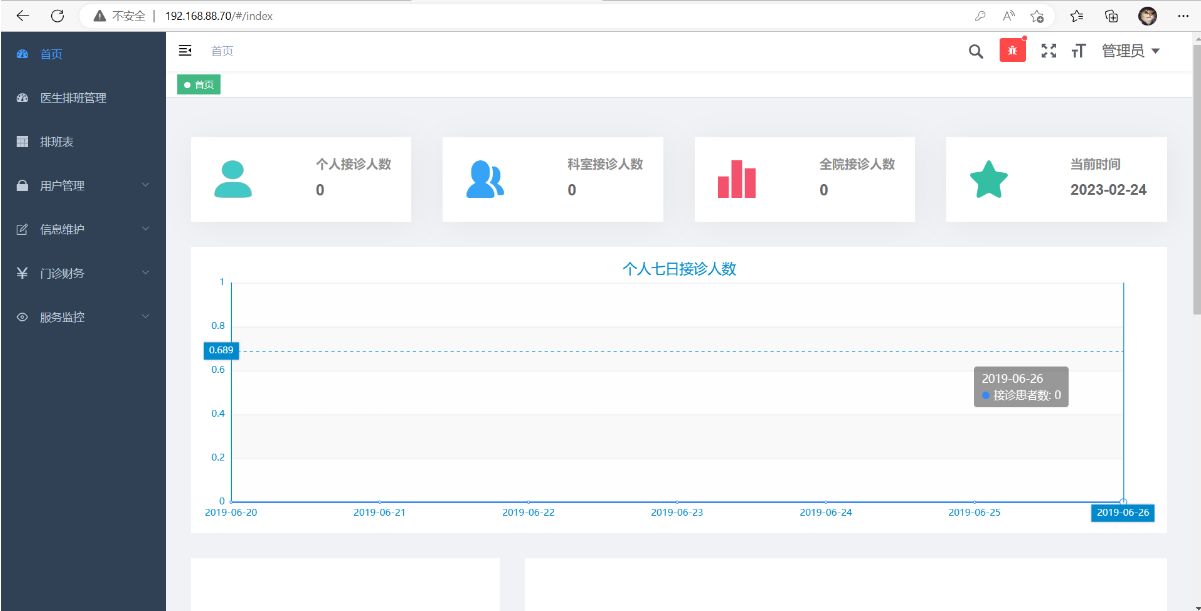
HIS效果展示
#浏览器访问HIS前端页面:http://192.168.88.70/
CI/CD全流程测试
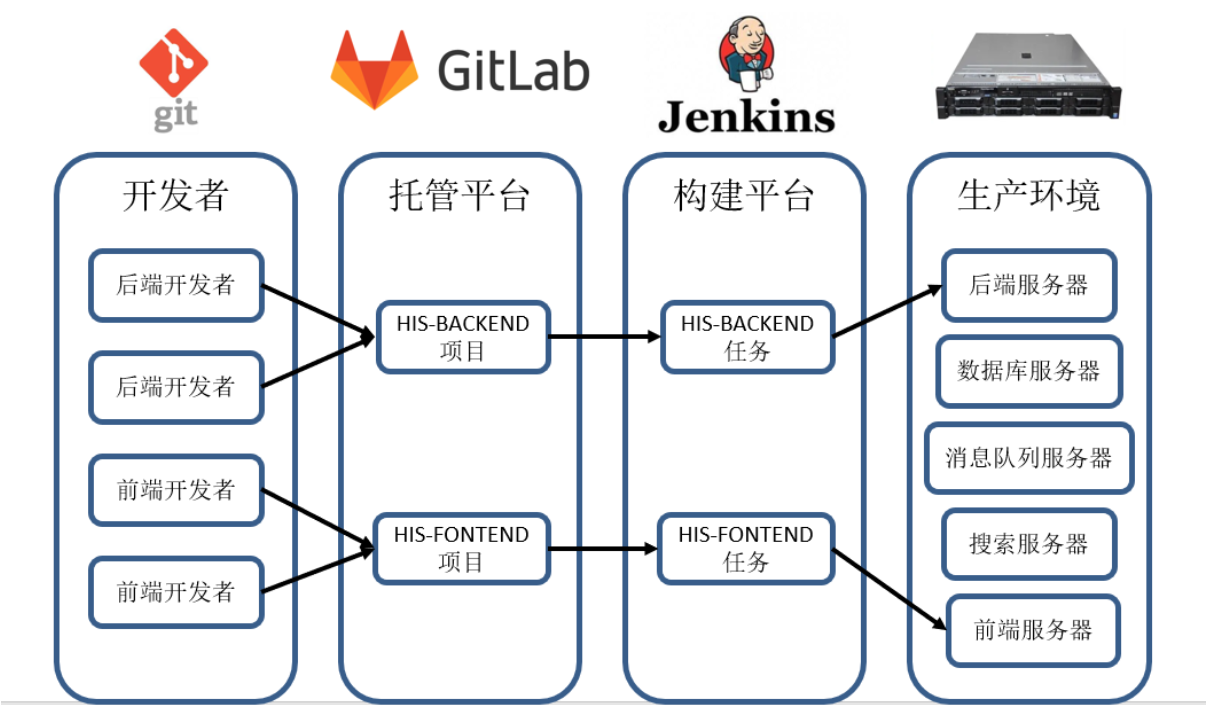
- 常用的CI/CD工具集及其作用
- Git:客户端代码用于版本控制的分布式版本控制工具
- GitLab:企业内部代码托管平台
- Jenkins:最流行的CI工具,操作简单,插件丰富
- Ansible:自动化运维工具,配合Jenkins可完成批量部署
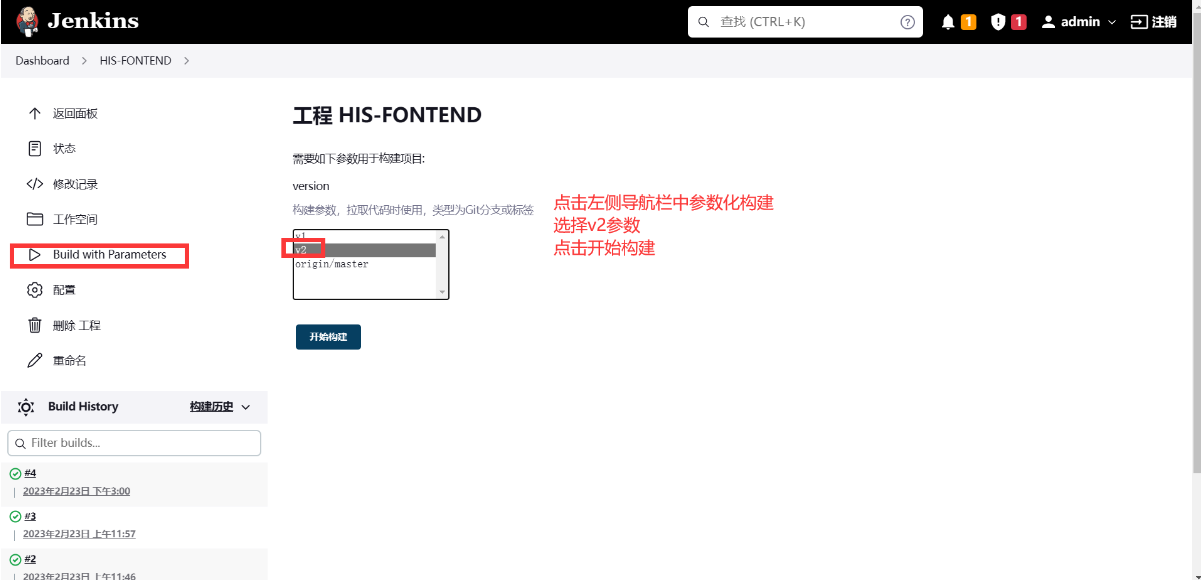
- 前端全流程测试
#查看现有首页内容,注意title内容为"东软云"
root@Fontend \~# vim /opt/his/web/index.html
root@Fontend \~#
#Programer主机更新前端代码,title更新为"达内云"
root@Programer HIS-FONTEND# vim index.html #修改title内容
root@Programer HIS-FONTEND#
root@Programer HIS-FONTEND# git add ./ #添加修改到暂存区
root@Programer HIS-FONTEND#git commit -m "modify index.html" #生成新版本
master 33da040 modify index.html
1 file changed, 1 insertion(+), 1 deletion(-)
root@Programer HIS-FONTEND# git tag v2 #打v2标签
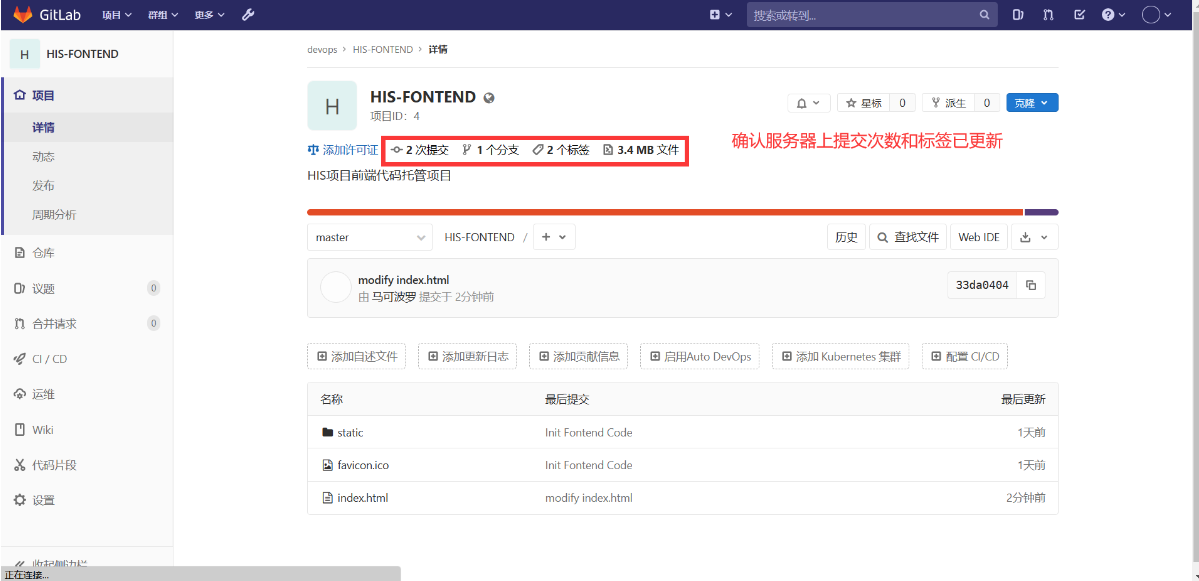
root@Programer HIS-FONTEND#git push #推送分支到服务器
枚举对象中: 5, 完成.
对象计数中: 100% (5/5), 完成.
使用 2 个线程进行压缩
压缩对象中: 100% (3/3), 完成.
写入对象中: 100% (3/3), 345 字节 | 345.00 KiB/s, 完成.
总共 3(差异 1),复用 0(差异 0),包复用 0
To http://192.168.88.20/devops/HIS-FONTEND.git
2c9f9bb..33da040 master -> master
root@Programer HIS-FONTEND#git push --tags #推送标签到服务器
总共 0(差异 0),复用 0(差异 0),包复用 0
To http://192.168.88.20/devops/HIS-FONTEND.git
* new tag v2 -> v2
root@Programer HIS-FONTEND#
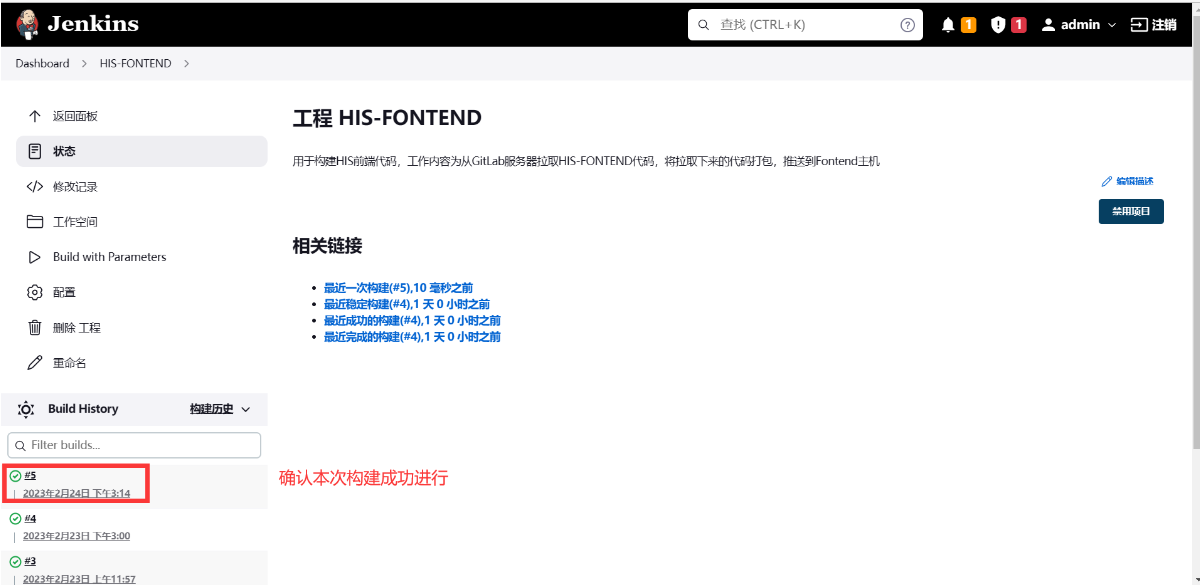
#Fontend主机验证构建结果
root@Fontend \~# ls /opt/his/web/ #确认fontend.tar.gz清理情况
favicon.ico index.html static
root@Fontend \~# vim /opt/his/web/index.html #查看页面内title内容是否为"达内云"
root@Fontend \~#
#Jenkins主机确认自动清理工作目录
root@Jenkins \~# ls /var/lib/jenkins/workspace/
root@Jenkins \~#
- 后端全流程测试
#此时HIS后端jar包应为之前的手工启动前台进程
root@Fontend \~# curl http://192.168.88.60:8888/
<!DOCTYPE html>
<html lang="cn">
<head>
<meta charset="UTF-8">
<title>Title</title>
</head>
<body>
<h1>HIS</h1> #页面展示为HIS
</body>
</html>root@Fontend \~#
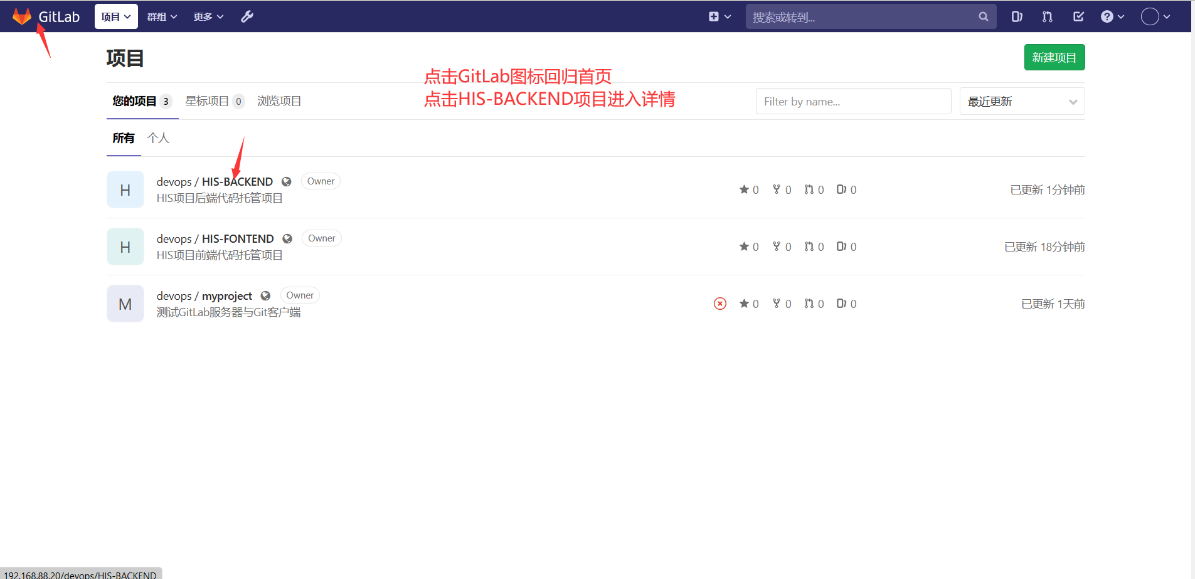
#Programer主机更新HIS-BACKEND代码
root@Programer \~# cd HIS/HIS-BACKEND/
root@Programer HIS-BACKEND# vim HIS-api/src/main/resources/static/index.html
<!DOCTYPE html>
<html lang="cn">
<head>
<meta charset="UTF-8">
<title>Title</title>
</head>
<body>
<h1>医疗信息系统</h1> #修改后端首页内容
</body>
</html>
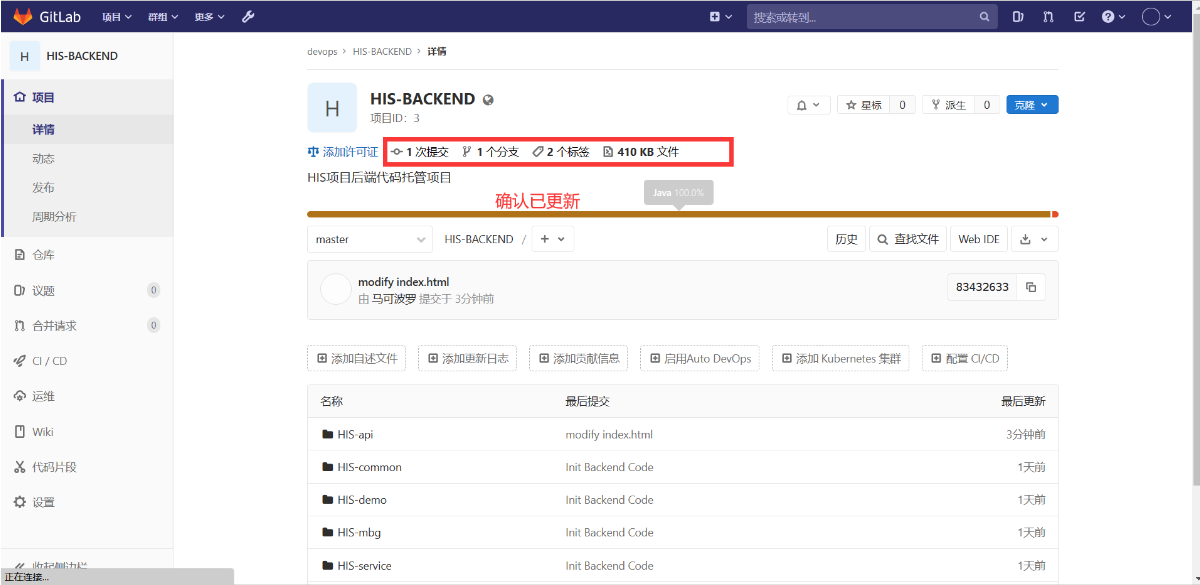
root@Programer HIS-BACKEND# git add . #添加修改到暂存区
root@Programer HIS-BACKEND# git commit -m "modify index.html"#生成版本库
master 8343263 modify index.html
1 file changed, 2 insertions(+), 2 deletions(-)
root@Programer HIS-BACKEND# git tag v2 #打v2标签
root@Programer HIS-BACKEND# git push --all #推送所有分支到服务器
枚举对象中: 15, 完成.
对象计数中: 100% (15/15), 完成.
使用 2 个线程进行压缩
压缩对象中: 100% (6/6), 完成.
写入对象中: 100% (8/8), 607 字节 | 607.00 KiB/s, 完成.
总共 8(差异 4),复用 0(差异 0),包复用 0
To http://192.168.88.20/devops/HIS-BACKEND.git
f582569..8343263 master -> master
root@Programer HIS-BACKEND# git push --tags #推送所有标签到服务器
总共 0(差异 0),复用 0(差异 0),包复用 0
To http://192.168.88.20/devops/HIS-BACKEND.git
* new tag v2 -> v2
root@Programer HIS-BACKEND#

#确认jar包后台运行
root@Backend his# ss -antpu | grep :8888
tcp LISTEN 0 100 *:8888 *:* users:(("java",pid=9934,fd=63))
root@Backend his#
#测试访问后台首页
root@Backend his# curl http://localhost:8888/
<!DOCTYPE html>
<html lang="cn">
<head>
<meta charset="UTF-8">
<title>Title</title>
</head>
<body>
<h1>医疗信息系统</h1>
</body>
</html>
root@Backend his#