要学习 LangChain 躲不过的就是它的几大核心组件,这些组件撑起了 LangChain 框架的重要功能,今天我们看一下 Models,这个组件到底应该如何应用,这也算是 LangChain 的功能起源了,调用大模型一般都是在这个组件下面,下面就让我们一起来看一看。

一、基础用法
1. 介绍
大语言模型(LLMs)是强大的AI工具,能够像人类一样理解和生成文本。它们用途广泛,无需为每个任务进行专门训练,就能完成内容创作、语言翻译、摘要生成和问答等任务。
除文本生成外,许多模型还支持:
- 工具调用:调用外部工具(如数据库查询或API调用),并在响应中使用结果。
- 结构化输出:模型的响应被限制为遵循特定格式。
- 多模态:处理和返回文本以外的数据,如图像、音频和视频。
- 推理:模型通过多步推理得出结论。
2. 这个组件的作用
模型是智能体(agents)的推理引擎。它们驱动智能体的决策过程,决定调用哪些工具、如何解读结果,以及何时提供最终答案。你选择的模型质量和能力直接影响智能体的基准可靠性和性能。
不同模型擅长不同任务------有些更擅长遵循复杂指令,有些擅长结构化推理,还有些支持更大的上下文窗口以处理更多信息。LangChain 的标准模型接口让我们能够接入众多不同提供商的集成,方便我们试验和切换模型,找到最适合你使用场景的选择。
有关特定提供商的集成信息和功能,可以参阅官方的提供商聊天模型页面。
3. 模型使用方式
我们一般使用模型有两种使用方式:
- 与智能体配合使用:创建智能体时可以动态指定模型。
- 独立使用:可以直接调用模型(在智能体循环之外),用于文本生成、分类或提取等任务,无需智能体框架。
两种场景使用相同的模型接口,让你可以灵活地从简单场景开始,根据需要扩展到更复杂的基于智能体的工作流。
二、初始化模型
在 LangChain 中使用独立模型最简便的方式是使用init_chat_model从我们选择的聊天模型提供商初始化一个模型,我们使用 OpenAI 进行演示示例:
bash
# 安装
pip install -U "langchain[openai]"
一般我们调用模型有以下两种方式:
python
# init_chat_model 方式
import os
from langchain.chat_models import init_chat_model

os.environ["OPENAI_API_KEY"] = "sk-..."

model = init_chat_model("gpt-4.1")

# 模型类方式
import os
from langchain_openai import ChatOpenAI

os.environ["OPENAI_API_KEY"] = "sk-..."

model = ChatOpenAI(model="gpt-4.1")
两种调用方式的区别:
| 维度 | init_chat_model 方式 | ChatOpenAI 类方式 |
|---|---|---|
| 核心特点 | 使用 LangChain 的抽象层,支持多模型适配 | 直接调用 OpenAI 的实现类 |
| 使用场景 | 无需指定具体模型库(如 langchain-openai),简化模型切换 | 明确使用 OpenAI 模型时,代码更直观 |
| 依赖包 | langchain + langchain-openai | langchain-openai |
| 配置限制 | 支持动态参数配置(如温度、最大令牌数) | 参数配置需通过类构造函数(如 temperature) |
若需多模型适配(如切换 OpenAI/GPT4All),使用 init_chat_model。
若明确使用 OpenAI,且需固定参数,使用 ChatOpenAI。
- 核心方法:
- 调用(Invoke):模型接收消息作为输入,生成完整响应后输出消息。
- 流式输出(Stream):调用模型,但实时流式返回生成的输出。
- 批量处理(Batch):批量向模型发送多个请求,以提高处理效率。
除聊天模型外,LangChain还支持其他相关技术,如嵌入模型和向量存储等,这一块有兴趣的各位可以具体参考官方文档进行了解研究,本教程暂时不涉及。
三、参数
聊天模型接收可用于配置其行为的参数。支持的完整参数集因模型和提供商而异,但都大同小异,标准参数包括:
| 参数 | 类型 | 说明 |
|---|---|---|
| model | string | 必需 - 你要使用的特定模型的名称或标识符。也可以使用":"格式在单个参数中同时指定模型及其提供商,例如"openai:o1"。 |
| api_key | string | 用于向模型提供商验证身份的密钥。通常在注册获取模型访问权限时发放。通常通过设置环境变量访问。 |
| temperature | number | 控制模型输出的随机性。数值越高,响应越具创造性;数值越低,响应越具确定性。 |
| max_tokens | number | 限制响应中的令牌总数,有效控制输出长度。 |
| timeout | number | 等待模型响应的最长时间(秒),超时后将取消请求。 |
| max_retries | number | 如果请求因网络超时或速率限制等问题失败,系统将重新发送请求的最大尝试次数。 |
使用init_chat_model时,可以将这些参数作为内置**kwargs传递:
-
使用模型参数初始化:
下面我们就以模型的初始化参数为例示例模型的参数使用过程:
pythonmodel = init_chat_model( "claude-sonnet-4-5-20250929", # 传递给模型的参数: temperature=0.7, timeout=30, max_tokens=1000, )
当然每个聊天模型集成可能也有额外的参数,用于控制提供商特定的功能,模型不同所涉及的额外参数也不同。例如,ChatOpenAI有use_responses_api参数,用于指定是否使用OpenAI Responses API或Completions API。
三、调用方式
必须调用聊天模型才能生成输出。主要有三种调用方式,每种适用于不同的使用场景。
1. 调用(Invoke)
调用模型最直接的方式是使用invoke(),传入单条消息或消息列表。
-
单条消息
pythonresponse = model.invoke("为什么鹦鹉的羽毛色彩鲜艳?") print(response)可以向聊天模型提供消息列表来表示对话历史。每条消息都可以在指定一个角色,模型用该角色指示对话中谁发送了消息。
-
字典格式
pythonconversation = [ {"role": "system", "content": "你是一个将英文翻译成法语的助手。"}, {"role": "user", "content": "翻译:I love programming."}, {"role": "assistant", "content": "J'adore la programmation."}, {"role": "user", "content": "翻译:I love building applications."} ] response = model.invoke(conversation) print(response) # AIMessage("J'adore créer des applications.") -
消息对象
pythonfrom langchain.messages import HumanMessage, AIMessage, SystemMessage conversation = [ SystemMessage("你是一个将英文翻译成法语的助手。"), HumanMessage("翻译:I love programming."), AIMessage("J'adore la programmation."), HumanMessage("翻译:I love building applications.") ] response = model.invoke(conversation) print(response) # AIMessage("J'adore créer des applications.")
这里需要注意的一点是如果你的调用返回类型是字符串,要确保你使用的是聊天模型而非大语言模型(LLM)。传统的文本补全大语言模型直接返回字符串。LangChain聊天模型以"Chat"为前缀,例如
ChatOpenAI(/oss/integrations/chat/openai)。
2. 流式输出(Stream)
大多数模型可以在生成输出内容时流式返回。通过逐步显示输出,流式传输显著改善了用户体验,尤其是对于较长的响应。
调用stream()返回一个迭代器,在生成输出块时逐个生成:
-
基本文本流式输出 | 流式输出工具调用、推理和其他内容
pythonfor chunk in model.stream("为什么鹦鹉的羽毛色彩鲜艳?"): print(chunk.text, end="", flush=True)与
invoke()(模型生成完整响应后返回单个AIMessage)不同,stream()返回多个AIMessageChunk对象,每个对象包含输出文本的一部分。重要的是,流中的每个块都设计为通过求和聚合为完整消息: -
构建AIMessage
pythonfull = None # None | AIMessageChunk for chunk in model.stream("天空是什么颜色的?"): full = chunk if full is None else full + chunk print(full.text) # The # The sky # The sky is # The sky is typically # The sky is typically blue # ... print(full.content_blocks) # [{"type": "text", "text": "The sky is typically blue..."}]生成的消息可以像使用
invoke()生成的消息一样处理------例如,它可以聚合到消息历史中,并作为对话上下文传递回模型。只有当程序中的所有步骤都知道如何处理块流时,流式传输才有效。例如,无法流式传输的应用程序是需要先将整个输出存储在内存中才能处理的应用程序。
-
高级流式输出主题
流式输出事件:
LangChain 聊天模型可以使用
astream_events()流式输出语义事件。这简化了基于事件类型和其他元数据的过滤,并将在后台聚合完整消息。以下是示例:pythonasync for event in model.astream_events("Hello"): if event["event"] == "on_chat_model_start": print(f"输入: {event['data']['input']}") elif event["event"] == "on_chat_model_stream": print(f"令牌: {event['data']['chunk'].text}") elif event["event"] == "on_chat_model_end": print(f"完整消息: {event['data']['output'].text}") else: pass输入: Hello 令牌: Hi 令牌: there 令牌: ! 令牌: How 令牌: can 令牌: I ... 完整消息: Hi there! How can I help today?"自动流式传输"聊天模型:
LangChain 简化了聊天模型的流式传输,即使你没有显式调用流式传输方法,也会在某些情况下自动启用流式传输模式。当你使用非流式传输的invoke方法但仍想流式传输整个应用程序(包括聊天模型的中间结果)时,这特别有用。
例如,在LangGraph智能体中,你可以在节点内调用
model.invoke(),但如果在流式传输模式下运行,LangChain将自动委托给流式传输。工作原理:
当你
invoke()一个聊天模型时,如果LangChain检测到你正在尝试流式传输整个应用程序,它将自动切换到内部流式传输模式。调用的结果与使用invoke的代码所关心的结果相同;然而,在流式传输聊天模型时,LangChain将负责调用LangChain回调系统中的on_llm_new_token事件。如果你需要实时信息,你可以回调事件允许LangGraph
stream()和astream_events()实时呈现聊天模型的输出。
3. 批量处理(Batch)
将一组独立请求批量发送到模型可以显著提高性能并降低成本,因为处理可以并行进行:
-
批量处理
pythonresponses = model.batch([ "为什么鹦鹉的羽毛色彩鲜艳?", "飞机如何飞行?", "什么是量子计算?" ]) for response in responses: print(response)本节描述的是聊天模型方法
batch(),它在客户端并行化模型调用。它与模型提供商支持的批量API(如OpenAI或Anthropic)并不同。
默认情况下,batch()仅返回整个批次的最终输出。如果你想在每个输入完成生成时接收其输出,可以使用batch_as_completed()流式传输结果:
-
完成后生成批量响应
pythonfor response in model.batch_as_completed([ "为什么鹦鹉的羽毛色彩鲜艳?", "飞机如何飞行?", "什么是量子计算?" ]): print(response)使用
batch_as_completed()时,结果可能会乱序到达。每个结果都包含输入索引,可用于匹配以根据需要重建原始顺序。使用
batch()或batch_as_completed()处理大量输入时,你可能希望控制最大并行调用数。这可以通过在RunnableConfig字典中设置max_concurrency属性来实现。 -
带最大并发数的批量处理
pythonmodel.batch( list_of_inputs, config={ 'max_concurrency': 5, # 限制为5个并行调用 } )
四、工具调用
模型可以请求调用工具来执行诸如从数据库获取数据、网络搜索或运行代码等任务。工具由以下两部分组成:
- 模式(schema),包括工具名称、描述和/或参数定义(通常是JSON模式)
- 要执行的函数或协程
你可能会听到"函数调用"这个术语。我们将其与"工具调用"互换使用。
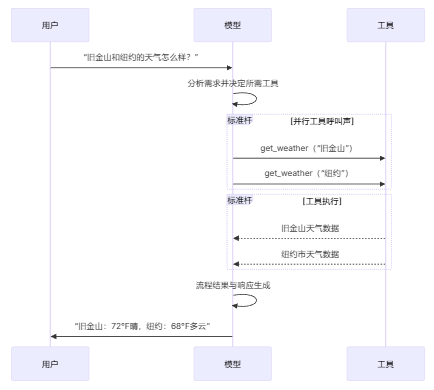
以下是用户和模型之间的基本工具调用流程:
要使你定义的工具可供模型使用,必须使用bind_tools绑定它们。在后续调用中,模型可以根据需要选择调用任何绑定的工具。
一些模型提供商提供内置工具,可以通过模型或调用参数启用(例如ChatOpenAI、ChatAnthropic),这些如果需要都可以参考官方文档库。
1. 绑定用户工具
下面将使用一个示例来演示绑定用户的工具:
python
from langchain.tools import tool

@tool
def get_weather(location: str) -> str:
    """获取某个地点的天气。"""
    return f"{location}的天气是晴天。"


model_with_tools = model.bind_tools([get_weather])

response = model_with_tools.invoke("波士顿的天气怎么样?")
for tool_call in response.tool_calls:
    # 查看模型发起的工具调用
    print(f"工具:{tool_call['name']}")
    print(f"参数:{tool_call['args']}")
绑定用户定义的工具时,模型的响应包括执行工具的请求。当在智能体之外单独使用模型时,需要你执行请求的工具,并将结果返回给模型以用于后续推理。当使用智能体时,智能体循环将为你处理工具执行循环。
下面,我们展示一些使用工具调用的常见方式。
2. 工具执行循环
当模型返回工具调用时,你需要执行工具并将结果传递回模型。这创建了一个对话循环,模型可以使用工具结果生成最终响应。LangChain包含智能体抽象,可为你处理这种编排。
以下是如何实现的简单示例:
-
工具执行循环
python# 将(可能多个)工具绑定到模型 model_with_tools = model.bind_tools([get_weather]) # 步骤1:模型生成工具调用 messages = [{"role": "user", "content": "波士顿的天气怎么样?"}] ai_msg = model_with_tools.invoke(messages) messages.append(ai_msg) # 步骤2:执行工具并收集结果 for tool_call in ai_msg.tool_calls: # 使用生成的参数执行工具 tool_result = get_weather.invoke(tool_call) messages.append(tool_result) # 步骤3:将结果传递回模型以生成最终响应 final_response = model_with_tools.invoke(messages) print(final_response.text) # "波士顿当前的天气是72°F,晴天。"工具返回的每个
ToolMessage都包含一个tool_call_id,该ID与原始工具调用匹配,帮助模型将结果与请求关联起来。
3. 强制工具调用
默认情况下,模型可以根据用户输入自由选择使用哪个绑定的工具。然而,你可能希望强制选择工具,确保模型使用特定工具或给定列表中的任何工具:
python
# 强制使用任何工具
model_with_tools = model.bind_tools([tool_1], tool_choice="any")

# 强制使用特定工具
model_with_tools = model.bind_tools([tool_1], tool_choice="tool_1")
4. 并行工具调用
许多模型支持在适当时并行调用多个工具。这允许模型同时从不同来源收集信息。
并行工具调用:
python
model_with_tools = model.bind_tools([get_weather])

response = model_with_tools.invoke(
    "波士顿和东京的天气怎么样?"
)


# 模型可能会生成多个工具调用
print(response.tool_calls)
# [
#   {'name': 'get_weather', 'args': {'location': 'Boston'}, 'id': 'call_1'},
#   {'name': 'get_weather', 'args': {'location': 'Tokyo'}, 'id': 'call_2'},
# ]


# 执行所有工具(可以使用异步并行执行)
results = []
for tool_call in response.tool_calls:
    if tool_call['name'] == 'get_weather':
        result = get_weather.invoke(tool_call)
    ...
    results.append(result)
模型会根据请求操作的独立性,智能地确定何时适合并行执行。
大多数支持工具调用的模型默认启用并行工具调用。一些模型(包括OpenAI和Anthropic)允许你禁用此功能。要禁用,为此要设置parallel_tool_calls=False:
python
model.bind_tools([get_weather], parallel_tool_calls=False)5. 流式输出工具调用
流式输出响应时,工具调用通过ToolCallChunk逐步构建。这允许你在工具调用生成时查看它们,而无需等待完整响应。
-
流式输出工具调用
pythonfor chunk in model_with_tools.stream( "波士顿和东京的天气怎么样?" ): # 工具调用块逐步到达 for tool_chunk in chunk.tool_call_chunks: if name := tool_chunk.get("name"): print(f"工具:{name}") if id_ := tool_chunk.get("id"): print(f"ID:{id_}") if args := tool_chunk.get("args"): print(f"参数:{args}") # 输出: # 工具:get_weather # ID:call_SvMlU1TVIZugrFLckFE2ceRE # 参数:{"lo # 参数:catio # 参数:n": "B # 参数:osto # 参数:n"} # 工具:get_weather # ID:call_QMZdy6qInx13oWKE7KhuhOLR # 参数:{"lo # 参数:catio # 参数:n": "T # 参数:okyo # 参数:"}
你可以累积块以构建完整的工具调用:
-
累积工具调用
pythongathered = None for chunk in model_with_tools.stream("波士顿的天气怎么样?"): gathered = chunk if gathered is None else gathered + chunk print(gathered.tool_calls)
五、结构化输出
后面我们也可以要求模型提供符合给定模式的响应。这对于确保输出可以轻松解析并用于后续处理非常有用。LangChain支持多种模式类型和强制结构化输出的方法。
Pydantic 模型提供最丰富的功能集,包括字段验证、描述和嵌套结构。另外 Python 也提供了更简单的 Pydantic 模型替代方案就是 TypedDict,非常适合不需要运行时验证。除此之外 LangChain 还提供了一个JSON 模式以实现最大控制和互作性。
下面我就以这三种输出方式分别做一个示例:
python
# Pydantic

from pydantic import BaseModel, Field
class Movie(BaseModel):
    """一部包含详细信息的电影。"""
    title: str = Field(..., description="电影的标题")
    year: int = Field(..., description="电影的上映年份")
    director: str = Field(..., description="电影的导演")
    rating: float = Field(..., description="电影的评分(满分10分)")
model_with_structure = model.with_structured_output(Movie)
response = model_with_structure.invoke("提供电影《盗梦空间》的详细信息")
print(response)  # Movie(title="Inception", year=2010, director="Christopher Nolan", rating=8.8)

# TypedDict

from typing_extensions import TypedDict, Annotated
class MovieDict(TypedDict):
    """A movie with details."""
    title: Annotated[str, ..., "The title of the movie"]
    year: Annotated[int, ..., "The year the movie was released"]
    director: Annotated[str, ..., "The director of the movie"]
    rating: Annotated[float, ..., "The movie's rating out of 10"]
model_with_structure = model.with_structured_output(MovieDict)
response = model_with_structure.invoke("Provide details about the movie Inception")
print(response)  # {'title': 'Inception', 'year': 2010, 'director': 'Christopher Nolan', 'rating': 8.8}

# JSON Schema

import json
json_schema = {
    "title": "Movie",
    "description": "A movie with details",
    "type": "object",
    "properties": {
        "title": {
            "type": "string",
            "description": "The title of the movie"
        },
        "year": {
            "type": "integer",
            "description": "The year the movie was released"
        },
        "director": {
            "type": "string",
            "description": "The director of the movie"
        },
        "rating": {
            "type": "number",
            "description": "The movie's rating out of 10"
        }
    },
    "required": ["title", "year", "director", "rating"]
}
model_with_structure = model.with_structured_output(
    json_schema,
    method="json_schema",
)
response = model_with_structure.invoke("Provide details about the movie Inception")
print(response)  # {'title': 'Inception', 'year': 2010, ...}
当然结构化输出还有一些非常值得注意的关键事项:
- 方法参数:一些提供商支持不同的方法(
'json_schema'、'function_calling'、'json_mode')'json_schema'通常指提供商提供的专用结构化输出功能'function_calling'通过强制遵循给定模式的工具调用来派生结构化输出'json_mode'是一些提供商提供的'json_schema'的前身------它生成有效的JSON,但模式必须在提示词中描述
- 包含原始数据:使用
include_raw=True可同时获取解析后的输出和原始AI消息 - 验证:Pydantic模型提供自动验证,而
TypedDict和JSON Schema需要手动验证
示例: 消息输出与解析后的结构一起返回:
将原始AIMessage对象与解析后的表示一起返回以访问令牌计数等响应元数据可能很有用。要实现这一点,请在调用with_structured_output时设置include_raw=True:
python
from pydantic import BaseModel, Field

class Movie(BaseModel):
    """一部包含详细信息的电影。"""
    title: str = Field(..., description="电影的标题")
    year: int = Field(..., description="电影的上映年份")
    director: str = Field(..., description="电影的导演")
    rating: float = Field(..., description="电影的评分(满分10分)")

model_with_structure = model.with_structured_output(Movie, include_raw=True)
response = model_with_structure.invoke("提供电影《盗梦空间》的详细信息")
response
# {
#     "raw": AIMessage(...),
#     "parsed": Movie(title=..., year=..., ...),
#     "parsing_error": None,
# }
六、支持的模型
LangChain支持所有主要模型提供商,包括OpenAI、Anthropic、Google、Azure、AWS Bedrock等。每个提供商都提供多种具有不同功能的模型,接下来我们来学习一些比较有深度的模型相关使用技巧和方法。
1. 模型配置文件
这是一项测试版功能。模型配置文件的格式可能会发生变化,所以大家使用得时候可以先查查官方文档,同时模型配置文件也需要langchain>=1.1。
LangChain聊天模型可以通过.profile属性公开支持的功能和能力的字典:
python
model.profile
# {
#   "max_input_tokens": 400000,
#   "image_inputs": True,
#   "reasoning_output": True,
#   "tool_calling": True,
#   ...
# }
大部分模型配置文件数据由models.dev项目提供,这是一个提供模型能力数据的开源计划。这些数据会添加额外的字段,以便与LangChain一起使用。随着上游项目的发展,这些扩展会保持同步。
模型配置文件数据允许应用程序动态适应模型能力。例如:
- 摘要中间件可以根据模型的上下文窗口大小触发摘要生成。
create_agent中的结构化输出策略可以自动推断(例如,通过检查对原生结构化输出功能的支持)。- 可以基于支持的模态和最大输入令牌来控制模型输入。
更新或覆盖配置文件数据:
如果模型配置文件数据缺失、过时或不正确,可以进行更改。
选项1(快速修复)
你可以使用任何有效的配置文件实例化聊天模型:
python
custom_profile = {
    "max_input_tokens": 100_000,
    "tool_calling": True,
    "structured_output": True,
    # ...
}
model = init_chat_model("...", profile=custom_profile)profile也是一个常规dict,可以就地更新。如果模型实例是共享的,考虑使用model_copy以避免修改共享状态。
python
new_profile = model.profile | {"key": "value"}
model.model_copy(update={"profile": new_profile})
选项2(上游修复数据)
数据的主要来源是models.dev项目。这些数据会与LangChain集成包中的额外字段和覆盖项合并,并随这些包一起发布。
可以通过以下流程更新模型配置文件数据:
- (如有需要)通过向GitHub上的仓库提交拉取请求,更新models.dev的源数据。
- (如有需要)通过向LangChain集成包提交拉取请求,更新
langchain_<package>/data/profile_augmentations.toml中的额外字段和覆盖项。 - 使用
langchain-model-profilesCLI工具从models.dev拉取最新数据,合并扩展项并更新配置文件数据:
bash
pip install langchain-model-profiles
bash
langchain-profiles refresh --provider <provider> --data-dir <data_dir>此命令:
- 从models.dev下载
<provider>的最新数据 - 合并
<data_dir>中profile_augmentations.toml的扩展项 - 将合并后的配置文件写入
<data_dir>中的profiles.py
例如:从LangChain monorepo中的libs/partners/anthropic:
bash
uv run --with langchain-model-profiles --provider anthropic --data-dir langchain_anthropic/data2. 多模态
某些模型可以处理和返回非文本数据,如图像、音频和视频。你可以通过提供内容块(content blocks)将非文本数据传递给模型。
所有具有底层多模态能力的LangChain聊天模型都支持:
- 跨提供商标准格式(请参阅我们的消息指南)
- OpenAI聊天补全格式
- 特定于该提供商的任何原生格式(例如,Anthropic模型接受Anthropic原生格式)
一些模型可以在响应中返回多模态数据。如果被调用执行此操作,生成的AIMessage将包含具有多模态类型的内容块。
多模态输出
python
response = model.invoke("创建一张猫的图片")
print(response.content_blocks)
# [
#     {"type": "text", "text": "Here's a picture of a cat"},
#     {"type": "image", "base64": "...", "mime_type": "image/jpeg"},
# ]
3. 推理
许多模型能够通过多步推理得出结论。这涉及将复杂问题分解为更小、更易于管理的步骤。如果底层模型支持,你可以呈现此推理过程,以更好地理解模型如何得出最终答案。
python
# 流式输出推理结果
for chunk in model.stream("为什么鹦鹉的羽毛色彩鲜艳?"):
    reasoning_steps = [r for r in chunk.content_blocks if r["type"] == "reasoning"]
    print(reasoning_steps if reasoning_steps else chunk.text)

# 完整推理输出
response = model.invoke("Why do parrots have colorful feathers?")
reasoning_steps = [b for b in response.content_blocks if b["type"] == "reasoning"]
print(" ".join(step["reasoning"] for step in reasoning_steps))根据模型的不同,你有时可以指定它应该投入的推理力度。同样,你可以请求模型完全关闭推理。这可能表现为分类的推理"层级"(例如'low'或'high')或整数令牌预算。
有关详细信息,请参阅相应聊天模型的集成页面或参考。
4. 本地模型
LangChain支持在你自己的硬件上本地运行模型。这适用于数据隐私至关重要、你想调用自定义模型或想避免使用基于云的模型产生的成本的场景。
Ollama是在本地运行模型最简单的方式之一。有关本地集成的完整列表,可以参阅官网集成页面。
5. 提示词缓存
许多提供商提供提示词缓存功能,以减少重复处理相同令牌的延迟和成本。这些功能可以是隐式的或显式的:
- 隐式提示词缓存:如果请求命中缓存,提供商将自动传递成本节省。示例:OpenAI和Gemini。
- 显式缓存:提供商允许你手动指示缓存点以获得更大的控制权或保证成本节省。示例:
ChatOpenAI(通过prompt_cache_key)、Anthropic的AnthropicPromptCachingMiddleware、Gemini、AWS Bedrock。
提示词缓存通常仅在输入令牌阈值以上才会生效。缓存使用情况将反映在模型响应的使用元数据中。
6. 服务器端工具使用
一些提供商支持服务器端工具调用循环:模型可以与网络搜索、代码解释器和其他工具交互,并在单个对话轮次中分析结果。
如果模型在服务器端调用工具,响应消息的内容将包括表示工具调用和结果的内容。访问响应的内容块将以提供商无关的格式返回服务器端工具调用和结果:
python
from langchain.chat_models import init_chat_model

model = init_chat_model("gpt-4.1-mini")

tool = {"type": "web_search"}
model_with_tools = model.bind_tools([tool])

response = model_with_tools.invoke("今天有什么正面新闻?")
response.content_blocks
输出结果
python
[
    {
        "type": "server_tool_call",
        "name": "web_search",
        "args": {
            "query": "positive news stories today",
            "type": "search"
        },
        "id": "ws_abc123"
    },
    {
        "type": "server_tool_result",
        "tool_call_id": "ws_abc123",
        "status": "success"
    },
    {
        "type": "text",
        "text": "以下是今天的一些正面新闻...",
        "annotations": [
            {
                "end_index": 410,
                "start_index": 337,
                "title": "article title",
                "type": "citation",
                "url": "..."
            }
        ]
    }
]这代表单个对话轮次;不存在需要像客户端工具调用那样传入的相关ToolMessage对象。
7. 速率限制
许多聊天模型提供商对给定时间段内可以进行的调用次数施加限制。如果达到速率限制,你通常会收到提供商的速率限制错误响应,需要等待后再进行更多请求。
为了帮助管理速率限制,聊天模型集成在初始化时接受rate_limiter参数,可用于控制请求的发送速率。
初始化和使用速率限制器
LangChain附带(可选)内置的InMemoryRateLimiter。此限制器是线程安全的,可以由同一进程中的多个线程共享。
定义速率限制器
python
from langchain_core.rate_limiters import InMemoryRateLimiter

rate_limiter = InMemoryRateLimiter(
    requests_per_second=0.1,  # 每10秒1个请求
    check_every_n_seconds=0.1,  # 每100毫秒检查一次是否允许发送请求
    max_bucket_size=10,  # 控制最大突发大小。
)

model = init_chat_model(
    model="gpt-5",
    model_provider="openai",
    rate_limiter=rate_limiter
)
提供的速率限制器只能限制单位时间内的请求数量。如果你还需要根据请求大小进行限制,就不能使用它了。
8. 基础URL或代理
对于许多聊天模型集成,你可以配置API请求的基础URL,这允许你使用具有OpenAI兼容API的模型提供商或使用代理服务器。
基础URL
许多模型提供商提供OpenAI兼容的API(例如Together AI、vLLM)。你可以使用init_chat_model与这些提供商配合使用,方法是指定适当的base_url参数:
python
model = init_chat_model(
    model="MODEL_NAME",
    model_provider="openai",
    base_url="BASE_URL",
    api_key="YOUR_API_KEY",
)
使用直接聊天模型类实例化时,参数名称可能因提供商而异。
代理配置
对于需要HTTP代理的部署,一些模型集成支持代理配置:
python
from langchain_openai import ChatOpenAI

model = ChatOpenAI(
    model="gpt-4o",
    openai_proxy="http://proxy.example.com:8080"
)
代理支持因集成而异。有关代理配置选项,请查看特定模型提供商的参考。
9. 日志概率
某些模型可以通过在初始化模型时设置logprobs参数来配置返回令牌级别的日志概率,该概率表示给定令牌的可能性:
python
model = init_chat_model(
    model="gpt-4o",
    model_provider="openai"
).bind(logprobs=True)

response = model.invoke("为什么鹦鹉会说话?")
print(response.response_metadata["logprobs"])
10. 令牌使用量
许多模型提供商在调用响应中返回令牌使用量信息。如果可用,此信息将包含在相应模型生成的AIMessage对象中。
一些提供商API(特别是OpenAI和Azure OpenAI聊天补全)要求用户选择加入才能在流式传输上下文中接收令牌使用量数据。
你可以使用回调或上下文管理器跟踪应用程序中跨模型的聚合令牌计数,如下所示:
python
# 回调处理器

from langchain.chat_models import init_chat_model
from langchain_core.callbacks import UsageMetadataCallbackHandler

model_1 = init_chat_model(model="gpt-4o-mini")
model_2 = init_chat_model(model="claude-haiku-4-5-20251001")

callback = UsageMetadataCallbackHandler()
result_1 = model_1.invoke("Hello", config={"callbacks": [callback]})
result_2 = model_2.invoke("Hello", config={"callbacks": [callback]})
callback.usage_metadata
python
{
    'gpt-4o-mini-2024-07-18': {
        'input_tokens': 8,
        'output_tokens': 10,
        'total_tokens': 18,
        'input_token_details': {'audio': 0, 'cache_read': 0},
        'output_token_details': {'audio': 0, 'reasoning': 0}
    },
    'claude-haiku-4-5-20251001': {
        'input_tokens': 8,
        'output_tokens': 21,
        'total_tokens': 29,
        'input_token_details': {'cache_read': 0, 'cache_creation': 0}
    }
}
python
#  上下文管理器

from langchain.chat_models import init_chat_model
from langchain_core.callbacks import get_usage_metadata_callback

model_1 = init_chat_model(model="gpt-4o-mini")
model_2 = init_chat_model(model="claude-haiku-4-5-20251001")

with get_usage_metadata_callback() as cb:
    model_1.invoke("Hello")
    model_2.invoke("Hello")
    print(cb.usage_metadata)
python
{
    'gpt-4o-mini-2024-07-18': {
        'input_tokens': 8,
        'output_tokens': 10,
        'total_tokens': 18,
        'input_token_details': {'audio': 0, 'cache_read': 0},
        'output_token_details': {'audio': 0, 'reasoning': 0}
    },
    'claude-haiku-4-5-20251001': {
        'input_tokens': 8,
        'output_tokens': 21,
        'total_tokens': 29,
        'input_token_details': {'cache_read': 0, 'cache_creation': 0}
    }
}
11. 调用配置
调用模型时,你可以通过config参数使用RunnableConfig字典传递额外配置。这提供了对执行行为、回调和元数据跟踪的运行时控制。
常见配置选项包括:
-
带配置的调用
pythonresponse = model.invoke( "讲个笑话", config={ "run_name": "joke_generation", # 此运行的自定义名称 "tags": ["humor", "demo"], # 用于分类的标签 "metadata": {"user_id": "123"}, # 自定义元数据 "callbacks": [my_callback_handler], # 回调处理器 } )这些配置值在以下情况下特别有用:
- 使用LangSmith跟踪进行调试
- 实现自定义日志记录或监控
- 在生产环境中控制资源使用
- 跟踪复杂管道中的调用
-
关键配置属性
属性 类型 说明 run_name string 在日志和跟踪中标识此特定调用。不被子调用继承。 tags string\[\] 所有子调用继承的标签,用于在调试工具中过滤和组织。 metadata object 自定义键值对,用于跟踪额外上下文,所有子调用继承。 max_concurrency number 使用 batch()或batch_as_completed()时控制最大并行调用数。callbacks array 用于在执行期间监控和响应事件的处理器。 recursion_limit number 链的最大递归深度,防止复杂管道中的无限循环。
12. 可配置模型
当然你还可以通过指定configurable_fields创建运行时可配置的模型。如果不指定模型值,则'model'和'model_provider'将默认可配置。
python
from langchain.chat_models import init_chat_model

configurable_model = init_chat_model(temperature=0)

configurable_model.invoke(
    "what's your name",
    config={"configurable": {"model": "gpt-5-nano"}},  # 使用GPT-5-Nano运行
)
configurable_model.invoke(
    "what's your name",
    config={"configurable": {"model": "claude-sonnet-4-5-20250929"}},  # 使用Claude运行
)
带有默认值的可配置模型
我们可以创建带有默认模型值的可配置模型,指定哪些参数可配置,并为可配置参数添加前缀:
python
first_model = init_chat_model(
        model="gpt-4.1-mini",
        temperature=0,
        configurable_fields=("model", "model_provider", "temperature", "max_tokens"),
        config_prefix="first",  # 当链中有多个模型时很有用
)

first_model.invoke("what's your name")
python
first_model.invoke(
    "what's your name",
    config={
        "configurable": {
            "first_model": "claude-sonnet-4-5-20250929",
            "first_temperature": 0.5,
            "first_max_tokens": 100,
        }
    },
)有关configurable_fields和config_prefix的更多细节,请参阅init_chat_model参考。
声明式使用可配置模型
我们可以在可配置模型上调用声明式操作,如bind_tools、with_structured_output、with_configurable等,并以与常规实例化的聊天模型对象相同的方式链接可配置模型。
python
from pydantic import BaseModel, Field


class GetWeather(BaseModel):
    """获取特定地点的当前天气"""

        location: str = Field(..., description="城市和州,例如旧金山,加利福尼亚州")


class GetPopulation(BaseModel):
    """获取特定地点的当前人口"""

        location: str = Field(..., description="城市和州,例如旧金山,加利福尼亚州")


model = init_chat_model(temperature=0)
model_with_tools = model.bind_tools([GetWeather, GetPopulation])

model_with_tools.invoke(
    "2024年洛杉矶和纽约哪个更大", config={"configurable": {"model": "gpt-4.1-mini"}}
).tool_calls
python
[
    {
        'name': 'GetPopulation',
        'args': {'location': 'Los Angeles, CA'},
        'id': 'call_Ga9m8FAArIyEjItHmztPYA22',
        'type': 'tool_call'
    },
    {
        'name': 'GetPopulation',
        'args': {'location': 'New York, NY'},
        'id': 'call_jh2dEvBaAHRaw5JUDthOs7rt',
        'type': 'tool_call'
    }
]
python
model_with_tools.invoke(
    "2024年洛杉矶和纽约哪个更大",
    config={"configurable": {"model": "claude-sonnet-4-5-20250929"}},
).tool_calls
python
[
    {
        'name': 'GetPopulation',
        'args': {'location': 'Los Angeles, CA'},
        'id': 'toolu_01JMufPf4F4t2zLj7miFeqXp',
        'type': 'tool_call'
    },
    {
        'name': 'GetPopulation',
        'args': {'location': 'New York City, NY'},
        'id': 'toolu_01RQBHcE8kEEbYTuuS8WqY1u',
        'type': 'tool_call'
    }
]
到这里模型这一块得核心内容就算是介绍完了,你可以使用上面的方法自己搭建一个可对话的工作流,在后面我们将介绍工具、信息等,帮助你搭建一个完整的工作流。