文章目录
- [一、实现线程池项目 的准备工作](#一、实现线程池项目 的准备工作)
-
- [1. 准备工作汇总](#1. 准备工作汇总)
- [2. 互斥量 和 条件变量的封装](#2. 互斥量 和 条件变量的封装)
- [3. 线程类 的封装](#3. 线程类 的封装)
- [4. 任务类的封装](#4. 任务类的封装)
- [5. 日志类 的封装](#5. 日志类 的封装)
-
- [5.1 最终要达到的效果,如何达到(完整的代码呈现)](#5.1 最终要达到的效果,如何达到(完整的代码呈现))
- [5.2 获取当前时间 和 日志等级](#5.2 获取当前时间 和 日志等级)
- [5.3 刷新策略(多态实现)(补充 filesystem库 的部分知识)](#5.3 刷新策略(多态实现)(补充 filesystem库 的部分知识))
- [5.4 日志类的实现](#5.4 日志类的实现)
- [5.5 测试代码 演示效果(图解 日志类对象使用时 的调用过程)](#5.5 测试代码 演示效果(图解 日志类对象使用时 的调用过程))
- 二、线程池项目
-
- [1. 线程池设计](#1. 线程池设计)
- [2. 代码设计(图解 线程调用线程函数时,回调Handler_Task成员函数的全过程)](#2. 代码设计(图解 线程调用线程函数时,回调Handler_Task成员函数的全过程))
- [3. 测试代码的结果](#3. 测试代码的结果)
- 三、线程安全的单例模式
-
- [1. 什么是单例模式(单例模式的特点)](#1. 什么是单例模式(单例模式的特点))
- [2. 单例模式的两种实现方式:饿汉方式 和 懒汉方式](#2. 单例模式的两种实现方式:饿汉方式 和 懒汉方式)
-
- [2.1 饿汉方式实现单例模式](#2.1 饿汉方式实现单例模式)
- [2.2 懒汉方式实现单例模式](#2.2 懒汉方式实现单例模式)
- [3. 代码:单例式线程池(懒汉方式实现)](#3. 代码:单例式线程池(懒汉方式实现))
一、实现线程池项目 的准备工作
1. 准备工作汇总
下面开始,我们结合我们之前所做的所有封装,进行一个线程池的设计。在写之前,我们要做如下准备:
- 准备 锁(互斥量) 和 条件变量的封装
- 准备 线程的封装
- 准备 任务类的封装
- 引入日志,对线程进行封装
2. 互斥量 和 条件变量的封装
- Mutex.hpp
cpp
#pragma once

#include <pthread.h>

// 自己封装的Mutex
class My_Mutex
{
public:
    My_Mutex()
    {
        pthread_mutex_init(&_mutex, NULL);
    }

    int lock()
    {
        return pthread_mutex_lock(&_mutex);
    }

    int unlock()
    {
        return pthread_mutex_unlock(&_mutex);
    }

    pthread_mutex_t &Get()
    {
        return _mutex;
    }

    ~My_Mutex()
    {
        pthread_mutex_destroy(&_mutex);
    }

private:
    pthread_mutex_t _mutex;
};

// 封装LockGuard类,实现自动加锁 和 解锁
class LockGuard
{
public:
    LockGuard(My_Mutex &My_lock)
        : _My_lock(My_lock)
    {
        _My_lock.lock();
    }

    ~LockGuard()
    {
        _My_lock.unlock();
    }

private:
    My_Mutex &_My_lock;
};- Cond.hpp
cpp
#pragma once

#include <pthread.h>

class My_Cond
{
public:
    My_Cond()
    {
        pthread_cond_init(&_cond, nullptr);
    }

    void Wait(pthread_mutex_t &mutex)
    {
        int n = pthread_cond_wait(&_cond, &mutex);
        (void)n;
    }

    void Notify()
    {
        int n = pthread_cond_signal(&_cond);
        (void)n;
    }

    void NotifyAll()
    {
        int n = pthread_cond_broadcast(&_cond);
        (void)n;
    }

    ~My_Cond()
    {
        pthread_cond_destroy(&_cond);
    }

private:
    pthread_cond_t _cond;
};
3. 线程类 的封装
- Thread.hpp
cpp
#pragma once

#include <iostream>
#include <string>
#include <unistd.h>
#include <pthread.h>
#include <functional>
#include "Log.hpp"

using func = std::function<void(const std::string &)>;

class My_Thread
{
private:
    static void *thread_routine(void *th)
    {
        My_Thread *self = (My_Thread *)th;
        self->_start_routine(self->_thread_name);
        LOG(DEBUG) << self->_thread_name << "退出成功";
        return (void *)0;
    }

public:
    My_Thread(func routine, const std::string &thread_name)
        : _start_routine(routine),
          _thread_name(thread_name)
    {
        LOG(DEBUG) << "创建" << _thread_name << "成功";
    }

    void Start()
    {
        int n = pthread_create(&_id, nullptr, thread_routine, this);
        _run = true;
        LOG(DEBUG) << "启动" << _thread_name << "成功";
    }

    void Stop()
    {
        if (_run)
        {
            pthread_cancel(_id);
            LOG(DEBUG) << "取消" << _thread_name << "成功";
        }
    }

    bool Join()
    {
        if (_run)
        {
            int n = pthread_join(_id, nullptr); // 阻塞等待目标线程退出
            if (n == 0)
                LOG(DEBUG) << "回收" << _thread_name << "成功";

            _run = false;
            return true;
        }
        return false;
    }

private:
    func _start_routine;
    std::string _thread_name;
    pthread_t _id;
    bool _run = false;
};
4. 任务类的封装
- Task.hpp
cpp
#pragma once

#include <functional>
#include <vector>
#include <stdlib.h>
#include <time.h>
#include "Log.hpp"
using namespace std;

void MySQL_organization()
{
    LOG(INFO) << "执行 MySQL_organization 任务成功";
}

void Clear_memory()
{
    LOG(INFO) << "执行 Clear_memory 任务成功";
}

void Upload_to_cloud()
{
    LOG(INFO) << "执行 Upload_to_cloud 任务成功";
}

void Synchronize_Cloud_Server()
{
    LOG(INFO) << "执行 Synchronize_Cloud_Server 任务成功";
}

vector<void (*)()> vec_task({MySQL_organization, Clear_memory, Upload_to_cloud, Synchronize_Cloud_Server});

// 任务类
class Task
{
public:
    Task()
    {
        srand((unsigned int)time(NULL));
        func = vec_task[rand() % 4];
    }

    void operator()()
    {
        func();
    }

private:
    void (*func)();
};
5. 日志类 的封装
5.1 最终要达到的效果,如何达到(完整的代码呈现)
(1) 我们想要的日志格式如下:
bash
[可读性很好的时间] [日志等级] [进程pid] [打印对应日志的文件名][行号] - 消息内容,支持可变参数
[2024-08-04 12:27:03] [DEBUG] [202938] [main.cc] [16] - hello world
[2024-08-04 12:27:03] [DEBUG] [202938] [main.cc] [17] - hello world
[2024-08-04 12:27:03] [DEBUG] [202938] [main.cc] [18] - hello world
[2024-08-04 12:27:03] [DEBUG] [202938] [main.cc] [20] - hello world
[2024-08-04 12:27:03] [DEBUG] [202938] [main.cc] [21] - hello world
[2024-08-04 12:27:03] [WARNING] [202938] [main.cc] [23] - hello world
(2) 如何实现日志格式所需效果,以及如何将日志刷新到显示器(或 文件)
- 1.获取日志所需的各种信息的方法:
时间信息: time系统调用(头文件time.h)可以获取时间戳;localtime_r函数(头文件time.h)可以提取出时间戳中的 时间信息,并将这些信息存储在 struct tm类型的结构体
日志等级: 使用枚举类型同时定义多个日志等级
进程pid: 通过系统调用getpid(头文件unistd.h)获取
文件名 和 行号: 使用C语言中的预定义宏获取
cpp
__FILE__ // 是C语言的预定义宏,展开为当前源文件的完整路径或文件名(字符串常量),具体形式取决于编译器处理方式

__LINE__ // 是C语言的预定义宏,展开为当前代码的行号(十进制整数常量)-
2.日志信息的多种刷新策略: 用多态实现
-
3.构建一条完整的日志信息: 日志类实现
(3) 完整的代码呈现(后续将代码拆解成一部分一部分讲解)
- Log.hpp
cpp
#pragma once
#include <string>
#include <time.h>
#include <iostream>
#include <filesystem> // C++17, 需要高版本编译器和-std=c++17
#include <fstream>
#include <sstream>
#include <memory>
#include <unistd.h>
#include "Mutex.hpp"
using namespace std;
#define log_path "Log"
#define log_filename "log.txt"
// 日志等级
enum LogLevel
{
DEBUG, // 调试
INFO, // 正常输出
WARNING, // 警告
ERROR, // 错误(导致服务器暂时停止的,但不修复该错误,服务器能立刻重启)
FATAL // 重大错误(导致服务器停止,且必须将该错误修复后,服务器才能重启)
};
// 日志等级转换成为字符串
string LogLevel_ToString(LogLevel level)
{
switch (level)
{
case DEBUG:
return "DEBUG";
case INFO:
return "INFO";
case WARNING:
return "WARNING";
case ERROR:
return "ERROR";
case FATAL:
return "FATAL";
default:
return "UNKNOWN";
}
}
// 根据时间戳,获取可读性较强的时间信息
string Get_CurrTime()
{
time_t tm = time(nullptr);
struct tm CurrTime;
localtime_r(&tm, &CurrTime);
char CurrTime_buff[64];
snprintf(CurrTime_buff, 64, "%4d-%02d-%02d %02d:%02d:%02d",
CurrTime.tm_year + 1900,
CurrTime.tm_mon + 1,
CurrTime.tm_mday,
CurrTime.tm_hour, CurrTime.tm_min, CurrTime.tm_sec);
return CurrTime_buff;
}
///////////////////////////////////////////////////////////////////////////////////////////////////////////
// 日志的刷新策略(基类)
class Log_Strategy
{
public:
virtual void SyncLog(const string &message) = 0; // 刷新策略函数
virtual ~Log_Strategy() = default;
};
// 控制台日志策略(向显示器打印日志)
class Console_LogStrategy : public Log_Strategy
{
public:
void SyncLog(const string &message)
{
LockGuard lock_guard(_mutex);
cerr << message << endl; // 显示器也是临界资源,保证输出线程安全
}
~Console_LogStrategy()
{
}
private:
My_Mutex _mutex;
};
// 文件日志策略(向文件中打印日志)
class File_LogStrategy : public Log_Strategy
{
public:
// 构造函数,建立出指定的目录结构
File_LogStrategy(const string &logpath = log_path, const string &logfile_name = log_filename)
: _logpath(logpath),
_logfile_name(logfile_name)
{
LockGuard lock_guard(_mutex);
if (std::filesystem::exists(_logpath)) // 存在指定的目录结构,就直接返回
return;
try
{
std::filesystem::create_directories(_logpath);
}
catch (const std::filesystem::filesystem_error &e)
{
cerr << e.what() << '\n';
}
}
void SyncLog(const string &message)
{
LockGuard lock_guard(_mutex);
string file = _logpath + '/' + _logfile_name;
// 要使用C++中的文件操作,需包含头文件:fstream
std::ofstream out(file.c_str(), std::ios::app); // C++中以追加方式打开文件
if (!out.is_open())
return; // 如果打开文件失败,直接返回
out << message << "\n";
out.close();
}
~File_LogStrategy()
{
}
private:
string _logpath; // 日志文件目录
string _logfile_name; // 日志文件名
My_Mutex _mutex; // 文件也是临界资源,保证输出线程安全
};
///////////////////////////////////////////////////////////////////////////////////////////////////////////
// 日志类
class Logger
{
public:
Logger()
{
// 日志类对象默认使用 显示器刷新策略
_strategy = std::make_unique<Console_LogStrategy>();
}
void Use_Console_LogStrategy()
{
_strategy = std::make_unique<Console_LogStrategy>();
}
void Use_File_LogStrategy()
{
_strategy = std::make_unique<File_LogStrategy>();
}
// 内部类
class LogMessage
{
private:
LogLevel _type; // 日志等级
string _curr_time; // 写入日志的时间
pid_t _pid; // 写日志的进程的pid
string _filename; // 对应的文件名
int _line; // 对应的文件行号
Logger &_logger; // 引用外部logger类, 方便使用策略进行刷新
string _loginfo; // 一条合并完成的,完整的日志信息
public:
LogMessage(LogLevel type, const string &filename, int line, Logger &logger)
: _type(type),
_curr_time(Get_CurrTime()),
_pid(getpid()),
_filename(filename),
_line(line),
_logger(logger)
{
std::stringstream ssbuffer;
ssbuffer << "[" << _curr_time << "] "
<< "[" << LogLevel_ToString(type) << "] "
<< "[" << _pid << "] "
<< "[" << _filename << "] "
<< "[" << _line << "]"
<< " - ";
_loginfo = ssbuffer.str();
}
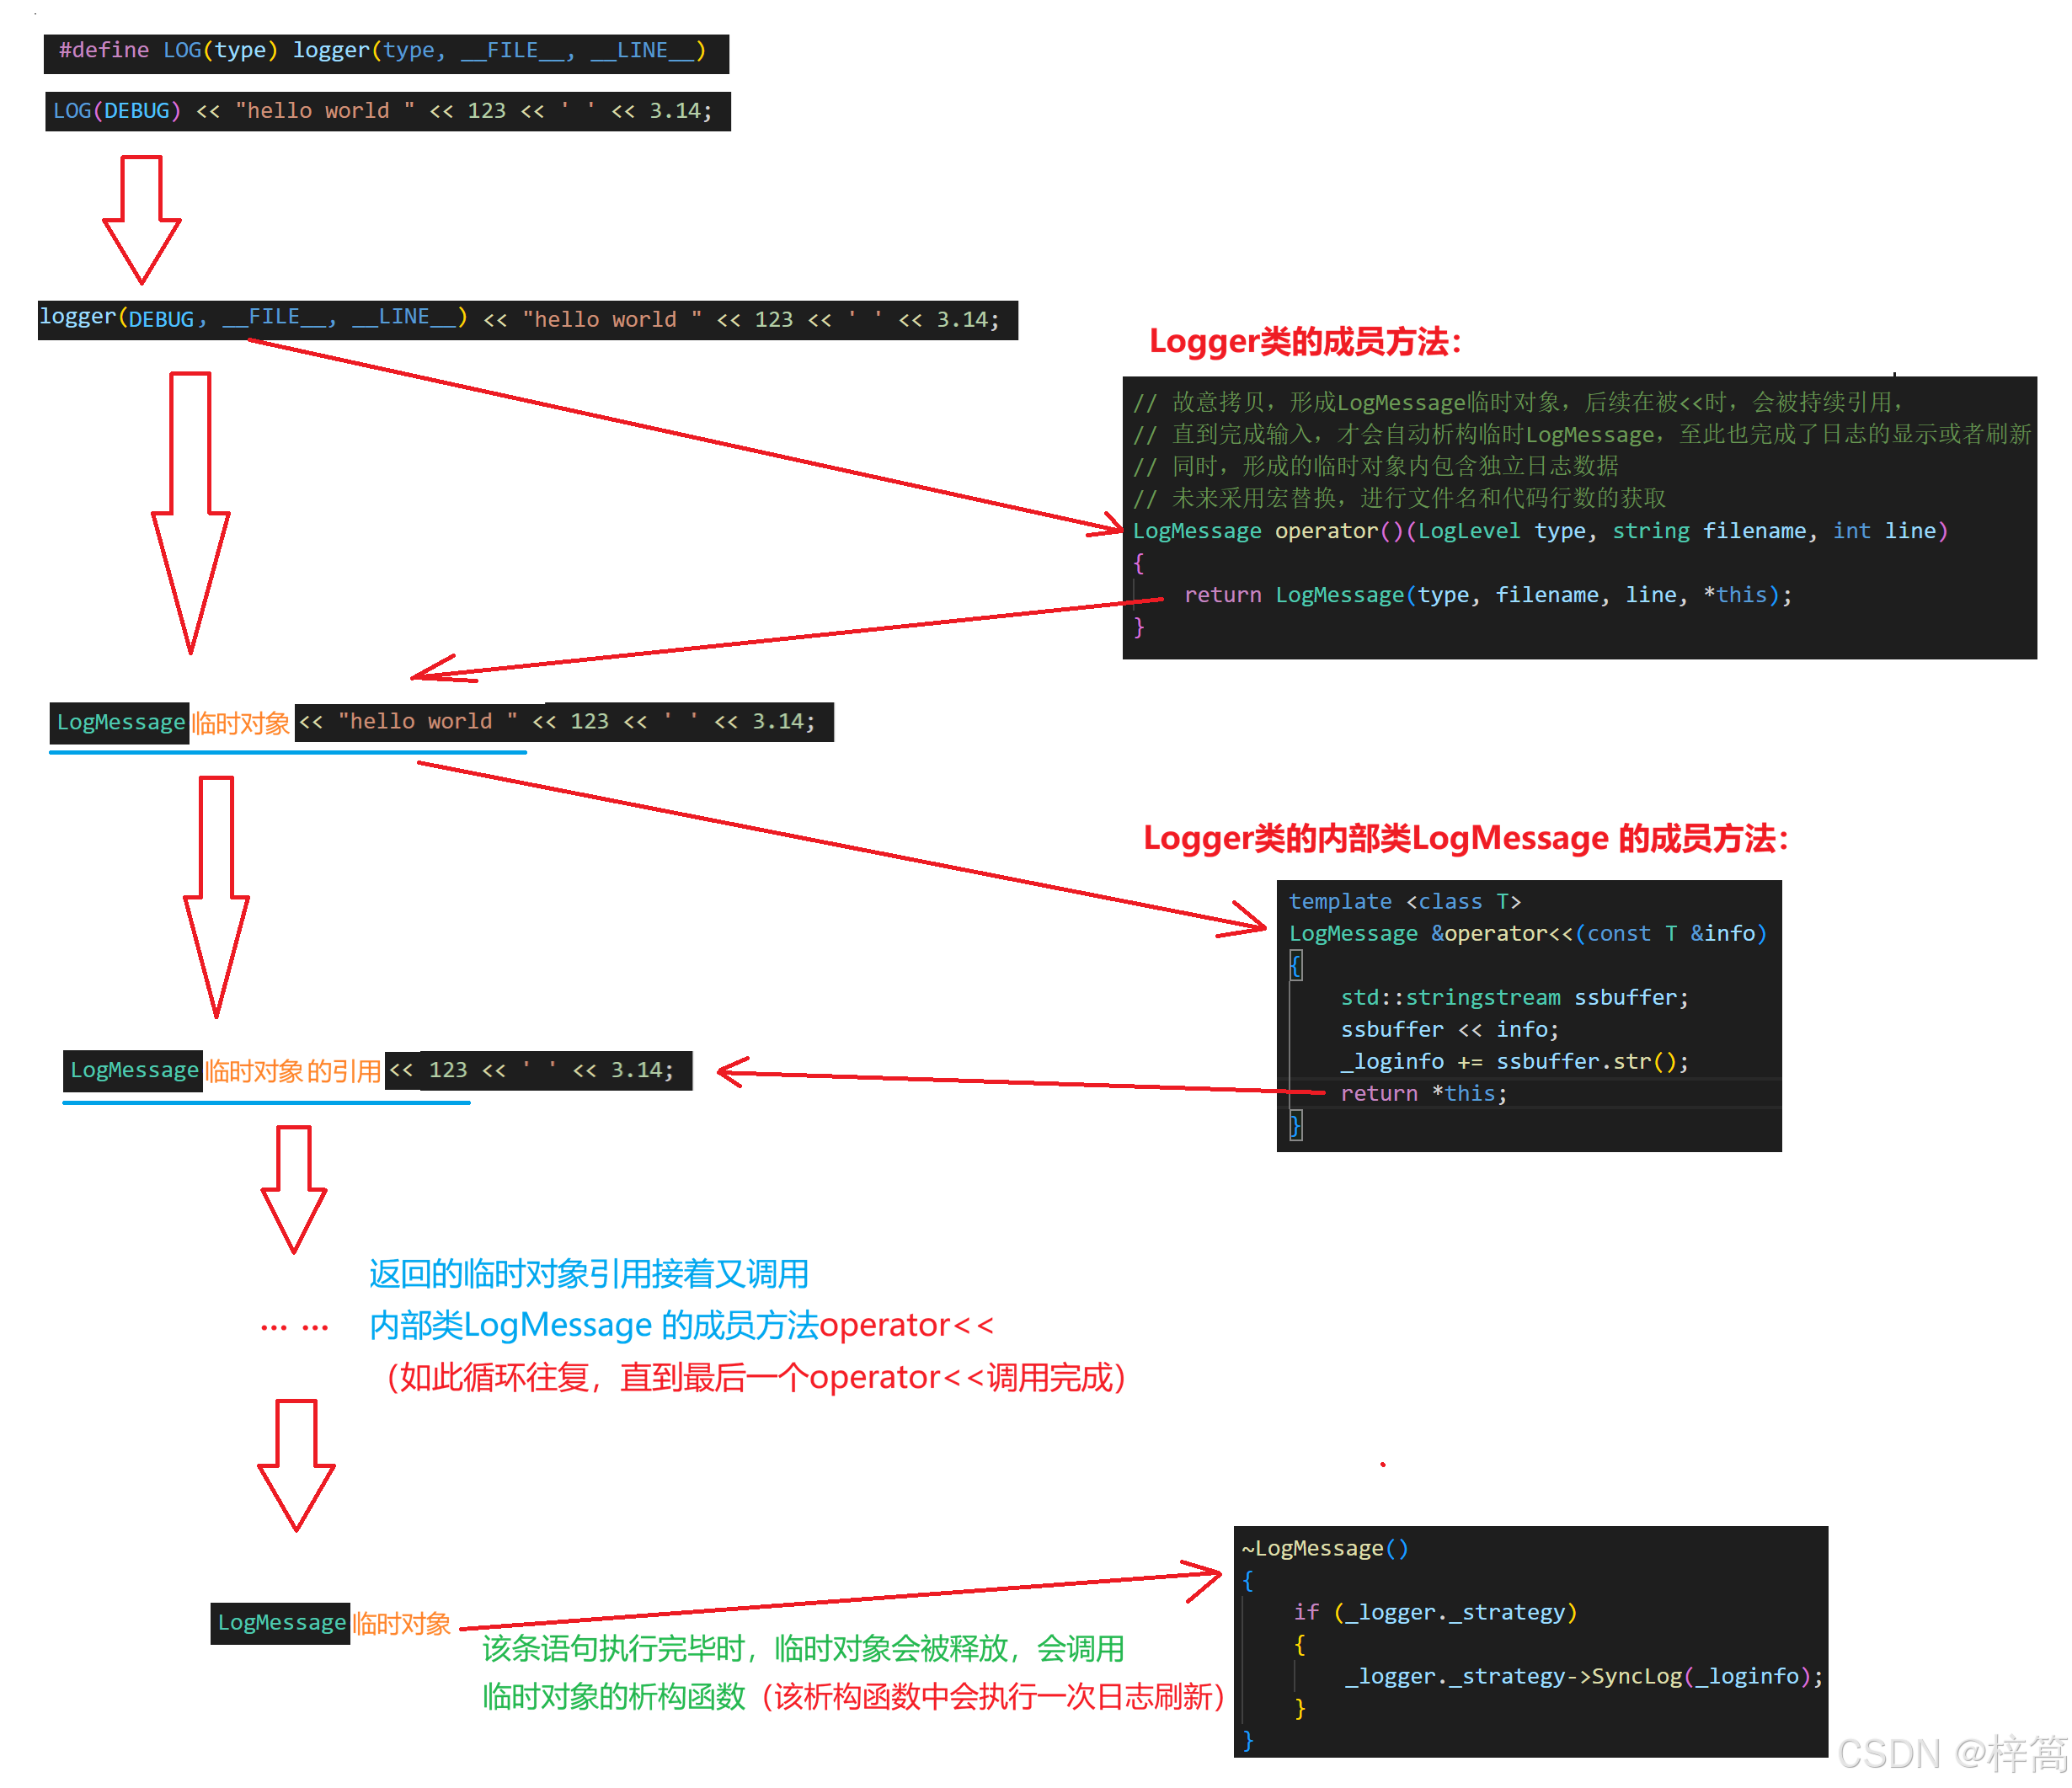
template <class T>
LogMessage &operator<<(const T &info)
{
std::stringstream ssbuffer;
ssbuffer << info;
_loginfo += ssbuffer.str();
return *this;
}
~LogMessage()
{
if (_logger._strategy)
{
_logger._strategy->SyncLog(_loginfo);
}
}
};
// 故意拷贝,形成LogMessage临时对象,后续在被<<时,会被持续引用,
// 直到完成输入,才会自动析构临时LogMessage,至此也完成了日志的显示或者刷新
// 同时,形成的临时对象内包含独立日志数据
// 未来采用宏替换,进行文件名和代码行数的获取
LogMessage operator()(LogLevel type, string filename, int line)
{
return LogMessage(type, filename, line, *this);
}
private:
unique_ptr<Log_Strategy> _strategy; // 写入日志的策略
};
// 定义全局的logger对象
Logger logger;
// 使用宏,可以进行代码插入,方便随时获取文件名和行号
#define LOG(type) logger(type, __FILE__, __LINE__)
// 提供选择使用何种日志策略的方法
#define ENABLE_CONSOLE_LOG_STRATEGY() logger.Use_Console_LogStrategy()
#define ENABLE_FILE_LOG_STRATEGY() logger.Use_File_LogStrategy()5.2 获取当前时间 和 日志等级
(1) 获取当前时间信息
time系统调用
- 函数结构:
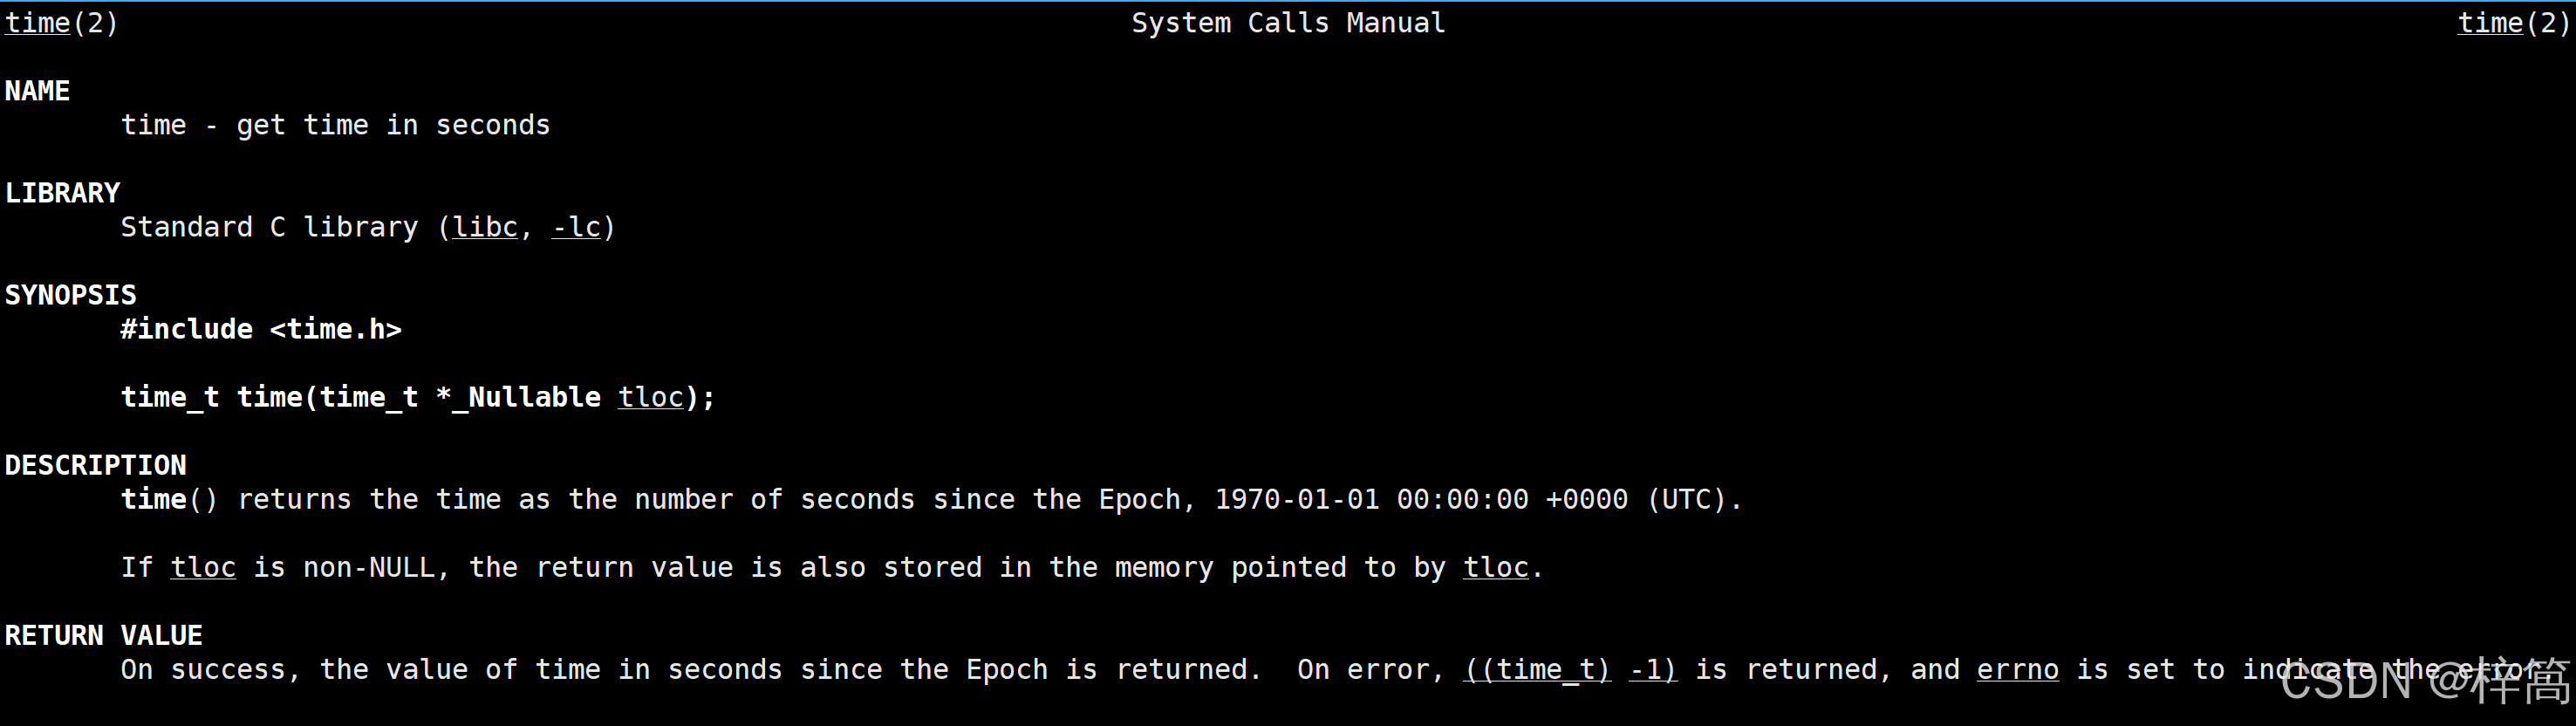
time_t time(time_t * tloc);- 返回值:
time()调用成功,会返回当前时间的时间戳(如果 tloc指针非空,时间戳还会保存在其指向的内容中);
调用失败,返回 ((time_t) -1),且设置错误码
localtime_r函数
- 函数结构:
#include <time.h>
struct tm * localtime_r(const time_t * timep, struct tm * result);- 函数作用:
第一个参数传入时间戳,localtime_r函数提取出时间戳中的各种时间信息,保存到 result 指针指向的 struct tm类型结构体中
c
#include <time.h>

// struct tm 是头文件time.h中定义的结构体类型
struct tm {
    int         tm_sec;    /* Seconds          [0, 60] */
    int         tm_min;    /* Minutes          [0, 59] */
    int         tm_hour;   /* Hour             [0, 23] */
    int         tm_mday;   /* Day of the month [1, 31] */
    int         tm_mon;    /* Month            [0, 11]  (January = 0) */
    int         tm_year;   /* Year minus 1900 */
    int         tm_wday;   /* Day of the week  [0, 6]   (Sunday = 0) */
    int         tm_yday;   /* Day of the year  [0, 365] (Jan/01 = 0) */
    int         tm_isdst;  /* Daylight savings flag */
    long        tm_gmtoff; /* Seconds East of UTC */
    const char *tm_zone;   /* Timezone abbreviation */
};- 获取时间信息 的代码如下(根据时间戳,获取可读性较强的时间信息):
cpp
// 根据时间戳,获取可读性较强的时间信息
string Get_CurrTime()
{
    time_t tm = time(nullptr);
    struct tm CurrTime;
    localtime_r(&tm, &CurrTime);

    char CurrTime_buff[64];
    snprintf(CurrTime_buff, 64, "%4d-%02d-%02d %02d:%02d:%02d",
             CurrTime.tm_year + 1900,
             CurrTime.tm_mon + 1,
             CurrTime.tm_mday,
             CurrTime.tm_hour, CurrTime.tm_min, CurrTime.tm_sec);
    return CurrTime_buff;
}
(2) 日志等级的设计
cpp
// 日志等级
enum LogLevel
{
    DEBUG,   // 调试
    INFO,    // 正常输出
    WARNING, // 警告
    ERROR,   // 错误(导致服务器暂时停止的,但不修复该错误,服务器能立刻重启)
    FATAL    // 重大错误(导致服务器停止,且必须将该错误修复后,服务器才能重启)
};

// 日志等级转换成为字符串
string LogLevel_ToString(LogLevel level)
{
    switch (level)
    {
    case DEBUG:
        return "DEBUG";
    case INFO:
        return "INFO";
    case WARNING:
        return "WARNING";
    case ERROR:
        return "ERROR";
    case FATAL:
        return "FATAL";
    default:
        return "UNKNOWN";
    }
}
5.3 刷新策略(多态实现)(补充 filesystem库 的部分知识)
- 日志信息的多种刷新策略的代码实现(多态实现):
cpp
#define log_path "Log"
#define log_filename "log.txt"

// 日志的刷新策略(基类)
class Log_Strategy
{
public:
    virtual void SyncLog(const string &message) = 0; // 刷新策略函数
    virtual ~Log_Strategy() = default;
};

// 控制台日志策略(向显示器打印日志)
class Console_LogStrategy : public Log_Strategy
{
public:
    void SyncLog(const string &message)
    {
        LockGuard lock_guard(_mutex);
        cerr << message << endl; // 显示器也是临界资源,保证输出线程安全
    }

    ~Console_LogStrategy()
    {
    }

private:
    My_Mutex _mutex;
};

// 文件日志策略(向文件中打印日志)
class File_LogStrategy : public Log_Strategy
{
public:
    // 构造函数,建立出指定的目录结构
    File_LogStrategy(const string &logpath = log_path, const string &logfile_name = log_filename)
        : _logpath(logpath),
          _logfile_name(logfile_name)
    {
        LockGuard lock_guard(_mutex);
        if (std::filesystem::exists(_logpath)) // 存在指定的目录结构,就直接返回
            return;
        try
        {
            std::filesystem::create_directories(_logpath);
        }
        catch (const std::filesystem::filesystem_error &e)
        {
            cerr << e.what() << '\n';
        }
    }

    void SyncLog(const string &message)
    {
        LockGuard lock_guard(_mutex);
        string file = _logpath + '/' + _logfile_name;
        // 要使用C++中的文件操作,需包含头文件:fstream
        std::ofstream out(file.c_str(), std::ios::app); // C++中以追加方式打开文件
        if (!out.is_open())
            return; // 如果打开文件失败,直接返回
        out << message << "\n";
        out.close();
    }

    ~File_LogStrategy()
    {
    }

private:
    string _logpath;      // 日志文件目录
    string _logfile_name; // 日志文件名
    My_Mutex _mutex; // 文件也是临界资源,保证输出线程安全
};
C++17 引入的 < filesystem > 库(简称 std::filesystem)提供了跨平台的文件系统操作接口,极大简化了文件和目录管理。以下是核心概念、用法及注意事项的总结:
(1) 核心类与功能
- std::filesystem::path(路径类)
作用:表示文件或目录路径,自动处理平台分隔符(Windows 用 \,Linux 用 /)。
使用 / 可同时在 Windows 和 Linux 生效(fs::path 自动转换)。
避免硬编码 \(Windows 专用)。
- 常用操作:
cpp
#include <filesystem>
namespace fs = std::filesystem;

fs::path p = "/home/user/data.txt";  // Linux 路径
p.filename();    // "data.txt"(文件名)
p.parent_path(); // "/home/user"(父目录)
p.extension();   // ".txt"(扩展名)
p /= "new_dir"; // 路径拼接:/home/user/data.txt/new_dir- 文件状态检查:
fs::exists( p):路径是否存在。
fs::is_regular_file( p):是否为普通文件。
fs::is_directory( p):是否为目录。
fs::file_size( p):获取文件大小(字节)。
cpp
if (fs::exists(p) && fs::is_regular_file(p))
{
    std::cout << "大小: " << fs::file_size(p) << " 字节\n";
}
(2) 常见操作与示例
- 目录操作
创建目录:
cpp
fs::create_directory("new_dir");       // 单级目录
fs::create_directories("a/b/c");       // 多级目录(自动创建父目录)
删除目录:
cpp
fs::remove("empty_dir");               // 删除空目录(失败则抛异常)
fs::remove_all("dir_to_delete"); // 递归删除目录及其内容(慎用!)- 文件操作
复制/移动/重命名:
cpp
fs::copy_file("source.txt", "dest.txt");                 // 复制文件
fs::rename("old.txt", "new.txt");                        // 重命名或移动
删除文件:
cpp
fs::remove("file.txt");5.4 日志类的实现
- 日志类的实现
cpp
// 日志类
class Logger
{
public:
    Logger()
    {
        // 日志类对象默认使用 显示器刷新策略
        _strategy = std::make_unique<Console_LogStrategy>();
    }

    void Use_Console_LogStrategy()
    {
        _strategy = std::make_unique<Console_LogStrategy>();
    }

    void Use_File_LogStrategy()
    {
        _strategy = std::make_unique<File_LogStrategy>();
    }

    // 内部类
    class LogMessage
    {
    private:
        LogLevel _type;    // 日志等级
        string _curr_time; // 写入日志的时间
        pid_t _pid;        // 写日志的进程的pid
        string _filename;  // 对应的文件名
        int _line;         // 对应的文件行号
        Logger &_logger;   // 引用外部logger类, 方便使用策略进行刷新
        string _loginfo;   // 一条合并完成的,完整的日志信息

    public:
        LogMessage(LogLevel type, const string &filename, int line, Logger &logger)
            : _type(type),
              _curr_time(Get_CurrTime()),
              _pid(getpid()),
              _filename(filename),
              _line(line),
              _logger(logger)
        {
            std::stringstream ssbuffer;
            ssbuffer << "[" << _curr_time << "] "
                     << "[" << LogLevel_ToString(type) << "] "
                     << "[" << _pid << "] "
                     << "[" << _filename << "] "
                     << "[" << _line << "]"
                     << " - ";
            _loginfo = ssbuffer.str();
        }

        template <class T>
        LogMessage &operator<<(const T &info)
        {
            std::stringstream ssbuffer;
            ssbuffer << info;
            _loginfo += ssbuffer.str();
            return *this;
        }

        ~LogMessage()
        {
            if (_logger._strategy)
            {
                _logger._strategy->SyncLog(_loginfo);
            }
        }
    };

    // 故意拷贝,形成LogMessage临时对象,后续在被<<时,会被持续引用,
    // 直到完成输入,才会自动析构临时LogMessage,至此也完成了日志的显示或者刷新
    // 同时,形成的临时对象内包含独立日志数据
    // 未来采用宏替换,进行文件名和代码行数的获取
    LogMessage operator()(LogLevel type, string filename, int line)
    {
        return LogMessage(type, filename, line, *this);
    }

private:
    unique_ptr<Log_Strategy> _strategy; // 写入日志的策略
};

// 定义全局的logger对象
Logger logger;

// 使用宏,可以进行代码插入,方便随时获取文件名和行号
#define LOG(type) logger(type, __FILE__, __LINE__)

// 提供选择使用 何种日志刷新策略
#define ENABLE_CONSOLE_LOG_STRATEGY() logger.Use_Console_LogStrategy()
#define ENABLE_FILE_LOG_STRATEGY() logger.Use_File_LogStrategy()
5.5 测试代码 演示效果(图解 日志类对象使用时 的调用过程)
cpp
#include "Log.hpp" // 头文件Log.hpp中定义了全局Logger类对象

int main()
{
    ENABLE_CONSOLE_LOG_STRATEGY(); // logger.Use_Console_LogStrategy(); 使用显示器刷新策略
    LOG(DEBUG) << "hello world " << 123 << ' ' << 3.14; // 图解该条语句,如下
    sleep(1);
    LOG(DEBUG) << "one piece " << 100;
    sleep(2);
    LOG(DEBUG) << "i love one piece";
    return 0;
}
二、线程池项目
1. 线程池设计
(1)线程池:
一种线程使用模式。线程过多会带来调度开销,进而影响缓存局部性和整体性能。而线程池维护着多个线程,等待着监督管理者分配可并发执行的任务。这避免了在处理短时间任务时创建与销毁线程的代价。线程池不仅能够保证内核的充分利用,还能防止过分调度。可用线程数量应该取决于可用的并发处理器、处理器内核、内存、网络sockets等的数量。
(2)线程池的应用场景:
- 需要大量的线程来完成任务,且完成任务的时间比较短。比如WEB服务器完成网页请求这样的任务,使用线程池技术是非常合适的。因为单个任务小,而任务数量巨大,你可以想象一个热门网站的点击次数。但对于长时间的任务,比如一个Telnet连接请求,线程池的优点就不明显了。因为 Telnet会话时间比线程的创建时间大多了。
- 对性能要求苛刻的应用,比如要求服务器迅速响应客户请求。
- 接受突发性的大量请求,但不至于使服务器因此产生大量线程的应用。突发性大量客户请求,在没有线程池情况下,将产生大量线程,虽然理论上大部分操作系统线程数目最大值不是问题,短时间内产生大量线程可能使内存到达极限,出现错误。
(3)线程池的种类:
- 固定数量线程池(初始化时 创建固定数量的线程),循环从任务队列中获取任务对象,获取到任务对象后,执行任务对象中的任务接口
- 浮动线程池(线程数量可以根据任务量动态调整),其他同上
我们要实现的线程池是:固定线程个数的线程池
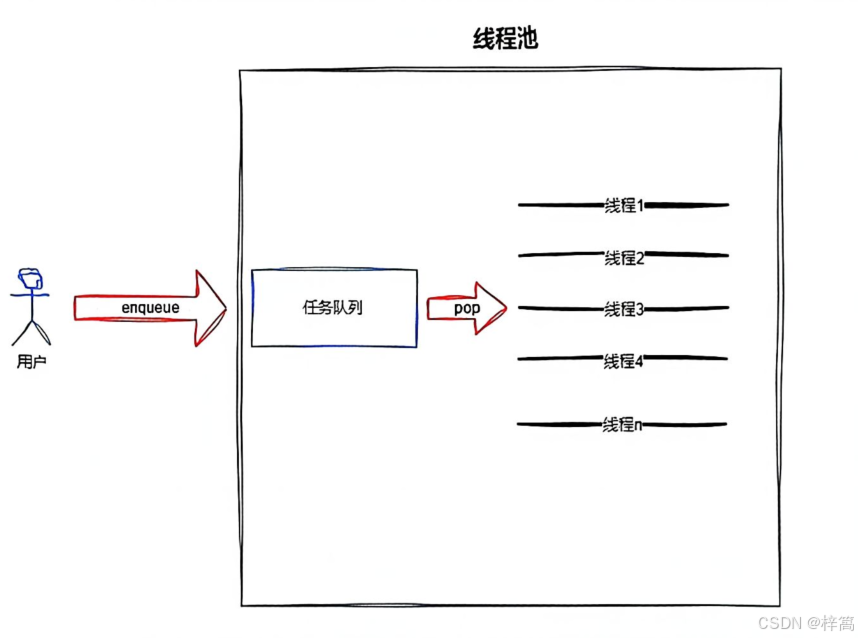
根据固定数量线程池的需求,我们实现的线程池类一定要包含以下成员变量 和 成员函数:
(1) 成员变量:
- 管理多个线程的数据结构(我选用std::vector)
- 管理多个任务的数据结构(我选用std::queue)
- 要创建的线程个数(用整型变量即可)
- 互斥量 和 条件变量(维护用户 和 线程间访问任务队列的互斥关系)
(2) 成员函数:
- 构建多个线程类对象 的函数(我在线程池类的构造函数中实现)
- 启动多个线程类对象 的函数(让多个线程跑起来,在 threads_start函数中实现)
- 停止多个线程类对象 的函数(让多个线程退出,在 threads_stop函数中实现)
- 回收多个线程类对象 的函数(回收多个线程,在 threads_wait函数中实现)
- 用户向任务队列增加任务类对象 的函数(在 Enqueue函数中实现)
- 线程从任务队列拿取任务类对象 的函数(在 Handler_Task函数中实现;需要通过一些方法,让线程执行线程函数的过程中 回调执行Handler_Task函数)
2. 代码设计(图解 线程调用线程函数时,回调Handler_Task成员函数的全过程)
- Thread_pool.hpp
cpp
#pragma once

#include <vector>
#include <queue>
#include "Mutex.hpp"
#include "Cond.hpp"
#include "Thread.hpp"
#include "Log.hpp"
#include "Task.hpp"

using namespace std;
using placeholders::_1;

class Thread_Pool
{
private:
    void Handler_Task(const string &thread_name)
    {
        while (true)
        {
            Task task;
            {
                // 多线程要串行从任务队列拿取任务
                LockGuard lockguarg(_mutex);
                // 当线程池处于开启状态 且 任务队列为空时,线程 挂起到_cond条件变量的等待队列
                while (_task_queue.empty() && _isrunning)
                {
                    _waitnum++;
                    _cond.Wait(_mutex.Get());
                    _waitnum--;
                }
                // 当线程池处于关闭状态 且 任务队列为空时,直接break跳出循环
                if (_task_queue.empty() && (!_isrunning))
                    break;
                task = _task_queue.front();
                _task_queue.pop();
                LOG(DEBUG) << thread_name << "获取任务成功";
            }
            // 多线程执行任务可以并发
            task();
        }
    }

public:
    Thread_Pool(int thread_num)
        : _thread_num(thread_num)
    {
        for (int i = 0; i < _thread_num; i++)
        {
            string str = "thread_";
            str += to_string(i + 1);
            _threads.emplace_back(bind(&Thread_Pool::Handler_Task, this, _1), str);
        }
        LOG(DEBUG) << "创建 Thread_Pool 成功";
    }

    void threads_start()
    {
        _isrunning = true; // 将线程池的状态设置为开启
        for (int i = 0; i < _thread_num; i++)
        {
            _threads[i].Start();
        }
        LOG(DEBUG) << "启动 Thread_Pool 成功";
    }

    // 这种实现方式,太过简单粗暴,可能导致以下情况 (以下仅列举部分情况) :
    // (1) 线程在执行任务的过程中,被强制退出
    // (2) 所有线程都被强制退出后,任务队列还有任务未被获取
    /*
    void threads_stop()
    {
        for (int i = 0; i < _thread_num; i++)
        {
            _threads[i].Stop();
        }
        LOG(DEBUG) << "取消 Thread_Pool 成功";
    }
    */

    void threads_stop()
    {
        LockGuard lockguarg(_mutex);
        _isrunning = false; // 将线程池的状态设置为关闭
        _cond.NotifyAll();
    }

    void threads_wait()
    {
        for (int i = 0; i < _thread_num; i++)
        {
            _threads[i].Join();
        }
        LOG(DEBUG) << "回收 Thread_Pool 成功";
    }

    void Enqueue(const Task &task)
    {
        if (!_isrunning) // 线程池处于关闭状态时,用户无法向任务队列添加任务
            return;

        LockGuard lockguarg(_mutex);
        _task_queue.push(task);
        if (_waitnum > 0)
            _cond.Notify();
    }

    ~Thread_Pool()
    {
    }

private:
    vector<My_Thread> _threads;
    int _thread_num; // 线程个数

    queue<Task> _task_queue;
    My_Mutex _mutex;
    My_Cond _cond;
    int _waitnum; // 在条件变量_cond等待队列的线程个数

    bool _isrunning = false; // 线程池是否开启
};
(1) 代码 实现线程调用线程函数thread_routine 时,回调 Thread_Pool类对象中Handler_Task成员函数 的全过程:

3. 测试代码的结果
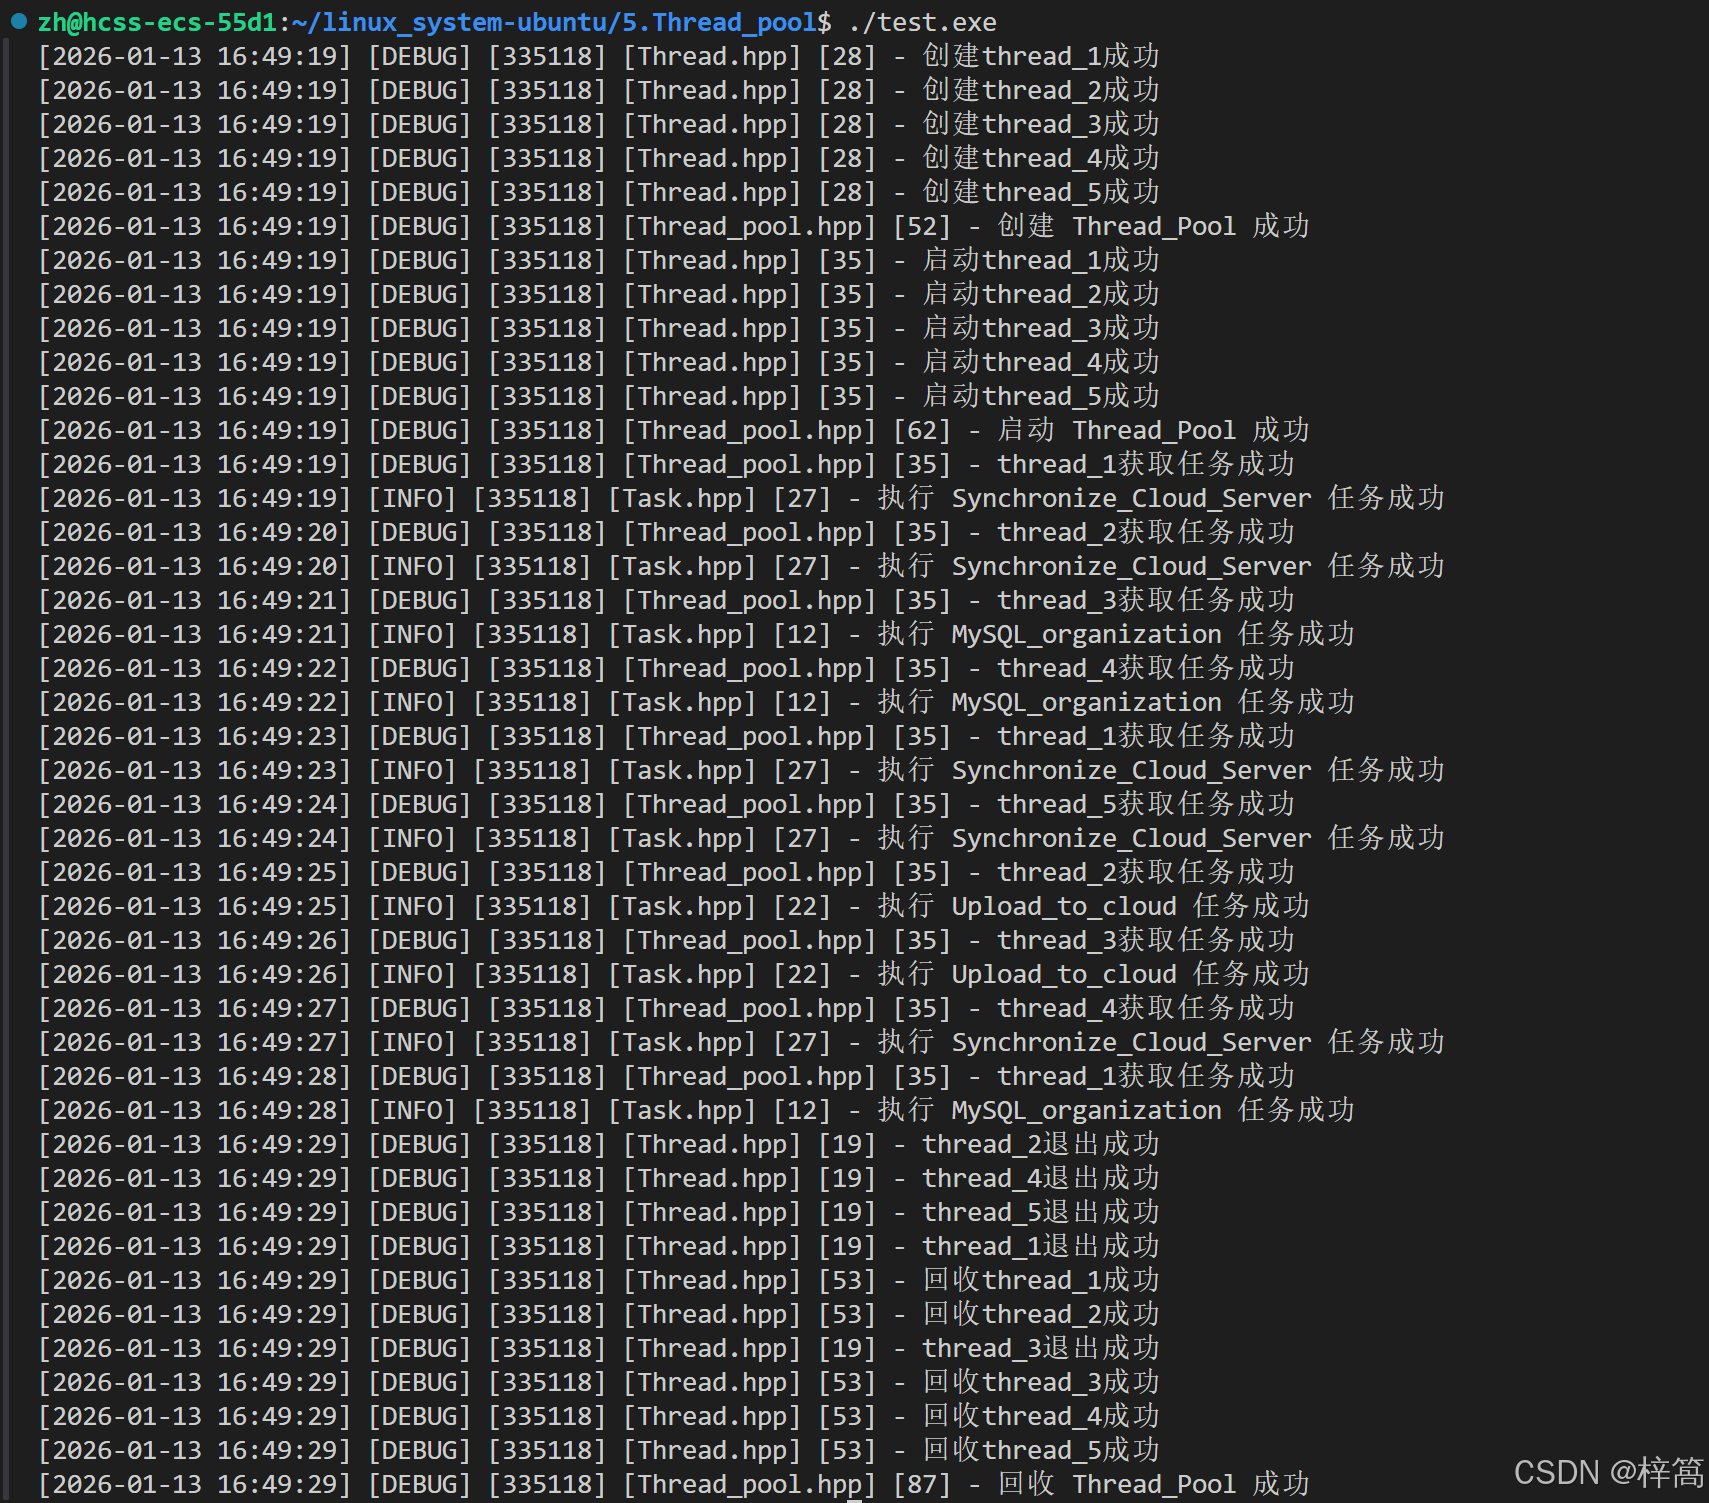
- test.cpp
cpp
#include "Thread_pool.hpp"

int main()
{
    Thread_Pool thread_pool(5);
    thread_pool.threads_start();

    for(int i = 0;i < 10;i++)
    {
        Task t;
        thread_pool.Enqueue(t);
        sleep(1);
    }

    thread_pool.threads_stop();
    thread_pool.threads_wait();
    return 0;
}
代码编译链接过程中 的注意事宜:
bash
g++ test.cpp -o test.exe -std=c++17 -lpthread
// 编译链接时, 需要使用C++17标准 以及 指定pthread库名
代码运行结果:
三、线程安全的单例模式
1. 什么是单例模式(单例模式的特点)
某些类,只应该具有一个对象(实例),就称之为单例。
在很多服务器开发场景中,经常需要让服务器加载很多的数据 (上百G) 到内存中。此时往往要用一个单例的类来管理这些数据。
2. 单例模式的两种实现方式:饿汉方式 和 懒汉方式
洗碗的例子
吃完饭,立刻洗碗,这种就是饿汉方式。因为下一顿吃的时候可以立刻拿着碗就能吃饭。
吃完饭,先把碗放下,然后下一顿饭用到这个碗了再洗碗,就是懒汉方式。
懒汉方式最核心的思想是 "延时加载"。 从而能够优化服务器的启动速度。
2.1 饿汉方式实现单例模式
cpp
template <typename T>
class Singleton
{
	static T data;

public:
	static T* GetInstance()
	{
		return &data;
	}
};
只要通过 Singleton 这个包装类来使用 T 对象,则一个进程中只有一个 T 对象的实例。
2.2 懒汉方式实现单例模式
- 懒汉方式实现单例模式:
cpp
template <typename T>
class Singleton
{
	static T* inst;

public:
	static T* GetInstance()
	{
		if (inst == NULL)
		{
			inst = new T();
		}
		return inst;
	}
};
存在一个严重的问题,线程不安全。
第一次调用 GetInstance 的时候,如果多个线程同时调用,可能会创建出多份 T 对象的实例。
但是后续再次调用,就没有问题了。
- 懒汉方式实现单例模式(线程安全版本):
cpp
// 懒汉模式, 线程安全
template <typename T>
class Singleton
{
	volatile static T* inst; // 需要设置 volatile 关键字, 否则可能被编译器优化.
	static std::mutex lock;

public:
	static T* GetInstance()
	{
		if (inst == NULL) // 双重判定空指针, 降低锁冲突的概率, 提⾼性能.
		{
			lock.lock(); // 使用互斥锁, 保证多线程情况下也只调用⼀次 new.
			if (inst == NULL)
			{
				inst = new T();
			}
			lock.unlock();
		}
		return inst;
	}
};
注意事项:
(1) 加锁解锁的位置
(2) 双重 if 判定,避免不必要的锁竞争
(3) volatile关键字防止过度优化
3. 代码:单例式线程池(懒汉方式实现)
- Threadpool_Singleton.hpp
cpp
#pragma once

#include <vector>
#include <queue>
#include "Mutex.hpp"
#include "Cond.hpp"
#include "Thread.hpp"
#include "Log.hpp"
#include "Task.hpp"

using namespace std;
using placeholders::_1;

class Thread_Pool
{
private:
    void Handler_Task(const string &thread_name)
    {
        while (true)
        {
            Task task;
            {
                // 多线程要串行从任务队列拿取任务
                LockGuard lockguarg(_mutex);
                while (_task_queue.empty() && _isrunning)
                {
                    _waitnum++;
                    _cond.Wait(_mutex.Get());
                    _waitnum--;
                }
                if (_task_queue.empty() && (!_isrunning))
                    break;
                task = _task_queue.front();
                _task_queue.pop();
                LOG(DEBUG) << thread_name << "获取任务成功";
            }
            // 多线程执行任务可以并发
            task();
        }
    }

    // 将构造函数设置为私有
    Thread_Pool(int thread_num)
        : _thread_num(thread_num)
    {
        for (int i = 0; i < _thread_num; i++)
        {
            string str = "thread_";
            str += to_string(i + 1);
            _threads.emplace_back(bind(&Thread_Pool::Handler_Task, this, _1), str);
        }
        LOG(DEBUG) << "创建 Thread_Pool 成功";
    }

    // 禁用拷贝构造 和 赋值重载
    Thread_Pool(const Thread_Pool &) = delete;
    Thread_Pool &operator=(const Thread_Pool &) = delete;

public:
    void threads_start()
    {
        _isrunning = true;
        for (int i = 0; i < _thread_num; i++)
        {
            _threads[i].Start();
        }
        LOG(DEBUG) << "启动 Thread_Pool 成功";
    }

    void threads_stop()
    {
        LockGuard lockguarg(_mutex);
        _isrunning = false;
        _cond.NotifyAll();
    }

    void threads_wait()
    {
        for (int i = 0; i < _thread_num; i++)
        {
            _threads[i].Join();
        }
        LOG(DEBUG) << "回收 Thread_Pool 成功";
    }

    void Enqueue(const Task &task)
    {
        if (!_isrunning)
            return;

        LockGuard lockguarg(_mutex);
        _task_queue.push(task);
        if (_waitnum > 0)
            _cond.Notify();
    }

    // 添加单例模式(必须是静态成员函数,外部无法直接构造类对象,也就无法调用成员函数;
    //            而静态成员函数是属于类的,只要指定类域就可以访问)
    static Thread_Pool *GetInstance()
    {
        if (_instance == nullptr)
        {
            LockGuard lockguarg(_Singleton_mutex);
            if (_instance == nullptr)
            {
                _instance = new Thread_Pool(5);
            }
        }
        return _instance;
    }

    ~Thread_Pool()
    {
    }

private:
    vector<My_Thread> _threads;
    int _thread_num; // 线程个数

    queue<Task> _task_queue;
    My_Mutex _mutex;
    My_Cond _cond;
    int _waitnum; // 在条件变量_cond等待队列的线程个数

    bool _isrunning = false; // 线程池是否开启

    // 添加单例模式(必须是静态成员变量,静态成员函数只能直接访问静态成员变量)
    static Thread_Pool *_instance;
    static My_Mutex _Singleton_mutex;
};

Thread_Pool *Thread_Pool::_instance = nullptr;
My_Mutex Thread_Pool::_Singleton_mutex;
代码细节:
(1) 将 构造函数设置为私有,禁用拷贝构造 和 赋值重载,使外部无法直接构造类对象!
(2) 外部只能直接使用 静态成员函数GetInstance( ) :第一次调用 GetInstance( ) 时,会构造一个类对象 并 返回指向类对象的指针;后续再调用 GetInstance( ) 时,只会返回指向类对象的指针
- test.cpp(测试代码)
cpp
#include "Threadpool_Singleton.hpp"

int main()
{
    Thread_Pool::GetInstance()->threads_start();

    for (int i = 0; i < 10; i++)
    {
        Task t;
        Thread_Pool::GetInstance()->Enqueue(t);
        sleep(1);
    }

    Thread_Pool::GetInstance()->threads_stop();
    Thread_Pool::GetInstance()->threads_wait();
    return 0;
}