最近有个项目需求是实现前端页面可以对word文档进行编辑,并且可以进行保存,于是一顿搜索,找到开源第三方onlyoffice,实际上onlyOffice有很多功能,例如文档转化、多人协同编辑文档、文档打印等,我们只用到了文档编辑功能。
01
OnlyOffice的部署
部署分为docker部署方式和本地直接安装的方式,比较两种部署方式,docker是比较简单的一种,因为只要拉取相关镜像,然后启动时配置好对应的配置文件即可。
由于搜索的时候先看到的是linux本地部署,所以采用了第二种方式,下面我将给出两个参考博客:
Docker部署方式(未尝试)
https://blog.csdn.net/wangchange/article/details/140185623
Ubuntu部署方式(已验证可行)
https://blog.csdn.net/qq_36437991/article/details/139859247
02
代码逻辑开发
前端使用的element框架vue版本,后端采用springboot
2.1、前端代码
参考官方文档API:
-
基础概念:https://api.onlyoffice.com/docs/docs-api/get-started/basic-concepts/
-
高级参数:https://api.onlyoffice.com/docs/docs-api/usage-api/advanced-parameters/
首先记得添加下面的js文件:
<div id="placeholder"></div>
<script type="text/javascript" src="https://documentserver/web-apps/apps/api/documents/api.js"></script>
注意 :记得将 documentserver 替换为部署onlyoffice的地址。
配置代码:
constconfig= {
    document: {
        mode: 'edit',
        fileType: 'docx',
        key: String(Math.floor(Math.random() * 10000)),
        title: route.query.name + '.docx',
        url: import.meta.env.VITE_APP_API_URL + `/getFile/${route.query.id}`,
        permissions: {
            comment: true,
            download: true,
            modifyContentControl: true,
            modifyFilter: true,
            edit: true,
            fillForms: true,
            review: true,
        },
    },
    documentType: 'word',
    editorConfig: {
        user: {
            id: 'liu',
            name: 'liu',
        },
        // 隐藏插件菜单
        customization: {
            plugins: false,
            forcesave: true,
        },
        lang: 'zh',
        callbackUrl: import.meta.env.VITE_APP_API_URL + `/callback`,
    },
    height: '100%',
    width: '100%',
}

newwindow.DocsAPI.DocEditor('onlyoffice', config)
说明 :
import.meta.env.VITEAPPAPI_URL
为你实际的后端地址,格式: http://ip:端口号/访问路径
例如: http://192.168.123.123:8089/getFile/12 ,其中12为会议号,用于得到文件地址
callbackUrl
为回调函数,即文档有什么操作后,都会通过这个函数进行回调,例如:编辑保存操作。
2.2、后端代码
POM依赖
<!-- httpclient start -->
<dependency>
    <groupId>org.apache.httpcomponents</groupId>
    <artifactId>httpclient</artifactId>
</dependency>
<dependency>
    <groupId>org.apache.httpcomponents</groupId>
    <artifactId>httpmime</artifactId>
</dependency>
OnlyOfficeController
@Api(value = "OnlyOfficeController")
@RestController
publicclass OnlyOfficeController {
@Autowired
private IMeetingTableService meetingTableService;
private String meetingMinutesFilePath;
/**
* 传入参数 会议id,得到会议纪要文件流,并进行打开
*/
@ApiOperation(value = "OnlyOffice")
@GetMapping("/getFile/{meeting_id}")
public ResponseEntity<byte[]> getFile(HttpServletResponse response, @PathVariable Long meeting_id)
throws IOException {
MeetingTablemeetingTable= meetingTableService.selectMeetingTableById(meeting_id);
meetingMinutesFilePath = meetingTable.getMeetingMinutesFilePath();
if (meetingMinutesFilePath == null || "".equals(meetingMinutesFilePath)) {
returnnull; // 当会议纪要文件为空的时候,就返回null
}
Filefile=newFile(meetingMinutesFilePath);
FileInputStreamfileInputStream=null;
InputStreamfis=null;
try {
fileInputStream = newFileInputStream(file);
fis = newBufferedInputStream(fileInputStream);
byte[] buffer = newbyte[fis.available()];
fis.read(buffer);
fis.close();
HttpHeadersheaders=newHttpHeaders();
headers.setContentType(MediaType.APPLICATION_OCTET_STREAM);
headers.setContentDispositionFormData("attachment",
URLEncoder.encode(file.getName(), "UTF-8"));
returnnew ResponseEntity<>(buffer, headers, HttpStatus.OK);
} catch (Exception e) {
thrownew RuntimeException("e -> ", e);
} finally {
try {
if (fis != null) fis.close();
} catch (Exception e) {
// ignore
}
try {
if (fileInputStream != null) fileInputStream.close();
} catch (Exception e) {
// ignore
}
}
}
@CrossOrigin(origins = "*", methods = {RequestMethod.GET, RequestMethod.POST, RequestMethod.OPTIONS})
@PostMapping("/callback")
public ResponseEntity<Object> handleCallback(@RequestBody CallbackData callbackData) {
// 状态监听
// 参见 https://api.onlyoffice.com/editors/callback
Integerstatus= callbackData.getStatus();
switch (status) {
case1: {
// document is being edited 文档已经被编辑
break;
}
case2: {
// document is ready for saving, 文档已准备好保存
System.out.println("document is ready for saving");
Stringurl= callbackData.getUrl();
try {
saveFile(url); // 保存文件
} catch (Exception e) {
System.out.println("保存文件异常");
}
System.out.println("save success.");
break;
}
case3: {
// document saving error has occurred, 保存出错
System.out.println("document saving error has occurred, 保存出错");
break;
}
case4: {
// document is closed with no changes, 未保存退出
System.out.println("document is closed with no changes, 未保存退出");
break;
}
case6: {
// document is being edited, but the current document state is saved, 编辑保存
Stringurl= callbackData.getUrl();
try {
saveFile(url); // 保存文件
} catch (Exception e) {
System.out.println("保存文件异常");
}
System.out.println("save success.");
}
case7: {
// error has occurred while force saving the document. 强制保存文档出错
System.out.println("error has occurred while force saving the document. 强制保存文档出错");
}
default: {
// ignore
}
}
// 返回响应
return ResponseEntity.ok(Collections.singletonMap("error", 0));
}
publicvoidsaveFile(String downloadUrl)throws URISyntaxException, IOException {
HttpsKitWithProxyAuth.downloadFile(downloadUrl, meetingMinutesFilePath);
}
@Setter
@Getter
publicstaticclass CallbackData {
/** 用户与文档的交互状态 */
Object changeshistory;
Object history;
String changesurl;
String filetype;
Integer forcesavetype;
String key;
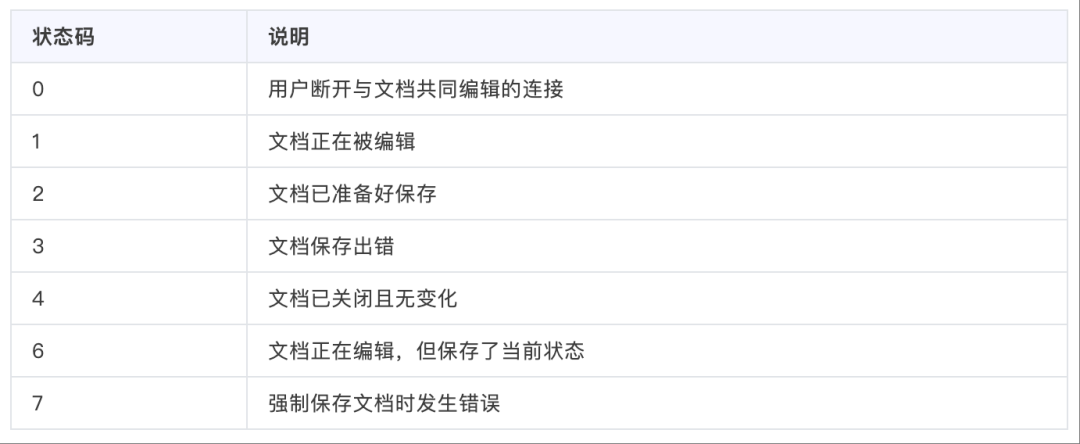
/** 文档状态。1:编辑中;2:准备保存;3:保存出错;4:无变化;6:编辑保存;7:强制保存出错 */
Integer status;
String url;
Object userdata;
String[] users;
String lastsave;
String token;
}
}HttpsKitWithProxyAuth工具类
这是一个HTTP请求工具类,主要用于文件下载等操作。由于代码较长,这里只列出核心的 downloadFile 方法:
/**
 * 下载文件到本地
 * @param downloadUrl 下载地址
 * @param savePathAndName 保存路径和文件名
 */
publicstaticvoiddownloadFile(String downloadUrl, String savePathAndName) {
    HttpGethttpGet=newHttpGet(downloadUrl);
    httpGet.setHeader("User-Agent", USER_AGENT);
    httpGet.setConfig(requestConfig);

    CloseableHttpResponseresponse=null;
    InputStreamin=null;

    try {
        response = getHttpClient().execute(httpGet, HttpClientContext.create());
        HttpEntityentity= response.getEntity();

        if (entity != null) {
            in = entity.getContent();
            FileOutputStreamout=newFileOutputStream(newFile(savePathAndName));
            IOUtils.copy(in, out);
            out.close();
        }
    } catch (IOException e) {
        logger.error("error", e);
    } finally {
        try {
            if (in != null) in.close();
        } catch (IOException e) {
            logger.error("error", e);
        }
        try {
            if (response != null) response.close();
        } catch (IOException e) {
            logger.error("error", e);
        }
    }
}
完整代码 :HttpsKitWithProxyAuth.java 和 JsonUtil.java 完整代码请参考原文。
03
问题总结
3.1、访问案例失败
部署完成后,可能存在很多问题,例如:访问example访问失败,那么使用以下命令查看服务状态:
systemctl status ds*查看有没有启动对应的服务。
3.2、加载word文档失败
修改启动的配置文件,将token去除,配置文件位置:
/etc/onlyoffice/documentserver修改 local.json
将参数token都改为false,去除token:
"token": {
   "enable": {
     "request": {
       "inbox": false,
       "outbox": false
     },
     "browser": false
   }
}
修改 default.json
将参数 request-filtering-agent 改为true,token也改为false,rejectUnauthorized改为false:
"request-filtering-agent": {
    "allowPrivateIPAddress": true,
    "allowMetaIPAddress": true
},
"token": {
    "enable": {
        "browser": false,
        "request": {
            "inbox": false,
            "outbox": false
        }
    }
},
"rejectUnauthorized": false
修改了以上配置参数后, 重启服务 ,再次测试。
以上更改基本能解决:
-
报错文档权限问题
-
文档保存失败问题
-
文档下载问题等报错信息
3.3、系统后端有token验证问题
如果你访问的地址需要携带token,进行token验证(自己的系统后台,并非onlyoffice的token),那么可以通过配置下面代码的形式进行解决。
例如:我的访问路径为 http://192.168.123.123:8089/getFile/12 ,去除token验证:
@Bean
protected SecurityFilterChain filterChain(HttpSecurity httpSecurity)throws Exception {
    return httpSecurity
            // CSRF禁用,因为不使用session
            .csrf(csrf -> csrf.disable())
            // 禁用HTTP响应标头
            .headers((headersCustomizer) -> {
                headersCustomizer.cacheControl(cache -> cache.disable())
                    .frameOptions(options -> options.sameOrigin());
            })
            // 认证失败处理类
            .exceptionHandling(exception -> exception.authenticationEntryPoint(unauthorizedHandler))
            // 基于token,所以不需要session
            .sessionManagement(session -> session.sessionCreationPolicy(SessionCreationPolicy.STATELESS))
            // 注解标记允许匿名访问的url
            .authorizeHttpRequests((requests) -> {
                permitAllUrl.getUrls().forEach(url -> requests.antMatchers(url).permitAll());
                // 对于登录login 注册register 验证码captchaImage 允许匿名访问
                // ⭐ 重点:这里添加 /callback 和 /getFile/* 的匿名访问权限
                requests.antMatchers("/callback", "/getFile/*", "/login", "/register", "/captchaImage")
                        .permitAll()
                        // 静态资源,可匿名访问
                        .antMatchers(HttpMethod.GET, "/", "/*.html", "/ **/*.html", "/** /*.css",
                            "/ **/*.js", "/profile/** ").permitAll()
                        .antMatchers("/swagger-ui.html", "/swagger-resources/ **", "/webjars/** ",
                            "/*/api-docs", "/druid/**").permitAll()
                        // 除上面外的所有请求全部需要鉴权认证
                        .anyRequest().authenticated();
            })
            // 添加Logout filter
            .logout(logout -> logout.logoutUrl("/logout").logoutSuccessHandler(logoutSuccessHandler))
            // 添加JWT filter
            .addFilterBefore(authenticationTokenFilter, UsernamePasswordAuthenticationFilter.class)
            // 添加CORS filter
            .addFilterBefore(corsFilter, JwtAuthenticationTokenFilter.class)
            .addFilterBefore(corsFilter, LogoutFilter.class)
            .build();
}
在线测试链接
下面你可以直接使用一个在线的docx链接来测试你是否部署成功,在线链接:
https://d2nlctn12v279m.cloudfront.net/assets/docs/samples/zh/demo.docx即将前端代码中的 url 替换为上面的链接。
04
后记
如果你看到这里,那么代表你将要成功了,整个过程比较艰难,前后弄了两三天,还好最后结果是好的,所以简单总结一下,勉励自己。
状态码说明
OnlyOffice回调状态码含义: