在单节点 Kubernetes 集群上部署 Longhorn 能为应用提供可靠的分布式块存储能力。下面是一份清晰的安装指南,包含了不同的安装方法和详细步骤。
目录
[Longhorn 简介](#Longhorn 简介)
[方法一:使用 kubectl 安装](#方法一:使用 kubectl 安装)
[方法二:使用 Helm 安装](#方法二:使用 Helm 安装)
[方法三:修改 Chart 配置为国内镜像源后安装](#方法三:修改 Chart 配置为国内镜像源后安装)
Longhorn 简介
Longhorn 是一个轻量级、可靠且易于使用的 Kubernetes 分布式块存储解决方案。它为每个卷创建一个专用的存储控制器,并在多个节点上同步复制数据,从而实现了高可用性 。
安装前准备
在安装 Longhorn 之前,请确保你的 Kubernetes 集群(单节点也需满足)符合以下要求:
-
Kubernetes 版本:不低于 1.21 。
-
容器运行时:Docker v1.13+ 或 containerd v1.3.7+ 等兼容的运行时 。
-
必需工具 :每个节点上都需安装
open-iscsi并确保iscsid守护进程正在运行,因为 Longhorn 依赖iscsiadm来提供持久卷 。对于 CentOS/RHEL 系统,安装命令为:sudo yum install iscsi-initiator-utils
可选工具 :如需支持 ReadWriteMany访问模式,每个节点还需安装 NFSv4 客户端 。对于 CentOS/RHEL:
sudo yum install nfs-utils- 其他要求 :节点内核需要支持文件扩展功能(如
ext4或XFS文件系统),并已启用挂载传播
可以使用 Longhorn 官方提供的脚本来快速检查环境是否满足要求 :
curl -sSfL https://raw.githubusercontent.com/longhorn/longhorn/v1.6.1/scripts/environment_check.sh | bash安装方法(方法三必成)
方法一:使用 kubectl 安装
这是最直接的方法,适用于快速部署。
-
直接应用官方 YAML 清单:
kubectl apply -f https://raw.githubusercontent.com/longhorn/longhorn/v1.6.1/deploy/longhorn.yaml
如果你想自定义配置(例如修改默认数据路径),可以先下载 YAML 文件进行编辑后再应用 。
wget https://raw.githubusercontent.com/longhorn/longhorn/v1.6.1/deploy/longhorn.yaml
# 编辑 longhorn.yaml,然后执行:
kubectl apply -f longhorn.yaml
方法二:使用 Helm 安装
如果你习惯使用 Helm 进行包管理,可以采用此方法。
-
添加 Longhorn 的 Helm 仓库:
helm repo add longhorn https://charts.longhorn.io
helm repo update


helm search repo longhorn
2.在 longhorn-system命名空间中安装 Longhorn:
helm install longhorn longhorn/longhorn --namespace longhorn-system --create-namespace --version 1.6.1验证安装
安装完成后,需要检查所有 Pod 是否正常运行。
查看 Longhorn 系统 Pod:
kubectl get pods -n longhorn-system遇到问题:

问题一:无法拉取并且状态报错:有两个 longhorn-driver-deployer Pod

原因:滚动更新过程中断,镜像拉取失败导致 Pod 卡住,可以查看 ReplicaSet 确认原因
# 查看 longhorn-driver-deployer 相关的所有 ReplicaSet
kubectl get replicaset -n longhorn-system | grep longhorn-driver-deployer

# 查看 Deployment 的详细信息
kubectl describe deployment longhorn-driver-deployer -n longhorn-system

# 查看 Deployment 的更新历史
kubectl rollout history deployment/longhorn-driver-deployer -n longhorn-system
问题二:镜像无法拉取,所以我使用edit编辑配置文件的镜像源时候,这部分无法更改,每次wq保存后又变了回来。
原因:不是配置文件保存失败,而是 控制器(Controller)在守护其"期望状态"
第一步:找到真正的管理者
# 1. 查看是哪个控制器管理这个Pod(例如 `longhorn-driver-deployer-xxxxx`)
kubectl describe pod <pod名称> -n longhorn-system | grep -A5 -B5 "Controlled By"

# 常见结果会是:
# Controlled By:  Deployment/longhorn-driver-deployer
# 或类似 DaemonSet/longhorn-csi-plugin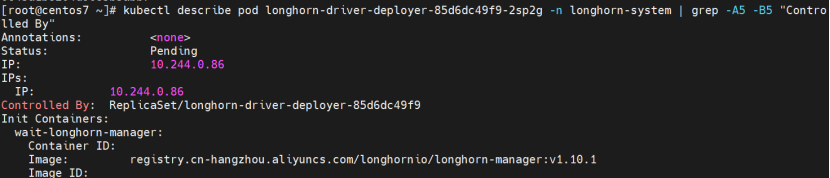
第二步:修改管理者的配置
找到控制器后,修改它的YAML,而不是Pod的。关键点在于,您要修改的是控制器中传递给Pod的 环境变量。
# 假设控制器是 Deployment/longhorn-driver-deployer
kubectl edit deployment longhorn-driver-deployer -n longhorn-system
解决方案(对我无效):
由于当前部署处于混乱状态,建议完全清理后重新安装。
步骤 1:完全卸载 Longhorn
# 1. 删除 Deployment(删除后会自动清理其下的 Pod)
kubectl delete deployment longhorn-driver-deployer -n longhorn-system

# 2. 清理所有残留的 Longhorn 资源
kubectl delete -f https://raw.githubusercontent.com/longhorn/longhorn/v1.6.1/deploy/longhorn.yaml 2>/dev/null || true

# 3. 强制删除命名空间(清理所有残留)
kubectl delete namespace longhorn-system --force --grace-period=0 2>/dev/null || true
2. 添加阿里云的 longhorn 镜像仓库
helm repo add longhorn https://charts.longhorn.io

# 如果阿里云源不行,尝试其他国内源
helm repo add longhorn-mirror https://charts.banana.sh/longhorn
3. 更新仓库索引
helm repo update4. 搜索确认 longhorn chart 可用
helm search repo longhorn5. 重新安装(简化命令,去掉有问题的 nodeSelector)
helm install longhorn longhorn/longhorn \
  --namespace longhorn-system \
  --create-namespace \
这通常是由于网络问题无法访问 Helm 仓库导致的。所以我放弃使用helm仓库安装。
方法三:修改 Chart 配置为国内镜像源后安装
最后使用更彻底的方法是下载 Chart 后修改其中的镜像地址:
# 1. 下载 Chart 包
wget https://github.com/longhorn/charts/releases/download/longhorn-1.6.1/longhorn-1.6.1.tgz
# 2. 解压
tar -zxvf longhorn-1.6.1.tgz
cd longhorn
# 3. 修改 values.yaml 中的镜像地址为国内源 替换镜像文件
vi values.yaml
# 4. 重新打包
cd ..
tar -czvf longhorn-1.6.1-cn.tgz longhorn/
# 5. 从修改后的包安装
helm install longhorn ./longhorn-1.6.1-cn.tgz \
--namespace longhorn-system \
--create-namespace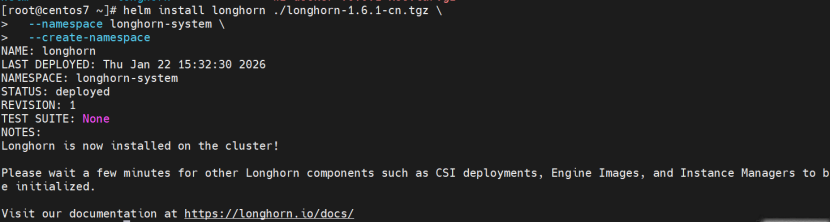 我改后的镜像文件部分如下:
image:
  longhorn:
    engine:
      # -- Repository for the Longhorn Engine image.
      repository: uhub.service.ucloud.cn/zzx_use/longhorn-engine
      # -- Specify Longhorn engine image tag
      tag: v1.6.1
    manager:
      # -- Repository for the Longhorn Manager image.
      repository: uhub.service.ucloud.cn/zzx_use/longhorn-manager
      # -- Specify Longhorn manager image tag
      tag: v1.6.1
    ui:
      # -- Repository for the Longhorn UI image.
      repository: uhub.service.ucloud.cn/zzx_use/longhorn-ui
      # -- Specify Longhorn ui image tag
      tag: v1.6.1
    instanceManager:
      # -- Repository for the Longhorn Instance Manager image.
      repository: uhub.service.ucloud.cn/zzx_use/longhorn-instance-manager
      # -- Specify Longhorn instance manager image tag
      tag: v1.6.1
    shareManager:
      # -- Repository for the Longhorn Share Manager image.
      repository: uhub.service.ucloud.cn/zzx_use/longhorn-share-manager
      # -- Specify Longhorn share manager image tag
      tag: v1.6.1
    backingImageManager:
      # -- Repository for the Backing Image Manager image. When unspecified, Longhorn uses the default value.
      repository: uhub.service.ucloud.cn/zzx_use/backing-image-manager
      # -- Specify Longhorn backing image manager image tag
      tag: v1.6.1
    supportBundleKit:
      # -- Repository for the Longhorn Support Bundle Manager image.
      repository: uhub.service.ucloud.cn/zzx_use/support-bundle-kit
      # -- Tag for the Longhorn Support Bundle Manager image.
      tag: v0.0.36
  csi:
    attacher:
      # -- Repository for the CSI attacher image. When unspecified, Longhorn uses the default value.
      repository: uhub.service.ucloud.cn/zzx_use/csi-attacher
      # -- Tag for the CSI attacher image. When unspecified, Longhorn uses the default value.
      tag: v4.4.2
    provisioner:
      # -- Repository for the CSI Provisioner image. When unspecified, Longhorn uses the default value.
      repository: uhub.service.ucloud.cn/zzx_use/csi-provisioner
      # -- Tag for the CSI Provisioner image. When unspecified, Longhorn uses the default value.
      tag: v3.6.2
    nodeDriverRegistrar:
      # -- Repository for the CSI Node Driver Registrar image. When unspecified, Longhorn uses the default value.
      repository: uhub.service.ucloud.cn/zzx_use/csi-node-driver-registrar
      # -- Tag for the CSI Node Driver Registrar image. When unspecified, Longhorn uses the default value.
      tag: v2.9.2
    resizer:
      # -- Repository for the CSI Resizer image. When unspecified, Longhorn uses the default value.
      repository: uhub.service.ucloud.cn/zzx_use/csi-resizer
      # -- Tag for the CSI Resizer image. When unspecified, Longhorn uses the default value.
      tag: v1.9.2
    snapshotter:
      # -- Repository for the CSI Snapshotter image. When unspecified, Longhorn uses the default value.
      repository: uhub.service.ucloud.cn/zzx_use/csi-snapshotter
      # -- Tag for the CSI Snapshotter image. When unspecified, Longhorn uses the default value.
      tag: v6.3.2
    livenessProbe:
      # -- Repository for the CSI liveness probe image. When unspecified, Longhorn uses the default value.
      repository: uhub.service.ucloud.cn/zzx_use/livenessprobe
      # -- Tag for the CSI liveness probe image. When unspecified, Longhorn uses the default value.
      tag: v2.12.0
  openshift:
    oauthProxy:
      # -- Repository for the OAuth Proxy image. This setting applies only to OpenShift users.
      repository: uhub.service.ucloud.cn/zzx_use/origin-oauth-proxy
      # -- Tag for the OAuth Proxy image. This setting applies only to OpenShift users. Specify OCP/OKD version 4.1 or later. The latest stable version is 4.14.
      tag: 4.14
  # -- Image pull policy that applies to all user-deployed Longhorn components, such as Longhorn Manager, Longhorn driver, and Longhorn UI.
pullPolicy: IfNotPresent也可使用镜像加速网站自行替换:https://console.ucloud.cn/
再次验证
# 1. 检查所有 Pod 状态 要多等一会拉取的镜像比较多
kubectl get pods -n longhorn-system -w

# 2. 查看 StorageClass
kubectl get storageclass | grep longhorn

# 3. 访问 Longhorn UI(改为 NodePort)
kubectl patch svc longhorn-frontend -n longhorn-system -p '{"spec":{"type":"NodePort"}}'
kubectl get svc -n longhorn-system longhorn-frontend

# 4. 创建测试 PVC
cat > test-pvc.yaml << EOF
apiVersion: v1
kind: PersistentVolumeClaim
metadata:
  name: test-longhorn-pvc
spec:
  accessModes:
    - ReadWriteOnce
  storageClassName: longhorn
  resources:
    requests:
      storage: 1Gi
EOF
kubectl apply -f test-pvc.yaml
kubectl get pvc test-longhorn-pvc
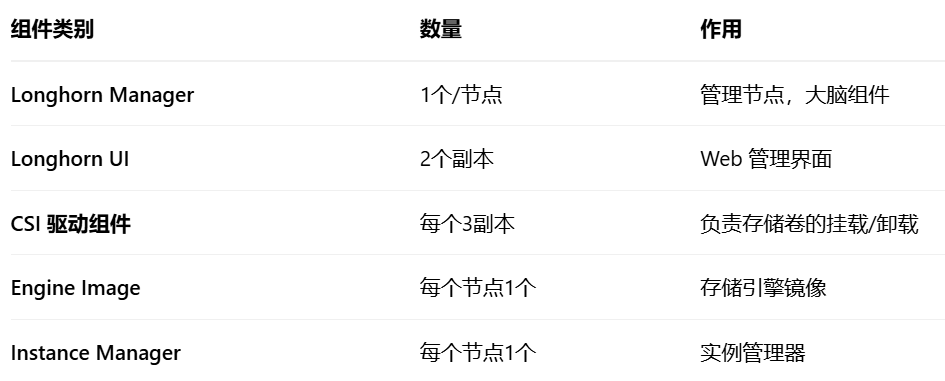
Longhorn 为了保证高可用性,CSI 组件会默认部署 3 个副本。但对于单节点集群来说,这确实有点"杀鸡用牛刀"。