文章目录
-
- 一、文档扫描与实时矫正
-
- [1.1 核心思路](#1.1 核心思路)
- [1.2 关键代码分析](#1.2 关键代码分析)
- 二、视频运动检测与跟踪
-
- [2.1 核心思路](#2.1 核心思路)
- [2.2 关键代码分析](#2.2 关键代码分析)
- 三、特定物体提取与分割
-
- [3.1 核心思路](#3.1 核心思路)
- [3.2 关键代码分析](#3.2 关键代码分析)
一、文档扫描与实时矫正
1.1 核心思路
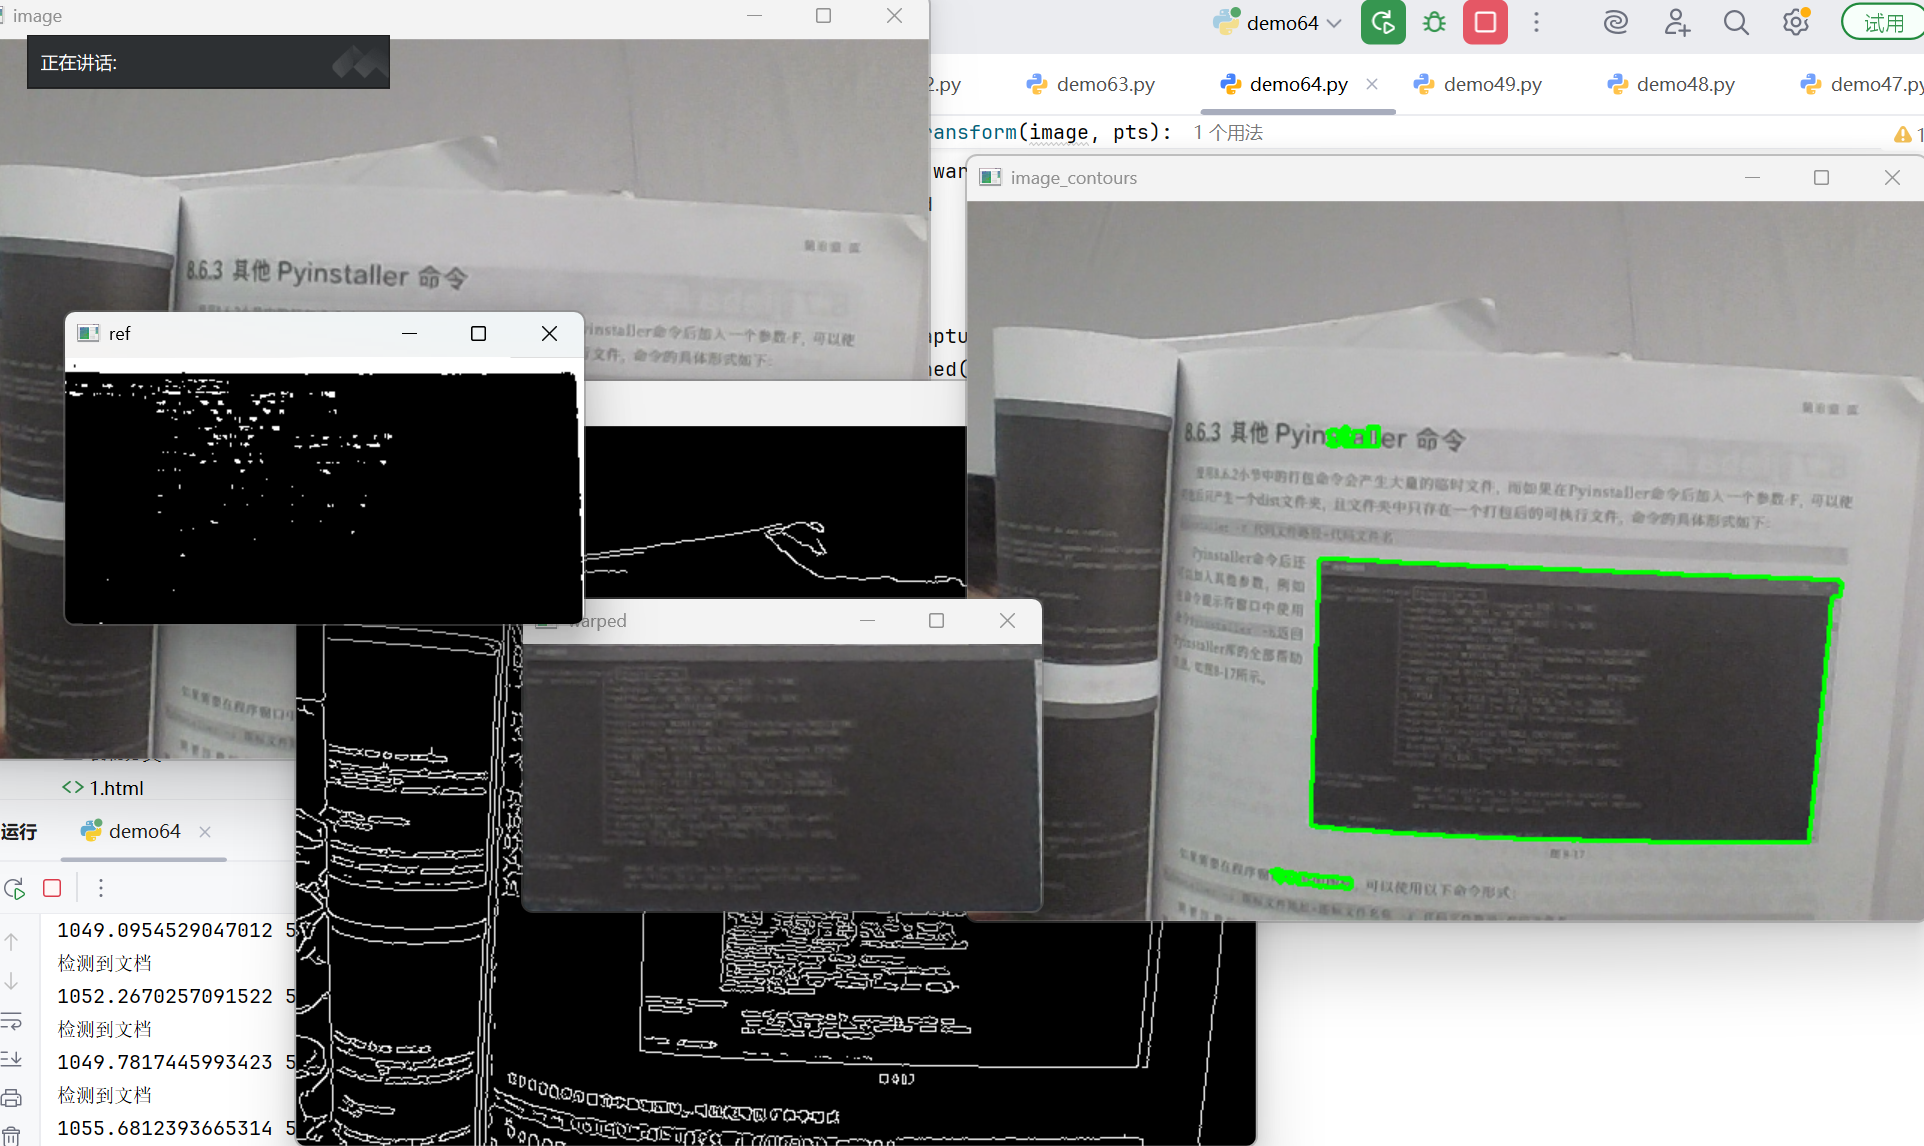
通过摄像头实时捕捉图像,自动检测文档轮廓,并进行透视变换将其矫正为正面视角。整个过程包含以下步骤:
- 图像采集与预处理
- 边缘检测
- 轮廓查找与筛选
- 透视变换矫正
- 二值化处理
1.2 关键代码分析
python
# 图像显示函数
def cv_show(name, img):
    """显示图像"""
    cv2.imshow(name, img)
    cv2.waitKey(1)  # 使用1ms等待,适合视频流
参数说明:
name:显示窗口的名称img:要显示的图像矩阵waitKey(1):等待1毫秒,适合视频流的连续显示
python
# 坐标点排序函数
def order_points(pts):
    # 一共4个坐标点
    rect = np.zeros((4, 2), dtype="float32")  # 用来存储排序之后的坐标位置
    # 按顺序找到对应坐标0123分别是:左上、右上、右下、左下
    s = pts.sum(axis=1)  # 对pts矩阵的每一行进行求和操作。(x+y)
    rect[0] = pts[np.argmin(s)]
    rect[2] = pts[np.argmax(s)]
    diff = np.diff(pts, axis=1)  # 对pts矩阵的每一行进行求差操作。(y-x)
    rect[1] = pts[np.argmin(diff)]
    rect[3] = pts[np.argmax(diff)]
    return rect
功能说明:
这个函数将检测到的四个角点按照"左上、右上、右下、左下"的顺序排列,为后续的透视变换提供正确的坐标顺序。
python
# 透视变换函数
def four_point_transform(image, pts):
    # 获取输入坐标点
    rect = order_points(pts)
    (tl, tr, br, bl) = rect
    # 计算输入的w和h值
    widthA = np.sqrt(((br[0] - bl[0]) ** 2) + ((br[1] - bl[1]) ** 2))
    widthB = np.sqrt(((tr[0] - tl[0]) ** 2) + ((tr[1] - tl[1]) ** 2))
    maxWidth = max(int(widthA), int(widthB))
    heightA = np.sqrt(((tr[0] - br[0]) ** 2) + ((tr[1] - br[1]) ** 2))
    heightB = np.sqrt(((tl[0] - bl[0]) ** 2) + ((tl[1] - bl[1]) ** 2))
    maxHeight = max(int(heightA), int(heightB))
    # 变换后对应坐标位置
    dst = np.array([
        [0, 0],
        [maxWidth - 1, 0],
        [maxWidth - 1, maxHeight - 1],
        [0, maxHeight - 1]
    ], dtype="float32")
    # 透视变换矩阵
    M = cv2.getPerspectiveTransform(rect, dst)
    warped = cv2.warpPerspective(image, M, (maxWidth, maxHeight))
    return warped
关键函数分析:
cv2.getPerspectiveTransform(rect, dst):计算透视变换矩阵rect:原始图像的四个点坐标dst:目标图像的四个点坐标
cv2.warpPerspective():应用透视变换image:输入图像M:变换矩阵(maxWidth, maxHeight):输出图像尺寸
python
# 图像预处理与轮廓检测
gray = cv2.cvtColor(image, cv2.COLOR_BGR2GRAY)  # 转换为灰度图
gray = cv2.GaussianBlur(gray, ksize=(5, 5), sigmaX=0)  # 高斯滤波
edged = cv2.Canny(gray, 15, 45)  # Canny边缘检测

# 轮廓检测
cnts = cv2.findContours(edged, cv2.RETR_EXTERNAL, cv2.CHAIN_APPROX_SIMPLE)[-2]
cnts = sorted(cnts, key=cv2.contourArea, reverse=True)[:3]
参数说明:
GaussianBlur():高斯模糊,减少噪声ksize=(5,5):高斯核大小sigmaX=0:X方向标准差
Canny():边缘检测15:低阈值45:高阈值
findContours():查找轮廓RETR_EXTERNAL:只检测外轮廓CHAIN_APPROX_SIMPLE:压缩轮廓点
python
# 轮廓近似与筛选
for c in cnts:
    peri = cv2.arcLength(c, True)  # 计算轮廓周长
    approx = cv2.approxPolyDP(c, 0.05 * peri, True)  # 轮廓近似
    area = cv2.contourArea(approx)
    if area > 40000 and len(approx) == 4:
        screenCnt = approx
        flag = 1
        break
函数分析:
arcLength():计算轮廓周长c:轮廓点集True:轮廓是否闭合
approxPolyDP():多边形近似0.05*peri:近似精度(周长百分比)True:轮廓是否闭合
二、视频运动检测与跟踪
2.1 核心思路
通过分析视频帧间的差异来检测运动物体,主要包含:
- 背景建模与前景提取
- 形态学处理去除噪声
- 轮廓检测与目标框选

2.2 关键代码分析
python
# 创建结构元素
kernel = cv2.getStructuringElement(cv2.MORPH_CROSS, ksize=(3, 3))
参数说明:
MORPH_CROSS:十字形结构元素ksize=(3,3):核大小为3×3
python
# 创建背景减除模型
fgbg = cv2.createBackgroundSubtractorMOG2()
功能说明:
创建混合高斯背景模型,用于分离前景(运动物体)和背景。
python
# 应用背景减除
fgmask = fgbg.apply(frame)  # 获取前景掩码
工作流程:
- 模型学习视频的背景
- 将当前帧与背景模型比较
- 提取出运动的前景物体
python
# 形态学开运算
fgmask_new = cv2.morphologyEx(fgmask, cv2.MORPH_OPEN, kernel)
功能说明:
MORPH_OPEN:开运算(先腐蚀后膨胀)- 作用:去除小的噪声点,平滑前景区域
python
# 轮廓查找与框选
contours = cv2.findContours(fgmask_new, cv2.RETR_EXTERNAL, cv2.CHAIN_APPROX_SIMPLE)[-2]
for c in contours:
    perimeter = cv2.arcLength(c, True)
    if perimeter > 188:
        x, y, w, h = cv2.boundingRect(c)
        frame_rect = cv2.rectangle(frame, (x, y), (x + w, y + h), (0, 255, 0), 2)
函数分析:
boundingRect():计算轮廓的外接矩形rectangle():绘制矩形框(0,255,0):绿色(BGR格式)2:线宽
三、特定物体提取与分割
3.1 核心思路
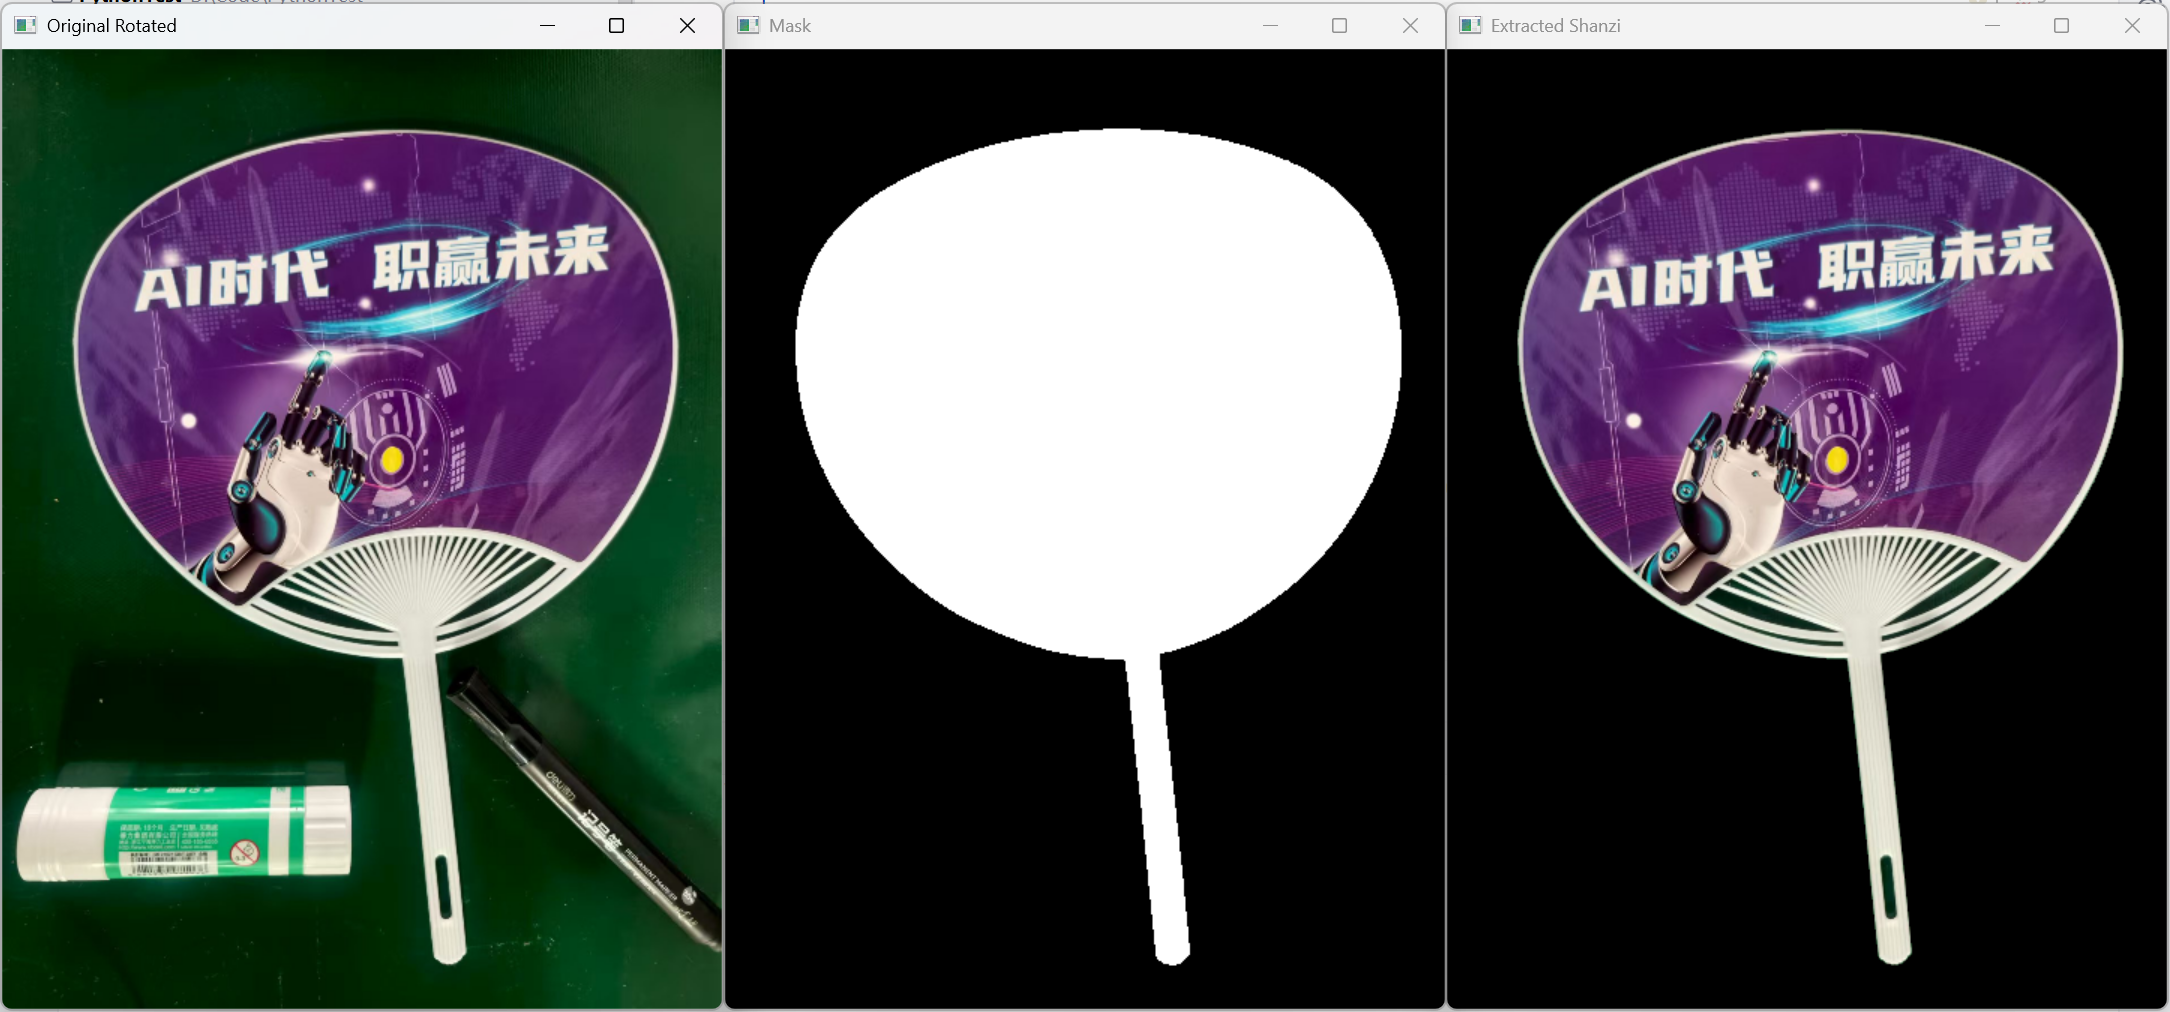
从图像中提取特定物体(扇子),主要步骤:
- 图像预处理(缩放、旋转)
- 边缘检测
- 轮廓查找与掩码生成
- 物体提取
3.2 关键代码分析
python
# 图像尺寸调整与旋转
img_resized = cv2.resize(img, (640, 480))
img_rotated = cv2.rotate(img_resized, cv2.ROTATE_90_COUNTERCLOCKWISE)
参数说明:
resize():调整图像尺寸ROTATE_90_COUNTERCLOCKWISE:逆时针旋转90度
python
# 边缘检测
gray = cv2.cvtColor(img_rotated, cv2.COLOR_BGR2GRAY)
edges = cv2.Canny(gray, threshold1=50, threshold2=150)
Canny参数:
threshold1=50:低阈值,低于此值的边缘被丢弃threshold2=150:高阈值,高于此值的边缘被保留
python
# 轮廓查找与掩码生成
contours = cv2.findContours(edges, cv2.RETR_EXTERNAL, cv2.CHAIN_APPROX_SIMPLE)[-2]
mask = np.zeros_like(gray)

if contours:
    contour_areas = [cv2.contourArea(cnt) for cnt in contours]
    max_area_idx = np.argmax(contour_areas)
    max_contour = contours[max_area_idx]

    cv2.drawContours(mask, [max_contour], -1, (255), thickness=cv2.FILLED)

    # 形态学闭运算
    kernel = np.ones((5, 5), np.uint8)
    mask = cv2.morphologyEx(mask, cv2.MORPH_CLOSE, kernel)
功能说明:
- 查找所有轮廓
- 选择面积最大的轮廓(假设为扇子)
- 绘制填充轮廓作为掩码
- 闭运算填充空洞
python
# 物体提取
mask_3ch = cv2.cvtColor(mask, cv2.COLOR_GRAY2BGR)
extracted = cv2.bitwise_and(img_rotated, mask_3ch)
位运算:
bitwise_and():按位与操作- 作用:使用掩码提取原图中的对应区域