
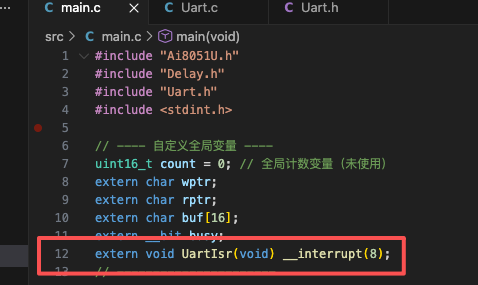
main.c
cpp
#include "Ai8051U.h"
#include "Delay.h"
#include "Uart.h"
#include <stdint.h>

// ---- 自定义全局变量 ----
uint16_t count = 0; // 全局计数变量(未使用)
extern char wptr;
extern char rptr;
extern char buf[16];
extern __bit busy;
extern void UartIsr(void) __interrupt(8);
// ----------------------

void main(void)
{
    CKCON = 0;
    P0M0 = 0x00; P0M1 = 0x00; // 设置P0为准双向口
    P1M0 = 0x00; P1M1 = 0x00; // 设置P1为准双向口
    P2M0 = 0x00; P2M1 = 0x00; // 设置P2为准双向口
    P3M0 = 0x00; P3M1 = 0x00; // 设置P3为准双向口
    P4M0 = 0x00; P4M1 = 0x00; // 设置P4为准双向口
    P5M0 = 0x00; P5M1 = 0x00; // 设置P5为准双向口

    Uart_Init(115200UL); // 初始化UART,波特率115200

    UartSendString("FCXi!\n");

    while (1)
    {
        if(rptr != wptr)
        {
            UartSend(buf[rptr++]);
            rptr &= 0x0F;
            UartSendString("\r\n");
        }
        // UartSendString("KCXi!\r\n");
        // delay_ms(1000);
    }
}
Uart.c
cpp
#include "Uart.h"

__bit busy;
char wptr;
char rptr;
char buf[16];

// 定时器2 串口2
// 默认管脚 P12(RxD) P13(TxD)
void Uart_Init(uint32_t baudrate)
{
    EA = 0;         // 关闭总中断
    P_SW2 |= EAXFR; // 使能扩展寄存器访问
    AUXR |= T2x12;  // 定时器2为1T模式
    S2CON = 0x50;
    T2L = (65536 - (FOSC / baudrate + 2) / 4) & 0xFF;
    T2H = (65536 - (FOSC / baudrate + 2) / 4) >> 8;
    AUXR |= T2R; // 启动定时器2
    wptr = 0;
    rptr = 0;
    busy = 0;

    // 管脚配置
    // P_SW2 |= S2_S; // 选择为P42(RxD) P43(TxD)
    P_SW2 &= ~S2_S; // 选择为P12(RxD) P13(TxD). --- 默认配置(不写也可) ---

    // 明确使能串口2中断(关键:补充中断使能)
    IE2 |= 0x01; // 使能串口2中断(根据芯片手册确认位定义)
    EA = 1;      // 开启总中断
}

void UartIsr(void) __interrupt(8)
{
    if (S2CON & S2TI)
    {
        // S2TI = 0;
        S2CON &= ~S2TI; // 取值  0x02->1111_1101
        busy = 0;
    }
    if (S2CON & S2RI)
    {
        S2CON &= ~S2RI; // 取值  0x01->1111_1110
        char recv_char = S2BUF;
        // 缓冲区保护:只有wptr和rptr不同时,才写入(避免覆盖未读数据)
        char next_wptr = (wptr + 1) & 0x0F;
        if (next_wptr != rptr)
        {
            buf[wptr] = recv_char;
            wptr = next_wptr;
        }
    }
}

void UartSend(char c)
{
    while (busy)
        ;
    busy = 1;
    S2BUF = c;
}

void UartSendString(char *str)
{
    while (*str)
    {
        UartSend(*str++);
    }
}
效果!
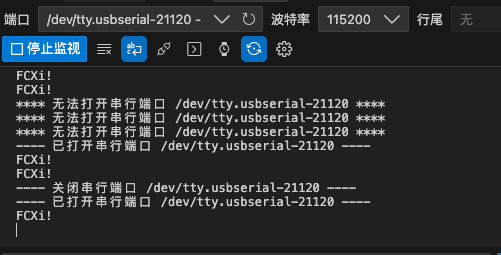
注意事项!
中断函数在外部文件写后需要在 main函数主文件中 继承函数名!
1,extern void 中断函数名(void)__interrupt(x);
2,或者在响应头文件声明!
