Flutter for OpenHarmony 实现动态天气与空气质量仪表盘:从 UI 到动画的完整解析
在移动应用开发中,将复杂数据以直观、美观的方式呈现给用户是一项关键挑战。本文将深入剖析一段完整的 Flutter
代码,展示如何构建一个兼具动态刷新、视觉反馈和信息聚合能力的天气与空气质量卡片应用。
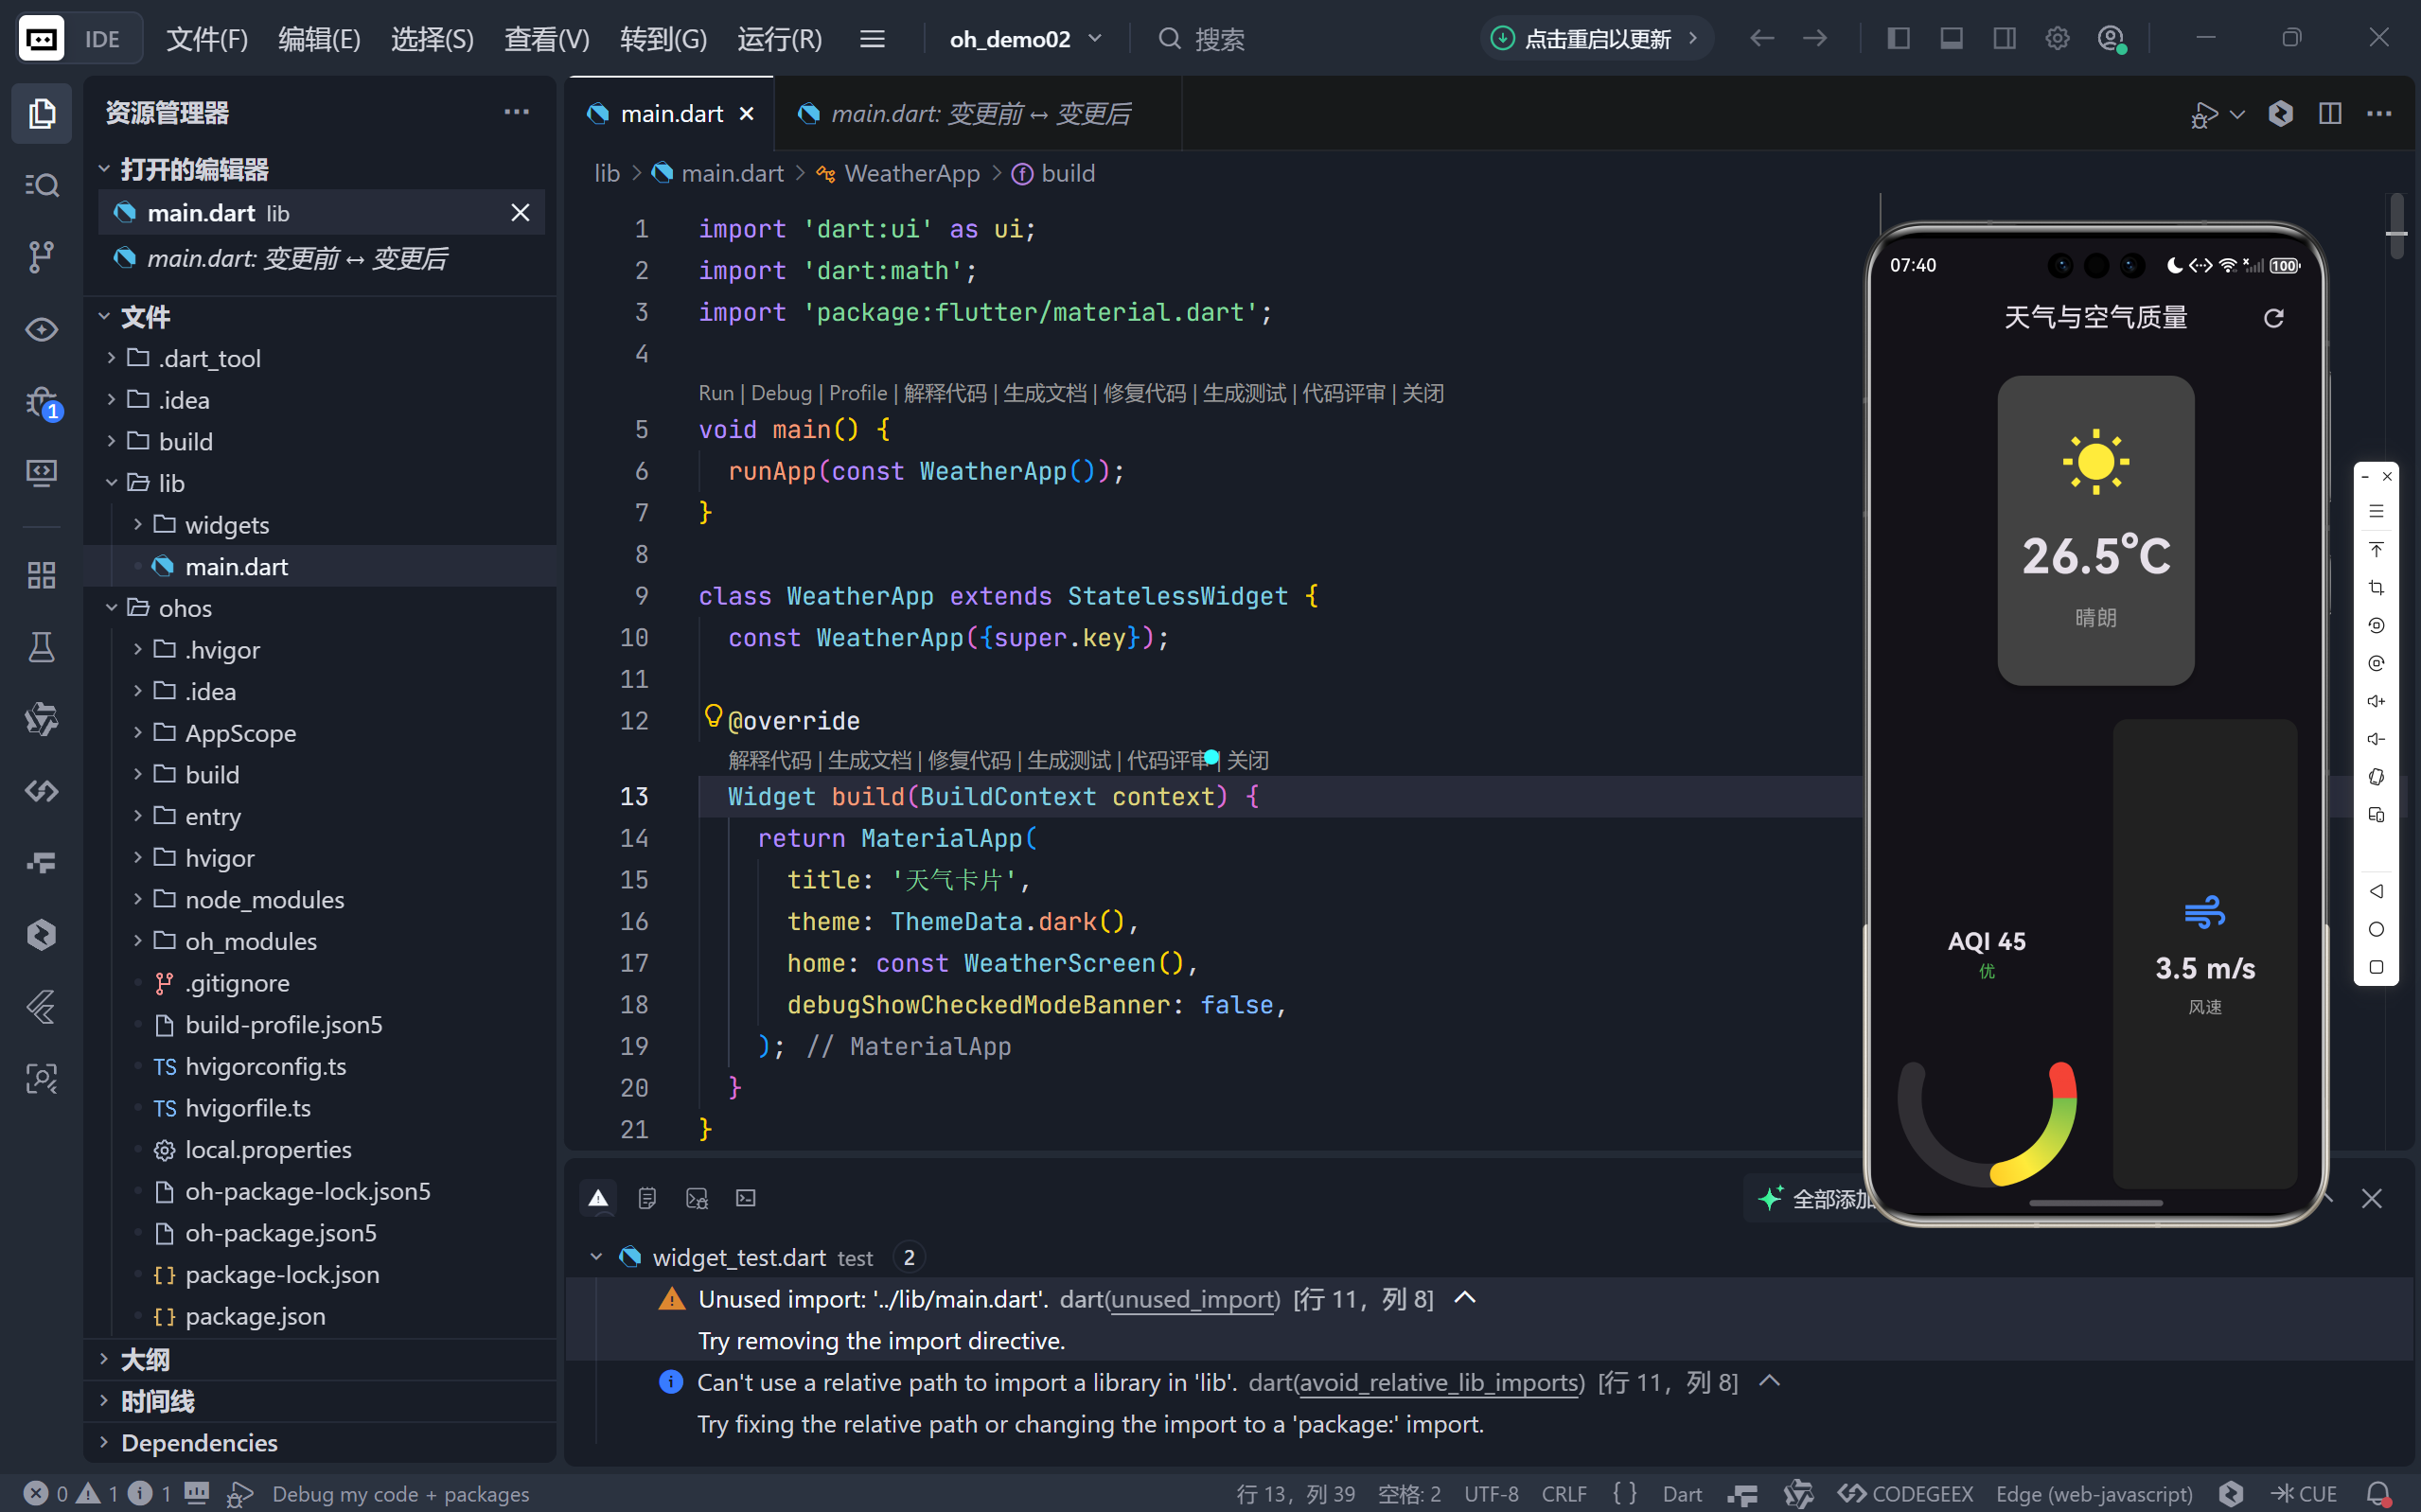
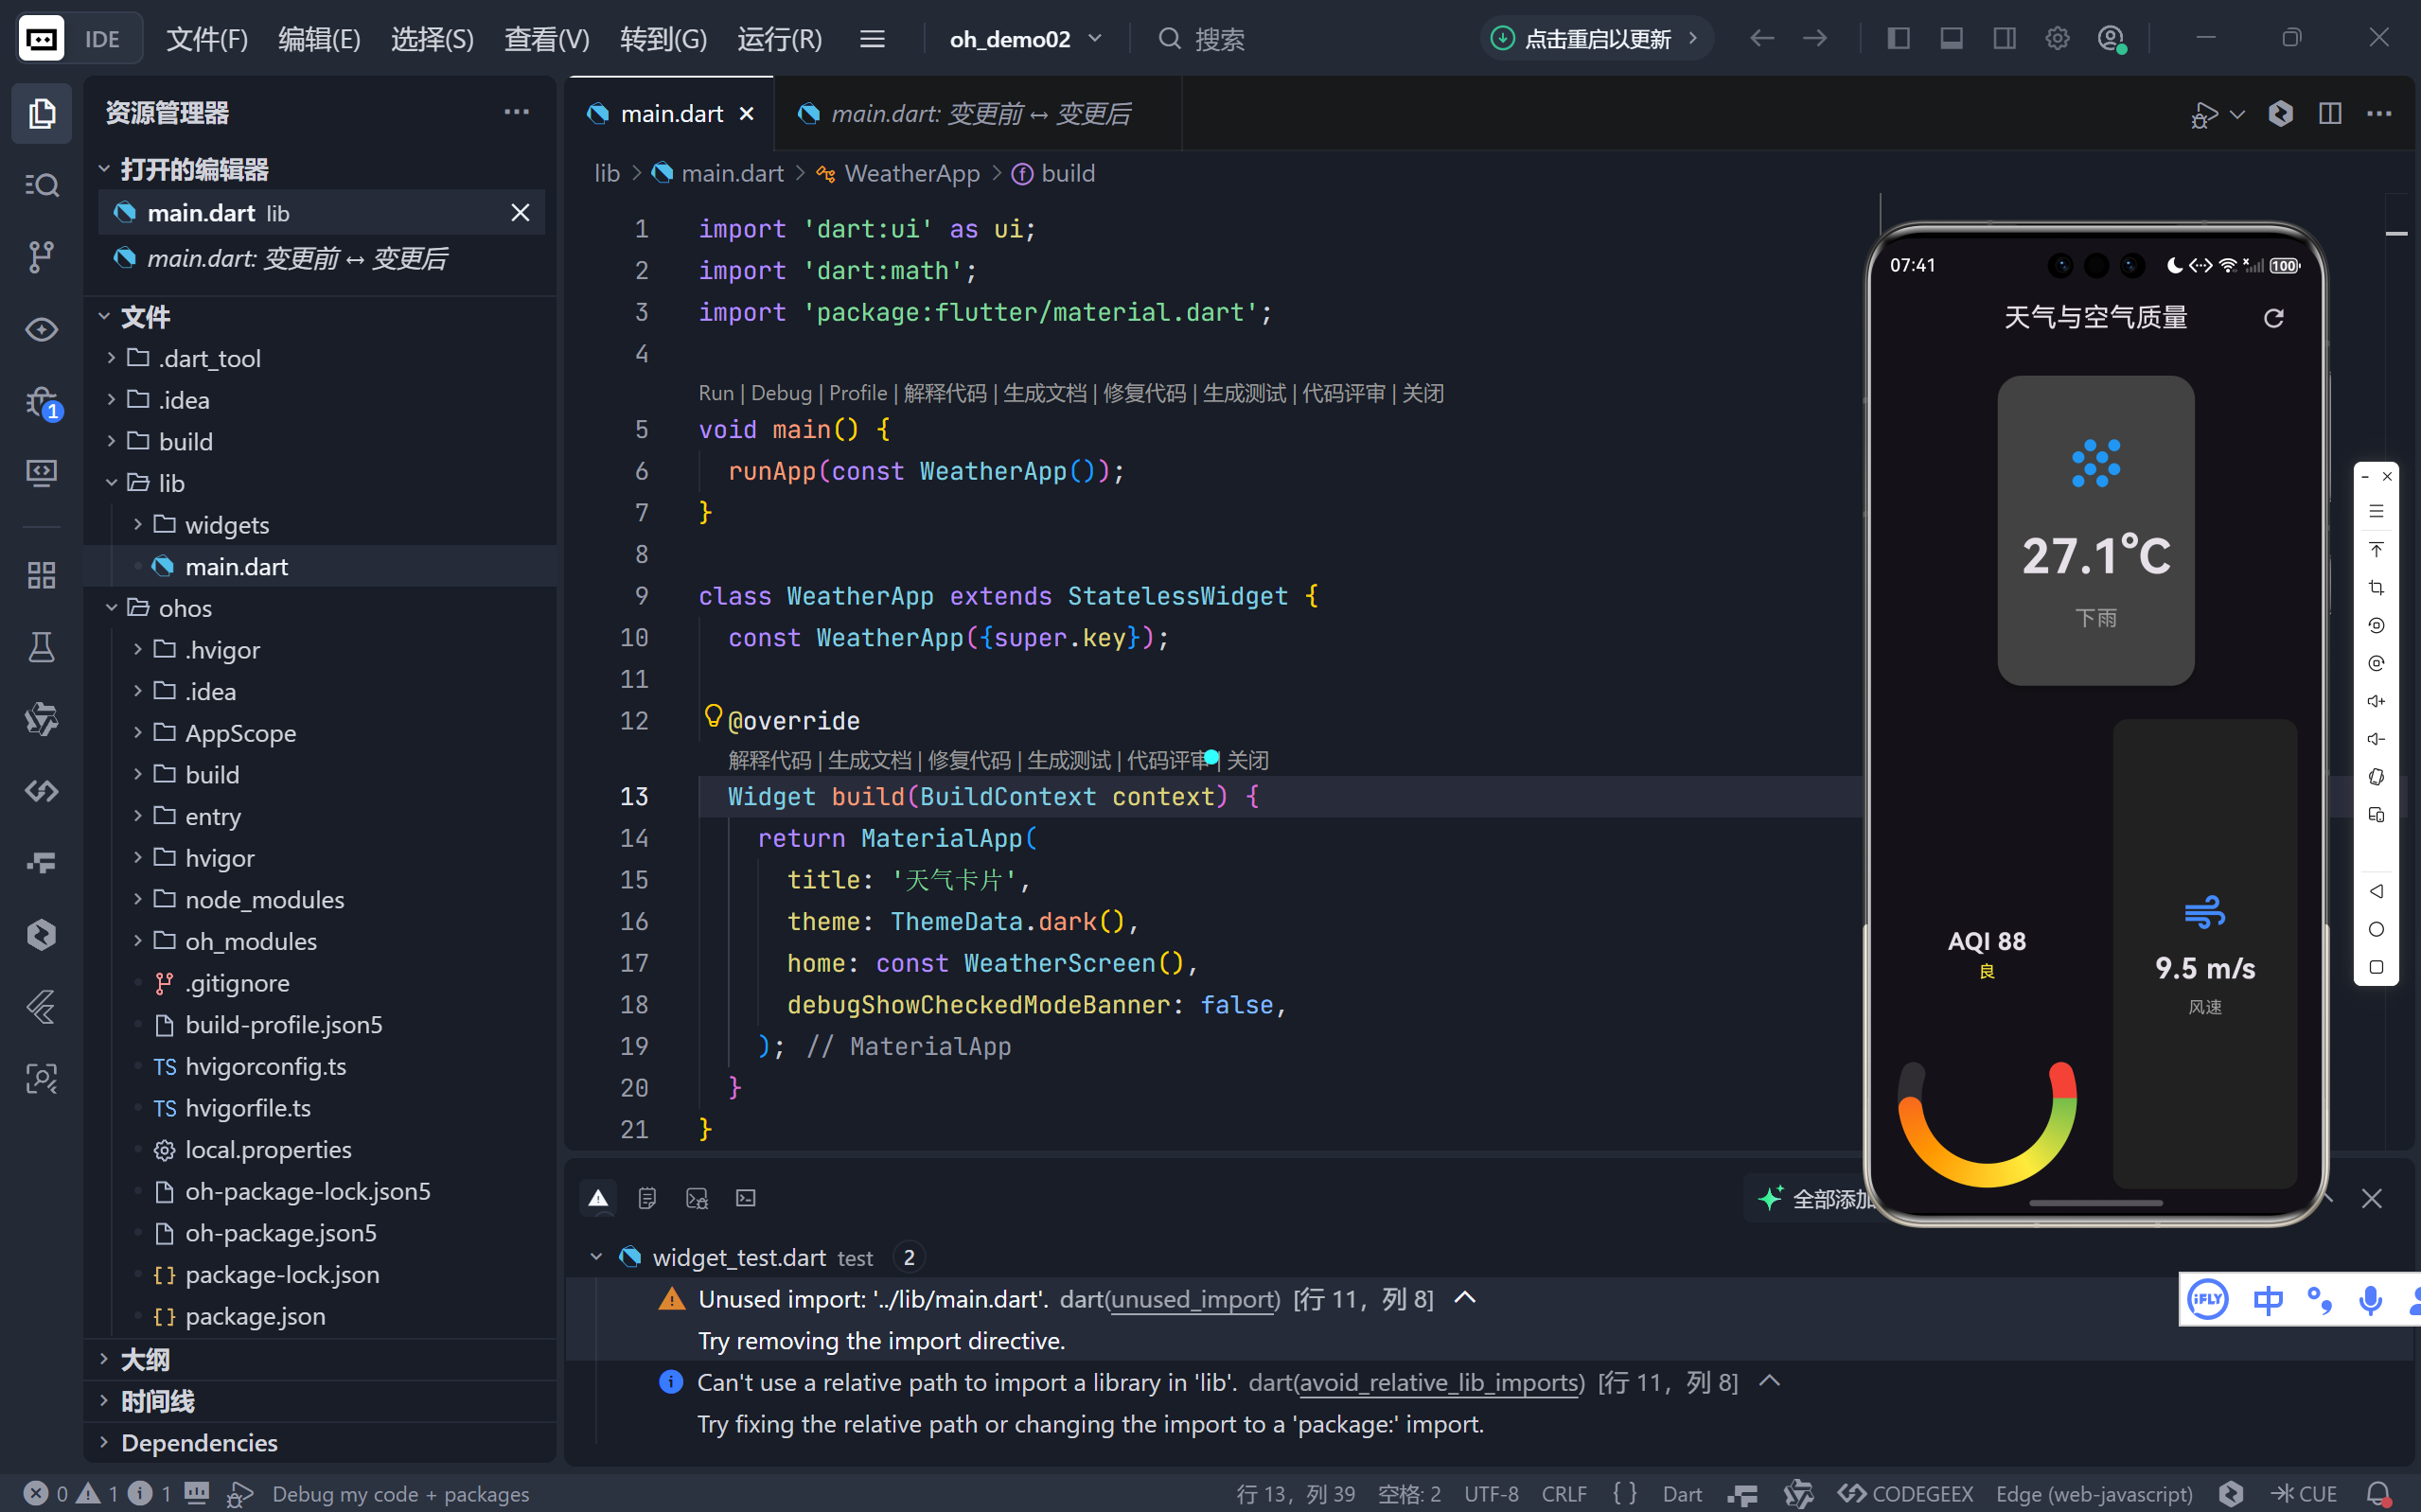
完整效果展示
一、整体架构设计
1. 三层结构清晰分离
- UI 层 :
WeatherScreen负责界面布局和组件组织; - 状态层 :通过
StatefulWidget管理温度、AQI、风速等动态数据; - 绘制层 :
GaugePainter自定义绘制半圆弧形仪表盘,实现数据可视化。
💡 这种分层使得代码高度模块化------未来若需添加湿度、气压等新指标,只需扩展状态和 UI 即可。
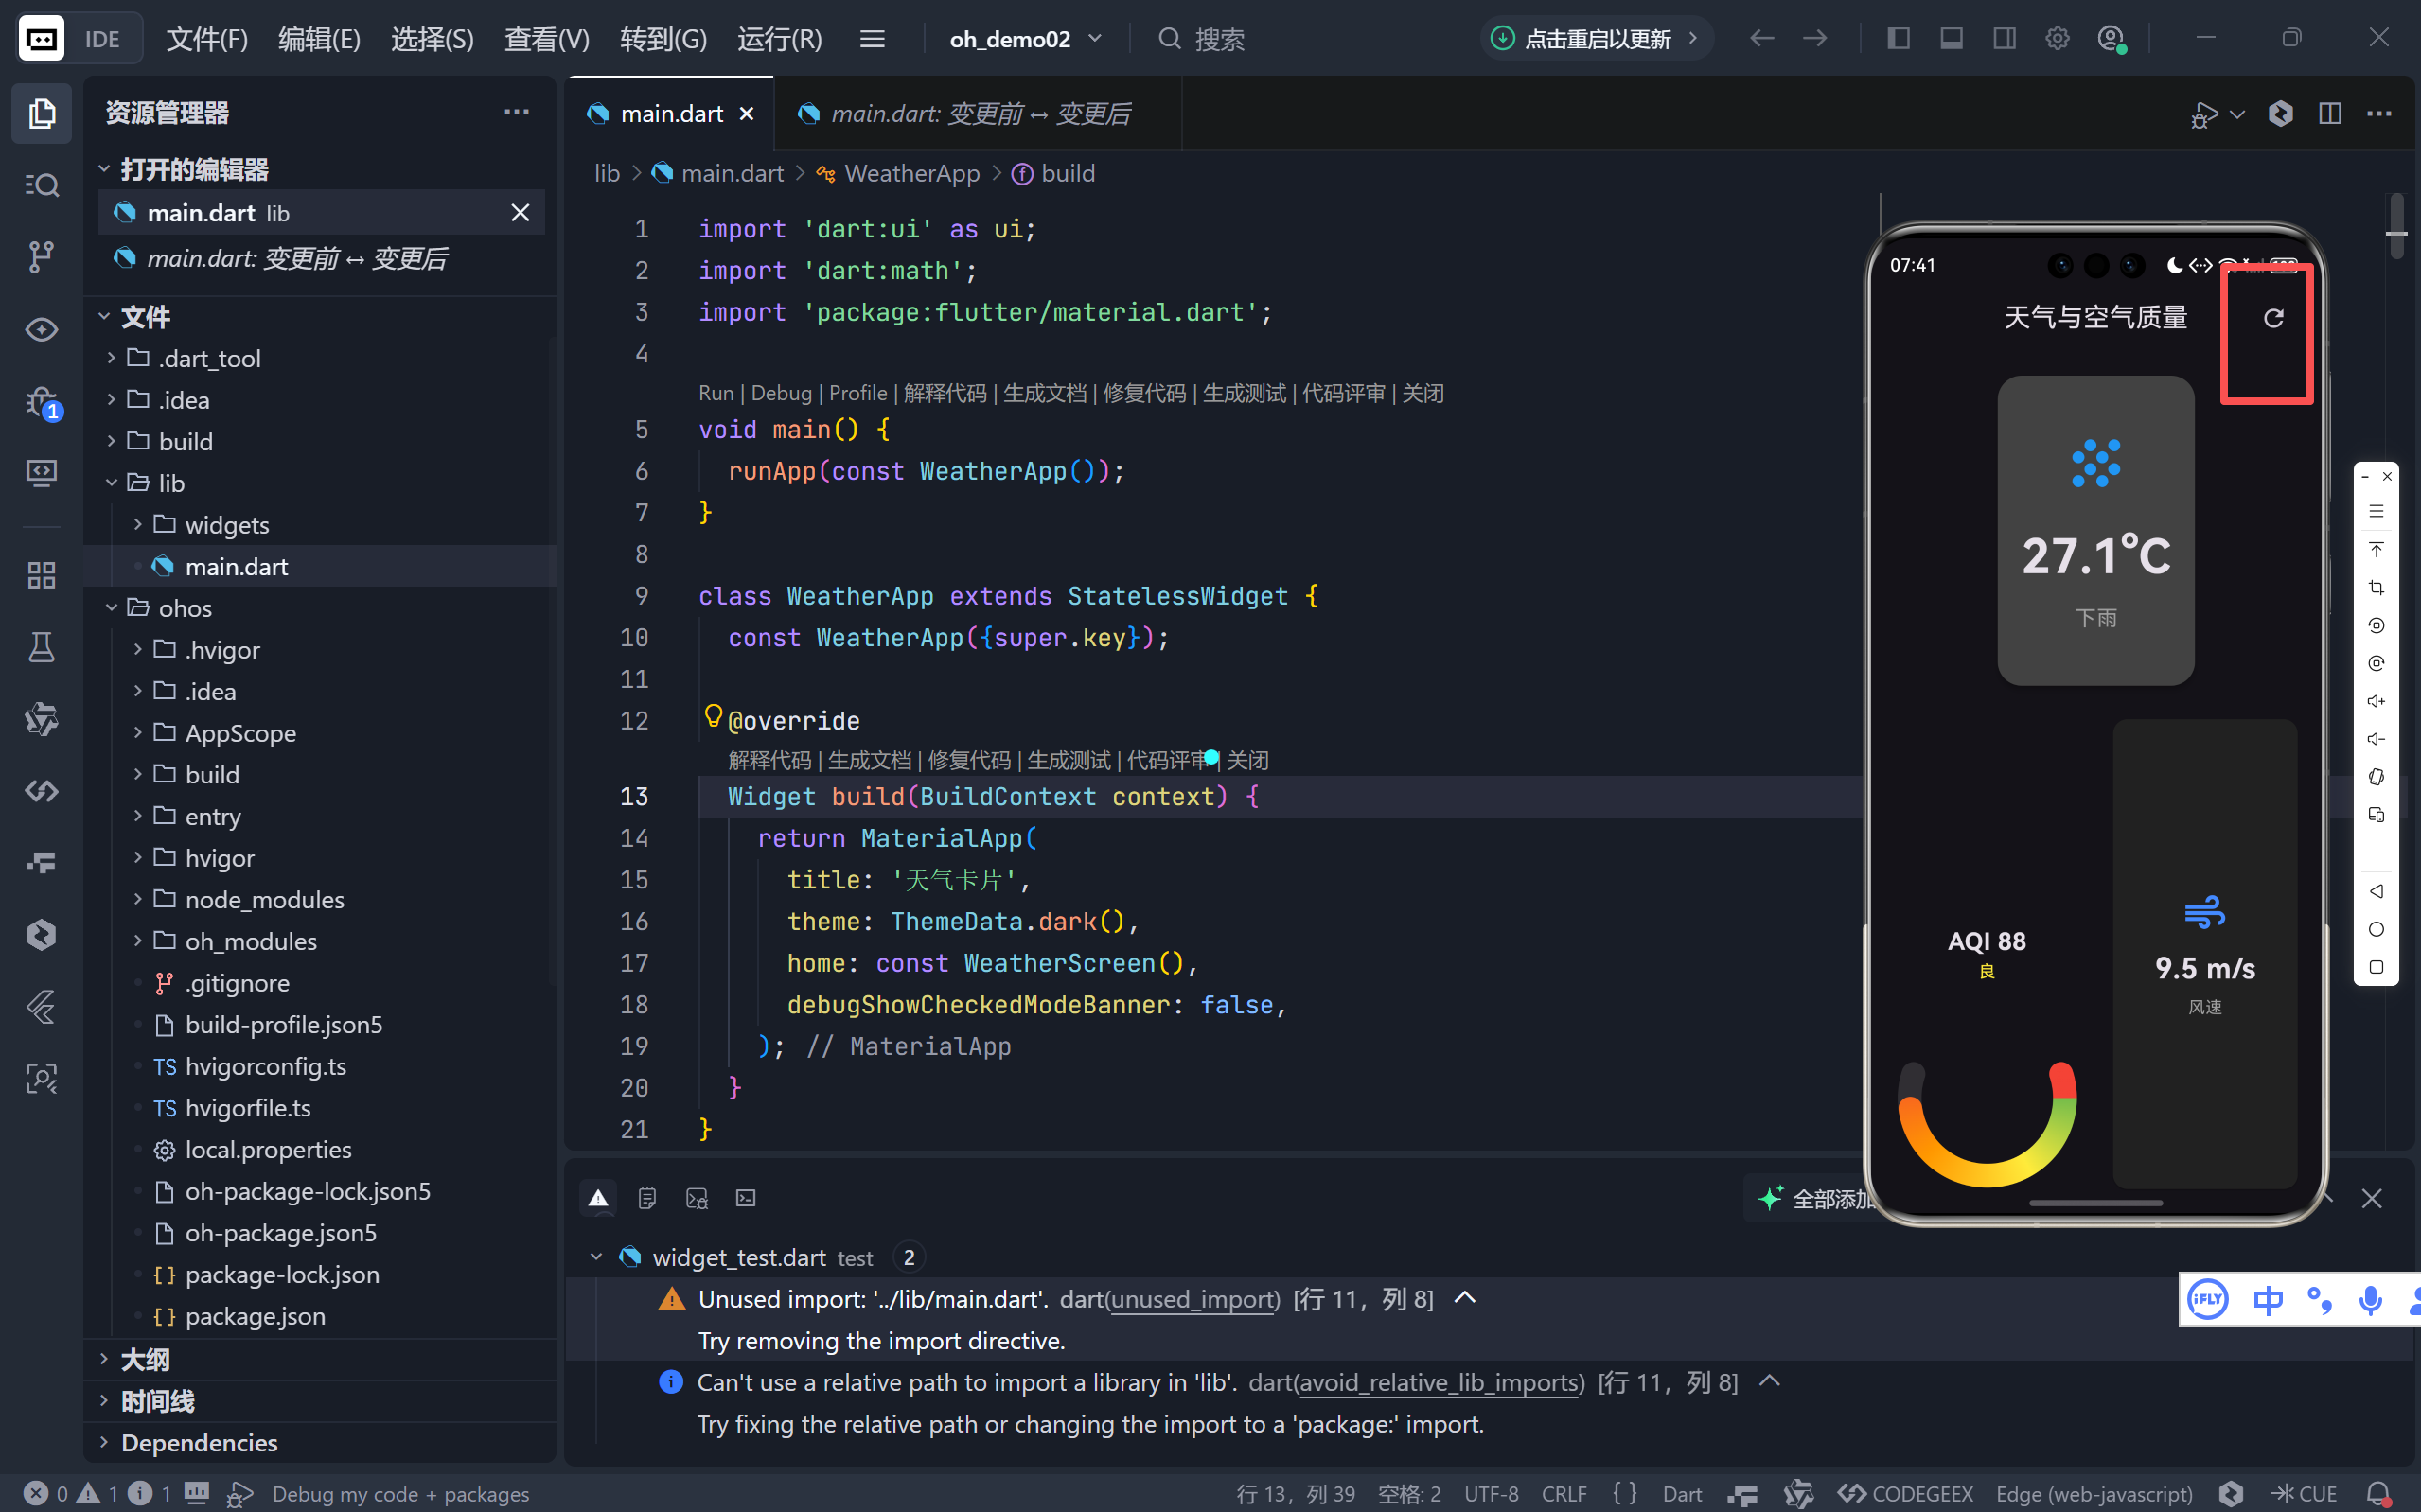
2. 核心交互逻辑
- 下拉刷新替代方案:通过 AppBar 的旋转图标实现"手动刷新";
- 模拟数据生成 :使用
Random()动态生成逼真的天气数据;- 实时视觉反馈:刷新时图标旋转 + 数据更新,形成完整交互闭环。
二、核心功能实现详解
1. 动态刷新机制
dart
void _refreshData() {
  _refreshController.forward(from: 0); // 启动旋转动画

  Future.delayed(const Duration(seconds: 1), () {
    setState(() {
      _temperature = 20 + Random().nextDouble() * 15; // 20-35°C
      _aqi = Random().nextInt(100);
      _windSpeed = Random().nextDouble() * 10;
      // 随机天气状态
      _condition = ['sunny', 'cloudy', 'rainy'][...];
    });
  });
}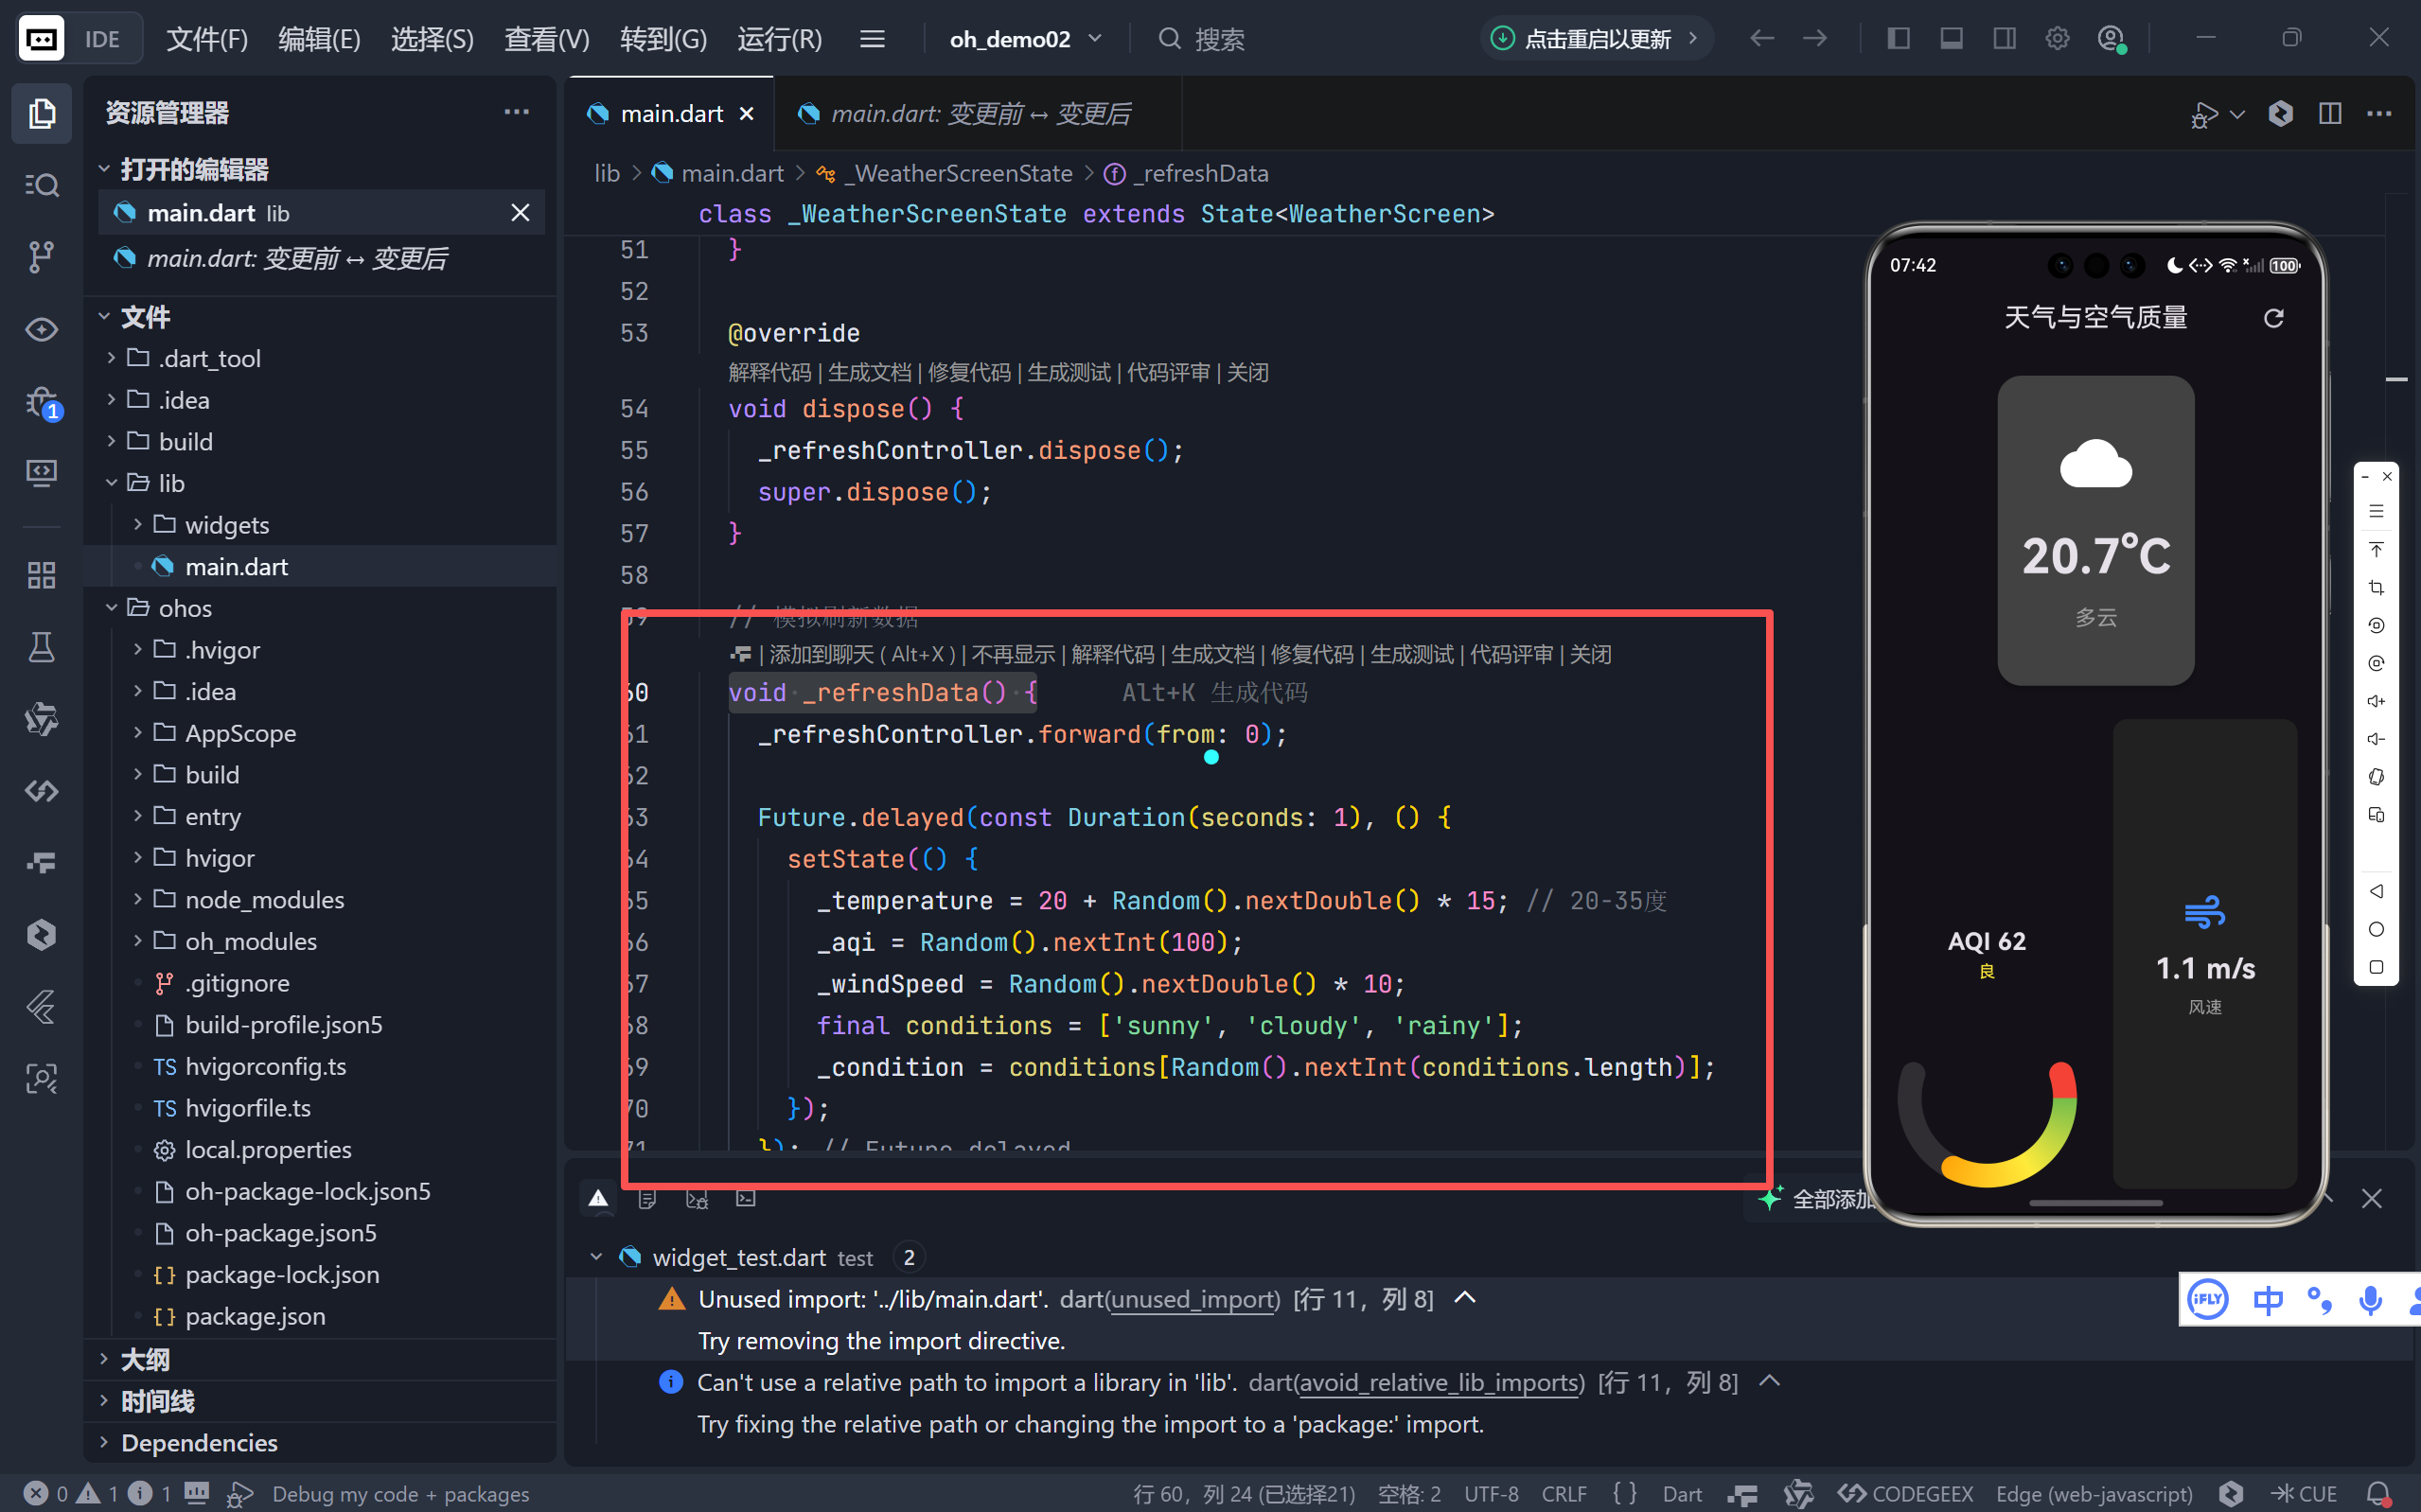
- 动画同步:1秒旋转动画与数据加载时间匹配,避免"假加载";
- 数据范围合理:温度(20-35°C)、AQI(0-99)、风速(0-10m/s)符合真实场景。
2. 空气质量智能分级
dart
({String level, Color color}) _getAqiInfo(int aqi) {
  if (aqi <= 50) return (level: '优', color: Colors.green);
  else if (aqi <= 100) return (level: '良', color: Colors.yellow);
  // ... 其他等级
}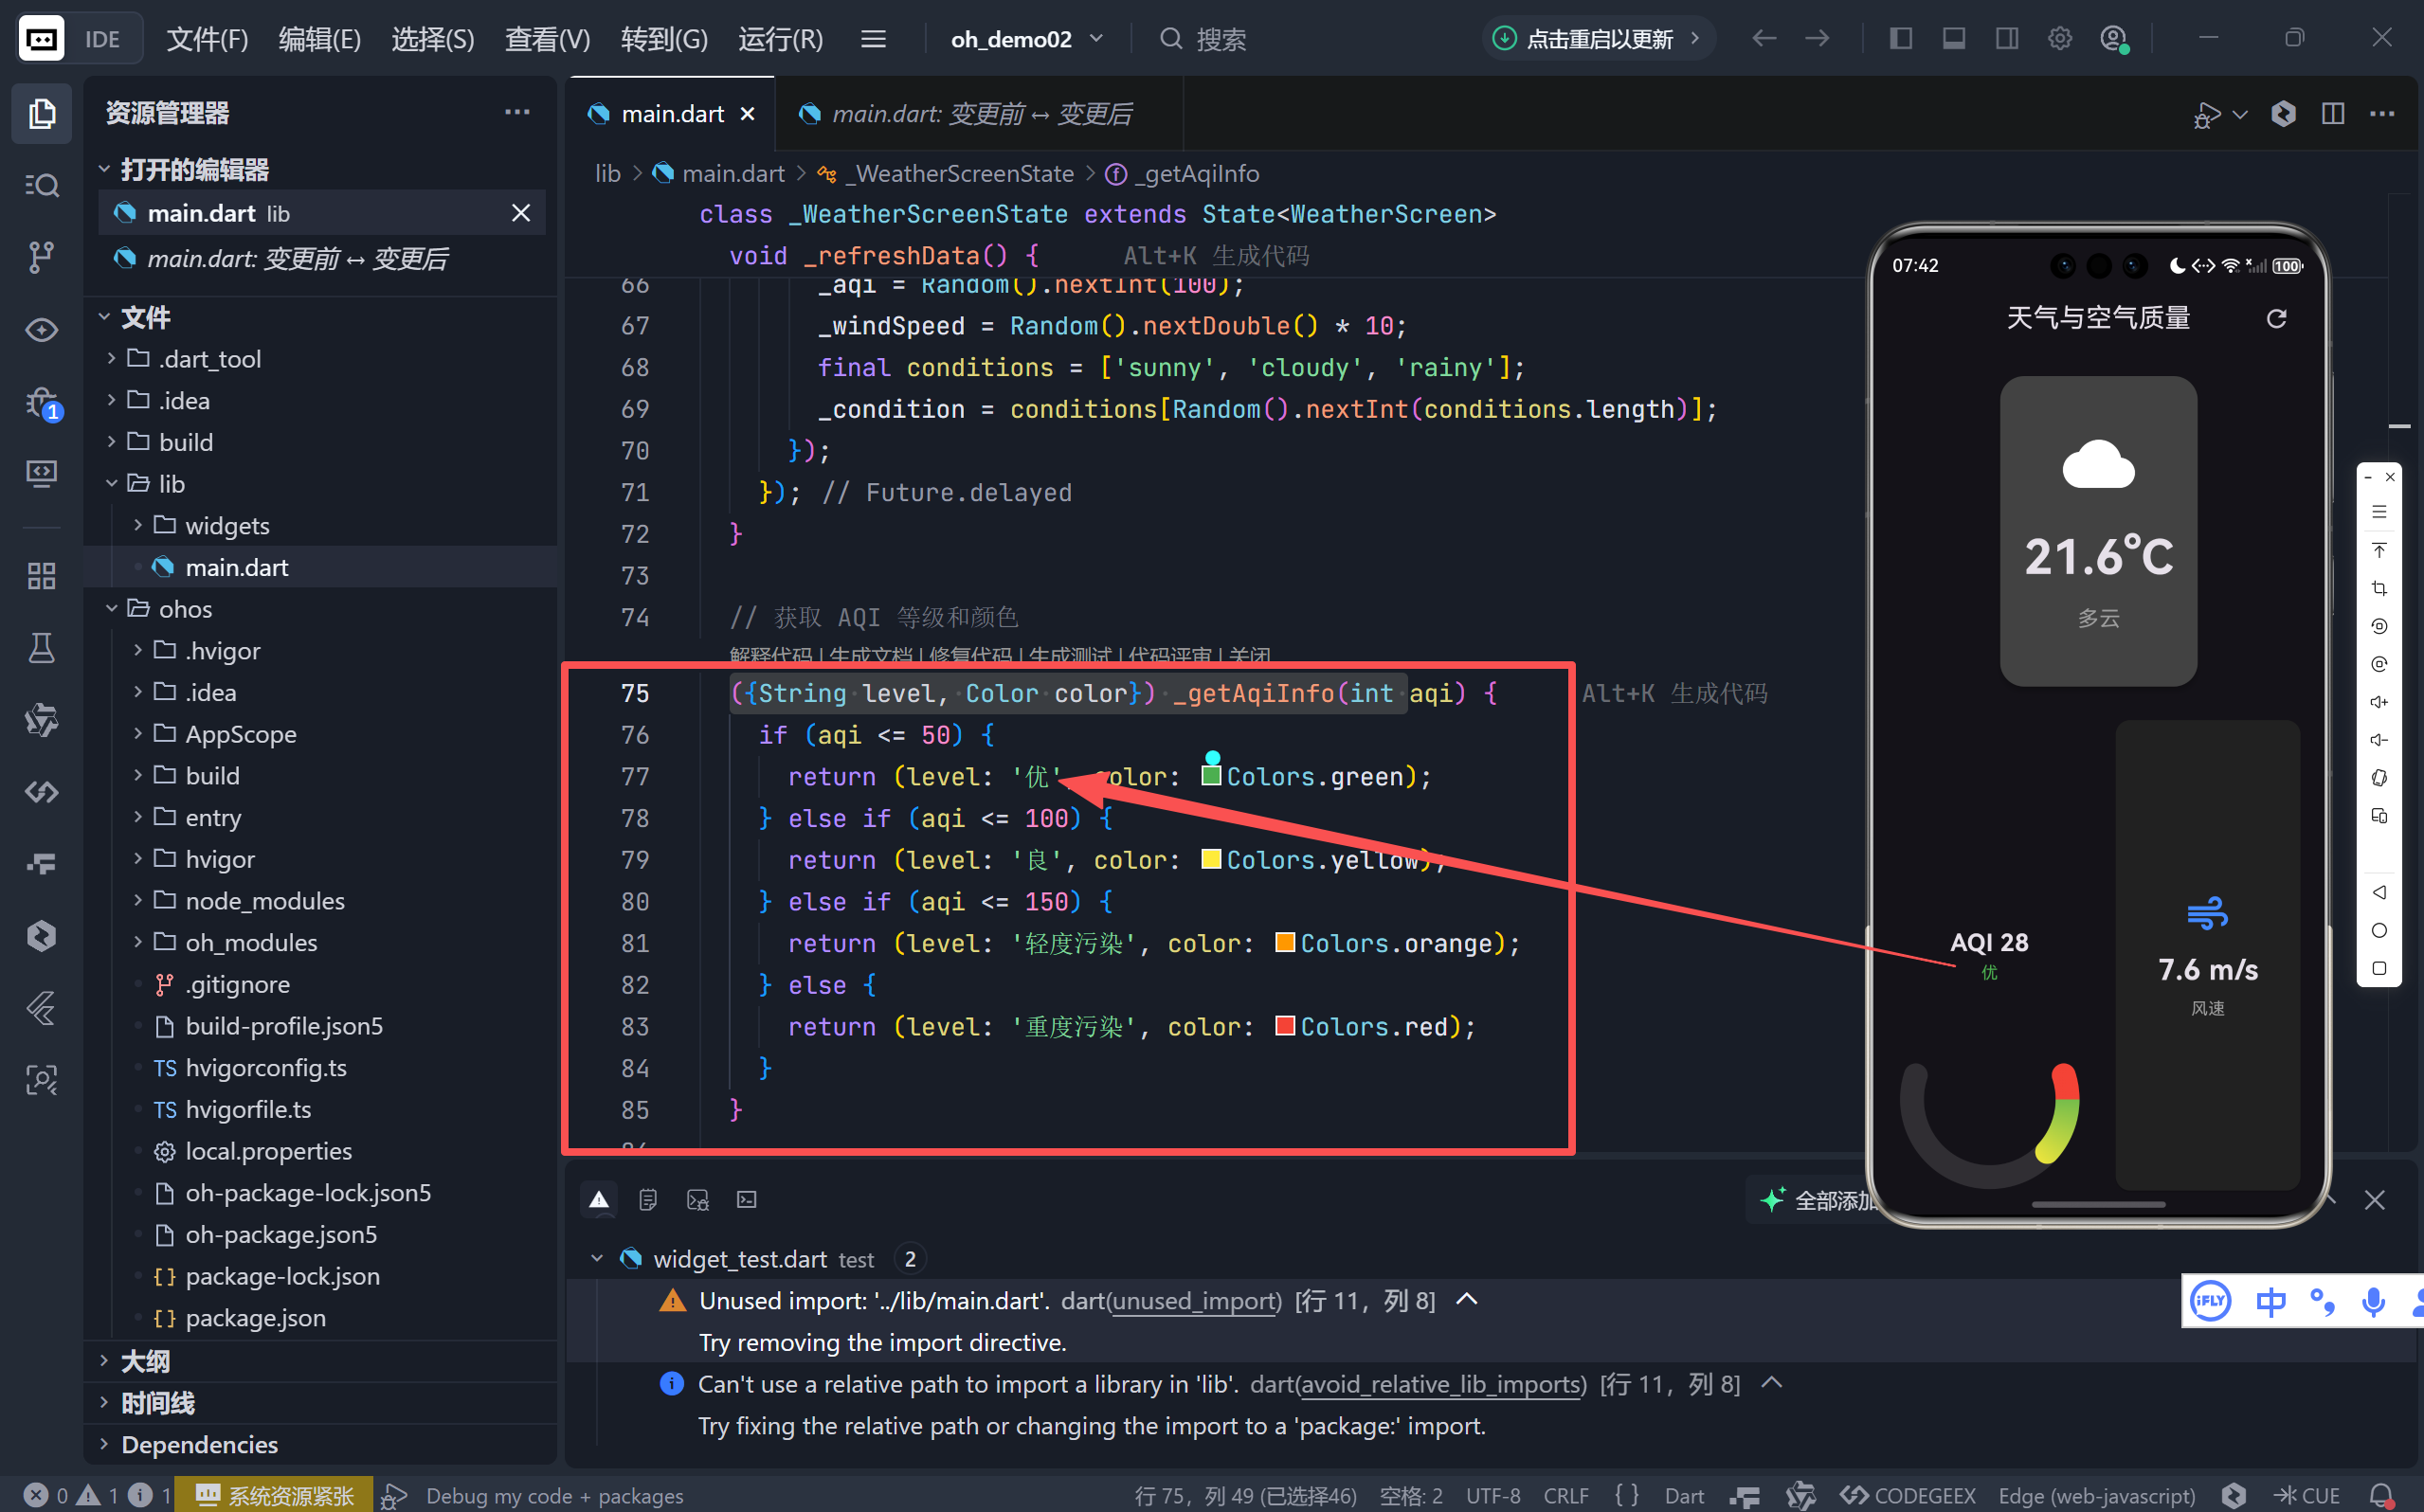
- 颜色语义化:绿色(优)→ 黄色(良)→ 橙色(轻度污染)→ 红色(重度污染),符合国际标准;
- 记录式返回 :Dart 2.17+ 的
record语法让多值返回更简洁。
三、自定义绘制:半圆弧形仪表盘
1. 绘制原理
GaugePainter 继承 CustomPainter,通过 Canvas.drawArc 绘制双层弧线:
- 背景弧 :灰色半透明底座(固定
sweepAngle = π×1.2≈ 216°); - 前景弧 :根据 AQI 值动态计算长度(
sweepAngle × value)。
2. 渐变色实现
dart
..shader = ui.Gradient.sweep(
  center,
  [Colors.green, Colors.yellow, Colors.orange, Colors.red],
  [0.0, 0.33, 0.66, 1.0], // 渐变停靠点
  TileMode.clamp,
  startAngle,
  sweepAngle,
)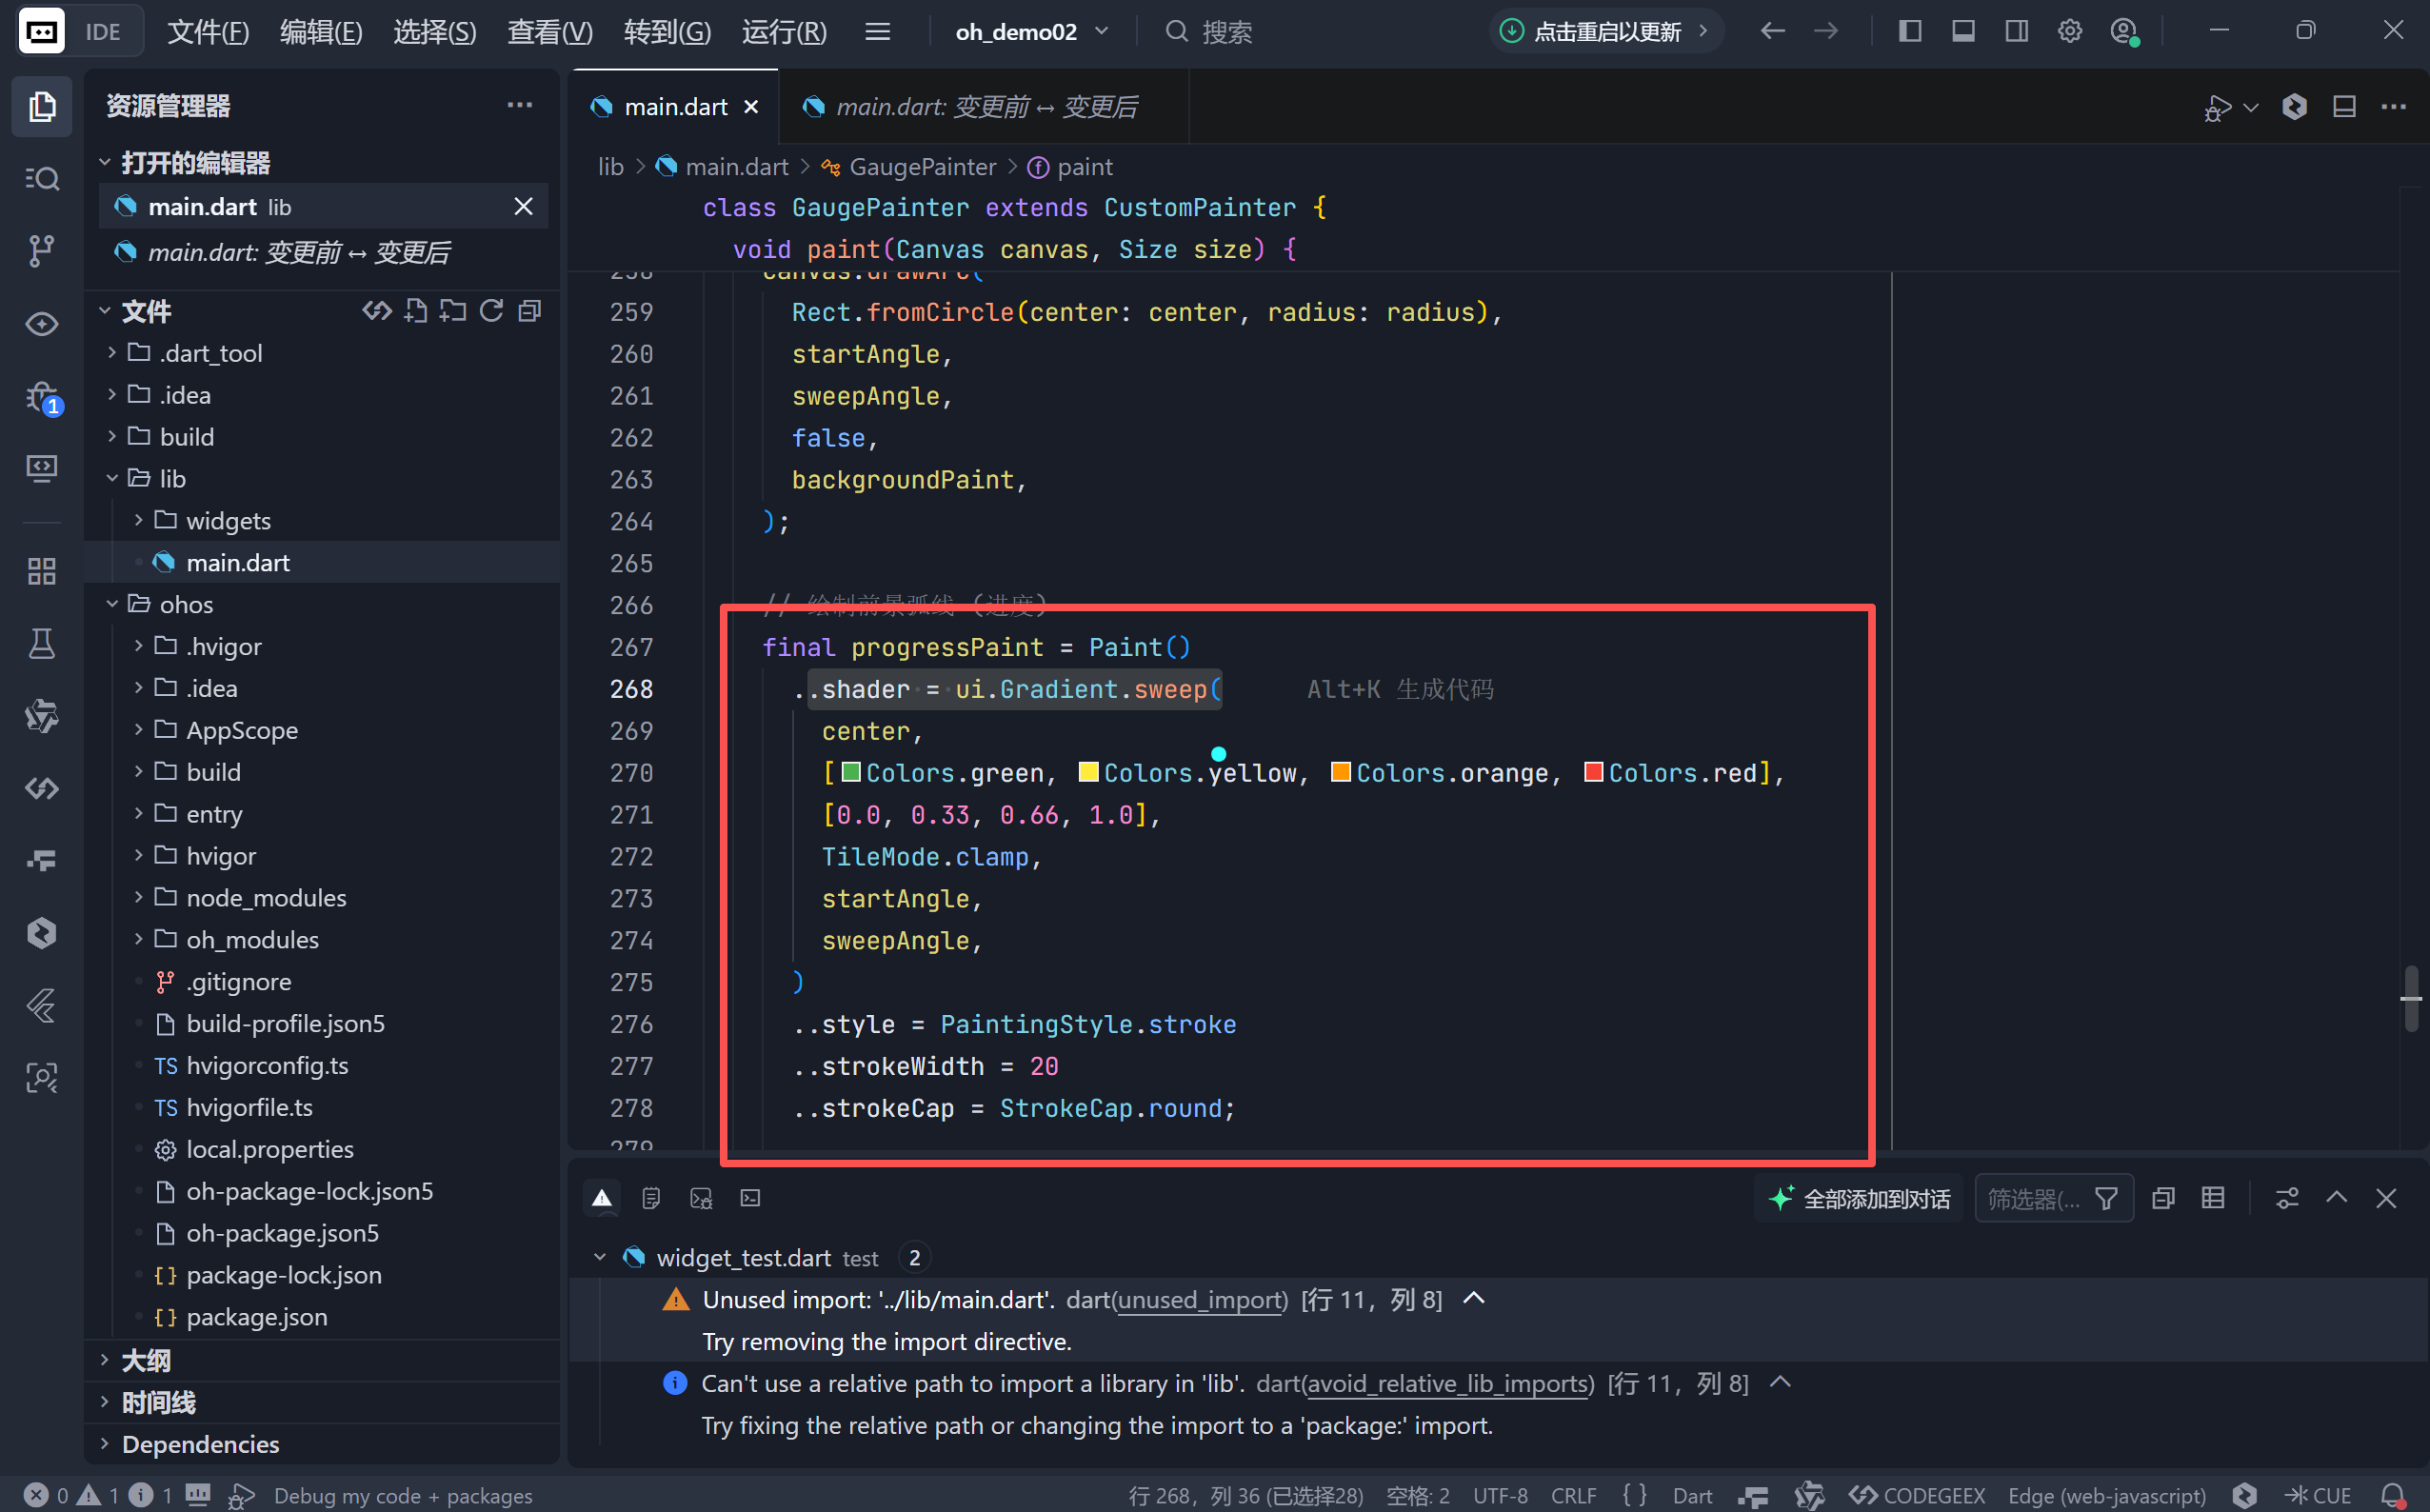
- 径向渐变 :
Gradient.sweep沿弧线方向平滑过渡颜色;- 语义映射:0%→绿色(优),33%→黄色(良),66%→橙色(污染),100%→红色(严重污染)。
3. 性能优化
dart
@override
bool shouldRepaint(covariant CustomPainter oldDelegate) {
  return oldDelegate is! GaugePainter ||
         oldDelegate.value != value ||
         oldDelegate.color != color;
}
仅当 value 或 color 变化时重绘,避免不必要的 GPU 开销。
四、UI/UX 设计亮点
1. 卡片式信息分层
| 区域 | 内容 | 设计要点 |
|---|---|---|
| 顶部卡片 | 天气图标 + 温度 + 状态 | 圆角 20 + 高对比度文字 |
| 左下方 | AQI 仪表盘 | 半圆弧 + 渐变色 + 中心标签 |
| 右下方 | 风速指示器 | 图标 + 数值 + 单位说明 |
2. 动态图标系统
dart
Widget _buildWeatherIcon() {
  if (_condition == 'sunny')
    return Icon(Icons.wb_sunny, color: Colors.yellow);
  else if (_condition == 'cloudy')
    return Icon(Icons.cloud, color: Colors.white);
  else
    return Icon(Icons.grain, color: Colors.blue); // 雨滴效果
}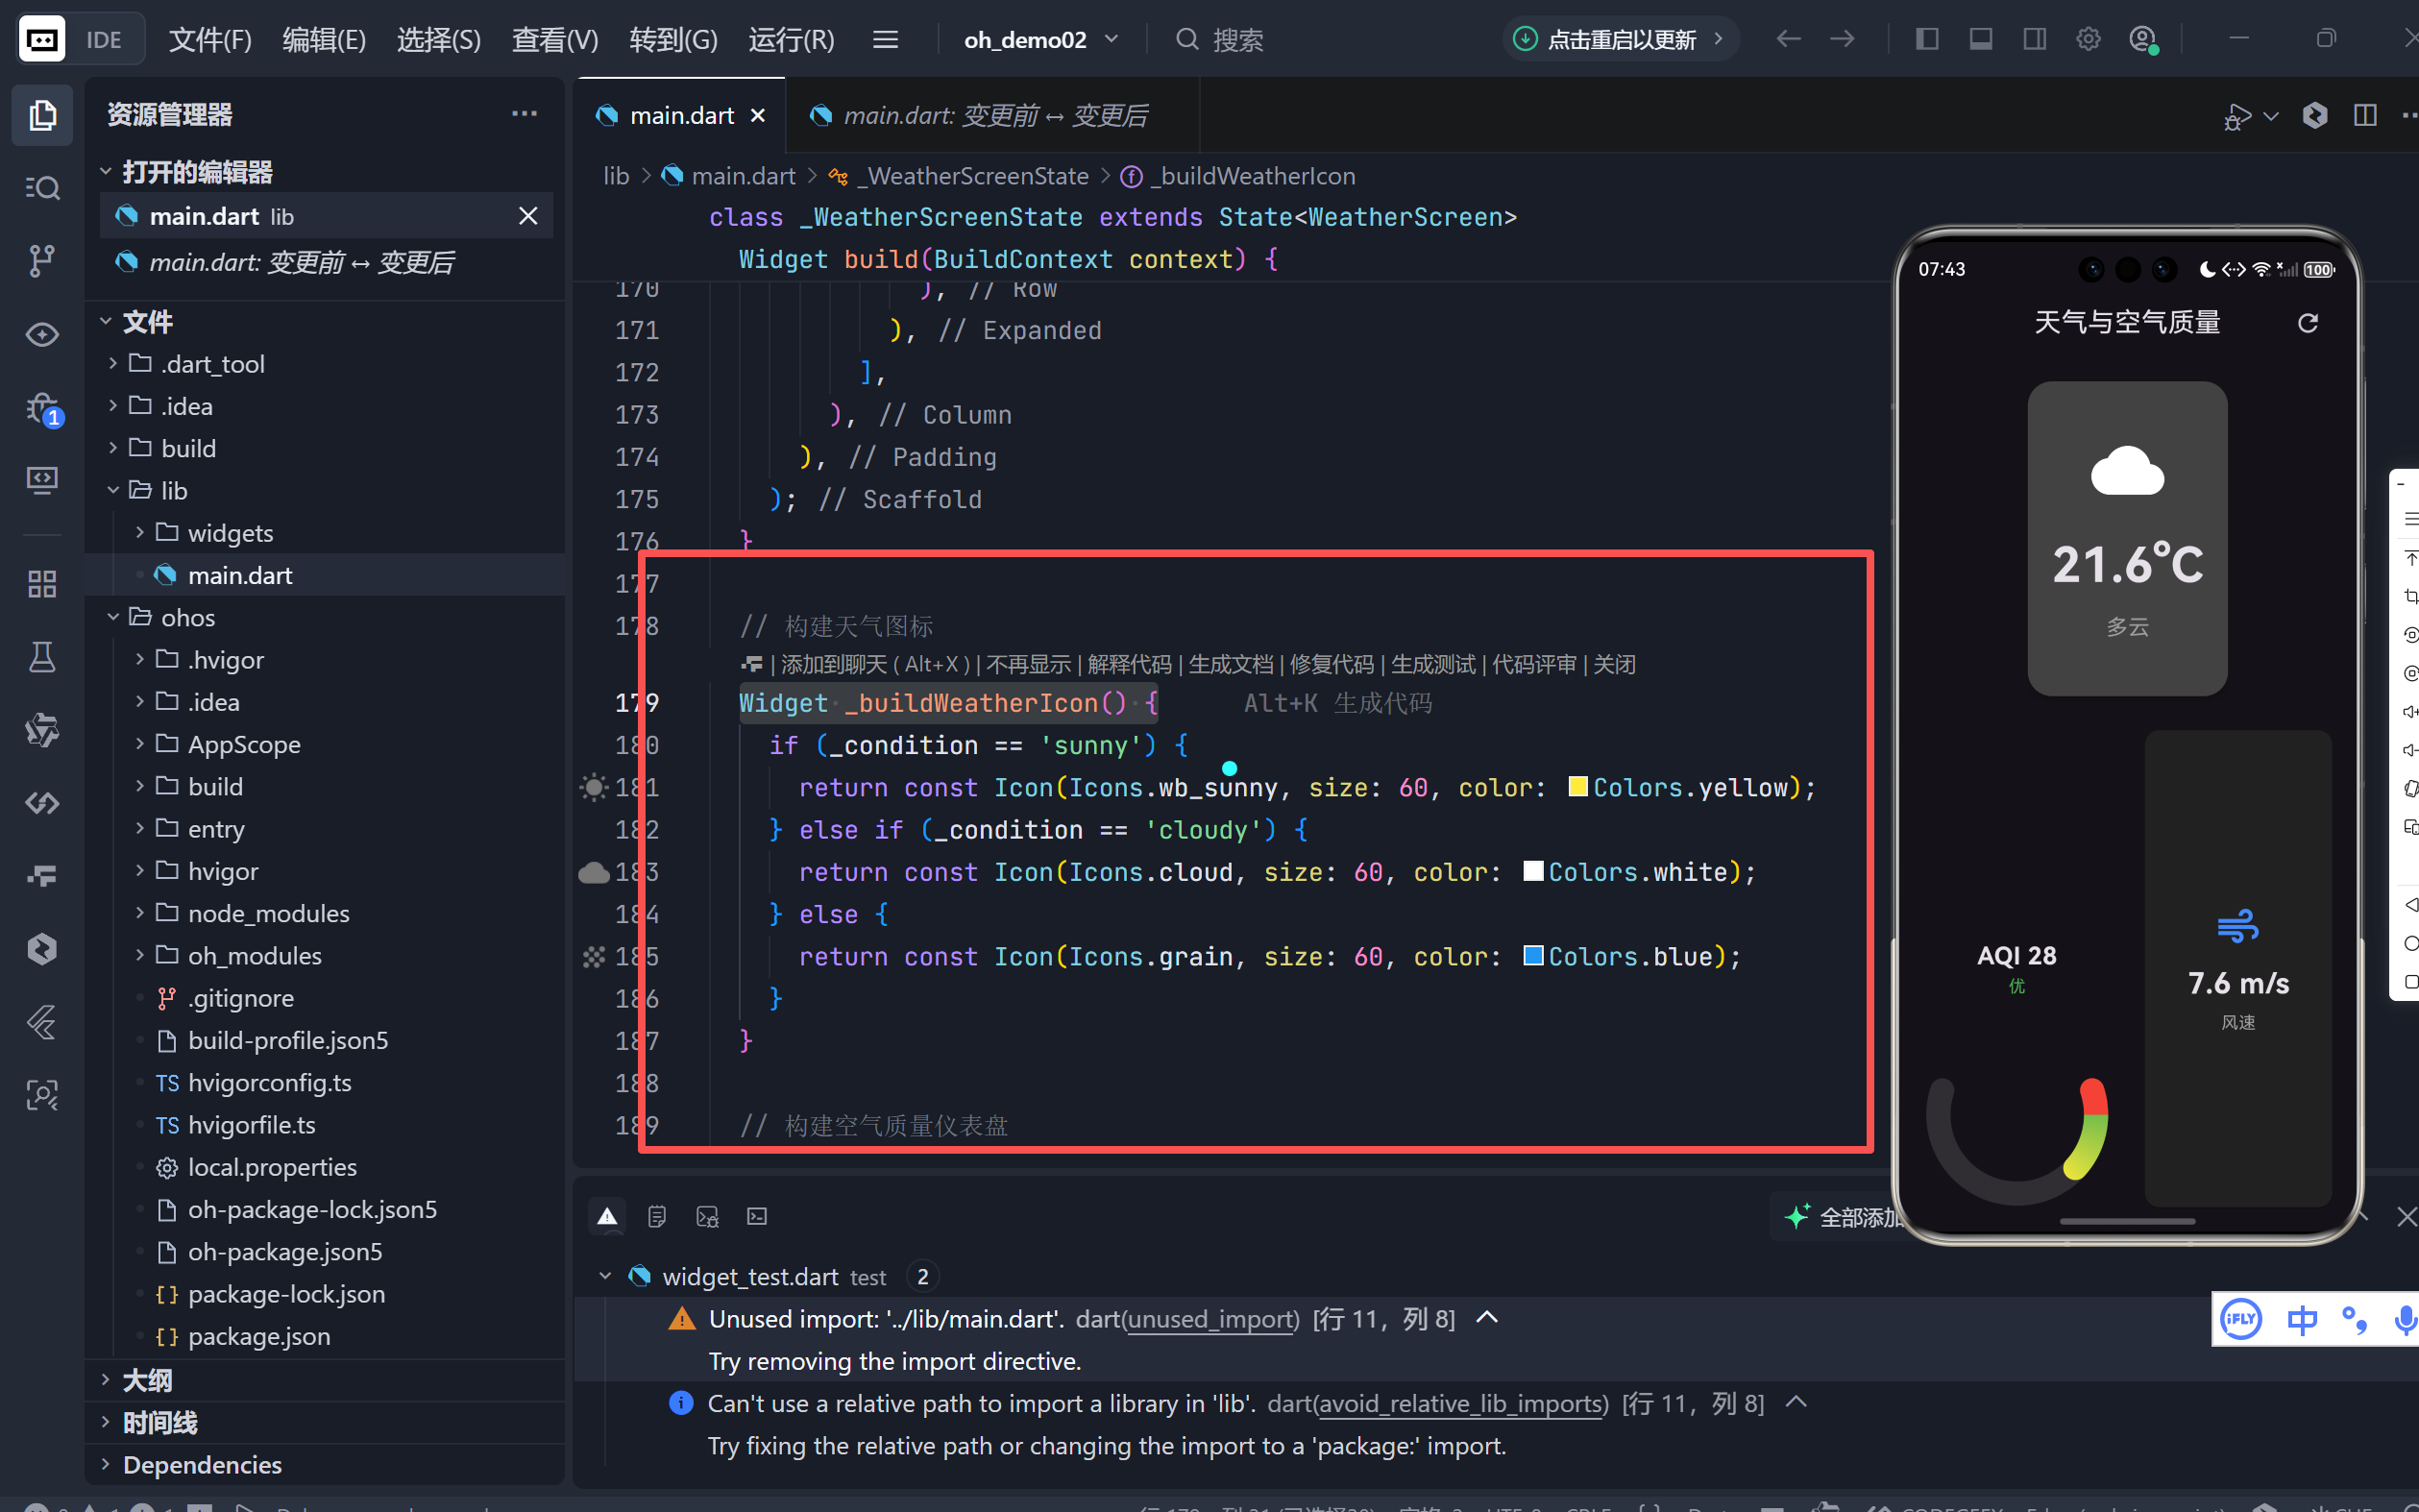
- 语义化图标:晴天(太阳)、多云(云朵)、雨天(雨滴);
- 色彩心理学:黄色(温暖)、白色(中性)、蓝色(清凉)强化天气感知。
3. 响应式布局
- 弹性分区:天气卡片(2份)、仪表盘区域(3份);
- 水平分割 :
Row内两个Expanded平分空间,适配不同屏幕宽度。
五、动画细节:刷新反馈
1. 旋转动画控制器
dart
late AnimationController _refreshController;
late Animation<double> _refreshAnimation;

@override
void initState() {
  _refreshController = AnimationController(vsync: this, duration: 1s);
  _refreshAnimation = Tween(begin: 0, end: 1).animate(_refreshController);
}
2. AppBar 集成
dart
IconButton(
  icon: RotationTransition(
    turns: _refreshAnimation, // 0→1 对应 0°→360°
    child: Icon(Icons.refresh),
  ),
  onPressed: _refreshData,
)- 物理感:图标顺时针旋转一圈,模拟"加载中"状态;
- 无状态干扰:动画结束后自动停止,不影响其他操作。
六、潜在优化方向
-
真实 API 集成
替换
Random()为 OpenWeatherMap 或和风天气 API:dartfinal response = await http.get(Uri.parse('https://api.openweathermap.org/...')); -
24 小时趋势图
在底部添加
LineChart显示温度/AQI 变化曲线。 -
深色模式增强
使用
Theme.of(context).brightness动态调整卡片颜色。 -
无障碍支持
为图标添加
Semantics描述,提升视障用户体验。
结语:小部件中的大格局
这个天气卡片项目虽小,却完美融合了状态管理、自定义绘制、动画控制、数据可视化四大 Flutter 核心能力。它证明了即使没有复杂业务逻辑,也能通过精心设计的 UI 和流畅的交互,打造出令人愉悦的用户体验。
🌐 加入社区
欢迎加入 开源鸿蒙跨平台开发者社区 ,获取最新资源与技术支持:
👉 开源鸿蒙跨平台开发者社区
完整代码展示
bash
import 'dart:ui' as ui;
import 'dart:math';
import 'package:flutter/material.dart';

void main() {
  runApp(const WeatherApp());
}

class WeatherApp extends StatelessWidget {
  const WeatherApp({super.key});

  @override
  Widget build(BuildContext context) {
    return MaterialApp(
      title: '天气卡片',
      theme: ThemeData.dark(),
      home: const WeatherScreen(),
      debugShowCheckedModeBanner: false,
    );
  }
}

class WeatherScreen extends StatefulWidget {
  const WeatherScreen({super.key});

  @override
  State<WeatherScreen> createState() => _WeatherScreenState();
}

class _WeatherScreenState extends State<WeatherScreen>
    with TickerProviderStateMixin {
  // 模拟数据
  double _temperature = 26.5;
  int _aqi = 45; // 空气质量指数
  double _windSpeed = 3.5; // 风速
  String _condition = 'sunny'; // 天气状况: sunny, cloudy, rainy

  // 动画控制器
  late AnimationController _refreshController;
  late Animation<double> _refreshAnimation;

  @override
  void initState() {
    super.initState();
    _refreshController = AnimationController(
      vsync: this,
      duration: const Duration(milliseconds: 1000),
    );
    _refreshAnimation =
        Tween<double>(begin: 0, end: 1).animate(_refreshController);
  }

  @override
  void dispose() {
    _refreshController.dispose();
    super.dispose();
  }

  // 模拟刷新数据
  void _refreshData() {
    _refreshController.forward(from: 0);

    Future.delayed(const Duration(seconds: 1), () {
      setState(() {
        _temperature = 20 + Random().nextDouble() * 15; // 20-35度
        _aqi = Random().nextInt(100);
        _windSpeed = Random().nextDouble() * 10;
        final conditions = ['sunny', 'cloudy', 'rainy'];
        _condition = conditions[Random().nextInt(conditions.length)];
      });
    });
  }

  // 获取 AQI 等级和颜色
  ({String level, Color color}) _getAqiInfo(int aqi) {
    if (aqi <= 50) {
      return (level: '优', color: Colors.green);
    } else if (aqi <= 100) {
      return (level: '良', color: Colors.yellow);
    } else if (aqi <= 150) {
      return (level: '轻度污染', color: Colors.orange);
    } else {
      return (level: '重度污染', color: Colors.red);
    }
  }

  @override
  Widget build(BuildContext context) {
    final aqiInfo = _getAqiInfo(_aqi);
    final aqiColor = aqiInfo.color;
    final aqiLevel = aqiInfo.level;

    return Scaffold(
      appBar: AppBar(
        title: const Text('天气与空气质量'),
        centerTitle: true,
        actions: [
          IconButton(
            icon: RotationTransition(
              turns: _refreshAnimation,
              child: const Icon(Icons.refresh),
            ),
            onPressed: _refreshData,
          ),
          const SizedBox(width: 16),
        ],
      ),
      body: Padding(
        padding: const EdgeInsets.all(16.0),
        child: Column(
          children: [
            // 当前天气卡片
            Expanded(
              flex: 2,
              child: Card(
                color: Colors.grey[800],
                elevation: 4,
                shape: RoundedRectangleBorder(
                    borderRadius: BorderRadius.circular(20)),
                child: Padding(
                  padding: const EdgeInsets.all(20),
                  child: Column(
                    mainAxisAlignment: MainAxisAlignment.center,
                    children: [
                      // 天气图标
                      _buildWeatherIcon(),
                      const SizedBox(height: 20),
                      // 温度
                      Text(
                        '${_temperature.toStringAsFixed(1)}°C',
                        style: const TextStyle(
                            fontSize: 40, fontWeight: FontWeight.bold),
                      ),
                      const SizedBox(height: 10),
                      // 状态
                      Text(
                        _condition == 'sunny'
                            ? '晴朗'
                            : _condition == 'cloudy'
                                ? '多云'
                                : '下雨',
                        style:
                            const TextStyle(fontSize: 18, color: Colors.grey),
                      ),
                    ],
                  ),
                ),
              ),
            ),

            const SizedBox(height: 20),

            // 底部仪表盘区域
            Expanded(
              flex: 3,
              child: Row(
                children: [
                  // 空气质量仪表盘 (半圆)
                  Expanded(
                    child: _buildAqiGauge(aqiColor, aqiLevel),
                  ),

                  const SizedBox(width: 20),

                  // 风速指示器
                  Expanded(
                    child: _buildWindSpeedIndicator(),
                  ),
                ],
              ),
            ),
          ],
        ),
      ),
    );
  }

  // 构建天气图标
  Widget _buildWeatherIcon() {
    if (_condition == 'sunny') {
      return const Icon(Icons.wb_sunny, size: 60, color: Colors.yellow);
    } else if (_condition == 'cloudy') {
      return const Icon(Icons.cloud, size: 60, color: Colors.white);
    } else {
      return const Icon(Icons.grain, size: 60, color: Colors.blue);
    }
  }

  // 构建空气质量仪表盘
  Widget _buildAqiGauge(Color color, String level) {
    return CustomPaint(
      size: const Size.fromHeight(150),
      painter: GaugePainter(value: _aqi / 100, color: color),
      child: Column(
        mainAxisAlignment: MainAxisAlignment.center,
        children: [
          Text(
            'AQI $_aqi',
            style: const TextStyle(fontSize: 20, fontWeight: FontWeight.bold),
          ),
          Text(
            level,
            style: TextStyle(color: color),
          ),
        ],
      ),
    );
  }

  // 构建风速指示器
  Widget _buildWindSpeedIndicator() {
    return Card(
      color: Colors.grey[900],
      child: Padding(
        padding: const EdgeInsets.all(16),
        child: Column(
          mainAxisAlignment: MainAxisAlignment.center,
          children: [
            const Icon(Icons.air, size: 40, color: Colors.blueAccent),
            const SizedBox(height: 10),
            Text(
              '${_windSpeed.toStringAsFixed(1)} m/s',
              style: const TextStyle(fontSize: 24, fontWeight: FontWeight.bold),
            ),
            const SizedBox(height: 5),
            const Text(
              '风速',
              style: TextStyle(color: Colors.grey),
            ),
          ],
        ),
      ),
    );
  }
}

// 仪表盘绘制类
class GaugePainter extends CustomPainter {
  final double value; // 0.0 - 1.0
  final Color color;

  GaugePainter({required this.value, required this.color});

  @override
  void paint(Canvas canvas, Size size) {
    final center = Offset(size.width / 2, size.height * 0.8);
    final radius = min(size.width, size.height) * 0.4;
    const startAngle = -pi * 0.1;
    const sweepAngle = pi * 1.2;

    // 绘制背景弧线
    final backgroundPaint = Paint()
      ..color = Colors.grey.withValues(alpha: 0.2)
      ..style = PaintingStyle.stroke
      ..strokeWidth = 20
      ..strokeCap = StrokeCap.round;

    canvas.drawArc(
      Rect.fromCircle(center: center, radius: radius),
      startAngle,
      sweepAngle,
      false,
      backgroundPaint,
    );

    // 绘制前景弧线 (进度)
    final progressPaint = Paint()
      ..shader = ui.Gradient.sweep(
        center,
        [Colors.green, Colors.yellow, Colors.orange, Colors.red],
        [0.0, 0.33, 0.66, 1.0],
        TileMode.clamp,
        startAngle,
        sweepAngle,
      )
      ..style = PaintingStyle.stroke
      ..strokeWidth = 20
      ..strokeCap = StrokeCap.round;

    canvas.drawArc(
      Rect.fromCircle(center: center, radius: radius),
      startAngle,
      sweepAngle * value,
      false,
      progressPaint,
    );
  }

  @override
  bool shouldRepaint(covariant CustomPainter oldDelegate) {
    return oldDelegate is! GaugePainter ||
        oldDelegate.value != value ||
        oldDelegate.color != color;
  }
}