1.检查防火墙状态
root@localhost tongsearch-3.0.8.0# systemctl status firewalld
● firewalld.service - firewalld - dynamic firewall daemon
Loaded: loaded (/usr/lib/systemd/system/firewalld.service; disabled; vendor preset: enabled)
Active: inactive (dead)
Docs: man:firewalld(1)
用户计划使用firewall-cmd命令开放端口,则需要先启动firewalld;
2.启动防火墙
systemctl start firewalld
3.开放端口
firewall-cmd --permanent --zone=public --add-port=9200/tcp
firewall-cmd --permanent --zone=public --add-port=9300/tcp
firewall-cmd --reload
4.不支持root用户 创建新用户
useradd tongsearch
sudo mkdir -p /data/tongsearch
5.配置JDK
5.2 root用户
vim /etc/security/limits.conf
tongsearch hard nproc unlimited
tongsearch soft nproc unlimited
tongsearch - nofile 262144
tongsearch - memlock unlimited
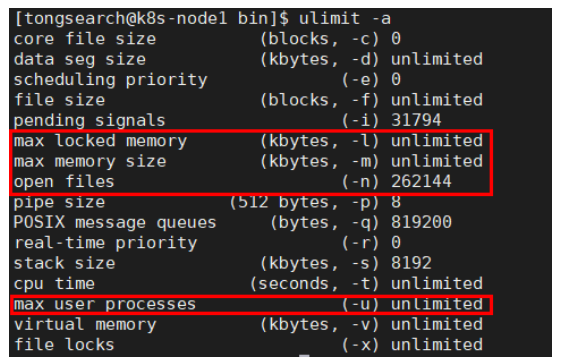
6.配置完之后切换tongsearch用户
ulimit -a 检查
7.切换root用户
vim /etc/sysctl.conf
vm.max_map_count = 262144 保存并退出
分别执行以下命令 使配置生效并查看
sysctl -p
sysctl -a|grep vm.max_map_count
8.安装包解压后 移动到 /data/tongsearch/目录下
mv tongsearch-{n} /data/tongsearch/
chown -R tongsearch:tongsearch tongsearch-3.0.8.0
9.修改配置文件
用户需要在 "tongsearch.yml" 文件中,配置存储数据的日志的路径等。
path.data:/data/tongsearch/data
path.logs:/data/tongsearch/logs
注释配置文件上面已经有下面的内容cluster.name node.name****network.host http.port:
cluster.name: tongsearch-cluster
node.name: ts1
path.data: /data/tongsearch/data
path.logs: /data/tongsearch/logs
network.host: 192.168.22.169
http.port: 9200
discovery.seed_hosts: "192.168.22.169","192.168.22.13","192.168.22.2"
cluster.initial_master_nodes: "ts1","ts2","ts3"
cluster.name: tongsearch-cluster
node.name: ts2
path.data: /data/tongsearch/data
path.logs: /data/tongsearch/logs
network.host: 192.168.22.13
http.port: 9200
discovery.seed_hosts: "192.168.22.169","192.168.22.13","192.168.22.2"
cluster.initial_master_nodes: "ts1","ts2","ts3"
cluster.name: tongsearch-cluster
node.name: ts3
path.data: /data/tongsearch/data
path.logs: /data/tongsearch/logs
network.host: 192.168.22.2
http.port: 9200
discovery.seed_hosts: "192.168.22.169","192.168.22.13","192.168.22.2"
cluster.initial_master_nodes: "ts1","ts2","ts3"
curl http://10.10.83.95:9200/_cat/nodes
168.1.88.86 41 47 11 0.64 0.26 0.22 cdfhimrstw - ts3
10.10.83.95 2 62 0 0.00 0.05 0.48 cdfhimrstw - ts1
168.1.88.84 8 97 1 0.15 0.11 0.10 cdfhimrstw * ts2

kill 这个进程