文章目录
- [1. 概述](#1. 概述)
- [2. 入门案例](#2. 入门案例)
-
- [2.1 引入依赖](#2.1 引入依赖)
- [2.2 配置 API Key](#2.2 配置 API Key)
- [2.3 工具定义](#2.3 工具定义)
- [2.4 Agent 配置类](#2.4 Agent 配置类)
- [2.5 启动测试](#2.5 启动测试)
- [3. API 端点](#3. API 端点)
-
- [3.1 Controller 类](#3.1 Controller 类)
- [3.2 Agent API](#3.2 Agent API)
- [3.3 Graph API](#3.3 Graph API)
- [3.4 Thread API](#3.4 Thread API)
- [3.5 UI 重定向](#3.5 UI 重定向)
- [4. 高级用法](#4. 高级用法)
-
- [4.1 Human-in-the-Loop 支持](#4.1 Human-in-the-Loop 支持)
- [4.2 Graph 工作流支持](#4.2 Graph 工作流支持)
- [4.3 独立运行模式](#4.3 独立运行模式)
- [4.4 自定义 Agent/GraphLoader 加载器](#4.4 自定义 Agent/GraphLoader 加载器)
- [4.5 生产环境自动关闭](#4.5 生产环境自动关闭)
-
- [4.5.1 方案一:排除自动配置(推荐)](#4.5.1 方案一:排除自动配置(推荐))
- [4.5.2 方案二:Maven 依赖控制](#4.5.2 方案二:Maven 依赖控制)
1. 概述
Spring AI Alibaba 提供了可视化 Agent 调试和交互 UI 模块,为开发者提供了与 AI Agent 进行可视化对话的前端界面。它支持嵌入式和独立部署两种模式,可以快速集成到任何 Spring Boot 应用中。
核心功能:
- 可视化对话
- 线程管理
- 流式响应
- 消息历史
特殊支持:
HITL审批界面- 工具调用可视化
- 自动/手动审批
- 参数编辑
2. 入门案例
使用嵌入模式,将 Studio 作为依赖添加到 Spring Boot 项目中。
2.1 引入依赖
Maven 配置:
xml
<dependency>
<groupId>com.alibaba.cloud.ai</groupId>
<artifactId>spring-ai-alibaba-studio</artifactId>
<version>1.1.2.2</version>
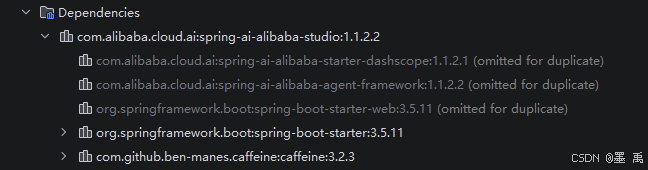
</dependency>spring-ai-alibaba-studio 中包含了以下子依赖:
本项目完整依赖如下:
xml
    <properties>
        <java.version>17</java.version>
        <maven.compiler.source>17</maven.compiler.source>
        <maven.compiler.target>17</maven.compiler.target>
        <project.build.sourceEncoding>UTF-8</project.build.sourceEncoding>
        <spring-ai-alibaba.version>1.1.2.2</spring-ai-alibaba.version>
        <spring-ai-alibaba-ext.version>1.1.2.1</spring-ai-alibaba-ext.version>
    </properties>

    <dependencyManagement>
        <dependencies>
            <!--Spring AI BOM-->
            <dependency>
                <groupId>org.springframework.ai</groupId>
                <artifactId>spring-ai-bom</artifactId>
                <version>1.1.2</version>
                <type>pom</type>
                <scope>import</scope>
            </dependency>
            <!--Spring AI Alibaba BOM-->
            <dependency>
                <groupId>com.alibaba.cloud.ai</groupId>
                <artifactId>spring-ai-alibaba-bom</artifactId>
                <version>${spring-ai-alibaba.version}</version>
                <type>pom</type>
                <scope>import</scope>
            </dependency>
            <!--Spring AI Alibaba Extensions BOM-->
            <dependency>
                <groupId>com.alibaba.cloud.ai</groupId>
                <artifactId>spring-ai-alibaba-extensions-bom</artifactId>
                <version>${spring-ai-alibaba-ext.version}</version>
                <type>pom</type>
                <scope>import</scope>
            </dependency>
        </dependencies>
    </dependencyManagement>

    <dependencies>
        <!-- Spring AI Alibaba Studio - 可视化调试工具 -->
        <dependency>
            <groupId>com.alibaba.cloud.ai</groupId>
            <artifactId>spring-ai-alibaba-studio</artifactId>
            <version>${spring-ai-alibaba.version}</version>
        </dependency>

        <!-- Spring AI Alibaba Agent Framework -->
        <dependency>
            <groupId>com.alibaba.cloud.ai</groupId>
            <artifactId>spring-ai-alibaba-agent-framework</artifactId>
            <version>${spring-ai-alibaba.version}</version>
        </dependency>

        <!-- 阿里云百炼 DashScope Starter (通义千问) -->
        <dependency>
            <groupId>com.alibaba.cloud.ai</groupId>
            <artifactId>spring-ai-alibaba-starter-dashscope</artifactId>
        </dependency>

        <!-- Spring Boot Starter Web -->
        <dependency>
            <groupId>org.springframework.boot</groupId>
            <artifactId>spring-boot-starter-web</artifactId>
        </dependency>

        <!-- Test -->
        <dependency>
            <groupId>org.springframework.boot</groupId>
            <artifactId>spring-boot-starter-test</artifactId>
            <scope>test</scope>
        </dependency>
    </dependencies>
2.2 配置 API Key
yml
spring:
  application:
    name: spring-ai-alibaba-studio-01
  ai:
    # 阿里云百炼配置 (DashScope)
    dashscope:
      api-key: sk-3d56ec506a894  # 从环境变量读取,或直接填写
      chat:
        options:
          model: qwen-plus  # 通义千问模型:qwen-turbo, qwen-plus, qwen-max
          temperature: 0.7
          max_tokens: 2000
server:
  port: 8080
2.3 工具定义
天气查询工具:
java
/**
 * 天气查询工具
 * 模拟天气查询功能(演示用途)
 *
 * 实际项目中可以接入真实的天气 API
 */
@Component
public class WeatherTool {

    private static final Map<String, String[]> WEATHER_DATA = new HashMap<>();

    static {
        WEATHER_DATA.put("北京", new String[]{"晴", "多云", "阴", "小雨"});
        WEATHER_DATA.put("上海", new String[]{"多云", "阴", "小雨", "晴"});
        WEATHER_DATA.put("广州", new String[]{"晴", "多云", "大雨", "小雨"});
        WEATHER_DATA.put("深圳", new String[]{"多云", "晴", "小雨", "阴"});
        WEATHER_DATA.put("杭州", new String[]{"晴", "多云", "小雨", "阴"});
        WEATHER_DATA.put("成都", new String[]{"多云", "阴", "小雨", "晴"});
        WEATHER_DATA.put("武汉", new String[]{"晴", "多云", "小雨", "阴"});
        WEATHER_DATA.put("长沙", new String[]{"多云", "小雨", "晴", "阴"});
    }

    @Tool(description = "查询指定城市的天气情况")
    public String queryWeather(
            @ToolParam(description = "城市名称,如:北京、上海、广州") String city
    ) {
        String[] weathers = WEATHER_DATA.get(city);
        if (weathers == null) {
            return "未找到城市 " + city + " 的天气数据,支持的城市:北京、上海、广州、深圳、杭州、成都、武汉、长沙";
        }

        Random random = new Random();
        String weather = weathers[random.nextInt(weathers.length)];
        int temperature = 15 + random.nextInt(20);  // 15-35度
        int humidity = 40 + random.nextInt(40);      // 40-80%

        return String.format("%s天气:%s,温度:%d°C,湿度:%d%%", city, weather, temperature, humidity);
    }

    @Tool(description = "查询多个城市的天气对比")
    public String compareWeather(
            @ToolParam(description = "第一个城市名称") String city1,
            @ToolParam(description = "第二个城市名称") String city2
    ) {
        String weather1 = queryWeather(city1);
        String weather2 = queryWeather(city2);
        return weather1 + "\n" + weather2;
    }
}
时间查询工具:
java
/**
 * 时间查询工具
 * 提供日期和时间查询功能
 */
@Component
public class DateTimeTool {

    @Tool(description = "获取当前的日期和时间")
    public String getCurrentDateTime() {
        LocalDateTime now = LocalDateTime.now();
        DateTimeFormatter formatter = DateTimeFormatter.ofPattern("yyyy年MM月dd日 HH:mm:ss");
        return "当前时间: " + now.format(formatter);
    }

    @Tool(description = "获取当前的日期")
    public String getCurrentDate() {
        LocalDateTime now = LocalDateTime.now();
        DateTimeFormatter formatter = DateTimeFormatter.ofPattern("yyyy年MM月dd日");
        return "当前日期: " + now.format(formatter);
    }

    @Tool(description = "获取当前的时间")
    public String getCurrentTime() {
        LocalDateTime now = LocalDateTime.now();
        DateTimeFormatter formatter = DateTimeFormatter.ofPattern("HH:mm:ss");
        return "当前时间: " + now.format(formatter);
    }

    @Tool(description = "计算两个日期之间的天数差")
    public String daysBetween(
            @ToolParam(description = "开始日期,格式: yyyy-MM-dd") String startDate,
            @ToolParam(description = "结束日期,格式: yyyy-MM-dd") String endDate
    ) {
        try {
            LocalDateTime start = LocalDateTime.parse(startDate + "T00:00:00");
            LocalDateTime end = LocalDateTime.parse(endDate + "T00:00:00");
            long days = java.time.temporal.ChronoUnit.DAYS.between(start, end);
            return "从 " + startDate + " 到 " + endDate + " 共有 " + Math.abs(days) + " 天";
        } catch (Exception e) {
            return "日期格式错误,请使用 yyyy-MM-dd 格式";
        }
    }
}
2.4 Agent 配置类
定义 Agent Bean 供 Spring AI Alibaba Studio 自动发现和管理,Studio 会自动扫描所有 ReactAgent Bean 并在界面中展示:
java
@Configuration
public class AgentConfig {

    /**
     * 基础聊天 Agent
     * 最简单的 Agent 配置,用于基础对话测试
     */
    @Bean
    public ReactAgent chatAgent(ChatModel dashscopeChatModel) throws GraphRunnerException {
        return ReactAgent.builder()
                .name("chat-agent")
                .description("基础聊天助手,用于简单对话测试")
                .model(dashscopeChatModel)
                .systemPrompt("你是一个友好的 AI 助手,请用中文回答用户的问题。")
                .saver(new MemorySaver())  // 内存存储对话历史
                .enableLogging(true)
                .build();
    }

    /**
     * 工具调用 Agent
     * 配置了时间查询和天气查询工具的 Agent
     */
    @Bean
    public ReactAgent toolAgent(ChatModel dashscopeChatModel,
                                DateTimeTool dateTimeTool,
                                WeatherTool weatherTool) throws GraphRunnerException {
        return ReactAgent.builder()
                .name("tool-agent")
                .description("工具调用助手,支持时间查询和天气查询")
                .model(dashscopeChatModel)
                .methodTools(dateTimeTool, weatherTool)
                .systemPrompt("""
                    你是一个智能助手,可以使用以下工具帮助用户:
                    - 时间查询工具:获取当前日期和时间
                    - 天气查询工具:查询指定城市的天气情况

                    当用户询问时间或天气时,请调用相应的工具。
                    """)
                .saver(new MemorySaver())
                .enableLogging(true)
                .build();
    }

    /**
     * 编程助手 Agent
     * 专注于代码和编程问题的 Agent
     */
    @Bean
    public ReactAgent codingAgent(ChatModel dashscopeChatModel) throws GraphRunnerException {
        return ReactAgent.builder()
                .name("coding-agent")
                .description("编程助手,专注于代码开发和技术问题解答")
                .model(dashscopeChatModel)
                .systemPrompt("""
                    你是一个专业的编程助手,擅长:
                    - Java/Spring 开发
                    - Python 编程
                    - 代码调试和优化
                    - 技术问题解答

                    请提供清晰、专业的技术建议和代码示例。
                    """)
                .saver(new MemorySaver())
                .enableLogging(true)
                .build();
    }

    @Bean("skillAgent")
    public ReactAgent skillAgent(ChatModel dashscopeChatModel) throws GraphRunnerException {

        // 1. 创建 SkillRegistry
        SkillRegistry registry = FileSystemSkillRegistry.builder()
                .userSkillsDirectory(System.getProperty("user.home") + "/saa/skills")
                .projectSkillsDirectory("E:\\TD\\icloud\\study-spring-ai\\spring-ai-alibaba-studio-01\\src\\main\\resources\\skills")
                .autoLoad(true)
                .build();


        // 2. 创建 Hook
        SkillsAgentHook skillsHook = SkillsAgentHook.builder()
                .skillRegistry(registry)           // 必选:技能注册表
                .autoReload(true)                  // 可选:启用自动重载
                .build();

        // 3. 创建 ShellToolAgentHook (支持 shell 命令执行)
        ShellToolAgentHook shellHook = ShellToolAgentHook.builder()
                .build();

        // 4. 创建 agent,同时添加两个 Hook
        ReactAgent agent = ReactAgent.builder()
                .name("skill_agent")
                .model(dashscopeChatModel)
                .hooks(skillsHook, shellHook)  // 添加 Skills 和 Shell 两个 Hook
                .saver(new MemorySaver())
                .enableLogging(true)
                .build();

        return agent;
    }

}
2.5 启动测试
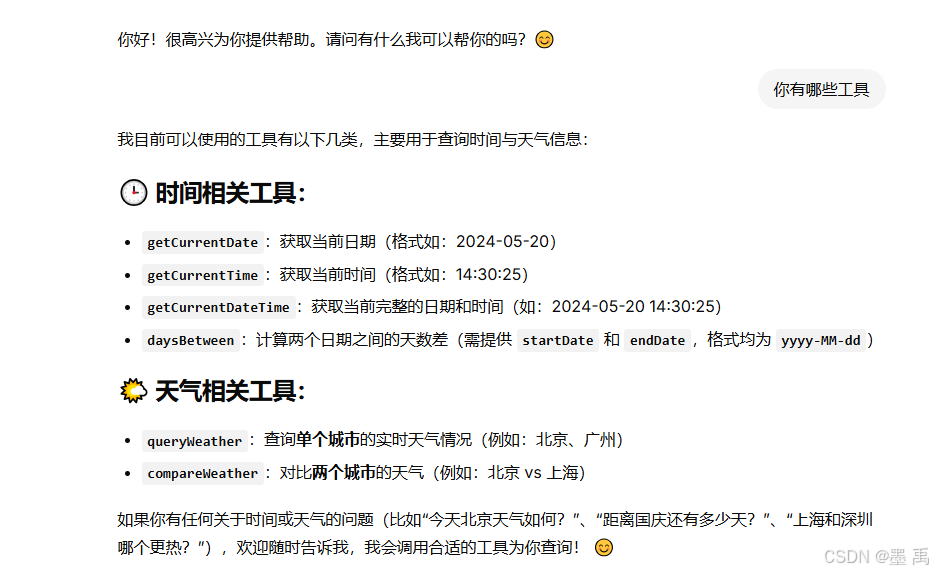
启动应用,访问 http://localhost:8080/chatui/index.html (前端使用相对路径,与后端同域名同端口):
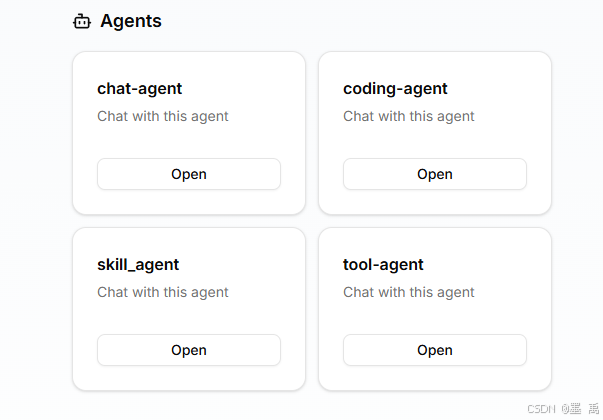
打开一个对话框进行测试:
3. API 端点
3.1 Controller 类
Studio 模块定义了很多 Controller 类,提供 Agent 智能体、Graph 工作流、会话线程完整管理与执行能力。
注册条件:
| Controller | 注册条件 |
|---|---|
| AgentController | 始终注册 |
| ExecutionController | 始终注册 |
| GraphController | 始终注册(无 Graph 时返回空列表) |
| GraphExecutionController | 仅当 GraphLoader Bean 存在时注册 |
| GraphThreadController | 仅当 GraphLoader Bean 存在时注册 |
| ThreadController | 始终注册 |
| ChatUiRedirectController | 始终注册 |
3.2 Agent API
Agent 管理:
| 端点 | 方法 | 描述 | Controller |
|---|---|---|---|
| /list-apps | GET | 列出所有可用的 Agent 应用名称 | AgentController |
Agent 执行 :
| 端点 | 方法 | 描述 | Controller |
|---|---|---|---|
| /run_sse | POST | 执行 Agent 并以 SSE 流式返回结果 | ExecutionController |
| /resume_sse | POST | 恢复 Agent 执行(处理 Human-in-the-loop 反馈) | ExecutionController |
3.3 Graph API
Graph 管理:
| 端点 | 方法 | 描述 | Controller |
|---|---|---|---|
| /list-graphs | GET | 列出所有可用的 Graph 名称 | GraphController |
| /graphs/{graphName}/representation | GET | 获取指定 Graph 的 Mermaid 图表表示 | GraphController |
Graph 执行:
| 端点 | 方法 | 描述 | Controller |
|---|---|---|---|
| /graph_run_sse | POST | 执行 Graph 并以 SSE 流式返回结果 | GraphExecutionController |
3.4 Thread API
Agent Thread 管理:
| 端点 | 方法 | 描述 | Controller |
|---|---|---|---|
| /apps/{appName}/users/{userId}/threads | GET | 列出用户的所有线程 | ThreadController |
| /apps/{appName}/users/{userId}/threads | POST | 创建新线程(自动生成 ID) | ThreadController |
| /apps/{appName}/users/{userId}/threads/{threadId} | GET | 获取指定线程详情 | ThreadController |
| /apps/{appName}/users/{userId}/threads/{threadId} | POST | 创建指定 ID 的线程 | ThreadController |
| /apps/{appName}/users/{userId}/threads/{threadId} | DELETE | 删除指定线程 | ThreadController |
Graph Thread 管理:
| 端点 | 方法 | 描述 | Controller |
|---|---|---|---|
| /graphs/{graphName}/users/{userId}/threads | GET | 列出用户在指定 Graph 的所有线程 | GraphThreadController |
| /graphs/{graphName}/users/{userId}/threads | POST | 创建新线程(自动生成 ID) | GraphThreadController |
| /graphs/{graphName}/users/{userId}/threads/{threadId} | GET | 获取指定线程详情 | GraphThreadController |
| /graphs/{graphName}/users/{userId}/threads/{threadId} | POST | 创建指定 ID 的线程 | GraphThreadController |
| /graphs/{graphName}/users/{userId}/threads/{threadId} | DELETE | 删除指定线程 | GraphThreadController |
3.5 UI 重定向
| 端点 | 方法 | 描述 | Controller |
|---|---|---|---|
| /chatui | GET | 重定向到 /chatui/index.html | ChatUiRedirectController |
| /chatui/ | GET | 重定向到 /chatui/index.html | ChatUiRedirectController |
4. 高级用法
4.1 Human-in-the-Loop 支持
定义一个删除文件的工具类:
java
public class HitlFileTools {

    /**
     * 删除文件(需要用户确认)
     */
    @Tool(name = "delete_file", description = "根据 文件路径 删除指定文件")
    public String deleteFile(@ToolParam(description = "The absolute path of the file to delete") String filePath) {
        System.out.println("==========================================");
        System.out.println("🔒 HITL 删除文件工具被调用");
        System.out.println("文件路径:" + filePath);
        System.out.println("==========================================");

        // 执行删除
        try {
            System.out.println("✅ 文件删除成功:" + filePath);
            return "文件删除成功:" + filePath;
        } catch (Exception e) {
            System.err.println("❌ 删除文件失败:" + e.getMessage());
            return "删除文件失败:" + e.getMessage();
        }
    }

}
ReactAgent 配置 HumanInTheLoopHook :
java
    @Bean("chatAgent")
    public ReactAgent chatAgent(DashScopeChatModel dashScopeChatModel) throws GraphRunnerException {
        // 1. 创建 HITL Hook
        HumanInTheLoopHook humanInTheLoopHook = HumanInTheLoopHook.builder()
                .approvalOn(Map.of(
                        "delete_file", ToolConfig.builder()
                                .description("删除文件需要审批")
                                .build()
                ))
                .build();

        // 2. 创建 agent,添加 Hooks 和 HITL 工具
        ReactAgent agent = ReactAgent.builder()
                .name("skill_agent")
                .saver(new MemorySaver()) // 必须配置
                .model(dashScopeChatModel)
                .methodTools(new HitlFileTools())
                .hooks(skillsHook, humanInTheLoopHook)
                .enableLogging(true)
                .build();
        return agent;
    }
删除文件时,会弹出审批页面:
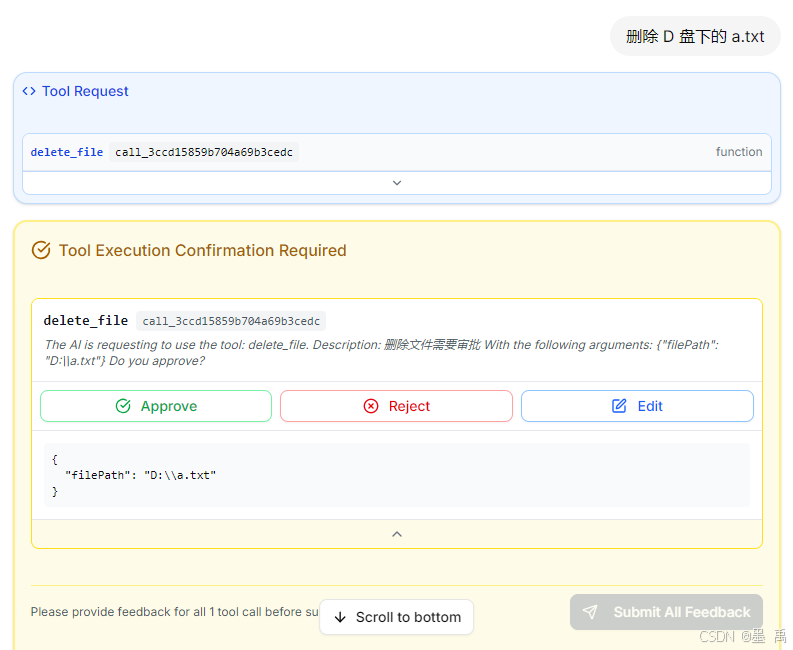
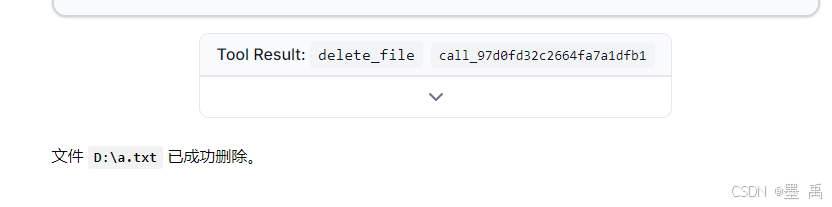
点击 Approve 并提交:
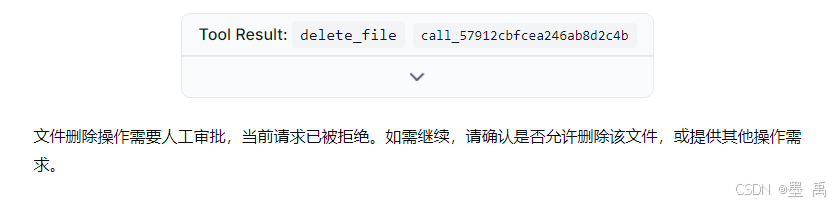
点击 Reject 并提交:
4.2 Graph 工作流支持
Graph 工作流配置:
java
@Configuration
public class SimpleGraphConfig {
/**
* 创建一个包含 LLM 节点的智能对话工作流
*
* 工作流程:
* START → collectInput(收集输入) → llmNode(大模型处理) → formatOutput(格式化输出) → END
*/
@Bean
public CompiledGraph llmWorkflowGraph(ChatModel dashscopeChatModel) throws GraphStateException {
// 1. 定义键策略工厂
KeyStrategyFactory keyFactory = () -> {
Map<String, KeyStrategy> strategies = new HashMap<>();
strategies.put("messages", new AppendStrategy()); // 消息追加(保留对话历史)
strategies.put("input", new ReplaceStrategy()); // 输入替换
strategies.put("llm_response", new ReplaceStrategy()); // LLM 响应替换
strategies.put("result", new ReplaceStrategy()); // 最终结果替换
return strategies;
};
// 2. 创建 ChatClient(用于 LLM 节点)
ChatClient chatClient = ChatClient.builder(dashscopeChatModel).build();
// 3. 创建状态图
StateGraph graph = new StateGraph("llm_workflow", keyFactory)
// 收集输入节点:将用户输入转换为消息格式
.addNode("collectInput", node_async(state -> {
String userInput = state.value("input", "");
if (userInput.isEmpty()) {
userInput = "你好";
}
return Map.of(
"messages", "用户: " + userInput,
"input", userInput
);
}))
// LLM 节点:调用大模型生成响应
.addNode("llmNode", node_async(state -> {
String userInput = state.value("input", "");
// 使用 ChatClient 调用大模型
String llmResponse = chatClient.prompt()
.user(userInput)
.system("你是一个友好的 AI 助手,请用中文简洁回答用户的问题。")
.call()
.content();
return Map.of(
"messages", "AI: " + llmResponse,
"llm_response", llmResponse
);
}))
// 格式化输出节点:生成最终结果
.addNode("formatOutput", node_async(state -> {
String llmResponse = state.value("llm_response", "");
String userInput = state.value("input", "");
String formattedResult = String.format("""
=== 对话结果 ===
用户输入: %s
AI 回复: %s
=== 对话结束 ===
""", userInput, llmResponse);
return Map.of(
"messages", formattedResult,
"result", formattedResult
);
}))
// 添加边:定义节点间的流转关系
.addEdge(START, "collectInput")
.addEdge("collectInput", "llmNode")
.addEdge("llmNode", "formatOutput")
.addEdge("formatOutput", END);
// 4. 编译并返回
return graph.compile();
}
/**
* 创建一个简单的 Echo 工作流(不含 LLM)
* 用于测试和演示基础 Graph 结构
*/
@Bean
public CompiledGraph simpleWorkflowGraph() throws GraphStateException {
// 1. 定义键策略工厂
KeyStrategyFactory keyFactory = () -> {
Map<String, KeyStrategy> strategies = new HashMap<>();
strategies.put("messages", new AppendStrategy(false)); // 消息追加
strategies.put("result", new ReplaceStrategy()); // 结果替换
return strategies;
};
// 2. 创建状态图
StateGraph graph = new StateGraph("simple_workflow", keyFactory)
// 添加 Echo 节点
.addNode("echo", node_async(state -> {
Object messages = state.value("messages").orElse(null);
return Map.of("result", "echo: " +
(messages != null ? messages.toString() : "empty"));
}))
// 添加边
.addEdge(START, "echo")
.addEdge("echo", END);
// 3. 编译并返回
return graph.compile();
}
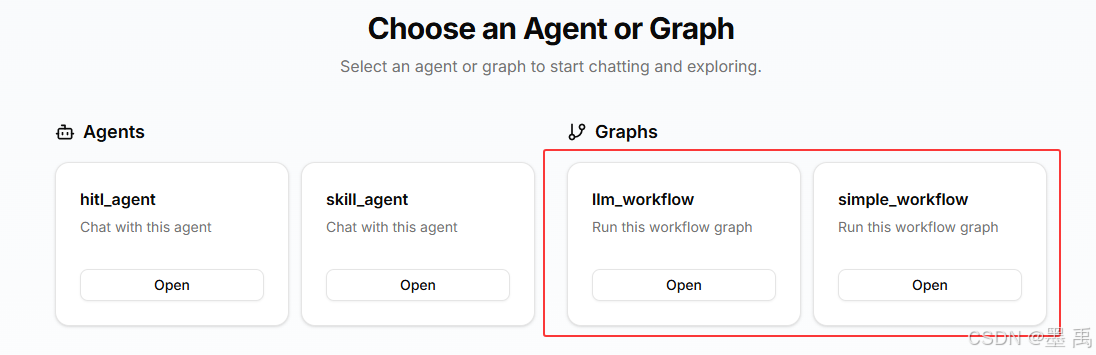
}Studio 首页中会显示可用工作流:
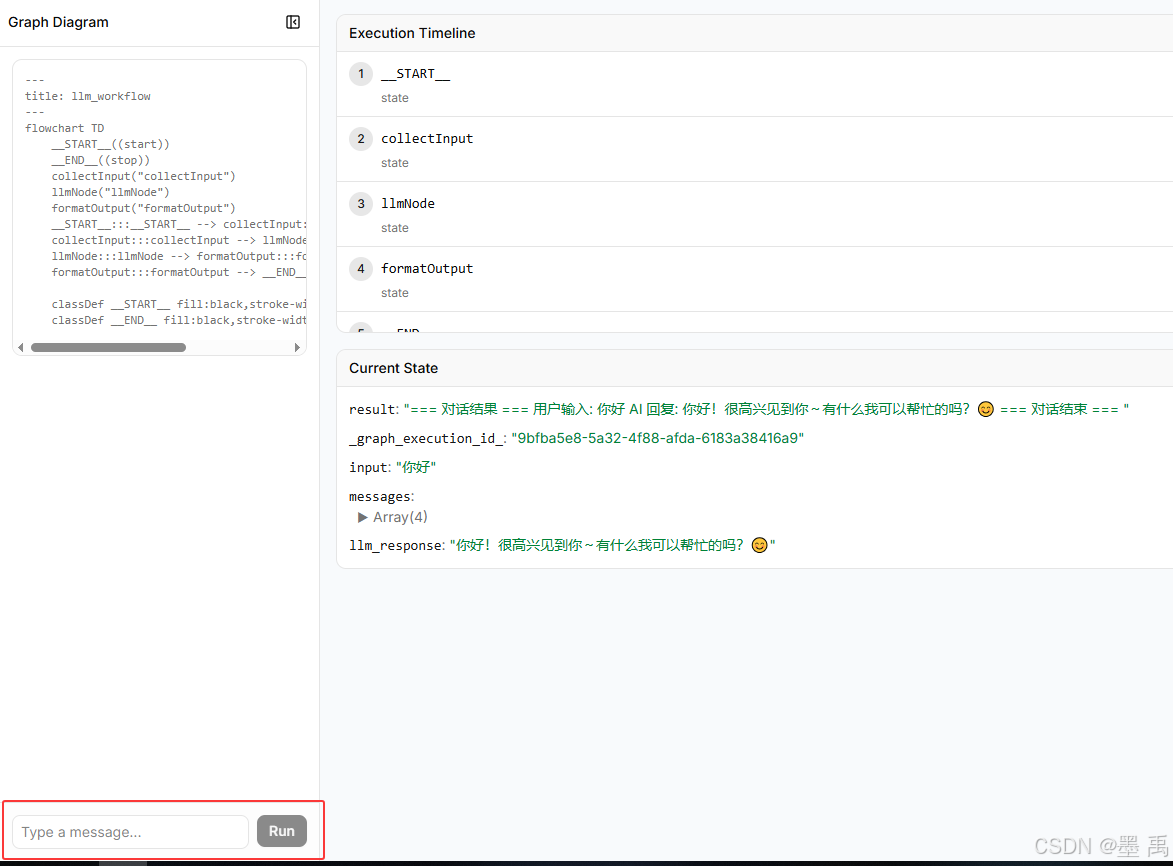
可以在工作流对话窗口,查看图结构、进行对话,会显示整个工作流的执行过程:
4.3 独立运行模式
嵌入式模式 :UI 可作为嵌入式组件集成到你的任意 Spring Boot 应用中。前后端一体,静态资源打包在 JAR 中。
独立部署模式:前后端分离,独立部署。
独立运行前端开发服务器:
bash
# 1. 克隆仓库

git clone https://github.com/alibaba/spring-ai-alibaba.git
cd spring-ai-alibaba/spring-ai-alibaba-studio/agent-chat-ui

# 2. 安装依赖
pnpm install
# 或
# npm install

# 3. 启动应用
pnpm dev
# 或
# npm run dev应用启动后访问:http://localhost:3000
UI 默认连接后端 Agent 地址:http://localhost:8080,可在 .env.development 文件中修改配置:
bash
# .env.development
# 后端 API 地址
NEXT_PUBLIC_API_URL=http://localhost:8080
# 后端应用中调用的 Agent 名称,后端需按需求注册对应 Agent,配置方式参考示例
NEXT_PUBLIC_APP_NAME=research_agent
# 用户 ID
NEXT_PUBLIC_USER_ID=user-001
4.4 自定义 Agent/GraphLoader 加载器
定义了 Agent Graph 的 Loader 机制,自动注册:
- 自动发现所有
Agent类型:ReactAgent、SequentialAgent、ParallelAgent、LlmRoutingAgent等 - 自动发现所有
CompiledGraph类型:与AgentLoader设计一致,但作用于CompiledGraph
AgentLoader 、GraphLoader 接口:
java
public interface AgentLoader {

	@Nonnull
	List<String> listAgents();

	Agent loadAgent(String name);
}
public interface GraphLoader {

	@Nonnull
	List<String> listGraphs();

	CompiledGraph loadGraph(String name);
}
默认从 Spring 容器中进行查找:
java
	protected static Map<String, Agent> discoverFromContext(ApplicationContext context) {
		Map<String, Agent> beans = context.getBeansOfType(Agent.class);
		Map<String, Agent> result = new LinkedHashMap<>();
		for (Agent agent : beans.values()) {
			String name = agent.name();
			if (result.putIfAbsent(name, agent) != null) {
				log.warn("Duplicate agent name '{}', keeping first. Consider using unique agent names for Studio.", name);
			}
		}
		return result;
	}
可以覆盖默认扫描行为,只暴露 chat 和 code 两个 Agent 示例:
java
@Component
public class MyAgentLoader extends AbstractAgentLoader {
    private final Agent chatAgent;
    private final Agent codeAgent;

    public MyAgentLoader(@Qualifier("chatAgent") Agent chatAgent,
                         @Qualifier("codeAgent") Agent codeAgent) {
        this.chatAgent = chatAgent;
        this.codeAgent = codeAgent;
    }

    @Override
    protected Map<String, Agent> loadAgentMap() {
        return Map.of("chat", chatAgent, "code", codeAgent);
    }
}
4.5 生产环境自动关闭
4.5.1 方案一:排除自动配置(推荐)
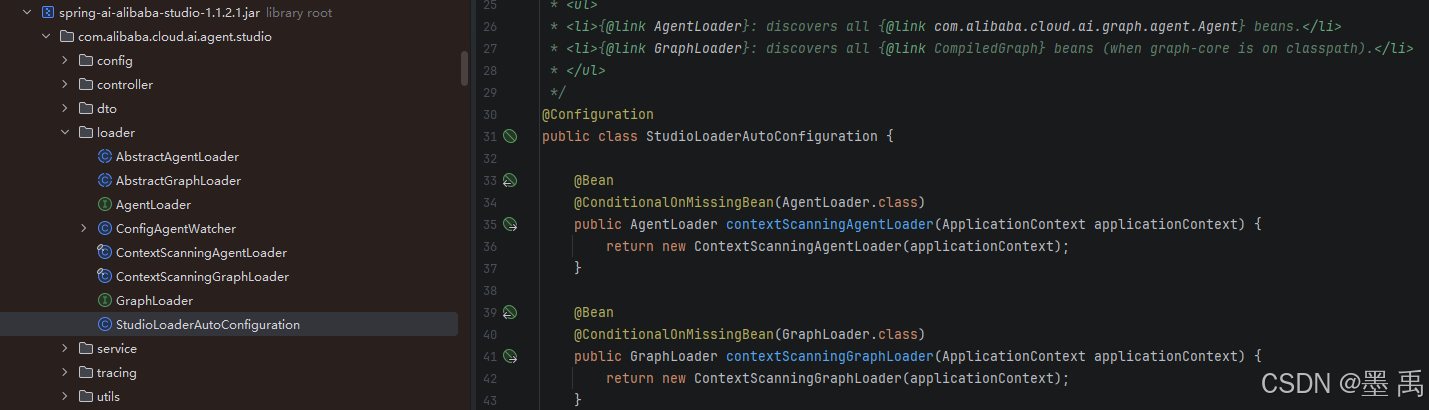
Studio 模块中的自动配置类,会扫描 com.alibaba.cloud.ai.agent.studio 路径,并加载到 Spring 容器中:
java
@Configuration
@ComponentScan(basePackages = "com.alibaba.cloud.ai.agent.studio")
public class SaaStudioWebModuleAutoConfiguration {
	public SaaStudioWebModuleAutoConfiguration() {
		System.out.println("✅ Spring AI Alibaba Studio module loaded!");
	}
}
可以在生成环境的 application.yml 中排除自动配置:
yml
# application-prod.yml
spring:
  autoconfigure:
    exclude:
      - com.alibaba.cloud.ai.agent.studio.loader.StudioLoaderAutoConfiguration
或在启动类:
java
@SpringBootApplication(exclude = {
    StudioLoaderAutoConfiguration.class
})
4.5.2 方案二:Maven 依赖控制
仅测试环境使用:
xml
<dependency>
    <groupId>com.alibaba.cloud.ai</groupId>
    <artifactId>spring-ai-alibaba-studio</artifactId>
    <scope>test</scope>
</dependency>
或使用 profile 区分:
xml
<dependencies>
    <!-- 生产环境不引入 -->
    <dependency>
        <groupId>com.alibaba.cloud.ai</groupId>
        <artifactId>spring-ai-alibaba-studio</artifactId>
        <scope>provided</scope>
        <optional>true</optional>
    </dependency>
</dependencies>