在实际项目里,我们的 Java 代码最终都会运行在 Spring 框架之上。这一节就把这套能力无缝嵌入到 Spring Boot 体系中,让它真正成为一个可对外提供服务的智能应用。
一、LangChain4j 是什么
LangChain4j 是一个专为 Java 设计的 LLM 应用开发框架,2023 年开源。它灵感来自 Python 的 LangChain,但不是简单移植------结合了 Java 语言特性做了大量重新设计。
GitHub: https://github.com/langchain4j/langchain4j
官网文档地址:https://docs.langchain4j.dev/
二、快速上手:从零搭建 Spring Boot + LangChain4j
2.1创建 Spring Boot 项目
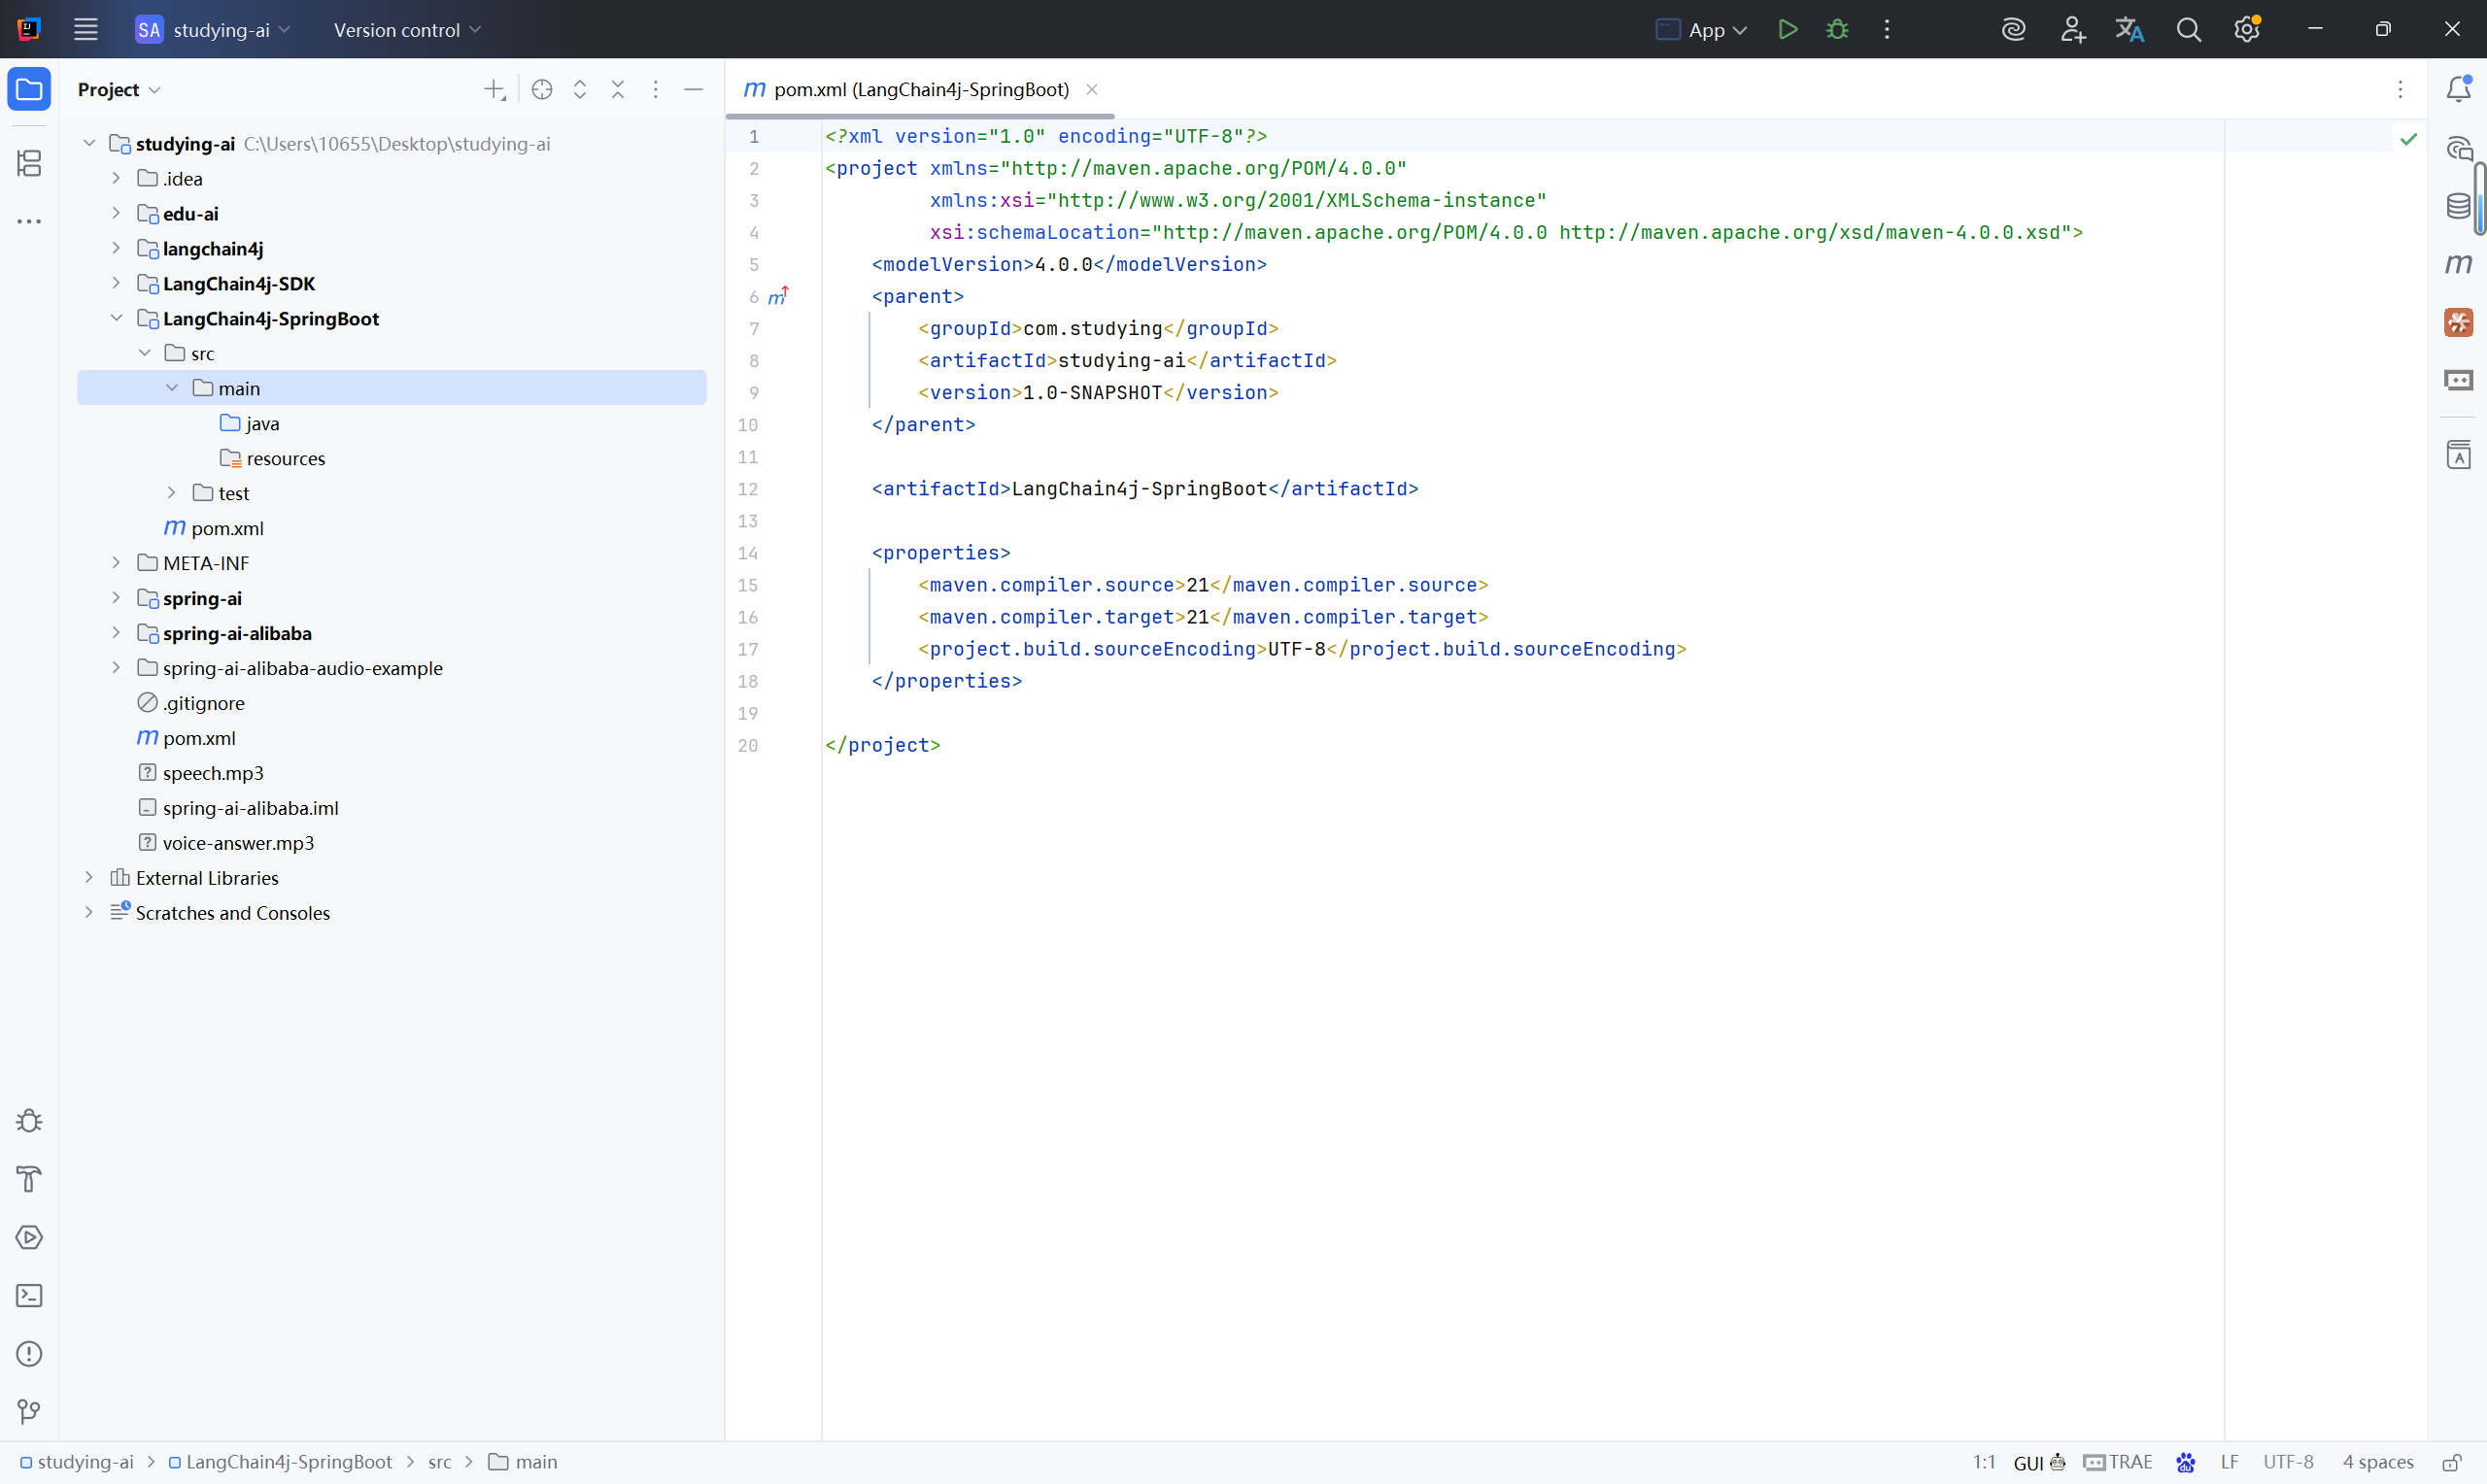
在 IDE 中新建一个 Spring Boot 项目(使用 Spring Initializr 或直接创建 Maven 项目均可),确保 Spring Boot 版本 ≥ 3.0,JDK ≥ 17。
创建一个LangChain4j-SpringBoot项目,本文选用JDK21:
2.2引入 LangChain4j 起步依赖
LangChain4j 提供了专门兼容OpenAI的 Spring Boot Starter,一个依赖搞定自动配置:(2026.05.15最新版)
        <!-- Source: https://mvnrepository.com/artifact/dev.langchain4j/langchain4j-open-ai-spring-boot-starter -->
        <dependency>
            <groupId>dev.langchain4j</groupId>
            <artifactId>langchain4j-open-ai-spring-boot-starter</artifactId>
            <version>1.15.0-beta25</version>
        </dependency>
引入这个 Starter 后,LangChain4j 会自动检测配置并完成 Bean 的注册,我们不需要手动 new 对象了。
Maven仓库地址:https://mvnrepository.com/artifact/dev.langchain4j/langchain4j-open-ai-spring-boot-starter
SpringBoot选用3.5.14:
    <!-- 继承 Spring Boot 父工程:统一管理 Spring Boot 相关依赖版本与插件配置 -->
    <parent>
        <groupId>org.springframework.boot</groupId>
        <artifactId>spring-boot-starter-parent</artifactId>
        <version>3.5.14</version>
        <relativePath/>
    </parent>

        <dependency>
            <groupId>org.springframework.boot</groupId>
            <artifactId>spring-boot-starter-web</artifactId>
        </dependency>
2.3在 application.yml 中配置大模型
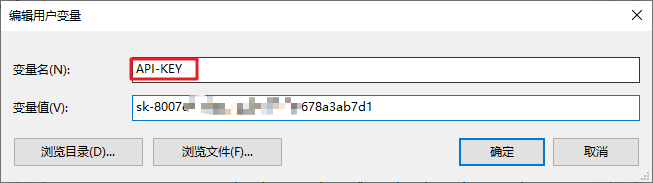
⚠️ 安全提醒:永远不要把 API-KEY 直接写在代码里,一旦提交到 Git 就会造成密钥泄露。
推荐的做法是将 API-KEY 配置到系统环境变量中。
-
打开系统环境变量设置,在 用户变量 中新建一个变量:
-
变量名:
API-KEY -
变量值:你在阿里云百炼平台申请的 API-KEY
-
-
重启 IDEA,让环境变量生效。
application.yml 配置如下:
langchain4j:
  open-ai:
    chat-model:
      base-url: https://dashscope.aliyuncs.com/compatible-mode/v1
      api-key: ${API-KEY}        # 引用环境变量
      model-name: qwen-plus
这里 api-key 使用了 ${API-KEY} 占位符,Spring Boot 会自动从环境变量中读取对应的值,保证了敏感信息不与代码耦合。
启动项目时,起步依赖检测到这些配置后,会自动向 IOC 容器中注入一个 OpenAiChatModel 对象,直接 @Autowired 就能使用。
2.4开发接口,对外暴露大模型能力
创建一个 ChatController,注入 OpenAiChatModel,将 HTTP 请求转发给大模型:
package com.langchan4jSpringBoot.controller;

import dev.langchain4j.model.openai.OpenAiChatModel;
import org.springframework.beans.factory.annotation.Autowired;
import org.springframework.web.bind.annotation.RequestMapping;
import org.springframework.web.bind.annotation.RequestParam;
import org.springframework.web.bind.annotation.RestController;

@RestController
public class ChatController {

    @Autowired
    private OpenAiChatModel openAiChatModel;

    @RequestMapping("/chat")
    public String chat(@RequestParam("message") String message) {
        String result = openAiChatModel.chat(message);
        return result;
    }


}
2.5创建启动类
package com.langchan4jSpringBoot;
import org.springframework.boot.SpringApplication;
import org.springframework.boot.autoconfigure.SpringBootApplication;
@SpringBootApplication
public class LangChain4jSpringBootApplication {
public static void main(String[] args) {
SpringApplication.run(LangChain4jSpringBootApplication.class, args);
}
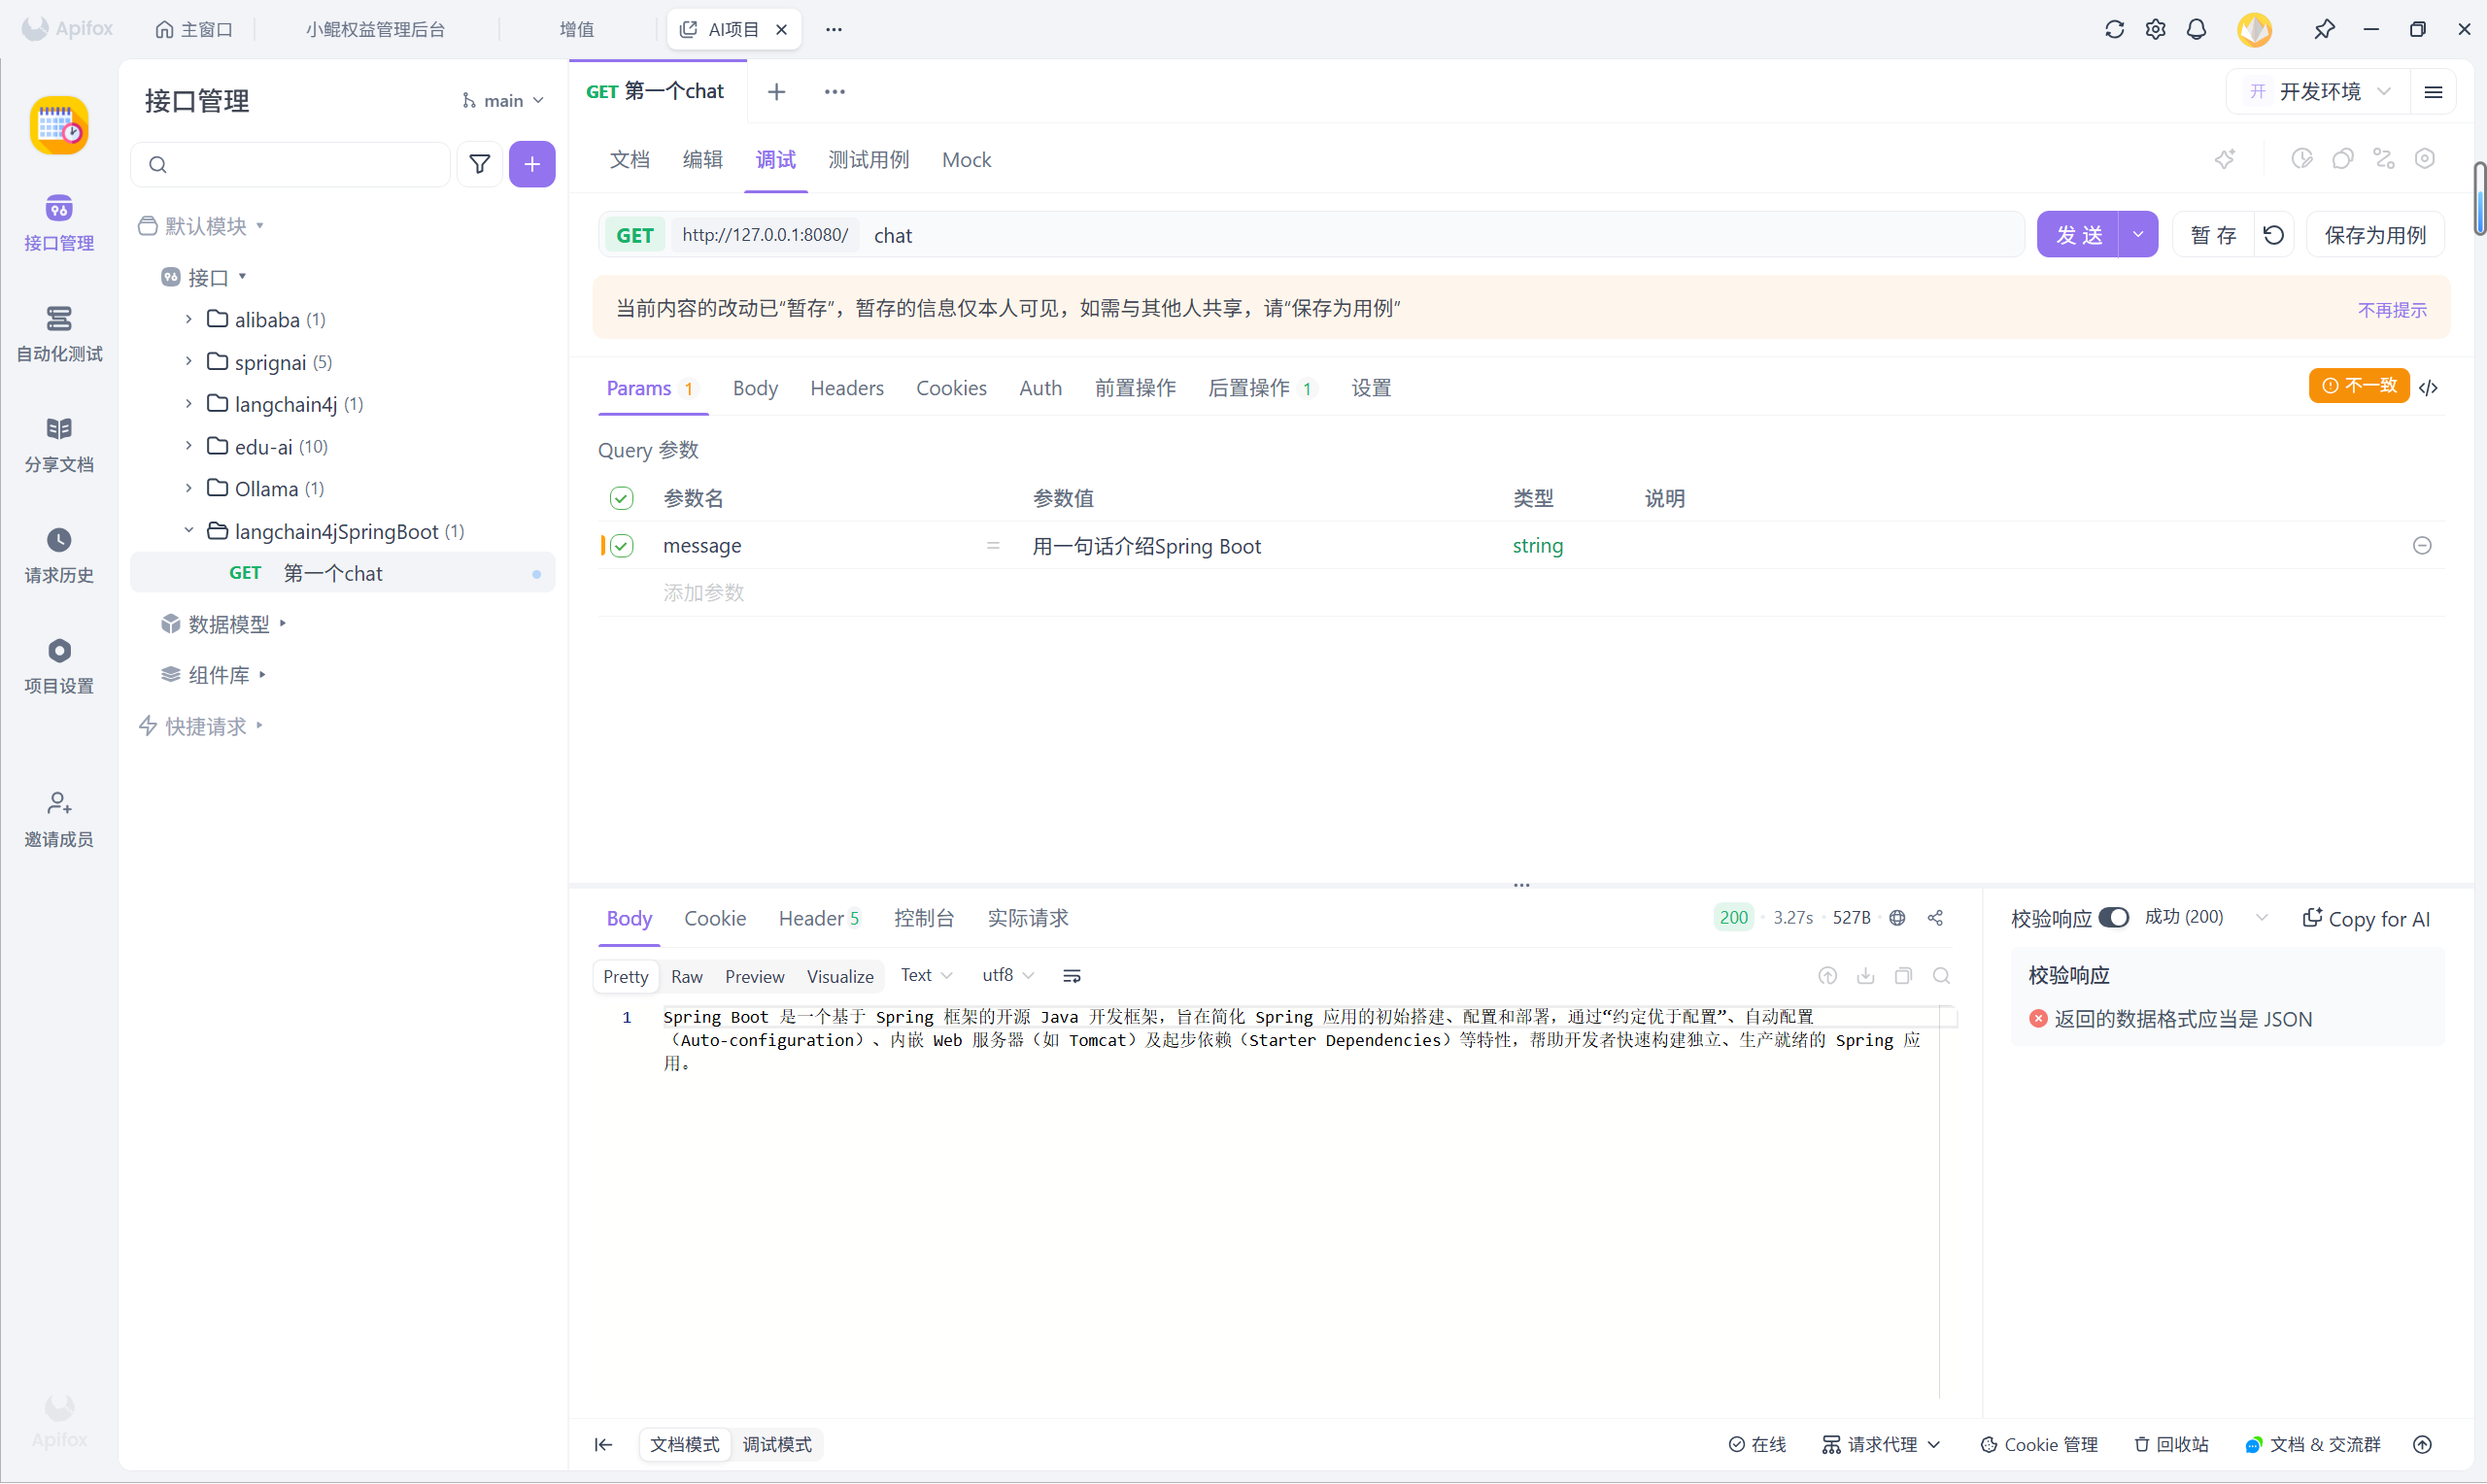
}启动项目后,访问:
http://localhost:8080/chat?message=用一句话介绍Spring Boot浏览器就会返回大模型的回答。至此,你的第一个基于 Spring Boot 的大模型接口已经跑通了。
三、开启日志,让交互过程透明化
开发阶段我们需要观察实际发送的请求和模型返回的原始数据,只需在 application.yml 中打开两个开关即可:
langchain4j:
open-ai:
chat-model:
base-url: https://dashscope.aliyuncs.com/compatible-mode/v1
api-key: ${API-KEY}
model-name: qwen-plus
log-requests: true # 打印请求日志
log-responses: true # 打印响应日志
logging:
level:
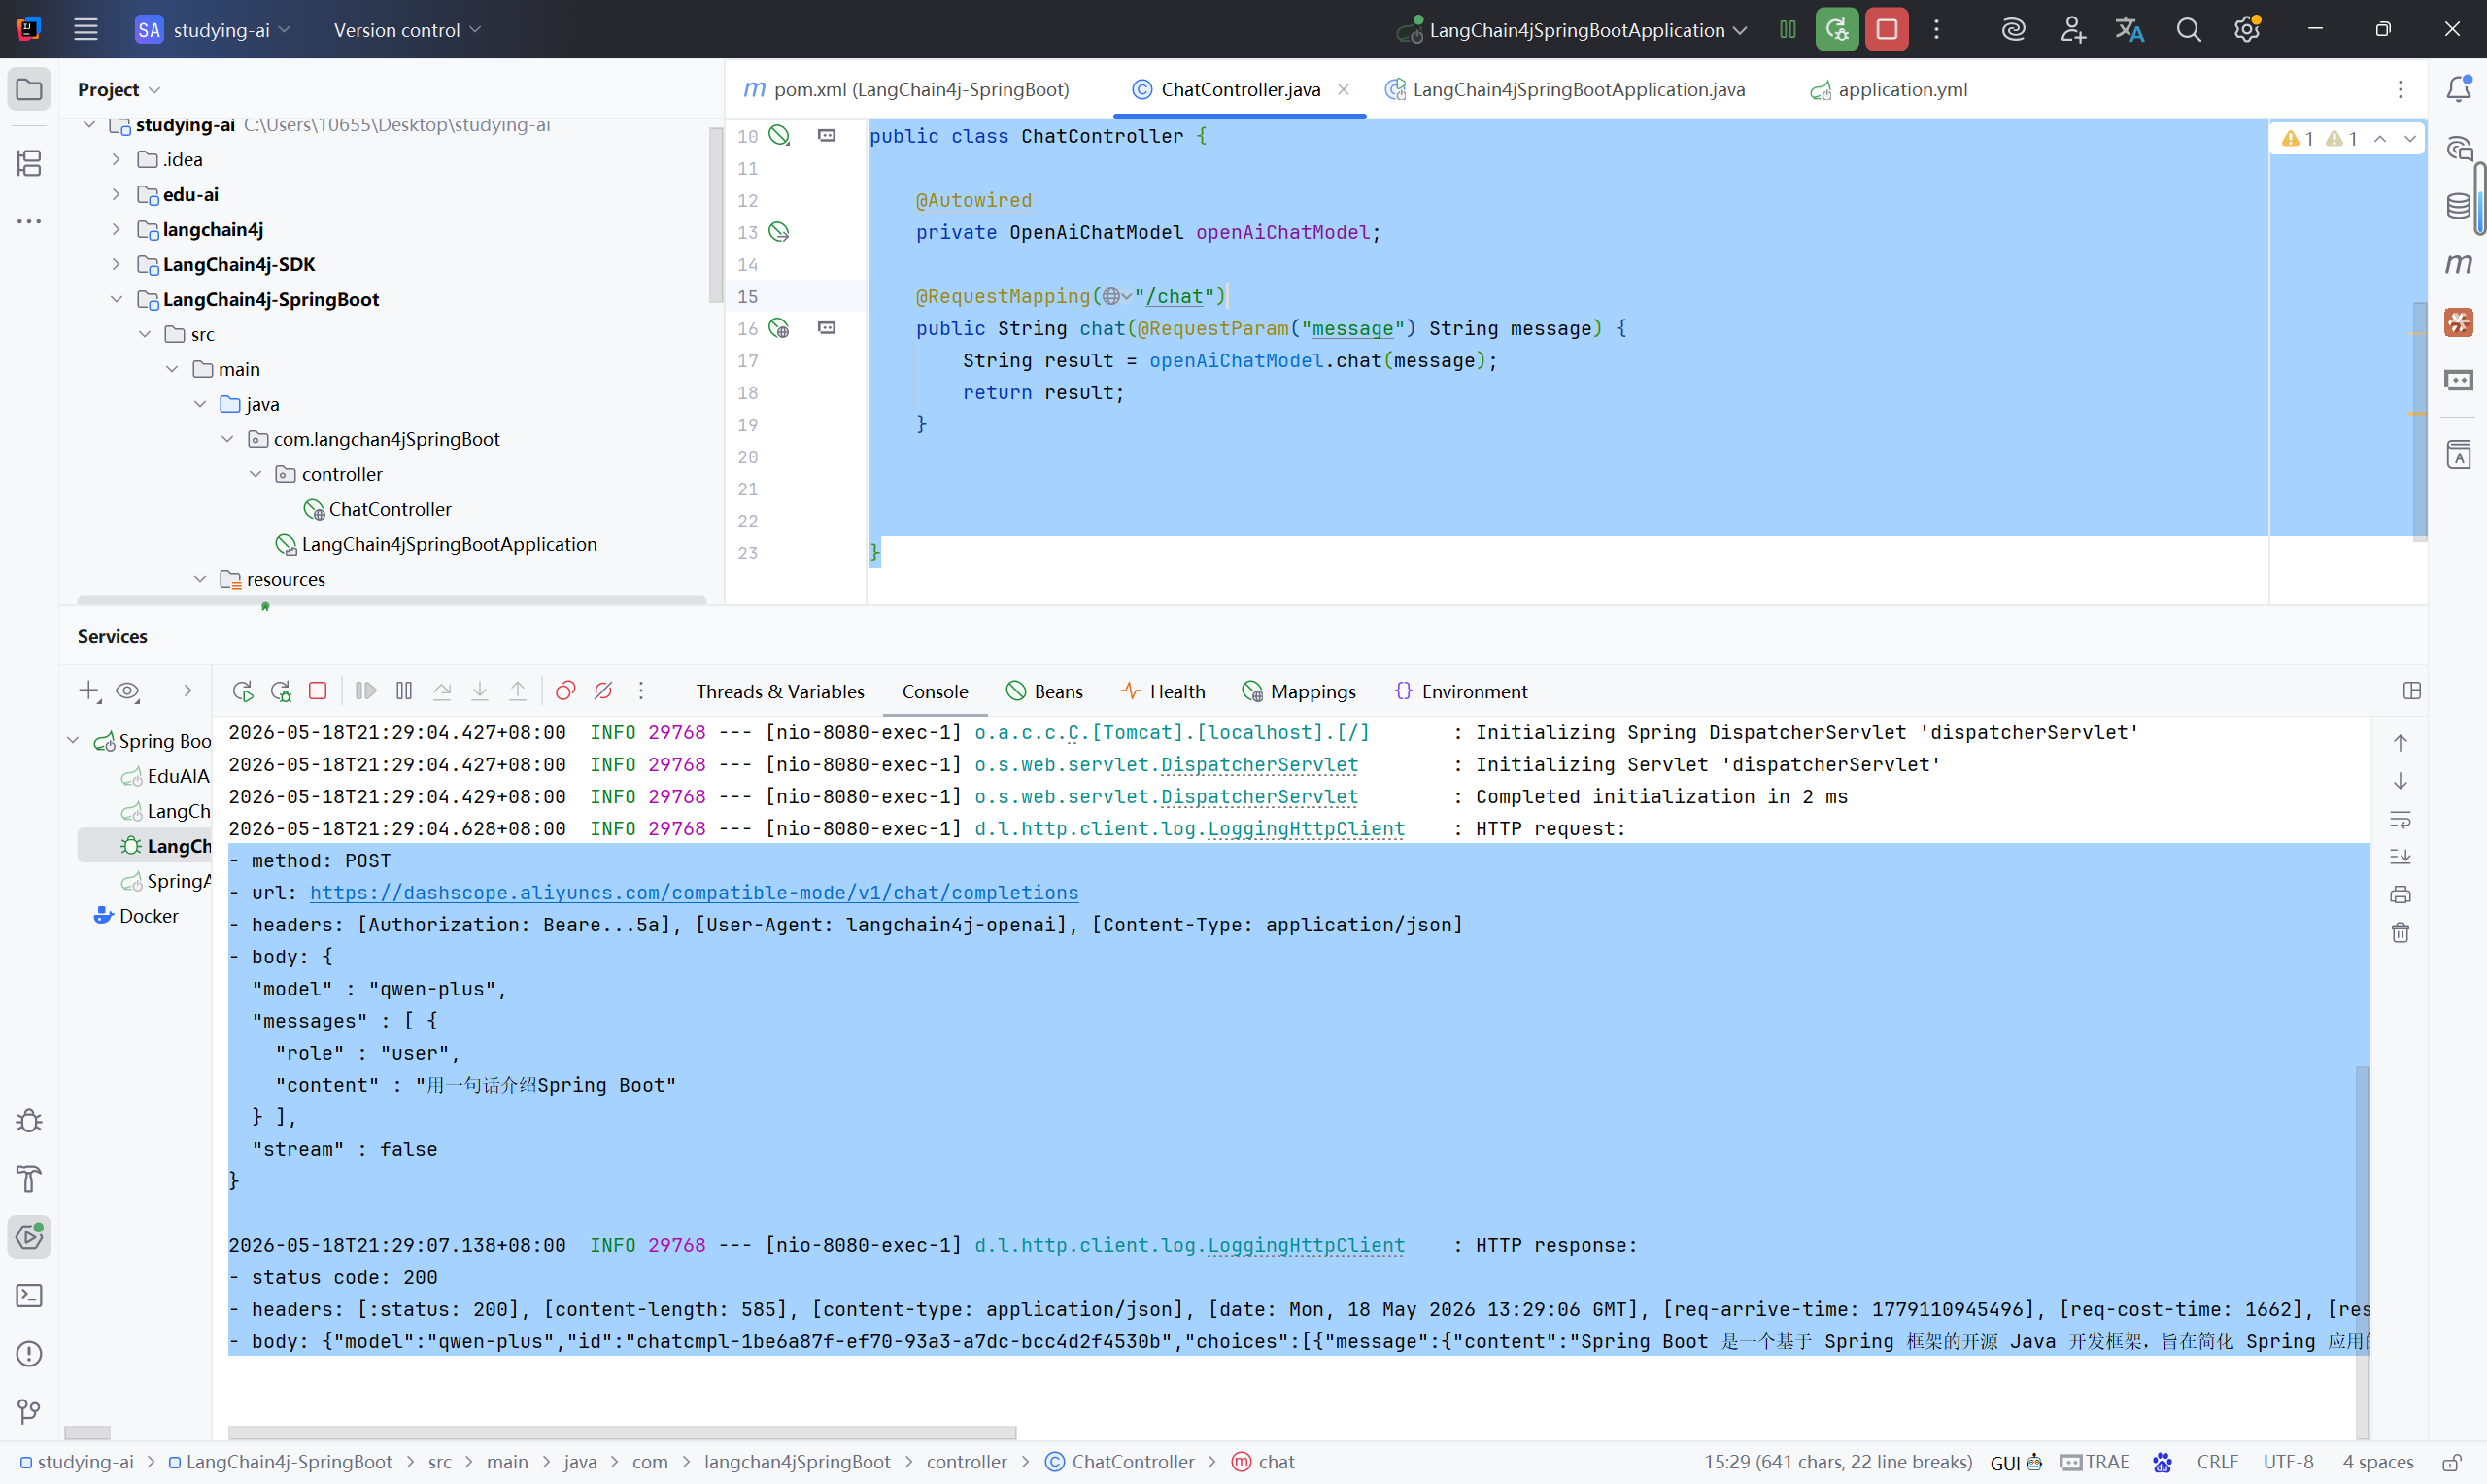
dev.langchain4j: debug # 设置日志级别开启后,控制台会详细输出每次调用的请求体和响应体:
- method: POST
- url: https://dashscope.aliyuncs.com/compatible-mode/v1/chat/completions
- headers: [Authorization: Beare...5a], [User-Agent: langchain4j-openai], [Content-Type: application/json]
- body: {
  "model" : "qwen-plus",
  "messages" : [ {
    "role" : "user",
    "content" : "用一句话介绍Spring Boot"
  } ],
  "stream" : false
}

2026-05-18T21:29:07.138+08:00  INFO 29768 --- [nio-8080-exec-1] d.l.http.client.log.LoggingHttpClient    : HTTP response:
- status code: 200
- headers: [:status: 200], [content-length: 585], [content-type: application/json], [date: Mon, 18 May 2026 13:29:06 GMT], [req-arrive-time: 1779110945496], [req-cost-time: 1662], [resp-start-time: 1779110947159], [server: istio-envoy], [vary: Origin,Access-Control-Request-Method,Access-Control-Request-Headers, Accept-Encoding], [x-dashscope-call-gateway: true], [x-envoy-upstream-service-time: 1662], [x-request-id: 1be6a87f-ef70-93a3-a7dc-bcc4d2f4530b]
- body: {"model":"qwen-plus","id":"chatcmpl-1be6a87f-ef70-93a3-a7dc-bcc4d2f4530b","choices":[{"message":{"content":"Spring Boot 是一个基于 Spring 框架的开源 Java 开发框架,旨在简化 Spring 应用的初始搭建和开发过程,通过自动配置、起步依赖(Starter)和内嵌服务器(如 Tomcat)实现"开箱即用"的快速开发体验。","role":"assistant"},"index":0,"finish_reason":"stop"}],"created":1779110945,"object":"chat.completion","usage":{"total_tokens":73,"completion_tokens":60,"prompt_tokens":13,"prompt_tokens_details":{"cached_tokens":0}}}
这对排查提示词问题、验证参数传递非常有帮助。
四、小结
从独立 Java 程序到 Spring Boot 整合,LangChain4j 的迁移几乎没有成本。核心变化只有三点:
-
依赖 :从
langchain4j-open-ai换成langchain4j-open-ai-spring-boot-starter -
配置 :从代码 Builder 移到
application.yml,API-KEY 引用环境变量 -
使用 :不再手动 new,直接
@Autowired注入 IOC 容器中的 Bean