计算机视觉中的关键点检测是一种用于识别图像中独特点或位置的技术,可用作进一步分析的参考,例如对象识别、姿态估计或运动跟踪等。
本文中,我们将介绍如何使用关键点标记来训练计算机视觉模型来识别水瓶的兴趣点。
然后,我们将使用此信息来估计水瓶的方向。水瓶的方向是指其相对于参考系或轴的旋转对齐或定位。简单来说,它是水瓶相对于某个方向倾斜或转动的角度。
例如,如果您将一个水瓶放在桌子上,并且它完全直立,其底座与桌子表面平行,则其方向将被视为 90 度。如果随后将瓶子稍微向左或向右倾斜,其方向会相应地改变。
在计算机视觉或机器人环境中,确定水瓶的方向可能涉及测量水瓶从预定义的参考方向倾斜或旋转的角度。此信息可用于各种应用,例如自动化系统中的对象检测、操作或跟踪。
确定物体的方向,例如水瓶或任何其他物体,在各个领域都有许多实际应用,例如:
- 在机器人技术中,工业机器人需要精确抓取物体以执行组装、分拣、包装或将物体放置在指定位置等任务。
- 在运输和物流中,将物品装入集装箱、卡车或货机时,了解包裹的方向有助于最大限度地提高空间利用率。
估计瓶子方向的方法
首先,我们需要训练一个关键点检测模型来识别水瓶的顶部和底部关键点。我们将在下一步中介绍如何训练模型。此模型将为我们提供这些关键点的 x 和 y 坐标。然后,使用三角函数,计算由两个点 (x1, y1) 和 (x2, y2) 形成的线段的角度,以估计水瓶的方向,如下所示: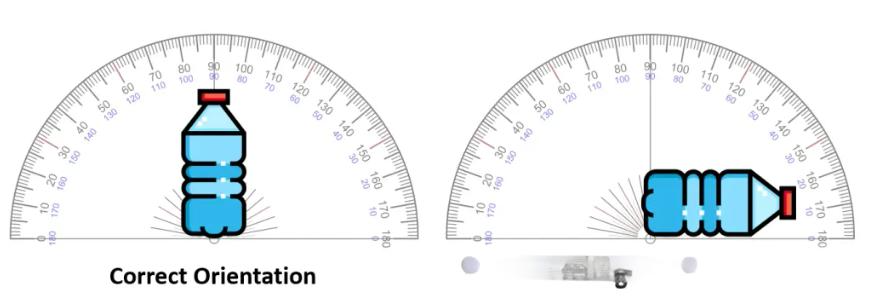
首先,找出 x 坐标 (Δx) 和 y 坐标 (Δy) 的差值: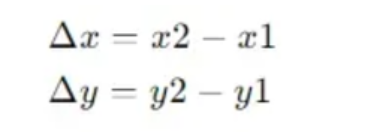
然后,使用 arctangent 函数求角度:

此信息用于估计对象的方向,在我们的示例中,一个具有顶部和底部关键点的水瓶。如果瓶子的底部是直立的,呈 90 度角,则表明方向正确;否则,它被视为不正确。
如果正确识别了对象的关键点,则此概念可用于估计任何物理对象的方向。
详细实现步骤
具体步骤如下:
- 收集和标记水瓶数据集
- 训练关键点检测模型
- 构建应用程序以检测关键点并估计水瓶的方向
步骤 #1:收集并标记水瓶数据集
手动采集水瓶的数据集。该数据集包含以三个不同方向放置的水瓶,如下图所示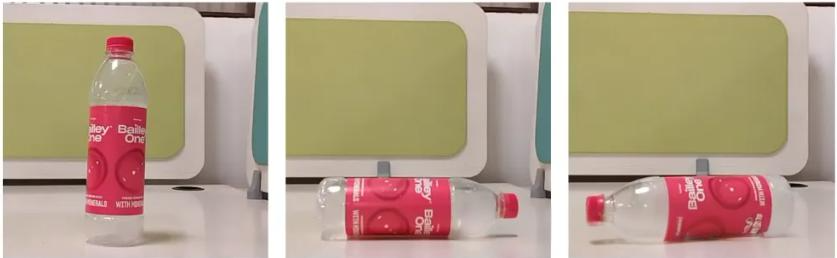
收集数据集后,将其上传到 Roboflow 项目进行标记和训练。要标记数据集,首先需要创建一个关键点骨架。有关如何使用 Roboflow 创建和标记关键点项目的更多详细信息,您可以参考下方链接:
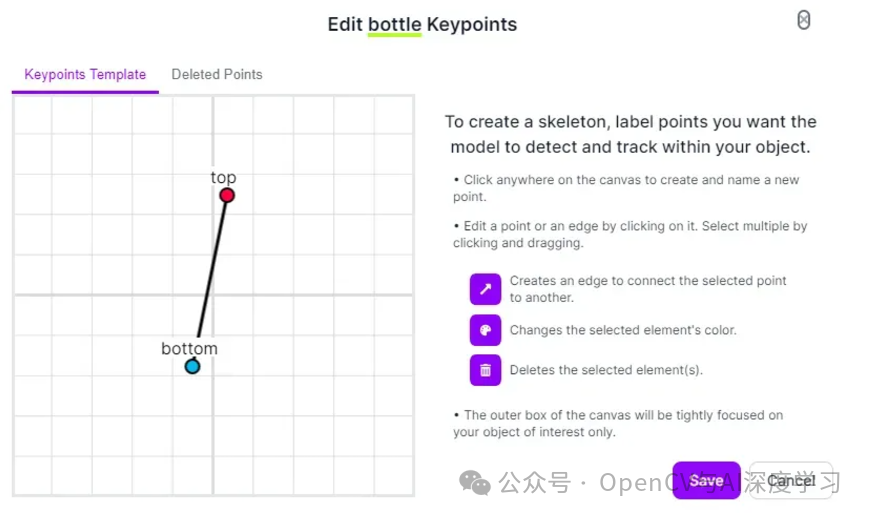
https://blog.roboflow.com/keypoint-detection-on-roboflow/对于此项目,我定义了一个关键点骨架,用于描述顶部点和底部点,如下图所示。
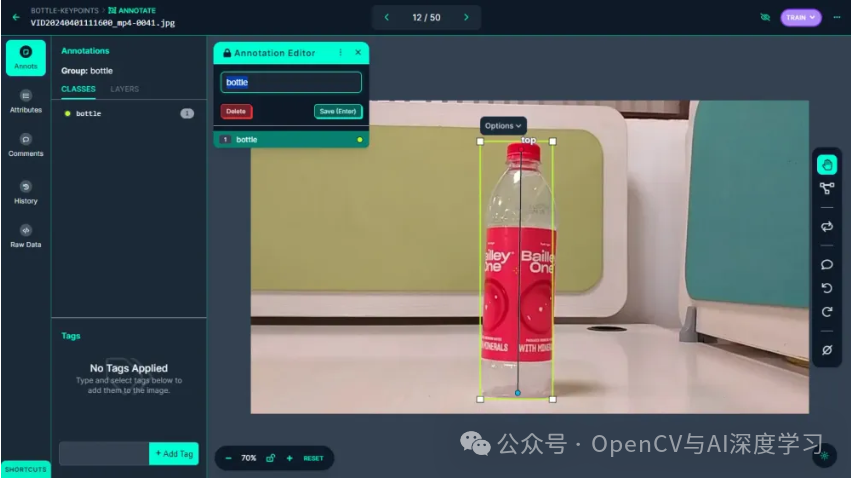
定义关键点骨架类后,它用于通过拖动边界框并将 "top" 和 "bottom" 关键点定位到其所需位置来标记每个图像,如下图所示。
所有图像都使用 keypoint 类进行标记,并生成数据集。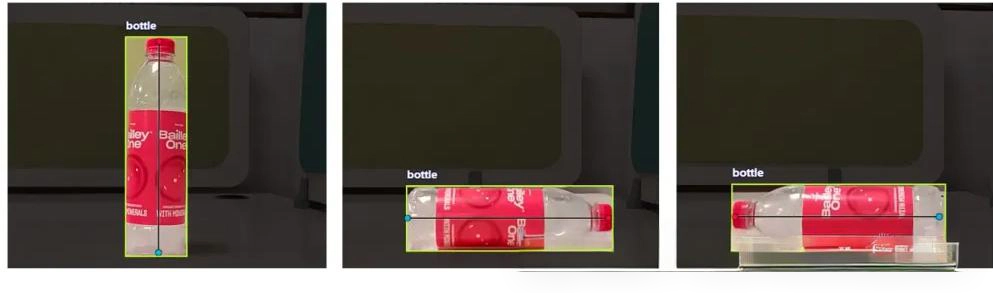
步骤 #2:训练关键点检测模型
完成标记过程后,将生成数据集版本,并使用 Roboflow 自动训练功能对模型进行训练。实现的训练准确率为 99.5%。
该模型会自动部署到云 API。Roboflow 提供了一系列用于测试和部署模型的选项,例如在 Web 浏览器中进行实时测试和部署到边缘设备。随附的图片说明了通过 Roboflow 的 Web 界面进行测试的模型。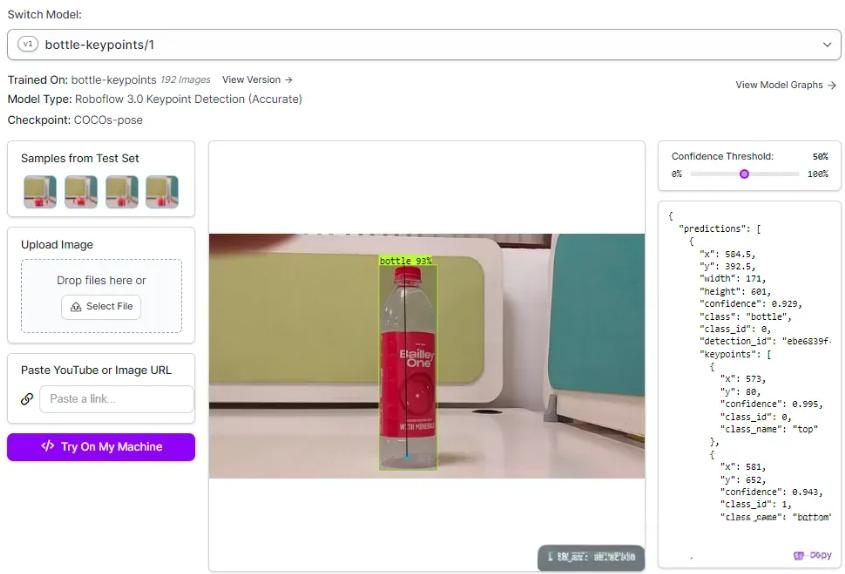
步骤 #3:构建应用程序以检测关键点并估计水瓶的方向
此步骤涉及构建应用程序,以检测实时摄像头源中水瓶的关键点。最初,我们将开发一个基本的 Python 脚本,该脚本能够检测水瓶的关键点,并在图像上用边界框显示它们。为此,我们将使用提供的测试映像。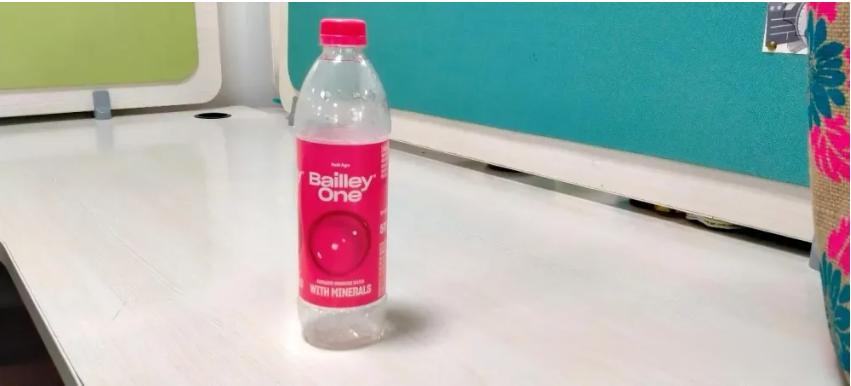
首先,安装 Roboflow Python 包和 Inference SDK 包,我们将使用它们在我们的模型上运行推理:
pip install roboflow inference-sdk inference然后,我们可以编写一个脚本来运行推理。创建新文件并添加以下代码:
python
json_string = json.dumps(json_data)
data = json.loads(json_string )
image = cv2.imread("bottle.jpg")
for prediction in data['predictions']:
    x = int(prediction['x'])
    y = int(prediction['y'])
    width = int(prediction['width'])
    height = int(prediction['height'])

    x1 = int(x - (width / 2))
    y1 = int(y - (height / 2))
    x2 = int(x + (width / 2))
    y2 = int(y + (height / 2))

    # Draw bounding box
    cv2.rectangle(image, (x1, y1), (x2, y2), (0, 255, 0), 2)

    # Draw keypoints
    for keypoint in prediction['keypoints']:
        keypoint_x = int(keypoint['x'])
        keypoint_y = int(keypoint['y'])
        class_name = keypoint['class_name']
        if class_name == 'top':
            color = (0, 0, 255)  # Red color for top keypoints
        elif class_name == 'bottom':
            color = (255, 0, 0)  # Blue color for bottom keypoints
        else:
            color = (0, 255, 0)  # Green color for other keypoints
        cv2.circle(image, (keypoint_x, keypoint_y), 5, color, -1)
cv2.imshow("Image with Bounding Boxes and Keypoints", image)
cv2.waitKey(0)
cv2.destroyAllWindows()
上面的代码以 JSON 格式给出输出,如下所示。此预测结果存储在 json_data 变量中。
{'time': 0.09515731000010419, 'image': {'width': 800, 'height': 360}, 'predictions': [{'x': 341.5, 'y': 196.5, 'width': 309.0, 'height': 85.0, 'confidence': 0.9074831008911133, 'class': 'bottle', 'class_id': 0, 'detection_id': 'bff695c1-df86-4576-83ad-8c802e08774e', 'keypoints': [{'x': 186.0, 'y': 198.0, 'confidence': 0.9994387626647949, 'class_id': 0, 'class_name': 'top'}, {'x': 496.0, 'y': 202.0, 'confidence': 0.9994300007820129, 'class_id': 1, 'class_name': 'bottom'}]}]}我们会将其转换为 JSON 字符串(在以下代码中),然后使用该字符串在测试图像输出上绘制边界框和关键点。
要显示带有关键点检测模型返回的边界框和关键点的图像,我们需要加载图像。然后,我们需要遍历存储在 JSON 字符串中的预测结果,并绘制边界框和关键点,如以下代码所示
python
from inference_sdk import InferenceHTTPClient
import cv2
import json
CLIENT = InferenceHTTPClient(
    api_url="https://detect.roboflow.com",
    api_key="YOUR_API_KEY"
)
# infer on a local image
json_data = CLIENT.infer("bottle.jpg", model_id="bottle-keypoints/1")
print(json_data)
效果如下: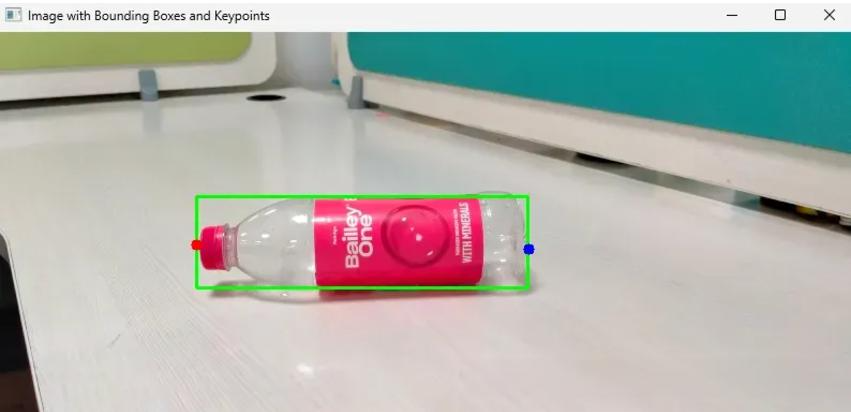
接下来,我们将更新此代码以对视频流执行推理。我们将利用网络摄像头来捕获视频并对视频的每一帧执行推理。
创建新文件并添加以下代码:
python
from inference_sdk import InferenceHTTPClient
import cv2
import json
CLIENT = InferenceHTTPClient(
    api_url="https://detect.roboflow.com",
    api_key="YOUR_API_KEY"
)

defcalculate_angle(x1, y1, x2, y2):
# Calculate the differences in coordinates
    delta_x = x1 - x2
    delta_y = y1 - y2

# Calculate the angle using arctan2 and convert it to degrees
    angle_rad = math.atan2(delta_y, delta_x)
    angle_deg = math.degrees(angle_rad)

# Ensure the angle is between 0 and 360 degrees
    mapped_angle = angle_deg % 360
if mapped_angle < 0:
        mapped_angle += 360# Ensure angle is positive

return mapped_angle

cap = cv2.VideoCapture(0)
 ret, frame = cap.read()

ifnot ret:
break

# Perform inference on the current frame
    json_data = CLIENT.infer(frame, model_id="bottle-keypoints/1")

# Convert JSON data to dictionary
    data = json.loads(json.dumps(json_data))
# Variables to store bottom and top keypoint coordinates
    bottom_x, bottom_y = None, None
    top_x, top_y = None, None

# Iterate through predictions
for prediction in data['predictions']:
        x = int(prediction['x'])
        y = int(prediction['y'])
        width = int(prediction['width'])
        height = int(prediction['height'])

        x1 = int(x - (width / 2))
        y1 = int(y - (height / 2))
        x2 = int(x + (width / 2))
        y2 = int(y + (height / 2))

# Draw bounding box
        cv2.rectangle(frame, (x1, y1), (x2, y2), (0, 255, 0), 2)

# Draw keypoints
for keypoint in prediction['keypoints']:
            keypoint_x = int(keypoint['x'])
            keypoint_y = int(keypoint['y'])
            class_name = keypoint['class_name']
if class_name == 'top':
                color = (0, 0, 255)  # Red color for top keypoints
                top_x, top_y = keypoint_x, keypoint_y
elif class_name == 'bottom':
                color = (255, 0, 0)  # Blue color for bottom keypoints
                bottom_x, bottom_y = keypoint_x, keypoint_y
else:
                color = (0, 255, 0)  # Green color for other keypoints
            cv2.circle(frame, (keypoint_x, keypoint_y), 5, color, -1)
if bottom_x isnotNoneand bottom_y isnotNoneand top_x isnotNoneand top_y isnotNone:
        angle = calculate_angle(bottom_x, bottom_y, top_x, top_y)

# Display the angle on the frame
        cv2.putText(frame, "Angle: {:.2f} degrees".format(angle), (50, 50), cv2.FONT_HERSHEY_SIMPLEX, 1, ( 251, 241, 25), 2)
# Check for orientation
if0 <= angle <= 85or95 <= angle <= 185:  # Angle close to 0 or 180 degrees
            cv2.putText(frame, "Wrong orientation", (50, 100), cv2.FONT_HERSHEY_SIMPLEX, 1, (0, 0, 255), 2)
elif85 <= angle <= 95or265 <= angle <= 275:  # Angle close to 90 degrees
            cv2.putText(frame, "Correct orientation", (50, 100), cv2.FONT_HERSHEY_SIMPLEX, 1, (0, 255, 0), 2)
# Display the frame with predictions and angle
    cv2.imshow('Webcam', frame)

# Check for 'q' key press to exit
if cv2.waitKey(1) & 0xFF == ord('q'):
break

# Release the webcam and close OpenCV windows
cap.release()
cv2.destroyAllWindows()
在我们的代码中,我们使用一个函数来计算模型关键点之间的角度。使用这个角度,我们将确定水瓶的正确方向。
我们可以打开视频流并从网络摄像头捕获帧,对每个帧执行推理,并保存预测结果。然后,我们在捕获的视频的每一帧上绘制边界框和关键点。
在此之后,我们将计算角度并将其显示在视频帧上。
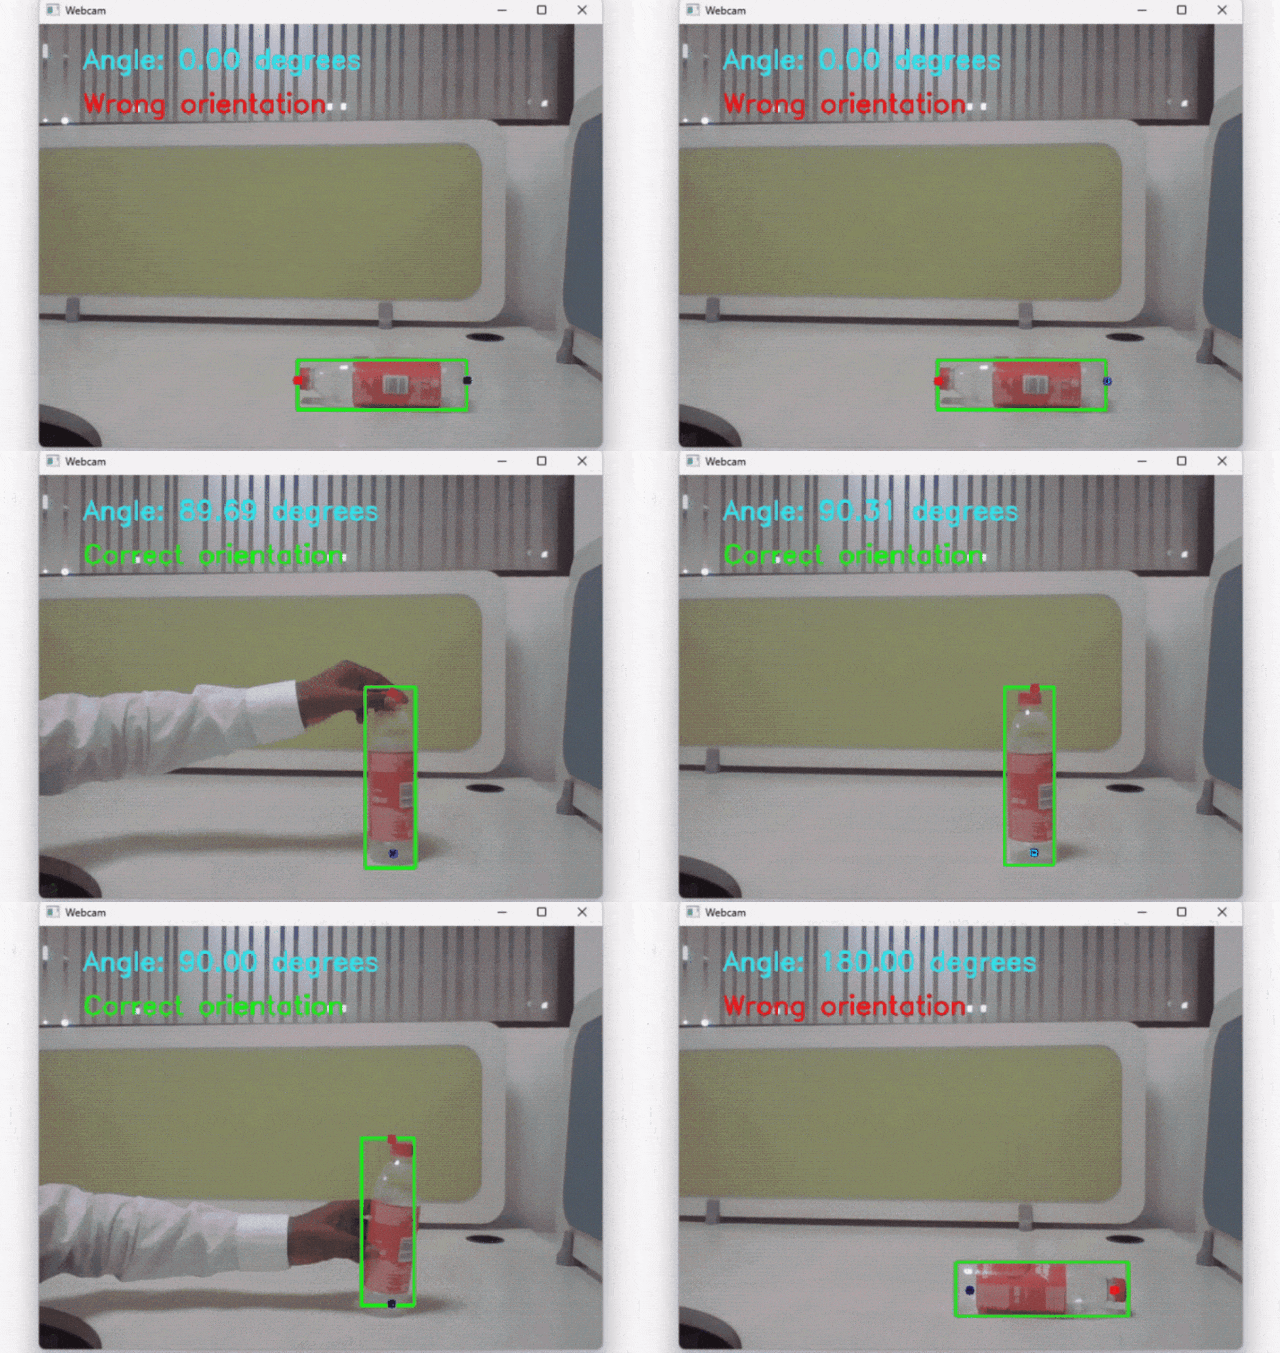
然后,我们可以评估方向,如果瓶子的角度为 90 度,则认为它的位置正确;但是,如果它倾斜接近 0 度或 180 度,则认为它的位置不正确。
这是我们系统的最终输出: