
目录
[2.1 GLM4-9B 模型概述](#2.1 GLM4-9B 模型概述)
[2.2 GLM4-9B 模型架构](#2.2 GLM4-9B 模型架构)
[3.1 GLM4-9B-Chat 语言模型](#3.1 GLM4-9B-Chat 语言模型)
[3.1.1 model.generate](#3.1.1 model.generate)
[3.1.2 model.chat](#3.1.2 model.chat)
[3.2 GLM-4V-9B 多模态模型](#3.2 GLM-4V-9B 多模态模型)
[3.2.1 多模态模型概述](#3.2.1 多模态模型概述)
[3.2.2 多模态模型实践](#3.2.2 多模态模型实践)
一、引言
周一(6.3)写完【机器学习】Qwen1.5-14B-Chat大模型训练与推理实战 ,周二(6.4)首次拿下CSDN热榜第一名,周三(6.5)清华智谱宣布开源GLM-4-9B,今天周四(6.6)马不停蹄开始部署实验+码字。
自ZHIPU AI于2023年3月14日发布ChatGLM-6B,截止目前,该系列已经发布了4代:ChatGLM-6B、ChatGLM2-6B、ChatGLM3-6B以及最新发布的GLM-4-9B。
二、模型简介
2.1 GLM4-9B 模型概述
GLM4-9B相较于上一代ChatGLM3-6B,主要有以下几点变更:
- 预训练数据量提升3倍:在预训练方面,引入了大语言模型进入数据筛选流程,最终获得了 10T 高质量多语言数据。
- 训练效率提高了 3.5 倍:采用了 FP8 技术进行高效的预训练,相较于第三代模型,训练效率提高了 3.5 倍。
- 模型规模提升至 9B:在有限显存的情况下,探索了性能的极限,并发现 6B 模型性能有限。因此,在考虑到大多数用户的显存大小后,将模型规模提升至 9B,并将预训练计算量增加了 5 倍。
综合以上技术升级和其他经验,GLM-4-9B 模型具备了更强大的推理性能 、更长的上下文处理能力 、多语言 、多模态 和 All Tools 等突出能力。GLM-4-9B 系列模型包括:
- **基础版本 GLM-4-9B(8K):**基础版本。
- 对话版本 GLM-4-9B-Chat(128K):人类偏好对齐的版本。除了能进行多轮对话,还具备网页浏览、代码执行、自定义工具调用(Function Call)和长文本推理(支持最大 128K 上下文)等高级功能。
- 超长上下文版本 GLM-4-9B-Chat-1M(1M):支持 1M 上下文长度(约 200 万中文字符)。
- 多模态版本 GLM-4V-9B-Chat(8K): 具备 1120 * 1120 高分辨率下的中英双语多轮对话能力。
官方能力缩影图如下:

2.2 GLM4-9B 模型架构
GLM模型从发布之初,最主要的特点是将encoder-decoder相结合:
- 自编码:随机 MASK 输入中连续跨度的 token
- 自回归:基于自回归空白填充的方法重新构建跨度中的内容
具体模型,这里看一下"原地漫游"大佬在ChatGLM2-6B模型推理流程和模型架构详解 中做的GLM架构图:
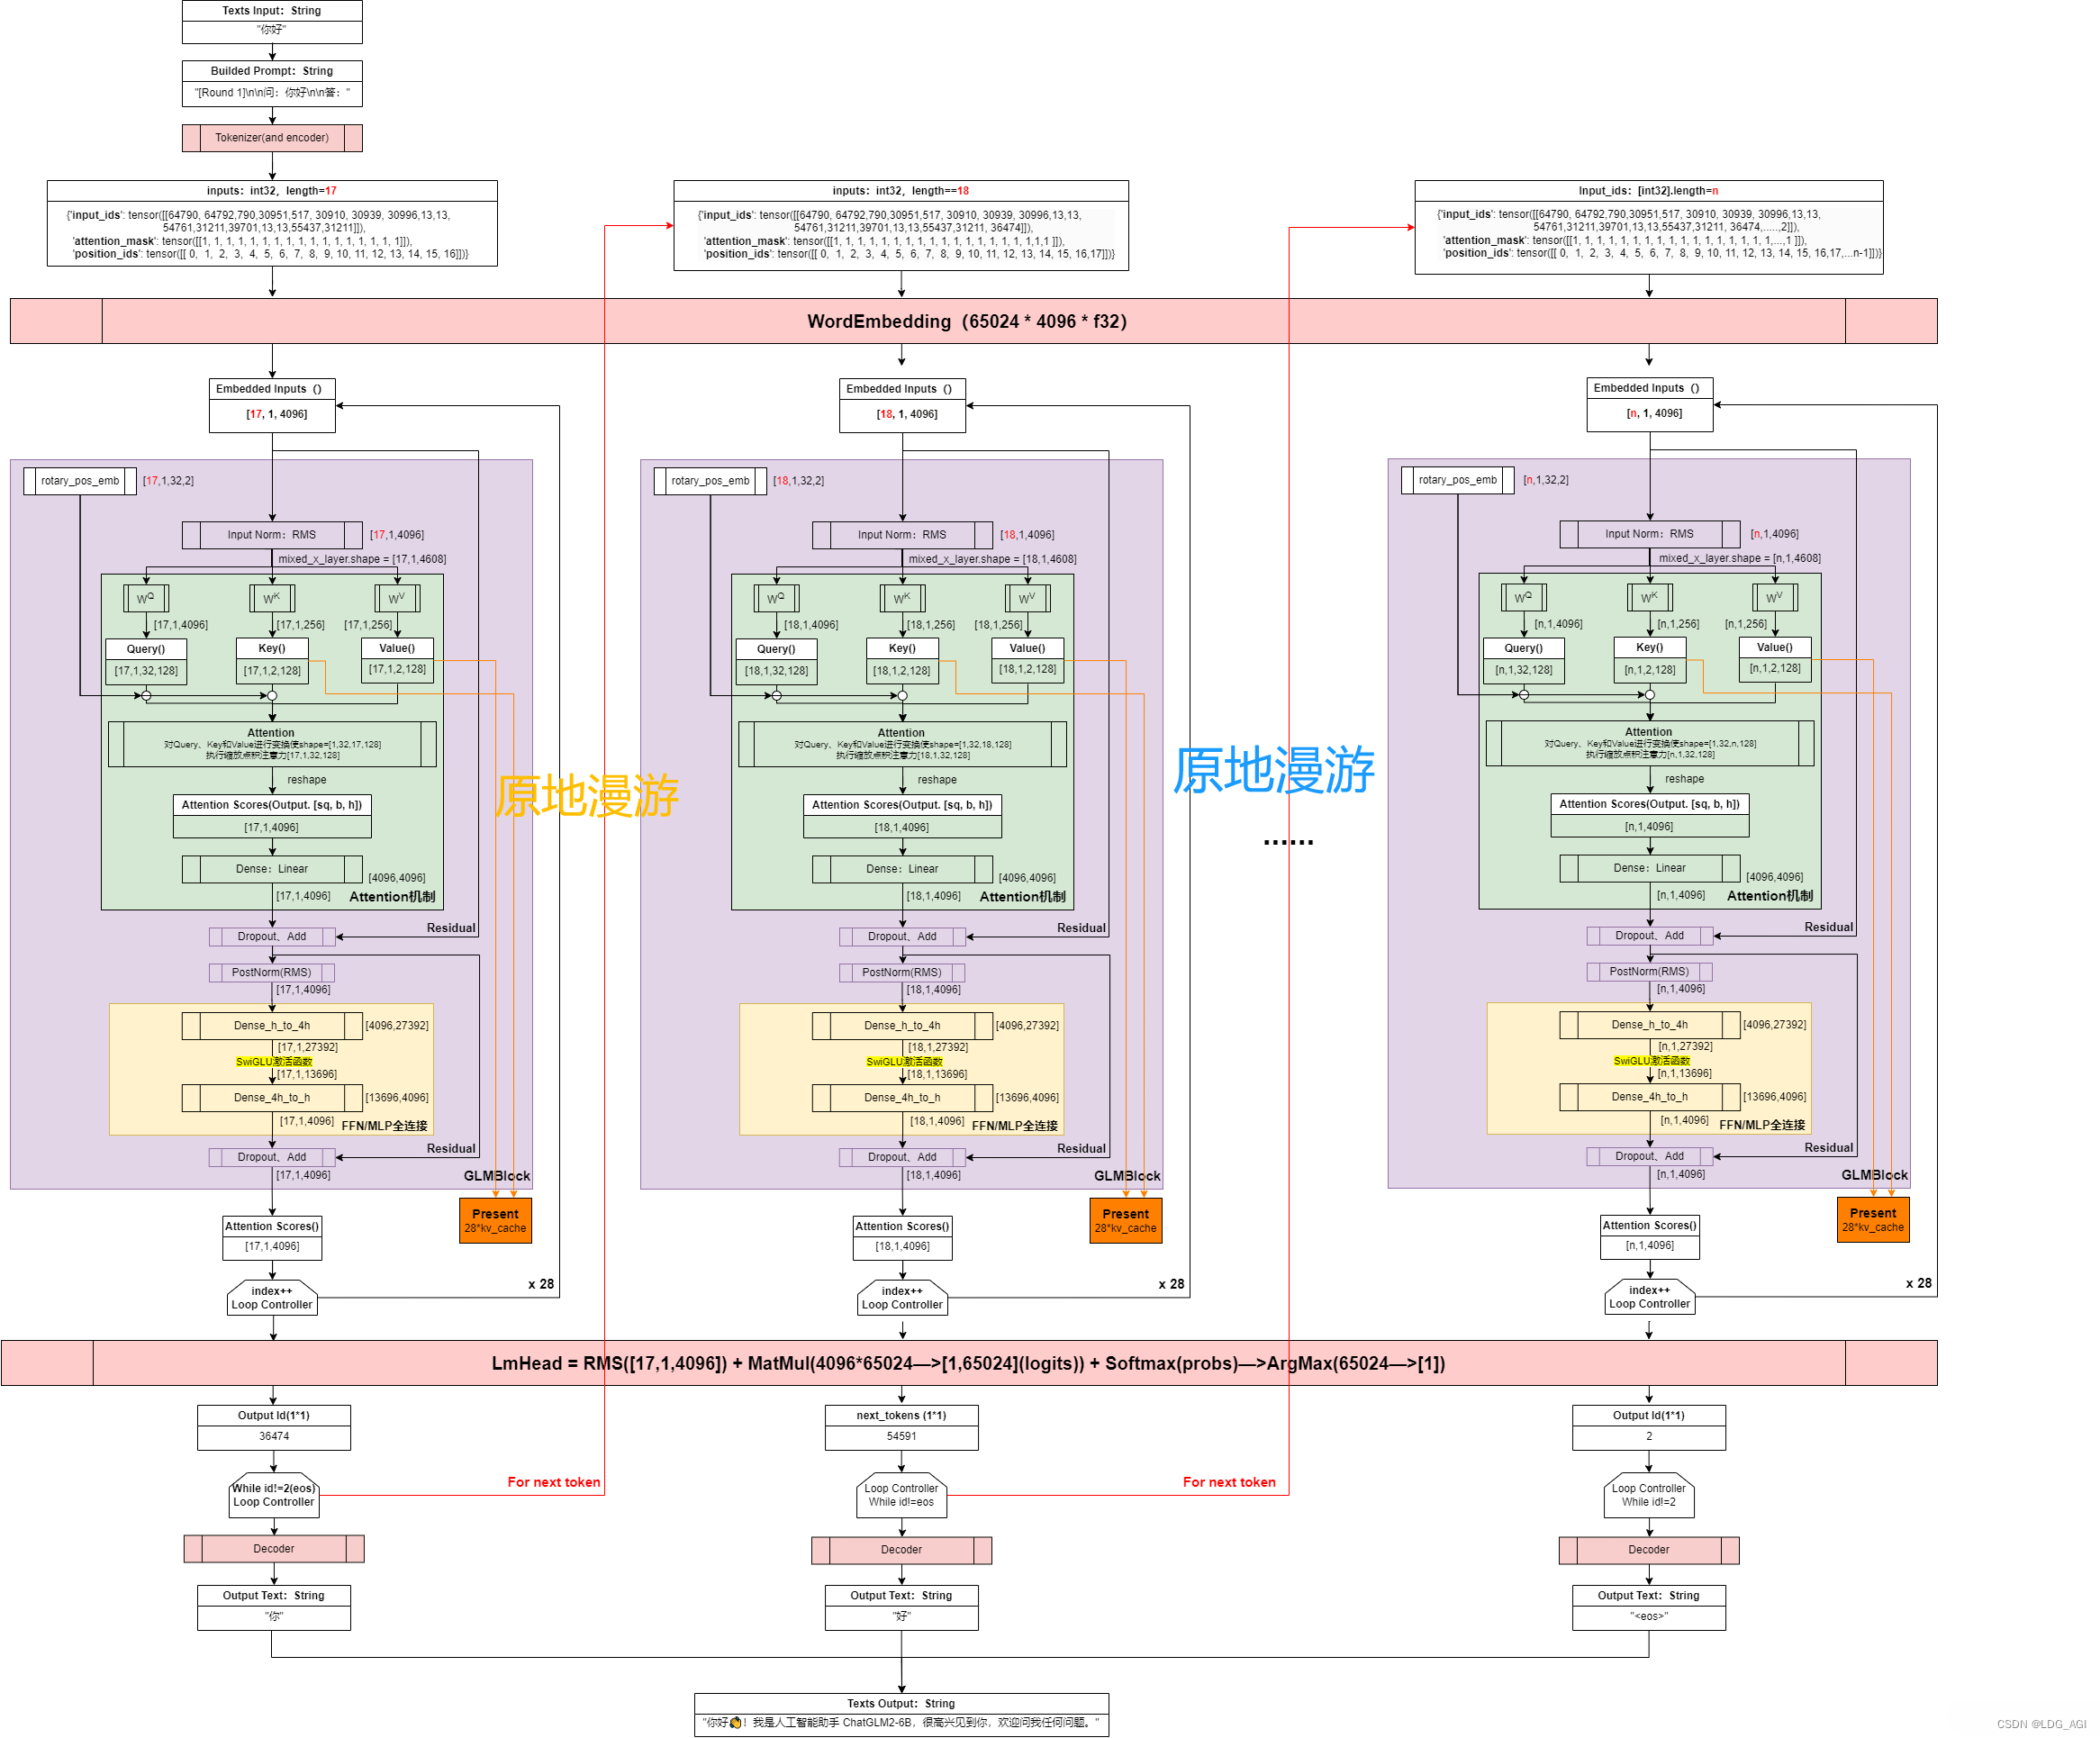
架构中包含输入层、Embedding层、GLMBlock*28层、RMS层、输出层,以及Residual网络和Rope。其中最核心的在于GLMBlock*28
- 输入层 :
- Tokenizer:将输入的文本序列转换为字或词标记的序列
- Input_ids:将Tokenizer生成的词标记ID化。
- Embedding层 :
- 将每个ID映射到一个固定维度的向量,生成一个向量序列作为模型的初始输入表示
- GLMBlock*28 :重复28次,类似qwen1.5中将layer堆叠,包含2个大部分
- **Self-Attention:**先将输入进行Q、K、V矩阵映射,引入RoPE位置网络后,再进行attention注意力计算,最后线性变换为输入同样的维度。输出后引入残差网络、Dropout、RMSNorm等方法方式过拟合。
- **Feed-Forward Network (MLP):**经过两层全连接变换,最多扩至13696维度(GLM4,ChatGLM3均为13696,ChatGLM2是27392),提升表征能力。激活函数使用Swiglu代替Relu。与self-attention的输出后一样,同样引入Dropout、RMSNorm方法。
- **RMSNorm层:**标准化,这里使用RMSNorm(均方根标准化)代替LayerNorm(层标准化),具有加速训练和改善模型的泛化能力的效果,在实际的推荐系统工作中经常用到BatchNorm(批量标准化),在神经元激活函数前,加上一个BN层,使得每个批次的神经元输出遵循标准正态分布,解决深度传播过程中随数据分布产生的协变量偏移问题。
- **输出层:**将将embedding转换会字词编码,之后decode为我们看到的文字。
- **Residual Connection:**残差连接网络,在深度学习中经常用到的技巧,在神经网络的层与层之间添加一个直接的连接,允许输入信号无损地传递到较深的层。这样设计的目的是为了缓解梯度消失和梯度爆炸问题,同时促进梯度在深层网络中的流畅传播,使得训练更高效,模型更容易学习复杂的特征
- **Rotary Position Embedding(RoPE):**旋转位置编码,Qwen、LLaMA也在用,可以更好的学习词之间的位置信息。
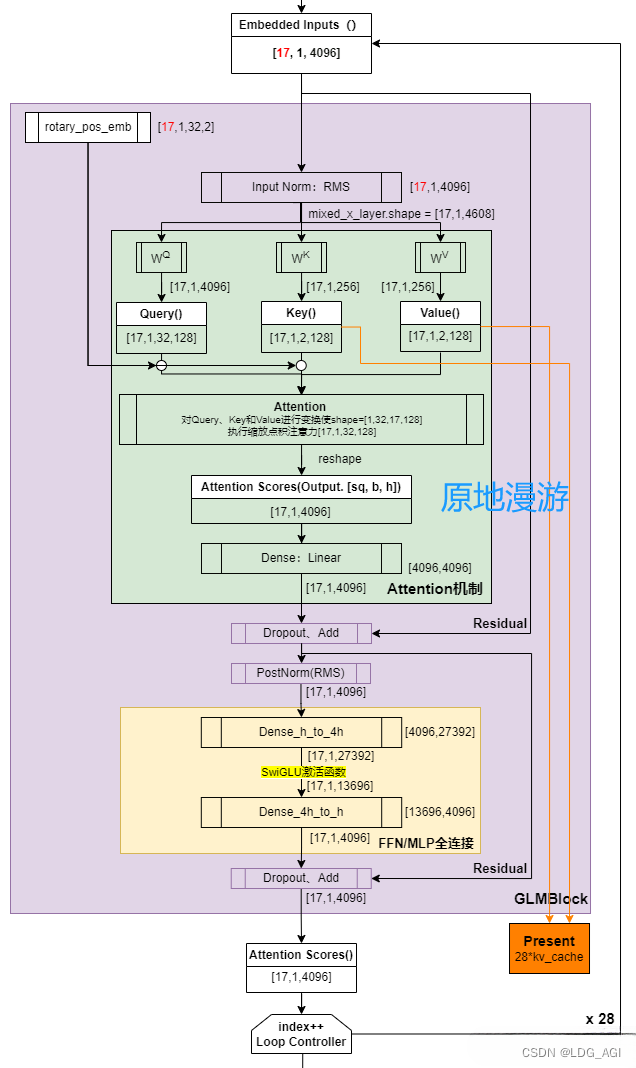
附GLMBlock官方源码:
python
class GLMBlock(torch.nn.Module):
    """A single transformer layer.
    Transformer layer takes input with size [s, b, h] and returns an
    output of the same size.
    """

    def __init__(self, config: ChatGLMConfig, layer_number, device=None):
        super(GLMBlock, self).__init__()
        self.layer_number = layer_number

        self.apply_residual_connection_post_layernorm = config.apply_residual_connection_post_layernorm

        self.fp32_residual_connection = config.fp32_residual_connection

        LayerNormFunc = RMSNorm if config.rmsnorm else LayerNorm
        # Layernorm on the input data.
        self.input_layernorm = LayerNormFunc(config.hidden_size, eps=config.layernorm_epsilon, device=device,
                                             dtype=config.torch_dtype)

        # Self attention.
        self.self_attention = SelfAttention(config, layer_number, device=device)
        self.hidden_dropout = config.hidden_dropout

        # Layernorm on the attention output
        self.post_attention_layernorm = LayerNormFunc(config.hidden_size, eps=config.layernorm_epsilon, device=device,
                                                      dtype=config.torch_dtype)

        # MLP
        self.mlp = MLP(config, device=device)

    def forward(
            self, hidden_states, attention_mask, rotary_pos_emb, kv_cache=None, use_cache=True,
    ):
        # hidden_states: [s, b, h]

        # Layer norm at the beginning of the transformer layer.
        layernorm_output = self.input_layernorm(hidden_states)
        # Self attention.
        attention_output, kv_cache = self.self_attention(
            layernorm_output,
            attention_mask,
            rotary_pos_emb,
            kv_cache=kv_cache,
            use_cache=use_cache
        )

        # Residual connection.
        if self.apply_residual_connection_post_layernorm:
            residual = layernorm_output
        else:
            residual = hidden_states

        layernorm_input = torch.nn.functional.dropout(attention_output, p=self.hidden_dropout, training=self.training)
        layernorm_input = residual + layernorm_input

        # Layer norm post the self attention.
        layernorm_output = self.post_attention_layernorm(layernorm_input)

        # MLP.
        mlp_output = self.mlp(layernorm_output)

        # Second residual connection.
        if self.apply_residual_connection_post_layernorm:
            residual = layernorm_output
        else:
            residual = layernorm_input

        output = torch.nn.functional.dropout(mlp_output, p=self.hidden_dropout, training=self.training)
        output = residual + output

return output, kv_cache附GLMBlock大图(by 原地漫游):
三、模型推理
3.1 GLM4-9B-Chat 语言模型
以为官方样例代码直接就能跑,结果由于网络、GPU、依赖包版本问题卡了好久(有趣的是,GLM卡了太长时间,于是先去Qwen1.5官网找了源码,调通后平移到GLM。这怎么评价呢):
- 网络:使用modelscope代替huggingface下载模型
- GPU:transformers支持多种GPU指定方式,这里用到了两种,均以字符串"cuda:2"形式指定
- tokenizer或model变量后加.to("cuda:2")方法
- 在from_pretrained里加入device_map="cuda:2"参数。
- pip安装依赖包:transformers、mdeolscope、torch==2.3.0、torchvision==0.18.0,最好用腾讯源安装,节约很多时间
bashpip install torch==2.3.0 -i https://mirrors.cloud.tencent.com/pypi/simple
3.1.1 model.generate
需要apply_chat_template(应用对话模版)引入对话messages数组以及设置add_generation_prompt=True对含有对话角色的message输入进行解析处理。大致意思就是将多个对话安装顺序展开成一行,并在每个角色对话之间加入"特殊符号"分割区分。具体可以参考如何设置transformers的聊天模板chat_template?
python
from modelscope import snapshot_download
from transformers import AutoTokenizer, AutoModelForCausalLM
model_dir = snapshot_download('ZhipuAI/glm-4-9b-chat')
import torch

device = "cuda:2" # the device to load the model onto

tokenizer = AutoTokenizer.from_pretrained(model_dir,trust_remote_code=True)

prompt = "介绍一下大语言模型"
messages = [
    {"role": "system", "content": "你是一个智能助理."},
    {"role": "user", "content": prompt}
]
text = tokenizer.apply_chat_template(
    messages,
    tokenize=False,
    add_generation_prompt=True
)
model_inputs = tokenizer([text], return_tensors="pt").to(device)

model = AutoModelForCausalLM.from_pretrained(
    model_dir,
    device_map="cuda:2",
    trust_remote_code=True
)

gen_kwargs = {"max_length": 512, "do_sample": True, "top_k": 1}
with torch.no_grad():
    outputs = model.generate(**model_inputs, **gen_kwargs)
    outputs = outputs[:, model_inputs['input_ids'].shape[1]:]
    print(tokenizer.decode(outputs[0], skip_special_tokens=True))

"""
generated_ids = model.generate(
    model_inputs.input_ids,
    max_new_tokens=512
)
generated_ids = [
    output_ids[len(input_ids):] for input_ids, output_ids in zip(model_inputs.input_ids, generated_ids)
]

response = tokenizer.batch_decode(generated_ids, skip_special_tokens=True)[0]
print(response)

"""
运行结果如下:
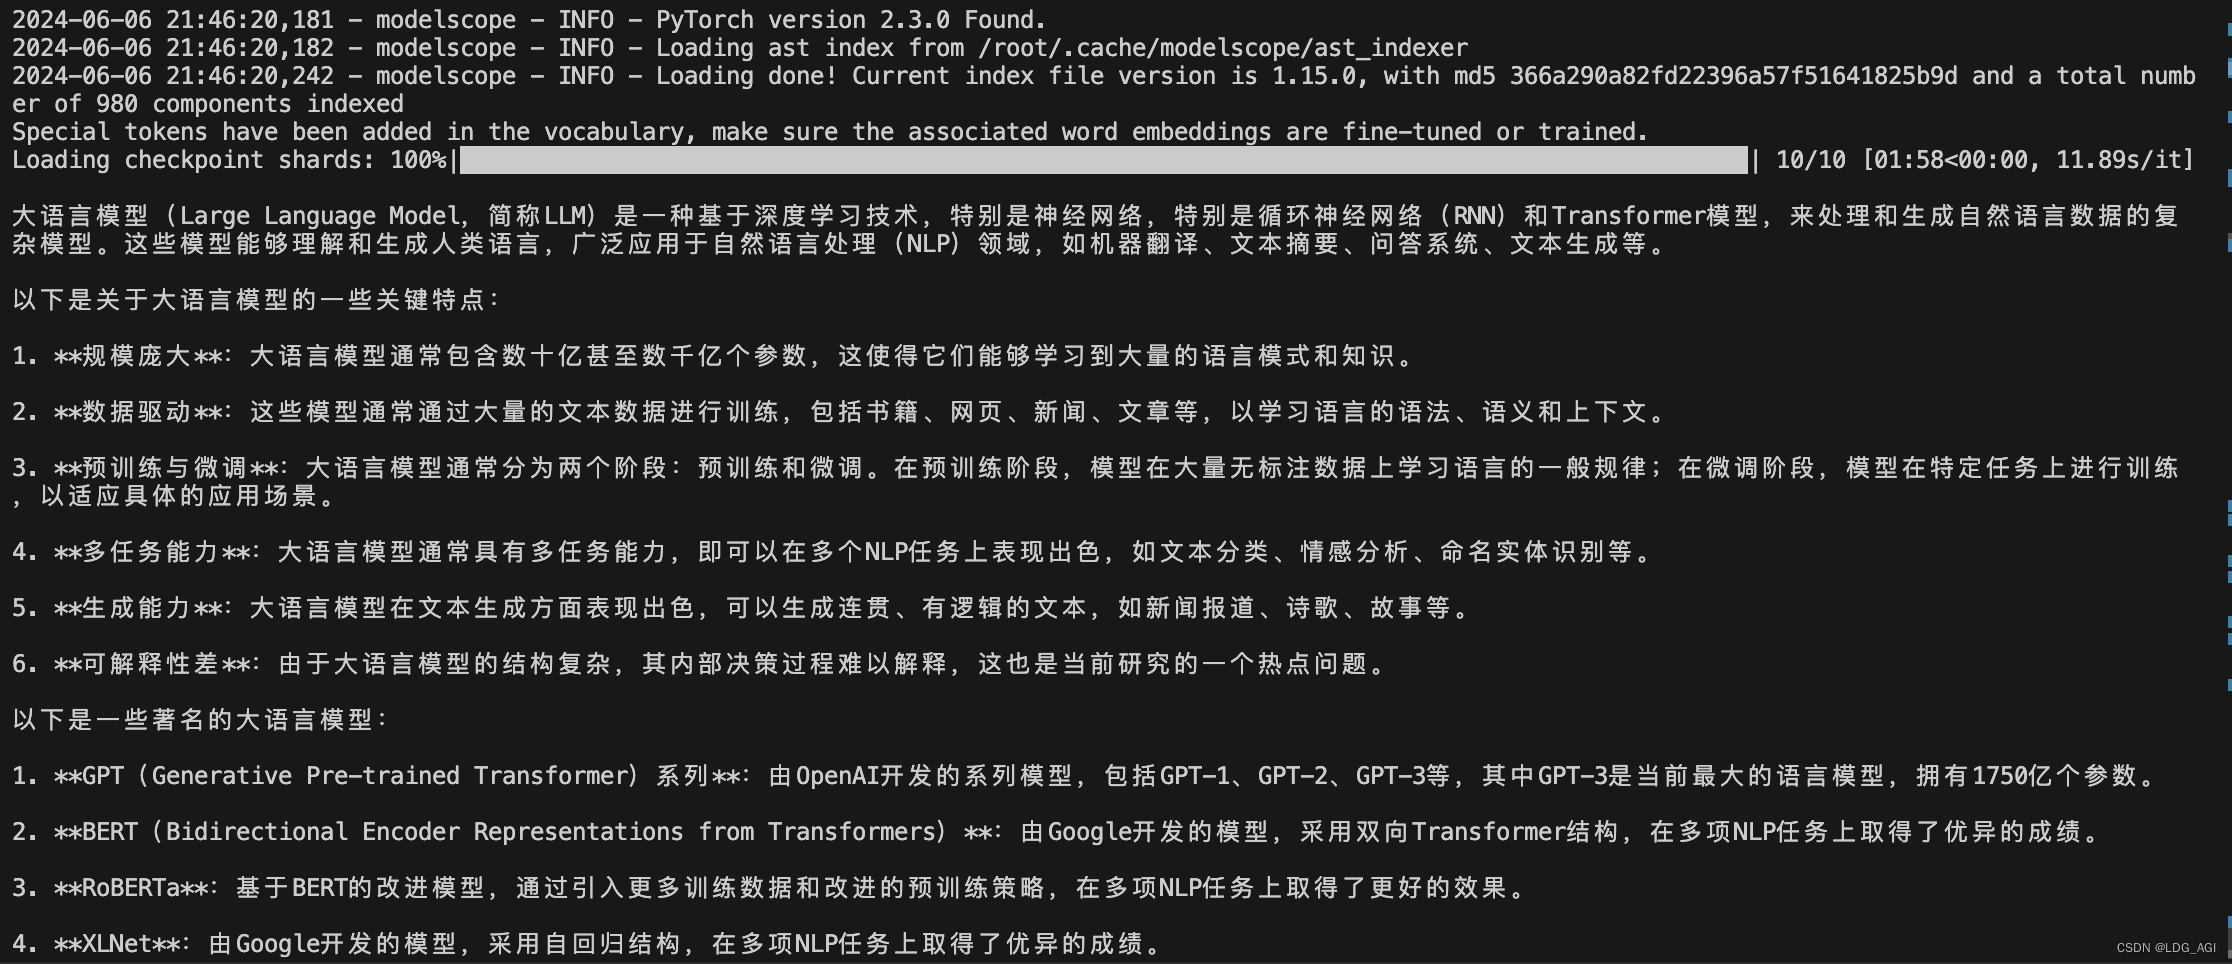
共计消耗GPU显存18G

3.1.2 model.chat
代码干净简洁好理解,并可以轻松实现多轮对话。只需要实例化tokenizer和model就可以了。ChatGLM和Qwen1.0早期均采用model.chat直接生成对话作为样例,后来可能系统提示词system prompt太刚需了,所以都采用apply_chat_template了。是这样吗?
python
from modelscope import snapshot_download
from transformers import AutoTokenizer, AutoModelForCausalLM
model_dir = snapshot_download('ZhipuAI/glm-4-9b-chat')
#from modelscope import AutoModelForCausalLM, AutoTokenizer
#from modelscope import GenerationConfig
tokenizer = AutoTokenizer.from_pretrained(model_dir, trust_remote_code=True)
model = AutoModelForCausalLM.from_pretrained(model_dir, device_map="cuda:2", trust_remote_code=True, torch_dtype=torch.bfloat16).eval()
#model.generation_config = GenerationConfig.from_pretrained("ZhipuAI/glm-4-9b-chat", trust_remote_code=True) # 可指定不同的生成长度、top_p等相关超参
response, history = model.chat(tokenizer, "你好", history=None)
print(response)
response, history = model.chat(tokenizer, "浙江的省会在哪里?", history=history)
print(response)
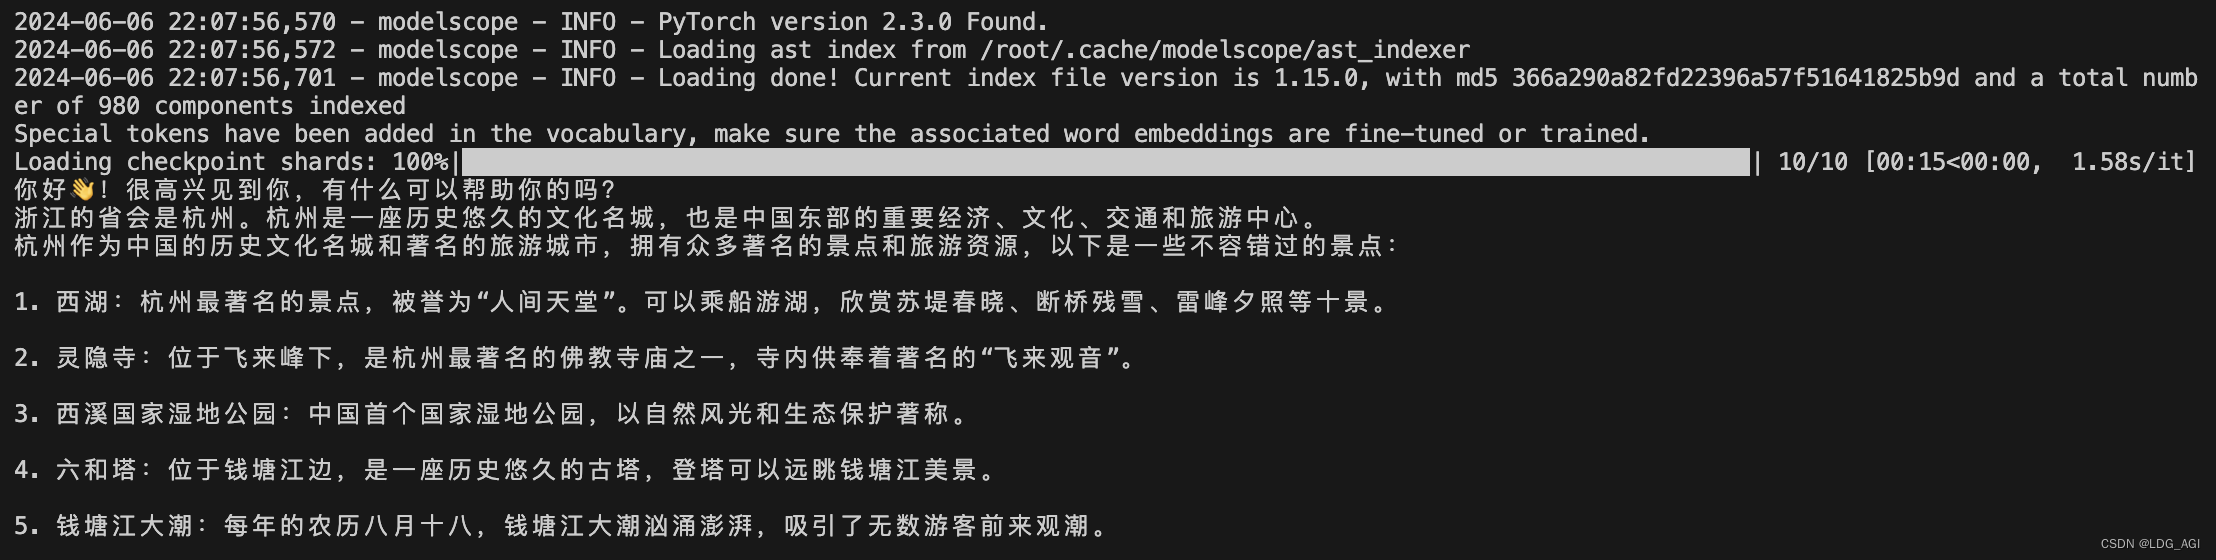
response, history = model.chat(tokenizer, "它有什么好玩的景点", history=history)
print(response)多轮对话结果:
3.2 GLM-4V-9B 多模态模型
同时,GLM还发布了图像识别大模型GLM-4V-9B(8K):
3.2.1 多模态模型概述
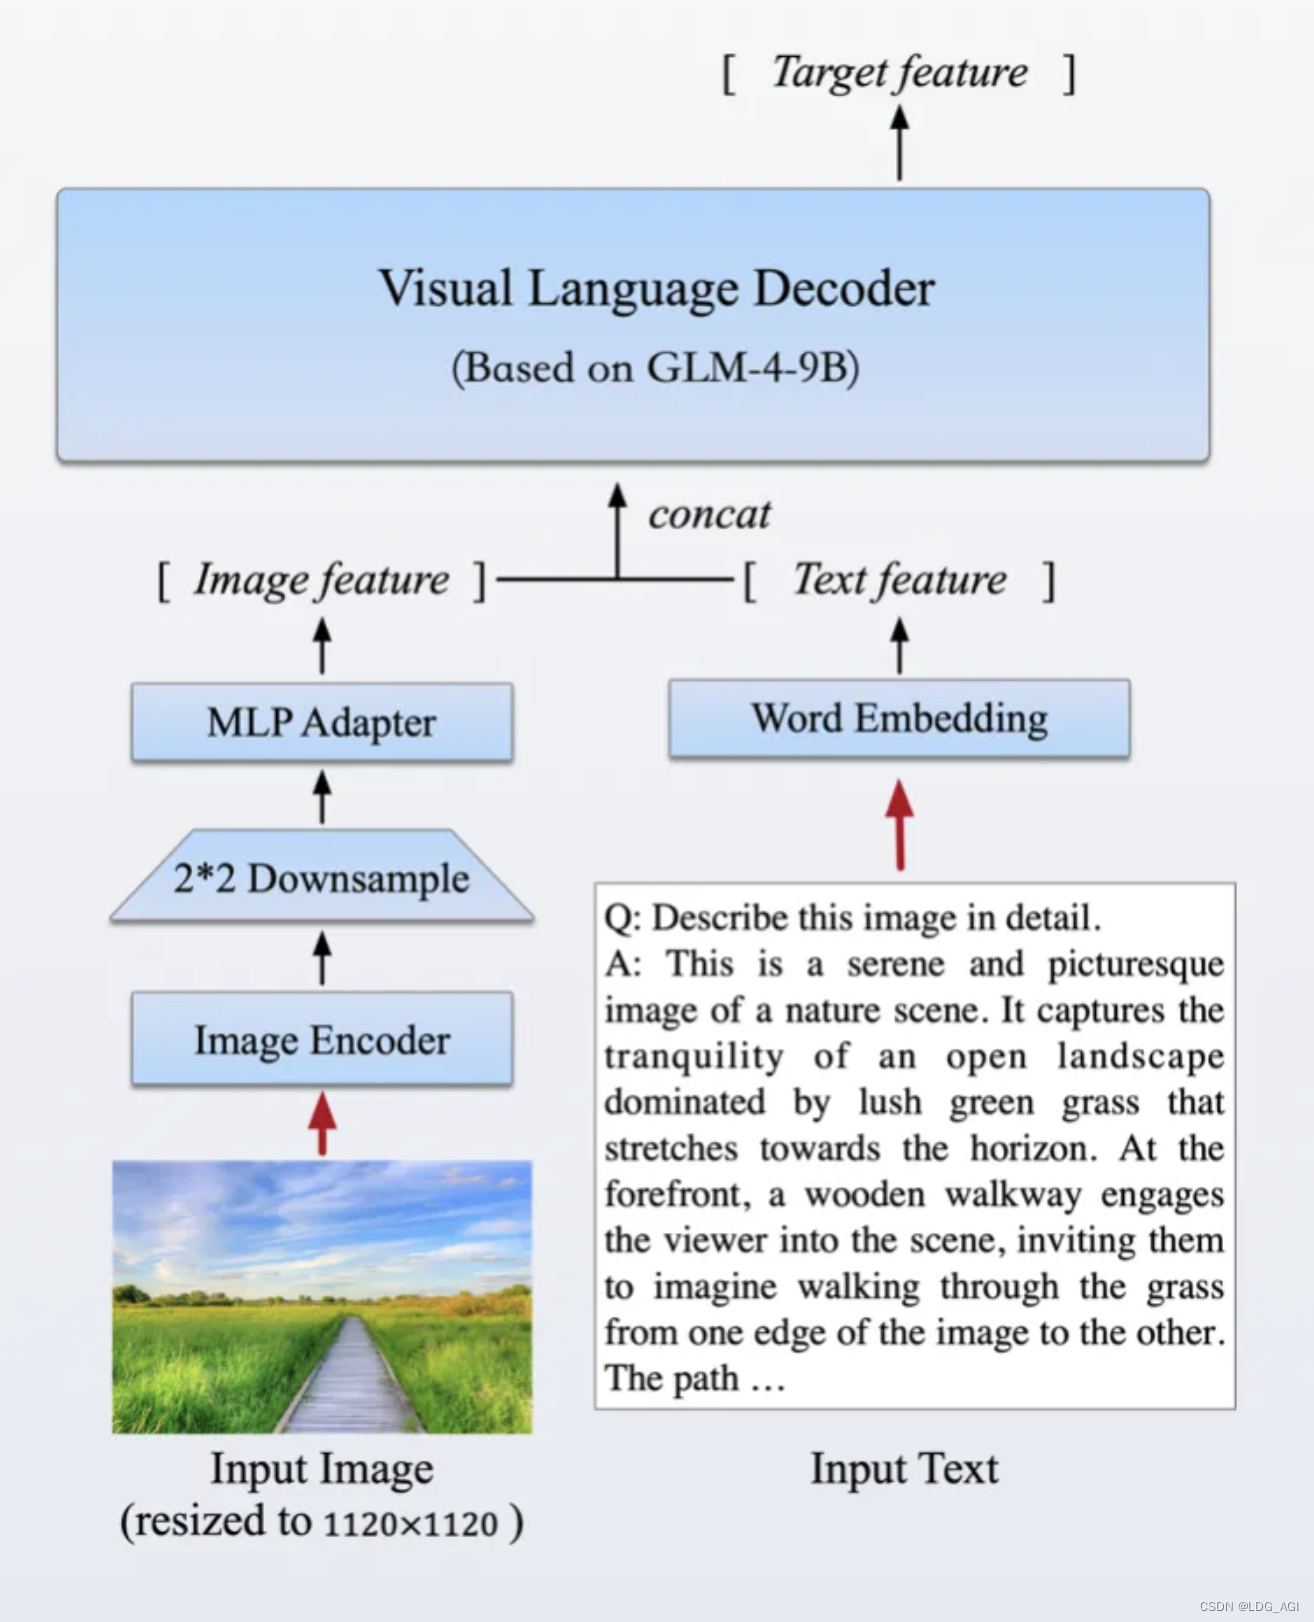
该模型采用了与CogVLM2相似的架构设计,能够处理高达1120 x 1120分辨率的输入,并通过降采样技术有效减少了token的开销。为了减小部署与计算开销,GLM-4V-9B没有引入额外的视觉专家模块,采用了直接混合文本和图片数据的方式进行训练,在保持文本性能的同时提升多模态能力。
3.2.2 多模态模型实践
上自己调通的代码:
python
from modelscope import snapshot_download
from transformers import AutoTokenizer, AutoModelForCausalLM
model_dir = snapshot_download('ZhipuAI/glm-4v-9b')
import torch
from PIL import Image
device = "cuda:2" # the device to load the model onto
tokenizer = AutoTokenizer.from_pretrained(model_dir,trust_remote_code=True)
prompt = "描述一下这张图片"
image = Image.open("./test_pic.png").convert("RGB")
messages = [
{"role": "user", "image":image,"content": prompt}
]
text = tokenizer.apply_chat_template(
messages,
tokenize=False,
add_generation_prompt=True
)
model_inputs = tokenizer([text], return_tensors="pt").to(device)
model = AutoModelForCausalLM.from_pretrained(
model_dir,
device_map="cuda:2",
trust_remote_code=True
)
gen_kwargs = {"max_length": 512, "do_sample": True, "top_k": 1}
with torch.no_grad():
outputs = model.generate(**model_inputs, **gen_kwargs)
outputs = outputs[:, model_inputs['input_ids'].shape[1]:]
print(tokenizer.decode(outputs[0], skip_special_tokens=True))
"""
generated_ids = model.generate(
model_inputs.input_ids,
max_new_tokens=512
)
generated_ids = [
output_ids[len(input_ids):] for input_ids, output_ids in zip(model_inputs.input_ids, generated_ids)
]
response = tokenizer.batch_decode(generated_ids, skip_special_tokens=True)[0]
print(response)
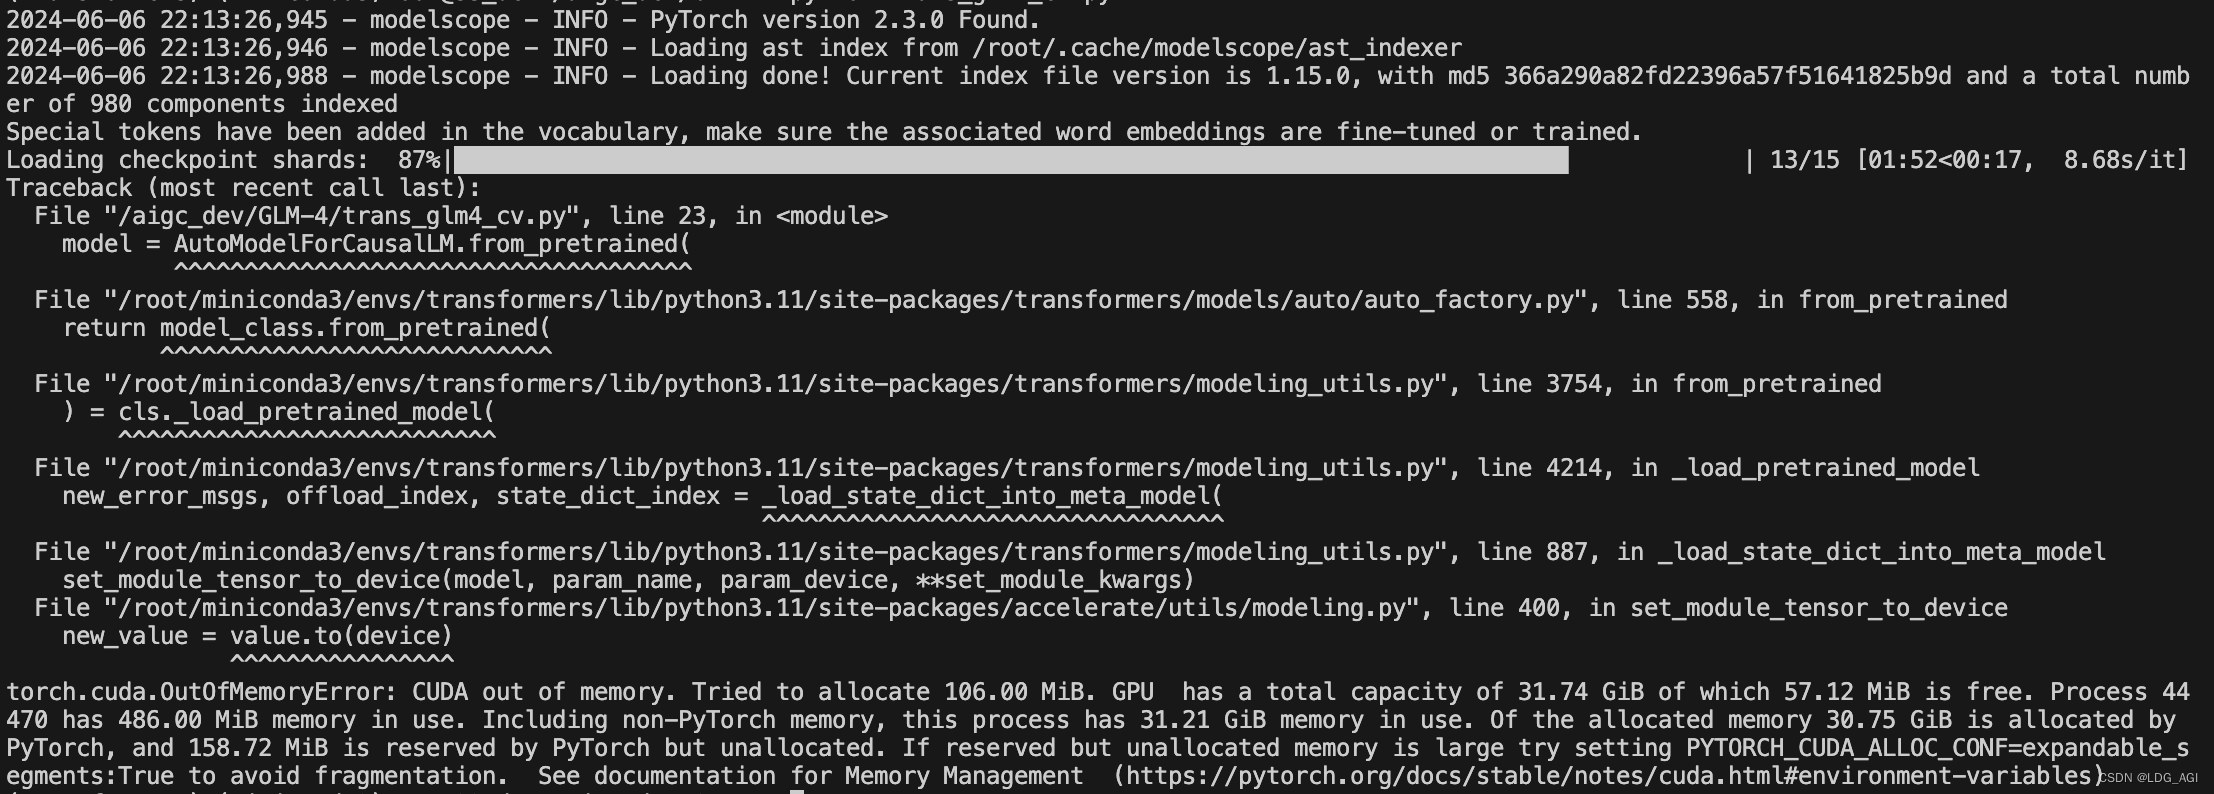
"""不过官方表示,GLM-4V-9B参数量达到13B,之前baichuan2-13B计算过,大概需要13*2.5=32.5G的显存,本人使用32B的单卡直接爆显存了。如果官方能看到,真希望再优化一丢丢。
四、总结
本文首先对GLM4-9B的模型特点及原理进行介绍,接着分别对GLM4-9B-Chat语言大模型和GLM-4V-9B多模态大模型进行代码实践。之前更多使用LLaMA_Factory、Xinference等框架对模型的Chat、Client及Api进行测试和部署,很多框架真的已经封装的非常易用(一件部署+前端管理),transformers原生版的反倒生疏了。最近正在夯实transformers库的知识,基础知识扎实在AI智能体开发过程中遇到问题才能游刃有余,上限更高。
期待您的关注+三连,您的鼓励让我创作更加充满动力!
如果您还有时间,可以看看我的其他文章:
《AI---工程篇》
AI智能体研发之路-工程篇(一):Docker助力AI智能体开发提效
AI智能体研发之路-工程篇(二):Dify智能体开发平台一键部署
AI智能体研发之路-工程篇(三):大模型推理服务框架Ollama一键部署
AI智能体研发之路-工程篇(四):大模型推理服务框架Xinference一键部署
AI智能体研发之路-工程篇(五):大模型推理服务框架LocalAI一键部署
《AI-模型篇》
AI智能体研发之路-模型篇(一):大模型训练框架LLaMA-Factory在国内网络环境下的安装、部署及使用
AI智能体研发之路-模型篇(二):DeepSeek-V2-Chat 训练与推理实战
AI智能体研发之路-模型篇(四):一文入门pytorch开发
AI智能体研发之路-模型篇(五):pytorch vs tensorflow框架DNN网络结构源码级对比
AI智能体研发之路-模型篇(六):【机器学习】基于tensorflow实现你的第一个DNN网络