Pytorch解决 多元回归 问题的算法
回归是一种基本的统计建模技术,用于建立因变量与一个或多个自变量之间的关系。
我们将使用 PyTorch(一种流行的深度学习框架)来开发和训练线性回归模型。
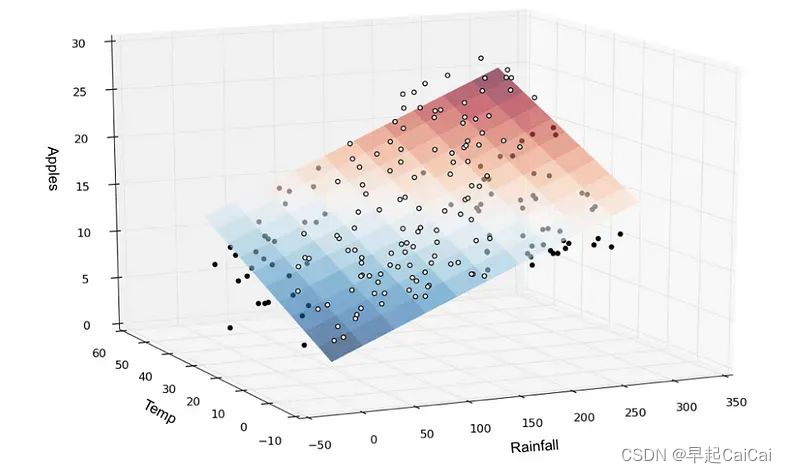
二元回归的简单示例
训练数据集(可获取)
对于此分析,我们将使用scikit-learn 库中的 make regression() 函数生成的合成数据集。数据集由输入特征和目标变量组成。输入特征代表自变量,而目标变量代表我们想要预测的因变量
python
import seaborn as sns
import numpy as sns
import torch
import torch.nn as nn
import torch.optim as optim
import sklearn
from sklearn import datasets
import pandas as pd

data=datasets.make_regression()    # from sklearn we are going to select one dataset
df = pd.DataFrame(data[0], columns=[f"feature_{i+1}" for i in range(data[0].shape[1])])
df["target"] = data[1]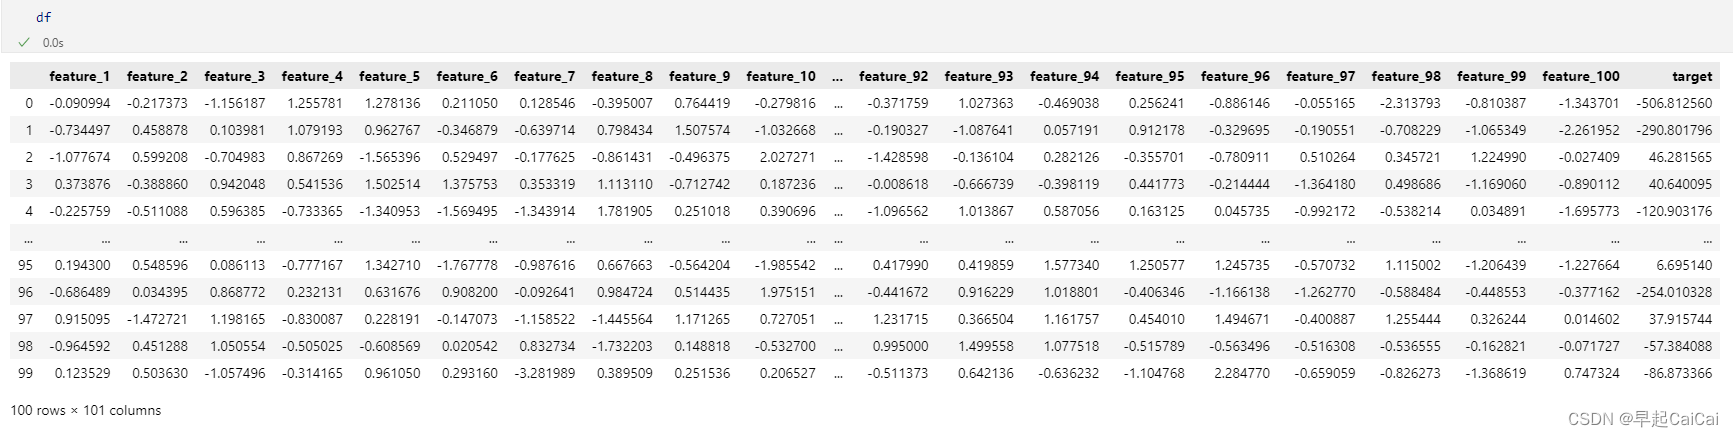
数据的结构,100 rows × 101 columns,最后 1 column为目标值
准备训练集与测试集
PyTorch 是一个功能强大的开源深度学习框架,提供了一种灵活的方式来构建和训练神经网络。它提供了一系列张量运算、自动微分和优化算法的功能。
使用 sklearn Train-Test-split 准备数据以开发模型
python
x=df.iloc[: , :-1]   # 除目标数据身下所以的
y=df.iloc[: , -1]    # target

from sklearn.model_selection import train_test_split
X_train,X_test,y_train,y_test=train_test_split(x,y,test_size=0.2,random_state=42)
print(type(X_train))
# X_train=torch.tensor(X_train,dtype=torch.float32)

X_train = torch.tensor(X_train.values, dtype=torch.float32)  # 转化为 tensor
X_test = torch.tensor(X_test.values, dtype=torch.float32)
y_train = torch.tensor(y_train.values, dtype=torch.float32)
y_test = torch.tensor(y_test.values, dtype=torch.float32)
模型架构
数据准备好了,可以准备模型了
我们的线性回归模型是作为PyTorch 中nn.Module类的子类实现的。该模型由多个按顺序连接的完全连接(线性)层组成。
python
class linearRegression(nn.Module):
# 所有来自torch的依赖项将被传递给这个类[父类]
# nn.Module 包含了神经网络的所有构建模块:
  def __init__(self,input_dim):
    super(linearRegression,self).__init__()   # building connection with parent and child classes
    self.fc1=nn.Linear(input_dim,10)          # hidden layer 1
    self.fc2=nn.Linear(10,5)                  # hidden layer 2
    self.fc3=nn.Linear(5,3)                   # hidden layer 3
    self.fc4=nn.Linear(3,1)                   # last layer

  def forward(self,d):
    out=torch.relu(self.fc1(d))              # input * weights + bias for layer 1
    out=torch.relu(self.fc2(out))            # input * weights + bias for layer 2
    out=torch.relu(self.fc3(out))            # input * weights + bias for layer 3
    out=self.fc4(out)                        # input * weights + bias for last layer
    return out                               # final outcome

input_dim=X_train.shape[1]     # 获取 input_dim 变量的数量
torch.manual_seed(42)          # to make initilized weights stable:
model=linearRegression(input_dim)
python
# select loss and optimizers
loss=nn.MSELoss() # loss function
optimizers=optim.Adam(params=model.parameters(),lr=0.01)
loss_values_all = [] # 创建一个列表来存储每个迭代的loss值
# training the model:
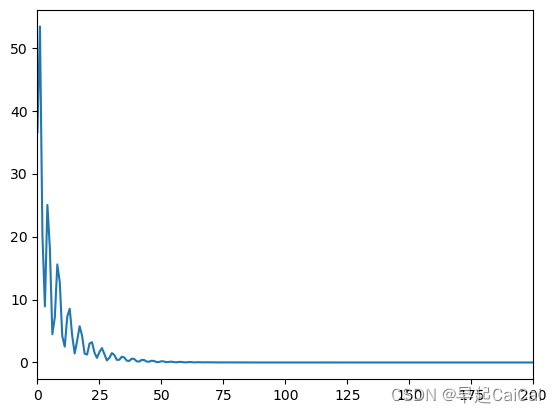
num_of_epochs=1000
for i in range(num_of_epochs):
# give the input data to the architecure
y_train_prediction=model(X_train) # model initilizing
loss_value=loss(y_train_prediction.squeeze(),y_train) # find the loss function:
optimizers.zero_grad() # make gradients zero for every iteration so next iteration it will be clear
loss_value.backward() # back propagation
optimizers.step() # update weights in NN
loss_values_all.append(loss_value.item()) # 将当前的loss值添加到列表中
# print the loss in training part:
if i % 10 == 0:
print(f'[epoch:{i}]: The loss value for training part={loss_value}')绘制 loss 曲线图
在测试数据集上的效果(test data)
python
with torch.no_grad():
  model.eval()   # make model in evaluation stage
  y_test_prediction=model(X_test)
  test_loss=loss(y_test_prediction.squeeze(),y_test)
  print(f'Test loss value : {test_loss.item():.4f}')
测试自己随机生成的数据
python
# Inference with own data:
pr = torch.tensor(torch.arange(1, 101).unsqueeze(dim=0), dtype=torch.float32).clone().detach()
print(pr)
保存训练好的模型
python
# save the torch model:

from pathlib import Path

filename=Path('models')
filename.mkdir(parents=True,exist_ok=True)

model_name='linear_regression.pth' # model name

# saving path

saving_path=filename/model_name
print(saving_path)
torch.save(obj=model.state_dict(),f=saving_path)

# we can load the saved model and do the inference again:

load_model=linearRegression(input_dim) # creating an instance again for loaded model
load_model.load_state_dict(torch.load('./models/linear_regression.pth'))

load_model.eval()   # make model in evaluation stage
with torch.no_grad():
  pred = load_model(torch.tensor([[  1.,   2.,   3.,   4.,   5.,   6.,   7.,   8.,   9.,  10.,  11.,  12.,
          13.,  14.,  15.,  16.,  17.,  18.,  19.,  20.,  21.,  22.,  23.,  24.,
          25.,  26.,  27.,  28.,  29.,  30.,  31.,  32.,  33.,  34.,  35.,  36.,
          37.,  38.,  39.,  40.,  41.,  42.,  43.,  44.,  45.,  46.,  47.,  48.,
          49.,  50.,  51.,  52.,  53.,  54.,  55.,  56.,  57.,  58.,  59.,  60.,
          61.,  62.,  63.,  64.,  65.,  66.,  67.,  68.,  69.,  70.,  71.,  72.,
          73.,  74.,  75.,  76.,  77.,  78.,  79.,  80.,  81.,  82.,  83.,  84.,
          85.,  86.,  87.,  88.,  89.,  90.,  91.,  92.,  93.,  94.,  95.,  96.,
          97.,  98.,  99., 100.]]))

  print(f'prediction value : {pred.item()}')