🔥博客主页: 【小扳_-CSDN博客】**
❤感谢大家点赞👍收藏⭐评论✍**


文章目录
[](#1.0 Spring Cache 概述)[1.0 Spring Cache 概述](#1.0 Spring Cache 概述)
[1.1 Spring Cache 具体使用](#1.1 Spring Cache 具体使用)
[1.1.1 引入依赖](#1.1.1 引入依赖)
[1.1.2 Spring Cache 相关注解的介绍](#1.1.2 Spring Cache 相关注解的介绍)
[](#2.0 Spring Task 概述)[2.0 Spring Task 概述](#2.0 Spring Task 概述)
[2.1 cron 表达式](#2.1 cron 表达式)
[2.2 Spring Task 使用步骤](#2.2 Spring Task 使用步骤)
[](#3.0 WebSocket 概述)[3.0 WebSocket 概述](#3.0 WebSocket 概述)
[3.1 WebSocket 与 HTTP 的区别](#3.1 WebSocket 与 HTTP 的区别)
[3.2 WebSocket 实现定时给客户端推送数据任务的步骤](#3.2 WebSocket 实现定时给客户端推送数据任务的步骤)
1.0 Spring Cache 概述
Spring Cache 是 Spring 框架通过对方法调用结果进行缓存管理的技术。Spring Cache 提供了一种简单易用的方法来减少方法的调用时间,提高系统性能。
Spring Cache 通过将方法调用的结果缓存在缓存中,下次再次调用该方法时,直接从缓存中取数据,避免了重复计算,减少了系统的负担和资源消耗。
Spring Cache 支持多种缓存提供器,包括 Ehcache、Guava Cache、Caffeine、Redis等,开发者可以根据实际需求选择合适的缓存提供器来进行缓存管理。
简单来说,Spring Cache 是一个框架,实现了基于注解的缓存功能,只需要简单地加一个注解,就能实现缓存功能。Spring Cache 提供了一层抽象,底层可以切换不同的缓存实现。
1.1 Spring Cache 具体使用
1.1.1 引入依赖
引入 Spring Cache 的依赖:
XML<dependency> <groupId>org.springframework.boot</groupId> <artifactId>spring-boot-starter-cache</artifactId> </dependency>
还需引入缓存中间件的依赖,这里使用的是 Redis 的中间件:因此引入 Redis 的依赖
XML<dependency> <groupId>org.springframework.boot</groupId> <artifactId>spring-boot-starter-data-redis</artifactId> </dependency>
接着就要在 application.yml 配置文件中配置 Redis 相关的信息:
XMLredis: host: localhost port: 6379 password: 123456 database: 0
1.1.2 Spring Cache 相关注解的介绍
提供了几个常用的注解来管理方法调用的结果缓存。
1)@EnableCacheing:开启缓存注解功能,通常加在启动类上。
代码演示:
2)@Cacheable:在方法执行前先查询缓存中是否有数据,如果有数据,则直接返回缓存数据;如果没有缓存数据,则会调用方法并将方法的返回值放到缓存中。
代码演示:
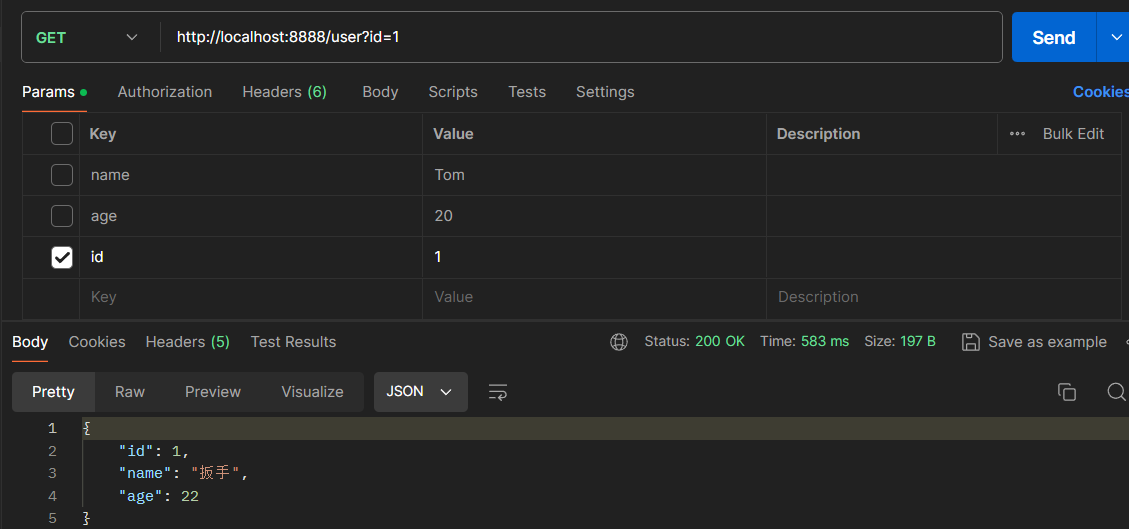
举个例子:根据 id 来查询用户信息,当前的 Redis 中是不存在用户信息的。
现在要根据 id 查询用户信息,首先会查询缓冲中是否有相关的数据,如果没有就会到数据库中进行查询相关的数据:
java@Autowired private UserMapper userMapper; @GetMapping @Cacheable(cacheNames = "user",key = "#id") public User getById(Long id){ User user = userMapper.getById(id); return user; }
使用 Postman 发送请求:
当请求发送到服务端,先根据 (cacheNames = "user",key = "#id") 查询 Redis 缓存是否存在相应的数据,当前是第一次查询,因此缓存不存在相应的数据,所以会到数据库中查询数据,查询之后,会将结果自动放入到 Redis 缓存中,那么下一次查询相同的数据,就会直接从 Redis 缓存中获取到。
第一次查询之后,Redis 缓存中的数据:
3)@CachePut:将方法的返回值放到缓存中。
举个例子:新增的用户数据之后,就可以直接将数据放入到 Redis 缓存中。
代码演示:
java@Autowired private UserMapper userMapper; @PostMapping @CachePut(cacheNames = "user",key = "#user.id") public User save(@RequestBody User user){ userMapper.insert(user); return user; }
使用 Postman 发送请求:
当发送请求之后,服务端就会给数据添加到数据库中,接着将返回值放到 Redis 缓存中来。
新增完之后的 Redis:
4)@CacheEvict:将一条或多条数据从缓存中删除。
举个例子:
删除一条数据:当从数据库中删除用户的数据,那么缓存中的该用户的数据也要删除。
代码演示:
java@Autowired private UserMapper userMapper; @DeleteMapping @CacheEvict(cacheNames = "user",key = "#id") public void deleteById(Long id){ userMapper.deleteById(id); }
使用 Postman 来发送请求:
删除之前的 Redis 的数据:
删除之后的 Redis 的数据:
删除多条数据:删除 user/ 下的全部数据。
代码演示:
java@Autowired private UserMapper userMapper; @DeleteMapping("/delAll") @CacheEvict(cacheNames = "user",allEntries = true) public void deleteAll(){ userMapper.deleteAll(); }
2.0 Spring Task 概述
Spring Task 是 Spring 框架提供的任务调度工具,可以按照约定时间自动指定某个代码逻辑。
2.1 cron 表达式
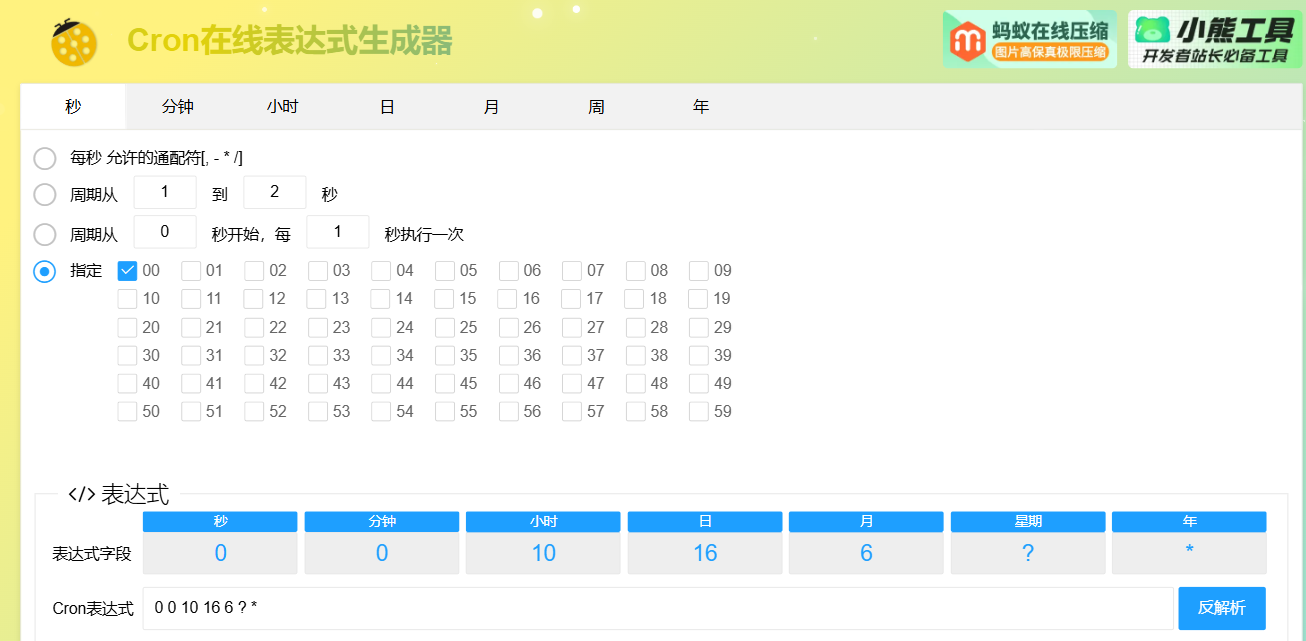
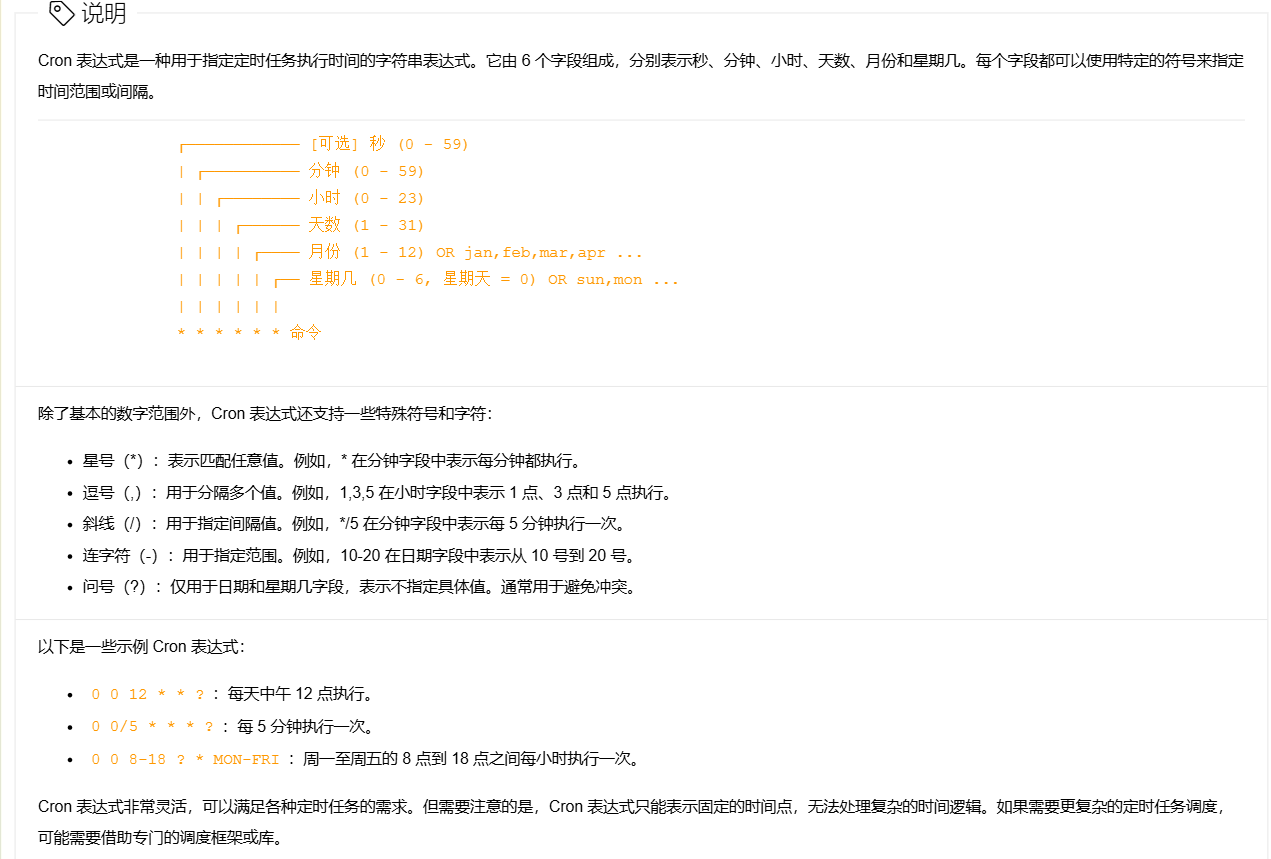
cron 表达式其实就是一个字符串,通过 cron 表达式可以定义任务触发的时间,构成规则:分为 6 或 7 个域,由空格分隔开,每个域代表一个含义。每个域的含义分别为:秒、分钟、小时、日、月、周、年(可选)。
举个例子:2024年6月16日上午10点整对应的 cron 表达式:0 0 10 16 6 ?2024
1)可以使用工具来根据需求来生成相应的 cron
cron 表达式在线生成器:Cron - 在线Cron表达式生成器 (ciding.cc)
相关的说明:
2.2 Spring Task 使用步骤
1)导入 maven 坐标
包含在 Spring-boot-starter jar 包中,因此不需要引入额外的 jar 包了。
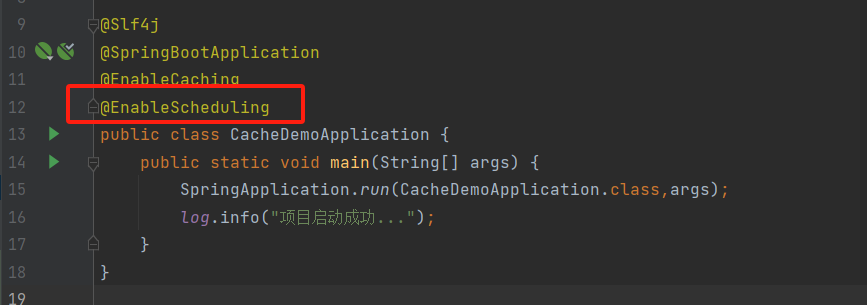
2)启动类添加注解 @EnableScheduling 开启任务调度
3)自定义定时任务类
javaimport lombok.extern.slf4j.Slf4j; import org.springframework.scheduling.annotation.Scheduled; import org.springframework.stereotype.Component; import java.util.Date; @Component @Slf4j public class MyTask { @Scheduled(cron = "0/5 * * * * ? ") public void runTask(){ log.info("定时任务开始执行:{}",new Date()); } }
定义一个定时类,该类需要交给 Spring 容器管理,因此需要加上 @Component 注解。在类中定义的方法为:需要定时执行的具体任务,通过 @Scheduled(cron = "") 注解来指定具体的时间。
运行结果:
3.0 WebSocket 概述
WebSocket 是一种基于 TCP 协议的网络通信协议,可以实现客户端和服务器之间双向通信。相对于传统的 HTTP 协议,WebSocket 具有更低的延迟和更少的网络开销。通过 WebSocket,客户端和服务器可以建立持久性的连接,实现实时的双向数据传输,而无需每次请求都建立新的连接。
WebSocket 是基于 TCP 的一种新的网络协议。它实现了浏览器与服务器全双工通信,浏览器和服务器只需要完成一次握手,两者之间就可以创建持久性的连接,并进行双向数据传输。
3.1 WebSocket 与 HTTP 的区别
总的来说:HTTP 是短连接。
WebSocket 是长连接。
HTTP 通信是单向的,基于请求响应模式。
WebSocket 支持双向通信。
HTTP 与 WebSocket 底层都是 TCP 连接。
3.2 WebSocket 实现定时给客户端推送数据任务的步骤
1)客户端浏览器发送一次握手请求给服务端来请求建立联系。
主要分为三个部分:
第一部分:向服务器发送建立连接请求。
htmlvar websocket = null; var clientId = Math.random().toString(36).substr(2); //判断当前浏览器是否支持WebSocket if('WebSocket' in window){ //连接WebSocket节点 websocket = new WebSocket("ws://localhost:8080/ws/"+clientId); } else{ alert('Not support websocket') }
通过 new WebSocket("请求的路径") 来请求与服务端建立联系。
第二部分:回调函数
自动调用的函数,比如说:当服务端发送的消息,那么客户端就会自动调用接收信息的函数。
java//连接发生错误的回调方法 websocket.onerror = function(){ setMessageInnerHTML("error"); }; //连接成功建立的回调方法 websocket.onopen = function(){ setMessageInnerHTML("连接成功"); } //接收到消息的回调方法 websocket.onmessage = function(event){ setMessageInnerHTML(event.data); } //连接关闭的回调方法 websocket.onclose = function(){ setMessageInnerHTML("close"); }
第三部分:客户端调用的函数
客户端手动调用的函数,比如说:发送消息给服务端。
html//监听窗口关闭事件,当窗口关闭时,主动去关闭websocket连接,防止连接还没断开就关闭窗口,server端会抛异常。 window.onbeforeunload = function(){ websocket.close(); } //将消息显示在网页上 function setMessageInnerHTML(innerHTML){ document.getElementById('message').innerHTML += innerHTML + '<br/>'; } //发送消息 function send(){ var message = document.getElementById('text').value; websocket.send(message); } //关闭连接 function closeWebSocket() { websocket.close(); }
完整的客户端前端代码:
html<!DOCTYPE HTML> <html> <head> <meta charset="UTF-8"> <title>WebSocket Demo</title> </head> <body> <input id="text" type="text" /> <button onclick="send()">发送消息</button> <button onclick="closeWebSocket()">关闭连接</button> <div id="message"> </div> </body> <script type="text/javascript"> var websocket = null; var clientId = Math.random().toString(36).substr(2); //判断当前浏览器是否支持WebSocket if('WebSocket' in window){ //连接WebSocket节点 websocket = new WebSocket("ws://localhost:8080/ws/"+clientId); } else{ alert('Not support websocket') } //连接发生错误的回调方法 websocket.onerror = function(){ setMessageInnerHTML("error"); }; //连接成功建立的回调方法 websocket.onopen = function(){ setMessageInnerHTML("连接成功"); } //接收到消息的回调方法 websocket.onmessage = function(event){ setMessageInnerHTML(event.data); } //连接关闭的回调方法 websocket.onclose = function(){ setMessageInnerHTML("close"); } //监听窗口关闭事件,当窗口关闭时,主动去关闭websocket连接,防止连接还没断开就关闭窗口,server端会抛异常。 window.onbeforeunload = function(){ websocket.close(); } //将消息显示在网页上 function setMessageInnerHTML(innerHTML){ document.getElementById('message').innerHTML += innerHTML + '<br/>'; } //发送消息 function send(){ var message = document.getElementById('text').value; websocket.send(message); } //关闭连接 function closeWebSocket() { websocket.close(); } </script> </html>
2)导入 WebSocket 的 maven 坐标。
XML<dependency> <groupId>org.springframework.boot</groupId> <artifactId>spring-boot-starter-websocket</artifactId> </dependency>
3)导入 WebSocket 服务端组件 WebSocketServer,用于和客户端进行通信。
当有客户端发送请求建立连接时,服务端就会通过 @ServerEndpoint("/ws/{sid}") 注解来接收到请求。由于发送请求的客户端不止一个,所以需要用到 map 集合来接收 session 即会话对象。
java/** * WebSocket服务 */ @Component @ServerEndpoint("/ws/{sid}") public class WebSocketServer { //存放会话对象 private static Map<String, Session> sessionMap = new HashMap(); }
同样的,服务端也会存在一些回调函数,比如说,当客户端发送消息给服务端,服务端就会自动接收到消息。
java@OnOpen public void onOpen(Session session, @PathParam("sid") String sid) { System.out.println("客户端:" + sid + "建立连接"); sessionMap.put(sid, session); } /** * 收到客户端消息后调用的方法 * * @param message 客户端发送过来的消息 */ @OnMessage public void onMessage(String message, @PathParam("sid") String sid) { System.out.println("收到来自客户端:" + sid + "的信息:" + message); } /** * 连接关闭调用的方法 * * @param sid */ @OnClose public void onClose(@PathParam("sid") String sid) { System.out.println("连接断开:" + sid); sessionMap.remove(sid); }
也会存在一些手动调用的函数,比如:发送消息给客户端。
java/** * 群发 * * @param message */ public void sendToAllClient(String message) { Collection<Session> sessions = sessionMap.values(); for (Session session : sessions) { try { //服务器向客户端发送消息 session.getBasicRemote().sendText(message); } catch (Exception e) { e.printStackTrace(); } } }
完整的服务端代码:
javaimport org.springframework.stereotype.Component; import javax.websocket.OnClose; import javax.websocket.OnMessage; import javax.websocket.OnOpen; import javax.websocket.Session; import javax.websocket.server.PathParam; import javax.websocket.server.ServerEndpoint; import java.util.Collection; import java.util.HashMap; import java.util.Map; /** * WebSocket服务 */ @Component @ServerEndpoint("/ws/{sid}") public class WebSocketServer { //存放会话对象 private static Map<String, Session> sessionMap = new HashMap(); /** * 连接建立成功调用的方法 */ @OnOpen public void onOpen(Session session, @PathParam("sid") String sid) { System.out.println("客户端:" + sid + "建立连接"); sessionMap.put(sid, session); } /** * 收到客户端消息后调用的方法 * * @param message 客户端发送过来的消息 */ @OnMessage public void onMessage(String message, @PathParam("sid") String sid) { System.out.println("收到来自客户端:" + sid + "的信息:" + message); } /** * 连接关闭调用的方法 * * @param sid */ @OnClose public void onClose(@PathParam("sid") String sid) { System.out.println("连接断开:" + sid); sessionMap.remove(sid); } /** * 群发 * * @param message */ public void sendToAllClient(String message) { Collection<Session> sessions = sessionMap.values(); for (Session session : sessions) { try { //服务器向客户端发送消息 session.getBasicRemote().sendText(message); } catch (Exception e) { e.printStackTrace(); } } } }
4)导入配置类 WebSocketConfiguration,注册 WebSocket 的服务端组件。
javaimport org.springframework.context.annotation.Bean; import org.springframework.context.annotation.Configuration; import org.springframework.web.socket.server.standard.ServerEndpointExporter; /** * WebSocket配置类,用于注册WebSocket的Bean */ @Configuration public class WebSocketConfiguration { @Bean public ServerEndpointExporter serverEndpointExporter() { return new ServerEndpointExporter(); } }
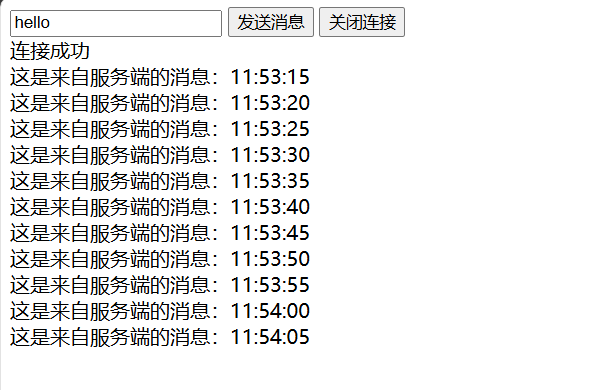
5)导入定时任务类 WebSocketTask,定时向客户端推送数据。
javaimport com.itheima.WebSocket.WebSocketServer; import org.springframework.beans.factory.annotation.Autowired; import org.springframework.scheduling.annotation.Scheduled; import org.springframework.stereotype.Component; import java.time.LocalDateTime; import java.time.format.DateTimeFormatter; @Component public class WebSocketTask { @Autowired private WebSocketServer webSocketServer; /** * 通过WebSocket每隔5秒向客户端发送消息 */ @Scheduled(cron = "0/5 * * * * ?") public void sendMessageToClient() { webSocketServer.sendToAllClient("这是来自服务端的消息:" + DateTimeFormatter.ofPattern("HH:mm:ss").format(LocalDateTime.now())); } }
运行结果:


