分布式数据采集系统Flume学习
一、Flume架构
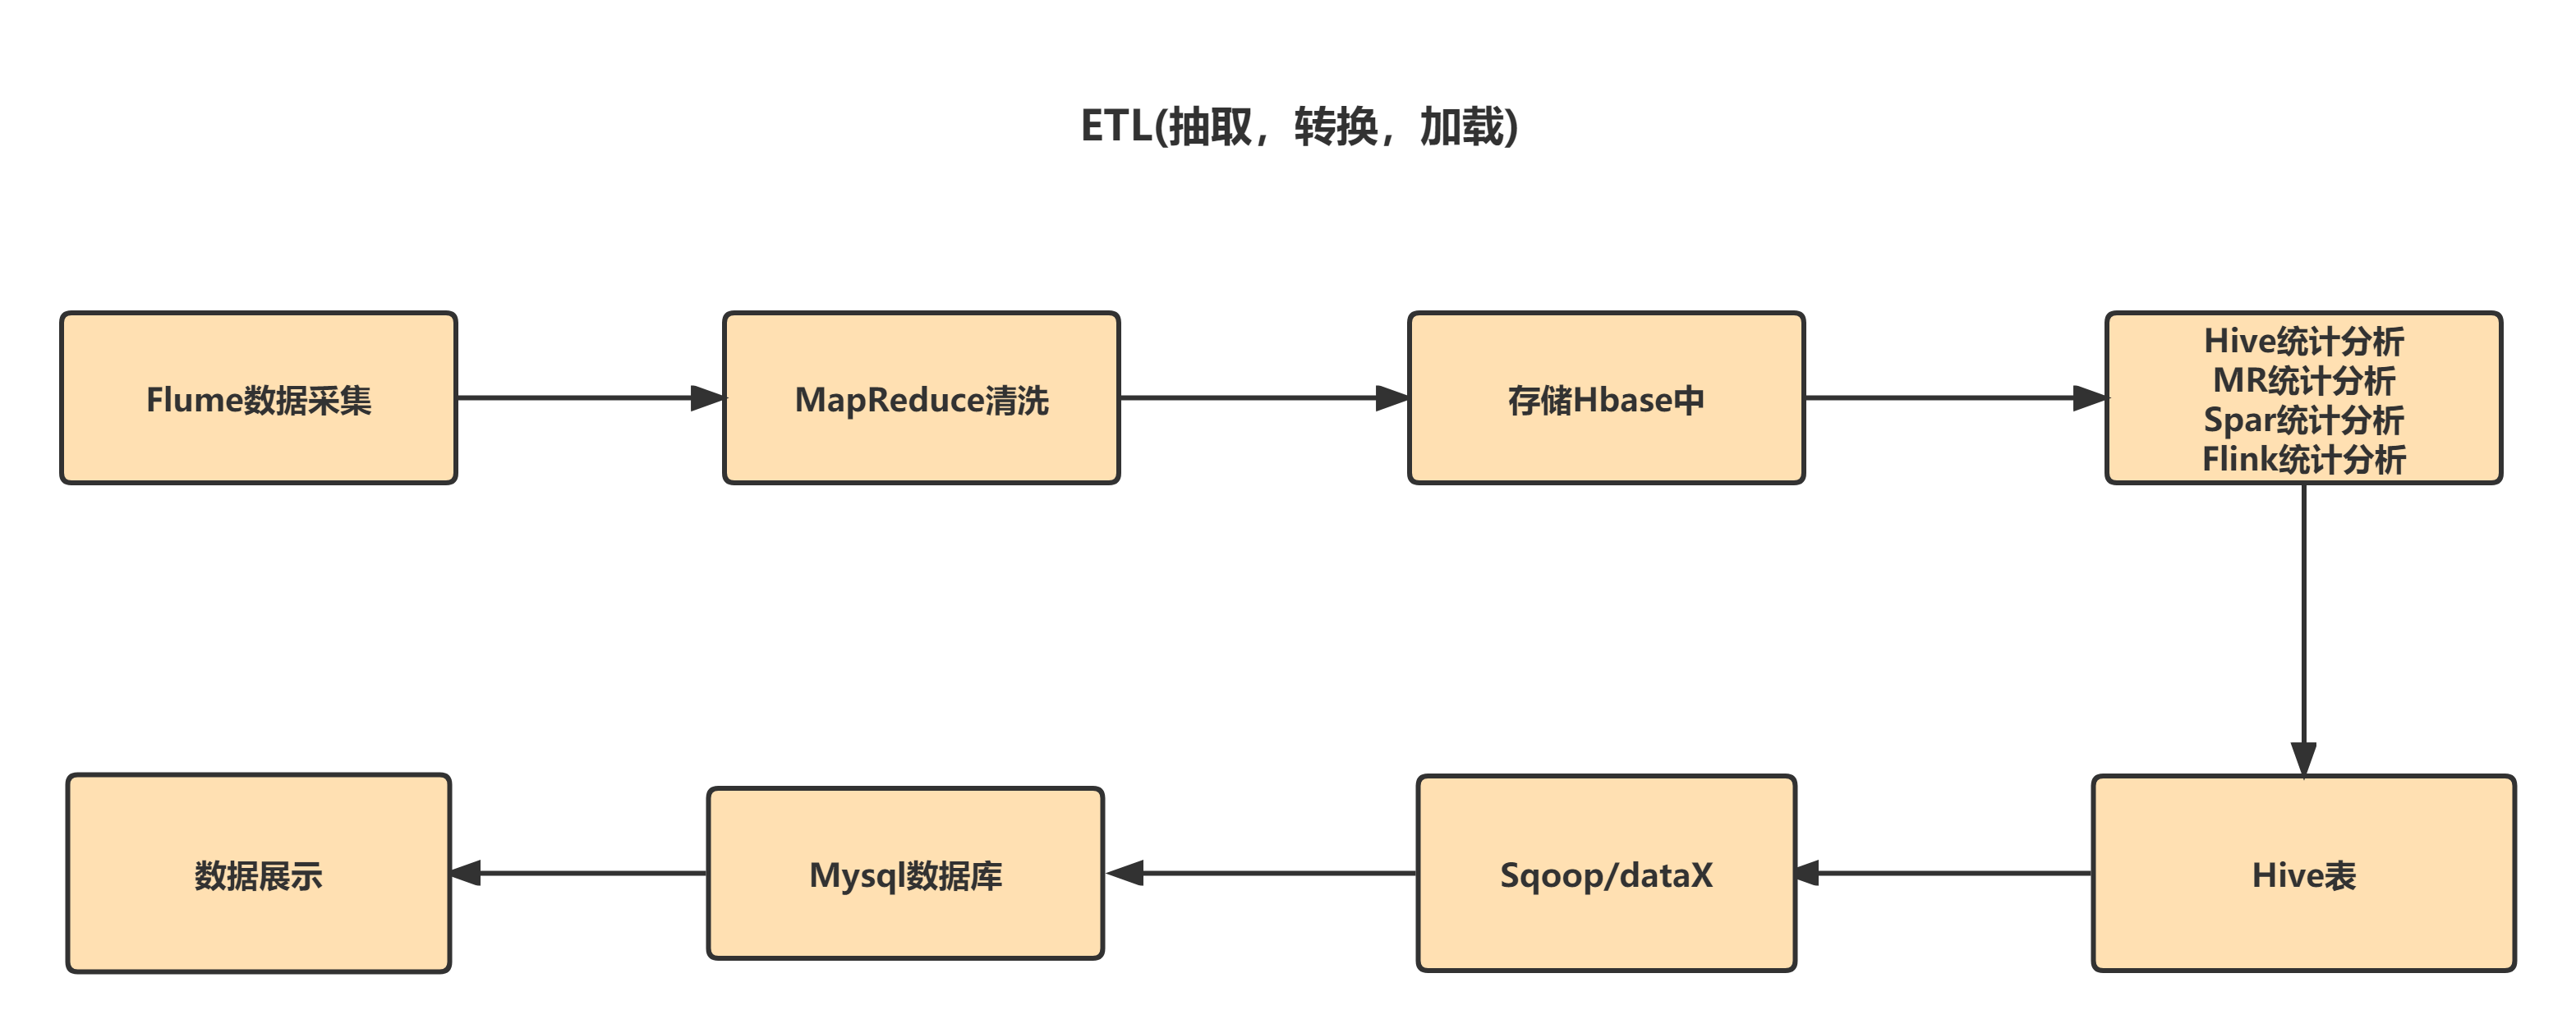
1.1 Hadoop业务开发流程
1.2 Flume概述
flume是一个分布式、可靠、和高可用的海量日志采集、聚合和传输的系统。
支持在日志系统中定制各类数据发送方,用于收集数据;
同时,Flume提供对数据进行简单处理,并写到各种数据接受方(比如文本、HDFS、Hbase等)的能力 。
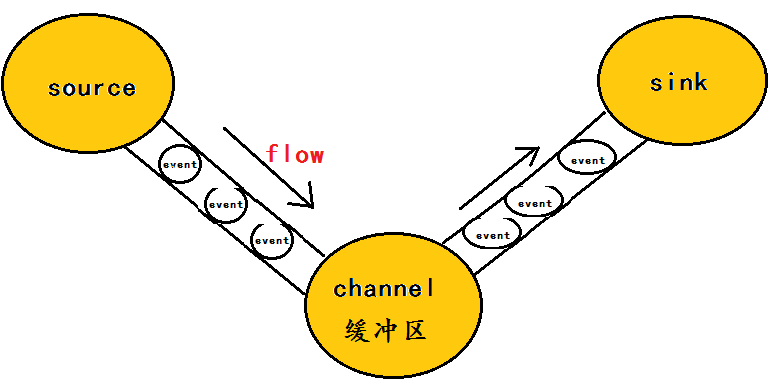
flume的数据流由**事件(Event)**贯穿始终。
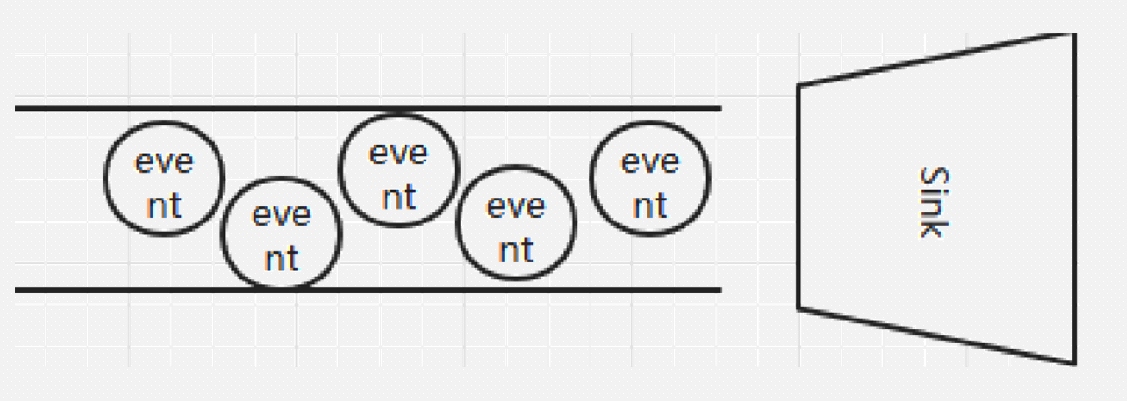
事件是Flume的基本数据单位,它携带日志数据(字节数组形式)并且携带有头信息,这些Event由Agent外部的Source生成,当Source捕获事件后会进行特定的格式化,然后Source会把event推入(单个或多个)Channel中。你可以把Channel看作是一个缓冲区,它将保存事件直到Sink处理完该事件。Sink负责持久化日志或者把事件推向另一个Source。
Event的概念:flume的核心是把数据从数据源(source)收集过来,在将收集到的数据由目的地(sink)所拉取 。为了保证输送的过程一定成功,在送到目的地(sink)之前,会先缓存数据(channel),待数据真正到达目的地(sink)后,flume再删除自己缓存的数据。
在整个数据的传输的过程中,流动的是event,即事务保证是在event级别进行的。那么什么是event呢?-----event将传输的数据进行封装,是flume传输数据的基本单位 ,如果是文本文件,通常是一行记录,event也是事务的基本单位。event从source,流向channel,再到sink,本身为一个字节数组,并可携带headers(头信息)信息。event代表着一个数据的最小完整单元,从外部数据源来,向外部的目的地去。
简单理解:event信息就是flume收集到的数据
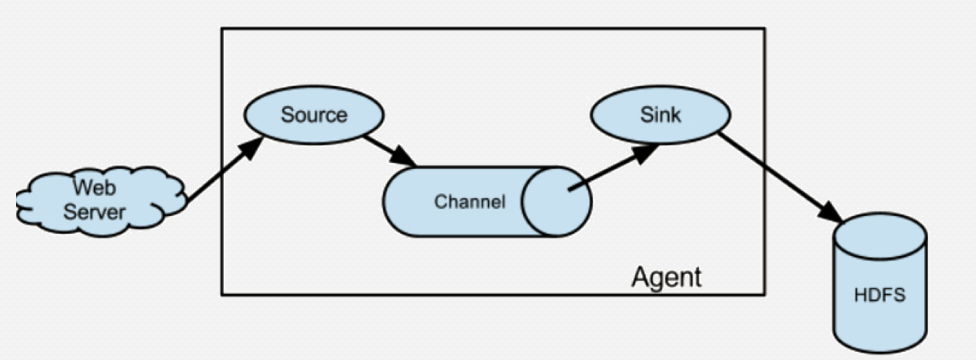
Flume 运行的核心是 Agent。Flume以agent为最小的独立运行单位。一个agent就是一个JVM。
它是一个完整的数据收集工具,含有三个核心组件,分别是source、 channel、 sink。
通过这些组件, Event 可以从一个地方流向另一个地方,如下图所示。
flume之所以这么神奇,是源于它自身的一个设计,这个设计就是agent,agent本身是一个java进程,运行在日志收集节点---所谓日志收集节点就是服务器节点。
agent里面包含3个核心的组件:source---->channel----->sink,类似生产者、仓库、消费者的架构。
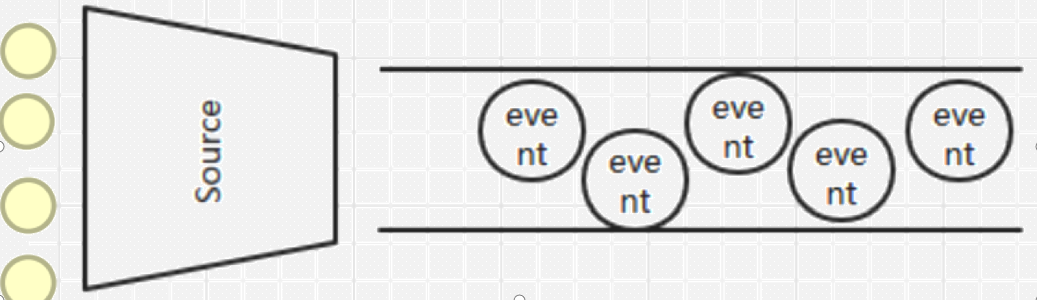
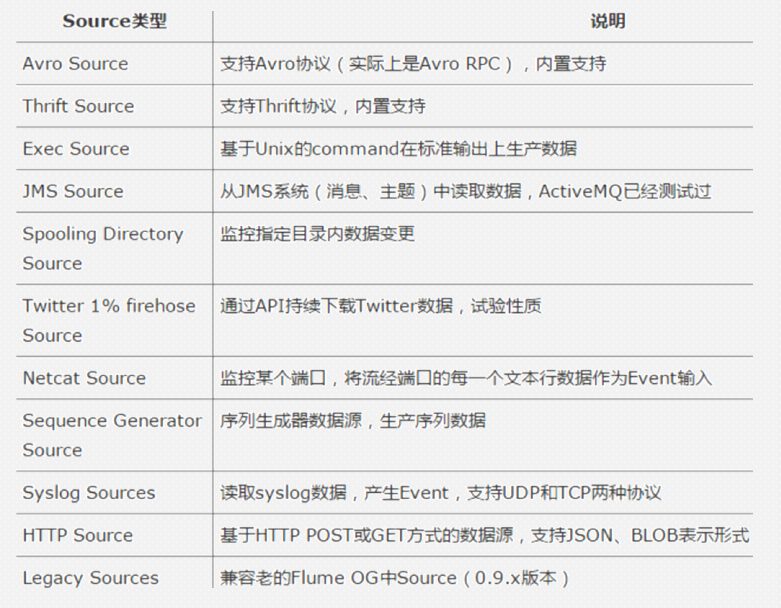
source :source组件是专门用来收集数据的,可以处理各种类型、各种格式的日志数据,包括avro、thrift、exec、jms、spooling directory、netcat、sequence generator、syslog、http、legacy、自定义。
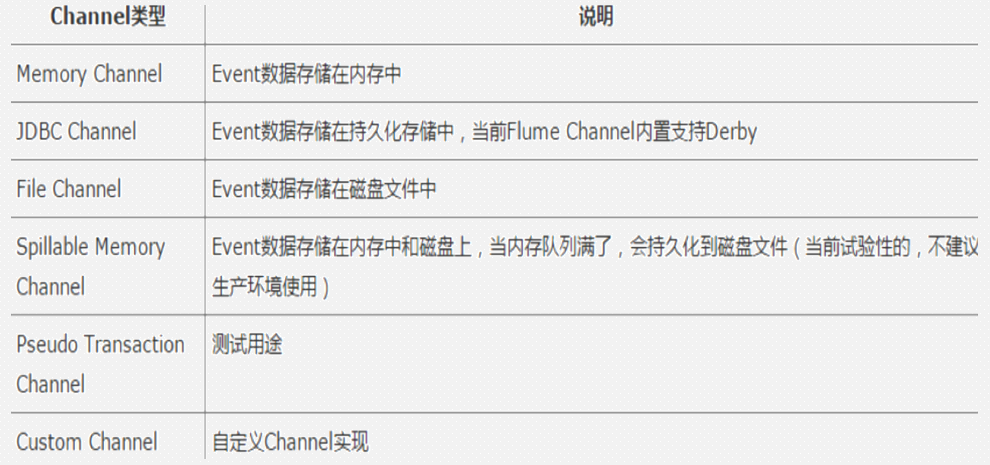
channel :source组件把数据收集来以后,临时存放在channel中,即channel组件在agent中是专门用来存放临时数据的------对采集到的数据进行简单的缓存,可以存放在memory、jdbc、file等等。
sink:sink组件是用于把数据发送到目的地的组件,目的地包括hdfs、logger、avro、thrift、ipc、file、null、hbase、solr、自定义。
1.2.1 Source
Source是数据的收集端,负责将数据捕获后进行特殊的格式化,将数据封装到事件(event) 里,然后将事件推入Channel中。 Flume提供了很多内置的Source, 支持 Avro, log4j, syslog 和 http post(body为json格式)。可以让应用程序同已有的Source直接打交道,如AvroSource
如果内置的Source无法满足需要, Flume还支持自定义Source。
Source支持的类型
1.2.2 Channel
Channel是连接Source和Sink的组件,大家可以将它看做一个数据的缓冲区(数据队列),它可以将事件暂存到内存中也可以持久化到本地磁盘(或支持jdbc的数据库中)上, 直到Sink处理完该事件。介绍两个较为常用的Channel, MemoryChannel和FileChannel。
Channel支持的类型
1.2.3 Sink
Sink从Channel中取出 事件,然后将数据发到别处,可以向文件系统、数据库、 hadoop存数据, 也可以是其他agent的Source。在日志数据较少时,可以将数据存储在文件系统中,并且设定一定的时间间隔保存数据。
1.3 Flume运行机制
Flume 的核心是把数据从数据源收集过来,再送到目的地。为了保证输送一定成功,在送到目的地之前,会先缓存数据,待数据真正到达目的地后,删除自己缓存的数据
Flume 传输的数据的基本单位是 Event,如果是文本文件,通常是一行记录,这也是事务的基本单位。 Event 从 Source,流向 Channel,再到 Sink,本身为一个 byte 数组,并可携带 headers 信息。 Event 代表着一个数据流的最小完整单元,从外部数据源来,向外部的目的地去。
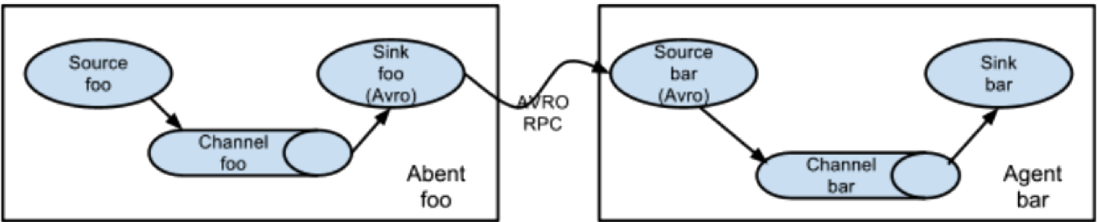
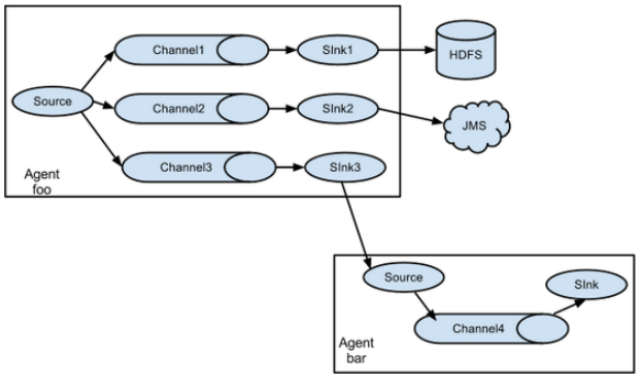
值得注意的是,Flume提供了大量内置的Source、Channel和Sink类型。不同类型的Source,Channel和Sink可以自由组合 。组合方式基于用户设置的配置文件,非常灵活。
比如:Channel可以把事件暂存在内存里,也可以持久化到本地硬盘上。Sink可以把日志写入HDFS, HBase,甚至是另外一个Source等等。Flume支持用户建立多级流,
也就是说,多个agent可以协同工作。
1.4 Flume可靠性
Flume 使用事务性的方式保证传送Event整个过程的可靠性。 Sink 必须在Event 已经被传达到下一站agent里,又或者,已经被存入外部数据目的地之后,才能把 Event 从 Channel 中 remove 掉。这样数据流里的 event 无论是在一个 agent 里还是多个 agent 之间流转,都能保证可靠,因为以上的事务保证了 event 会被成功存储起来。比如 Flume支持在本地保存一份channel文件作为备份,而memory channel 将event存在内存 queue 里,速度快,但丢失的话无法恢复。
1.5 flume的广义用法(多个agent顺序连接)
可以将多个Agent顺序连接起来,将最初的数据源经过收集,存储到最终的存储系统中。这是最简单的情况,一般情况下,应该控制这种顺序连接的
Agent 的数量,因为数据流经的路径变长了,如果不考虑failover的话,出现故障将影响整个Flow上的Agent收集服务。
二、Flume的安装(解压即安装)
1、上传至虚拟机,并解压
shell
tar -zxvf apache-flume-1.11.0-bin.tar.gz -C /usr/local/soft/在环境变量中增加如下命令,可以使用 soft 快速切换到 /usr/local/soft
alias soft='cd /usr/local/soft/'
2、重命名目录,并配置环境变量
mv apache-flume-1.9.0-bin/ flume-1.9.0
vim /etc/profile
source /etc/profile
3、查看flume版本
flume-ng version

[root@master soft]# flume-ng version
Flume 1.9.0
Source code repository: https://git-wip-us.apache.org/repos/asf/flume.git
Revision: d4fcab4f501d41597bc616921329a4339f73585e
Compiled by fszabo on Mon Dec 17 20:45:25 CET 2018
From source with checksum 35db629a3bda49d23e9b3690c80737f9
[root@master soft]#
三、使用案例
在使用之前,提供一个大致思想,使用Flume的过程是确定scource类型,channel类型和sink类型,编写conf文件并开启服务,在数据捕获端进行传入数据流入到目的地。
案例一、从控制台打入数据,在控制台显示
1、确定scource类型,channel类型和sink类型
确定的使用类型分别是,netcat source, memory channel, logger sink.
2、编写conf文件(文件中内容书写的顺序不做要求)
sh
#a代表agent的名称,r1代表source的名称。c1代表channel名称,k1代表的是sink的名称
#声明各个组件
a.sources=r1
a.channels=c1
a.sinks=k1

#定义source类型,这里是使用netcat的类型:监控流经一个端口的数据(此时需设置一个端口号),将每一个文本行数据作为EVENT的输入
a.sources.r1.type=netcat
a.sources.r1.bind=192.168.128.100
a.sources.r1.port=8888
#定义source发送的下游channel
a.sources.r1.channels=c1

#定义channel:将数据存储到内存中
a.channels.c1.type=memory
#缓存的数据条数
a.channels.c1.capacity=1000
#事务数据量
a.channels.c1.transactionCapacity=1000


#定义sink的类型,确定上游channel
a.sinks.k1.channel=c1
a.sinks.k1.type=logger
properties
#a代表agent的名称,r1代表source的名称。c1代表channel名称,k1代表的是sink的名称
#声明各个组件
a1.sources=r1
a1.channels=c1
a1.sinks=k1

a1.sources.r1.type = netcat
a1.sources.r1.bind = 192.168.128.100
a1.sources.r1.port = 12345

a1.channels.c1.type = memory
a1.channels.c1.capacity = 10000
a1.channels.c1.transactionCapacity = 10000

a1.sinks.k1.type = logger

# 组装
a1.sources.r1.channels = c1
a1.sinks.k1.channel = c1
3、开启服务,我们重新开启复制一个客户端进行开启服务
命令: 注意 -n 后面跟着的是你在conf文件中定义好的,-f 后面跟着的是编写conf文件的路径
shell
-- Dflume.root.logger=DEBUG,console :指定日志
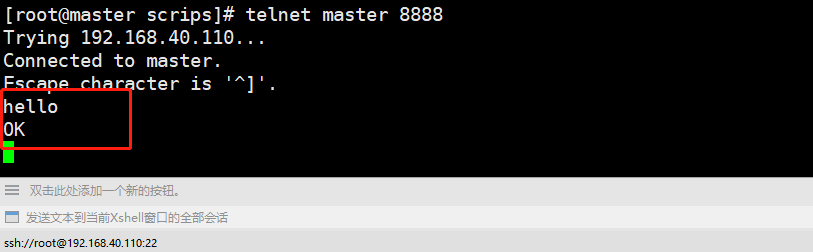
[root@master scrips]# flume-ng agent -n a1 -c /usr/local/soft/flume-1.11.0/conf -f ./netcat2logger.conf -Dflume.root.logger=DEBUG,console 4、在另一个客户端输入命令:
注意:这里的master和8888是在conf文件中设置好的ip地址和端口
在输入第二个命令的窗口中输入数据,回车,在服务端就会接收到数据。
shell
yum install -y telnet
shell
telnet master 12345
退出:ctrl+],然后再按 q

netstat -tunlp |grep 端口号

netstat -tunlp |grep 12345

监控日志文件,查看输入结果
日志文件在脚本编写运行的目录下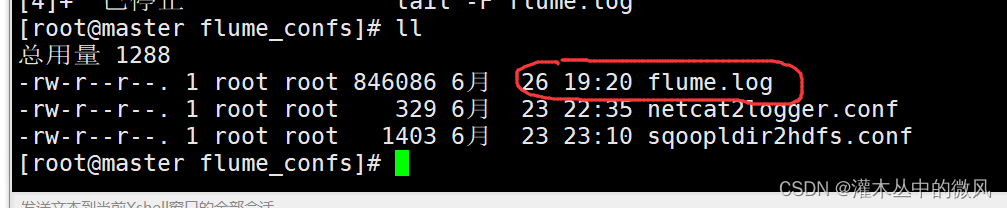

案例二、从本地指定路径中打入数据到HDFS
1、同样,我们需要先确定scource类型,channel类型和sink类型
我们确定使用的类型分别是,spooldir source(监控指定目录内的数据变更), memory channel, hdfs sink
2、编写conf文件
create external table students_flume
(
    id bigint,
    name string,
    age int,
    gender string,
    clazz string
)
ROW FORMAT DELIMITED FIELDS TERMINATED BY ',';


LOCATION '/bigdata30/flumeout2/log_s'; // 必选,指定列分隔符 (已做修改)
shell
a1.sources = r1
a1.channels = c1
a1.sinks = k1


#指定spooldir的属性
a1.sources.r1.type = spooldir
a1.sources.r1.spoolDir = /usr/local/soft/bigdata30/flumedata1
#时间拦截器 : 获取数据到达event的时间戳,将其放入event中。在最后给文件命名时会加上时间
a1.sources.r1.interceptors = i1
a1.sources.r1.interceptors.i1.type = timestamp

#指定channel
a1.channels.c1.type = memory
#暂存的条数
a1.channels.c1.capacity = 10000
#每次sink取的条数
a1.channels.c1.transactionCapacity = 1000

#指定sink的类型
a1.sinks.k1.type = hdfs
#指定hdfs的集群地址和路径,路径如果没有创建会自动创建
a1.sinks.k1.hdfs.path = hdfs://master:9000/bigdata30/flumeout2/log_s2
#指定hdfs路径下生成的文件的前缀
a1.sinks.k1.hdfs.filePrefix = log_%Y-%m-%d
#手动指定hdfs最小备份
a1.sinks.k1.hdfs.minBlockReplicas=1
#设置数据传输类型
a1.sinks.k1.hdfs.fileType = DataStream
#如果参数为0,不按照条数生成文件。如果参数为n,就是按照n条生成一个文件
a1.sinks.k1.hdfs.rollCount = 100
#这个参数是hdfs下文件sink的数据size。每sink 32MB的数据,自动生成一个文件
a1.sinks.k1.hdfs.rollSize =0
#每隔n 秒 将临时文件滚动成一个目标文件。如果是0,就不按照时间进行生成目标文件。
a1.sinks.k1.hdfs.rollInterval =0
a1.sinks.k1.hdfs.idleTimeout=0


#组装
a1.sources.r1.channels = c1
a1.sinks.k1.channel = c1


传入的文件为csv文件,若是text???
执行脚本:
flume-ng agent -n a1 -c /usr/local/soft/flume-1.11.0/conf -f ./sqoopldir2hdfs.conf -Dflume.root.logger=DEBUG,console
properties
a1.sources = r1
a1.channels = c1
a1.sinks = k1


#指定spooldir的属性
a1.sources.r1.type = spooldir
a1.sources.r1.spoolDir = /usr/local/soft/bigdata30/flumedata2
#时间拦截器
a1.sources.r1.interceptors = i1
a1.sources.r1.interceptors.i1.type = timestamp

#指定channel
a1.channels.c1.type = memory
#暂存的条数
a1.channels.c1.capacity = 10000
#每次sink取的条数
a1.channels.c1.transactionCapacity = 1000

#指定sink的类型
a1.sinks.k1.type = hive
a1.sinks.k1.hive.metastore = thrift://192.168.128.100:9083
a1.sinks.k1.hive.database = bigdata30_test
a1.sinks.k1.hive.table = students_flume
a1.sinks.k1.serializer = DELIMITED
a1.sinks.k1.serializer.delimiter = ","
a1.sinks.k1.serializer.serdeSeparator = ','
a1.sinks.k1.serializer.fieldnames =id,name,age,gender,clazz


#组装
a1.sources.r1.channels = c1
a1.sinks.k1.channel = c1
3、开启服务
shell
[root@master scrips]# flume-ng agent -n a1 -c ../../flume/conf -f ./linux2hive.conf -Dflume.root.logger=DEBUG, console

执行出错:
一直卡在下述界面
原因:新版本0各种包错误,不要轻易尝试新版本。可以使用先将数据传到hdfs中,再再hive中创建表指定这个hdfs目录,将数据映射到hive中
类似案例
sqlcreate external table bigdata30_test.students_flume_test ( id bigint, name string, num int, num1 int ) ROW FORMAT DELIMITED FIELDS TERMINATED BY ',' location '/bigdata30/teachers';
4、将文件复制到指定的目录下
shell
cp DIANXIN.csv /usr/local/soft/flumedata/
cp students.csv ./flumedata1 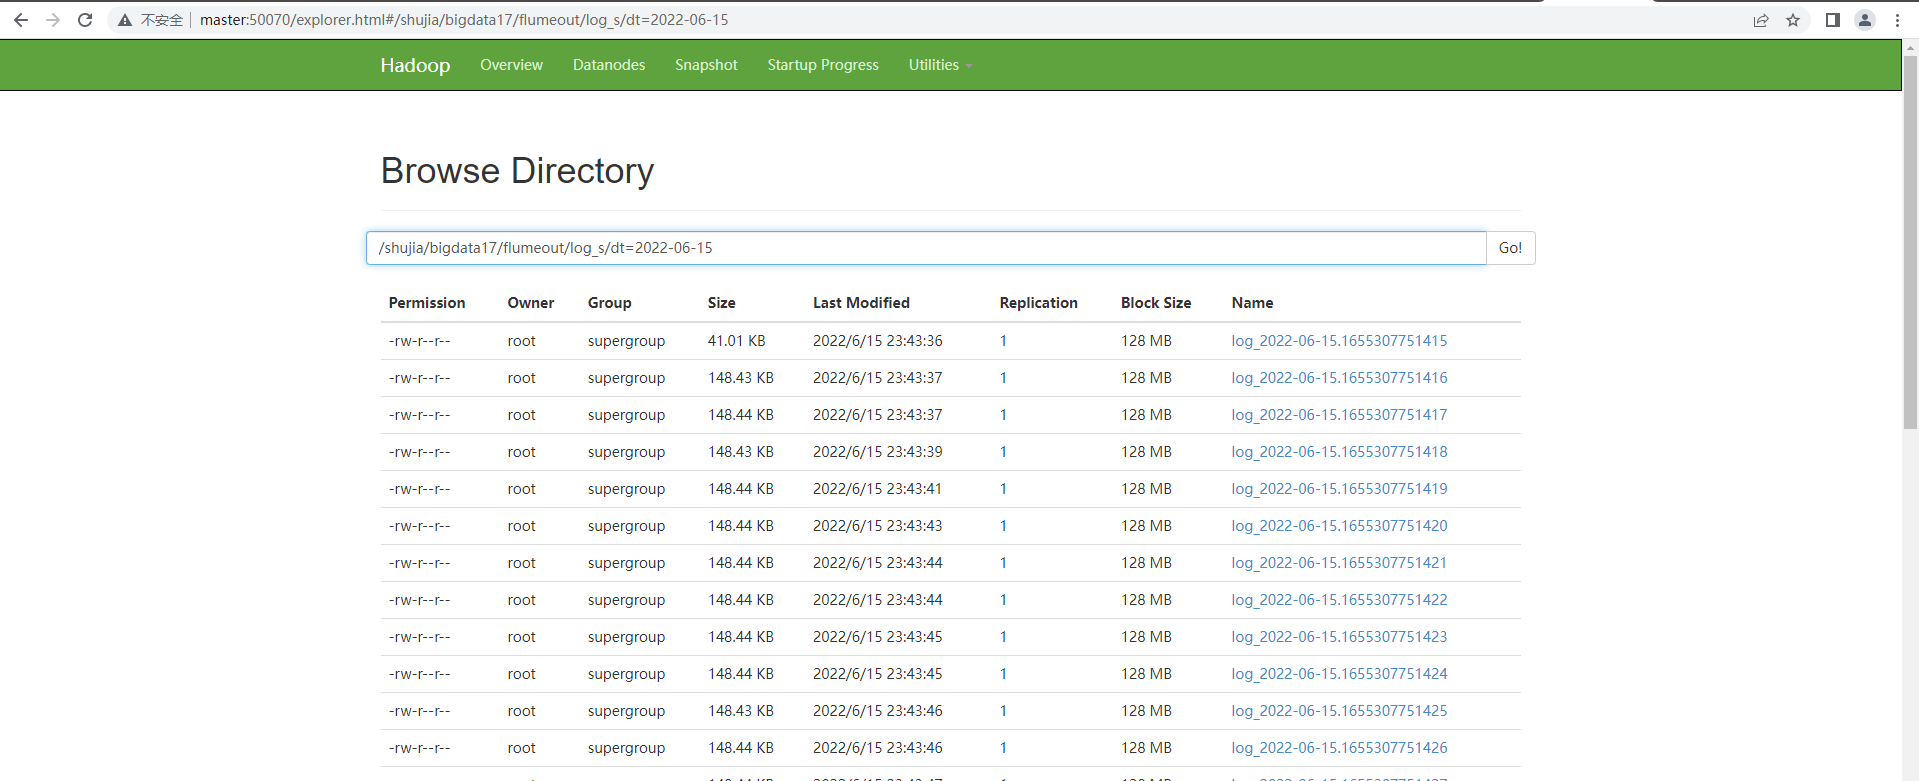
课堂穿插案例:手动打数据到hive表(无法执行)
shell
a1.sources = r1
a1.sinks = k1
a1.channels = c1


#指定spooldir的属性
a1.sources.r1.type = spooldir
a1.sources.r1.spoolDir = /usr/local/soft/flumedata4
#时间拦截器
a1.sources.r1.interceptors = i1
a1.sources.r1.interceptors.i1.type = timestamp

#指定sink的类型
a1.sinks.k1.type = hdfs
#指定hdfs的集群地址和路径,路径如果没有创建会自动创建
a1.sinks.k1.hdfs.path = hdfs://master:9000/user/hive/warehouse/bigdata30.db/students_flume
#指定hdfs路径下生成的文件的前缀
a1.sinks.k1.hdfs.filePrefix = students_test
#手动指定hdfs最小备份
a1.sinks.k1.hdfs.minBlockReplicas=1
#设置数据传输类型
a1.sinks.k1.hdfs.fileType = DataStream
#如果参数为0,不按照条数生成文件。如果参数为n,就是按照n条生成一个文件
a1.sinks.k1.hdfs.rollCount = 1000
#这个参数是hdfs下文件sink的数据size。每sink 32MB的数据,自动生成一个文件
a1.sinks.k1.hdfs.rollSize =0
#每隔n 秒 将临时文件滚动成一个目标文件。如果是0,就不按照时间进行生成目标文件。
a1.sinks.k1.hdfs.rollInterval =0
a1.sinks.k1.hdfs.idleTimeout=0
#每次从channel中取出的条数
a1.sinks.k1.hdfs.batchSize=1000


#指定channel
a1.channels.c1.type = memory
#暂存的条数
a1.channels.c1.capacity = 10000
#每次sink取的条数
a1.channels.c1.transactionCapacity = 1000


 #组装
a1.sources.r1.channels = c1
a1.sinks.k1.channel = c1
properties
a1.sources = r1
a1.sinks = k1
a1.channels = c1


#指定spooldir的属性
a1.sources.r1.type = spooldir
a1.sources.r1.spoolDir = /usr/local/soft/flumedata3
#时间拦截器
a1.sources.r1.interceptors = i1
a1.sources.r1.interceptors.i1.type = timestamp

a1.sinks.k1.type = hive
a1.sinks.k1.hive.metastore = thrift://192.168.128.100:9083
a1.sinks.k1.hive.database = bigdata30
a1.sinks.k1.hive.table = students_flume
a1.sinks.k1.hive.partition = asia,%{country},%Y-%m-%d-%H-%M
a1.sinks.k1.useLocalTimeStamp = false
a1.sinks.k1.round = true
a1.sinks.k1.roundValue = 10
a1.sinks.k1.roundUnit = minute
a1.sinks.k1.serializer = DELIMITED
a1.sinks.k1.serializer.delimiter = ","
a1.sinks.k1.serializer.serdeSeparator = ','
a1.sinks.k1.serializer.fieldnames =id,name,age,gender,clazz


#指定channel
a1.channels.c1.type = memory


 #组装
a1.sources.r1.channels = c1
a1.sinks.k1.channel = c1
案例三、从java代码中进行捕获打入到HDFS
1、先确定scource类型,channel类型和sink类型
确定的三个组件的类型是,avro source, memory channel, hdfs sink
2、打开maven项目,添加依赖
xml
            <!-- https://mvnrepository.com/artifact/org.apache.flume/flume-ng-core -->
            <dependency>
                <groupId>org.apache.flume</groupId>
                <artifactId>flume-ng-core</artifactId>
                <version>1.9.0</version>
            </dependency>
            <dependency>
                <groupId>org.apache.flume.flume-ng-clients</groupId>
                <artifactId>flume-ng-log4jappender</artifactId>
                <version>1.9.0</version>
            </dependency>
3、设置log4J的内容
properties
log4j.rootLogger=INFO,stdout,flume

log4j.appender.stdout = org.apache.log4j.ConsoleAppender
log4j.appender.stdout.Target = System.out
log4j.appender.stdout.layout=org.apache.log4j.PatternLayout
log4j.appender.stdout.layout.ConversionPattern=%d{yyyy-MM-dd HH:mm:ss,SSS} [%t] [%c] [%p] - %m%n


log4j.appender.flume = org.apache.flume.clients.log4jappender.Log4jAppender
log4j.appender.flume.Hostname = 192.168.230.50
log4j.appender.flume.Port = 41414
log4j.appender.flume.UnsafeMode = true
log4j.appender.flume.layout=org.apache.log4j.PatternLayout
log4j.appender.flume.layout.ConversionPattern=%m%n
编写java代码(示例,可以修改logger打印的内容)
java
package com.shujia.log2flume;

import org.apache.log4j.Logger;

import java.text.SimpleDateFormat;
import java.util.Date;

public class LoggerToFlume {
    public static void main(String[] args) throws InterruptedException {
        //创建一个logger对象
        Logger logger = Logger.getLogger(LoggerToFlume.class.getName());

        //创建一个日期格式化对象
        SimpleDateFormat sdf = new SimpleDateFormat("yyyy-MM-dd HH:mm:ss");

        //写一个死循环
        while (true) {
            Date date = new Date();
            logger.info("dateToBigdata17: " + sdf.format(date));
            //让线程休眠一会儿
            Thread.sleep(1000);
        }

    }
}
4、编写conf文件
shell
#定义agent名, source、channel、sink的名称
a.sources = r1
a.channels = c1
a.sinks = k1
#具体定义source
a.sources.r1.type = avro
a.sources.r1.bind = 192.168.128.100
a.sources.r1.port = 12345
#具体定义channel
a.channels.c1.type = memory
a.channels.c1.capacity = 10000
a.channels.c1.transactionCapacity = 10
#具体定义sink
a.sinks.k1.type = hdfs
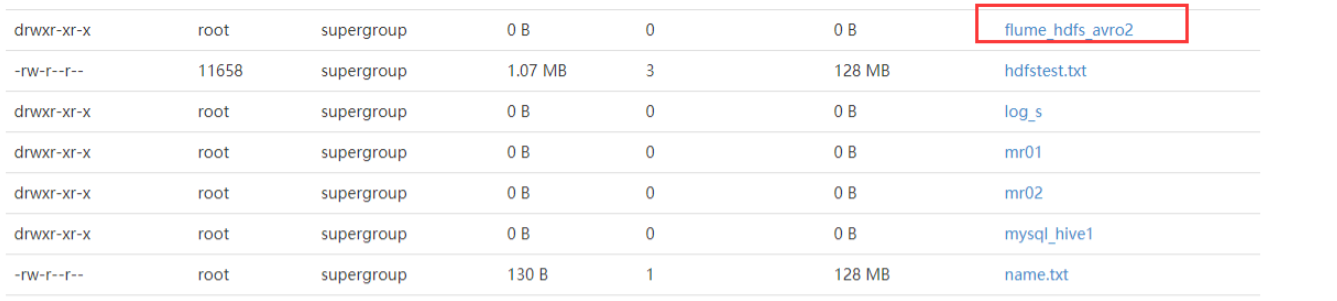
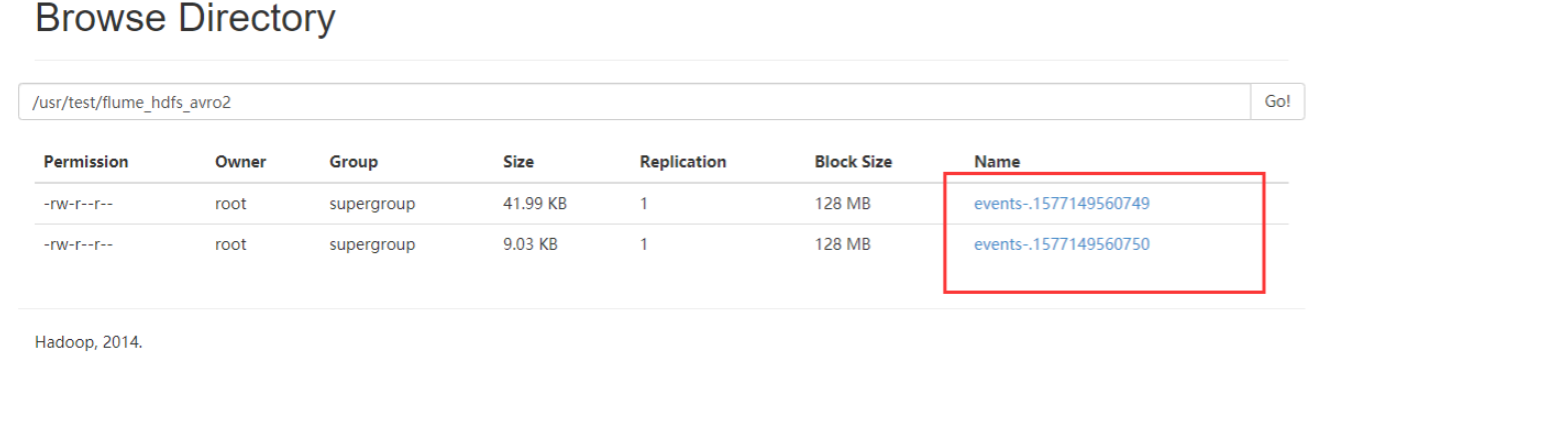
a.sinks.k1.hdfs.path =hdfs://master:9000/bigdata30/flumeout3/flume_hdfs_avro2
a.sinks.k1.hdfs.filePrefix = events-
a.sinks.k1.hdfs.minBlockReplicas=1
a.sinks.k1.hdfs.fileType = DataStream
#不按照条数生成文件
a.sinks.k1.hdfs.rollCount = 10
a.sinks.k1.hdfs.batchSize = 10
a.sinks.k1.hdfs.rollSize = 0
#每隔N s将临时文件滚动成一个目标文件
a.sinks.k1.hdfs.rollInterval =0
a.sinks.k1.hdfs.idleTimeout=0
#组装source、channel、sink
a.sources.r1.channels = c1
a.sinks.k1.channel = c15、开启服务,命令:
shell
flume-ng agent -n a -c ../conf -f ./avro2hdfs2.conf -Dflume.root.logger=DEBUG,console6、运行Java代码
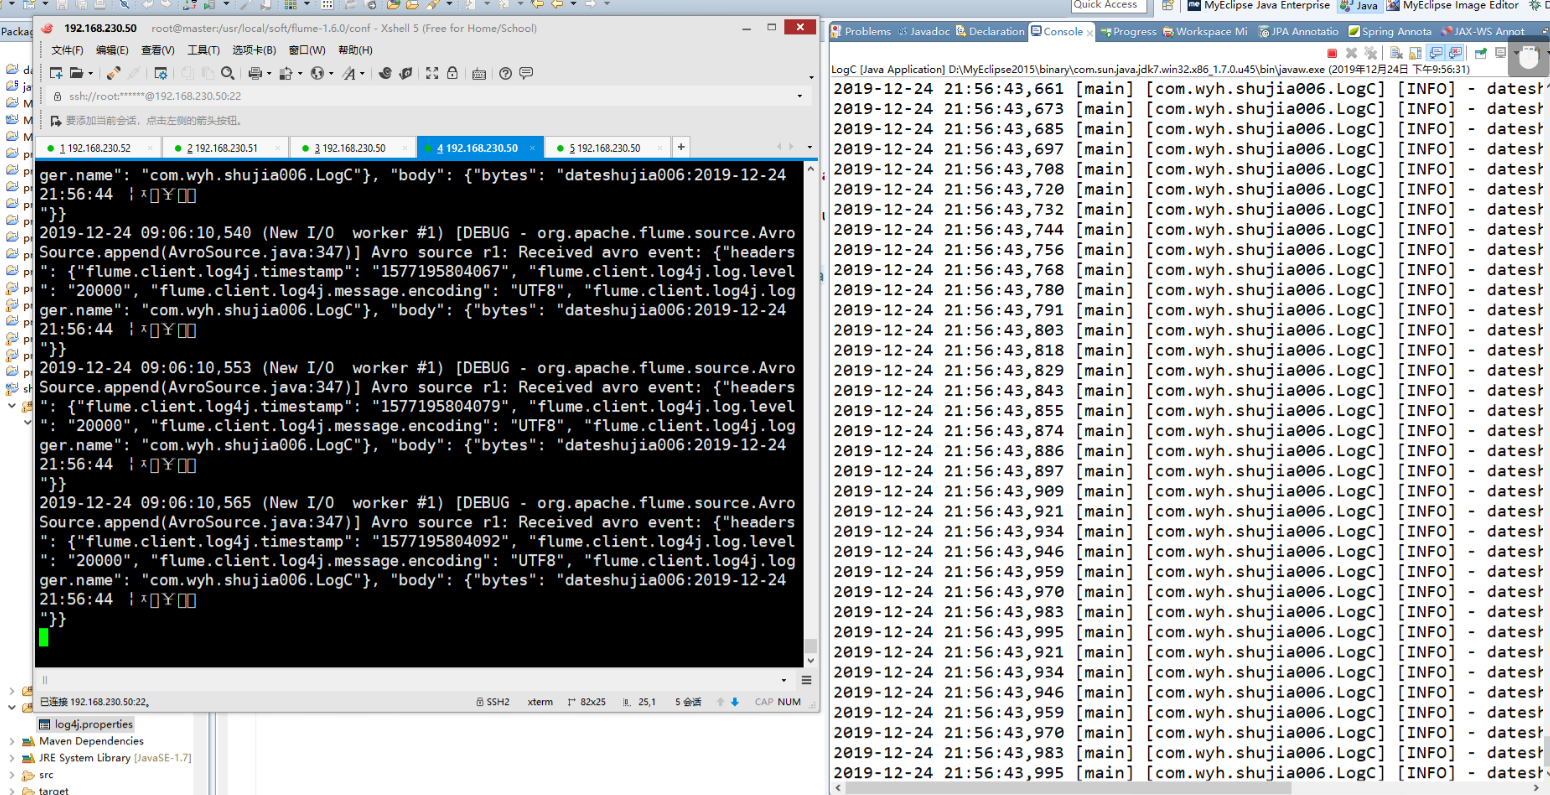
7、查看HDFS
案例四、监控HBase日志到Hbase表中(这里可以换成其他组件日志监控)
1、监控日志
提前建好表
create 'log' , 'cf1'编写conf文件 hbaselog2hdfs.conf
shell
# a表示给agent命名为a
# 给source组件命名为r1
a.sources = r1
# 给sink组件命名为k1
a.sinks = k1
# 给channel组件命名为c1
a.channels = c1


#指定spooldir的属性
a.sources.r1.type = exec
a.sources.r1.command = tail -F /usr/local/soft/bigdata30/work_day.txt

#指定channel
a.channels.c1.type = memory
a.channels.c1.capacity = 10000
# 表示sink每次会从channel里取多少数据
a.channels.c1.transactionCapacity = 100

#指定sink的类型
#a.sinks.k1.type = hbase
#a.sinks.k1.table = log
#a.sinks.k1.columnFamily = cf1

a.sinks.k1.type = hbase2
a.sinks.k1.table = log
a.sinks.k1.columnFamily = cf1
a.sinks.k1.serializer = org.apache.flume.sink.hbase2.RegexHBase2EventSerializer

# 组装
a.sources.r1.channels = c1
a.sinks.k1.channel = c1
运行
shell
flume-ng agent -n a -c ../conf -f ./ hbaselog2hdfs.conf -Dflume.root.logger=DEBUG,console2、监控自定义的文件
确保test_idoall_org表在hbase中已经存在:
shell
hbase(main):002:0> create 'test_idoall_org','uid','name'
0 row(s) in 0.6730 seconds

=> Hbase::Table - test_idoall_org
hbase(main):003:0> put 'test_idoall_org','10086','name:idoall','idoallvalue'
0 row(s) in 0.0960 seconds
2.创建配置文件:
shell
a1.sources = r1
a1.sinks = k1
a1.channels = c1

# Describe/configure the source
a1.sources.r1.type = exec
a1.sources.r1.command = tail -F /usr/local/soft/flumedata/data.txt

# Describe the sink
a1.sinks.k1.type = hbase
a1.sinks.k1.table = test_idoall_org
a1.sinks.k1.columnFamily = name
a1.sinks.k1.serializer = org.apache.flume.sink.hbase.RegexHbaseEventSerializer

# Use a channel which buffers events in memory
a1.channels.c1.type = memory
a1.channels.c1.capacity = 1000
a1.channels.c1.transactionCapacity = 100

# Bind the source and sink to the channel
a1.sources.r1.channels = c1
a1.sinks.k1.channel = c1
3.启动flume agent:
shell
flume-ng agent -n a1 -c ../../flume/conf -f ./file2hbase.conf -Dflume.root.logger=DEBUG, console4.产生数据:
shell
echo "hello idoall.org from flume" >> data.txt案例五、flume监控Http source
1、先确定scource类型,channel类型和sink类型
确定的三个组件的类型是,http source, memory channel, logger sink.
2、编写conf文件
shell
a1.sources=r1
a1.sinks=k1
a1.channels=c1

a1.sources.r1.type=http
a1.sources.r1.port=50000
a1.sources.r1.channels=c1

a1.sinks.k1.type=logger
a1.sinks.k1.channel=c1

a1.channels.c1.type=memory
a1.channels.c1.capacity=10000
# 表示sink每次会从channel里取多少数据
a1.channels.c1.transactionCapacity=100
3、启动服务
shell
flume-ng agent -n a1 -f ./httpToLogger.conf -Dflume.root.logger=DEBUG,console4、复制一个窗口进行打数据
shell
curl -X POST -d'[{"headers":{"h1":"v1","h2":"v2"},"body":"hello bigdata"}]' http://192.168.128.100:50000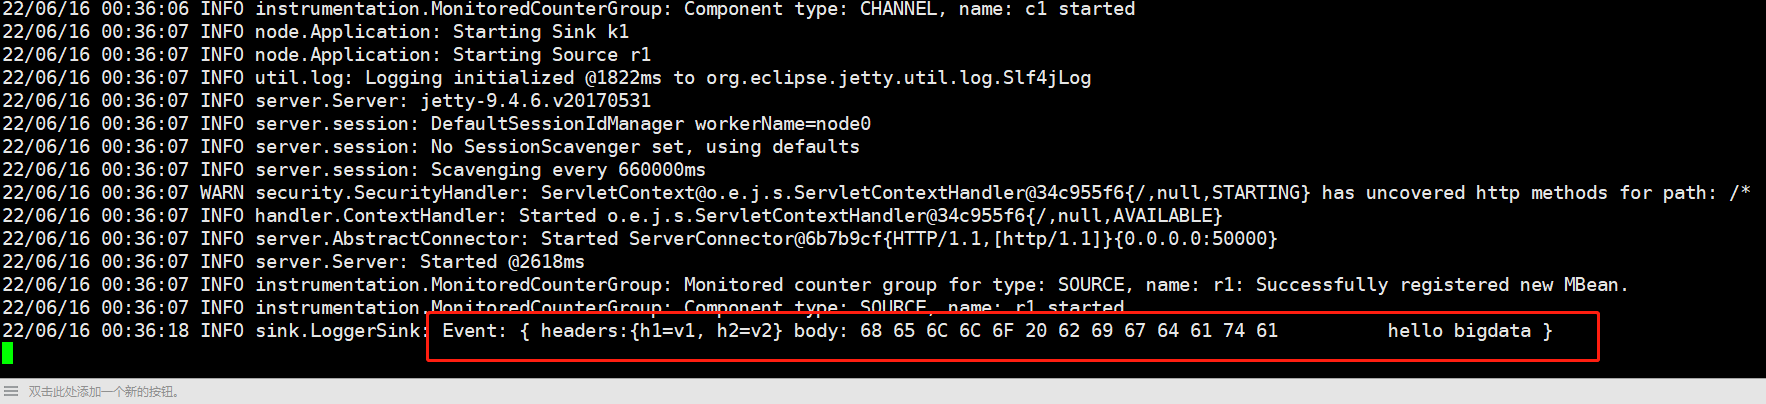
案例六、多路复制
1、将flume复制到node1,node2
shell
[root@master soft]# scp -r flume-1.9.0 node1:`pwd`
[root@master soft]# scp -r flume-1.9.0 node2:`pwd`
2、在node1节点的/usr/local/soft/bigdata17/scripts 下新建配置文件:
vim netcat-flume-loggers.conf添加如下内容
a1.sources = r1
a1.channels = c1
a1.sinks = k1

a1.sources.r1.type = avro
a1.sources.r1.bind = node1
a1.sources.r1.port = 4141

a1.channels.c1.type = memory
a1.channels.c1.capacity = 1000
a1.channels.c1.transactionCapacity = 100


a1.sinks.k1.type = logger


a1.sources.r1.channels = c1
a1.sinks.k1.channel = c1


flume-ng agent -n a1 -c /usr/local/soft/flume-1.11.0/conf -f ./avro2logger.conf -Dflume.root.logger=DEBUG,console
3、在node2节点的 /usr/local/soft/bigdata17/scripts 下新建配置文件:
vim netcat-flume-loggers.conf添加如下内容:
a4.sources = r4
a4.channels = c4
a4.sources.r4.type = avro
a4.sources.r4.channels = c4
a4.sources.r4.bind = node2
a4.sources.r4.port = 4141
a4.channels.c4.type = memory
a4.channels.c4.capacity = 1000
a4.channels.c4.transactionCapacity = 100
a4.sinks = k4
a4.sinks.k4.type = logger
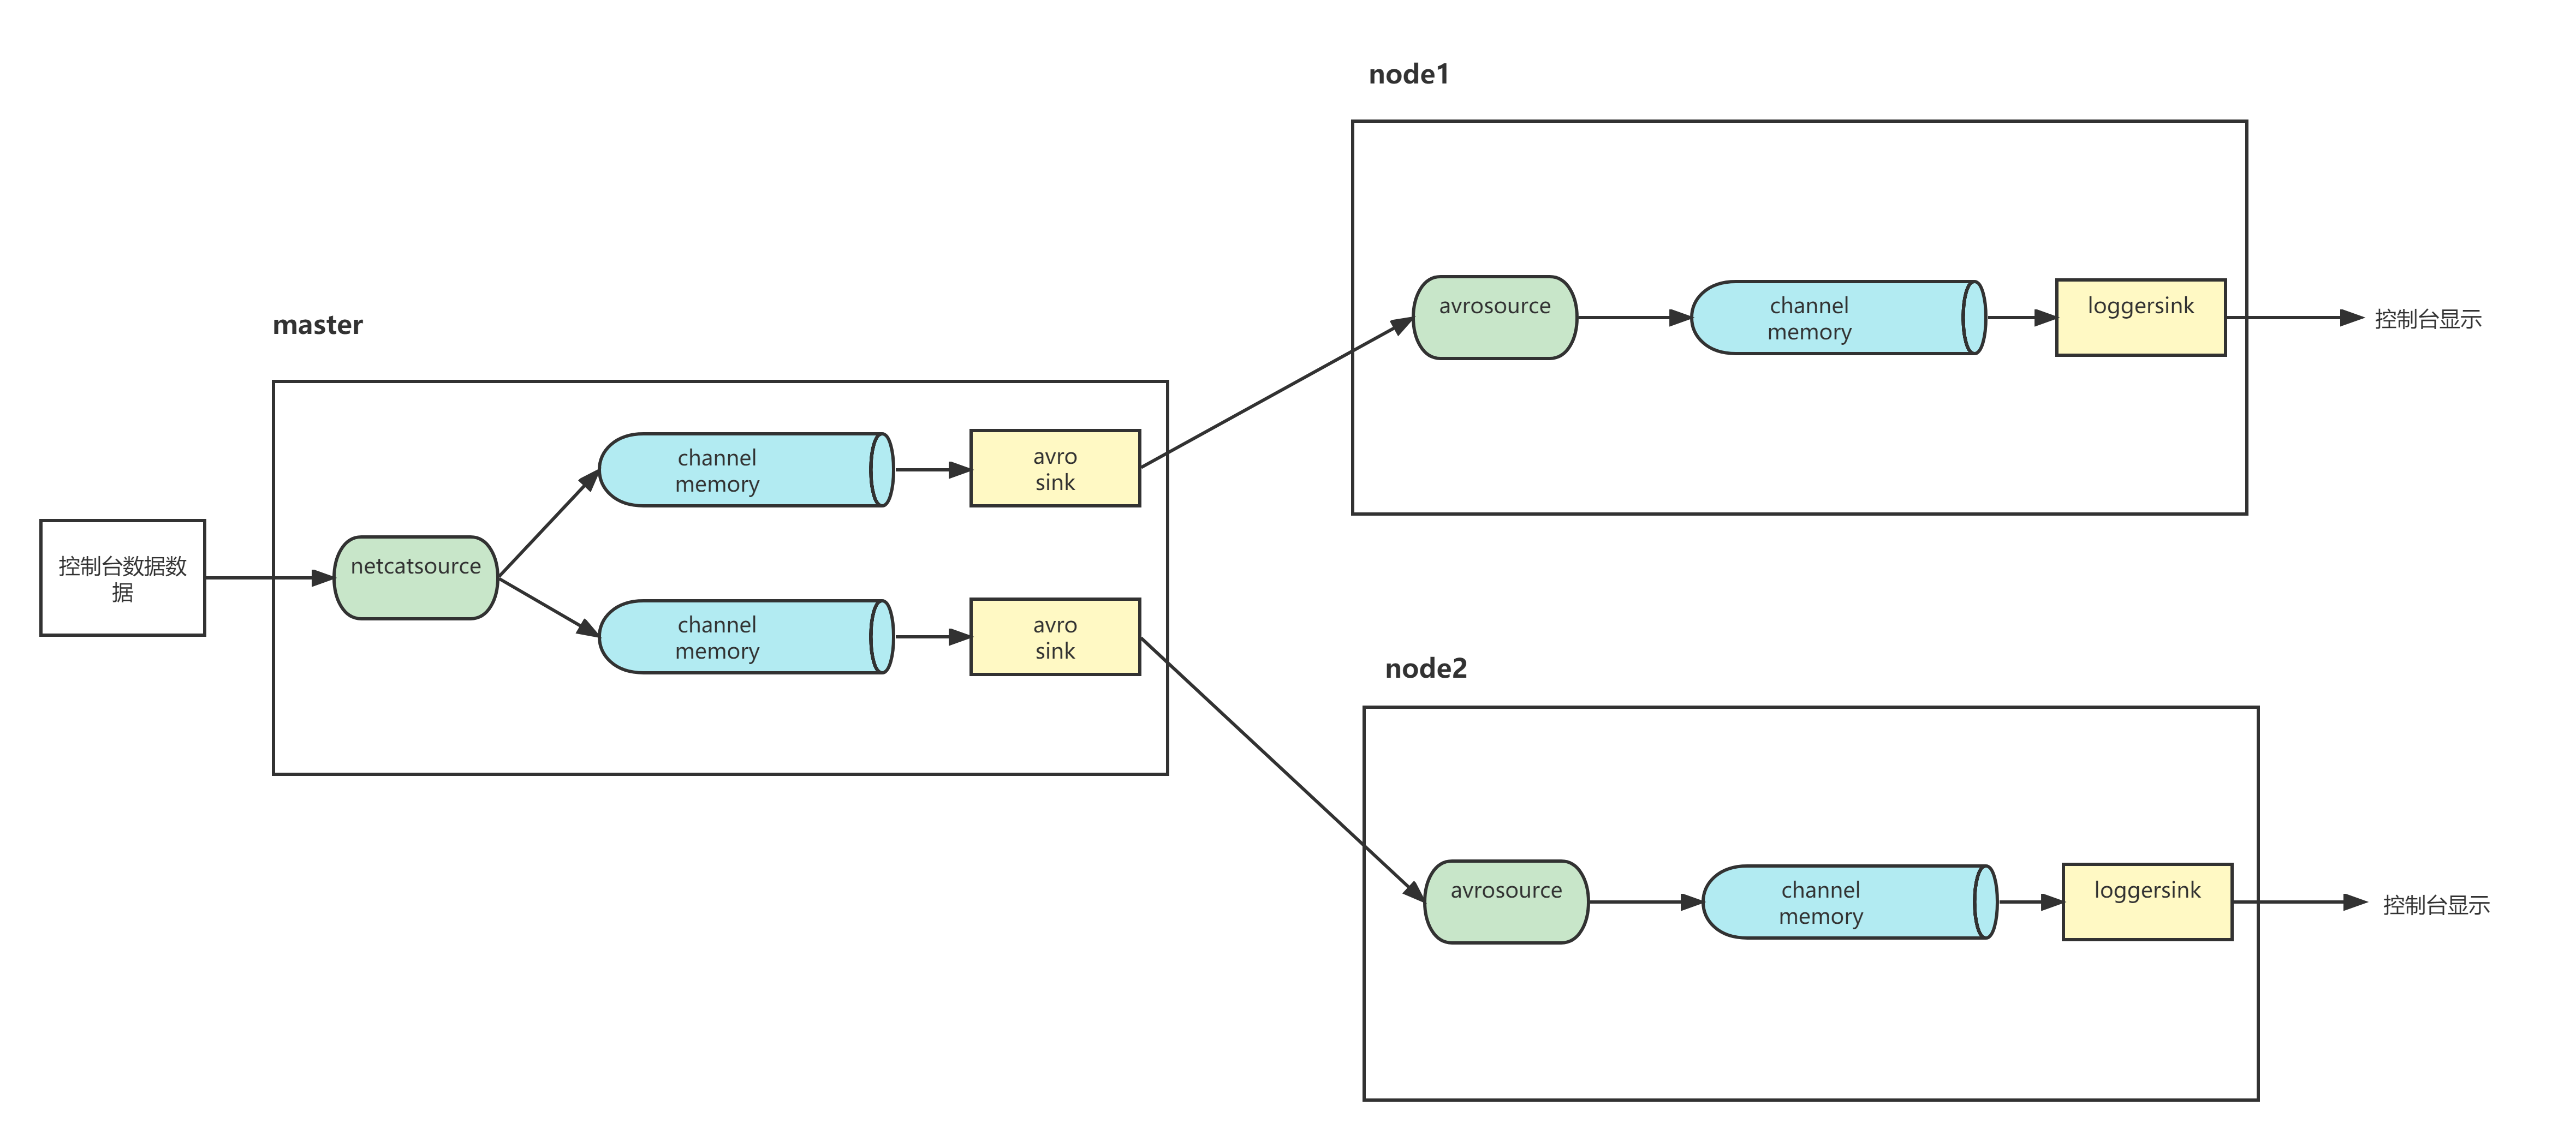
a4.sinks.k4.channel = c44、在master节点的 /usr/local/soft/bigdata17/scrips 下新建配置文件:
vim netcat-flume-loggers.conf添加如下内容
a2.sources = r1
a2.channels = c1 c2
a2.sinks = k1 k2


# Describe/configure the source
a2.sources.r1.type = netcat
a2.sources.r1.bind = master
a2.sources.r1.port = 44444

# Use a channel which buffers events in memory
a2.channels.c1.type = memory
a2.channels.c1.capacity = 1000
a2.channels.c1.transactionCapacity = 100

# Use a channel which buffers events in memory
a2.channels.c2.type = memory
a2.channels.c2.capacity = 1000
a2.channels.c2.transactionCapacity = 100

# Describe the sink
a2.sinks.k1.type = avro
a2.sinks.k1.hostname = node1
a2.sinks.k1.port = 4141

a2.sinks.k2.type = avro
a2.sinks.k2.hostname = node2
a2.sinks.k2.port = 4141


# Bind the source and sink to the channel
a2.sources.r1.channels = c1 c2
a2.sinks.k1.channel = c1
a2.sinks.k2.channel = c2
三台服务器的配置文件建好了,现在就可以启动flume集群了:
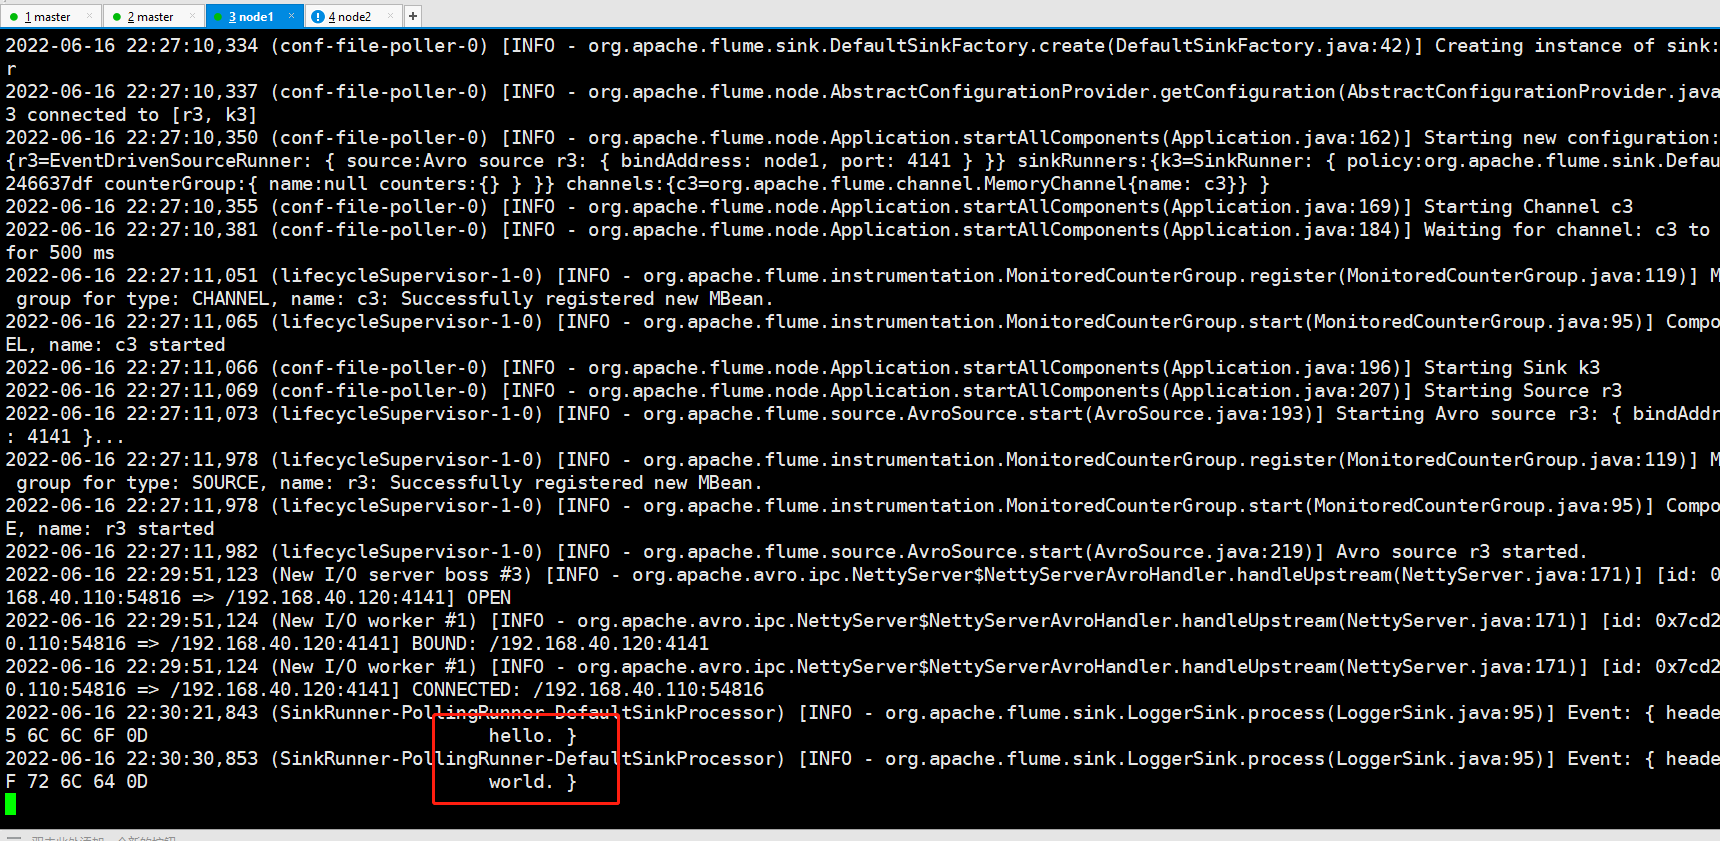
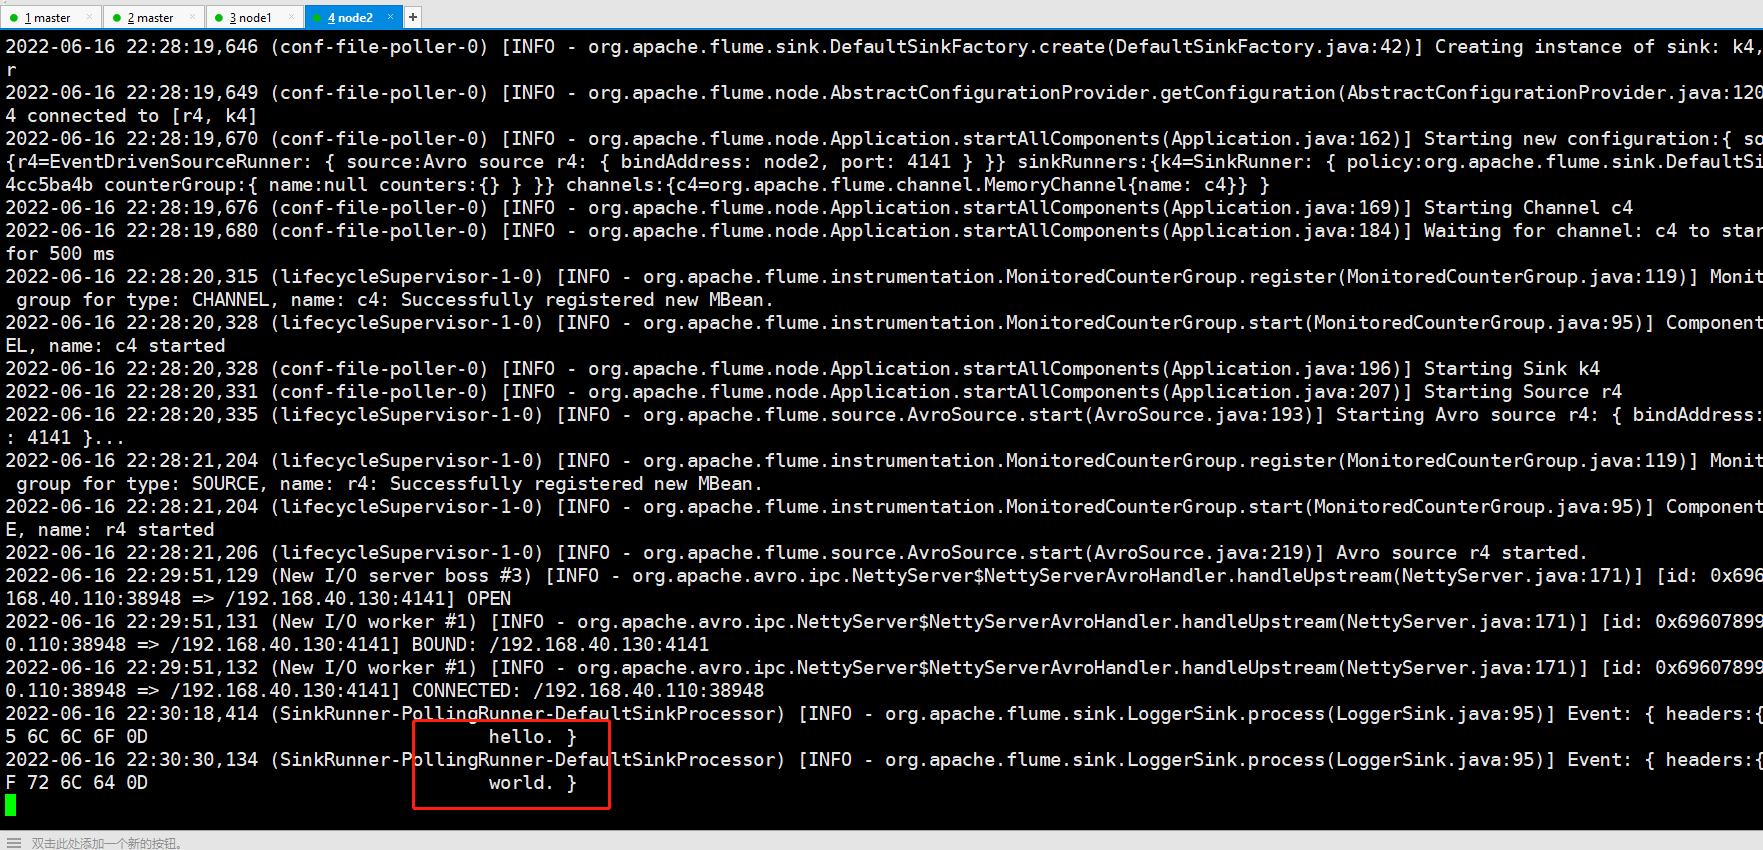
先启动node1和node2节点的logger服务端:
flume-ng agent -n a3 -c ../../flume-1.9.0/conf -f ./netcat-flume-loggers.conf -Dflume.root.logger=INFO,console
flume-ng agent -n a4 -c ../../flume-1.9.0/conf -f ./netcat-flume-loggers.conf -Dflume.root.logger=INFO,console
启动master节点的netcat:
flume-ng agent -n a2 -c ../../flume-1.9.0/conf -f ./netcat-flume-loggers.conf -Dflume.root.logger=INFO,console开启netcat后此窗口就不能操作了,再新建一个master窗口启动telnet:
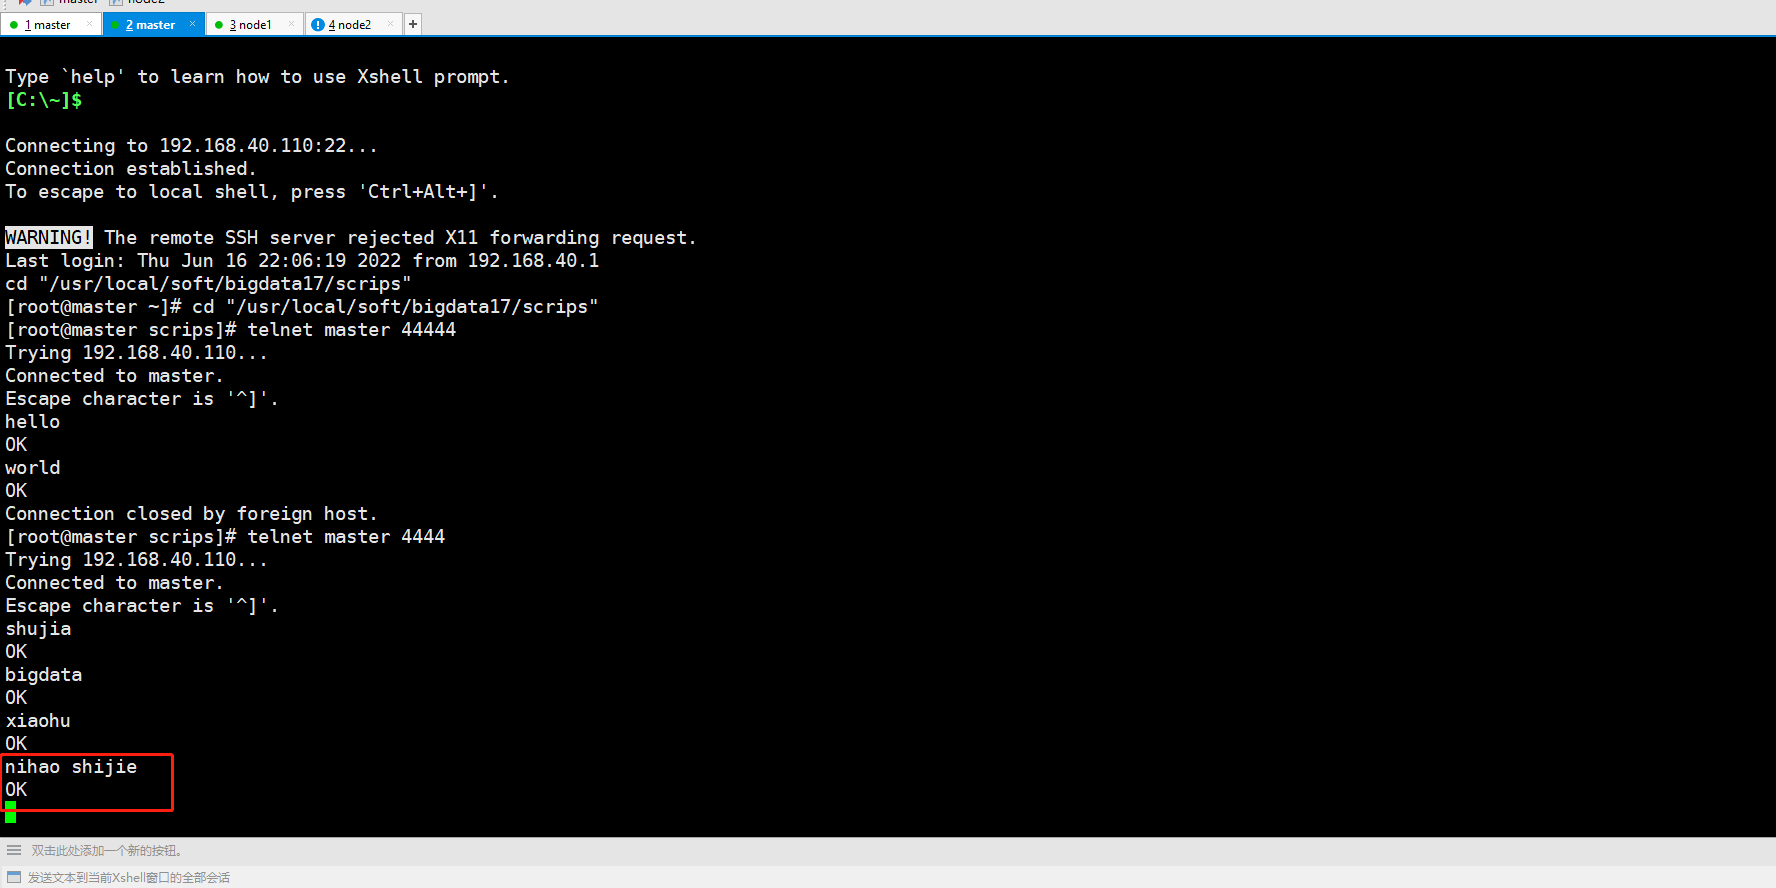
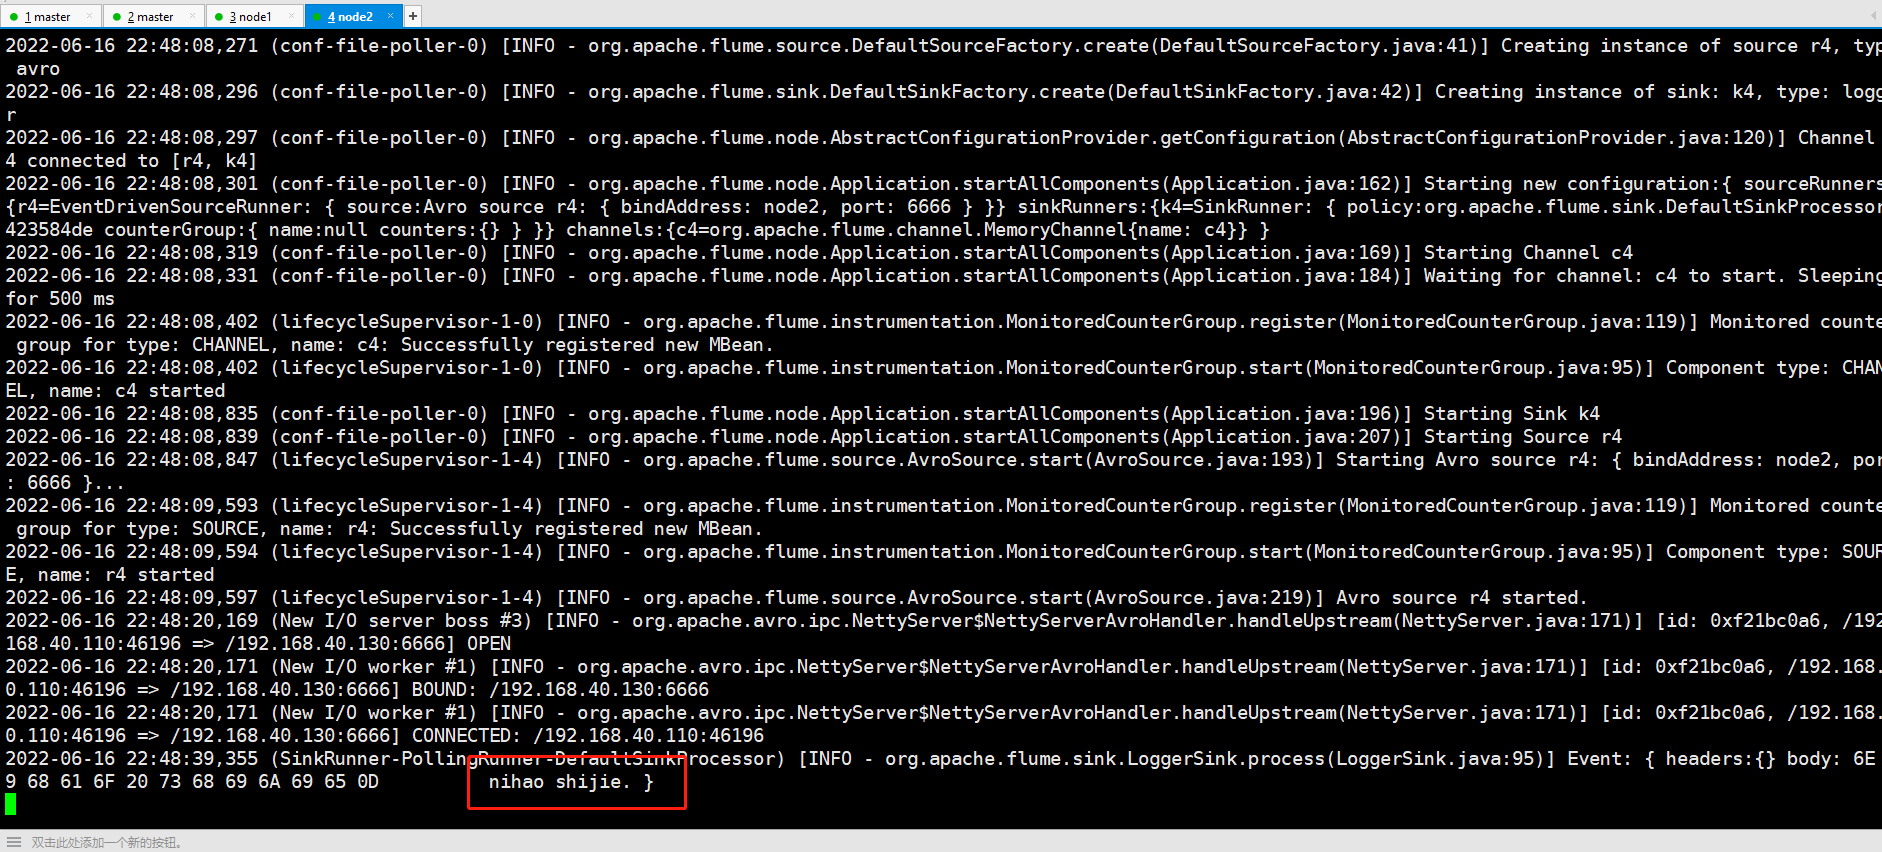
telnet master 44444master上输入数据:
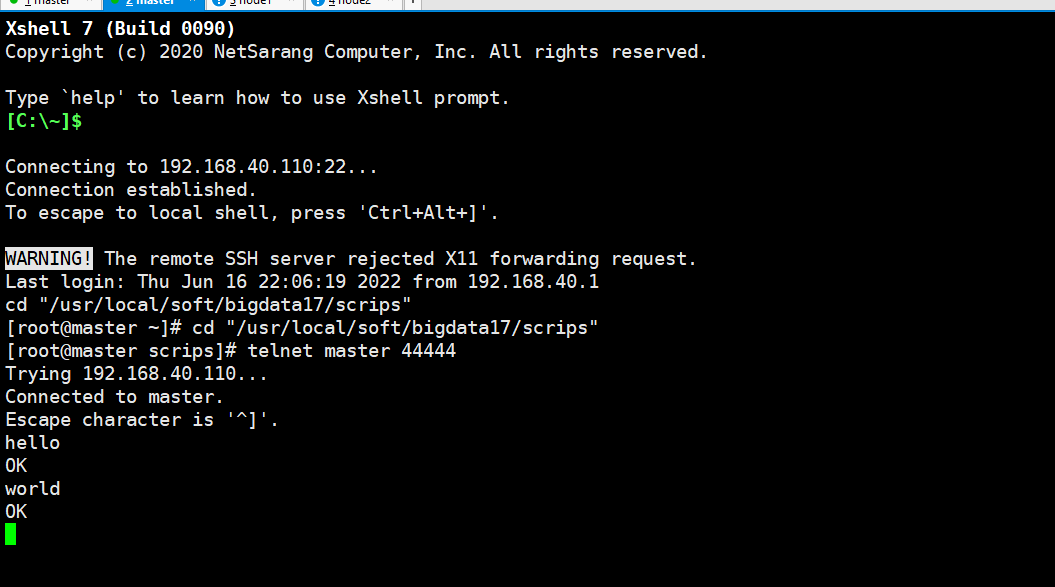
node1和node2接收数据:
案例七、故障转移

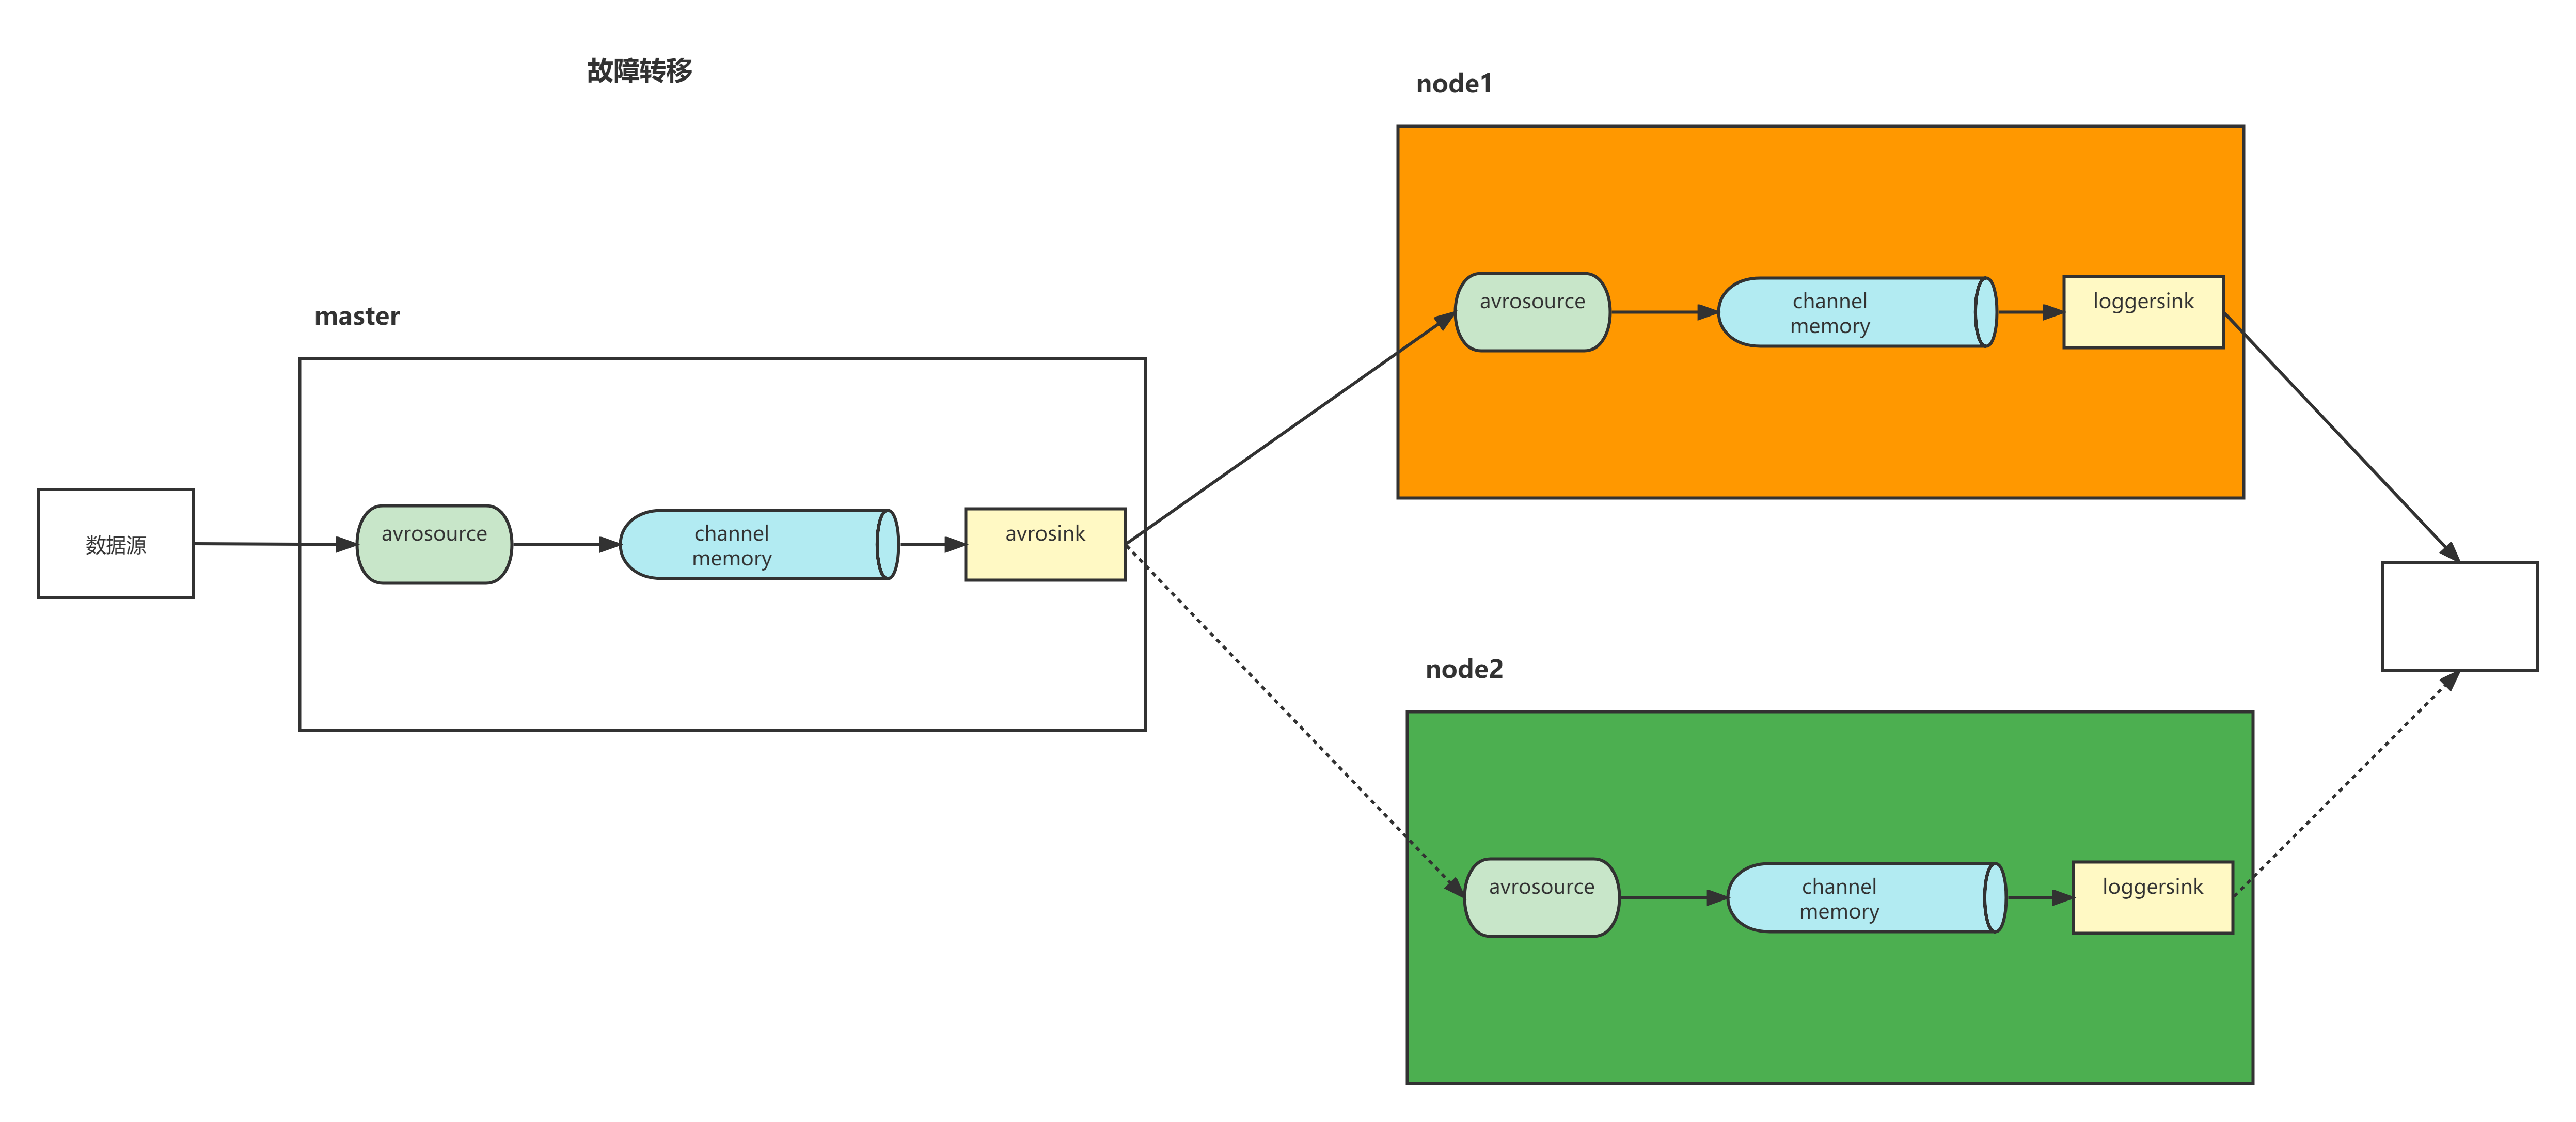
Flume支持使用将多个sink逻辑上分到一个sink组,sink组配合不同的SinkProcessor可以实现负载均衡和错误恢复的功能。这里的故障,指的是Sink故障
1)通过sinkgroups里priority属性配置的权重来决定哪台的优先级高,同一时间只能有一台机器工作
2)当当前的sink挂掉后切换为standby模式(假设优先级10),并立刻切换到另一台(假设优先级9),当sink修复好重新启动后,隔段时间会恢复使用优先级为10的sink
3)遇到故障时,我们要立即修复
master:
vim guzhang.conf

a1.sources = r1
a1.channels = c1
a1.sinks = k1 k2

a1.sources.r1.type = netcat
a1.sources.r1.bind = master
a1.sources.r1.port = 4444

a1.channels.c1.type = memory
a1.channels.c1.capacity = 10000
a1.channels.c1.transactionCapacity = 100

#将数据写到另一台Flume服务器上
a1.sinks.k1.type = avro
a1.sinks.k1.hostname = node1
a1.sinks.k1.port = 5555

#将数据写到另一台Flume服务器上
a1.sinks.k2.type = avro
a1.sinks.k2.hostname = node2
a1.sinks.k2.port = 6666

#使用sink processor来控制channel的数据流向
a1.sinkgroups = g1
a1.sinkgroups.g1.sinks = k1 k2
a1.sinkgroups.g1.processor.type = failover
a1.sinkgroups.g1.processor.priority.k1 = 5
a1.sinkgroups.g1.processor.priority.k2 = 10

a1.sources.r1.channels = c1
a1.sinks.k1.channel = c1
a1.sinks.k2.channel = c1
node1
a3.sources = r3
a3.channels = c3
a3.sources.r3.type = avro
a3.sources.r3.channels = c3
a3.sources.r3.bind = node1
a3.sources.r3.port = 5555

a3.channels.c3.type = memory
a3.channels.c3.capacity = 1000
a3.channels.c3.transactionCapacity = 100

a3.sinks = k3
a3.sinks.k3.type = logger
a3.sinks.k3.channel = c3
node2
a4.sources = r4
a4.channels = c4
a4.sources.r4.type = avro
a4.sources.r4.channels = c4
a4.sources.r4.bind = node2
a4.sources.r4.port = 6666

a4.channels.c4.type = memory
a4.channels.c4.capacity = 1000
a4.channels.c4.transactionCapacity = 100

a4.sinks = k4
a4.sinks.k4.type = logger
a4.sinks.k4.channel = c4
先启动node1,node2上的
flume-ng agent -n a3 -c ../../flume-1.9.0/conf -f ./guzhang.conf -Dflume.root.logger=INFO,console
flume-ng agent -n a4 -c ../../flume-1.9.0/conf -f ./guzhang.conf -Dflume.root.logger=INFO,console
再启动master的
flume-ng agent -n a1 -c ../../flume-1.9.0/conf -f ./guzhang.conf -Dflume.root.logger=INFO,consolemaster输入数据
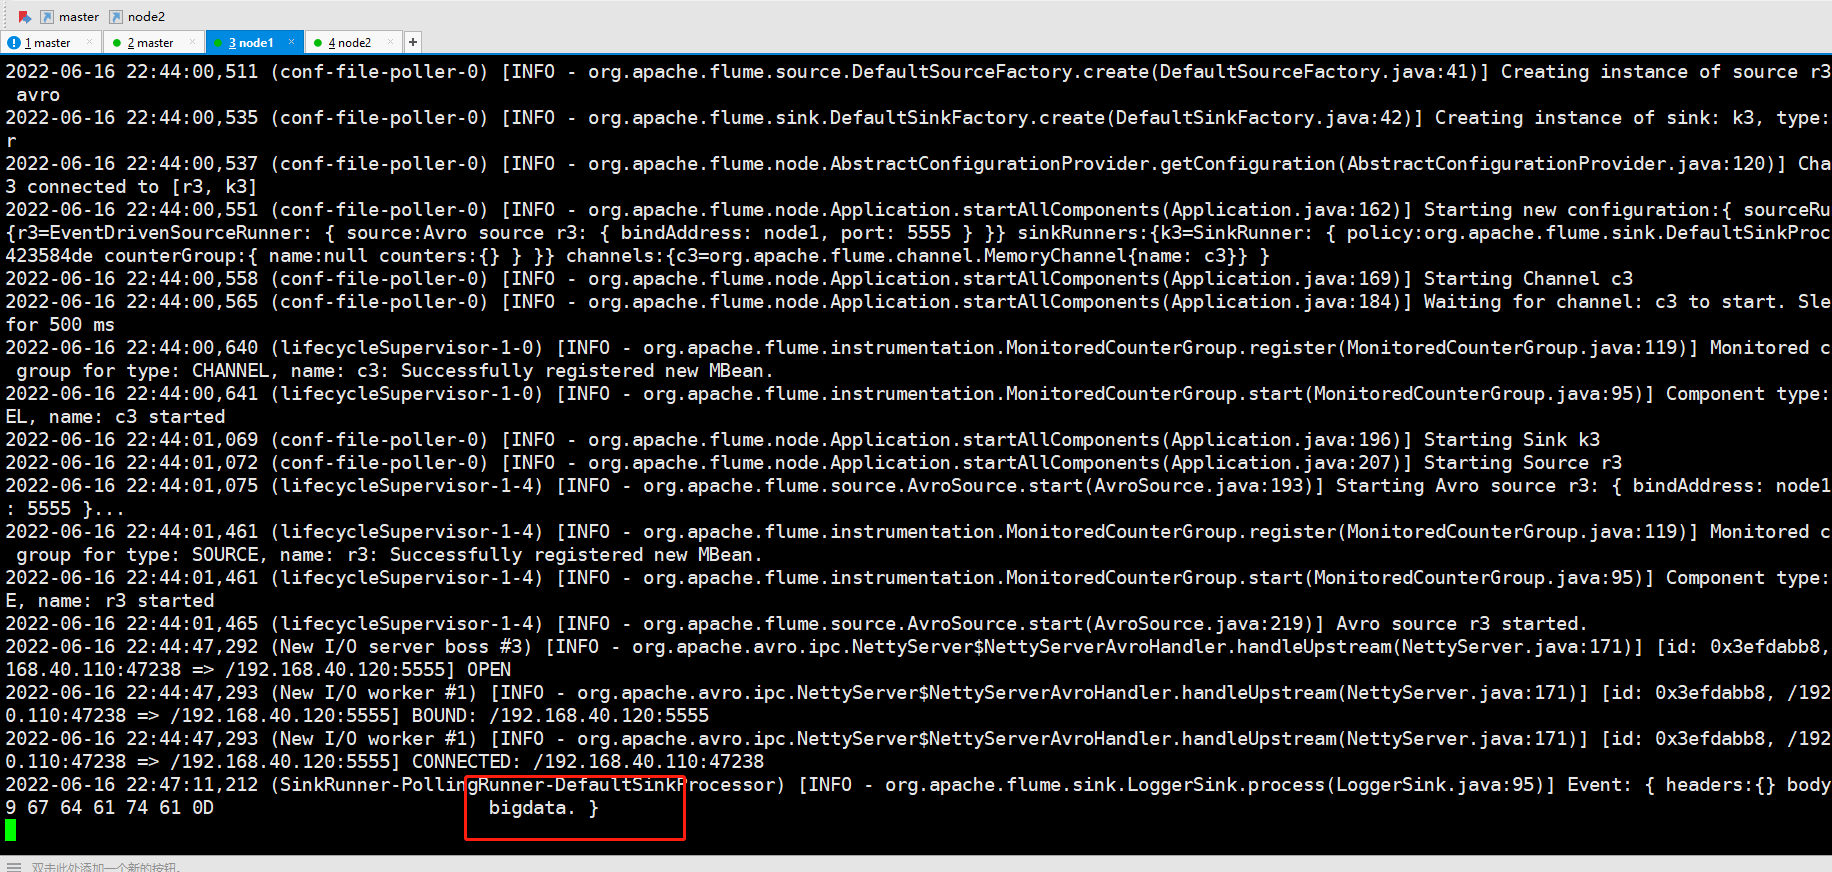
telnet master 4444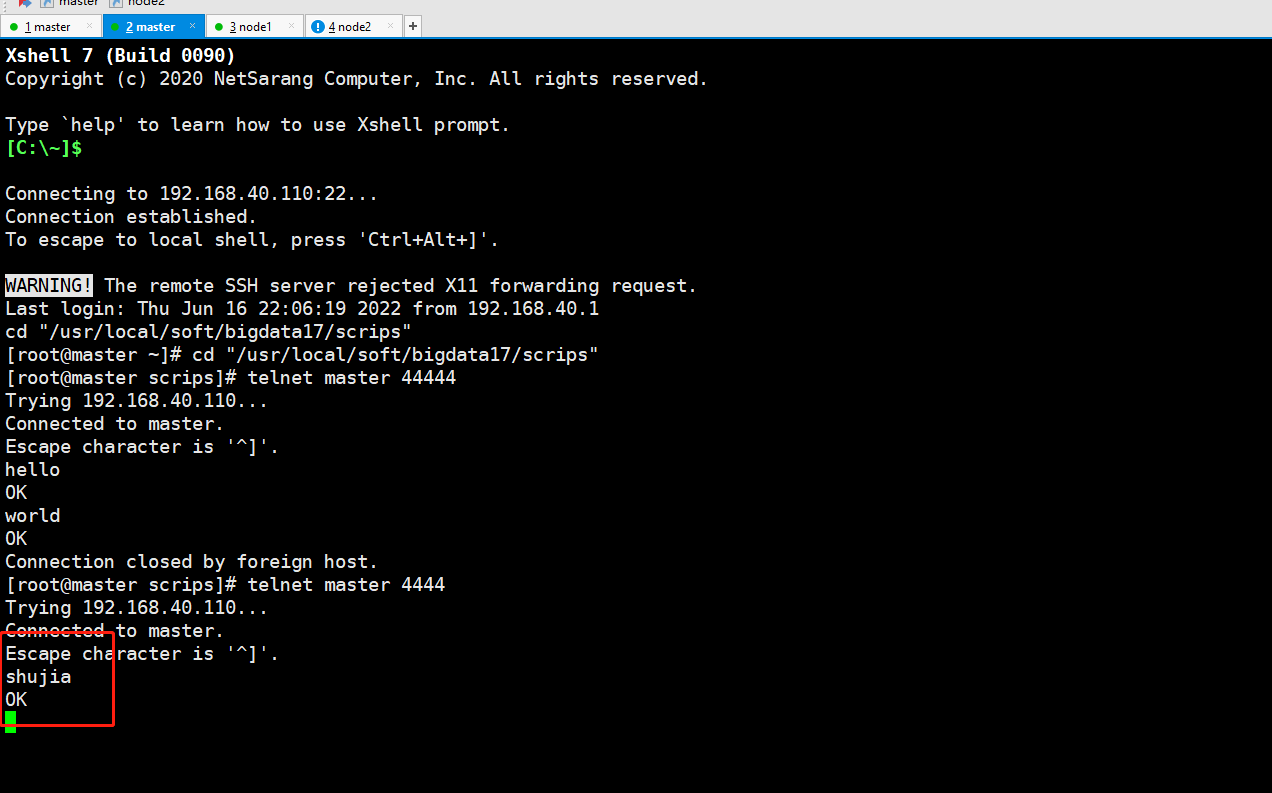
数据会打到node2
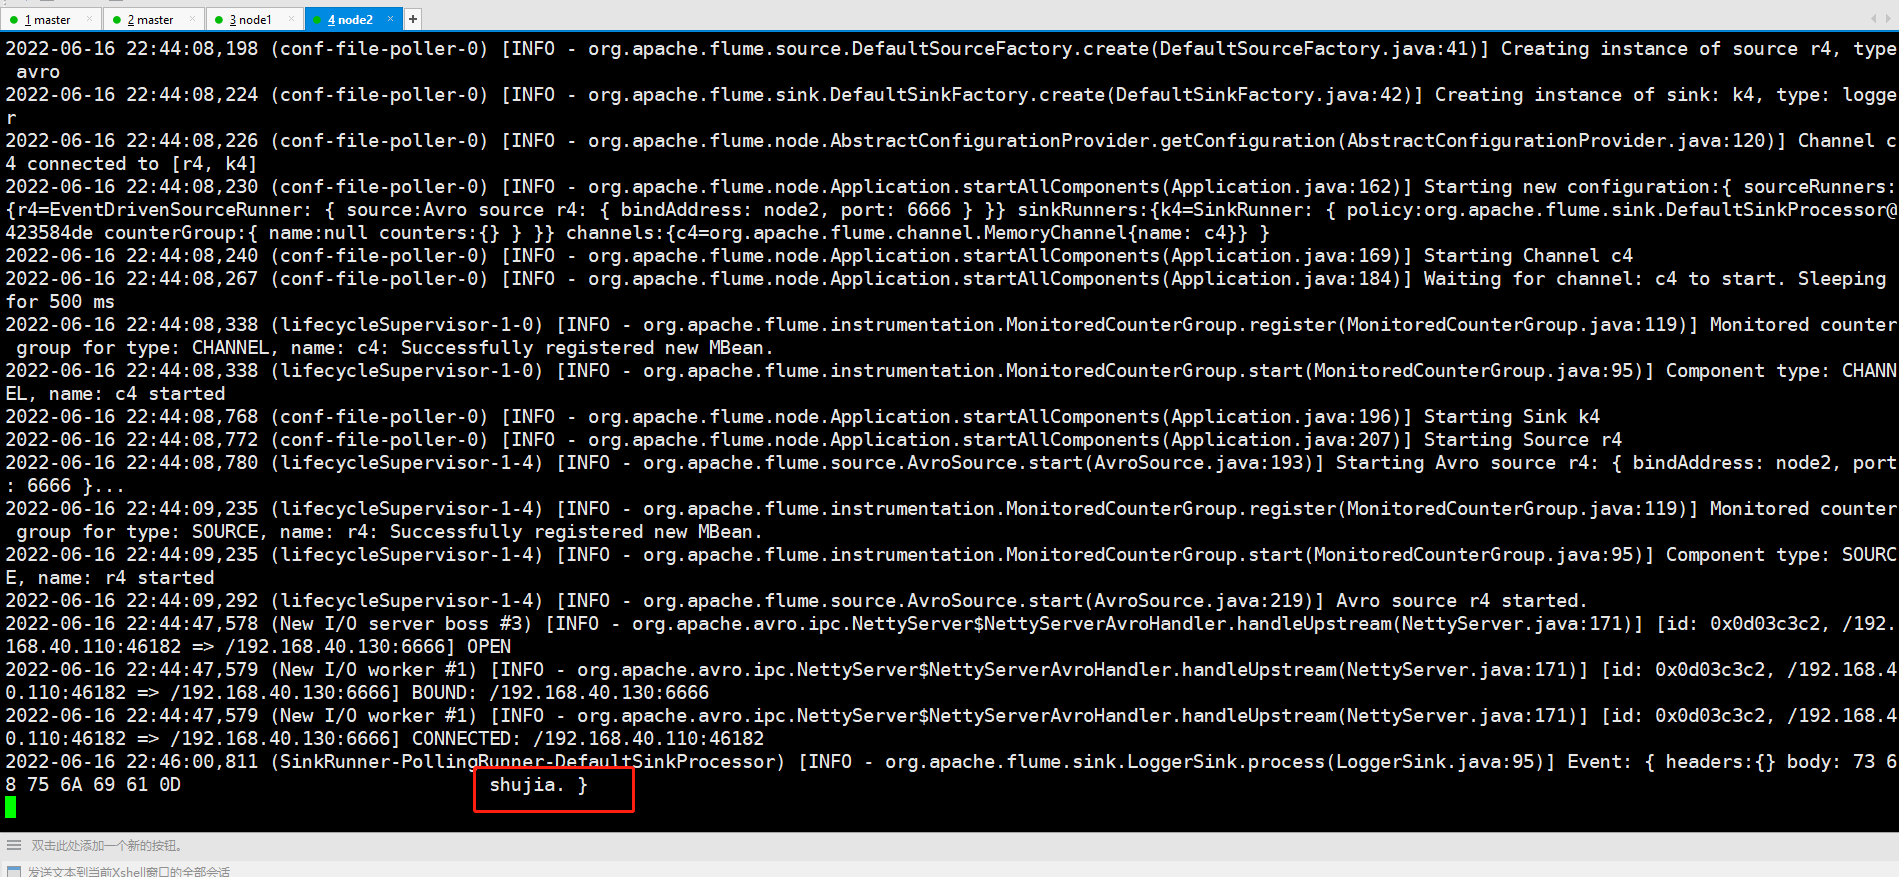
将node2手动关闭,再输入数据,这时候数据打到node1
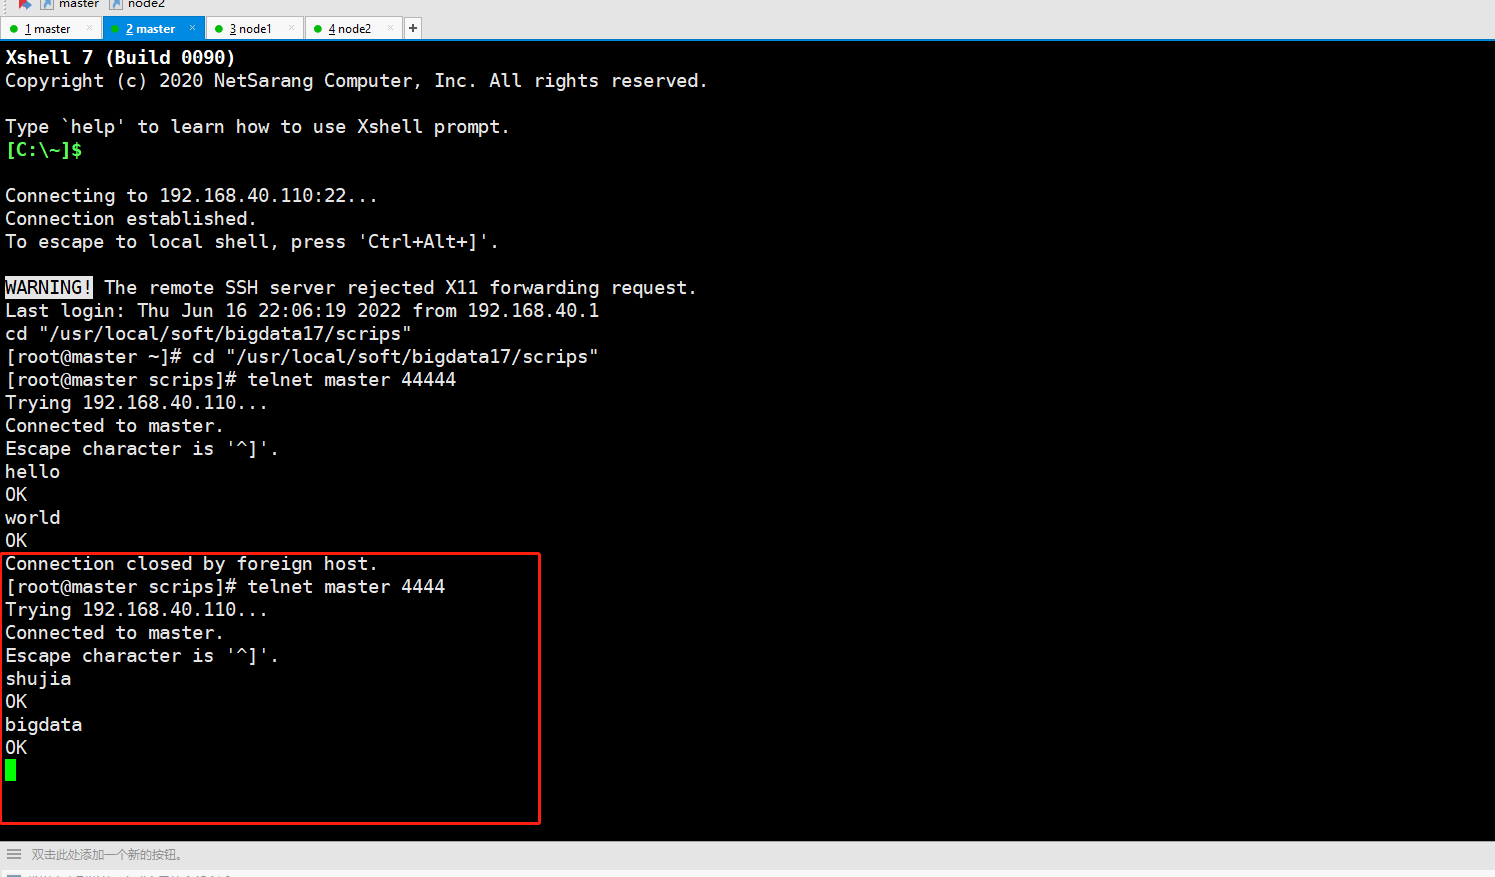
再将node2启动起来,再输入数据,这时候,node2继续接收
案例八、负载均衡
通过将sinkprocessor里的type属性来控制processor模式,分别是(负载均衡load_balance、故障转移failover)
使用负载均衡以后,channel会轮训分配任务,减少机器负荷
master上的配置文件:(随机的)
a1.sources = r1
a1.channels = c1
a1.sinks = k1 k2

a1.sources.r1.type = netcat
a1.sources.r1.bind = master
a1.sources.r1.port = 4444

a1.channels.c1.type = memory
a1.channels.c1.capacity = 10000
a1.channels.c1.transactionCapacity = 100

a1.sinks.k1.type = avro
a1.sinks.k1.hostname = node1
a1.sinks.k1.port = 5555

a1.sinks.k2.type = avro
a1.sinks.k2.hostname = node2
a1.sinks.k2.port = 6666

a1.sinkgroups = g1
a1.sinkgroups.g1.sinks = k1 k2
a1.sinkgroups.g1.processor.type = load_balance
a1.sinkgroups.g1.processor.backoff = true
a1.sinkgroups.g1.processor.selector = random

a1.sources.r1.channels = c1
a1.sinks.k1.channel = c1
a1.sinks.k2.channel = c1
案例九、聚合
node1、node2两台日志服务机器实时生产日志主要类型为access.log、nginx.log、web.log 现在要求:
把node1、node2机器中的access.log、nginx.log、web.log 采集汇总到master机器上然后统一收集到hdfs中。 但是在hdfs中要求的目录为:
/shujia/bigdata17/flumelogs/access/20220616/**
/shujia/bigdata17/flumelogs/nginx/20180616/**
/shujia/bigdata17/flumelogs/web/20180616/**
场景分析:
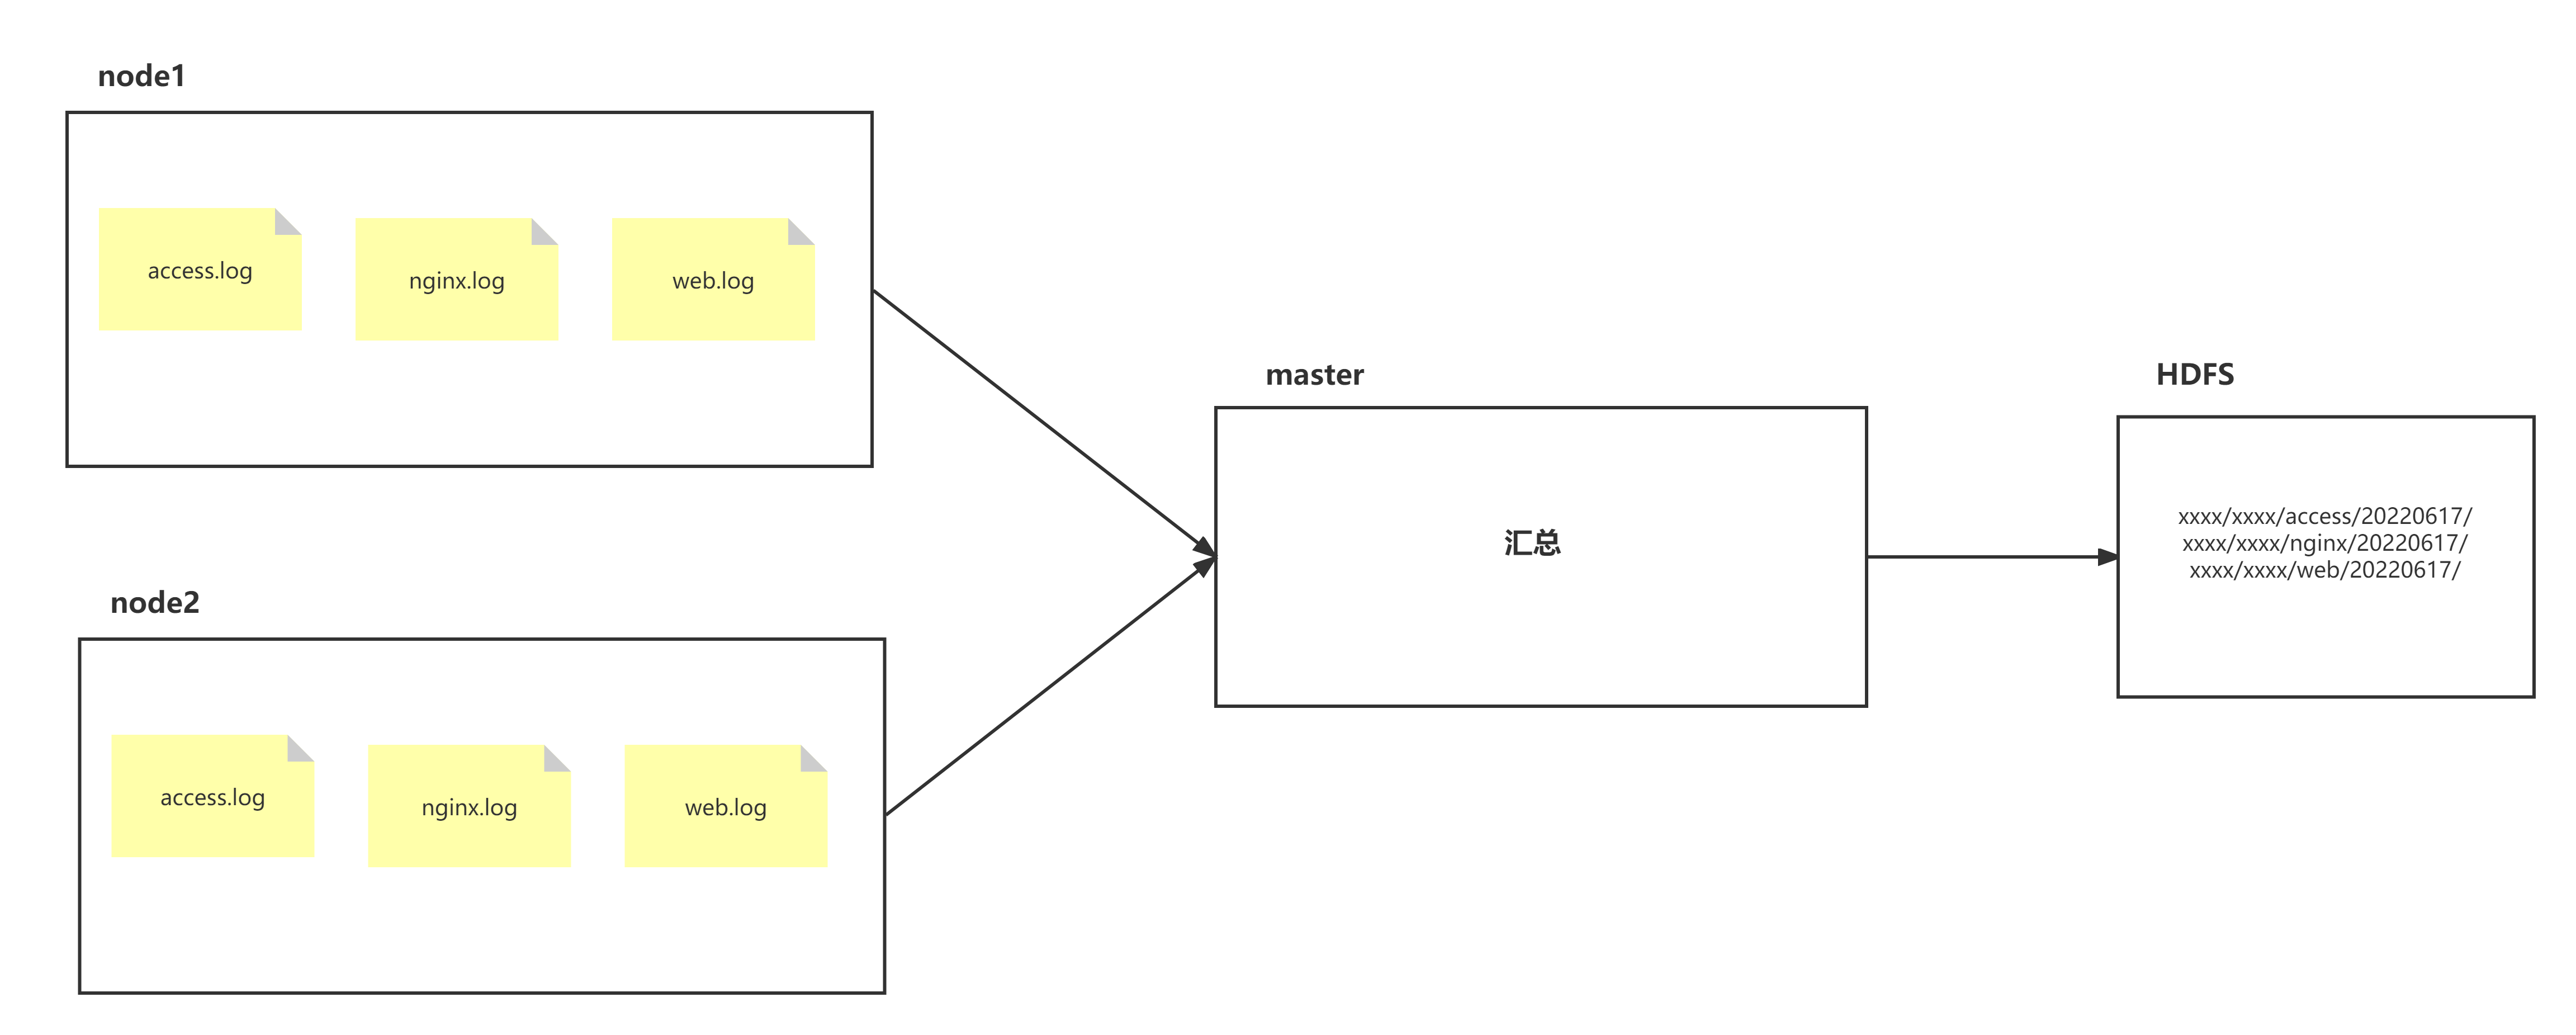
数据流程处理分析:
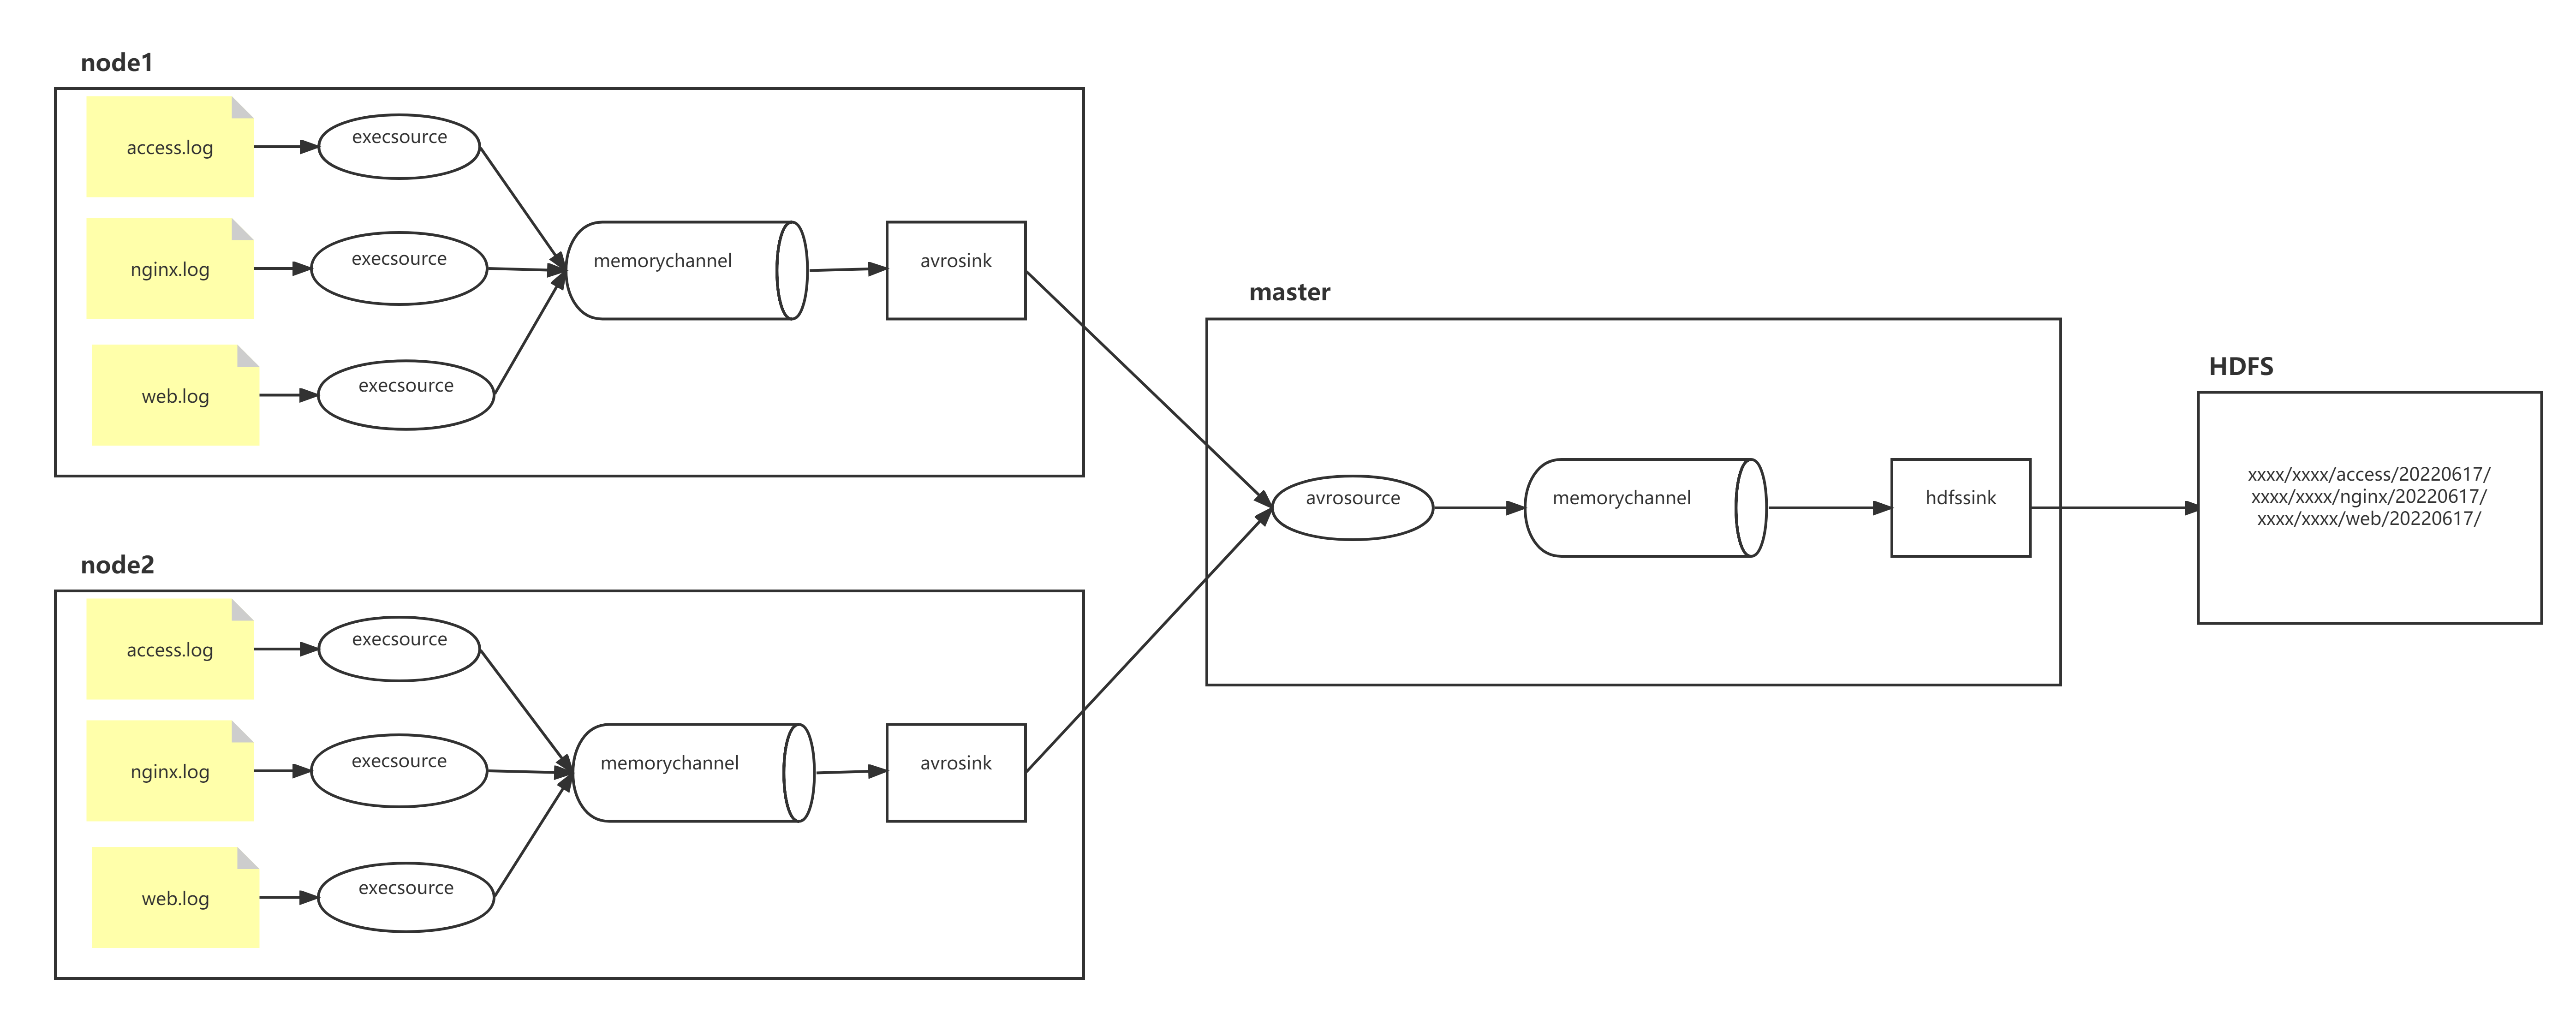
实现:
node1对应的IP为 192.168.40.120
node2对应的IP为 192.168.40.130
master对应的IP为 192.168.40.110
node1和node2上配置文件
[root@node2 bigdata17]# mkdir -p /usr/local/soft/bigdata30/scrips/taillogs

[root@node2 bigdata17]# touch /usr/local/soft/bigdata30/scrips/taillogs/access.log
[root@node2 bigdata17]# touch /usr/local/soft/bigdata30/scrips/taillogs/nginx.log
[root@node2 bigdata17]# touch /usr/local/soft/bigdata30/scrips/taillogs/web.log

vim exec_source_avro_sink.conf

# Name the components on this agent
a1.sources = r1 r2 r3
a1.channels = c1
a1.sinks = k1

# Describe/configure the source
a1.sources.r1.type = exec
a1.sources.r1.command = tail -F /usr/local/soft/bigdata30/scrips/taillogs/access.log
# static拦截器的功能就是往采集到的数据的header中插入自己定义的key-value对
a1.sources.r1.interceptors = i1
a1.sources.r1.interceptors.i1.type = static
a1.sources.r1.interceptors.i1.key = type
a1.sources.r1.interceptors.i1.value = access

a1.sources.r2.type = exec
a1.sources.r2.command = tail -F /usr/local/soft/bigdata30/scrips/taillogs/nginx.log
a1.sources.r2.interceptors = i2
a1.sources.r2.interceptors.i2.type = static
a1.sources.r2.interceptors.i2.key = type
a1.sources.r2.interceptors.i2.value = nginx

a1.sources.r3.type = exec
a1.sources.r3.command = tail -F /usr/local/soft/bigdata30/scrips/taillogs/web.log
a1.sources.r3.interceptors = i3
a1.sources.r3.interceptors.i3.type = static
a1.sources.r3.interceptors.i3.key = type
a1.sources.r3.interceptors.i3.value = web

# Describe the sink
a1.sinks.k1.type = avro
a1.sinks.k1.hostname = master
a1.sinks.k1.port = 41414

# Use a channel which buffers events in memory
a1.channels.c1.type = memory
a1.channels.c1.capacity = 20000
a1.channels.c1.transactionCapacity = 10000

# Bind the source and sink to the channel
a1.sources.r1.channels = c1
a1.sources.r2.channels = c1
a1.sources.r3.channels = c1
a1.sinks.k1.channel = c1
在master上面开发flume配置文件
vim avro_source_hdfs_sink.conf

a1.sources = r1
a1.sinks = k1
a1.channels = c1

# 定义source
a1.sources.r1.type = avro
a1.sources.r1.bind = master
a1.sources.r1.port =41414
# 添加时间拦截器
a1.sources.r1.interceptors = i1
a1.sources.r1.interceptors.i1.type = timestamp

# 定义channels
a1.channels.c1.type = memory
a1.channels.c1.capacity = 20000
a1.channels.c1.transactionCapacity = 10000

# 定义sink
a1.sinks.k1.type = hdfs
a1.sinks.k1.hdfs.path=hdfs://master:9000/bigdata30/flumelogs/%{type}/%Y%m%d
a1.sinks.k1.hdfs.filePrefix = events
a1.sinks.k1.hdfs.fileType = DataStream
a1.sinks.k1.hdfs.writeFormat = Text
# 时间类型
a1.sinks.k1.hdfs.useLocalTimeStamp = true
# 生成的文件不按条数生成
a1.sinks.k1.hdfs.rollCount = 0
# 生成的文件按时间生成
a1.sinks.k1.hdfs.rollInterval = 30
# 生成的文件按大小生成
a1.sinks.k1.hdfs.rollSize = 10485760
# 批量写入hdfs的个数
a1.sinks.k1.hdfs.batchSize = 10000
# flume操作hdfs的线程数(包括新建,写入等)
a1.sinks.k1.hdfs.threadsPoolSize=10
# 操作hdfs超时时间
a1.sinks.k1.hdfs.callTimeout=30000


# 组装source、channel、sink
a1.sources.r1.channels = c1
a1.sinks.k1.channel = c1
采集端文件生成脚本
在node1与node2上面开发shell脚本,模拟数据生成 server.sh
# !/bin/bash

while true
	do
	date >> /usr/local/soft/bigdata30/scrips/taillogs/access.log;
	date >> /usr/local/soft/bigdata30/scrips/taillogs/web.log;
	date >> /usr/local/soft/bigdata30/scrips/taillogs/nginx.log;
	sleep 0.5;
done
顺序启动服务
master启动flume实现数据收集
flume-ng agent -n a1 -c ../../flume-1.9.0/conf -f ./avro_source_hdfs_sink.conf -Dflume.root.logger=INFO,consolenode1与node2启动flume实现数据监控
flume-ng agent -n a1 -c ../../flume-1.9.0/conf -f ./exec_source_avro_sink.conf -Dflume.root.logger=INFO,consolenode1与node2启动生成文件脚本
sh server.sh案例十、ChannelSelector案例
ChannelSelector的作用就是选出Event将要被发往哪个Channel。其共有两种类型,分别是Replicating(复制)和Multiplexing(多路复用)。
ReplicatingSelector会将同一个Event发往所有的Channel,Multiplexing会根据相应的原则,将不同的Event发往不同的Channel。默认是Replicating
- Multiplexing类型的ChannelSelector会根据Event中Header中的某个属性决定分发到哪个Channel。
- 每个event里的header默认是没有值的,所以,multiplexing类型的ChannelSelector一般会配合自定义拦截器使用
replicating类型例子:
a1.sources = r1
a1.channels = c1 c2 # 如果有100个Event,那么c1和c2中都会有这100个事件

a1.channels.c1.type = memory
a1.channels.c1.capacity = 1000
a1.channels.c1.transactionCapacity = 100

a1.channels.c2.type = memory
a1.channels.c2.capacity = 1000
a1.channels.c2.transactionCapacity = 100
multiplexing类型的ChannelSelector例子:
a1.sources = r1
a1.channels = c1 c2

a1.sources.source1.selector.type = multiplexing
a1.sources.source1.selector.header = title # 以header中的title对应的值作为条件
a1.sources.source1.selector.mapping.a = c2 # 如果header中title的值为a,使用c2这个channel
a1.sources.source1.selector.mapping.b = c1 # 如果header中title的值为b,使用c1这个channel
a1.sources.source1.selector.default = c1 # 默认使用c1这个channel
SinkProcessor
SinkProcessor共有三种类型,分别是DefaultSinkProcessor、LoadBalancingSinkProcessor和FailoverSinkProcessor
DefaultSinkProcessor对应的是单个的Sink,LoadBalancingSinkProcessor和FailoverSinkProcessor对应的是Sink Group,LoadBalancingSinkProcessor可以实现负载均衡的功能,FailoverSinkProcessor可以错误恢复的功能。
自定义Interceptor
使用Flume采集服务器本地日志,需要按照日志类型的不同,将不同种类的日志发往不同的分析系统。
需求:
在该案例中,我们以端口数据模拟日志,模拟不同类型的日志,我们需要自定义interceptor区分内容是否包含shujia,将其分别发往不同的分析系统(Channel)。实现代码
java
package com.shujia.log2flume;

import org.apache.flume.Context;
import org.apache.flume.Event;
import org.apache.flume.interceptor.Interceptor;

import java.util.List;
import java.util.Map;

/**
 *  1. 如何自定义拦截器?
 *   flume的自定义拦截器需要实现Flume提供的Interceptor接口.
 *
 *  实现抽象方法:
 *      initialize: 完成一些初始化工作.
 *      close: 完成一些善后的工作
 *      intercept:拦截器的核心处理方法.  拦截的逻辑.
 *          intercept(Event event) : 单个event的拦截处理
 *          intercept(List<Event> events): 批次event的拦截处理
 *
 *  2. 拦截器的对象如何实例化?
 *    在拦截器中定义一个static的内部类,实现Flume提供的Builder接口
 *
 *   实现抽象方法:
 *      build : 用于构建拦截器对象
 *      configure:用于读取配置信息(xxxx.conf)
 *
 *
 *
 */
public class LogDataInterceptor implements Interceptor {
    @Override
    public void initialize() {

    }

    /*
        判断变成event的数据中是否包含shujia字符串,event==>header({}) + body(数据)
        如果包含,给event中的header中添加一个key-value: name/title/key ===  sj
        如果不包含,给event中的header中添加一个key-value: name/title/key ===  nsj
     */
    @Override
    public Event intercept(Event event) {
        //如何取出event中的header和body呢?
        //    Map<String, String> getHeaders();
        //    void setHeaders(Map<String, String> var1);
        //    byte[] getBody();
        Map<String, String> headers = event.getHeaders();
        String body = new String(event.getBody());

        //判断body是否包含shujia
        if(body.contains("shujia")){
            headers.put("title","sj");
        }else {
            headers.put("title","nsj");
        }

        return event;
    }

    @Override
    public List<Event> intercept(List<Event> list) {
        for (Event event : list) {
            intercept(event);
        }
        return list;
    }

    @Override
    public void close() {

    }

    public static class MyBuilder implements Builder{

        @Override
        public Interceptor build() {
           return new LogDataInterceptor();
        }

        @Override
        public void configure(Context context) {

        }
    }
}
引入依赖
<dependency>
    <groupId>org.apache.flume</groupId>
    <artifactId>flume-ng-core</artifactId>
    <version>1.9.0</version>
</dependency>
将代码打成jar包
将jar包放在flume的lib目录下。简单暴力,但是不方便管理
配置文件
1.进阶案例 - channel选择器 - 多路
a3 ==> a3.conf

a3.sources = r1
a3.channels = c1
a3.sinks = k1

a3.sources.r1.type = avro
a3.sources.r1.bind = node2
a3.sources.r1.port = 6666

a3.channels.c1.type = memory
a3.channels.c1.capacity = 10000
a3.channels.c1.transactionCapacity = 100

a3.sinks.k1.type = logger

a3.sources.r1.channels = c1
a3.sinks.k1.channel = c1

a2 ==> a2.conf
a2.sources = r1
a2.channels = c1
a2.sinks = k1

a2.sources.r1.type = avro
a2.sources.r1.bind = node1
a2.sources.r1.port = 5555

a2.channels.c1.type = memory
a2.channels.c1.capacity = 10000
a2.channels.c1.transactionCapacity = 100

a2.sinks.k1.type =logger

a2.sources.r1.channels = c1
a2.sinks.k1.channel = c1


a1 ==> a1.conf
a1.sources = r1
a1.channels = c1 c2
a1.sinks = k1 k2

a1.sources.r1.type = netcat
a1.sources.r1.bind = master
a1.sources.r1.port = 4444

#将选择器类型改为multiplexing分发
a1.sources.r1.selector.type = multiplexing
#检测每个event里head的title key
a1.sources.r1.selector.header = type
#如果title的值为at,吧event发到channel c1里,如果为ot,发到channel c2里,如果都不匹配,默认发到c2里
a1.sources.r1.selector.mapping.sj = c1
a1.sources.r1.selector.mapping.nsj = c2
a1.sources.r1.selector.default=c2
#给拦截器命名i1
a1.sources.r1.interceptors = i1
#这里写自定义类的全类名
a1.sources.r1.interceptors.i1.type = interceptor.ShuJiaInterceptor$MyBuilder
# 组装channel与source
a1.sources.r1.channels = c1 c2


a1.channels.c1.type = memory
a1.channels.c1.capacity = 10000
a1.channels.c1.transactionCapacity = 100

a1.channels.c2.type = memory
a1.channels.c2.capacity = 10000
a1.channels.c2.transactionCapacity = 100

a1.sinks.k1.type = avro
a1.sinks.k1.hostname = node1
a1.sinks.k1.port = 5555

a1.sinks.k2.type = avro
a1.sinks.k2.hostname = node2
a1.sinks.k2.port = 6666


a1.sinks.k1.channel = c1
a1.sinks.k2.channel = c2
启动
先启动node1和node2上面的flume
flume-ng agent -n a2 -c ../../flume-1.9.0/conf -f ./a2.conf -Dflume.root.logger=INFO,console
flume-ng agent -n a3 -c ../../flume-1.9.0/conf -f ./a3.conf -Dflume.root.logger=INFO,console
最后启动master上面的flume
flume-ng agent -n a1 -c ../../flume-1.9.0/conf -f ./a3.conf -Dflume.root.logger=INFO,console