摘要: 本文将详细介绍如何使用 ESP32 开发板制作一个功能完备的网络收音机。我们将涵盖硬件选择、软件架构、网络连接、音频流解码、用户界面设计等方面,并提供完整的代码示例和详细的解释,帮助您轻松构建自己的网络收音机。
关键词: ESP32, 网络收音机, VS1053, Arduino, 音频流, HTTP, MP3, AAC
1. 项目概述
1.1 功能简介
本项目旨在利用 ESP32 的强大性能和丰富的功能,打造一款可以播放互联网广播的网络收音机。主要功能包括:
- 通过 WiFi 连接互联网
- 搜索并播放网络电台
- 支持多种音频流格式,例如 MP3, AAC 等
- 通过编码器调节音量和切换电台
- 使用 OLED 显示屏显示电台信息
1.2 硬件组成
以下是本项目所需的硬件清单:
- ESP32 开发板 (例如: ESP32-DevKitC)
- VS1053 MP3 解码模块
- OLED 显示屏 (例如: SSD1306 128x64)
- 旋转编码器
- 扬声器 (8Ω, 3W)
- 面包板和跳线
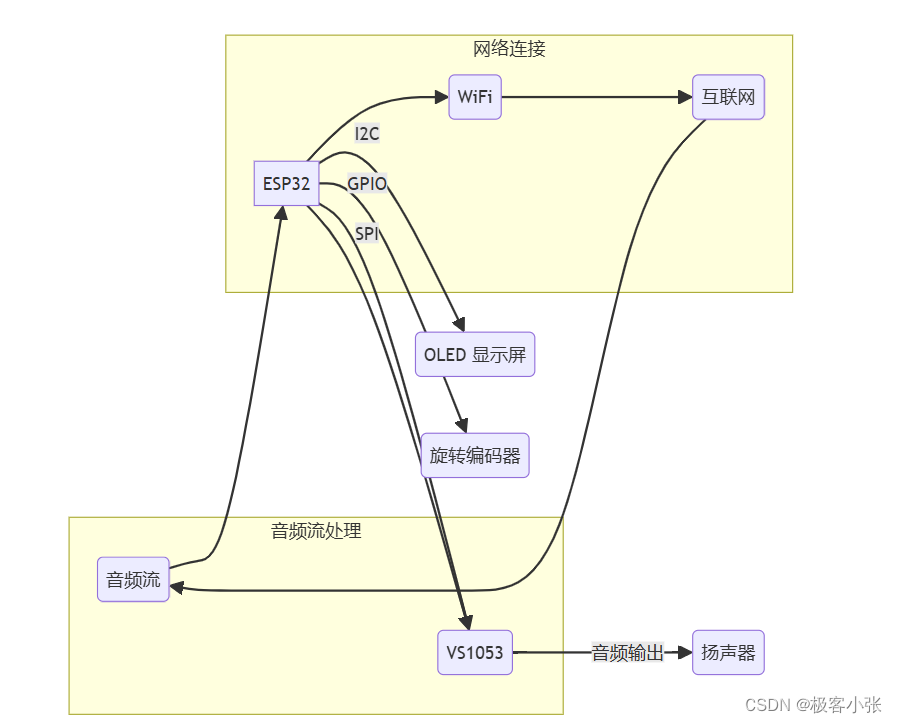
1.3 软件架构
本项目采用 Arduino IDE 进行开发,主要使用的库包括:
- WiFi.h: 用于连接 WiFi 网络
- HTTPClient.h: 用于发送 HTTP 请求获取音频流
- VS1053.h: 用于控制 VS1053 解码模块
- Wire.h: 用于与 I2C 设备 (OLED 显示屏) 通信
- Adafruit_SSD1306.h: 用于控制 SSD1306 OLED 显示屏
- Encoder.h: 用于读取旋转编码器的值
以下是软件架构图:
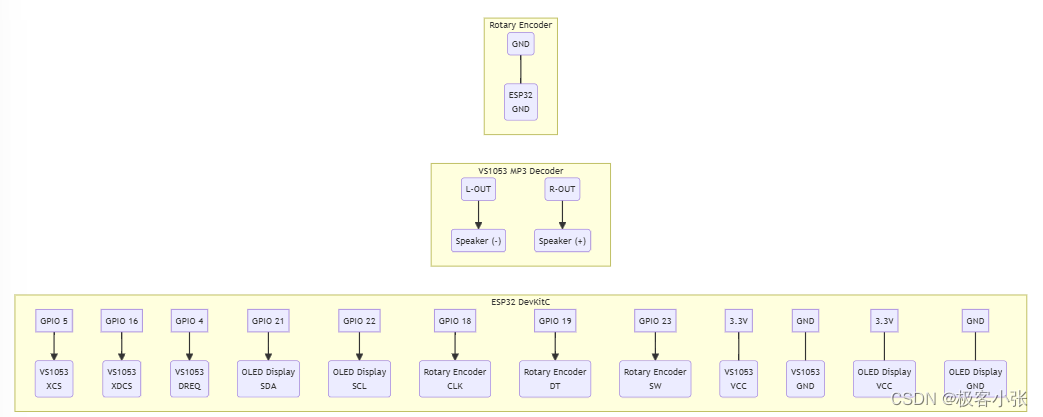
2. 硬件连接
请参考以下电路图连接硬件:
3. 软件实现
3.1 代码示例
cpp
#include <WiFi.h>
#include <HTTPClient.h>
#include <VS1053.h>
#include <Wire.h>
#include <Adafruit_SSD1306.h>
#include <Encoder.h>

// WiFi 设置
const char* ssid = "你的WiFi名称";
const char* password = "你的WiFi密码";

// 电台列表
const char* radioStations[] = {
  "http://icecast.spc.org.au/3pbsfm",
  "http://stream.radioparadise.com/flac-320",
  // 添加更多电台...
};
const int numStations = sizeof(radioStations) / sizeof(radioStations[0]);

// 当前电台索引
int currentStation = 0;

// VS1053 引脚定义
#define VS1053_CS 5
#define VS1053_DCS 16
#define VS1053_DREQ 4

// OLED 显示屏引脚定义
#define OLED_SDA 21
#define OLED_SCL 22

// 旋转编码器引脚定义
#define ENCODER_CLK 18
#define ENCODER_DT 19
#define ENCODER_SW 23

// 实例化对象
VS1053 player(VS1053_CS, VS1053_DCS, VS1053_DREQ);
Adafruit_SSD1306 display(128, 64, &Wire);
Encoder encoder(ENCODER_CLK, ENCODER_DT);

void setup() {
  Serial.begin(115200);

  // 初始化 VS1053
  player.begin();
  player.setVolume(5); // 设置初始音量

  // 初始化 OLED 显示屏
  display.begin(SSD1306_SWITCHCAPVCC, 0x3C);
  display.clearDisplay();
  display.setTextSize(2);
  display.setTextColor(WHITE);
  display.setCursor(0, 0);
  display.print("Connecting...");
  display.display();

  // 连接 WiFi
  WiFi.begin(ssid, password);
  while (WiFi.status() != WL_CONNECTED) {
    delay(500);
    Serial.print(".");
  }
  Serial.println("WiFi connected!");
  Serial.print("IP address: ");
  Serial.println(WiFi.localIP());

  // 显示第一个电台信息
  displayStationInfo();
}

void loop() {
  // 读取编码器数值
  int encoderValue = encoder.read();
  if (encoderValue != 0) {
    // 调整音量或切换电台
    if (encoderValue > 0) {
      currentStation = (currentStation + 1) % numStations;
    } else {
      currentStation = (currentStation - 1 + numStations) % numStations;
    }
    playStation(radioStations[currentStation]);
  }

  // 播放音频流
  if (player.available()) {
    // 从网络读取音频数据
    HTTPClient http;
    http.begin(radioStations[currentStation]);
    int httpCode = http.GET();
    if (httpCode > 0) {
      if (httpCode == HTTP_CODE_OK) {
        WiFiClient client = http.getStream();
        while (client.connected()) {
          // 将音频数据发送到 VS1053
          if (player.readyForData()) {
            uint8_t buffer[32];
            size_t bytesRead = client.read(buffer, sizeof(buffer));
            player.playData(buffer, bytesRead);
          }
        }
      }
    } else {
      Serial.printf("HTTP request failed, error: %s\n", http.errorToString(httpCode).c_str());
    }
    http.end();
  }
}

void playStation(const char* url) {
  // 停止播放
  player.stopSong();
  // 显示电台信息
  displayStationInfo();
  // 开始播放新电台
  // (注意: 实际播放逻辑在 loop() 函数中处理)
}

void displayStationInfo() {
  // 在 OLED 显示屏上显示电台信息
  display.clearDisplay();
  display.setCursor(0, 0);
  display.print("Radio:");
  display.setCursor(0, 16);
  display.print(radioStations[currentStation]);
  display.display();
}
3.2 代码解释
- 包含头文件: 引入必要的库文件,包括 WiFi, HTTPClient, VS1053, Wire, Adafruit_SSD1306 和 Encoder。
- 定义变量: 定义 WiFi 连接信息、电台列表、当前电台索引、引脚定义和实例化对象。
- setup() 函数: 初始化串口、VS1053、OLED 显示屏,连接 WiFi 并显示初始信息。
- loop() 函数: 循环读取编码器数值,根据数值调整音量或切换电台,并持续从网络获取音频数据发送到 VS1053 播放。
- playStation() 函数: 停止当前播放,更新电台信息并准备播放新电台。
- displayStationInfo() 函数: 在 OLED 显示屏上显示当前电台信息。
4. 项目扩展
本项目可以进行以下扩展:
- 添加更多功能: 例如,可以添加时钟显示、闹钟功能、睡眠定时器等。
- 改进用户界面: 例如,可以使用更美观的界面库,或者使用 TFT 彩屏显示更丰富的电台信息。
- 支持更多音频格式: 例如,可以添加对 FLAC、OPUS 等音频格式的支持。
- 实现远程控制: 例如,可以使用手机 App 通过蓝牙或 WiFi 控制网络收音机。
5. 总结
本文介绍了如何使用 ESP32 制作一个功能完备的网络收音机,并提供了详细的代码示例和解释。您可以根据自己的需求对项目进行修改和扩展,打造属于自己的个性化网络收音机。
知识点参考链接
- ESP32:
- OLED 显示屏:
- Arduino IDE:
- HTTP 通信: