Day1
一.数据库概述
计算机中数据存放的仓库,可以按数据类型划分数据库,又可以在数据库中划分更细节的分类存放到相应的表中。
抽象来说就是生活中的菜市场、五金店之类的场所,根据用途开设;划分广泛的还有百货商场、批发市场等。


生活中的数据包括 图片、文字、视频、音乐等各种各种渠道信息。
数据库常见格式:.sql #方便后续学习过程中,数据库导入导出内容测试,
常见数据库系统有以下几种:
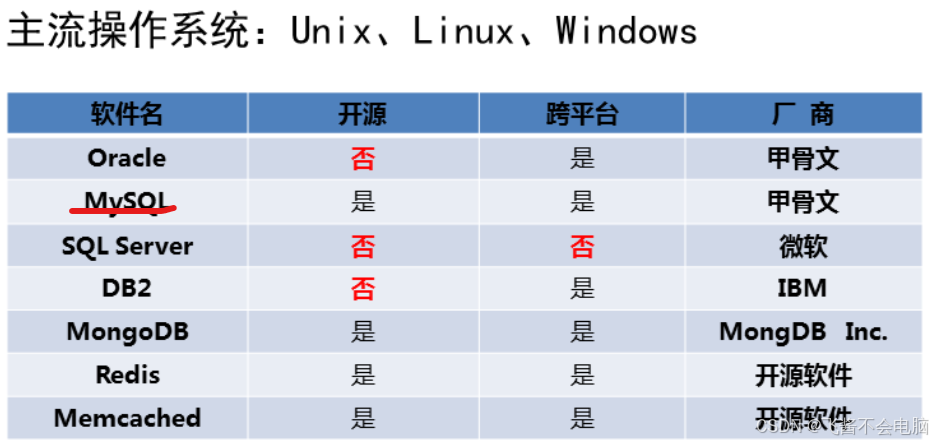
我上大学时候使用的是MySQL 和Tomcat两种类型,同学们想要下载推荐都下个免费版,或者开源的免费版。因为在工作中有的数据库软件公司发现你用的是破解版,时机到了会找你索要赔偿。
 ̄□ ̄||
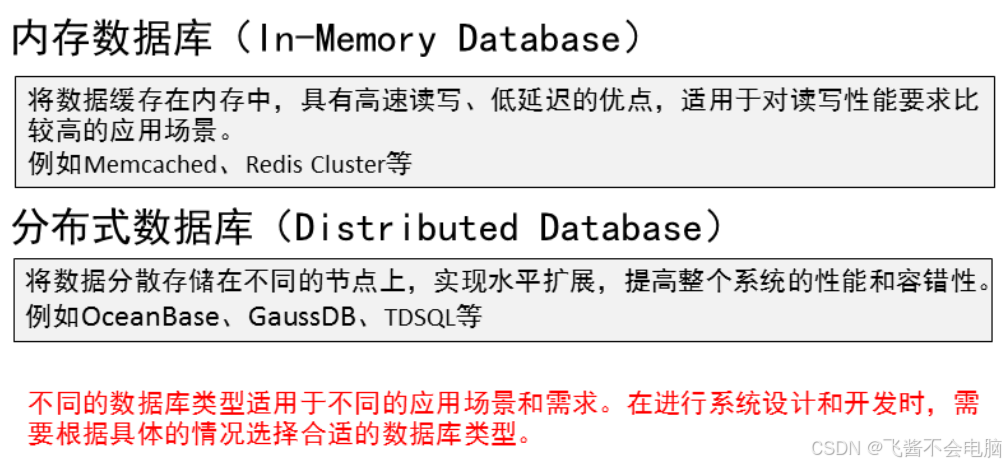
数据库类型分为:
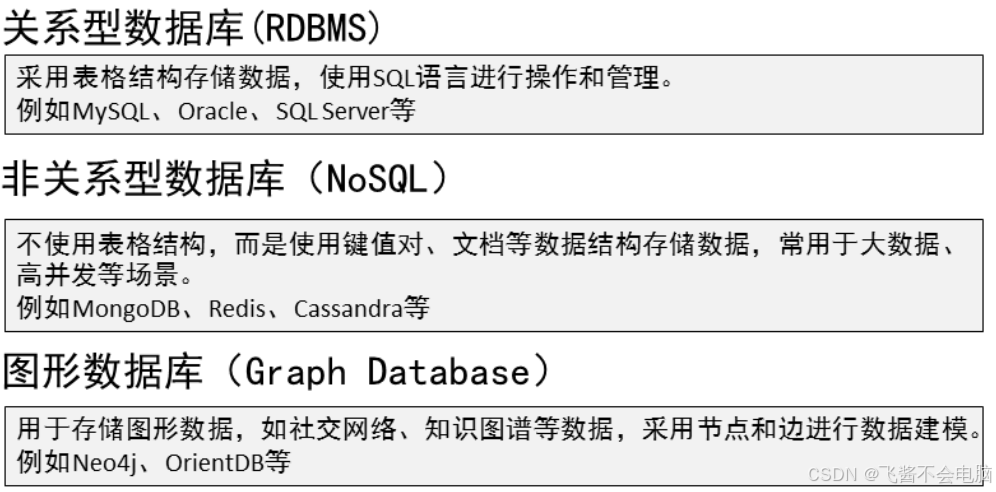
#tomcat图形数据库,就需要建模,而建模需要换成收费版,有包括建模的更多功能#
二.部署MySQL服务
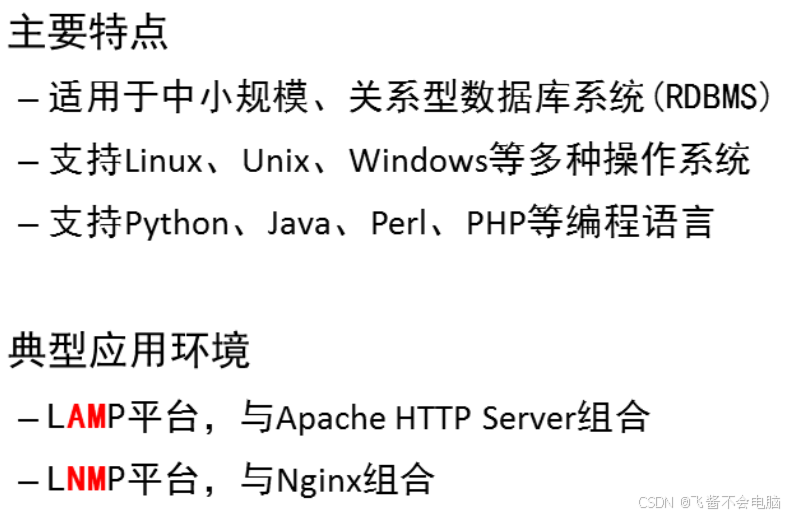
特点:
部署MySQL环境:
1 案例1:构建MySQL服务器
1.1 问题
- 在IP地址192.168.88.50主机和192.168.88.51主机上部署mysql服务
- 练习必备命令的使用
1.2 方案
准备2台虚拟机,要求如下:
表-1

#练习环境中,记得配置yum源、关闭selinux和防火墙
1.3 步骤
步骤一:安装软件
命令操作如下所示:
#装mysql-server自动补全依赖,以防万一,就一起下。
mysql-server 提供服务软件
mysql 提供命令软件
//安装提供服务和命令软件
root@mysql50 \~# yum -y install mysql-server mysql
软件已安装
root@mysql50 \~# rpm -q mysql-server mysql
mysql-server-8.0.26-1.module+el8.4.0+652+6de068a7.x86_64
mysql-8.0.26-1.module+el8.4.0+652+6de068a7.x86_64
root@mysql50 \~#
//查看软件信息
root@mysql50 \~# rpm -qi mysql-server
Name : mysql-server
Version : 8.0.26
Release : 1.module+el8.4.0+652+6de068a7
Architecture: x86_64
Install Date: 2023年03月13日 星期一 12时09分38秒
Group : Unspecified
Size : 126674945
License : GPLv2 with exceptions and LGPLv2 and BSD
Signature : RSA/SHA256, 2021年09月22日 星期三 07时27分14秒, Key ID 15af5dac6d745a60
Source RPM : mysql-8.0.26-1.module+el8.4.0+652+6de068a7.src.rpm
Build Date : 2021年09月22日 星期三 07时06分32秒
Build Host : ord1-prod-x86build005.svc.aws.rockylinux.org
Relocations : (not relocatable)
Packager : infrastructure@rockylinux.org
Vendor : Rocky
URL : http://www.mysql.com
Summary : The MySQL server and related files
Description :
MySQL is a multi-user, multi-threaded SQL database server. MySQL is a
client/server implementation consisting of a server daemon (mysqld)
and many different client programs and libraries. This package contains
the MySQL server and some accompanying files and directories.
root@mysql50 \~# systemctl start mysqld //启动服务
root@mysql50 \~# systemctl enable mysqld //开机运行
步骤二:查看端口号和进程名
- root@mysql50 \~# ps -C mysqld //仅查看mysqld进程
- PID TTY TIME CMD
- 21912 ? 00:00:00 mysqld
- root@mysql50 \~#
- root@mysql50 \~# ss -utnlp | grep 3306 查看端口
- tcp LISTEN 0 70 *:33060 *:* users:(("mysqld",pid=21912,fd=22))
- tcp LISTEN 0 128 *:3306 *:* users:(("mysqld",pid=21912,fd=25))
- root@mysql50 \~#
- 或
- root@mysql50 \~# netstat -utnlp | grep mysqld //仅查看mysqld进程
- tcp6 0 0 :::33060 :::* LISTEN 21912/mysqld
- tcp6 0 0 :::3306 :::* LISTEN 21912/mysqld
- root@mysql50 \~#
#MySQL 8中的3306端口是MySQL服务默认使用的端口,主要用于建立客户端与MySQL服务器之间的连接。
支持协议: TCP。
#两个配置文件都是可以tab补全的
主配置文件位置: /etc/my.cnf.d/mysql-server.conf
错误日志文件: /var/log/mysql/mysqld.log
步骤三:连接服务。
说明: 数据库管理员本机登陆默认没有密码
- root@mysql50 \~# mysql //连接服务
- Welcome to the MySQL monitor. Commands end with ; or \g.
- Your MySQL connection id is 8
- Server version: 8.0.26 Source distribution
- Copyright (c) 2000, 2021, Oracle and/or its affiliates.
- Oracle is a registered trademark of Oracle Corporation and/or its
- affiliates. Other names may be trademarks of their respective
- owners.
- Type 'help;' or '\h' for help. Type '\c' to clear the current input statement.
- mysql> 登陆后的提示符
- mysql> exit //断开连接
- Bye
- root@mysql50 \~#
步骤四:配置第2台数据库服务器MySQL51。
命令操作如下所示:
- root@mysql51 \~# yum -y install mysql-server mysql
- root@mysql51 \~# systemctl start mysqld
- root@mysql51 \~# systemctl enable mysqld
- root@mysql51 \~# mysql
- mysql> exit
- Bye
- root@mysql51 \~#
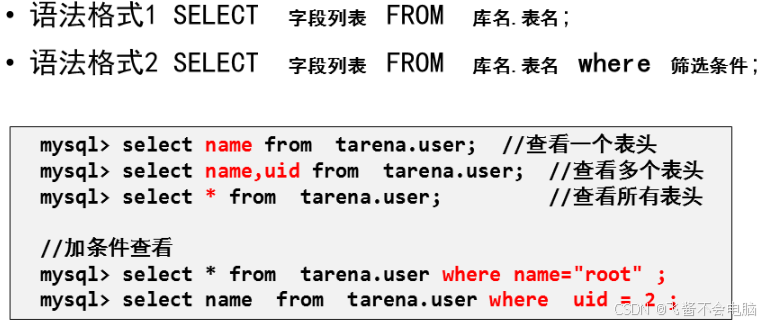
三.基础查询语句
MySQL语句规范:
-P: 数据服务器端口 -h: IP地址 。 exit: 退出数据库 ctrl+D也可以退出。
1.不区分大小写。 2. 语句以**" ;" , "\g", "\G"** 结尾**。**
3.注释 :
单行注释 :" -- " 多行注释: /* 内容 /*
SQL语句分类
| DQL查询语句 | DML 操作语言 | DDL 定义语言 | TCL 事务控制语言 | DCL 控制语言 |
|---|---|---|---|---|
| **【不修改本身数据】**select | insert插入数据、update更新数据、delete删除数据。 | create、alter、 drop。 针对:表库索引 | commit提交 ,rollback:回滚savepoint:设置保存点。 set transaction 设置事务特性 | grant:授予权限。 revoke:撤销权限 |
查看MySQL版本: select version();
查看系统时间: select now();
查看当前用户: select user();
脚本案例:
- root@mysql50 \~# mysql //连接服务
- mysql> select version() ; //查看数据库软件版本
- +-----------+
- | version() |
- +-----------+
- | 8.0.26 |
- +-----------+
- 1 row in set (0.00 sec)
- mysql> select user() ; //查看登陆的用户和客户端地址
- +----------------+
- | user() |
- +----------------+
- | root@localhost | 管理员root本机登陆
- +----------------+
- 1 row in set (0.00 sec)
- mysql> show databases; //查看已有的库
- +--------------------+
- | Database |
- +--------------------+
- | information_schema |
- | mysql |
- | performance_schema |
- | sys |
- +--------------------+
- 4 rows in set (0.00 sec)
- mysql>
以下是MySQL自带数据库介绍
默认4个库 不可以删除,存储的是 服务运行时加载的不同功能的程序和数据。
**information_schema:**是MySQL数据库提供的一个虚拟的数据库,存储了MySQL数据库中的相关信息,比如数据库、表、列、索引、权限、角色等信息。它并不存储实际的数据,而是提供了一些视图和存储过程,用于查询和管理数据库的元数据信息。
**mysql:**存储了MySQL服务器的系统配置、用户、账号和权限信息等。它是MySQL数据库最基本的库,存储了MySQL服务器的核心信息。
#MySQL 数据库中有user表,里面有一个user 表,想要在其他软件连接MySQL数据库,就需要设置该表的user=root 位置,host的localhost:本地 设置为 % . 意思:所有机器都可以登录#
**performance_schema:**存储了MySQL数据库的性能指标、事件和统计信息等数据,可以用于性能分析和优化。
**sys:**是MySQL 8.0引入的一个新库,它基于information_schema和performance_schema视图,提供了更方便、更直观的方式来查询和管理MySQL数据库的元数据和性能数据。
- mysql> select database();//查看当前在那个库里 null 表示没有在任何库里
- +------------+
- | database() |
- +------------+
- | NULL |
- +------------+
- 1 row in set (0.00 sec)
- mysql> use mysql ;//切换到mysql库
- mysql> select database(); // 再次显示所在的库
- +------------+
- | database() |
- +------------+
- | mysql |
- +------------+
- 1 row in set (0.00 sec)
- mysql> show tables; //显示库里已有的表
- +------------------------------------------------------+
- | Tables_in_mysql |
- +------------------------------------------------------+
- | columns_priv |
- | component |
- | db |
- | default_roles |
- | engine_cost |
- | func |
- | general_log |
- | global_grants |
- | gtid_executed |
- | help_category |
- | help_keyword |
- | help_relation |
- | help_topic |
- | innodb_index_stats |
- | innodb_table_stats |
- | password_history |
- | plugin |
- | procs_priv |
- | proxies_priv |
- | replication_asynchronous_connection_failover |
- | replication_asynchronous_connection_failover_managed |
- | replication_group_configuration_version |
- | replication_group_member_actions |
- | role_edges |
- | server_cost |
- | servers |
- | slave_master_info |
- | slave_relay_log_info |
- | slave_worker_info |
- | slow_log |
- | tables_priv |
- | time_zone |
- | time_zone_leap_second |
- | time_zone_name |
- | time_zone_transition |
- | time_zone_transition_type |
- | user |
- +------------------------------------------------------+
- 37 rows in set (0.00 sec)
- mysql> exit ; 断开连接
- Bye
- root@mysql50 \~#
设置数据库登录账号密码
案例2:密码管理
2.1 问题
1) 在192.168.88.50主机做如下练习:
- 设置root密码为123
- 修改root密码为 456
- 破解root密码为 123456
设置root密码为123
- root@mysql50 \~# mysqladmin -uroot -p password "123"
- Enter password: //敲回车
- mysqladmin: Warning Using a password on the command line interface can be insecure.
- Warning: Since password will be sent to server in plain text, use ssl connection to ensure password safety
- #设置完成后,不能直接用MySQL 进入数据库。需要使用用户密码。
修改root密码为 456
- root@mysql50 \~# mysqladmin -uroot -p123 password "456"
- mysqladmin: Warning Using a password on the command line interface can be insecure.
- Warning: Since password will be sent to server in plain text, use ssl connection to ensure password safety.
#修改新密码后,旧密码作废,需要设置新密码登录。
破解root密码
在mysql50主机做此练习
修改主配置文件
- root@mysql50 \~# vim /etc/my.cnf.d/mysql-server.cnf
-
mysqld
- skip-grant-tables //手动添加此行 作用登陆时不验证密码
- ......
- ......
- :wq
- root@mysql50 \~# systemctl restart mysqld //重启服务 让服务以新配置运行
############配置了新东西,都需要重新启动服务才能看到结果。
连接服务
- root@mysql50 \~# mysql
- Welcome to the MySQL monitor. Commands end with ; or \g.
- Your MySQL connection id is 7
- Server version: 8.0.26 Source distribution
- Copyright (c) 2000, 2021, Oracle and/or its affiliates.
- Oracle is a registered trademark of Oracle Corporation and/or its
- affiliates. Other names may be trademarks of their respective
- owners.
- Type 'help;' or '\h' for help. Type '\c' to clear the current input statement.
查看存放密码的表头名
- Mysql> desc mysql.user ;
删除不知道的密码
- mysql> update mysql.user set authentication_string="" where user="root" and host="localhost";
删除后的效果
- mysql> select host , user , authentication_string from mysql.user where user="root";
- +-----------+------+-------------------------------------------+
- | host | user | authentication_string |
- +-----------+------+-------------------------------------------+
- | localhost | root | |
- +-----------+------+-------------------------------------------+
- 1 row in set (0.01 sec)
- mysql> exit; 断开连接
编辑配置文件
- root@mysql50 \~# vim /etc/my.cnf.d/mysql-server.cnf
-
mysqld
- #skip-grant-tables //破完密码需要添加注释。
- :wq
- root@mysql50 \~# systemctl restart mysqld //重启服务 作用让注释生效
无密码登陆
- root@localhost \~# mysql
- Welcome to the MySQL monitor. Commands end with ; or \g.
- Your MySQL connection id is 8
- Server version: 8.0.26 Source distribution
- Copyright (c) 2000, 2021, Oracle and/or its affiliates.
- Oracle is a registered trademark of Oracle Corporation and/or its
- affiliates. Other names may be trademarks of their respective
- owners.
- Type 'help;' or '\h' for help. Type '\c' to clear the current input statement.
设置root用户本机登陆密码
- mysql> alter user root@"localhost" identified by "123456";
- Query OK, 0 rows affected (0.00 sec)
- mysql> exit 断开连接
不输密码无法登陆
- root@localhost \~# mysql
- ERROR 1045 (28000): Access denied for user 'root'@'localhost' (using password: NO)
使用破解的密码登陆
- root@localhost \~# mysql -uroot -p123456
- mysql: Warning Using a password on the command line interface can be insecure.
- Welcome to the MySQL monitor. Commands end with ; or \g.
- Your MySQL connection id is 10
- Server version: 8.0.26 Source distribution
- Copyright (c) 2000, 2021, Oracle and/or its affiliates.
- Oracle is a registered trademark of Oracle Corporation and/or its
- affiliates. Other names may be trademarks of their respective
- owners.
- Type 'help;' or '\h' for help. Type '\c' to clear the current input statement.
- mysql>
- mysql> 登陆成功
- mysql> show databases; 查看已有的库
- +--------------------+
- | Database |
- +--------------------+
- | information_schema |
- | mysql |
- | performance_schema |
- | sys |
- +--------------------+
- 4 rows in set (0.01 sec)
- root@localhost \~# mysql
- ERROR 1045 (28000): Access denied for user 'root'@'localhost' (using password: NO)
案例3:筛选条件
#没有文件的话,可以看看。或者网上下几个来测试。知识点是想通的#
3.1 问题
- 准备练习环境
- 练习数值比较
- 练习范围匹配
- 练习模糊匹配
- 练习正则匹配
- 练习逻辑比较
- 练习字符比较/空/非空
- 练习别名/去重/合并
3.2 方案
拷贝tarena.sql文件到mysql50主机里,然后使用tarena.sql创建练习使用的数据。
3.3 步骤
实现此案例需要按照如下步骤进行。#这是我们上课的教学环境。#
步骤一:准备练---+
步骤八:练习别名/去重/合并
定义别名使用 as 或 空格
- mysql> select name , homedir from tarena.user;
- mysql> select name as 用户名 , homedir 家目录 from tarena.user;
拼接 concat()
- mysqlcat(name,"-",uid) as 用户信息 from tarena.user where uid <= 5;
- +--------------+
- |
- | bin-1 |
- | daemon-2 |
- | adm-3 |
- | lp-4 |
- | sync-5 |
- +--------------+
- 6 rows in set (0.00 sec)
- //拼接
- mysql> select concat(name , "-" , uid) as 用户信息 from tarena.user where uid <= 5;
多列拼接
- mysql> select concat(name , "-" , uid , "-" , gid) as 用户信息 from tarena.user where uid <= 5;
- +--------------+
- | 用户信息 |
- +--------------+
- | root-0-0 |
- | bin-1-1 |
- | daemon-2-2 |
- | adm-3-4 |
- | lp-4-7 |
- | sync-5-0 |
- +--------------+
去重显示 distinct 字段名列表
- //去重前输出
- mysql> select shell from tarena.user where shell in ("/bin/bash","/sbin/nologin") ;
- +---------------+
- | shell |
- +---------------+
- | /bin/bash |
- | /sbin/nologin |
- | /sbin/nologin |
- | /sbin/nologin |
- | /sbin/nologin |
- | /sbin/nologin |
- | /sbin/nologin |
- | /sbin/nologin |
- | /sbin/nologin |
- | /sbin/nologin |
- | /sbin/nologin |
- | /sbin/nologin |
- | /sbin/nologin |
- | /sbin/nologin |
- | /sbin/nologin |
- | /sbin/nologin |
- | /sbin/nologin |
- | /sbin/nologin |
- | /sbin/nologin |
- | /sbin/nologin |
- | /bin/bash |
- | /sbin/nologin |
- +---------------+
- 22 rows in set (0.00 sec)
- //去重后查看
- mysql> select distinct shell from tarena.user where shell in ("/bin/bash","/sbin/nologin") ;
- +---------------+
- | shell |
- +---------------+
- | /bin/bash |
- | /sbin/nologin |
- +---------------+
- 2 rows in set (0.01 sec)
- mysql>
4 案例4:安装图形软件
#可以在网络服务器上设置 数据库的增删改查
4.1 问题
- 在IP地址192.168.88.50主机安装phpmyadmin软件
- 客户端通过访问phpmyadmin软件管理数据库
4.2 方案
把用到的软件拷贝的虚拟机mysql50里
在mysql50主机,首先配置运行环境LNP,然后安装phpmyadmin软件,最后打开真机的浏览器输入phpmyadmin的网址访问。
4.3 步骤
实现此案例需要按照如下步骤进行。
步骤一:准备运行环境
命令操作如下所示:
- gcc 源码包编译工具
- unzip 提供解压.zip 压缩包命令
- make 源码软件编译命令
- pcre-devel 支持正则表达式
- zlib-devel 提供数据压缩命令
- root@mysql50 \~# yum -y install gcc unzip make pcre-devel zlib-devel //安装依赖
- root@mysql50 \~# tar -xf nginx-1.22.1.tar.gz //解压源码
- root@mysql50 \~# cd nginx-1.22.1 //进源码目录
- root@mysql50 nginx-1.22.1# ./configure //配置
- root@mysql50 nginx-1.22.1# make && make install //编译并安装
- root@mysql50 nginx-1.22.1# ls /usr/local/nginx/ //查看安装目录
- conf html logs sbin
- //修改主配置文件
- root@mysql50 nginx-1.22.1# vim /usr/local/nginx/conf/nginx.conf
- 43 location / {
- 44 root html;
- 45 index index.php index.html index.htm; //添加首页名
- 46 }
- 65 location ~ \.php$ {
- 66 root html;
- 67 fastcgi_pass 127.0.0.1:9000; //访问.php的请求转给本机的9000端口
- 68 fastcgi_index index.php;
- 69 #fastcgi_param SCRIPT_FILENAME /scripts$fastcgi_script_name;
- 70 include fastcgi.conf; //保存nginx变量文件
- 71 }
- :wq
- root@mysql50 nginx-1.22.1# /usr/local/nginx/sbin/nginx //启动服务
- root@mysql50 nginx-1.22.1# netstat -utnlp | grep 80 //查看端口
- tcp 0 0 0.0.0.0:80 0.0.0.0:* LISTEN 42182/nginx: master
- root@mysql50 nginx-1.22.1#
软件功能说明
- php 解释php代码
- php-devel php扩展包
- php-mysqlnd 连接mysql命令包
- php-json 支持json代码
- php-fpm 提供fpm服务
安装软件
- root@mysql50 \~# yum -y install php php-devel php-mysqlnd php-json php-fpm
修改主配置文件
- root@mysql50 \~# vim +38 /etc/php-fpm.d/www.conf
- listen = 127.0.0.1:9000 #监听端口设置,默认是80
- :wq
- root@mysql50 \~# systemctl start php-fpm //启动服务
查看端口 #mysqladmin
- root@mysql50 \~# netstat -utnlp | grep 9000
- tcp 0 0 127.0.0.1:9000 0.0.0.0:* LISTEN 67251/php-fpm: mast
- root@mysql50 \~#
编写php脚本
- root@mysql50 \~# vim /usr/local/nginx/html/test.php
- <?php
- $name = "qq" ;
- echo $name ;
- echo "\n" ;
- ?>
步骤二:安装phpmyadmin软件
解压软件
- root@mysql50 \~# which unzip || yum -y install unzip
- root@mysql50 \~# unzip phpMyAdmin-5.2.1-all-languages.zip //解压
移动并改名
- root@mysql50 \~# mv phpMyAdmin-5.2.1-all-languages /usr/local/nginx/html/phpmyadmin
创建主配置文件
- root@mysql50 \~# cd /usr/local/nginx/html/phpmyadmin/
- root@mysql50 phpmyadmin# cp config.sample.inc.php config.inc.php
步骤三:客户端访问
打开浏览器输入此网址 效果如图-1所示
http://192.168.88.50/phpmyadmin
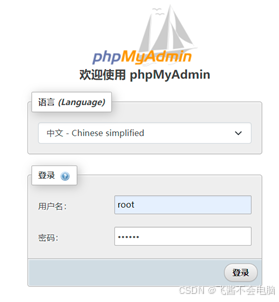
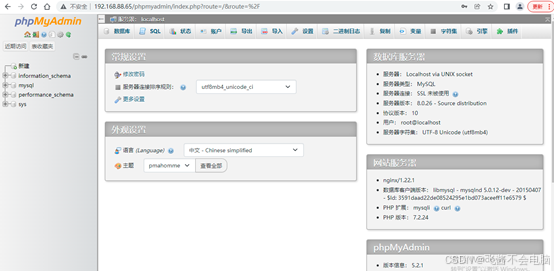
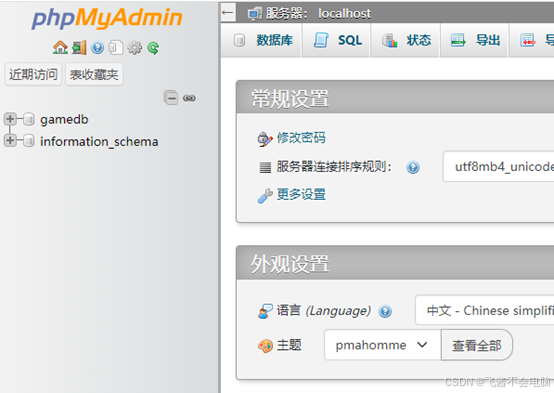
说明:输入数据库管理员root 和 密码 成功后如图-2所示
在数据库服务器里创建普通用户
- 创建库
- mysql> create database gamedb;
- Query OK, 1 row affected (0.01 sec)
- 创建用户
- mysql> create user dc@"localhost" identified by "123456";
- Query OK, 0 rows affected (0.01 sec)
- 授权权限
- mysql> grant all on gamedb.* to dc@"localhost" ;
- Query OK, 0 rows affected (0.00 sec)
- mysql>
客户端以上用户密码 登陆 mysqladmin
可以看到
第一天涉及到的内容太多了,软件依赖下载,配置 mysqladmin,mysql 和 具体语法的介绍,还有密码用户的授权管理。
后续内容我放到下几篇文章,不然眼睛看不过来了。O(∩_∩)O