一、编写Ansible内容集
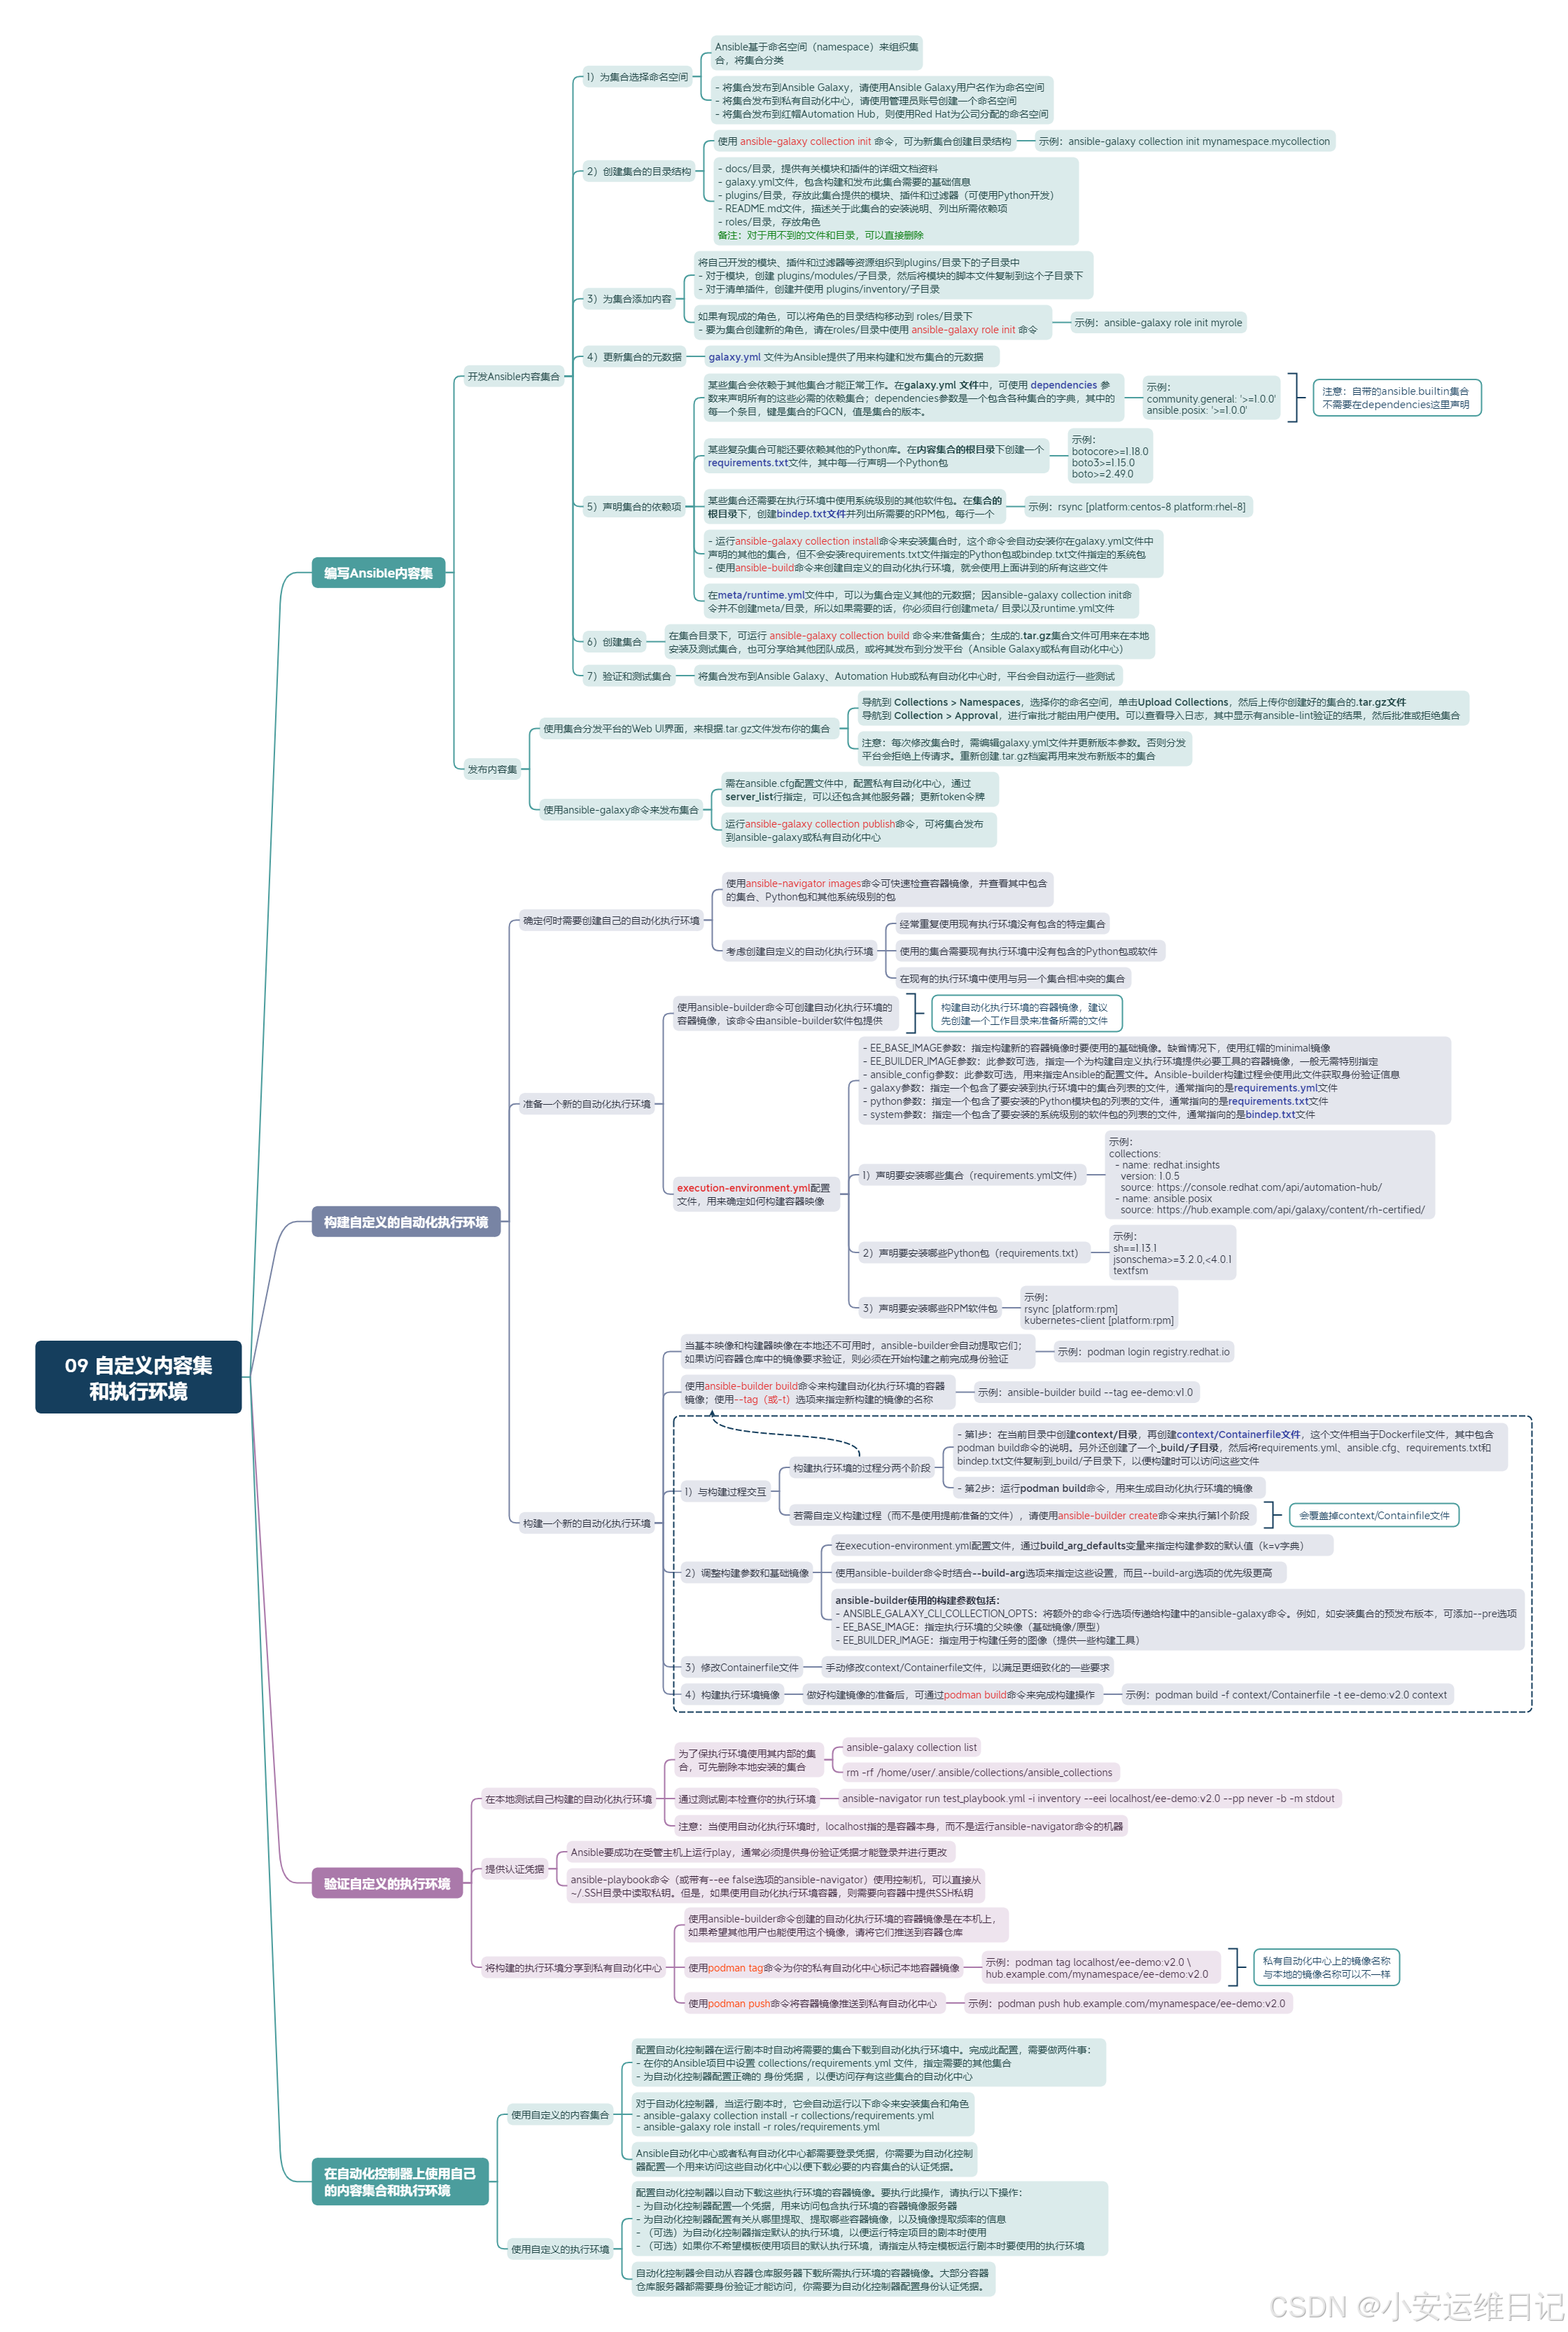
1. 开发Ansible内容集合
红帽公司、红帽合作伙伴以及Ansible社区为很多软件产品和技术提供了内容集合。然而,客户仍然会遇到现有的集合无法满足的自动化需求。例如,你可能需要试用一个没有可用集合的新应用程序,或者你的公司可能需要开发自动化的内部工具。在这些情况下,就应该考虑开发自己的集合了。
1)为集合选择命名空间
Ansible基于命名空间(namespace)来组织集合,将集合分类。命名空间是集合名称的第一部分,例如amazon.aws集合的名称空间是amazon。
开发新的集合时,基于以下几个方面考虑:
-
如果计划将你的集合发布到Ansible Galaxy ,请使用你的Ansible Galaxy用户名作为命名空间
-
如果你将集合发布到私有自动化中心 ,那么就请平台管理员为你创建一个命名空间。或者,如果你的用户账号有权限的话,也可以自己创建命名空间
-
如果是Red Hat合作伙伴,需要将你的集合发布到红帽的Automation Hub ,则使用Red Hat为你的公司分配的命名空间
2)创建集合的目录结构
使用ansible-galaxy collection init命令,可以为新集合创建目录结构。只要指定集合的名称(包括命名空间)作为命令的参数就行。
javascript
[user@host ~]$ ansible-galaxy collection init mynamespace.mycollection
- Collection mynamespace.mycollection was created successfully
这个命令会创建一个新集合,并组织为如下目录结构:
javascript
[user@host ~]$ tree mynamespace/
mynamespace/
¹------ mycollection
}------ docs
}------ galaxy.yml
}------ plugins
|   ¹------ README.md
}------ README.md
¹------ roles

4 directories, 3 files
其中,
-
docs/目录 ,提供有关模块和插件的详细文档资料
-
galaxy.yml文件 ,包含构建和发布此集合需要的基础信息
-
plugins/目录 ,存放此集合提供的模块、插件和过滤器(可以使用Python开发)
-
README.md文件 ,描述关于此集合的安装说明、列出所需依赖项。Ansible Galaxy或私有自动化中心等平台会将这个文件作为此集合的首页
-
roles/目录 ,存放角色
对于用不到的文件和目录,可以直接删除。例如,如果集合中没有角色,就可以删除roles/这个目录。
3)为集合添加内容
将自己开发的模块、插件和过滤器等资源组织到plugins/目录下的子目录中。
-
对于模块 ,创建 plugins/modules/子目录,然后将模块的脚本文件复制到这个子目录下。
-
对于清单插件 ,创建并使用 plugins/inventory/子目录。
类似地,其他插件类型也有专用的子目录。开发模块、插件和过滤器不在本课程讨论。
如果有现成的角色,可以将角色的目录结构移动到 roles/目录下。
- 要为集合创建新的角色,请在roles/目录中使用 ansible-galaxy role init 命令:
javascript
[user@host ~]$ cd mynamespace/mycollection/roles/
[user@host roles]$ ansible-galaxy role init myrole
- RoNe myrole was created successfully
[user@host roles]$ ls myrole/
defaults files handlers meta README.md tasks templates tests vars
4)更新集合的元数据
集合的根目录下的 galaxy.yml 文件为Ansible提供了用来构建和发布集合的元数据,其中包括包括每个参数的解释。以下galaxy.yml文件是一个完整的示例:
javascript
---
namespace: mynamespace
name: mycollection
version: 1.0.0
readme: README.md
authors:
  - your name <example@domain.com>
description: Ansible modules to manage my company's custom software
license:
  - GPL-3.0-or-Nater
repository: https://git.example.com/training/my-collection
# The URL to any online docs
documentation: https://git.example.com/training/my-collection/tree/main/docs

# The URL to the homepage of the collection/project
homepage: https://git.example.com/training/my-collection

# The URL to the collection issue tracker
issues: https://git.example.com/training/my-collection/issues

dependencies:
  community.general: '>=1.0.0'    # 描述依赖关系
  ansible.posix: '>=1.0.0'
5)声明集合的依赖项
某些集合会依赖于其他集合才能正常工作。例如,新集合中的角色可能会调用其他集合中的某个模块。在galaxy.yml 文件中,可以使用dependencies参数来声明所有的这些必需的依赖集合。
① dependencies参数是一个包含各种集合的字典,其中的每一个条目,键是集合的FQCN,值是集合的版本(如果不需要特定的版本,请使用>=1.0.0)。以下示例列出community.general和ansible.posix集合作为需求:
javascript
dependencies:
community.general: '>=1.0.0'
ansible.posix: '>=1.0.0'
注意:自带的ansible.builtin集合不需要在dependencies这里声明。
一些更复杂的集合可能还要依赖其他的Python库,用户必须在执行环境中安装这些Python软件包,然后才能使用相应的集合。例如,amazon.aws集合使用boto这个Python包提供的Amazon Web Services Software Development Kit软件开发工具包(SDK)。
② 可以在内容集合的根目录下创建一个requirements.txt文件,其中每一行声明一个Python包。以下示例显示了amazon.aws集合的requirements.txt文件的内容。包名称末尾的版本部分是可选的。
javascript
botocore>=1.18.0
boto3>=1.15.0
boto>=2.49.0
③ 某些集合还需要在执行环境中使用系统级别的其他软件包。例如,ansible.posix集合需要rsync软件包。可以在集合的根目录下,创建bindep.txt文件并列出所需要的RPM包,每行一个。以下示例显示ansible.posix集合的bindep.txt文件的内容。
javascript
rsync [platform:centos-8 platform:rhel-8]使用bindep工具(支持管理多个Linux发行版的包)可以处理bindep.txt文件。同一个软件在不同的Linux系统中可能有不同的包名称。前面这个文件中,通过 platform:centros-8 platform:rhel-8 配置指定了Linux发行版的名称。另一个标准用法是采用 platform:rpm,这样表示针对所有以RPM封装系统的Linux发行版。
- 当用户或自动化控制器运行ansible-galaxy collection install命令来安装集合时,这个命令会自动安装你在galaxy.yml文件中声明的其他的集合,但是不会安装requirements.txt文件指定的Python包,或bindep.txt文件指定的系统包。
- 不过,如果使用ansible-build命令来创建自定义的自动化执行环境,就会使用上面讲到的所有这些文件(galaxy.yml、requirements.txt、binddep.txt)。
④ 在meta/runtime.yml文件中,可以为集合定义其他的元数据。如果你的集合需要特定版本的Ansible,请将requires_ansible参数添加到此文件中。
下面的例子指定此集合适用于Ansible 2.10或更高版本。
javascript
---
requires_ansible: ">=2.10"
因为ansible-galaxy collection init命令并不创建meta/目录,所以如果需要的话,你必须自行创建meta/ 目录以及runtime.yml文件。
6)创建集合
在集合目录下,可以运行ansible-galaxy collection build命令来准备集合:
javascript
[user@host mycollection]$ ansible-galaxy collection build
Created collection for mynamespace.mycollection at /home/user/mynamespace/ mycollection/mynamespace-mycollection-1.0.0.tar.gz
生成的.tar.gz集合文件可用来在本地安装及测试集合,也可以分享给其他团队成员,或将其发布到分发平台(Ansible Galaxy或私有自动化中心)。
7)验证和测试集合
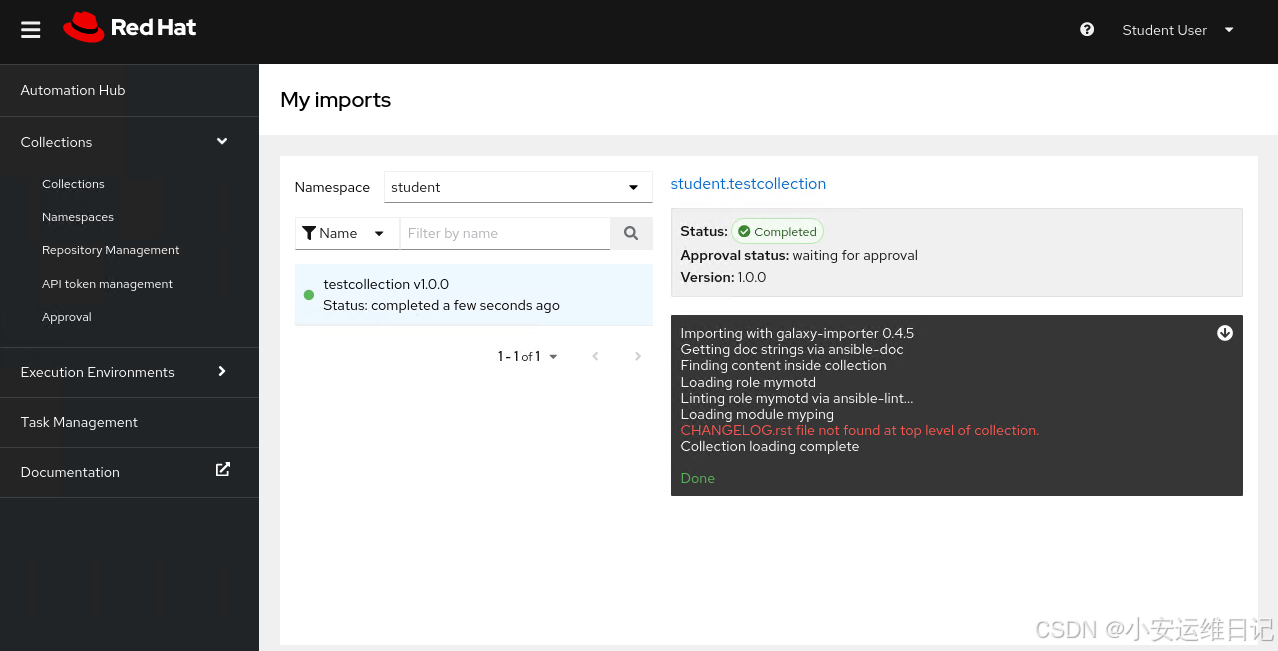
当你将集合发布到Ansible Galaxy、Automation Hub或私有自动化中心时,平台会自动运行一些测试。例如,私有自动化中心使用ansible-lint工具来验证你的集合是否符合Ansible团队制定的标准和最佳实践,平台会将生成的报告与集合一起发布。以下输出结果显示了mynamespace.mycollection集合的导入日志。
Importing with galaxy-importer 0.4.4
Getting doc strings via ansible-doc
Finding content inside collection
loading role myrole
Linting role myrole via ansible-lint...
roles/myrole/tasks/main.yml:3: fqcn-builtins Use FQCl for builtin actions.
roles/myrole/tasks/main.yml:3: risky-file-permissions File permissions unset or
incorrect.
CHANGELOG.rst file not found at top Nevel of collection.
Collection loading complete
Done
当导入日志显示Collection loading complete和Done,则表示集合已成功上载。请注意,这个日志会产生关于fqcn-buitins和risky-file-permissions的警告。虽然不是必需的,但你可以更新集合以修复任何报告的问题。
如果集合里没有提供CHANGELOG.rst文件,日志还会显示:CHANGELOG.rst file not found at top Nevel of collection。这个文件不是必需的,可以忽略这个消息。
对于Red Hat合作伙伴开发的集合,自动化中心使用ansible-test工具做更彻底的测试。
Ansible团队建议你在发布集合之前先安装并使用这些测试工具。一些社区项目也运行这些测试工具,并且拒绝未能通过测试的集合。至少,从.tar.gz文件将你的集合安装在测试系统上,然后写一个剧本来验证这个集合,确保它能够正常工作。
要在剧本中测试集合,不要直接将ansible.cfg配置文件中的collections_path指令指向工作目录来使用开发中的集合,而是要从.tar.gz文件构建并安装集合。
2. 发布内容集
1)通过使用集合分发平台的Web UI界面,来根据.tar.gz文件发布你的集合。
-
对于私有自动化中心,导航到 Collections > Namespaces ,选择你的命名空间,单击Upload Collections,然后上传你创建好的集合的.tar.gz文件。新上传的集合,还必须由管理员进行审批,然后才能由用户使用。
-
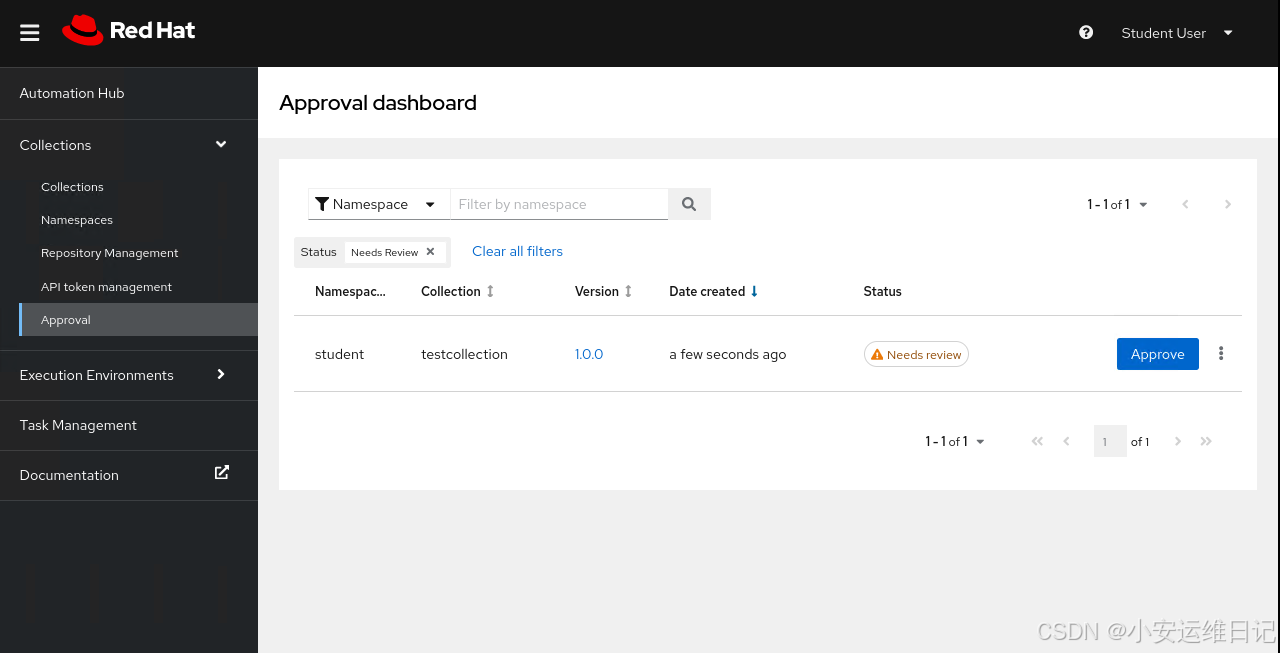
如果你的用户具有管理员权限,导航到 Collection > Approval ,可以查看导入日志,其中显示有ansible-lint验证的结果,然后批准或拒绝集合(如图-1所示)。
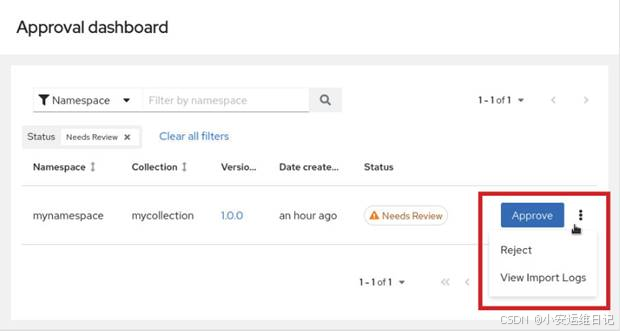
图-1
2)每次修改集合时,记得编辑galaxy.yml文件并更新版本参数。否则,分发平台会拒绝你的上传请求。重新创建一个.tar.gz档案,再用来发布新版本的集合。
javascript
[user@host mycollection]$ cat galaxy.yml
---
namespace: mynamespace
name: mycollection
version: 2.0.0
readme: README.md
authors:
  - your name <example@domain.com>
...output omitted...

[user@host mycollection]$ ansible-galaxy collection build
Created collection for mynamespace.mycollection at /home/user/mynamespace/ mycollection/mynamespace-mycollection-2.0.0.tar.gz
3)除了从私有自动化中心的Web UI界面发布集合以外,也可以用ansible-galaxy命令发布集合。更新你的Ansible配置文件,包含像下边这样的设置(你的server_list行可能还包含其他服务器)。
javascript
[galaxy]
server_list = inbound_mynamespace

[galaxy_server.inbound_mynamespace]
url=https://hub.lab.example.com/api/galaxy/content/inbound-mynamespace/
token=<put your token here>
从私有自动化中心的Web UI上可以获取命名空间的入站URL网站。导航到 Collections > Namespaces,单击命名空间的 View collections链接,然后单击 CLI configuration选项卡。导航到 Collections > APItoken management,然后单击 load token加载令牌,复制令牌字串用来更新Ansible配置的token行。
运行ansible-galaxy collection publish命令,可以将你的集合发布到ansible-galaxy或私有自动化中心。请注意,这个命令输出的消息与Web UI导入日志中的相同。
javascript
[user@host mycollection]$ ansible-galaxy collection publish mynamespace-mycollection-2.0.0.tar.gz
...output omitted...
[WARNING]: Galaxy import warning message: roles/myrole/tasks/main.yml:3: fqcn- builtins Use FQCl for builtin actions.
[WARNING]: Galaxy import warning message: roles/myrole/tasks/main.yml:3: risky- file-permissions File permissions unset or incorrect.
[ERROR]: Galaxy import error message: CHANGELOG.rst file not found at top Nevel of collection.
Collection has been successfully published and imported to the Galaxy server inbound_mynamespace https://hub.lab.example.com/api/galaxy/content/inbound-
mynamespace/
3. 课堂练习:编写Ansible内容集
开始练习(部署环境):
以用户student登入workstation虚拟机,使用lab命令来构建案例环境。
javascript
[student@workstation ~]$ lab start create-writing步骤说明:
1)进入/home/student/create-writing/目录,使用ansible-galaxy命令创建名为student命名空间的testclooection的集合
javascript
[student@workstation ~]$ cd ~/create-writing/
[student@workstation create-writing]$ ansible-galaxy collection init student.testcollection
- Collection student.testcollection was created successfully
2)检查新集合的目录及文件
使用tree命令来查看新集合的目录结构:
javascript
[student@workstation create-writing]$ tree student/testcollection/
student/testcollection/
}------ docs
}------ galaxy.yml
}------ plugins
|   ¹------ README.md
}------ README.md
¹------ roles

3 directories, 3 files
查看集合文件galaxy.yml中的元数据,如namespace、name、version:
javascript
[student@workstation create-writing]$ cd student/testcollection/
[student@workstation testcollection]$ grep -Ev "^#|^$" galaxy.yml | head
namespace: student
name: testcollection
version: 1.0.0
readme: README.md
authors:
- your name <example@domain.com>
description: your collection description
license:
- GPL-2.0-or-later license_file: ''3)创建meta/runtime.yml文件,用来指定此集合需要2.9.10或更高版本的ansible才能正常工作
创建~/create-writing/student/testcollection/meta/目录:
javascript
[student@workstation testcollection]$ mkdir meta新建~/create-writing/student/testcollection/meta/runtime.yml文件,内容如下:
javascript
[student@workstation testcollection]$ vim meta/runtime.yml
---
requires_ansible: '>=2.9.10'4)为这个集合添加一个模块,可直接从/home/ student/create-writing/目录下复制myping.py模块文件
javascript
[student@workstation testcollection]$ ls plugins/
README.md
[student@workstation testcollection]$ mkdir plugins/modules
[student@workstation testcollection]$ cp ~/create-writing/myping.py plugins/modules/
[student@workstation testcollection]$ ls plugins/modules/
myping.py
5)为这个集合添加一个角色
使用ansible-galaxy命令创建mymotd角色,并进入mymotd目录:
javascript
[student@workstation testcollection]$ cd roles/
[student@workstation roles]$ ansible-galaxy role init mymotd
- Role mymotd was created successfully
[student@workstation roles]$ tree mymotd/
mymotd/
├── defaults
│   └── main.yml
├── files
├── handlers
│   └── main.yml
├── meta
│   └── main.yml
├── README.md
├── tasks
│   └── main.yml
├── templates
├── tests
│   ├── inventory
│   └── test.yml
└── vars
└── main.yml
[student@workstation roles]$ cd mymotd/- 新建templates/motd.j2模板文件. 这个例子展示了通过设置the_date变量来影响日期的显示(例如将September 26, 2022显示为26-Sep-2022),内容如下:
javascript
[student@workstation mymotd]$ vim templates/motd.j2
{% set the_date = '%d-%b-%Y' | strftime(ansible_facts['date_time']['epoch']) %}
Connected to: {{ ansible_facts['fqdn'] }}
Ansible last updated the /etc/motd file on {{ the_date }}.- 新建tasks/main.yml文件,内容如下:
javascript
[student@workstation mymotd]$ vim tasks/main.yml
---
# tasks file for mymotd
- name: update the /etc/motd file
  ansible.builtin.template:
    src: motd.j2
    dest: /etc/motd
    owner: root
    group: root
mode: '0444'6)再次使用tree命令检查此集合的目录结构,如图-2所示。
javascript
[student@workstation mymotd]$ cd ~/create-writing/student/testcollection/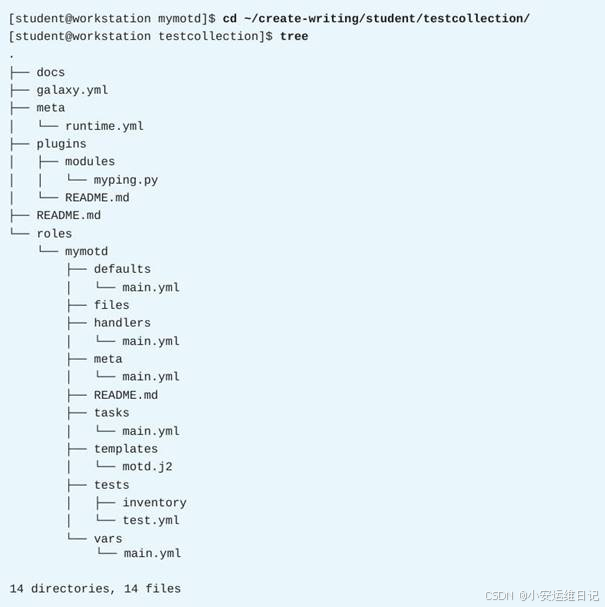
图-2
删除此前由ansible-galaxy collection init和ansible-galaxy role init 命令创建但是用不到的多余文件(如图-3所示)。
javascript
[student@workstation testcollection]$ rm -vr docs roles/mymotd/{defaults,files,handlers,tests,vars}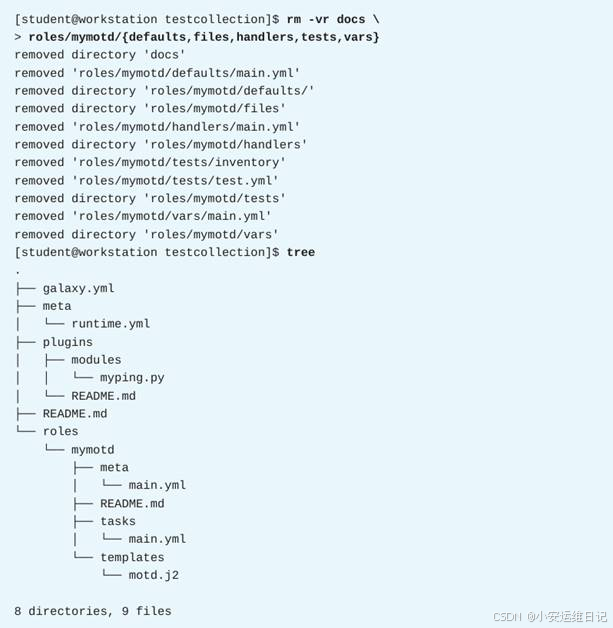
图-3
7)使用ansible-galaxy命令来构建集合
javascript
[student@workstation testcollection]$ ansible-galaxy collection build
Created collection for student.testcollection at /home/student/create-writing/student/testcollection/student-testcollection-1.0.0.tar.gz
[student@workstation testcollection]$ ls
galaxy.yml meta plugins README.md roles student-testcollection-1.0.0.tar.gz
8)在私有自动化中心新建student命名空间,然后上传、审批新集合
注意:SSH -X student@workstation
登录到https://hub.lab.example.com,用户名student、密码redhat123。
在web界面中,导航到 Collections > Namespaces ,然后点击Create 。在Create new namespace页面,填写下列内容(如表所示),然后点击Create即可创建新的命名空间。
|------------------|--------------------|
| 字段 | 值 |
| Name | student |
| Namespace owners | Content Developers |
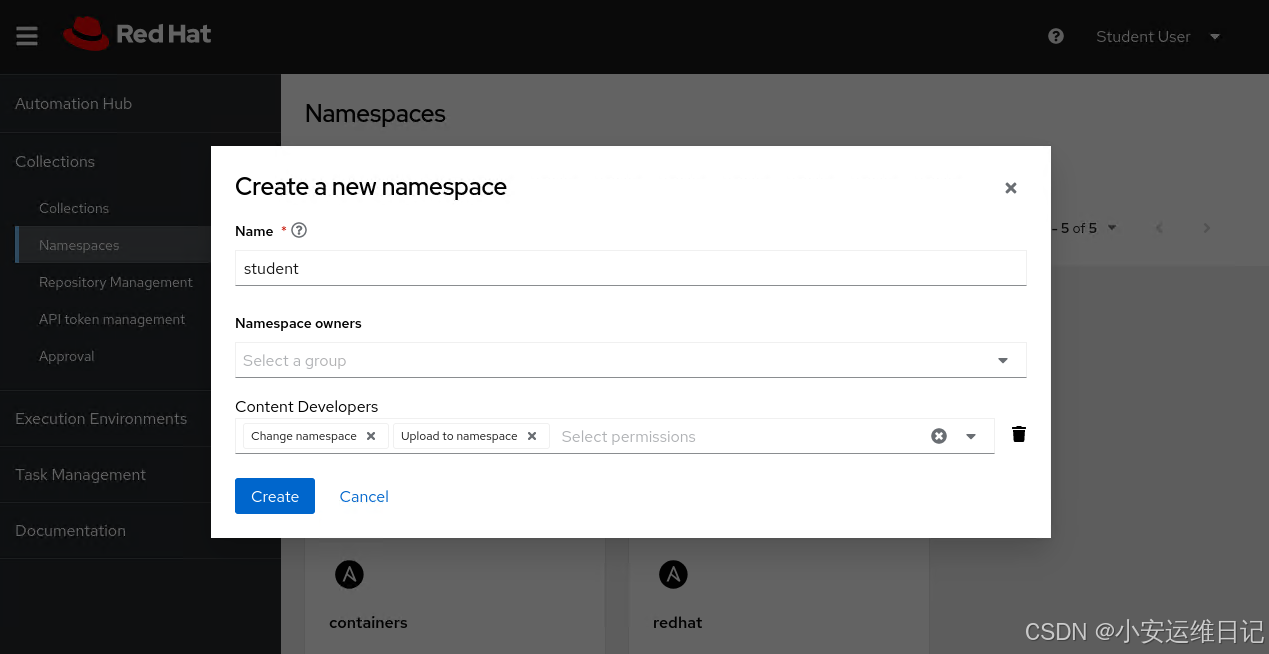
点击Upload collection ,发布集合;点击Select file ,选取/home/student/create-writing/student/testcollection/student-testcollection-1.0.0.tar.gz文件,然后点击Upload。虽然web UI 显示一个missing CHANGELOG.rst file警告(可忽略),上传也成功了。
点击Collections > Approval,然后点击Approve来完成对student.testcollection 集合的审批。
导航到Collections > Collections,确认在私有自动化中心能看到testcollection这个自动化内容集合。
9)使用ansible-galaxy命令安装来自私有自动化中心的student.testcollection集合(也就是前一步上传并审批的集合)
进入/home/student/create-writing/目录:
javascript
[student@workstation testcollection]$ cd ~/create-writing/导航到 Collections > Repository Management,复制published仓库的CLI configuration配置内容。
修改/home/student/create-writing/ansible.cfg文件,包含刚刚复制的配置内容。
javascript
[student@workstation create-writing]$ vim ansible.cfg
[defaults]
inventory = ./inventory
remote_user = devops
collections_paths = ./collections:/usr/share/ansible/collections

[galaxy]
server_list = published_repo

[galaxy_server.published_repo]
url=https://hub.lab.example.com/api/galaxy/content/published/
token=<put your token here>
导航到 Collections > API token management,然后点击load token,点击Copy to clipboard按钮,将复制的内容更新到/home/student/create-writing/ansible.cfg文件中的token行处。
javascript
[defaults]
inventory = ./inventory
remote_user = devops
collections_paths = ./collections:/usr/share/ansible/collections

[galaxy]
server_list = published_repo

[galaxy_server.published_repo]
url=https://hub.lab.example.com/api/galaxy/content/published/
token=efc21bec287501ff486ac20a41621407c9321cb9
项目中的~/create-writing/collections/requirements.yml文件引用了内容集合student.testCollections,确保此文件的内容如下:
javascript
[student@workstation create-writing]$ cat ~/create-writing/collections/requirements.yml
---
collections:
  - name: student.testcollection
确认当前位于/home/student/create-writing目录下,使用ansible-galaxy命令来安装集合。集合将会安装到./collections目录下,方便自动化执行环境自动加载。
javascript
[student@workstation create-writing]$ ansible-galaxy collection install -r collections/requirements.yml -p collections/
Starting galaxy collection install process Process install dependency map
Starting collection install process
Downloading https://hub.lab.example.com/api/galaxy/v3/plugin/ansible/content/ published/collections/artifacts/student-testcollection-1.0.0.tar.gz to / home/student/.ansible/tmp/ansible-local-247766f2gkx05/tmptvok5tde/student- testcollection-1.0.0-nb_d_xxi
Installing 'student.testcollection:1.0.0' to '/home/student/create-writing/ collections/ansible_collections/student/testcollection'
student.testcollection:1.0.0 was installed successfully
10)检查并运行site.yml剧本,用来测试student.testcollection集合
查看site.yml剧本:
javascript
[student@workstation create-writing]$ cat site.yml
---
- name: Test custom collection
  hosts: serverd.lab.example.com
  become: true

  roles:
    - role: student.testcollection.mymotd
使用ansible-navigator run命令来运行site.yml剧本:
javascript
[student@workstation create-writing]$ ansible-navigator run site.yml -m stdout登录到serverd以验证play已成功运行:
javascript
[student@workstation create-writing]$ ssh serverd
Connected to: serverd.lab.example.com
Ansible last updated the /etc/motd file on 20-May-2025.
Activate the web console with: systemctl enable --now cockpit.socket
This system is not registered to Red Hat Insights. See https://cloud.redhat.com/
To register this system, run: insights-client --register
[student@serverd ~]$ logout
结束练习(清理环境):
在workstation虚拟机上,切换到student用户主目录,使用lab命令来清理案例环境,确保先前练习的资源不会影响后续的练习。
javascript
[student@workstation ~]$ lab finish create-writing二、 构建自定义的自动化执行环境
1. 确定何时需要创建自己的自动化执行环境
Red Hat提供了好几个Ansible自动化执行环境,以便满足众多用户的需求。这些自动化执行环境包括最常见的Ansible内容集合。使用ansible-navigator images命令可以快速检查容器镜像,并查看其中包含的集合、Python包和其他系统级别的包。
Image: ee-supported-rhel8:latest Description
0|Image information Information collected from image inspection
1|General information OS and python version information
2|Ansible version and collections Information about ansible and ansible collect
3|Python packages Information about python and python packages
4|Operating system packages Information about operating system packages
5|Everything All image information
通常来说,Red Hat提供的执行环境足以满足你的需求了。在这种情况下,就不需要创建新的自动化执行环境。有些时候,你可能需要一个现有的执行环境无法提供的内容集合。在这种情况下,还可以为Ansible项目安装这些额外的集合,然后再使用现有的自动化执行环境,这样的话也无需构建新的环境。
但是另一方面,如果遇到以下情况,你应该考虑创建一个自定义的自动化执行环境:
-
经常重复使用现有执行环境没有包含的特定集合。如果能将这些集合嵌入到自定义的自动化执行环境中,会比每次在项目中都要从requirements.yml文件安装它们更有效。如果有很多项目使用这个集合,那就更加需要自定义的执行环境
-
要使用的集合需要现有执行环境中没有包含的Python包或软件
-
需要在现有的执行环境中使用与另一个集合相冲突的集合
2. 准备一个新的自动化执行环境
使用ansible-builder命令可以创建自动化执行环境的容器镜像,这个命令由ansible-builder 软件包提供。
javascript
[root@host ~]# yum install ansible-builder要构建自动化执行环境的容器镜像,建议先创建一个工作目录来准备所需的文件。ansible-builder命令会在这个工作目录下搜索execution-environment.yml配置文件,用来确定如何构建容器映像。
以下是execution-environment.yml文件的示例:
javascript
---
version: 1

build_arg_defaults:
  EE_BASE_IMAGE: registry.redhat.io/ansible-automation-platform-22/ee-minimal- rhel8:latest
  EE_BUILDER_IMAGE: registry.redhat.io/ansible-automation-platform-22/ansible- builder-rhel8:latest

ansible_config: ansible.cfg

dependencies:
  galaxy: requirements.yml
  python: requirements.txt
  system: bindep.txt
关于这个文件内容,其中,
-
EE_BASE_IMAGE参数 :指定构建新的容器镜像时要使用的基础镜像。缺省情况下,ansible-builder命令使用红帽的minimal镜像registry.redhat.io/ansible-automation-platform-22/ee-minimal-rhel8:latest
-
EE_BUILDER_IMAGE参数 :此参数可选 ,指定一个为构建自定义执行环境提供必要工具的容器镜像,一般无需特别指定
-
ansible_config参数 :此参数可选 ,用来指定Ansible的配置文件。Ansible-builder构建过程会使用此文件获取身份验证信息。例如,必须使用身份验证URL和令牌,才能从Automation Hub安装集合的时候。如果你只从公共平台(如Ansible Galaxy)安装集合,则无需提供此参数
-
galaxy参数 :指定一个包含了要安装到执行环境中的集合列表的文件,通常指向的是requirements.yml文件
-
python参数 :指定一个包含了要安装的Python模块包的列表的文件,通常指向的是requirements.txt文件
-
system参数 :指定一个包含了要安装的系统级别的软件包的列表的文件,通常指向的是bindep.txt文件
1)声明要安装哪些集合(requirements.yml文件)
在requirements.yml文件 中,把需要ansible-builder在自动化执行环境中安装的内容集合给列出来。
下面例子指明了需要从Ansible Galaxy安装两个集合:community.aws和community.general。
javascript
---
collections:
  - community.aws
  - community.general
下面这个requirements.yml文件稍复杂一些:
javascript
---
collections:
  - name: redhat.insights
    version: 1.0.5
    source: https://console.redhat.com/api/automation-hub/
  - name: ansible.posix
source: https://hub.example.com/api/galaxy/content/rh-certified/-
name:指定要安装的集合的名称
-
version:指定要安装的集合的版本
-
source :指定要安装的来自发布平台的集合地址,本例中使用的是红帽Automation Hub的集合地址,因此必须创建一个ansible.cfg文件,并正确配置token验证,在execution-environment.yml配置文件中,还需要设置ansible_config参数来引用ansible.cfg文件
注意:对于私有自动化中心提供的集合,也可能要在ansible.cfg文件中提供token令牌
以下ansible.cfg文件示例,提供了ansible-builder命令向红帽Automation Hub和私有自动化中心(本例中为hub.example.com)进行身份验证所需的参数。
javascript
[galaxy]
server_list = ansible_automation_hub, my_hub, galaxy

[galaxy_server.ansible_automation_hub]
url=https://console.redhat.com/api/automation-hub/
uth_url=https://sso.redhat.com/auth/realms/redhat-external/protocol/openid- connect/token
token=eyJh...0Nwk

[galaxy_server.my_hub]
url=https://hub.example.com/api/galaxy/content/rh-certified/
token=e8e4...b0c2

[galaxy_server.galaxy]
url=https://galaxy.ansible.com/
2)声明要安装哪些Python包(requirements.txt)
在requirements.txt文件中,把需要ansible-builder安装到自动化执行环境中的Python包给列出来。下面这个requirements.txt文件的例子,列出了一些必需的Python包,其中每个软件包都可以提供一个特定的版本供选择。
javascript
sh==1.13.1
jsonschema>=3.2.0,<4.0.1
textfsm
ttp
xmltodict
dnspython
有一些集合会包含requirements.txt文件,如果已经指定了安装这样的集合,就不需要在requirements.txt文件中再重复指定了。
3)声明要安装哪些RPM软件包
在bindep.txt文件中,把需要ansible-builder安装到自动化执行环境中的RPM软件包给列出来。下面这个bindep.txt文件的列子,列出了前面示例所需的RPM包。
javascript
rsync [platform:rpm]
kubernetes-client [platform:rpm]其中,platform:rpm指令表示针对所有使用RPM封装包的Linux发行版。
有一些集合会包含bindep.txt文件,如果已经指定了安装这样的集合,就不需要在bindep.txt文件中再重复指定了。
如果执行构建任务的系统具有有效的红帽订阅,那么ansible-builder命令可以访问与这个系统相同的RPM包。但是,如果没有有效的订阅,则构建过程只能访问Red Hat Universal Base Images(UBI)仓库。这些仓库是公开的,但提供的RPM包相对比较少一些。
3. 构建一个新的自动化执行环境
当基本映像和构建器映像在本地还不可用时,ansible-builder会自动提取它们。如果访问容器仓库中的镜像要求验证,则必须在开始构建之前完成身份验证。
例如,通过podman login来登录到指定的容器仓库:
javascript
[user@host demo]$ podman login registry.redhat.io准备好必要的配置文件,并完成容器仓库的登录验证后,就可以使用ansible-builder build命令来构建自动化执行环境的容器镜像了。
使用--tag(或-t)选项来指定新构建的镜像的名称。名称包括两部分:一个名称和一个可选的版本标记。例如,--tag demo:v1.0选项表示镜像名为demo,标记版本为v1.0。如果不指定标记,则默认的标记为latest。例如,--tag demo选项相当于--tag demo:latest选项。
javascript
[user@host demo]$ ansible-builder build --tag ee-demo:v1.0
Running command:
podman build -f context/Containerfile -t ee-demo:v1.0 context
Complete! The build context can be found at: /home/user/demo/context
构建成功后会生成新的镜像,使用podman images命令可以检查(如图-4所示)。

图-4
1)与构建过程交互
对于更高级的配置,可能需要自定义生成过程。例如,假设你的私有自动化中心使用由CA机构签名的TLS证书。在这种情况下,你必须向ansible-builder提供这个CA证书,以便它可以从自动化中心下载集合。
构建执行环境的过程分两个阶段:
-
第1步 :在当前目录中创建 context/ 目录 ,再创建 context/Containerfile 文件 ,这个文件相当于Dockerfile文件,其中包含podman build命令的说明。另外还创建了一个**_build/子目录**,然后将requirements.yml、ansible.cfg、requirements.txt和bindep.txt文件复制到_build/子目录下,以便构建时可以访问这些文件
-
第2步 :运行 podman build****命令 ,用来生成自动化执行环境的镜像
若要自定义构建过程(而不是使用提前准备的文件),请使用ansible-builder create命令来执行第1个阶段(如图-5所示)。
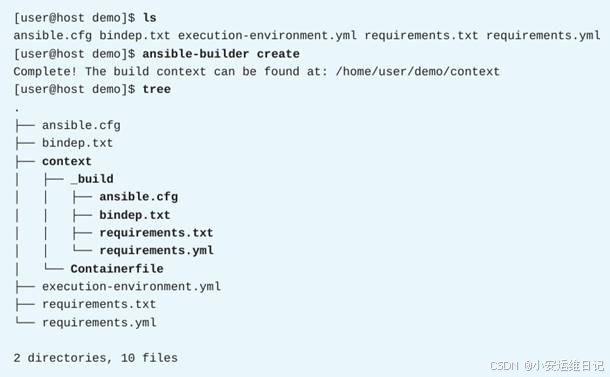
图-5
注意,如果使用ansible-builder create命令,会覆盖掉context/Containfile文件。
2)调整构建参数和基础镜像
-
可使用execution-environment.yml 配置文件,通过build_arg_defaults变量来指定构建参数的默认值(k=v字典)。
-
也可使用ansible-builder命令时结合**--build-arg**选项来指定这些设置,而且--build-arg选项的优先级更高。
ansible-builder使用的构建参数包括:
-
ANSIBLE_GALAXY_CLI_COLLECTION_OPTS :将额外的命令行选项传递给构建中的ansible-galaxy命令。例如,如果要安装集合的预发布版本,可以添加--pre选项
-
EE_BASE_IMAGE:指定执行环境的父映像(基础镜像/原型)
-
EE_BUILDER_IMAGE:指定用于构建任务的图像(提供一些构建工具)
javascript
build_arg_defaults:
EE_BASE_IMAGE: registry.redhat.io/ansible-automation-platform-22/ee-minimal-rhel8:latest
EE_BUILDER_IMAGE: registry.redhat.io/ansible-automation-platform-22/ansible-builder-rhel8:latest
当使用ansible-builder create命令生成Containerfile文件时,当前的构建参数将会硬编码到Containerfile文件中。
3)修改Containerfile文件
运行ansible-builder create命令之后,还可手动修改context/Containerfile文件,以满足更细致化的一些要求。
例如,可以在Containerfile文件中添加以下两个指令,以将专用CA的证书注入到镜像中:
javascript
ARG EE_BASE_IMAGE=registry.redhat.io/ansible-automation-platform-22/ee-minimal- rhel8:latest
ARG EE_BUILDER_IMAGE=registry.redhat.io/ansible-automation-platform-22/ansible- builder-rhel8:latest

FROM $EE_BASE_IMAGE as galaxy
ARG ANSIBLE_GALAXY_CLI_COLLECTION_OPTS=
USER root

COPY my-company-ca.pem /etc/pki/ca-trust/source/anchors
RUN update-ca-trust

ADD _build/ansible.cfg ~/.ansible.cfg
...output omitted...
上面这个例子中,你需要将my-company-ca.pem证书文件放到context/目录下。
4)构建执行环境镜像
做好了构建镜像的准备以后,可以通过podman build命令来完成构建操作。
javascript
[user@host demo]$ podman build -f context/Containerfile -t ee-demo:v2.0 context
STEP 1: FROM registry.redhat.io/ansible-automation-platform-22/ee-minimal- rhel8:latest AS galaxy
STEP 2: ARG ANSIBLE_GALAXY_CLI_COLLECTION_OPTS=
--> 5894c40a543
STEP 3: USER root
--> 913568f77bb
STEP 4: COPY my-company-ca.pem /etc/pki/ca-trust/source/anchors
--> b9c4d7eaad0
STEP 5: RUI update-ca-trust
--> be65558ebb8
STEP 6: ADD _build/ansible.cfg ~/.ansible.cfg
--> 4a5410ba1c2
...output omitted...
STEP 22: COMMIT ee-demo:v2.0
--> 8be47093daaae18160468f3db6e0335d55d0d11c838c7e285d74037e4a31d8a9

[user@host demo]$ podman images
REPOSITORY TAG IMAGE ID   CREATED SIZE
localhost/ee-demo v2.0   ba77b0d0a59d   2 minutes ago  308 MB
...output omitted...
4. 课堂练习:构建自定义的自动化执行环境
开始练习(部署环境):
以用户student登入workstation虚拟机,使用lab命令来构建案例环境。
javascript
[student@workstation ~]$ lab start builder-custom步骤说明:
1)查看自定义的Ansible内容集合exercise.motd中的一些文件,这个集合包含了一个用来更新用户登录时显示的每日消息文件的角色
进入~/builder-custom/exercise.motd/目录,将~/build-custom/execise.motd.tar.gz文件解压:
javascript
[student@workstation ~]$ cd ~/builder-custom/exercise.motd/
[student@workstation exercise.motd]$ tar -xzf ../exercise.motd.tar.gz
使用tree命令列出目录下的内容:
javascript
[student@workstation exercise.motd]$ tree
.
├── FILES.json
├── MANIFEST.json
├── README.md
└── roles
└── banner
├── defaults
│   └── main.yml
├── meta
│   └── main.yml
├── README.md
├── tasks
│   └── main.yml
└── templates
└── motd.j2
6 directories, 8 files
查看motd.j2模板文件的内容:
javascript
[student@workstation exercise.motd]$ cat roles/banner/templates/motd.j2
================================================================================
================================================================================
==                                                                            ==
{{ formatted_msg_1 }}
{{ formatted_msg_2 }}
==                                                                            ==
================================================================================
================================================================================
banner角色会根据这个模板创建/etc/motd.d/banner文件。
查看banner角色的main任务文件的内容:
javascript
[student@workstation exercise.motd]$ cat roles/banner/tasks/main.yml
---
# tasks file for banner
- name: Ensure /etc/motd.d/ exists
  ansible.builtin.file:
    path: /etc/motd.d
    state: directory
    owner: root
    group: root
    mode: '0755'

- name: Create custom motd banner
  vars:
    left_pad_1: "{{ (width - (message_1 | length)) // 2 }}"
    left_pad_2: "{{ (width - (message_2 | length)) // 2 }}"
    right_pad_1: "{{ left_pad_1|int + ((width - (message_1 | length)) % 2) }}"
    right_pad_2: "{{ left_pad_2|int + ((width - (message_2 | length)) % 2) }}"
    formatted_msg_1: "=={% for x in range((left_pad_1|int) - 1) %} {% endfor %}{{ message_1 }}{% for y in range((right_pad_1|int) - 1) %} {% endfor %}=="
    formatted_msg_2: "=={% for x in range((left_pad_2|int) - 1) %} {% endfor %}{{ message_2 }}{% for y in range((right_pad_2|int) - 1) %} {% endfor %}=="
  ansible.builtin.template:
    src: motd.j2
    dest: /etc/motd.d/banner
banner角色使用width、message_1和message_2变量来对齐/etc/motd.d/banner文件中的两条自定义消息。使用角色时,用户可能会覆盖掉message_1和message_2变量的默认值。
2)为新的自动化执行环境创建配置文件
创建并进入~/builder-custom/ee-motd/目录:
javascript
[student@workstation exercise.motd]$ mkdir ~/builder-custom/ee-motd/
[student@workstation exercise.motd]$ cd ~/builder-custom/ee-motd/- 创建execution-environment.yml文件,包含以下内容::
javascript
[student@workstation ee-motd]$ vim execution-environment.yml
---
version: 1
build_arg_defaults:
  EE_BASE_IMAGE: 'hub.lab.example.com/ee-minimal-rhel8:latest'
  EE_BUILDER_IMAGE: 'hub.lab.example.com/ansible-builder-rhel8:latest'

dependencies:
  galaxy: requirements.yml
  python: requirements.txt
  system: bindep.txt
lab命令会将ee-minimal-rhel8容器下载到workstation 主机上,这个容器镜像可以用来作为新的容器镜像的基础镜像。
可参考:~/builder-custom/solutions/execution-environment.yml文件。
- 创建requirements.yml文件,包含以下内容:
javascript
[student@workstation ee-motd]$ vim requirements.yml
---
collections:
  - name: /build/exercise.motd.tar.gz
    type: file
exercise.motd.tar.gz归档文件的路径是构建过程中使用的容器内的绝对路径。
可参考:~/builder-custom/solutions/requirements.yml文件。
- 创建requirements.txt文件用来指定需要哪些Python包,包含以下内容:
javascript
[student@workstation ee-motd]$ vim requirements.txt
# Python dependencies
funmotd
在这个文件中还可以进一步指定Python包的版本号,例如:funmotd==0.3
可参考:~/builder-custom/solutions/requirements.txt文件。
- 创建bindep.txt文件,用来指定需要哪些系统包(每行指定一个,也支持进一步指定版本号),包含以下内容:
javascript
[student@workstation ee-motd]$ vim bindep.txt
# System-level dependencies
hostname
可参考:~/builder-custom/solutions/bindep.txt文件。
3)确认ansible-builder包已经安装
javascript
[student@workstation ee-motd]$ rpm -qa | grep ansible
python39-ansible-runner-2.2.1-1.el8ap.noarch
ansible-runner-2.2.1-1.el8ap.noarch
ansible-navigator-2.1.0-1.el8ap.noarch
ansible-builder-1.1.0-3.el8ap.noarch
如果ansible-builder包没有安装的话,可以执行sudo yum -y install ansible-builder命令来安装(用户student的密码为student)。
4)创建自定义的自动化执行环境
使用ansible-builder create命令来创建构建过程中需要的一些文件:
javascript
[student@workstation ee-motd]$ ansible-builder create
Complete! The build context can be found at: /home/student/builder-custom/ee-motd/ context
这一步操作是可选的,主要用来创建context目录和相关文件。在本练习中,将向context/_build/目录中添加一个附加文件。
使用tree命令查看当前的目录结构,注意ansible-builder在context目录下创建了一个Containerfile文件以及一个_build子目录(如图-6所示)。
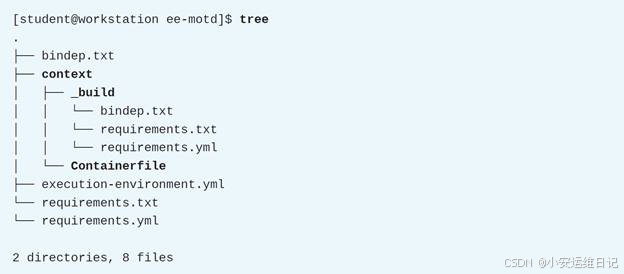
图-6
将~/builder-custom/exercise.motd.tar.gz归档文件复制到context/_build/目录下。
javascript
[student@workstation ee-motd]$ cp ../exercise.motd.tar.gz context/_build/构建进程会将context/_build/目录的内容装载到容器中的/build/目录,因此, 从容器中也可以访问context/_build/exercise.motd.tar.gz这个归档(根据requirements.yml文件指定,通过以下路径:/build/exercise.motd.tar.gz来访问)
使用ansible-builder build命令来构建自定义的自动化执行环境,为新生成的容器镜像指定标签ee-motd-minimal:1.0,可能需要等待几分钟才能构建完毕。
javascript
[student@workstation ee-motd]$ ansible-builder build -t ee-motd-minimal:1.0
Running command:
podman build -f context/Containerfile -t ee-motd-minimal:1.0 context
Complete! The build context can be found at: /home/student/builder-custom/ee-motd/context
ansible-builder build命令会显示相关的podman build命令。若想对context/Containerfile文件进行一些自定义修改,请直接使用podman build命令(而不是使用ansible-builder)。
注意:如果还没有登录到hub.lab.example.com的话会报认证错误。请使用podman login hub.lab.example.com命令提前登录,用户名student、密码redhat123。
javascript
[student@workstation ee-motd]$ podman login hub.lab.example.com
Username: student
Password: redhat123
Login Succeeded!
使用podman images命令可列出本地的容器镜像(如图-7所示)。

图-7
异常处理:
因基础镜像的软件源需要连接外网,若do374环境未配置互联网连接,则使用ansible-builder构建镜像时会报错。
解决办法:
1)为do374环境配置稳定的外网连接(比如将f0_do374虚拟机桥接到外网);
2)或者,修改Containerfile文件(去掉装包的操作,后续也不再验证安装的包),手动执行podman build指令来构建镜像。
javascript
[student@workstation ee-motd]$ ansible-builder build -t ee-motd-minimal:1.0  #无外网连接时,此行ansible-builder命令报错
Running command:
  podman build -f context/Containerfile -t ee-motd-minimal:1.0 context
...showing last 20 lines of output...
+ PKGMGR=
+ PKGMGR_OPTS=
+ '[' -z ']'
+ PKGMGR=/usr/bin/dnf
+ '[' -f /usr/bin/microdnf ']'
+ PKGMGR=/usr/bin/microdnf
+ '[' -z ']'
+ PKGMGR_OPTS='--nodocs --setopt install_weak_deps=0'
+ mkdir -p /output/bindep
+ mkdir -p /output/wheels
+ mkdir -p /tmp/src
+ cd /tmp/src
+ /usr/bin/microdnf update -y

(microdnf:10): librhsm-WARNING **: 14:36:49.251: Found 0 entitlement certificates

(microdnf:10): librhsm-WARNING **: 14:36:49.264: Found 0 entitlement certificates
Downloading metadata...
error: cannot update repo 'ubi-8-baseos-rpms': Cannot download repomd.xml: Cannot download repodata/repomd.xml: All mirrors were tried; Last error: Curl error (6): Couldn't resolve host name for https://cdn-ubi.redhat.com/content/public/ubi/dist/ubi8/8/x86_64/baseos/os/repodata/repomd.xml [Could not resolve host: cdn-ubi.redhat.com]
Error: error building at STEP "RUN assemble": error while running runtime: exit status 1

An error occured (rc=1), see output line(s) above for details.
修改Containerfile,去掉装包的操作
javascript
[student@workstation ee-motd]$ vim  context/Containerfile
.. ..
#RUN assemble
.. ..
#RUN /output/install-from-bindep && rm -rf /output/wheels
手动构建执行环境,即可成功
javascript
[student@workstation ee-motd]$ podman build -f context/Containerfile -t ee-motd-minimal:1.0 context
[1/3] STEP 1/7: FROM hub.lab.example.com/ee-minimal-rhel8:latest AS galaxy
[1/3] STEP 2/7: ARG ANSIBLE_GALAXY_CLI_COLLECTION_OPTS=
--> 57c5380fb57
.. ..
Successfully tagged localhost/ee-motd-minimal:1.0
3498fdd2478e52d6d028e072f6b27338bebc36f37bcf72f32a6a27173b5784b2
列出本地的容器镜像
javascript
[student@workstation ee-motd]$ podman images localhost/ee-motd-minimal
REPOSITORY                 TAG         IMAGE ID      CREATED        SIZE
localhost/ee-motd-minimal  1.0         f4e0af6674e7  7 seconds ago  294 MB
5)使用ansible-navigator images命令检查ee-motd-minimal容器镜像。
通过ansible-navigator命令确认自定义的执行环境已经在本地存在。指定使用1.0版本的localhost/ee-motd-minimal镜像,并使用never作为拉取策略。
javascript
[student@workstation ee-motd]$ ansible-navigator images --pp never --eei localhost/ee-motd-minimal:1.0找到ee-motd-minimal镜像并输入对应的数字(如果大于9的话,可以输入 :2,与vim编辑器中定位到指定行类似)再按Enter键。
javascript
Image                       Tag        Execution environment     ...
0|ansible-builder-rhel8       latest     False                    ...
1|ee-minimal-rhel8            latest     True                     ...
2|ee-motd-minimal 1.0 True ...输入:2,Ansible version and collections行的编号。
javascript
Image: ee-motd-minimal:1.0   Description
0|Image information          Information collected from image inspection
1|General information        OS and python version information
2|Ansible version and collections   Information about ansible and ansible ...
3|Python packages           Information about python and python packages
4|Operating system packages  Information about operating system packages
5|Everything                All image information
输出结果表明这个执行环境中包含了exercise.motd内容集合。
javascript
Image: ee-motd-minimal:1.0 (primary) (Information about ansible and ansible collections)
0│---
1│ansible:
2│  collections:
3│    details:
4│      exercise.motd: 1.0.0
5│  version:
6│ details: ansible [core 2.13.4]按Esc键回到最顶层,然后输入:3,Python packages行的编号。
javascript
Image: ee-motd-minimal:1.0 (pr...    Description
0|Image information       Information collected from image inspection
1|General information     OS and python version information
2|Ansible version and collections   Information about ansible and ansible ...
3|Python packages       Information about python and python packages
4|Operating system packages  Information about operating system packages
5|Everything             All image information
确认在已经安装的Python包列表中包含有funmotd:
javascript
Name                    Version Summary
0|ansible-compat         2.0.2  Ansible compatibiNity goodies
1|ansible-core            2.13.4 Radically simple IT automation
2|ansible-lint            6.0.2  Checks playbooks for practices and ...
3|ansible-runner         2.2.1  "Consistent Ansible Python API and
4|bcrypt                 3.2.0  Modern password hashing for your s....
5|bracex                 2.2.1  Bash styNe brace expander.
6|cffi                   1.14.3 Foreign Function Interface for Pyt ...
7|chardet                3.0.4  Universal encoding detector for Pyt...
8|commonmark              0.9.1  Python parser for the CommonMark Ma...
9|cryptography            3.3.1  cryptography is a package which pro...
10|decorator              5.0.7  Decorators for Humans
11|docutils               0.16   Docutils -- Python Documentation Ut...
12|enrich                1.2.7  enrich
13|funmotd               1.1 TV Show and Movie Quotes MOTD for...
...output omitted..
按Esc键回到最顶层,然后输入Operating system packages行的编号。
javascript
Image: ee-motd-minimal:1.0 (pr...    Description
0|Image information       Information collected from image inspection
1|General information     OS and python version information
2|Ansible version and collections   Information about ansible and ansible ...
3|Python packages Information about python and python packages
4|Operating system packages  Information about operating system packages
5|Everything   All image information
确认你通过bindep.txt文件指定的依赖包hostname已经包含在此容器镜像中(如图-8所示)。
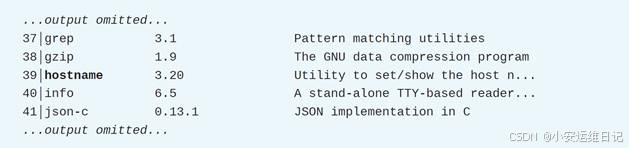
图-8
按Esc键退出ansible-navigator导航器。
结束练习(清理环境):
在workstation虚拟机上,切换到student用户主目录,使用lab命令来清理案例环境,确保先前练习的资源不会影响后续的练习。
javascript
[student@workstation ~]$ lab finish builder-custom三、 验证自定义的执行环境
1. 在本地测试自己构建的自动化执行环境
针对ansible-builder命令创建的自动化执行环境,还需要验证它是否能够正常工作。为了确保执行环境使用其内部的集合,你可以先从系统中删除本地安装的集合。使用ansible-galaxy命令可以列出已安装的集合。
javascript
[user@host ~]$ ansible-galaxy collection list

# /home/user/.ansible/collections/ansible_collections
Collection            Version
----------            ------
ansible.controller    4.2.0
community.crypto      2.7.0
community.general     5.6.0
输出结果中还会显示集合的安装位置,递归删除ansible_collections目录就可以删除本地安装的集合。
javascript
[user@host ~]$ rm -rf /home/user/.ansible/collections/ansible_collections通过测试剧本检查你的执行环境
创建一个简单的剧本来测试集合中包含的角色或模块。
javascript
[user@host ~]$ cat test_playbook.yml
---
- name: Testing a custom Ansible Content Collection
  hosts: all

  roles:
    - role: mynamespace.mycollection.my_role

  tasks:
    - name: Ensure my custom module works
      mynamespace.mycollection.my_module:
注意: 当使用自动化执行环境时,localhost指的是容器本身,而不是运行ansible-navigator命令的机器。针对在原本localhost主机上运行任务的剧本可能无法按预期工作。如果希望play或task在原本的localhost主机上运行,请在清单文件中定义你的localhost机器,并修改play和task指向localhost。
对于打算在本地以及自动化控制器上运行的剧本,可以使用hosts:all来针对所有清单主机。然后,你可以按需创建一个仅包含所需主机的清单。
使用ansible-navigator命令调用新的自动化执行环境运行测试剧本:
-
使用**--inventory(或-i)**选项指定清单文件或目录
-
使用-**-execution-environment-image(或--eei)**选项指定执行环境的容器镜像
-
如果容器镜像存在于本地,则使用**--pull-policy never(或--pp never)**选项。如果不使用这个选项,并且镜像的标签是latest,那么ansible-navigator命令将尝试从容器仓库中提取容器镜像
-
如果剧本要求提权,但没有使用"become: true",则添加**--become(或-b)**选项来启用提权
-
可选择添加**--mode stdout(或-m stdout)选**项,将剧本输出重定向到终端窗口。或者,在默认交互模式下运行剧本
javascript
[user@host ~]$ ansible-navigator run test_playbook.yml -i inventory --eei localhost/ee-demo:v2.0 --pp never -b -m stdout如果剧本运行成功,那么你就可以共享这个自动化执行环境。如果剧本没有成功,则应该解决报告的问题。
2. 提供认证凭据
Ansible要成功在受管主机上运行play,通常必须提供身份验证凭据才能登录并进行更改。
对于Linux受管主机,一种常见的解决方案是安装由remote_user指令指定的用户的SSH公钥,这个SSH公钥与自动化执行环境中的SSH私钥相匹配。
ansible-playbook命令(或带有--ee false选项的ansible-navigator)使用控制机,可以直接从~/.SSH目录中读取私钥。但是,如果使用自动化执行环境容器,则需要向容器中提供SSH私钥。
1)Controller的机器凭据
对于自动化控制器来说,可以将你的SSH私钥存储在机器凭据中(这是一种可以更新但不能从web UI读取的特殊资源)。可以在剧本的作业模板中提供机器凭据,这样的话,当自动化控制器要运行剧本时,凭证会自动传递给指定的执行环境。机器凭据也可以存储SSH用户名和密码,也可以存储用于提权的密码。
2)Navigator导航器的身份验证
ansible-navigator导航器可以从SSH代理获取SSH私钥。如果使用默认的图形GNOME桌面环境,则ssh代理在登录时会自动启动。如果是通过文本终端或ssh登录,则可以使用eval $(ssh-agent)命令来启动SSH代理。当SSH代理正在运行时,再通过ssh-add命令来添加SSH私钥到SSH代理。Navigator导航器可以将SSH代理存储的私钥提供给执行环境。
⚠️注意:默认情况下,导航器不接受交互式输入。这意味着,通常无法使用--ask-pass、--ask-become-pass或--ask-vault-pass等选项。要使ansible-navigator命令支持交互的方式输入密码,可以使用--pae-false选项,也可以编辑ansible-navigator.yml配置文件并添加以下的配置内容:
javascript
---
ansible-navigator:
  playbook-artifact:
    enable: false
另外,使用ansible-navigator命令时需要添加--mode stdout(或-m stdout)选项。
3. 将自己构建的执行环境分享到私有自动化中心
使用ansible-builder命令创建的自动化执行环境的容器镜像是在本机上,如果希望其他用户也能使用这个镜像,请将它们推送到容器仓库,如Quay.io或私有自动化中心。注意:不允许公开分发基于Red Hat提供的镜像构建的容器镜像。
以下操作将容器镜像推送到私有自动化中心(本例中,对应hub.example.com服务器)
1)列出您的本地容器图像
javascript
[user@host ~]$ podman images
REPOSITOR             TAG    IMAGE ID        CREATED        SIZE
localhost/ee-demo     v2.0   ba77b0d0a59d   2 minutes ago  308 MB
...output omitted...
2)使用podman tag命令为你的私有自动化中心标记本地容器镜像
私有自动化中心上的镜像名称与本地的镜像名称可以不一样。此外,私有自动化中心通过命名空间组织镜像,方便对镜像按团队进行分组。下面这条podman tag命令会创建相应的命名空间(如果此命名空间还不存在的话)。
javascript
[user@host ~]$ podman tag localhost/ee-demo:v2.0 \
hub.example.com/mynamespace/ee-demo:v2.0
3)使用podman login命令登录到私有自动化中心
javascript
[user@host ~]$ podman login hub.example.com4)使用podman push命令将容器镜像推送到私有自动化中心
javascript
[user@host ~]$ podman push hub.example.com/mynamespace/ee-demo:v2.04. 课堂练习:验证自定义的执行环境
开始练习(部署环境):
以用户student登入workstation虚拟机,使用lab命令来构建案例环境。
javascript
[student@workstation ~]$ lab start builder-validate异常处理:
若do374环境未配置互联网连接,则使用lab start build-validate操作时会报错。
解决办法:
忽略lab未完成的操作;改用练习2已完成的ee-motd-minimal:1.0镜像(若已清理完毕可重新构建一次)。
javascript
[student@workstation ~]$ cd  ~/builder-custom/ee-motd/
[student@workstation ee-motd]$ vim  context/Containerfile     //修改Containerfile,去掉装包的操作
.. ..
#RUN assemble
.. ..
#RUN /output/install-from-bindep && rm -rf /output/wheels

[student@workstation ee-motd]$ podman build -f context/Containerfile -t ee-motd-minimal:1.0 context     //手动构建ee-motd-minimal环境
步骤说明:
1)lab命令安装了一个测试剧本~/builder-validate/motd-test.yml,这个剧本使用exercise.motd 内容集合中的exercise.motd.banner角色,注意检查这个测试剧本以及lab提供的清单文件
进入~/builder-validate/目录:
javascript
[student@workstation ~]$ cd ~/builder-validate/检查motd-test.yml剧本内容:
javascript
[student@workstation builder-validate]$ cat motd-test.yml
---
- name: Test banner role from exercise.motd collection
  hosts: all
  collections:
    - exercise.motd
  roles:
    - name: exercise.motd.banner
这个play面向所有的清单主机,调用了exercise.motd内容集合中的banner角色。
检查 inventory 主机清单文件:
javascript
[student@workstation builder-validate]$ cat inventory
[servers]
serverc
serverd
2)检查serverc主机现有的MOTD每日消息
使用ssh命令以student用户登录到serverc:
javascript
[student@workstation builder-validate]$ ssh student@serverc
Activate the web console with: systemctl enable --now cockpit.socket

Register this system with Red Hat Insights: insights-client --register
Create an account or view all your systems at https://red.ht/insights-dashboard
其中,
-
/etc/motd.d/cockpit文件包含激活web控制台的消息
-
/etc/motd.d/insights-client文件包含Red Hat insights消息
使用logout命令返回workstation主机:
javascript
[student@serverc ~]$ logout3)运行~/builder-validate/motd-test.yml剧本
先尝试使用ansible-navigator选择的默认执行环境来运行motd-test.yml剧本,此操作会失败,因为workstation上未安装exercise.motd.banner角色。
javascript
[student@workstation builder-validate]$ ansible-navigator run motd-test.yml -m stdout
ERROR! the role 'exercise.motd.banner' was not found in exercise.motd:ansible.legacy:/home/student/builder-validate/roles:/home/
runner/.ansible/roles:/usr/share/ansible/roles:/etc/ansible/roles:/home/student/  builder-validate

The error appears to be in '/home/student/builder-validate/motd-test.yml': line 7, column 7, but may
be elsewhere in the file depending on the exact syntax problem. The offending line appears to be:
roles:
- name: exercise.motd.banner
^ here
检查本地的容器镜像:
javascript
[student@workstation builder-validate]$ podman images
REPOSITORY                   TAG        IMAGE ID       ...
localhost/ee-motd-minimal     latest     77c649cc9312   ...
...output omitted...
改用自定义的ee-motd-minimal执行环境(包含有exercise.motd集合),这个执行环境与你在前面的练习中创建的环境一样,但已由lab命令准备。注意使用以下选项来运行(如表所示),SSH连接密码为redhat。
|-------------------------------------|------------------------|
| 选项 | 用途 |
| --eei localhost/ee-motd-minimal:1.0 | 选择自定义的执行环境的容器镜像 |
| --pp never | 不要从容器仓库中下载容器镜像 |
| --pae false | 禁止创建剧本工件,这个选项也允许提示输入密码 |
| -k | 提示用户输入SSH连接密码 |
javascript
[student@workstation builder-validate]$ ansible-navigator run motd-test.yml --eei localhost/ee-motd-minimal:1.0 --pp never --pae false -k -m stdout
SSH password: redhat
PLAY [Test banner role from exercise.motd collection] ***********************************************************************************************************************************************************************************
TASK [Gathering Facts] ******************************************************************************************************************************************************************************************************************
ok: [serverd]
ok: [serverc]
TASK [exercise.motd.banner : Ensure /etc/motd.d/ exists] ********************************************************************************************************************************************************************************
ok: [serverc]
ok: [serverd]
TASK [exercise.motd.banner : Create custom motd banner] *********************************************************************************************************************************************************************************
changed: [serverd]
changed: [serverc]
PLAY RECAP ******************************************************************************************************************************************************************************************************************************
serverc                    : ok=3    changed=1    unreachable=0    failed=0    skipped=0    rescued=0    ignored=0
serverd                    : ok=3    changed=1    unreachable=0    failed=0    skipped=0    rescued=0    ignored=0
4)确认运行剧本后为serverc设置了MOTD每日消息
以用户student使用ssh连接到serverc:
javascript
[student@workstation builder-validate]$ ssh student@serverc
Activate the web console with: systemctl enable --now cockpit.socket

Register this system with Red Hat Insights: insights-client --register
Create an account or view all your systems at https://red.ht/insights-dashboard
===============================================================================
===============================================================================
==
==                   This system is managed by Ansible.                         ==
==
===============================================================================
===============================================================================
...output omitted...
可看到除了以前的web控制台和Red Hat Insights消息外,还有一条新消息表明系统由Ansible管理。这个新消息来自/etc/motd.d/banner文件。
使用logout命令返回workstation主机:
javascript
[student@serverc ~]$ logout5)将测试过的localhost/ee-motd-minimal执行环境发布到私有自动化中心
使用podman tag命令为本地镜像localhost/ee-motd-minimal添加一个标签hub.lab.example.com/ee-motd-minimal,此命令没有任何输出信息。
javascript
[student@workstation builder-validate]$ podman images
[student@workstation builder-validate]$ podman tag localhost/ee-motd-minimal:1.0  hub.lab.example.com/ee-motd-minimal
使用podman login命令登入私有自动化中心,用户名student、密码redhat23。
javascript
[student@workstation builder-validate]$ podman login hub.lab.example.com
Username: student
Password: redhat123
login Succeeded!
使用podman push推送hub.lab.example.com/ee-motd-minimal容器镜像。
javascript
[student@workstation builder-validate]$ podman push hub.lab.example.com/ee-motd-minimal
[student@workstation builder-validate]$ podman images
REPOSITORY                                 TAG         IMAGE ID      CREATED        SIZE
localhost/ee-motd-minimal                  1.0         61b4a5b265ac  6 minutes ago  294 MB
hub.lab.example.com/ee-motd-minimal        latest      61b4a5b265ac  6 minutes ago  294 MB
...从浏览器访问https://hub.lab.example.com,以用户名student、密码redhat123登入私有自动化中心的web UI界面。导航到Execution Environments > Execution Environments,在执行环境页面可以看到ee-motd-minimal容器仓库。
6)确认这个镜像可以从私有自动化中心下载,并且能正常工作
检查servere主机上现有的MOTD消息:
javascript
[student@workstation builder-validate]$ ssh student@servere
Activate the web console with: systemctl enable --now cockpit.socket

Register this system with Red Hat Insights: insights-client --register
Create an account or view all your systems at https://red.ht/insights-dashboard
使用logout命令返回workstation主机:
javascript
[student@servere ~]$ logout将servere添加到现有的主机清单中:
javascript
[student@workstation builder-validate]$ echo "servere" >> inventory再次使用ansible-navigator运行motd-test.yml剧本,注意使用以下选项(如表-2所示),SSH连接密码为redhat(如图-9所示)。
|-------------------------------------------|------------------------|
| 选项 | 用途 |
| --eei hub.lab.example.com/ee-motd-minimal | 选项执行环境的容器镜像 |
| --pp always | 总是从容器仓库下载镜像 |
| --pae false | 禁止创建剧本工件,这个选项也允许提示输入密码 |
| -k | 提示用户输入SSH连接密码 |
javascript
[student@workstation builder-validate]$ ansible-navigator run motd-test.yml --eei hub.lab.example.com/ee-motd-minimal --pp always --pae false -k -m stdout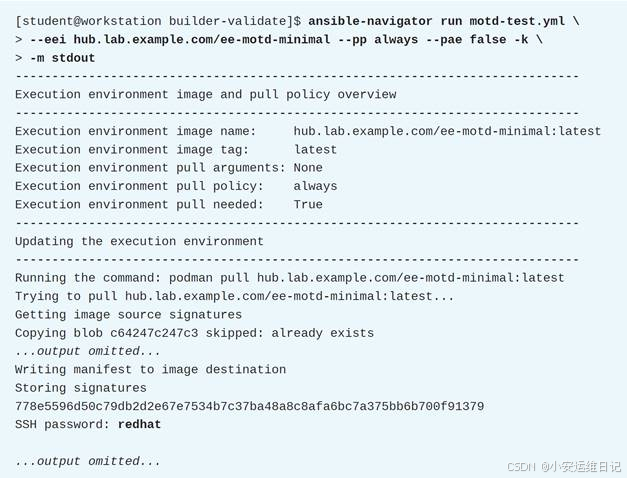
图-9
确认servere现在也启用了额外的MOTD消息:
javascript
[student@workstation builder-validate]$ ssh student@servere
Activate the web console with: systemctl enable --now cockpit.socket

Register this system with Red Hat Insights: insights-client --register
Create an account or view all your systems at https://red.ht/insights-dashboard
===============================================================================
===============================================================================
==
==                   This system is managed by Ansible.                         ==
==
===============================================================================
===============================================================================
...output omitted...
使用logout命令返回workstation主机:
javascript
[student@servere ~]$ logout结束练习(清理环境):
在workstation虚拟机上,切换到student用户主目录,使用lab命令来清理案例环境,确保先前练习的资源不会影响后续的练习。
javascript
[student@workstation ~]$ lab finish builder-validate四、 在自动化控制器上使用自己的内容集和执行环境
1. 使用自定义的内容集合
在某些情况下,你运行的剧本可能会需要一个并未包含在现有的执行环境中的内容集合,你的执行环境也许提供了集合要用到的资源(但不是集合本身)。这时,可以配置自动化控制器在运行剧本时自动将需要的集合下载到自动化执行环境中。
完成此配置,需要做两件事:
-
在你的Ansible项目中设置 collections/requirements.yml文件,指定需要的其他集合
-
为自动化控制器配置正确的 身份凭据,以便访问存有这些集合的自动化中心
1)为自动化控制器准备Ansible项目
当运行的剧本需要一个执行环境中未包含的内容集合时,就需要先手动安装集合。通常情况下,对于Ansible项目提供的collections/requirements.yml文件,可以使用ansible-galaxy collection install -r collections/requirements.yml 命令来处理。而对于自动化控制器来说,不需要手动运行这个命令。相反地,当你运行剧本时,它会自动运行以下命令来安装集合和角色:
-
ansible-galaxy collection install -r collections/requirements.yml
-
ansible-galaxy role install -r roles/requirements.yml
在Ansible项目中提供的collections/requirements.yml文件,可以指向Ansible自动化中心或私有自动化中心上的可用的集合。
例如,以下collections/requirements.yml文件列出了两个集合:Ansible自动化中心提供的redhat.insights集合,以及位于hub.example.com上的私有自动化中心提供的ansible.posix集合。
javascript
---
collections:
  - name: redhat.insights
    source: https://console.redhat.com/api/automation-hub/

  - name: ansible.posix
    source: https://hub.example.com/api/galaxy/content/rh-certified/
2)存储用来访问集合的认证凭据
Ansible自动化中心或者私有自动化中心都需要登录凭据,你需要为自动化控制器配置一个用来访问这些自动化中心以便下载必要的内容集合的认证凭据。
要完成相应的配置,可参考以下步骤。
-
a) 登录到自动化中心的web UI界面
-
b) 导航到 Resources > Credentials ,然后单击Add
-
c) 选择 Ansible Galaxy/Automation Hub API Token 凭据类型,并输入自动化中心的URL地址和你的token令牌。可以访问https://console.redhat.com/ansible/automation-hub/token来获取这些信息(如图-10所示)
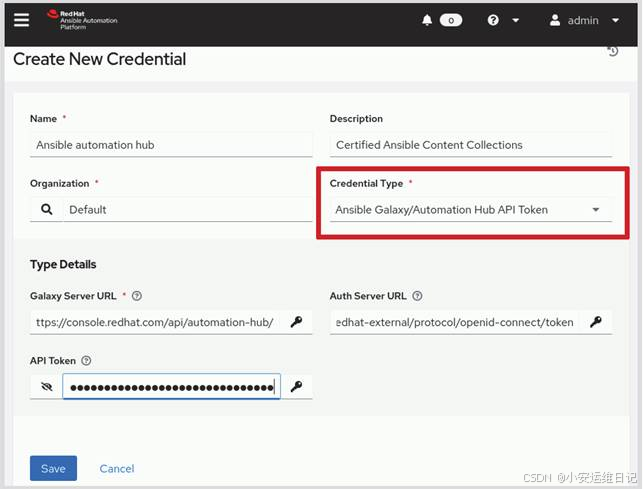
图-10
-
d) 单击Save保存
-
e) 将凭证关联到自动化控制器中需要访问自动化中心的所有组织。要执行此操作,请导航到 Access > Organizations,然后选择一个组织
-
f) 单击Edit ,然后在Galaxy Credentials字段中按搜索顺序添加凭据(如图-11所示)
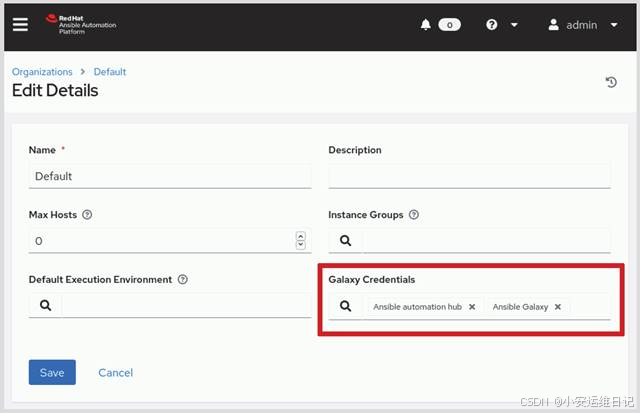
图-11
- g) 单击Save保存
2. 使用自定义的执行环境
自动化控制器使用自动化执行环境来运行剧本。默认情况下,自动化控制器已经包括Red Hat支持的自动化执行环境。当然,也可以使用自己的自动化执行环境,你可以配置自动化控制器以自动下载这些执行环境的容器镜像。
要执行此操作,请执行以下操作:
-
为自动化控制器配置一个凭据,用来访问包含执行环境的容器镜像服务器
-
为自动化控制器配置有关从哪里提取、提取哪些容器镜像,以及镜像提取频率的信息
-
(可选)为自动化控制器指定默认的执行环境,以便运行特定项目的剧本时使用
-
(可选)如果你不希望模板使用项目的默认执行环境,请指定从特定模板运行剧本时要使用的执行环境
1)存储用来访问容器镜像仓库的认证凭据
自动化控制器会自动从容器仓库服务器下载所需执行环境的容器镜像。大部分容器仓库服务器都需要身份验证才能访问,你需要为自动化控制器配置身份认证凭据。
以下步骤显示了如何创建访问容器仓库的认证凭据:
-
a) 登录到自动化控制器web UI
-
b) 导航到Resources > Credentials ,然后单击Add
-
c) 选择Container Registry凭据类型,然后输入容器仓库的URL、用户名和密码。以下屏幕截图显示了如何在hub.example.com上为私有自动化中心的容器仓库配置凭据(如图-12所示)
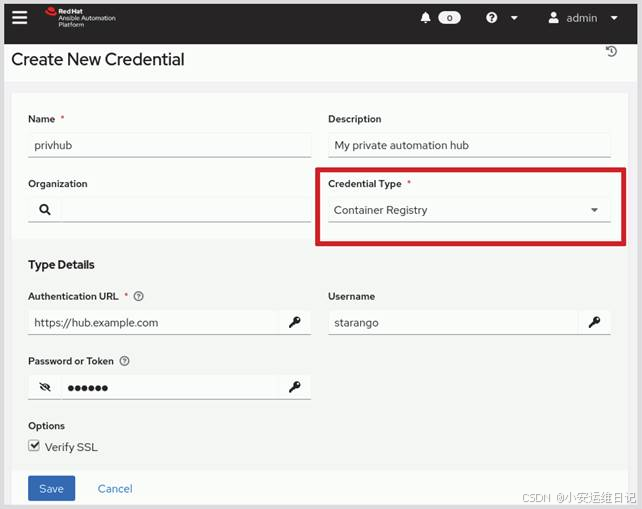
图-12
d) 单击Save保存
2)配置自动化执行环境
可以参考以下步骤配置你的自动化执行环境的镜像。
-
a) 导航到Administration > Execution Environments ,然后单击Add
-
b) 完成表单填写(如表所示)
|---------------------|-------------------------|
| 字段 | 描述 |
| Name | 指定自动化控制器上要使用的自动化执行环境的名称 |
| Image | 指定自动化执行环境的容器镜像 |
| Pull | 指定自动化控制器如何拉取容器镜像 |
| Registry credential | 选择现有的用来访问容器仓库服务器的认证凭据 |
填写结果如图-13所示。
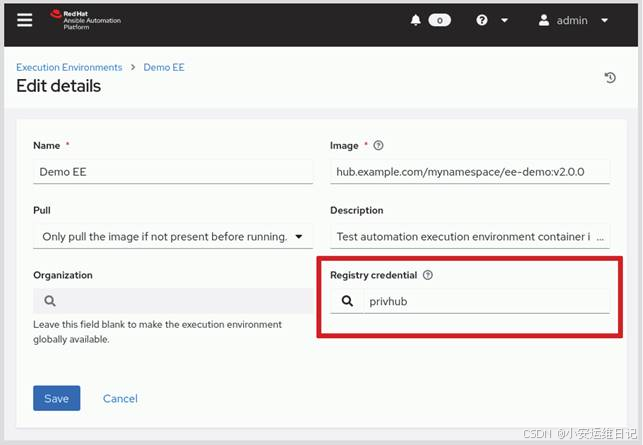
图-13
c) 单击Save保存
3)为项目指定默认的自动化执行环境
在自动化控制器中设置Ansible项目时,你可以为这个项目的剧本运行指定默认的自动化执行环境,参考如下方式。
-
a) 导航到Resources > Projects ,然后单击Add
-
b) 填写表格以配置你的项目,注意在Execution Environment字段中选择默认要使用的自动化执行环境(如图-14所示)
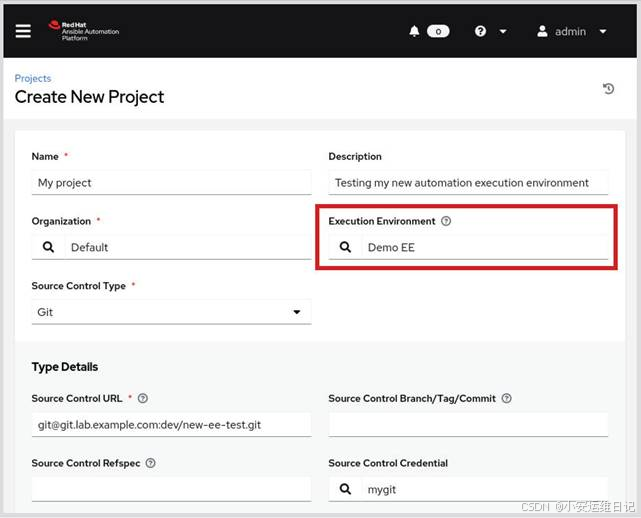
图-14
- c) 单击Save保存
4)为模板指定自动化执行环境
模板指定了自动化控制器运行剧本所需的所有参数,包括包含剧本的项目、要使用的清单以及访问其剧本中的受管节点所需的机器凭据。
当你通过作业模板来运行剧本时,还可以选择运行剧本时要使用的特定执行环境(如图-15所示)。这会覆盖由剧本所在的项目指定的默认执行环境。
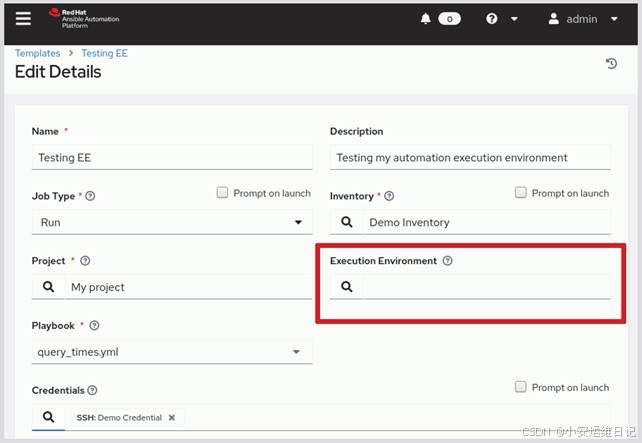
图-15
如果将Execution Environment字段留空,那么自动化控制器将使用剧本项目中指定的默认自动化执行环境。
创建模板后,单击Launch以启动作业(运行剧本)。第一次启动使用新的自动化执行环境的作业时,该作业可能比以后运行的时间更长。如果自动化执行环境的容器镜像不存在,则自动化控制器必须下载这个镜像。
3. 课堂练习:在自动化控制器上使用自己的内容集和执行环境
开始练习(部署环境):
以用户student登入workstation虚拟机,使用lab命令来构建案例环境。
javascript
[student@workstation ~]$ lab start builder-use此lab命令创建了/home/student/builder-use/,并提供以下资源。
-
Exercise Credential 机器凭据
-
Git Project Credential 源码管理凭据
-
Exercise Inventory 主机清单
此命令还为私有自动化中心的admin用户请求新的API令牌,并使用该新令牌更新相关自动化控制器的证书。
步骤说明:
1)在私有自动化中心上发布给定的Ansible内容集合
从浏览器访问https://hub.lab.example.com,用户名student、密码redhat123。
-
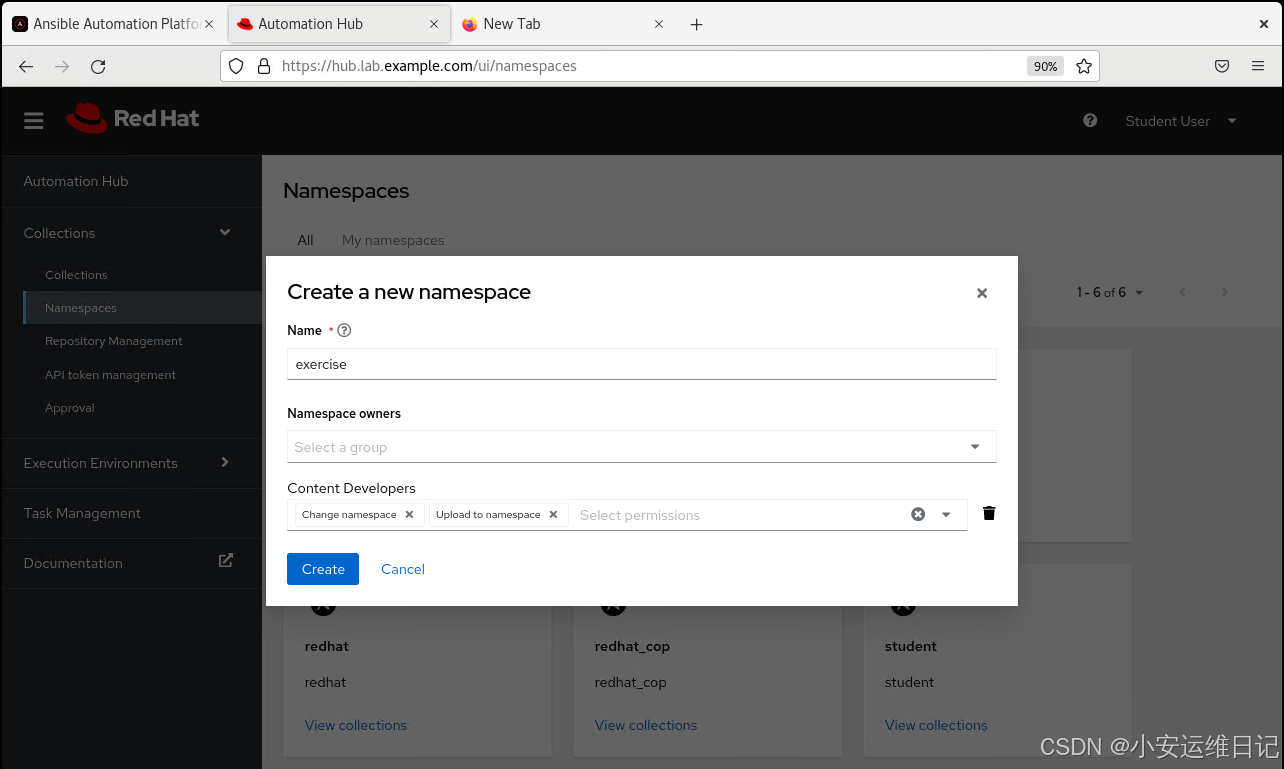
导航到 Collections > Namespaces ,然后单击Create,
-
在Create new namespace 页面,完成表单内容(如表所示),然后单击Create来创建命名空间
|------------------|--------------------|
| 字段 | 值 |
| Name | exercise |
| Namespace owners | Content Developers |
注意,Content Developers组(包括组成员如student用户)必须是命名空间的所有者,才能上传内容到命名空间。
- 单击Upload Collections ,然后再单击Select file 。在web UI界面中,浏览到**/home/student/builder-use/** 目录,选择exercise-motd-1.0.0.tar.gz文件,然后单击Upload上传。
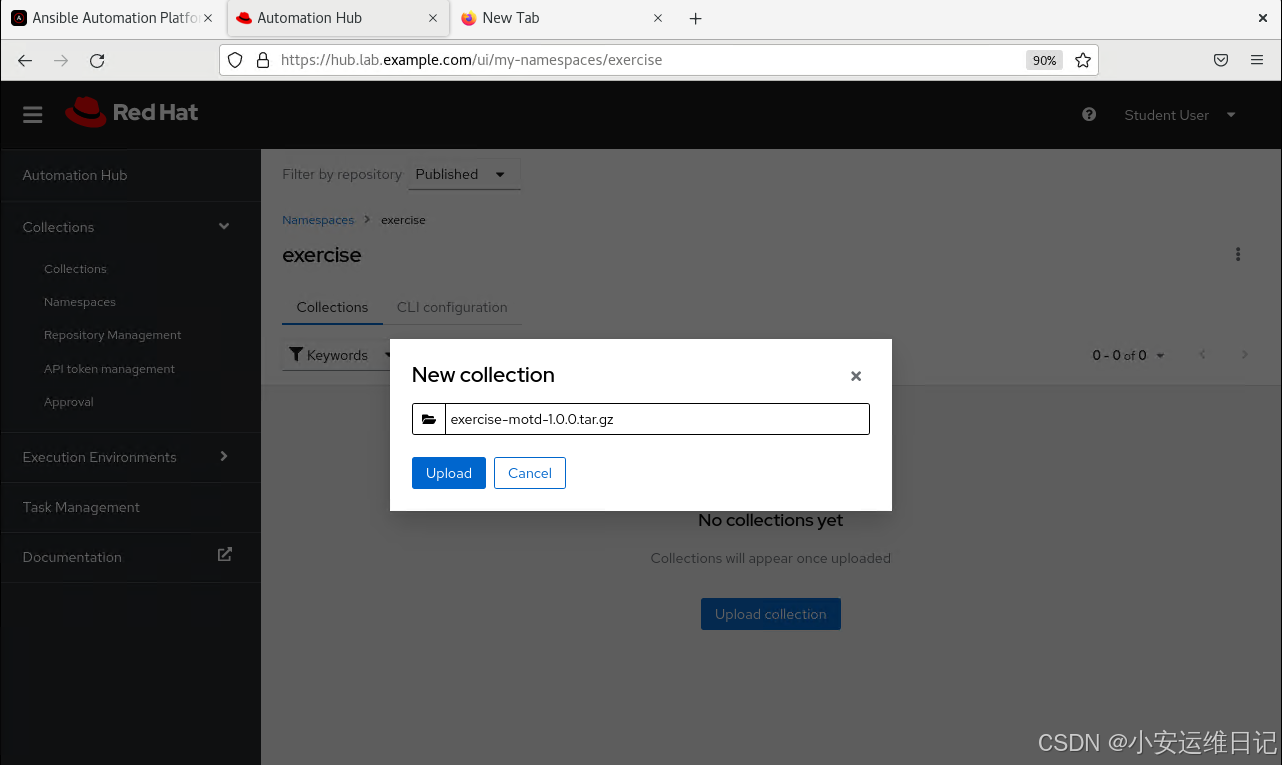
上传过程会生成以下信息:
javascript
Importing with galaxy-importer 0.4.4
Getting doc strings via ansible-doc
Finding content inside collection loading role banner
linting role banner via ansible-lint...
CHANGELOG.rst file not found at top level of collection.
Collection loading complete

Done
内容集合中可以包含一个可选的CHANGELOG.rst文件,如果提示找不到这个文件,可以直接忽略相应的提示。
-
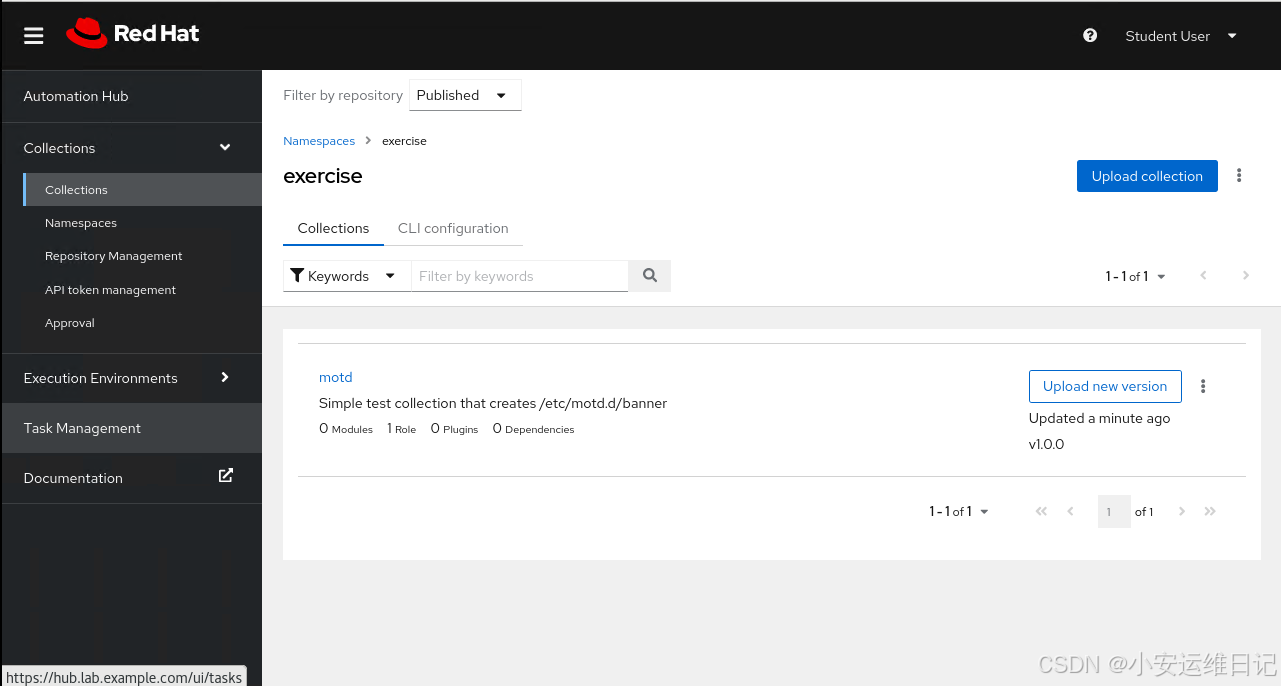
完成上传以后,导航到Collections > Approval ,然后单击Approve完成审批。
-
返回 Collections 查看已经上传好的内容集。
2)在自动化控制器的web UI中创建一个项目
访问https://controller.lab.example.com,以用户名admin、密码redhat登入。
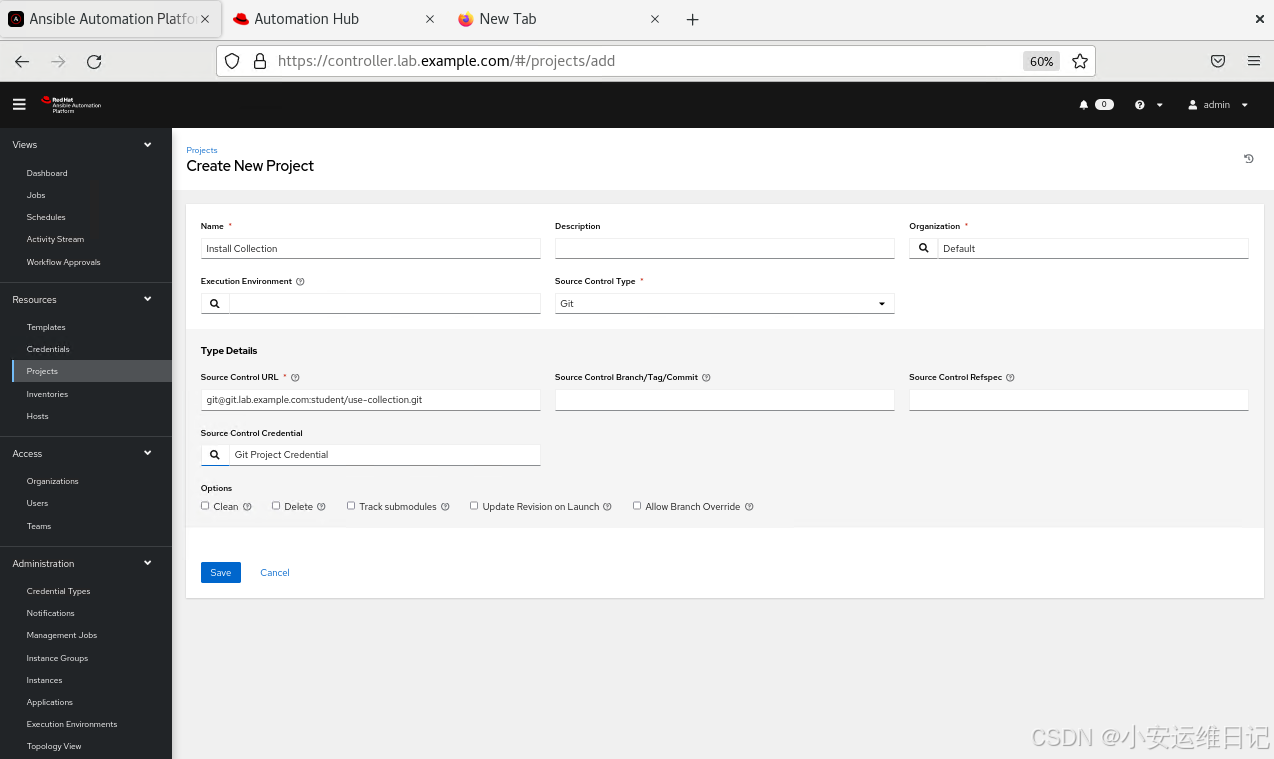
- 导航到Resources > Projects ,然后单击Add。添加一个新项目,根据需求文件来安装exercise.motd集合,参考以下信息完成填写表格(如表所示),单击Save保存。
|---------------------------|----------------------------------------------------|
| 字段 | 值 |
| Name | Install Collection |
| Organization | Default |
| Source Control Type | Git |
| Source Control URL | git@git.lab.example.com:student/use-collection.git |
| Source Control Credential | Git Project Credential |
等待同步完成。如果同步失败,请检查上述Git网址是否正确,以及上传的motd内容集合是否已成功审批,纠正后再重试。
- 在Details详情页中单击Successful来查看项目同步细节,注意作业安装了在文件collections/requirements.yml中定义的内容集合。
javascript
...output omitted...
TASK [fetch galaxy collections from collections/requirements.(yml/yaml)] *******
changed: [localhost] => (item=/var/lib/awx/projects/_8_install_collection/collections/requirements.yml)
PLAY RECAP *********************************************************************
localhost  : ok=4 changed=2 ... failed=0   skipped=2  ...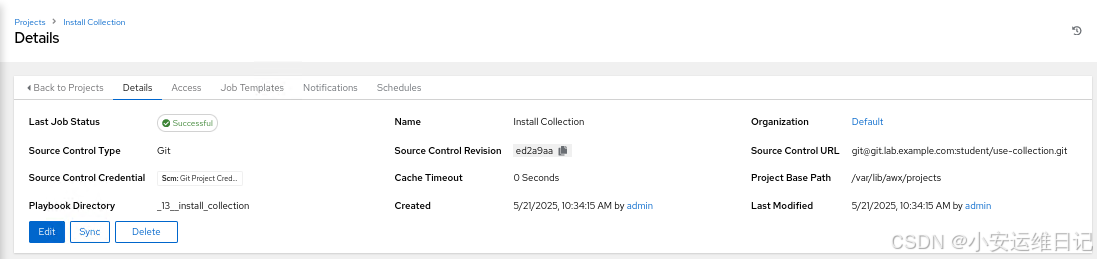
3)检查servera、serverb主机的当前的MOTD消息(默认无自定义消息)
以student用户SSH连接到servera主机:
javascript
[student@workstation ~]$ ssh student@servera
Activate the web console with: systemctl enable --now cockpit.socket

This system is not registered to Red Hat Insights. See https://cloud.redhat.com/ To register this system, run: insights-client --register
使用logout命令返回workstation主机:
javascript
[student@servera ~]$ logout以student用户SSH连接到serverb主机:
javascript
[student@workstation ~]$ ssh student@serverb
Activate the web console with: systemctl enable --now cockpit.socket

This system is not registered to Red Hat Insights. See https://cloud.redhat.com/ To register this system, run: insights-client --register
使用logout命令返回workstation主机:
javascript
[student@serverb ~]$ logout4)在Install Collection项目中新建一个作业模板,用来运行motd-test.yml剧本
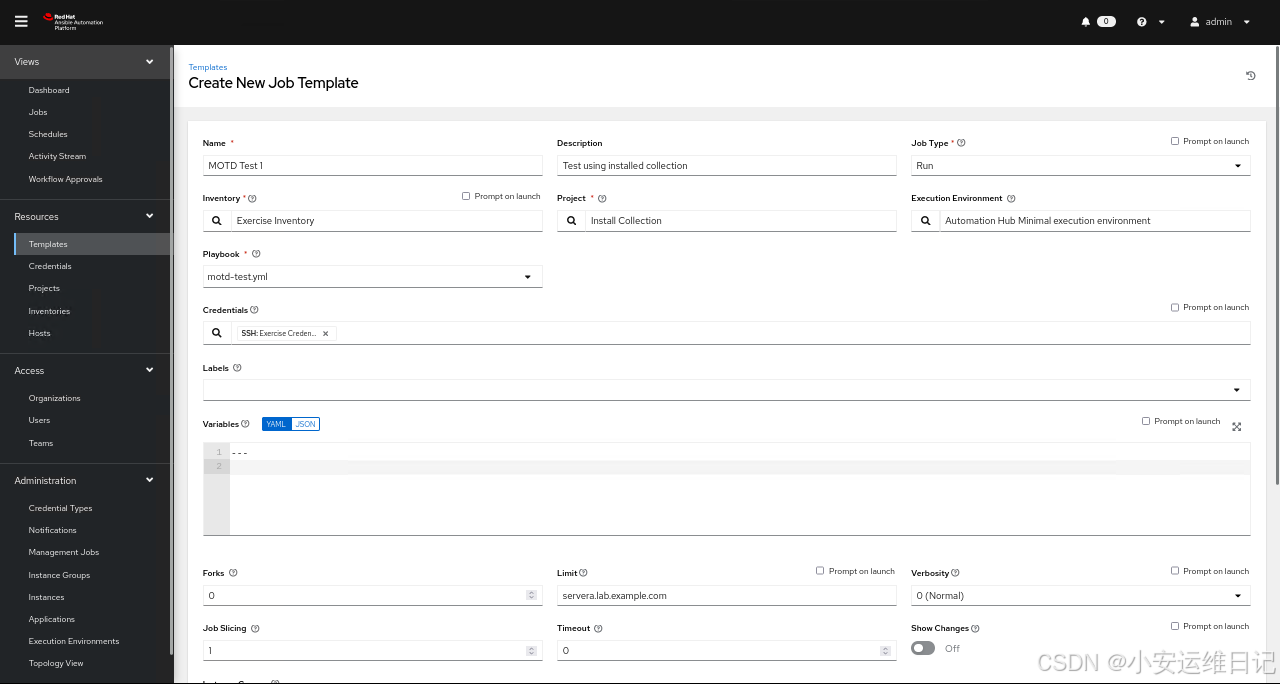
- 在自动化控制器的web UI中,导航到Resources > Templates ,单击Add > Add job template,参考下表信息新建一个作业模板(如表所示),单击Save保存。
|-----------------------|----------------------------------------------|
| 字段 | 值 |
| Name | MOTD Test 1 |
| Description | Test using installed collection |
| Inventory | Exercise Inventory |
| Project | Install Collection |
| Execution Environment | Automation Hub Minimal execution environment |
| Playbook | motd-test.yml |
| Credentials | Exercise Credential |
| Limit | servera.lab.example.com |
- 单击Launch启动MOTD Test 1作业模板,作业运行成功,输出结果表明已经对主机servera.lab.example.com做了更改。
javascript
...output omitted...
TASK [exercise.motd.banner : Create custom motd banner] ************************
changed: [servera.lab.example.com]
...output omitted...
以student用户SSH连接到servera主机,注意观察MOTD消息变化:
javascript
[student@workstation ~]$ ssh student@servera
Activate the web console with: systemctl enable --now cockpit.socket

This system is not registered to Red Hat Insights. See https://cloud.redhat.com/
To register this system, run: insights-client --register

================================================================================
================================================================================
==                                                                            ==
==                     This system is managed by Ansible.                     ==
==                                                                            ==
================================================================================
================================================================================
使用logout命令返回workstation主机:
javascript
[student@servera ~]$ logout6)使用自动化控制的web UI添加新的执行环境资源
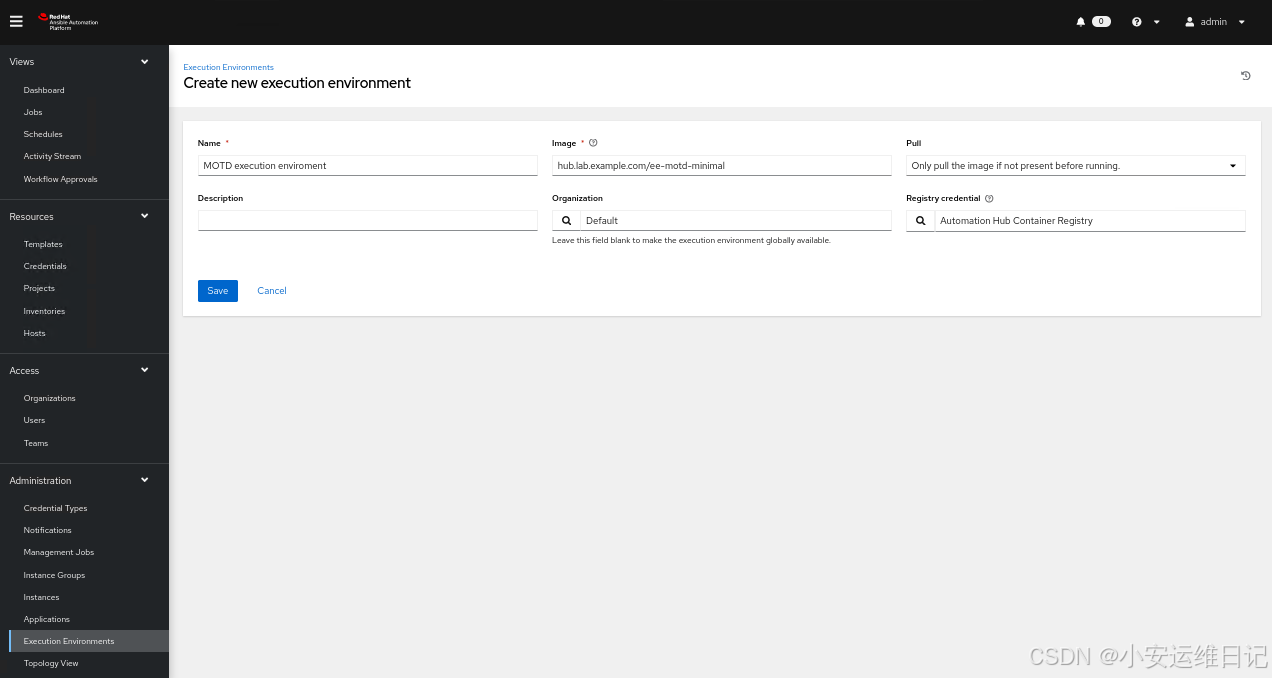
- 导航到 Administration > Execution Environments,然后单击Add,参考下表内容(如表所示)新建一个执行环境资源,单击Save保存。
|---------------------|----------------------------------------------------|
| 字段 | 值 |
| Name | MOTD execution environment |
| Image | hub.lab.example.com/ee-motd-minimal |
| Pull | Only pull the image if not present before running. |
| Organization | Default |
| Registry credential | Automation Hub Container Registry |
7)添加一个新的自动化控制器项目,使用安装到自定义的执行环境中的exercise.motd内容集合
- 导航到Resources > Project ,然后单击Add ,使用下表内容(如表所示)新建一个项目资源,然后单击Save保存。
|---------------------------|--------------------------------------------|
| 字段 | 值 |
| Name | Use Custom EE |
| Organization | Default |
| Source Control Type | Git |
| Source Control URL | git@git.lab.example.com:student/use-ee.git |
| Source Control Credential | Git Project Credential |
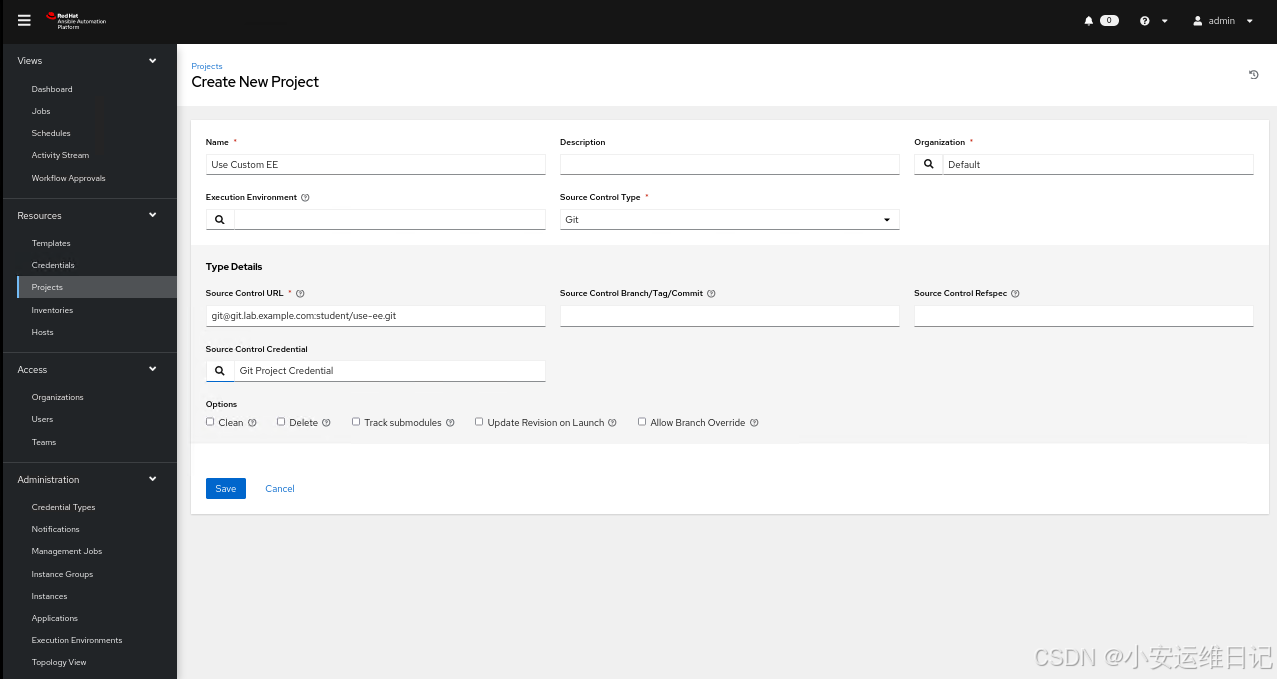
等待同步完毕。
8)在Use Custom EE项目中新建一个作业模板用来运行motd-test.yml剧本
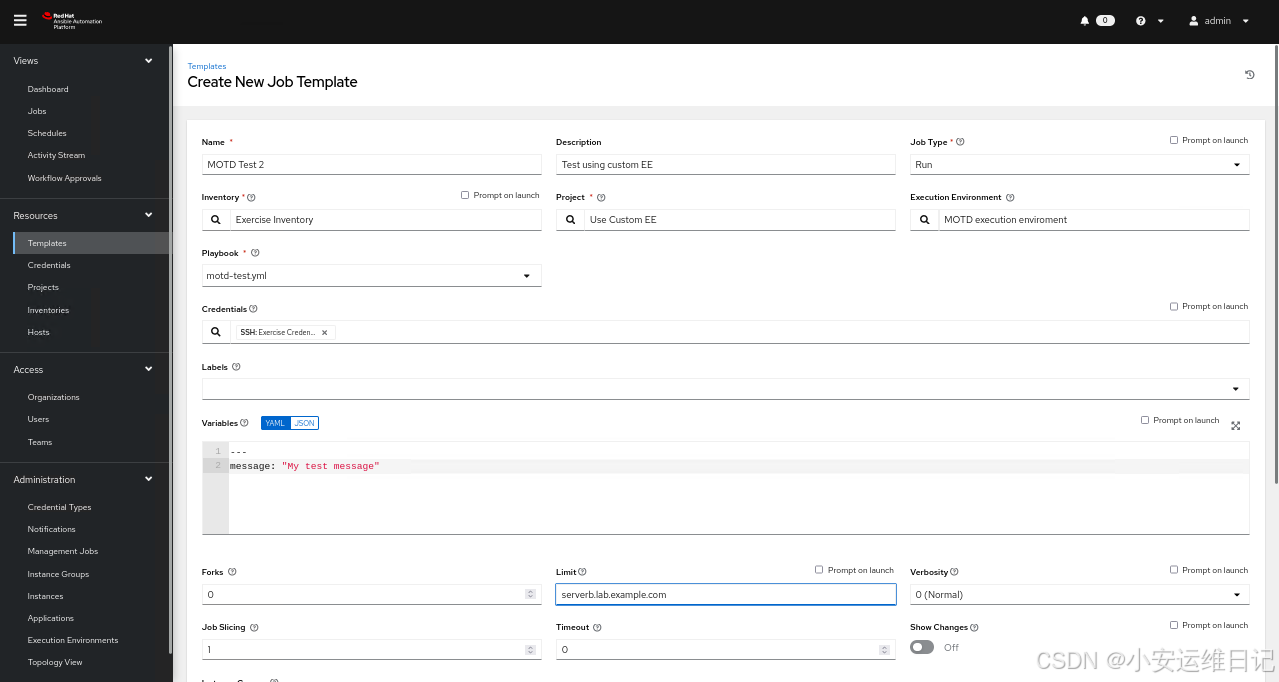
- 导航到Resources > Templates ,然后单击Add > Add job template ,参考下表内容(如表所示)新建一个作业模板,然后单击Save保存。
|-----------------------|----------------------------|
| 字段 | 值 |
| Name | MOTD Test 2 |
| Description | Test using custom EE |
| Inventory | Exercise Inventory |
| Project | Use Custom EE |
| Execution Environment | MOTD execution environment |
| Playbook | motd-test.yml |
| Credentials | Exercise Credential |
| Variables | message: "My test message" |
| Limit | serverb.lab.example.com |
这个作业模板选择特定的自动化执行环境,并且仅使用Exercise Inventory清单中的一个主机。作业模板会覆盖exercise.motd.banner角色设置的message变量的值。
单击Launch启动MOTD Test 2作业模板,作业成功,输出结果表明已经对主机serverb.lab.example.com做了更改。
javascript
...output omitted...
TASK [exercise.motd.banner : Create custom motd banner] ************************
changed: [serverb.lab.example.com]
...output omitted...
9)确认主机serverb的MOTD信息变化
以student用户SSH连接到servera主机,系统提示了在MOTD Test 2作业模板中message变量的内容:
javascript
[student@workstation ~]$ ssh student@serverb
Activate the web console with: systemctl enable --now cockpit.socket

This system is not registered to Red Hat Insights. See https://cloud.redhat.com/
To register this system, run: insights-client --register

================================================================================
================================================================================
==                                                                            ==
==                     This system is managed by Ansible.                     ==
==                                   AAP2.0                                   ==
==                                                                            ==
================================================================================
================================================================================
使用logout命令返回workstation主机:
javascript
[student@servera ~]$ logout结束练习(清理环境):
在workstation虚拟机上,切换到student用户主目录,使用lab命令来清理案例环境,确保先前练习的资源不会影响后续的练习。
javascript
[student@workstation ~]$ lab finish builder-use五、 综合实验:自建内容集和执行环境
开始实验(部署环境):
以用户student登入workstation虚拟机,使用lab命令来构建案例环境。
javascript
[student@workstation ~]$ lab start create-review
- 通过https://hub.lab.example.com访问私有自动化中心的web UI,用户名student、密码redhat123。
- 通过https://controller.lab.example.com访问自动化控制器的web UI,用户名admin、密码redhat。
解决方案,
1. 在workstation主机上的/home/student/create-review目录中,创建一个名为training.web的内容集合,包括两个角色和一个查找插件
-
这两个角色位于**/home/student/create-review/roles/**目录中。为集合创建目录结构后,必须将它们复制到集合中的正确位置。
-
firewall角色取决于ansible.posix集合(version>=1.0.0),配置集合以满足此依赖项。
-
查找插件创建PNG(便携式网络图形)格式的QR(快速响应)代码。它可以在文件/home/student/create-review/lookup.tgz中找到。
-
将这个档案提取到你的集合中的正确位置。它还需要Pillow和qrcode Python包。配置集合以指定这两个Python依赖项。
-
该集合需要Ansible 2.9.10或更高版本。
-
构建集合,然后将生成的.tar.gz文件复制到/home/student/create-review/目录中。
1)进入/home/student/create-review/目录,使用ansible-galaxy collection init命令来创建新的集合
javascript
[student@workstation ~]$ cd ~/create-review/
[student@workstation create-review]$ ansible-galaxy collection init training.web
- Collection training.web was created successfully
2)将~/create-review/roles/下的两个角色复制到~/create-review/training/web/roles/目录下
javascript
[workstation create-review]$ ls roles/
apache firewall
[student@workstation create-review]$ cp -r roles/* training/web/roles/
3)修改training/web/galaxy.yml文件,声明ansible.posix集合是新集合必须包含的
javascript
[student@workstation create-review]$ vim training/web/galaxy.yml
...output omitted...
# Collections that this collection requires to be installed for it to be usable. The key of the dict is the
# collection label 'namespace.name'. The value is a version range
# L(specifiers,https://python-semanticversion.readthedocs.io/en/latest/#requirement-specification). Multiple version
# range specifiers can be set and are separated by ','
dependencies:
  ansible.posix: '>=1.0.0'
...output omitted...
4)在~/create-review目录下,将lookup.tgz文件释放到training/web/plugins/目录
javascript
[student@workstation create-review]$ tar xf lookup.tgz -C training/web/plugins/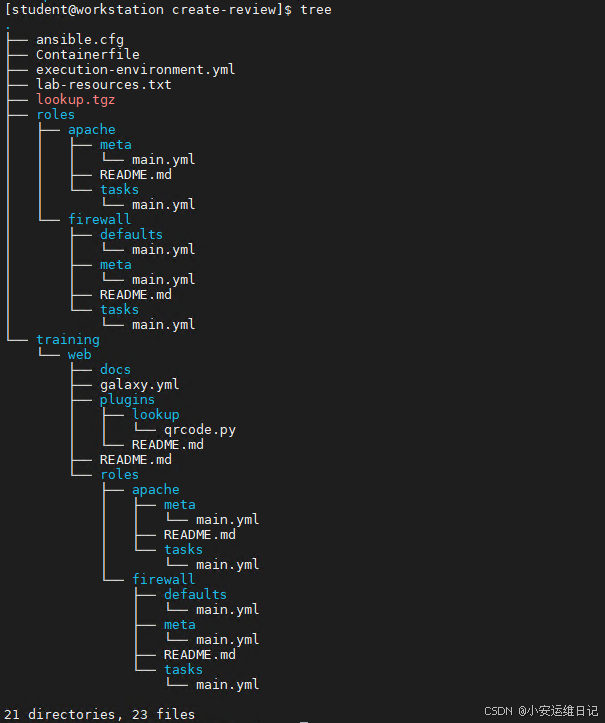
5)创建training/web/requirements.txt 文件,用来声明Python包依赖
javascript
[student@workstation create-review]$ vim training/web/requirements.txt
Pillow
qrcode
6)创建~/create-review/training/web/meta/目录
javascript
[student@workstation create-review]$ mkdir training/web/meta7)创建~/create-review/training/web/meta/runtime.yml文件
javascript
[student@workstation create-review]$ vim ~/create-review/training/web/meta/runtime.yml
---
requires_ansible: '>=2.9.10'
8)在~/create-review/training/web目录下,构建集合
javascript
[student@workstation create-review]$ cd training/web/
[student@workstation web]$ ansible-galaxy collection build
Created collection for training.web at /home/student/create-review/training/web/ training-web-1.0.0.tar.gz
9)将~/create-review/training/web目录下的结果文件training-web-1.0.0.tar.gz复制到/home/student/create-review/目录
javascript
[student@workstation web]$ cp training-web-1.0.0.tar.gz ~/create-review/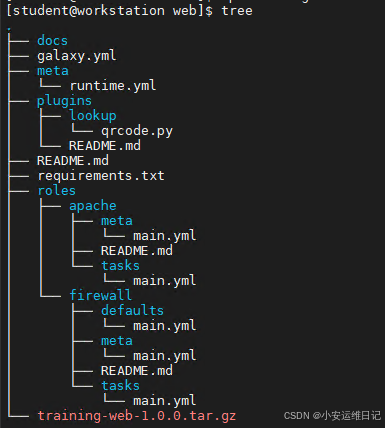
2. 将training.web集合发布到私有自动化中心
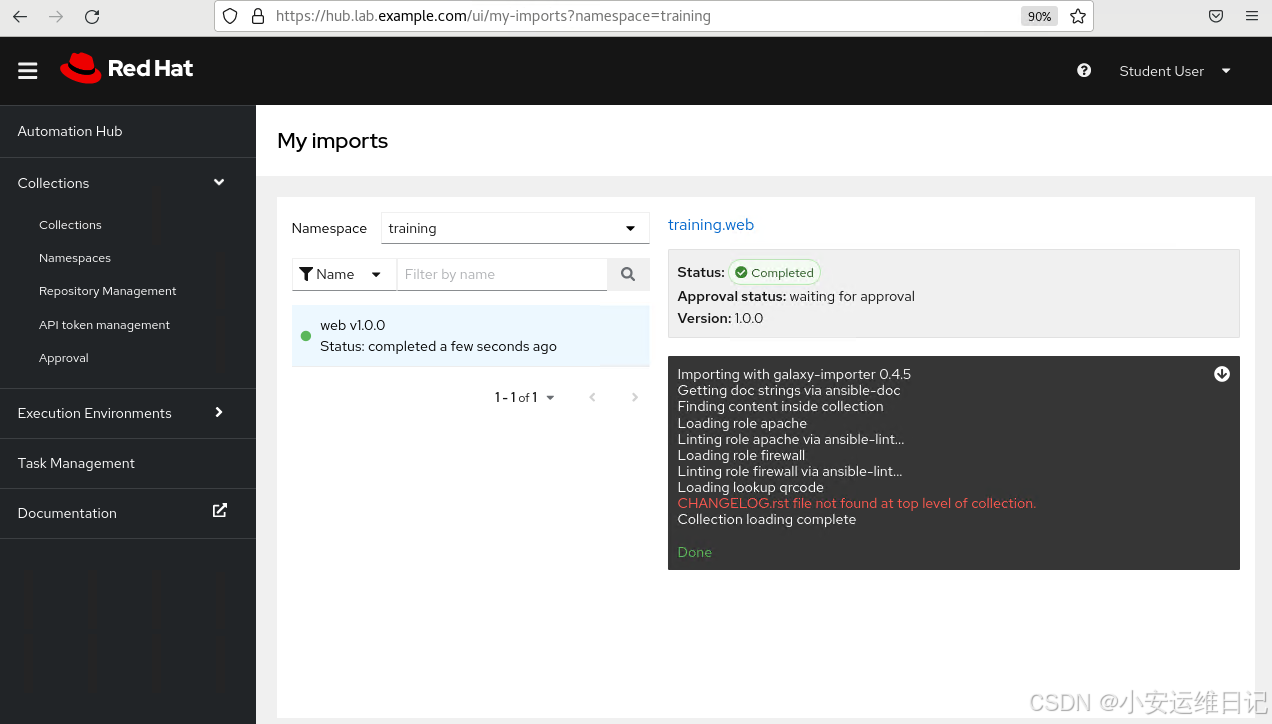
从私有自动化中心的web UI界面创建名为training的集合命名空间,并且将Content Developers组配置为集合的命名空间所有者。将training.web集合上载到该命名空间,并在上传集合后对其进行审批。
-
1)访问https://hub.lab.example.com,以用户名student、密码redhat123登入
-
2)导航到Collections > Namespaces ,然后单击Create.创建命名空间,设置参考下表(如表-所示)
|------------------|--------------------|
| 字段 | 值 |
| Name | training |
| Namespace owners | Content Developers |
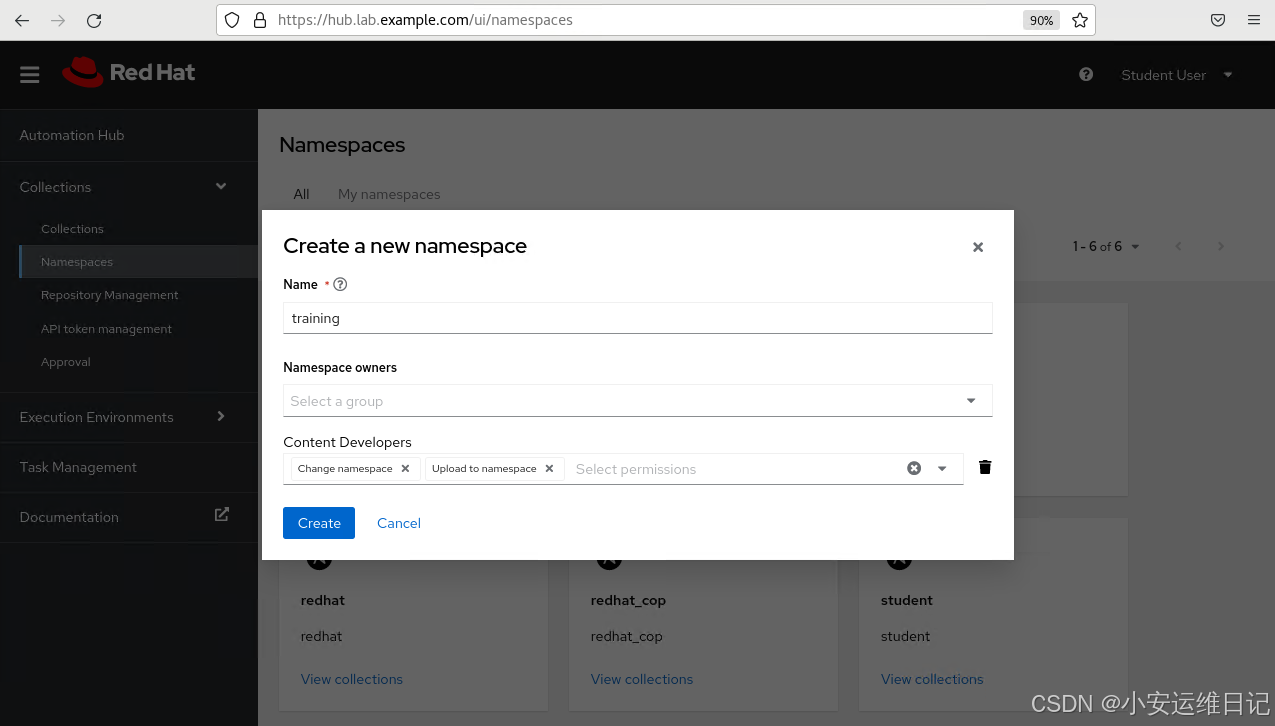
- 3)单击Upload Collections ,选择**/home/student/create-review/training-web-1.0.0.tar.gz**文件上传,等待上传完毕
-
4)导航到Collections > Approval,完成审批
-
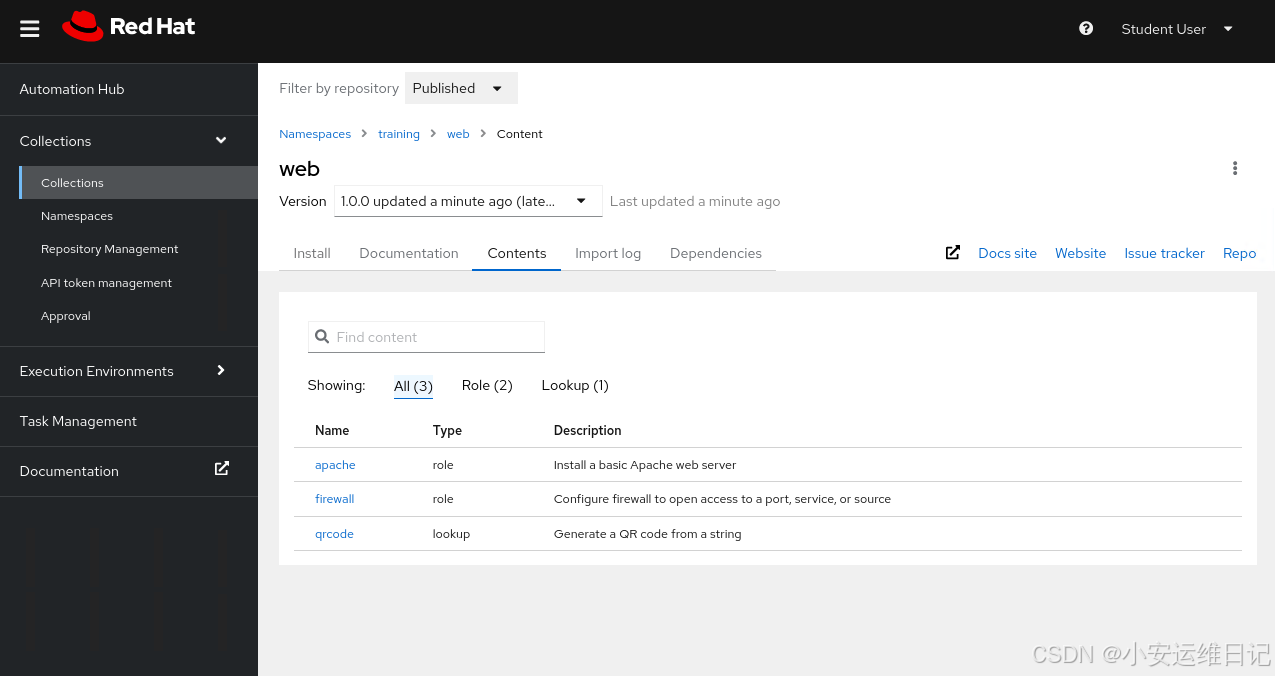
5)导航到Collections > Collections ,选择Published in Filter by repository,可以看到web集合
-
6)单击web 然后单击Contents表单,确认页面中列出了2个角色:apache和firewall,以及qrcode查找插件
3. 在workstation主机上安装ansible-builer程序包
用户student可以sudo提权运行特权命令(密码为student)
javascript
[student@workstation web]$ sudo yum install ansible-builder
[sudo] password for student: student
4. 为构建自定义的自动化执行环境准备配置文件,从而将training.web集合包含在其中
-
在workstation上,创建**~/create-review/ee-build**目录以存储配置文件
-
创建ee-build/execution-environment.yml文件以控制构建过程。可以参考示例文件(位于/home/student/create-review/目录中),注意删除不需要的参数
将hub.lab.example.com/ee-minimal-rhel8:latest容器镜像设置为基本映像
将hub.lab.example.com/ansible-builder-rhel8:latest容器镜像设置为构建器映像。
-
将~/create-review/ansible.cfg文件复制到~/create-review/ee-build/目录中。该文件配置了对https://hub.lab.example.com上的私有自动化中心的访问,以便构建过程可以检索training.web和ansible.posix集合
-
从私有自动化中心web UI获取令牌,并编辑ansible.cfg文件以更新这两个令牌参数。对两个参数使用来自私有自动化中心的相同的令牌
-
创建ee-build/requirements.yml文件,调整配置以将training.web集合安装到自动化执行环境中
1)进入~/create-review目录,创建ee-build/子目录
javascript
[student@workstation web]$ cd ~/create-review/
[student@workstation create-review]$ mkdir ee-build
2)将示例文件execution-environment.yml复制到ee-build/目录
javascript
[student@workstation create-review]$ cp execution-environment.yml ee-build/3)修改ee-build/execution-environment.yml文件
-
将EE_BASE_IMAGE参数设置为hub.lab.example.com/ee-minimal-rhel8:latest;
-
将EE_BUILDER_IMAGE参数设置为hub.lab.example.com/ansible-builder-rhel8:latest;
-
删除dependencies部分的python和system参数。
training.web集合已经提供了一份必要的Python包列表,不需要依赖其他的RPM包。
修改好的ee-build/execution-environment.yml文件应包含下列内容:
javascript
[student@workstation create-review]$ vim ee-build/execution-environment.yml
---
version: 1
build_arg_defaults:
  EE_BASE_IMAGE: hub.lab.example.com/ee-minimal-rhel8:latest
  EE_BUILDER_IMAGE: hub.lab.example.com/ansible-builder-rhel8:latest

ansible_config: ansible.cfg

dependencies:
  galaxy: requirements.yml
4)将 ~/create-review/ansible.cfg 文件复制到ee-build/目录
javascript
[student@workstation create-review]$ cp ~/create-review/ansible.cfg ee-build/5)从位于 https:// hub.lab.example.com的私有自动化中心获取API token令牌
导航到Collections > API token management,单击load token,然后单击Copy to clipboard 按钮。
修改~/create-review/ee-build/ansible.cfg文件,使用复制的令牌字串更新文件中的2个令牌行。
javascript
[student@workstation create-review]$ vim ~/create-review/ee-build/ansible.cfg
[galaxy]
server_list = published_repo, rh-certified_repo

# Published collections (for training.web)
[galaxy_server.published_repo]
url=https://hub.lab.example.com/api/galaxy/content/published/
token=b03c9561fb375395f4bb69f64551b6d49aa63c13

# Certified collections (for ansible.posix)
[galaxy_server.rh-certified_repo]
url=https://hub.lab.example.com/api/galaxy/content/rh-certified/
token=b03c9561fb375395f4bb69f64551b6d49aa63c13
6)在~/create-review/ee-build/目录下新建requirements.yml文件,列出新的执行环境中需要的training.web集合。文件ee-build/requirements.yml需要包含如下内容
javascript
[student@workstation create-review]$ vim ~/create-review/ee-build/requirements.yml
---
collections:
  - name: training.web
5. 配置容器镜像包含私有自动化中心的TLS CA证书
在~/create-review/ee-build/目录中,使用ansible-builder命令(通过执行构建过程的第一阶段)来创建ee-build/context/目录。
将实验环境的TLS CA证书(已经提供了这2个文件)添加到容器镜像中,以便构建过程能够从私有自动化中心检索集合。这些文件应按如下方式使用:
-
将~/create-review/Containerfile复制为 ~/create-review/e-build/context/Containerfile
-
将/etc/pki/tls/certs/classroom-ca.pem 复制为 ~/create-review/e-build/context/classroom-ka.pem
1)在ee-build/目录下运行ansible-builder create命令
javascript
[student@workstation create-review]$ cd ee-build
[student@workstation ee-build]$ ansible-builder create
Complete! The build context can be found at: /home/student/create-review/ee-build/ context
2)将/home/student/create-review/Containerfile 文件、/etc/pki/ tls/certs/classroom-ca.pem文件复制到context/目录
javascript
[student@workstation ee-build]$ cp ~/create-review/Containerfile context/
[student@workstation ee-build]$ cp /etc/pki/tls/certs/classroom-ca.pem context/
6. 构建自动化执行环境的容器镜像,使用 hub.lab.example.com/review/ee-training-rhel8:v1.0作为标签,将此镜像推送到hub.lab.example.com容器镜像
1)登录到hub.lab.example.com容器仓库服务器,用户名student、密码redhat123
javascript
[student@workstation ee-build]$ podman login hub.lab.example.com
Username: student
Password: redhat123
login Succeeded!
2)在ee-build/目录下运行podman build命令,添加-t选项来指定新镜像的标签为 hub.lab.example.com/review/ee-training-rhel8:v1.0
javascript
[student@workstation ee-build]$ podman build -f context/Containerfile -t hub.lab.example.com/review/ee-training-rhel8:v1.0 context
.. ..
异常处理:
若do374环境未配置连接到互联网,则使用此Containerfile文件会报错。
解决办法:
请修改Containerfile文件,去掉装包操作后再重新构建。
javascript
[student@workstation ee-build]$ vim context/Containerfile     //注释掉2行装包的操作
.. ..
#RUN assemble
.. ..
#RUN /output/install-from-bindep && rm -rf /output/wheels

[student@workstation ee-build]$ podman build -f context/Containerfile -t hub.lab.example.com/review/ee-training-rhel8:v1.0 context
.. ..
3)确认新的容器镜像在本地可用(你的镜像ID可能会不同)
javascript
[student@workstation ee-build]$ podman images
REPOSITORY                                    TAG         IMAGE ID      CREATED         SIZE
hub.lab.example.com/review/ee-training-rhel8  v1.0        aded34194fc0  5 seconds ago   295 MB
...output omitted...
4)将容器镜像推送到私有自动化中心
javascript
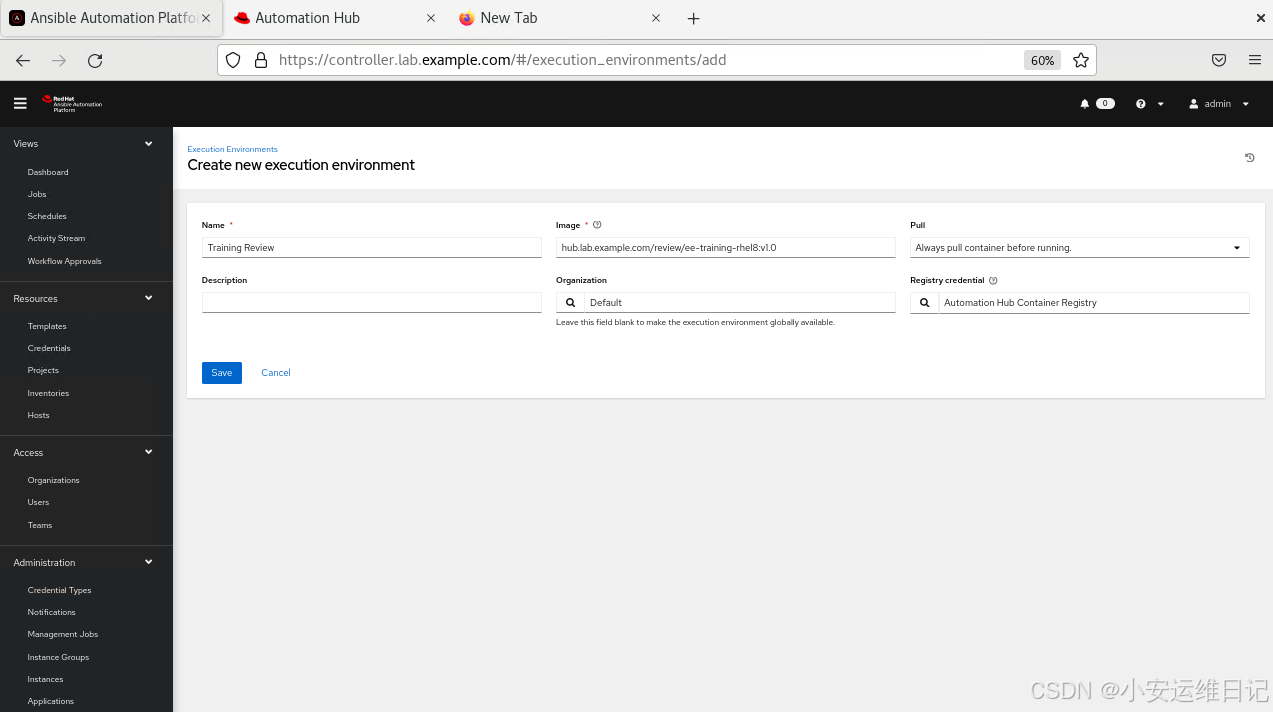
[student@workstation ee-build]$ podman push hub.lab.example.com/review/ee-training-rhel8:v1.07. 使用自动化控制器web UI创建一个执行环境资源,参考下表设置(如表所示)
|---------------------|---------------------------------------------------|
| 字段 | 值 |
| Name | Training Review |
| Image | hub.lab.example.com/review/ee-training-rhel8:v1.0 |
| Pull | Always pull the container before running. |
| Organization | Default |
| Registry credential | Automation Hub Container Registry |
-
1)登入https://controller.lab.example.com,用户名admin、密码redhat
-
2)导航到Administration > Execution Environments ,然后单击Add
-
3)根据前面表格中的信息新建自动化执行环境,完成后单击Save保存
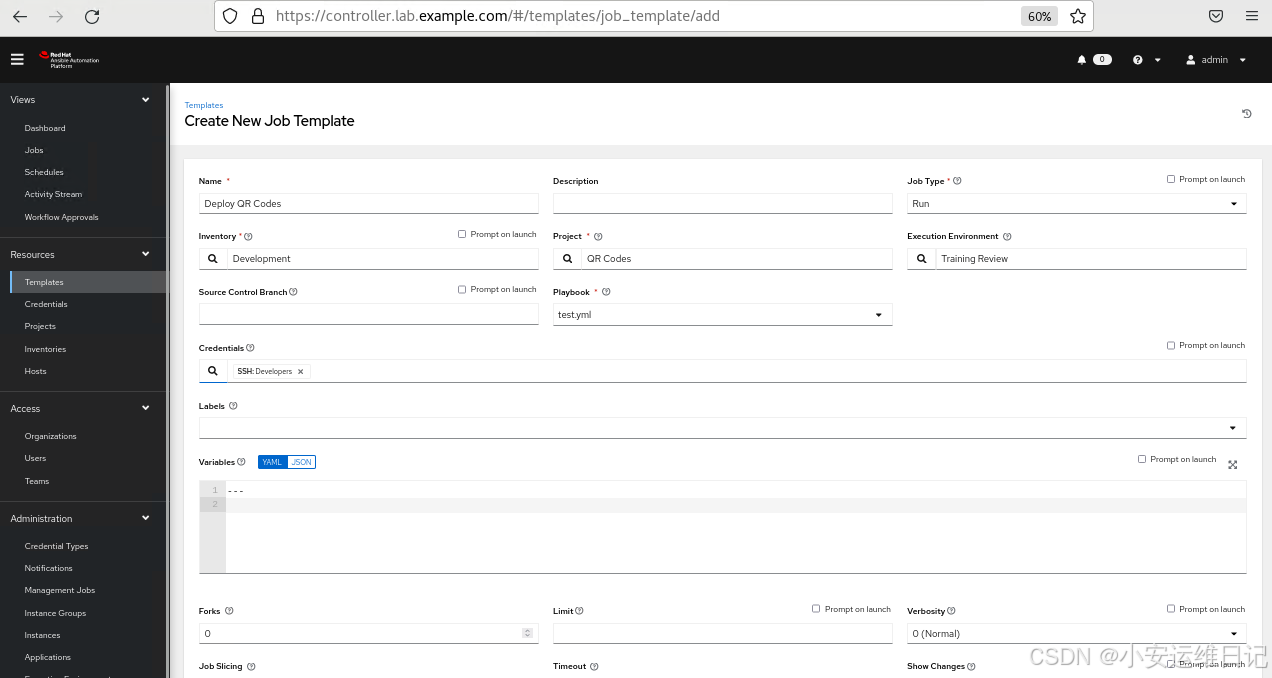
8. 新建一个自动化控制器作业模板,参考下表设置(如表所示)
|-----------------------|-----------------|
| 字段 | 值 |
| Name | Deploy QR Codes |
| Inventory | Development |
| Project | QR Codes |
| Execution environment | Training Review |
| Playbook | test.yml |
| Credentials | Developers |
注意,lab命令已经创建了Development inventory清单、QR Codes项目,以及Developers机器凭据。
1)导航到Resources > Templates,然后单击Add > Add job template
2)根据前面表格中的信息新建一个作业模板,完成后单击Save保存
9. 使用Deploy QR Codes作业模板启动一个作业,确认能够成功完成,访问http://serverf.lab.example.com会显示QR code图片
1)导航到Resources > Templates,然后单击Deploy QR Codes作业模板的Launch Template图标,等待作业完成
2)单击作业的Details标签,看到状态为Successful
3)从浏览器访问http://serverf.lab.example.com,, 确认作业已成功执行(如果作业已正确完成,web页面会显示一个QR code的图片
异常处理:
若前面已修改Containerfile文件后完成的执行环境构建(不完整),则此处验证时会报错(qrcode模块未找到)。
解决办法:
忽略。
结束实验(清理环境):
在workstation虚拟机上,切换到student用户主目录,使用lab命令来清理案例环境,确保先前练习的资源不会影响后续的练习。
javascript
[student@workstation ~]$ lab finish create-review思维导图:
小结:
本篇为 【RHCA认证 - DO374 | Day09:自定义内容集和执行环境】的学习笔记,希望这篇笔记可以让您初步了解如何编写Ansible内容集、构建及验证自定义的自动化执行环境、在自动化控制器上使用自己的内容集和执行环境、综合实验:自建内容集和执行环境等,不妨跟着我的笔记步伐亲自实践一下吧
Tip:毕竟两个人的智慧大于一个人的智慧,如果你不理解本章节的内容或需要相关环境、视频,可评论666并私信小安,请放下你的羞涩,花点时间直到你真正的理解。