OpenGL笔记二十之深度检测概念
------ 2024-08-25 晚上
bilibili赵新政老师的教程看后笔记
code review!
文章目录
1.课程PPT截图

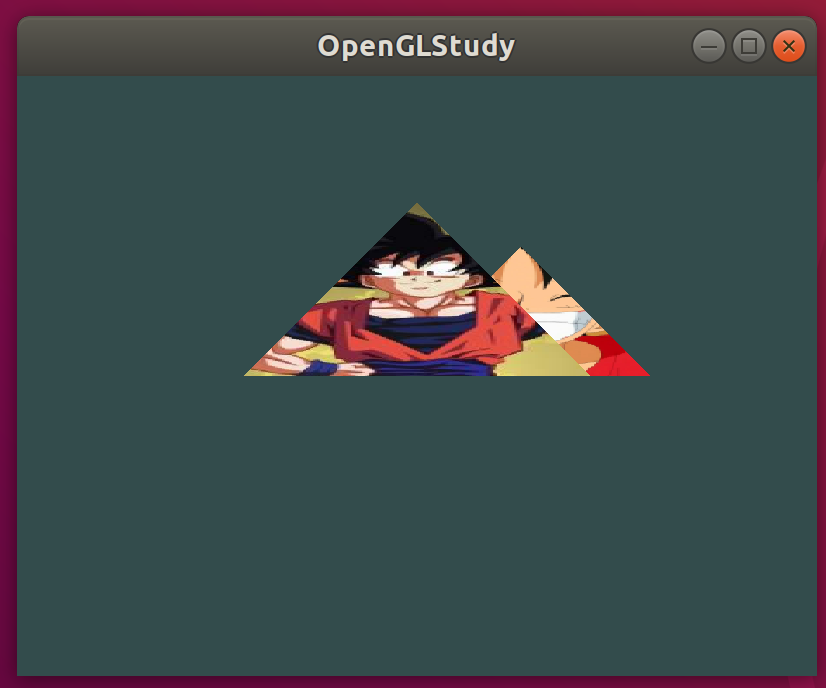
2.运行
3.代码
关键部分

main.cpp
cpp
#include <iostream>
#include "glframework/core.h"
#include "glframework/shader.h"
#include <string>
#include <assert.h>//断言
#include "wrapper/checkError.h"
#include "application/Application.h"
#include "glframework/texture.h"
/*
*┌────────────────────────────────────────────────┐
*│ 目 标: 学习使用深度测试功能
*│ 讲 师: 赵新政(Carma Zhao)
*│ 拆分目标:
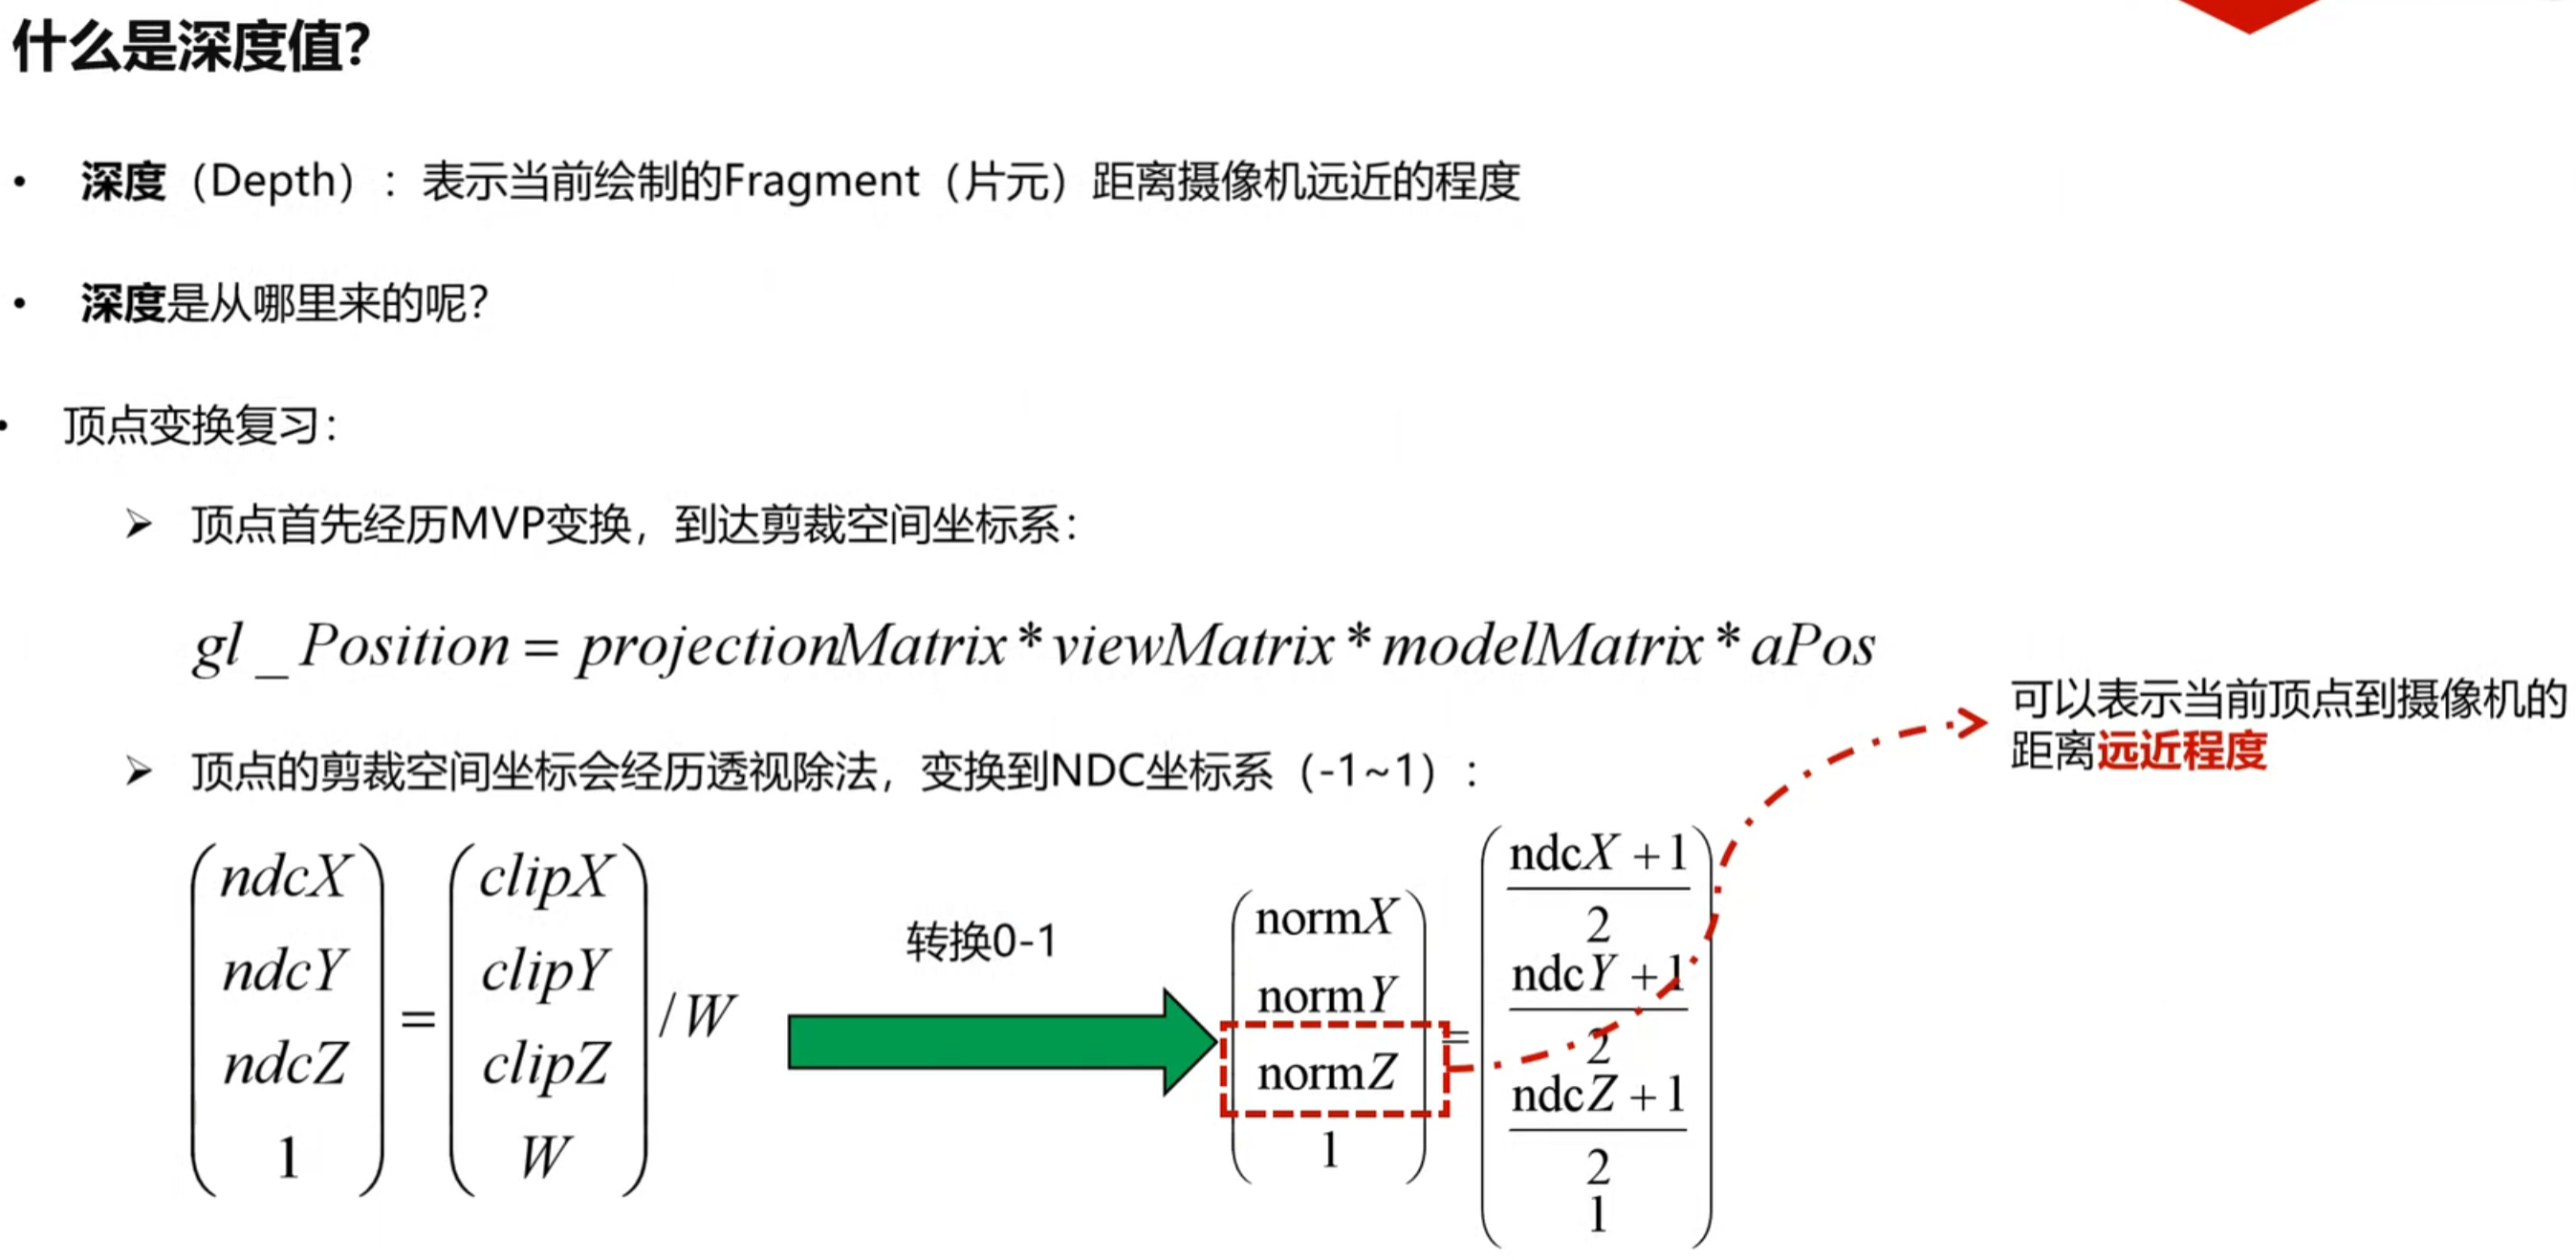
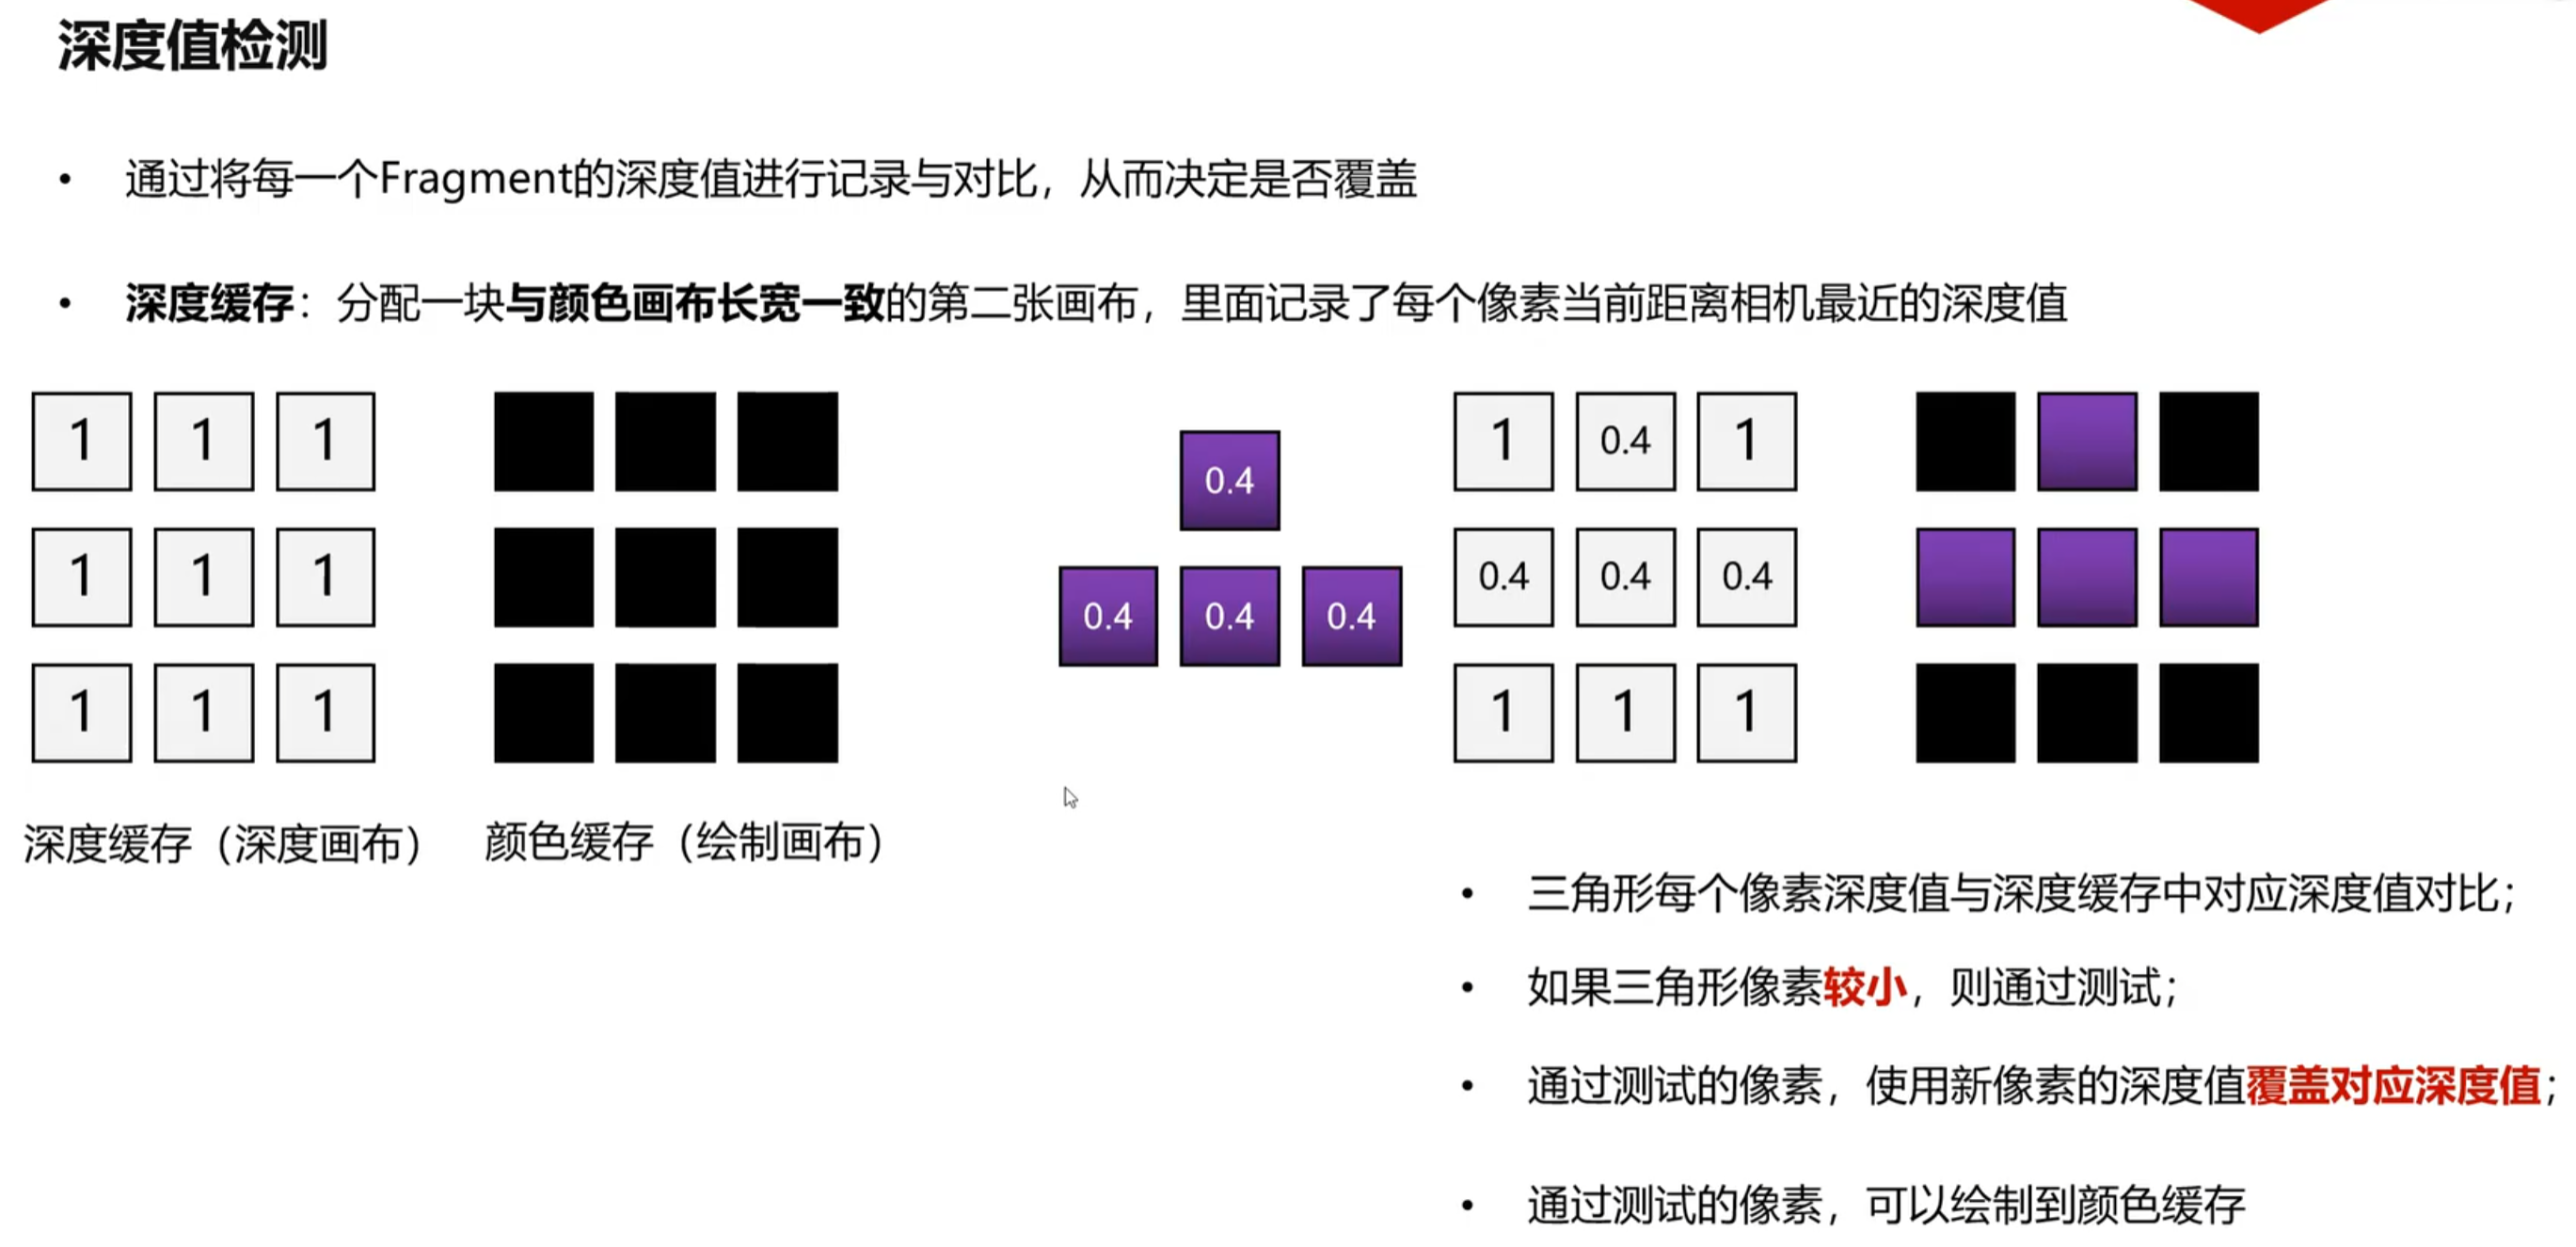
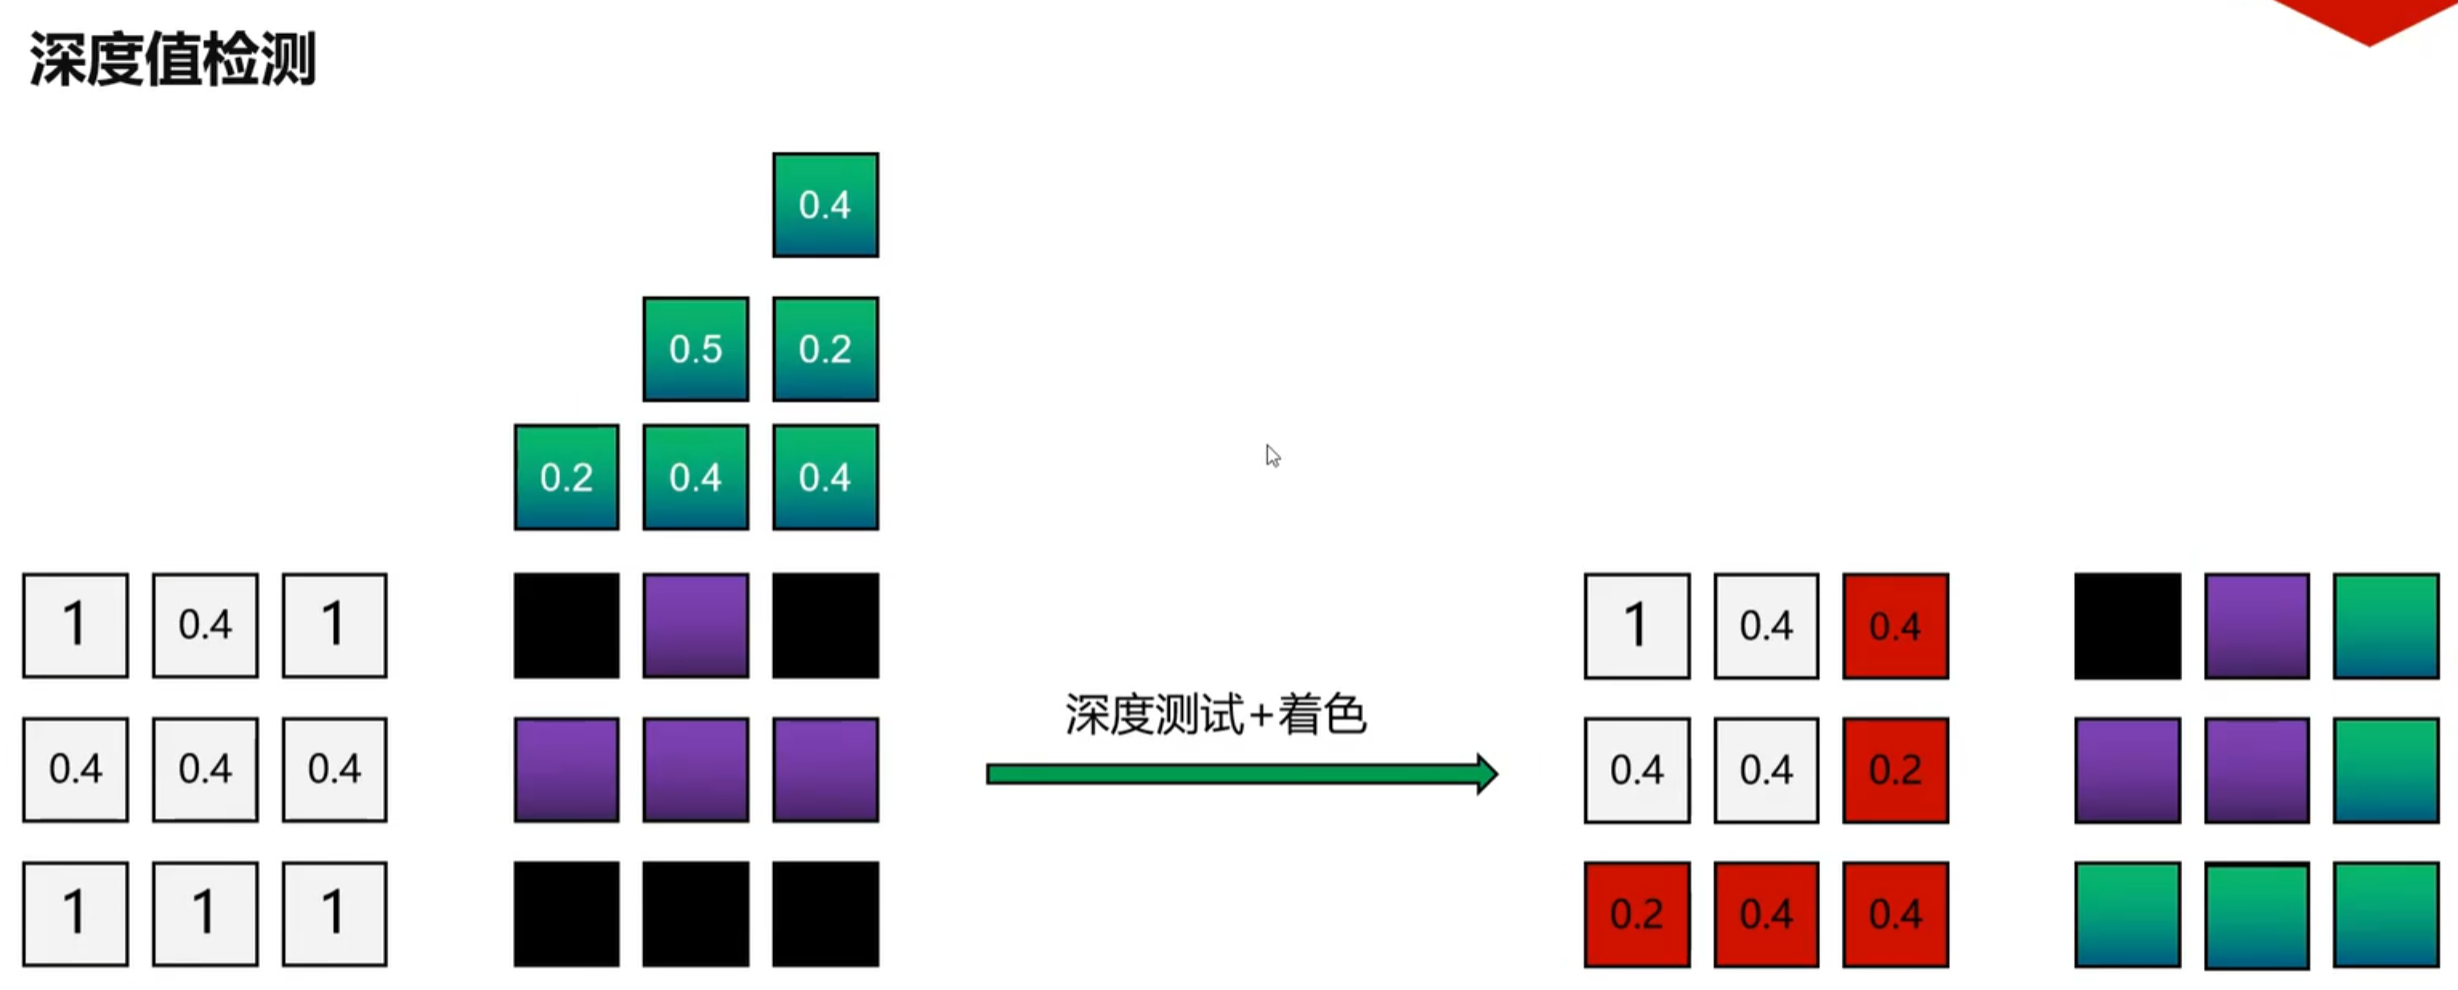
* -1 演示为什么需要深度检测
-2 演示OpenGL深度检测的使用
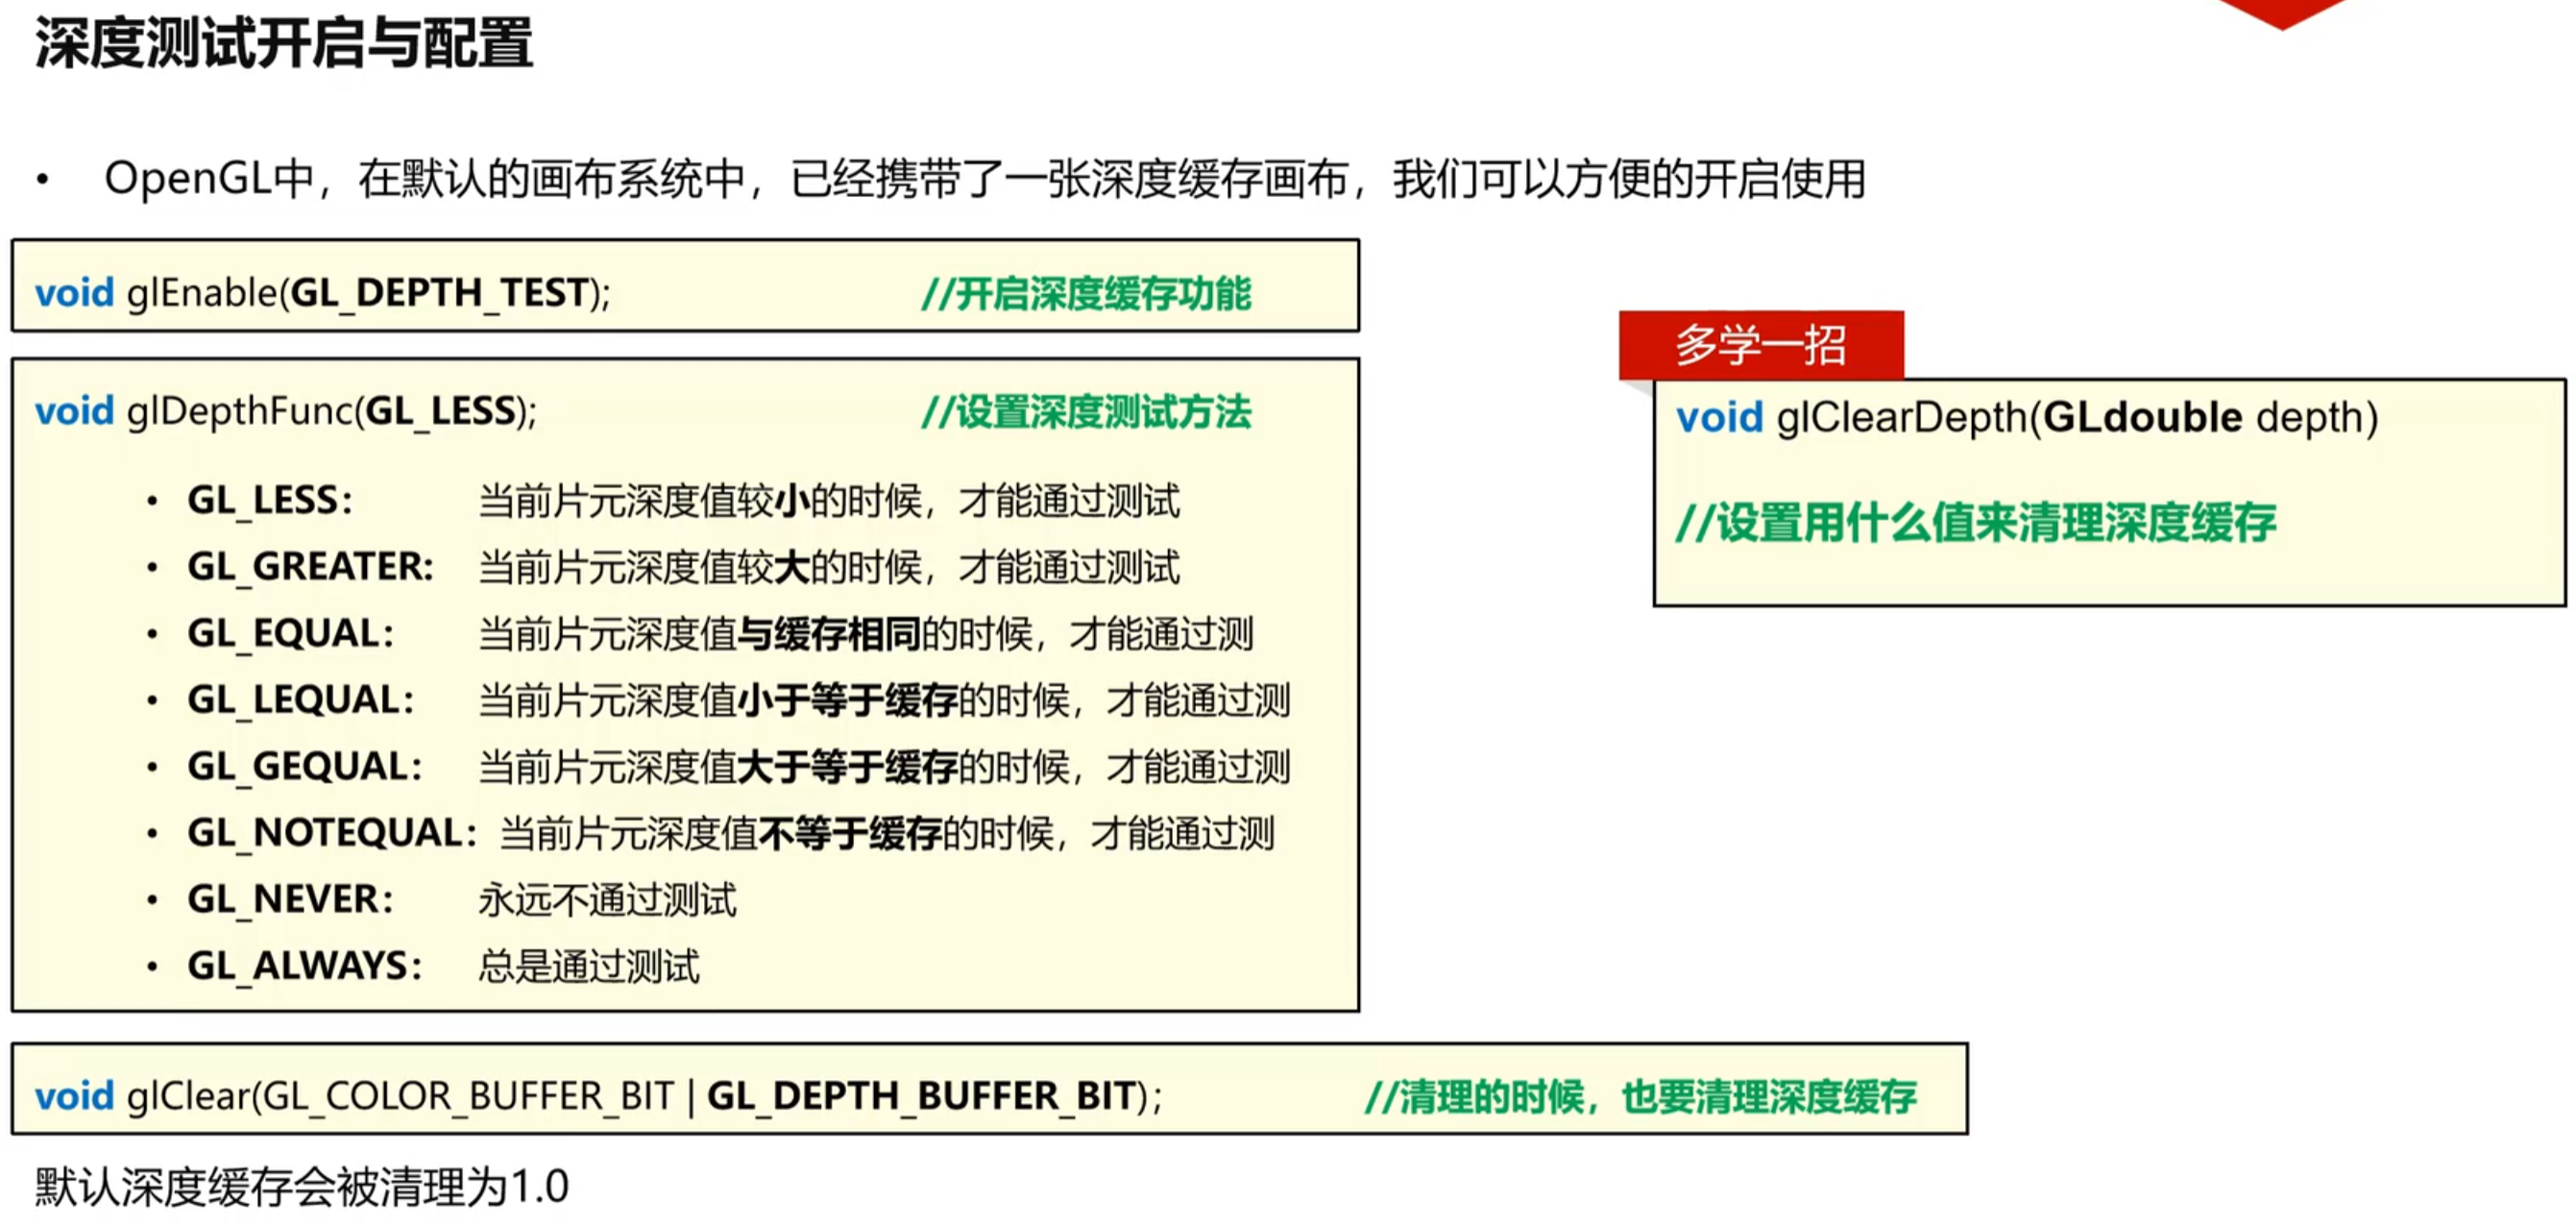
2.1 glEnable深度检测
2.2 glDepthFunc设置深度检测的算法
2.3 在glClear里面清理深度缓存的数据
*
*└────────────────────────────────────────────────┘
*/
GLuint vao;
Shader* shader = nullptr;
glm::mat4 transformGoku(1.0f);
glm::mat4 transformLuffy(1.0f);
Texture* textureGoku = nullptr;
Texture* textureLuffy = nullptr;
glm::mat4 viewMatrix(1.0f);
glm::mat4 perspectiveMatrix(1.0f);
void OnResize(int width, int height) {
GL_CALL(glViewport(0, 0, width, height));
std::cout << "OnResize" << std::endl;
}
void OnKey(int key, int action, int mods) {
std::cout << key << std::endl;
}
void prepareVAO() {
float positions[] = {
-1.0f, 0.0f, 0.0f,
1.0f, 0.0f, 0.0f,
0.0f, 1.0f, 0.0f,
};
float colors[] = {
1.0f, 0.0f,0.0f,
0.0f, 1.0f,0.0f,
0.0f, 0.0f,1.0f,
};
float uvs[] = {
0.0f, 0.0f,
1.0f, 0.0f,
0.5f, 1.0f,
};
unsigned int indices[] = {
0, 1, 2,
};
//2 VBO创建
GLuint posVbo, colorVbo, uvVbo;
glGenBuffers(1, &posVbo);
glBindBuffer(GL_ARRAY_BUFFER, posVbo);
glBufferData(GL_ARRAY_BUFFER, sizeof(positions), positions, GL_STATIC_DRAW);
glGenBuffers(1, &colorVbo);
glBindBuffer(GL_ARRAY_BUFFER, colorVbo);
glBufferData(GL_ARRAY_BUFFER, sizeof(colors), colors, GL_STATIC_DRAW);
glGenBuffers(1, &uvVbo);
glBindBuffer(GL_ARRAY_BUFFER, uvVbo);
glBufferData(GL_ARRAY_BUFFER, sizeof(uvs), uvs, GL_STATIC_DRAW);
//3 EBO创建
GLuint ebo;
glGenBuffers(1, &ebo);
glBindBuffer(GL_ELEMENT_ARRAY_BUFFER, ebo);
glBufferData(GL_ELEMENT_ARRAY_BUFFER, sizeof(indices), indices, GL_STATIC_DRAW);
//4 VAO创建
glGenVertexArrays(1, &vao);
glBindVertexArray(vao);
//5 绑定vbo ebo 加入属性描述信息
//5.1 加入位置属性描述信息
glBindBuffer(GL_ARRAY_BUFFER, posVbo);
glEnableVertexAttribArray(0);
glVertexAttribPointer(0, 3, GL_FLOAT, GL_FALSE, sizeof(float) * 3, (void*)0);
//5.2 加入颜色属性描述数据
glBindBuffer(GL_ARRAY_BUFFER, colorVbo);
glEnableVertexAttribArray(1);
glVertexAttribPointer(1, 3, GL_FLOAT, GL_FALSE, sizeof(float) * 3, (void*)0);
//5.3 加入uv属性描述数据
glBindBuffer(GL_ARRAY_BUFFER, uvVbo);
glEnableVertexAttribArray(2);
glVertexAttribPointer(2, 2, GL_FLOAT, GL_FALSE, sizeof(float) * 2, (void*)0);
//5.4 加入ebo到当前的vao
glBindBuffer(GL_ELEMENT_ARRAY_BUFFER, ebo);
glBindVertexArray(0);
}
void prepareShader() {
shader = new Shader("assets/shaders/vertex.glsl","assets/shaders/fragment.glsl");
}
void prepareTexture() {
textureGoku = new Texture("assets/textures/goku.jpg", 0);
textureLuffy = new Texture("assets/textures/luffy.jpg", 0);
}
void prepareCamera() {
//lookat:生成一个viewMatrix
//eye:当前摄像机所在的位置
//center:当前摄像机看向的那个点
//up:穹顶向量
viewMatrix = glm::lookAt(glm::vec3(0.0f,0.0f,3.0f),glm::vec3(0.0f,0.0f,0.0f),glm::vec3(0.0f,1.0f,0.0f));
}
void preparePerspective() {
//fovy:y轴方向的视张角,弧度单位
//aspect:近平面的横纵百分比
//near:近平面距离
//far:远平面距离
perspectiveMatrix = glm::perspective(glm::radians(60.0f), (float)app->getWidth() / (float)app->getHeight(), 0.1f, 1000.0f);
}
void prepareState() {
glEnable(GL_DEPTH_TEST);
glDepthFunc(GL_LESS);
// glClearDepth(0.0f);
}
void render() {
//执行opengl画布清理操作
GL_CALL(glClear(GL_COLOR_BUFFER_BIT | GL_DEPTH_BUFFER_BIT));
//绑定当前的program
shader->begin();
shader->setInt("sampler", 0);
shader->setMatrix4x4("transform", transformGoku);
shader->setMatrix4x4("viewMatrix", viewMatrix);
shader->setMatrix4x4("projectionMatrix", perspectiveMatrix);
textureGoku->bind();
//绑定当前的vao
GL_CALL(glBindVertexArray(vao));
//第一次绘制
GL_CALL(glDrawElements(GL_TRIANGLES, 3, GL_UNSIGNED_INT, 0));
//第二次绘制
textureLuffy->bind();
transformLuffy = glm::translate(glm::mat4(1.0f), glm::vec3(0.8f, 0.0f, -1.0f));
shader->setMatrix4x4("transform", transformLuffy);
GL_CALL(glDrawElements(GL_TRIANGLES, 3, GL_UNSIGNED_INT, 0));
GL_CALL(glBindVertexArray(0));
shader->end();
}
int main() {
if (!app->init(800, 600)) {
return -1;
}
app->setResizeCallback(OnResize);
app->setKeyBoardCallback(OnKey);
//设置opengl视口以及清理颜色
GL_CALL(glViewport(0, 0, 800, 600));
GL_CALL(glClearColor(0.2f, 0.3f, 0.3f, 1.0f));
prepareShader();
prepareVAO();
prepareTexture();
prepareCamera();
preparePerspective();
prepareState();
while (app->update()) {
render();
}
app->destroy();
return 0;
}