《博主简介》
小伙伴们好,我是阿旭。专注于人工智能、AIGC、python、计算机视觉相关分享研究。
✌更多学习资源,可关注公-仲-hao:【阿旭算法与机器学习】,共同学习交流~
👍感谢小伙伴们点赞、关注!
《------往期经典推荐------》
二、机器学习实战专栏【链接】 ,已更新31期,欢迎关注,持续更新中~~
三、深度学习【Pytorch】专栏【链接】
四、【Stable Diffusion绘画系列】专栏【链接】
五、YOLOv8改进专栏【链接】,持续更新中~~
六、YOLO性能对比专栏【链接】,持续更新中~
《------正文------》
目录
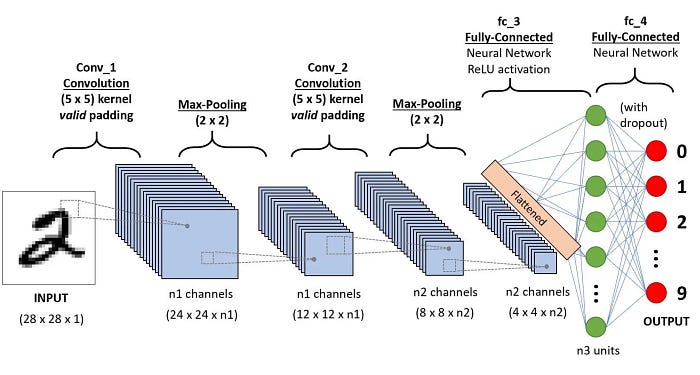
本文将分布详细介绍,如何使用PyTorch构建和训练一个简单的卷积神经网络(CNN),非常适合新手练手。我们将使用MNIST数据集(手写体数字数据集)来训练我们的模型。本指南假设你有一些Python和神经网络的基础知识,但不需要有PyTorch的经验。
步骤1:导入所需的库
首先,我们需要导入必要的库。PyTorch是我们用于构建和训练神经网络的主要库。我们还将使用torchvision来处理数据集和转换。
python
import torch
import torch.nn.functional as F
import torchvision.datasets as datasets
import torchvision.transforms as transforms
from torch import optim
from torch import nn
from torch.utils.data import DataLoader
from tqdm import tqdm
步骤2:定义卷积神经网络架构
我们将创建一个简单的CNN,它有两个卷积层,后面是一个完全连接的层。CNN特别适合图像数据,因为它们会自动捕获图像中的空间层次结构,例如边缘,纹理和更复杂的模式。
卷积层
卷积层是CNN的构建块。它们由几个关键组成部分组成:
过滤器(内核)-kernal:
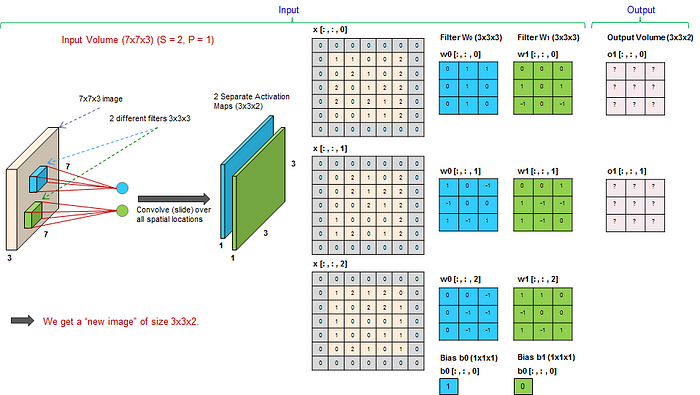
- 滤波器是在输入图像上滑动并执行逐元素乘法然后求和的小矩阵。每个滤波器被设计为检测输入图像中的特定特征。
- 例如,过滤器可以检测水平边缘、垂直边缘或更复杂的纹理。
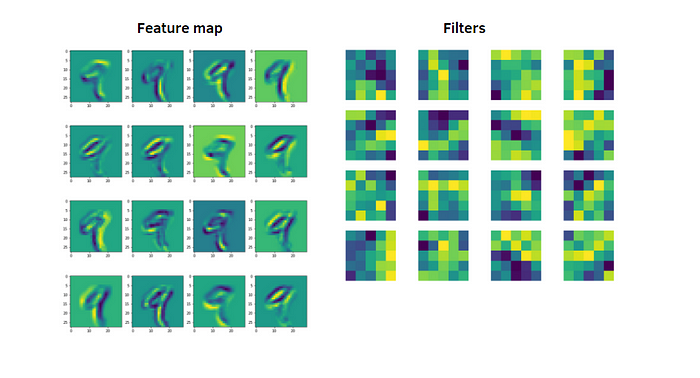
- 将滤波器应用于输入图像的输出称为特征图或激活图。如果你有多个过滤器,你会得到多个特征图。
步幅-stride:
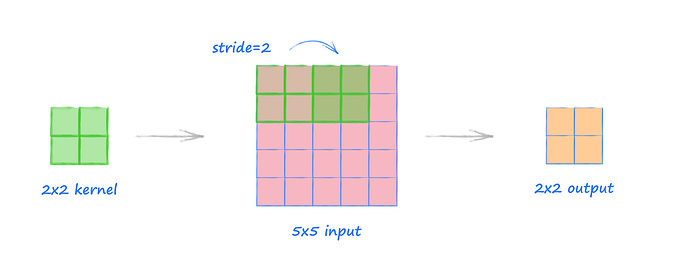
- 步幅是滤波器在输入图像上移动的步长。
- 步幅为1意味着过滤器一次移动一个像素,包括水平和垂直方向。
- 较大的步幅会减小特征图的大小,因为过滤器会跳过更多的像素。例如,步幅为2意味着过滤器一次移动两个像素,有效地对特征图进行下采样。
填充-padding:
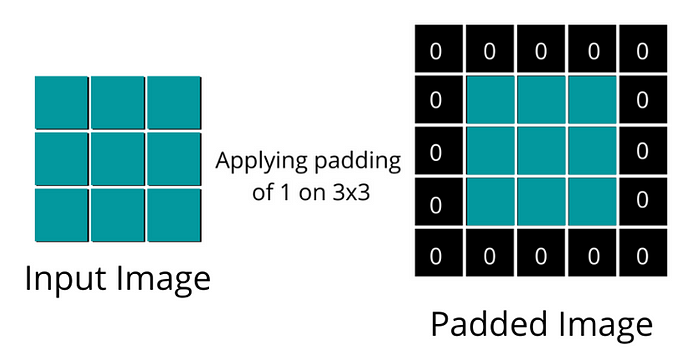
- 填充涉及在输入图像的边界周围添加额外的像素。这些额外的像素通常设置为零(零填充)。
- 填充可确保滤镜正确地覆盖图像,尤其是在边缘处。如果没有填充,特征图的大小在每次卷积操作后都会减小。
- 例如,如果您有一个5x5的输入图像和一个没有填充的3x3过滤器,则生成的特征图将是3x3。当padding为1时,特征图保持与输入相同的大小。
特征图:
- 特征图是在对输入图像应用滤波器之后卷积层的输出。
- 每个特征映射对应于不同的过滤器,并从输入中捕获不同的特征。
- 将多个特征图堆叠在一起形成多通道输出,该输出用作下一层的输入。
池化层
池化层减少了特征图的空间维度,这有助于提高网络的计算效率并减少过拟合。有两种主要类型的池:
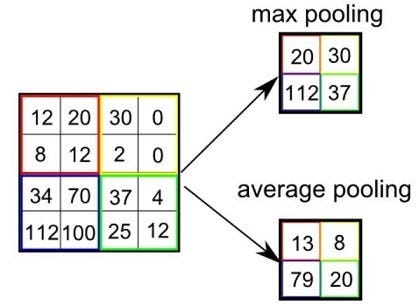
- 最大池化:
- 最大池化从特征图的每个补丁中获取最大值。
- 例如,在2x2最大池化操作中,取特征图的每个2x2块的最大值来创建新的较小特征图。
- 此操作会将特征图的大小在水平和垂直方向上减少一半,但保留最突出的特征。
- 平均合并:
- 平均池取特征图每个补丁的平均值。
- 类似于最大池,但不是最大值,而是每个块的平均值。
- 这在不同的上下文中可能很有用,尽管最大池在实践中更常见。
以下是我们如何定义我们的CNN:
python
class CNN(nn.Module):
    def __init__(self, in_channels, num_classes=10):
        """
        Define the layers of the convolutional neural network.

        Parameters:
            in_channels: int
                The number of channels in the input image. For MNIST, this is 1 (grayscale images).
            num_classes: int
                The number of classes we want to predict, in our case 10 (digits 0 to 9).
        """
        super(CNN, self).__init__()

        # First convolutional layer: 1 input channel, 8 output channels, 3x3 kernel, stride 1, padding 1
        self.conv1 = nn.Conv2d(in_channels=in_channels, out_channels=8, kernel_size=3, stride=1, padding=1)
        # Max pooling layer: 2x2 window, stride 2
        self.pool = nn.MaxPool2d(kernel_size=2, stride=2)
        # Second convolutional layer: 8 input channels, 16 output channels, 3x3 kernel, stride 1, padding 1
        self.conv2 = nn.Conv2d(in_channels=8, out_channels=16, kernel_size=3, stride=1, padding=1)
        # Fully connected layer: 16*7*7 input features (after two 2x2 poolings), 10 output features (num_classes)
        self.fc1 = nn.Linear(16 * 7 * 7, num_classes)

    def forward(self, x):
        """
        Define the forward pass of the neural network.

        Parameters:
            x: torch.Tensor
                The input tensor.

        Returns:
            torch.Tensor
                The output tensor after passing through the network.
        """
        x = F.relu(self.conv1(x))  # Apply first convolution and ReLU activation
        x = self.pool(x)           # Apply max pooling
        x = F.relu(self.conv2(x))  # Apply second convolution and ReLU activation
        x = self.pool(x)           # Apply max pooling
        x = x.reshape(x.shape[0], -1)  # Flatten the tensor
        x = self.fc1(x)            # Apply fully connected layer
        return x
步骤3:硬件设置
PyTorch可以在CPU和GPU上运行。我们将设备设置为使用GPU(如果可用);否则,我们将使用CPU。
python
device = "cuda" if torch.cuda.is_available() else "cpu"步骤4:定义超参数
超参数是用于调整模型训练方式的配置设置。
python
input_size = 784  # 28x28 pixels (not directly used in CNN)
num_classes = 10  # digits 0-9
learning_rate = 0.001
batch_size = 64
num_epochs = 10  # Reduced for demonstration purposes
第5步:加载数据
我们将使用torchvision.datasets模块下载并加载MNIST数据集。我们还将使用DataLoader来处理批处理和洗牌。
python
train_dataset = datasets.MNIST(root="dataset/", download=True, train=True, transform=transforms.ToTensor())
train_loader = DataLoader(dataset=train_dataset, batch_size=batch_size, shuffle=True)

test_dataset = datasets.MNIST(root="dataset/", download=True, train=False, transform=transforms.ToTensor())
test_loader = DataLoader(dataset=test_dataset, batch_size=batch_size, shuffle=True)
步骤6:初始化网络
我们实例化我们的神经网络并将其移动到设备(GPU或CPU)。
python
model = CNN(in_channels=1, num_classes=num_classes).to(device)步骤7:定义损失和优化器
我们将使用交叉熵损失进行分类,并使用Adam优化器更新模型的权重。
python
criterion = nn.CrossEntropyLoss()
optimizer = optim.Adam(model.parameters(), lr=learning_rate)
步骤8:训练网络
我们将多次循环数据集(epoch),并根据损失更新模型的权重。
python
for epoch in range(num_epochs):
    print(f"Epoch [{epoch + 1}/{num_epochs}]")
    for batch_index, (data, targets) in enumerate(tqdm(train_loader)):
        # Move data and targets to the device (GPU/CPU)
        data = data.to(device)
        targets = targets.to(device)

        # Forward pass: compute the model output
        scores = model(data)
        loss = criterion(scores, targets)

        # Backward pass: compute the gradients
        optimizer.zero_grad()
        loss.backward()

        # Optimization step: update the model parameters
        optimizer.step()
步骤9:模型评估
我们将定义一个函数来检查模型在训练和测试数据集上的准确性。
python
def check_accuracy(loader, model):
    """
    Checks the accuracy of the model on the given dataset loader.

    Parameters:
        loader: DataLoader
            The DataLoader for the dataset to check accuracy on.
        model: nn.Module
            The neural network model.
    """
    if loader.dataset.train:
        print("Checking accuracy on training data")
    else:
        print("Checking accuracy on test data")

    num_correct = 0
    num_samples = 0
    model.eval()  # Set the model to evaluation mode

    with torch.no_grad():  # Disable gradient calculation
        for x, y in loader:
            x = x.to(device)
            y = y.to(device)

            # Forward pass: compute the model output
            scores = model(x)
            _, predictions = scores.max(1)  # Get the index of the max log-probability
            num_correct += (predictions == y).sum()  # Count correct predictions
            num_samples += predictions.size(0)  # Count total samples

        # Calculate accuracy
        accuracy = float(num_correct) / float(num_samples) * 100
        print(f"Got {num_correct}/{num_samples} with accuracy {accuracy:.2f}%")

    model.train()  # Set the model back to training mode

# Final accuracy check on training and test sets
check_accuracy(train_loader, model)
check_accuracy(test_loader, model)
结论
本文使用PyTorch构建、训练和评估了一个简单的卷积神经网络(CNN)。本指南涵盖了从定义模型架构到加载数据、训练模型和评估其性能的基本内容。CNN是图像识别任务的强大工具,PyTorch为开发它们提供了一个灵活而强大的框架。
好了,这篇文章就介绍到这里,喜欢的小伙伴感谢给点个赞和关注,更多精彩内容持续更新~~
关于本篇文章大家有任何建议或意见,欢迎在评论区留言交流!