《------往期经典推荐------》
二、机器学习实战专栏【链接】 ,已更新31期,欢迎关注,持续更新中~~
三、深度学习【Pytorch】专栏【链接】
四、【Stable Diffusion绘画系列】专栏【链接】
五、YOLOv8改进专栏【链接】,持续更新中~~
六、YOLO性能对比专栏【链接】,持续更新中~
《------正文------》
目录
引言
在Python中运行对象检测模型已经变得非常容易,这要归功于像Ultralytics这样的用户友好的库,但是在C++中运行YOLO模型 呢?在本文中,将向您展示如何仅使用OpenCV库使用C++运行YOLO模型。
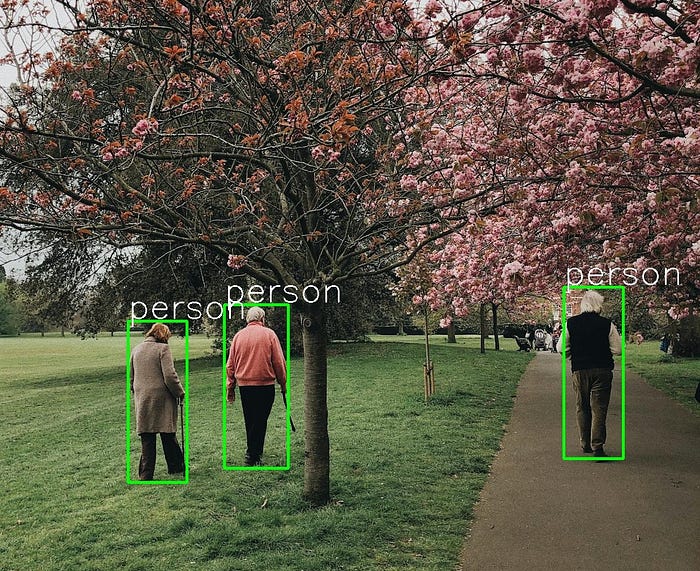
这篇文章是关于如何在CPU上运行YOLOv5模型 ,而不是GPU。在GPU上运行模型需要安装CUDA,CUDNN和其他可能令人困惑和耗时的东西。后续有空再进行详细介绍。
下面介绍详细的实现步骤:
1.克隆源码,并导出ONNX模型
- 创建一个新的文件夹,并命名为任何你想要的。打开一个终端并将yolov5存储库克隆到此文件夹。我们将使用此存储库将模型导出为onnx格式
python
git clone https://github.com/ultralytics/yolov5- 我将使用yolov5s.pt模型,但您可以使用您的自定义yolov5模型,过程不会改变。您可以从此链接下载预训练模型,也可以使用自己的模型。
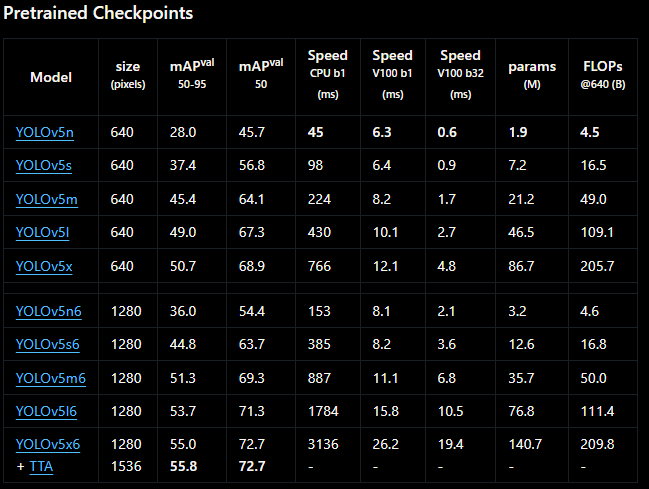
预训练的yolov5模型
-
现在让我们将模型导出到onnx。有不同的参数,你可以检查下面的图片。您可以编辑"export.py"文件(yolov 5/export.py)或手动更改参数从终端就像我在这里。对于 自定义模型,需要将权重更改为自定义模型权重( your_model.pt文件)。
python yolov5/export.py --weights yolov5s.pt --img 640 --include onnx --opset 12
注意:这里需要将opset设置为12,否则可能会出错。这是一个常见的问题,你可以检查github这个错误。
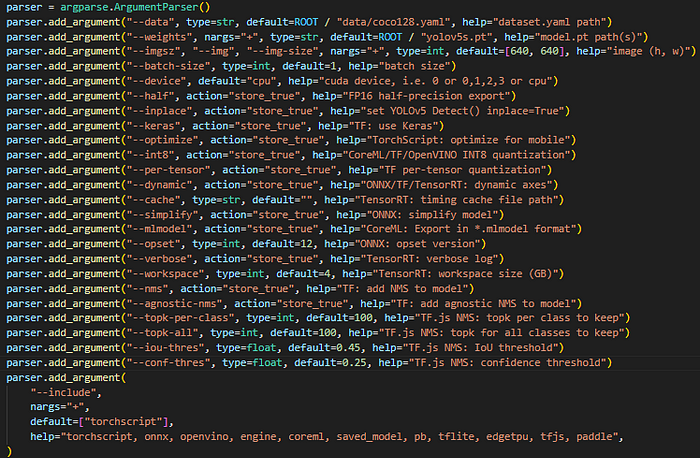
parameters /export.py文件
2.创建TXT文件以存储YOLO模型标签
这一步很简单,你只需要创建一个txt文件来存储标签。如下图:
如果你有自定义的模型,然后创建一个新的txt文件,并把你的标签写在里面。你可以给这个文件起任何你想要的名字。
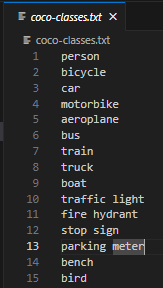
coco-classes.txt
3.创建CMakeLists.txt文件
现在,让我们创建一个CMakeLists.txt文件。使用CMake编译C++程序时需要此文件。如果你从我分享的链接安装了OpenCV,你应该已经安装了CMake。
python
cmake_minimum_required(VERSION 3.10)
project(cpp-yolo-detection) # your folder name here

# Find OpenCV
set(OpenCV_DIR C:/Libraries/opencv/build) # path to opencv
find_package(OpenCV REQUIRED)

add_executable(object-detection object-detection.cpp) # your file name

# Link OpenCV libraries
target_link_libraries(object-detection ${OpenCV_LIBS})
4.编写代码
最后这是最后一步。我使用了这个代码库中的代码。
python
#include <fstream>
#include <opencv2/opencv.hpp>


// Load labels from coco-classes.txt file
std::vector<std::string> load_class_list()
{
    std::vector<std::string> class_list;
    // change this txt file  to your txt file that contains labels
    std::ifstream ifs("C:/Users/sirom/Desktop/cpp-ultralytics/coco-classes.txt");
    std::string line;
    while (getline(ifs, line))
    {
        class_list.push_back(line);
    }
    return class_list;
}

// Model
void load_net(cv::dnn::Net &net)
{
    // change this path to your model path
    auto result = cv::dnn::readNet("C:/Users/sirom/Desktop/cpp-ultralytics/yolov5s.onnx");

    std::cout << "Running on CPU/n";
    result.setPreferableBackend(cv::dnn::DNN_BACKEND_OPENCV);
    result.setPreferableTarget(cv::dnn::DNN_TARGET_CPU);

    net = result;
}

const std::vector<cv::Scalar> colors = {cv::Scalar(255, 255, 0), cv::Scalar(0, 255, 0), cv::Scalar(0, 255, 255), cv::Scalar(255, 0, 0)};

// You can change this parameters to obtain better results
const float INPUT_WIDTH = 640.0;
const float INPUT_HEIGHT = 640.0;
const float SCORE_THRESHOLD = 0.5;
const float NMS_THRESHOLD = 0.5;
const float CONFIDENCE_THRESHOLD = 0.5;

struct Detection
{
    int class_id;
    float confidence;
    cv::Rect box;
};

// yolov5 format
cv::Mat format_yolov5(const cv::Mat &source) {
    int col = source.cols;
    int row = source.rows;
    int _max = MAX(col, row);
    cv::Mat result = cv::Mat::zeros(_max, _max, CV_8UC3);
    source.copyTo(result(cv::Rect(0, 0, col, row)));
    return result;
}

// Detection function
void detect(cv::Mat &image, cv::dnn::Net &net, std::vector<Detection> &output, const std::vector<std::string> &className) {
    cv::Mat blob;

    // Format the input image to fit the model input requirements
    auto input_image = format_yolov5(image);

    // Convert the image into a blob and set it as input to the network
    cv::dnn::blobFromImage(input_image, blob, 1./255., cv::Size(INPUT_WIDTH, INPUT_HEIGHT), cv::Scalar(), true, false);
    net.setInput(blob);
    std::vector<cv::Mat> outputs;
    net.forward(outputs, net.getUnconnectedOutLayersNames());

    // Scaling factors to map the bounding boxes back to original image size
    float x_factor = input_image.cols / INPUT_WIDTH;
    float y_factor = input_image.rows / INPUT_HEIGHT;

    float *data = (float *)outputs[0].data;

    const int dimensions = 85;
    const int rows = 25200;

    std::vector<int> class_ids; // Stores class IDs of detections
    std::vector<float> confidences; // Stores confidence scores of detections
    std::vector<cv::Rect> boxes;   // Stores bounding boxes

   // Loop through all the rows to process predictions
    for (int i = 0; i < rows; ++i) {

        // Get the confidence of the current detection
        float confidence = data[4];

        // Process only detections with confidence above the threshold
        if (confidence >= CONFIDENCE_THRESHOLD) {

            // Get class scores and find the class with the highest score
            float * classes_scores = data + 5;
            cv::Mat scores(1, className.size(), CV_32FC1, classes_scores);
            cv::Point class_id;
            double max_class_score;
            minMaxLoc(scores, 0, &max_class_score, 0, &class_id);

            // If the class score is above the threshold, store the detection
            if (max_class_score > SCORE_THRESHOLD) {

                confidences.push_back(confidence);
                class_ids.push_back(class_id.x);

                // Calculate the bounding box coordinates
                float x = data[0];
                float y = data[1];
                float w = data[2];
                float h = data[3];
                int left = int((x - 0.5 * w) * x_factor);
                int top = int((y - 0.5 * h) * y_factor);
                int width = int(w * x_factor);
                int height = int(h * y_factor);
                boxes.push_back(cv::Rect(left, top, width, height));
            }
        }

        data += 85;
    }

    // Apply Non-Maximum Suppression
    std::vector<int> nms_result;
    cv::dnn::NMSBoxes(boxes, confidences, SCORE_THRESHOLD, NMS_THRESHOLD, nms_result);

    // Draw the NMS filtered boxes and push results to output
    for (int i = 0; i < nms_result.size(); i++) {
        int idx = nms_result[i];

        // Only push the filtered detections
        Detection result;
        result.class_id = class_ids[idx];
        result.confidence = confidences[idx];
        result.box = boxes[idx];
        output.push_back(result);

        // Draw the final NMS bounding box and label
        cv::rectangle(image, boxes[idx], cv::Scalar(0, 255, 0), 3);
        std::string label = className[class_ids[idx]];
        cv::putText(image, label, cv::Point(boxes[idx].x, boxes[idx].y - 5), cv::FONT_HERSHEY_SIMPLEX, 2, cv::Scalar(255, 255, 255), 2);
    }
}


int main(int argc, char **argv)
{
    // Load class list
    std::vector<std::string> class_list = load_class_list();

    // Load input image
    std::string image_path = cv::samples::findFile("C:/Users/sirom/Desktop/cpp-ultralytics/test2.jpg");
    cv::Mat frame = cv::imread(image_path, cv::IMREAD_COLOR);

    // Load the  modeL
    cv::dnn::Net net;
    load_net(net);

    // Vector to store detection results
    std::vector<Detection> output;
    // Run detection on the input image
    detect(frame, net, output, class_list);

    // Save the result to a file
    cv::imwrite("C:/Users/sirom/Desktop/cpp-ultralytics/result.jpg", frame);

    while (true)
    {
        // display image
        cv::imshow("image",frame);

        // Exit the loop if any key is pressed
        if (cv::waitKey(1) != -1)
        {
            std::cout << "finished by user\n";
            break;
        }
    }

    std::cout << "Processing complete. Image saved /n";
    return 0;
}
5.编译并运行代码
python
mkdir build
cd build
cmake ..
cmake --build .
.\Debug\object-detection.exe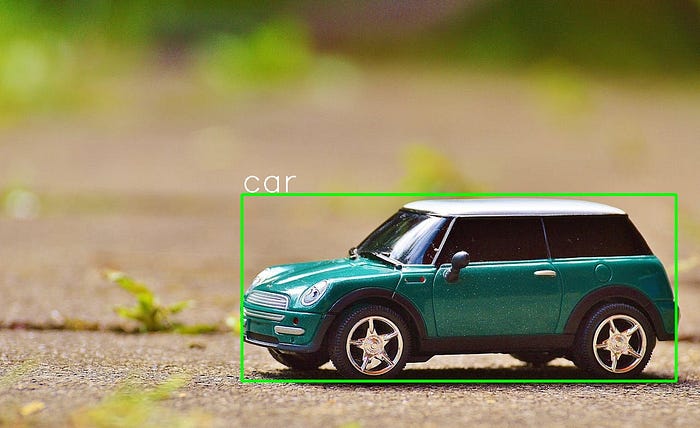
好了,这篇文章就介绍到这里,喜欢的小伙伴感谢给点个赞和关注,更多精彩内容持续更新~~
关于本篇文章大家有任何建议或意见,欢迎在评论区留言交流!