一、初识
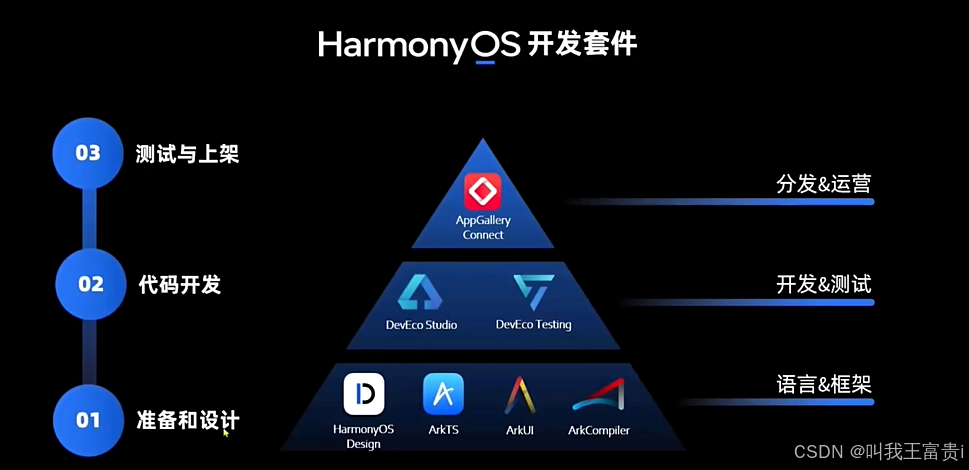

1. 开发工具
官网 开发-HarmonyOS NEXT鸿蒙应用开发平台-华为开发者联盟
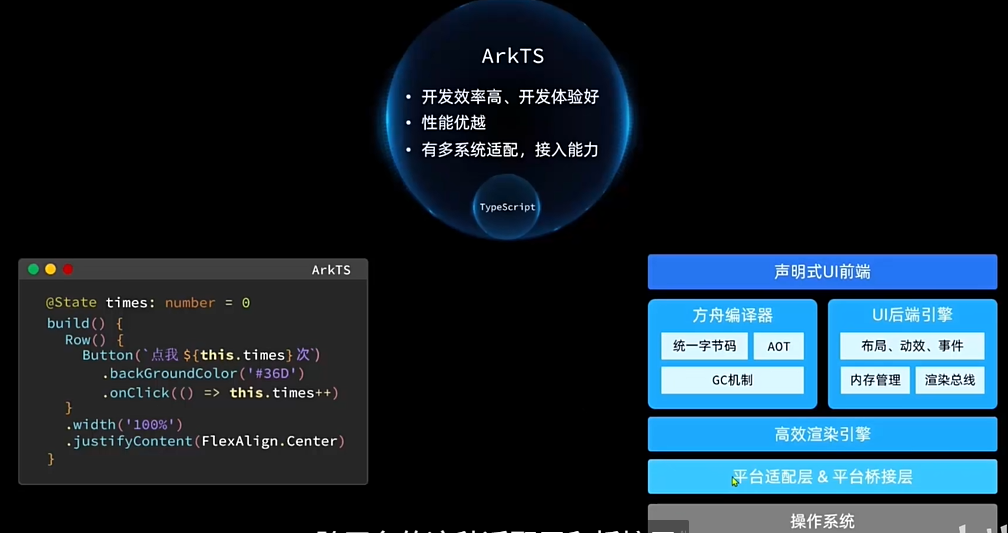
2. ArkTS
二、TypeScript 基本语法
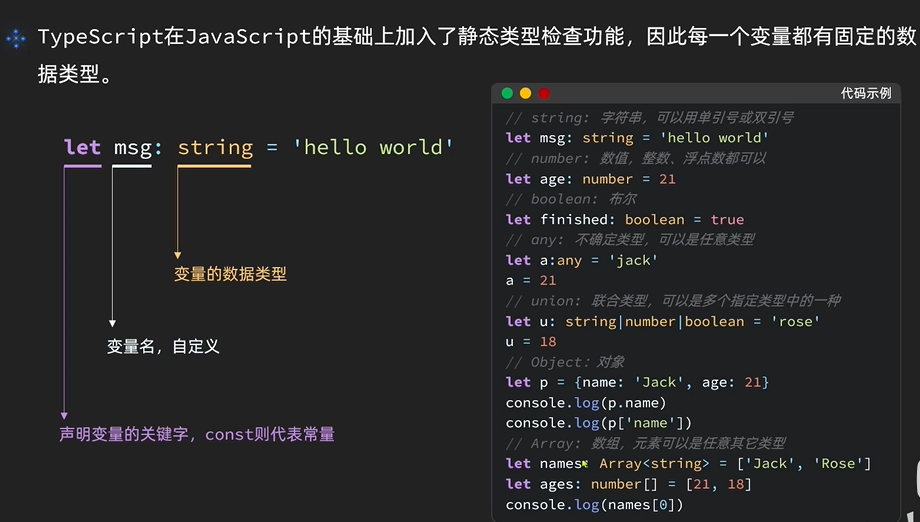
1.变量声明
2. 条件控制
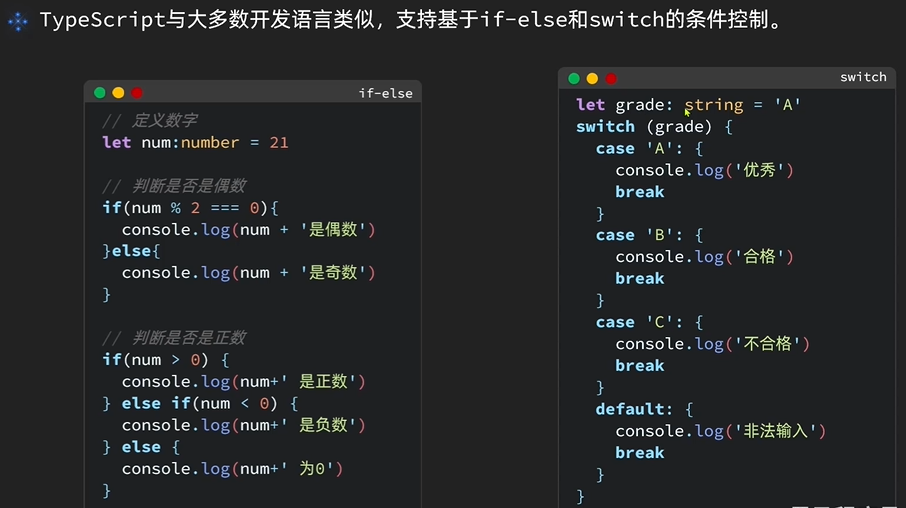
注意
在TypeScrips中·
空字符串·数字0、null、undefined 都坡认为是false
其它值则为true
TypeScriptif (num) { // num 非空执行 }
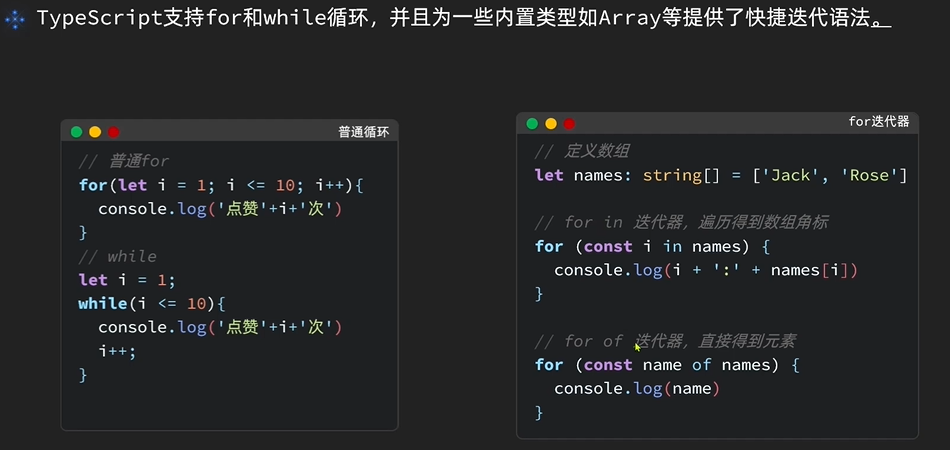
3. 循环迭代
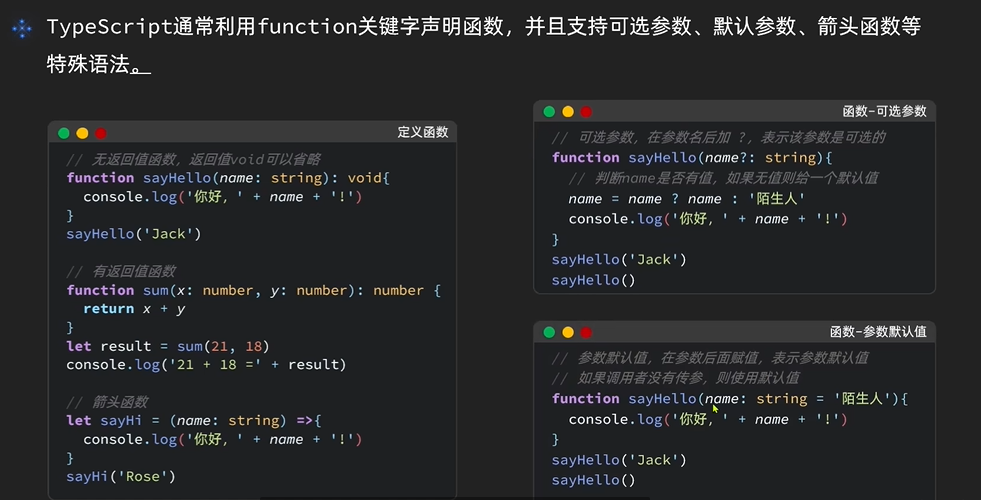
4. 函数
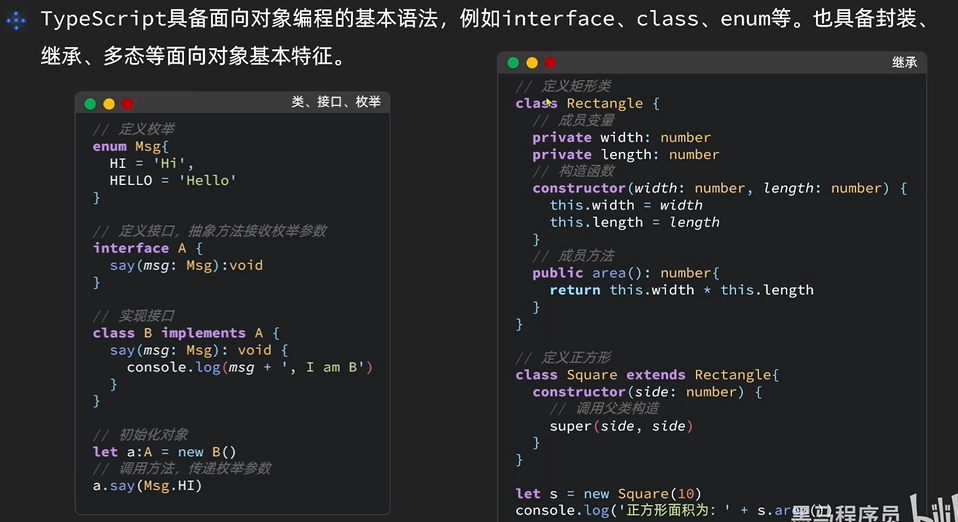
5. 类和接口
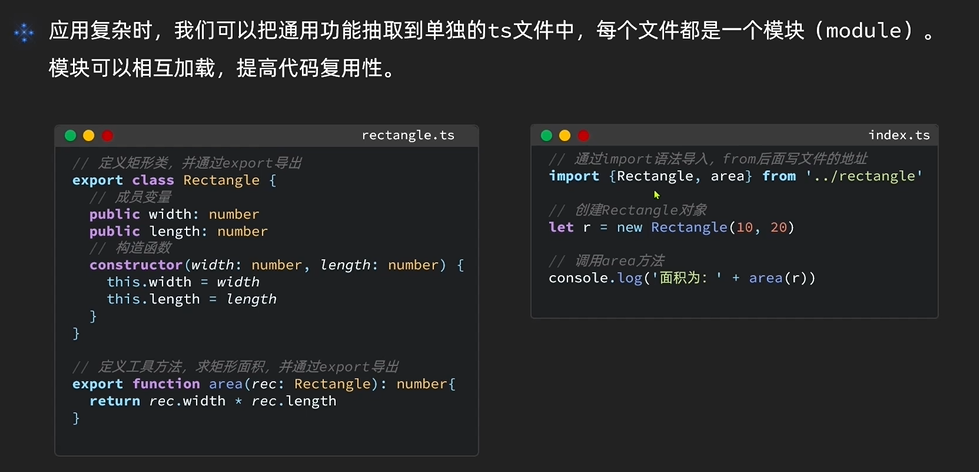
6. 模块化开发
三、快速入门
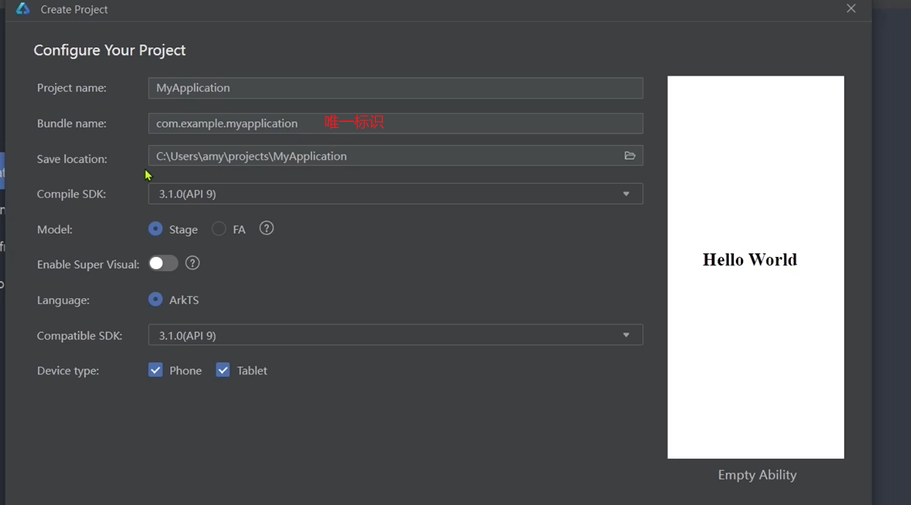
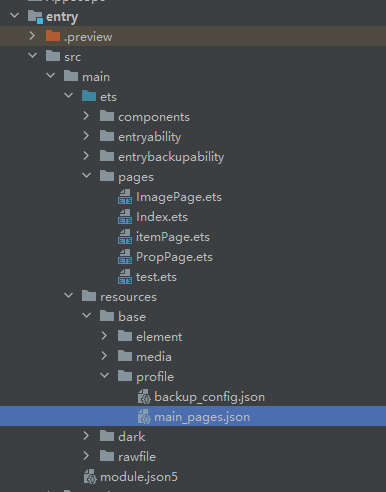
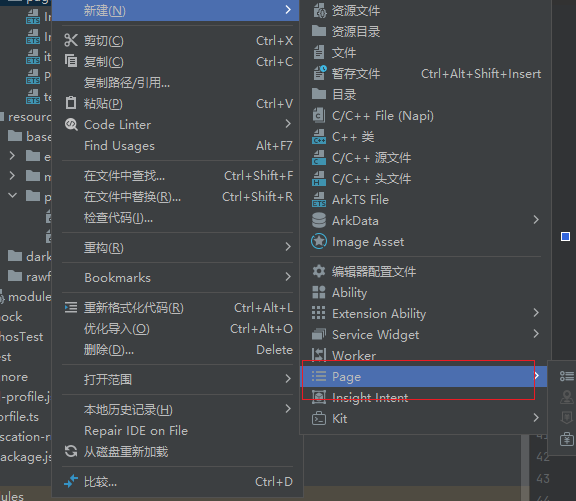
1. 创建项目
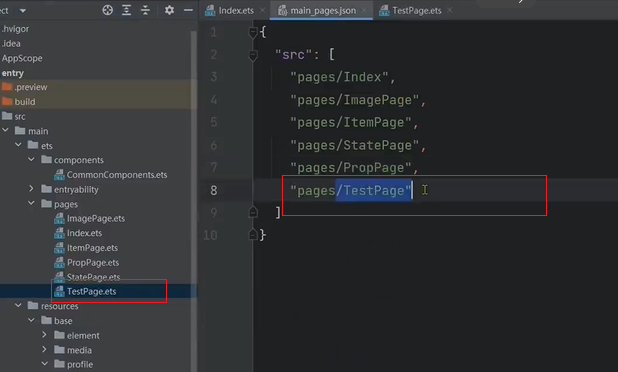
2. 结构信息

路由配置地址:
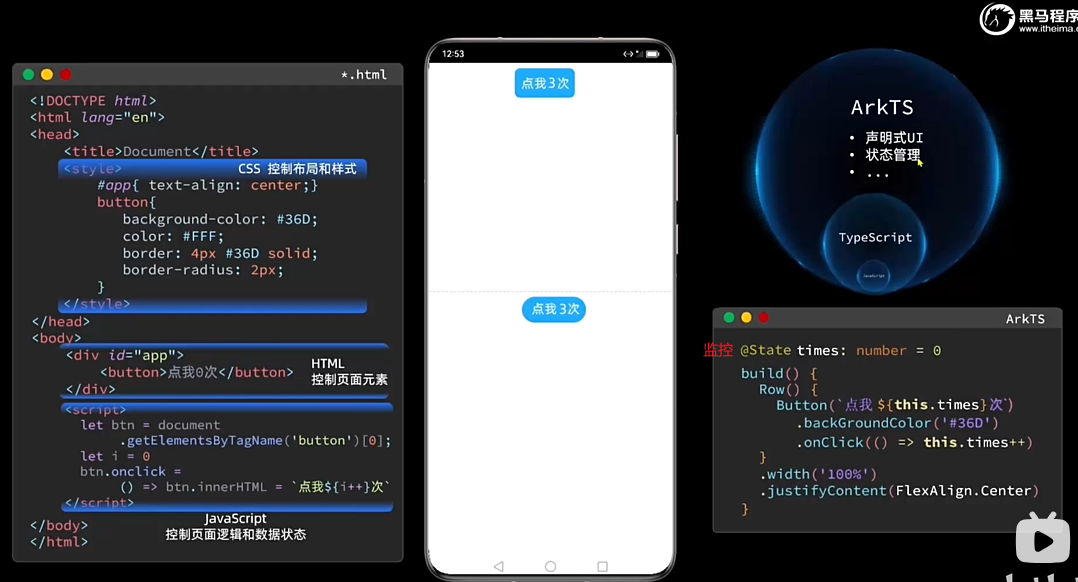
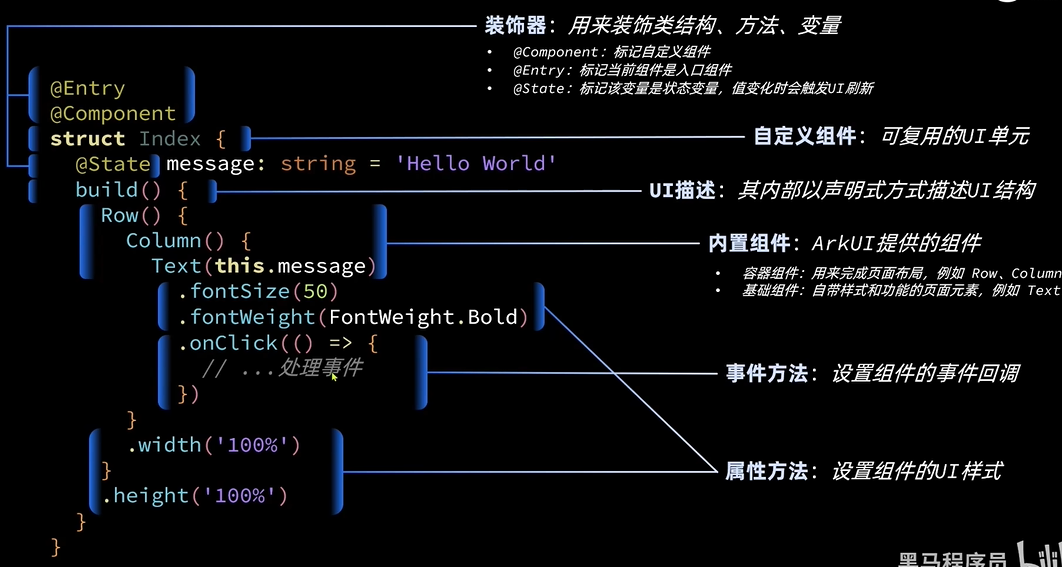
3. 入门案例
TypeScript
@Entry
@Component
struct Index { //自定义组件 --可以复用的UI单元
@State message: string = 'Hello World';
build() {
Row() {
Column() {
Text(this.message)
.fontSize(50)
.fontWeight(FontWeight.Bold)
.fontColor('red')
.onClick(() => {
this.message = '你好世界'
})
}
.width('100%')
}
.height('100%')
}
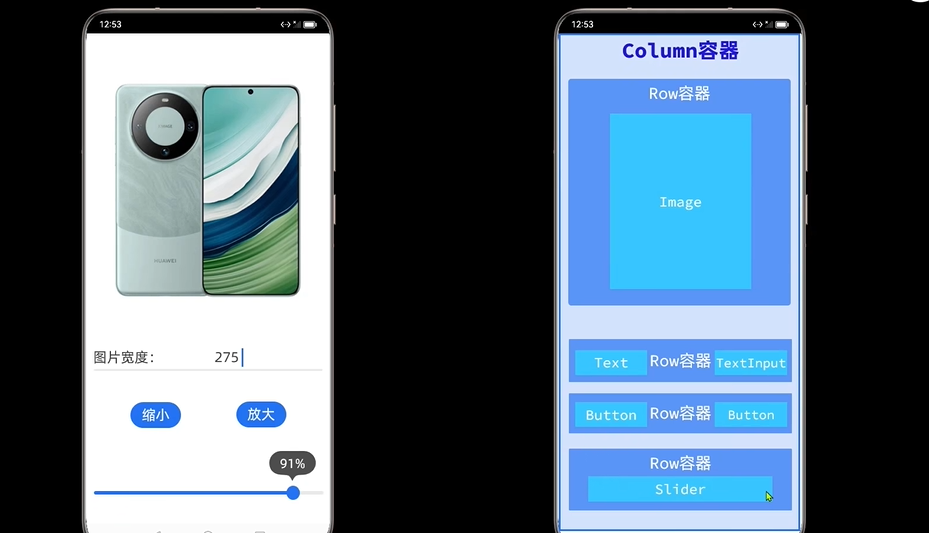
}四、ArkUI 基础组件
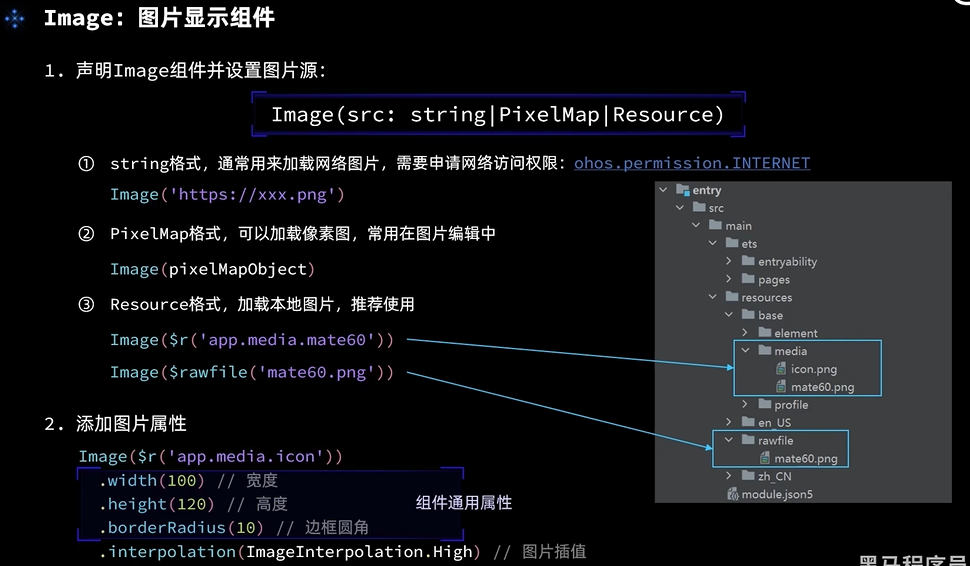
1. Image 组件
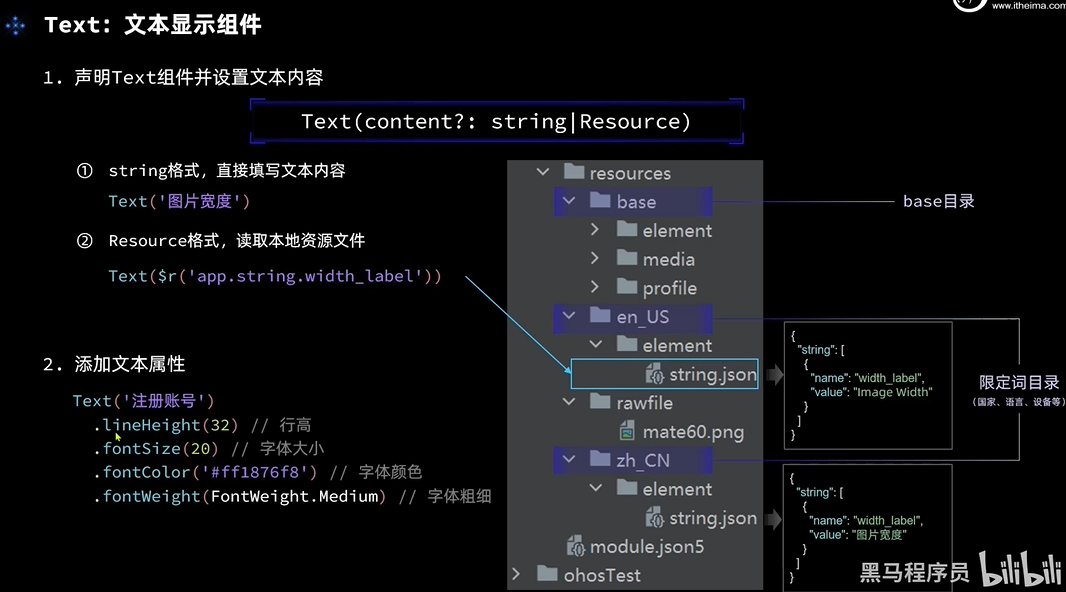
2. Text 组件
3. TextInput 文本输框
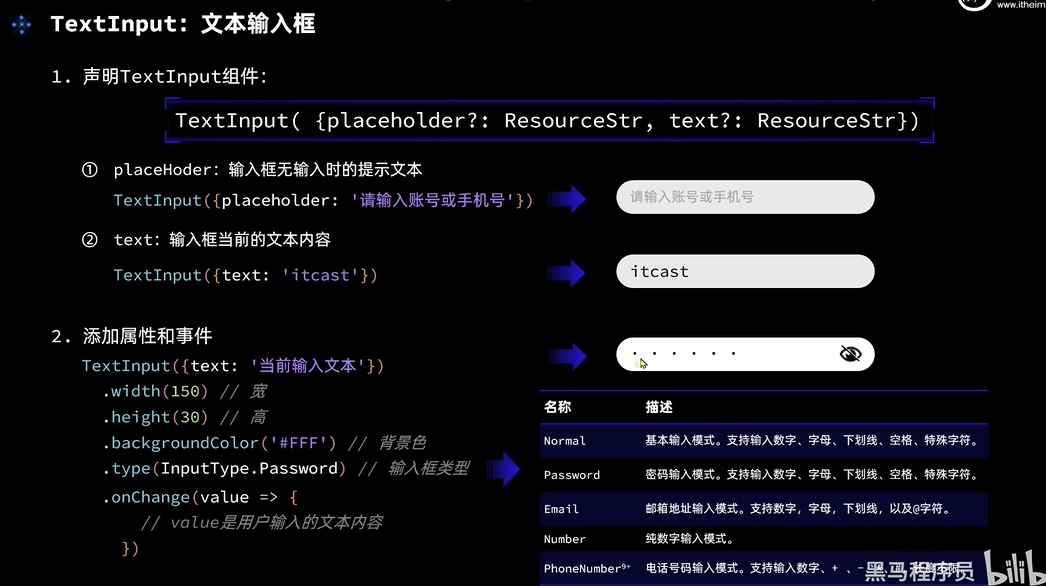
- 数值转字符串:
数值.toFixed(0) --保留0位小数
- 字符串转数值:
parseInt(字符串)
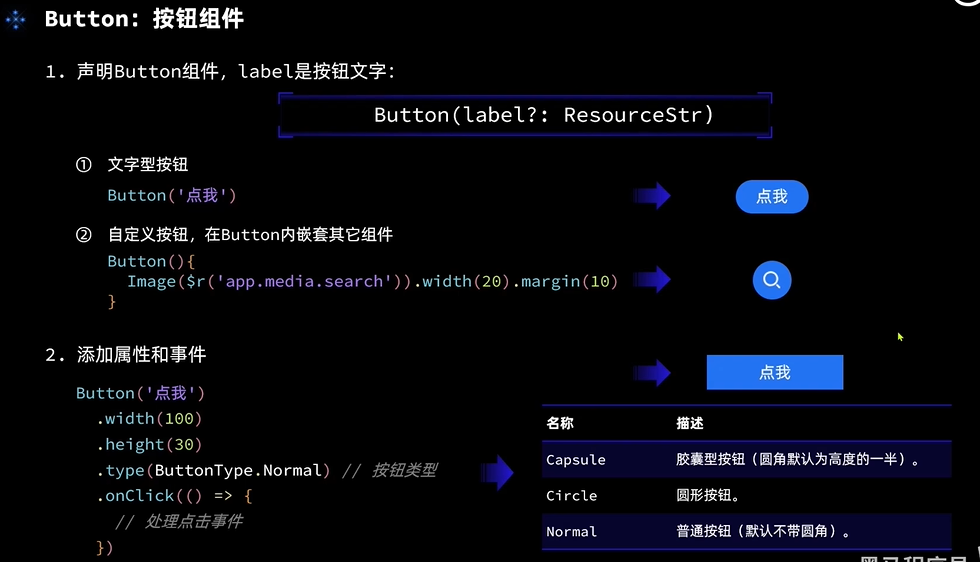
4. Button 按钮
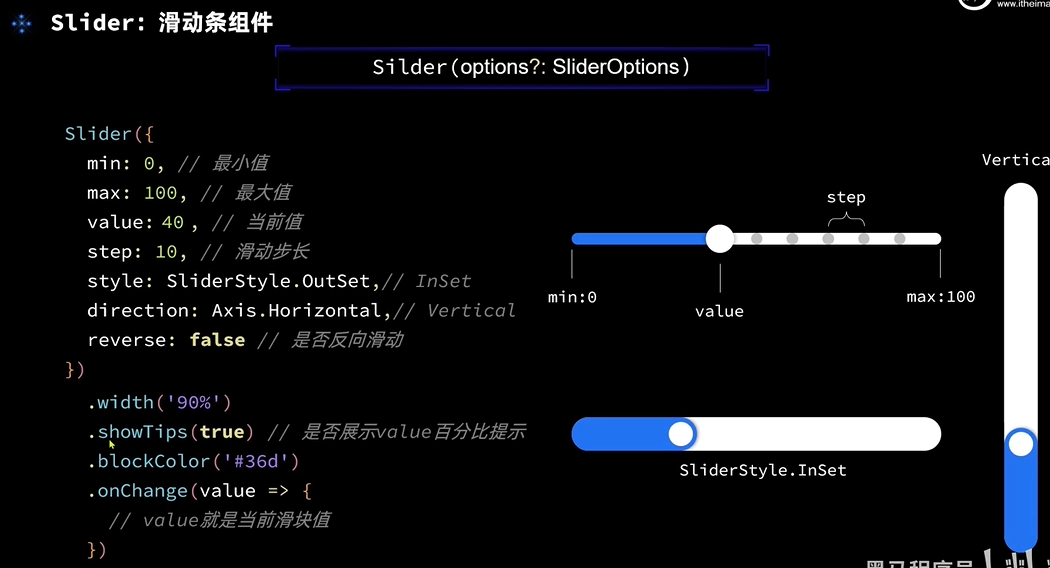
5. Slider 滑块
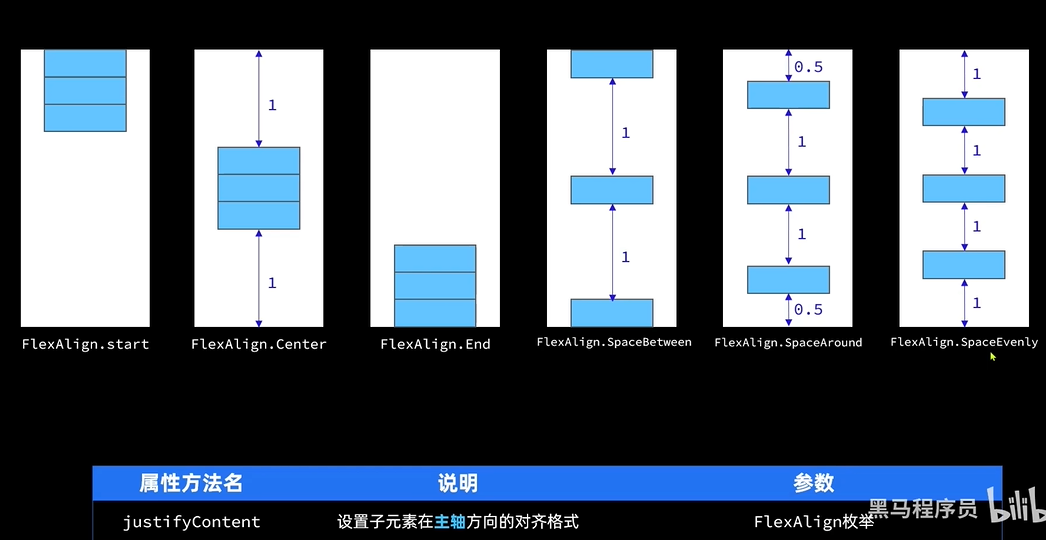
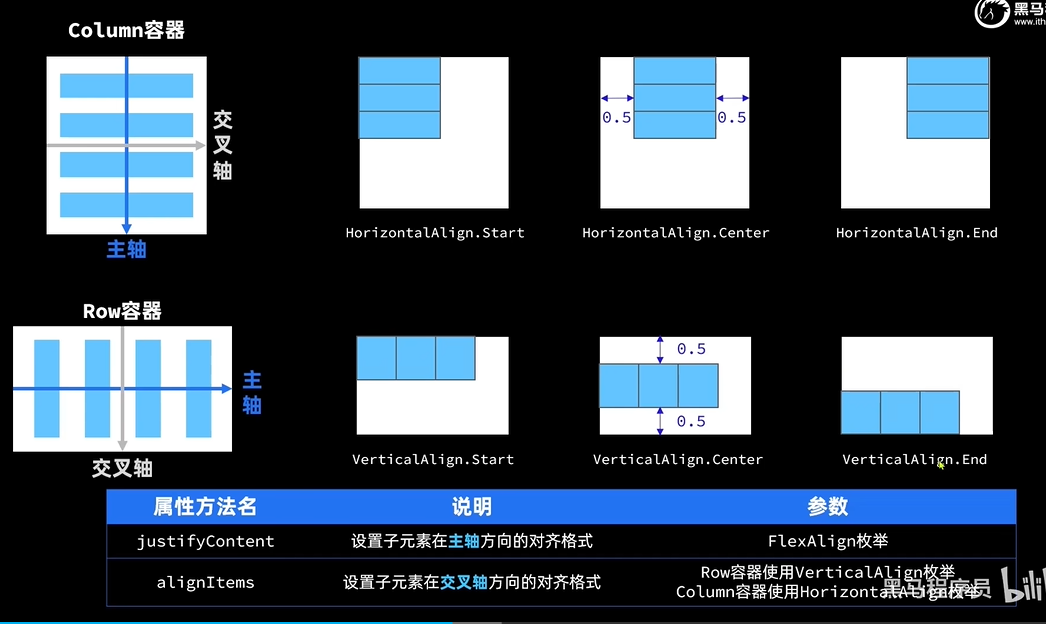
6. Column和Row
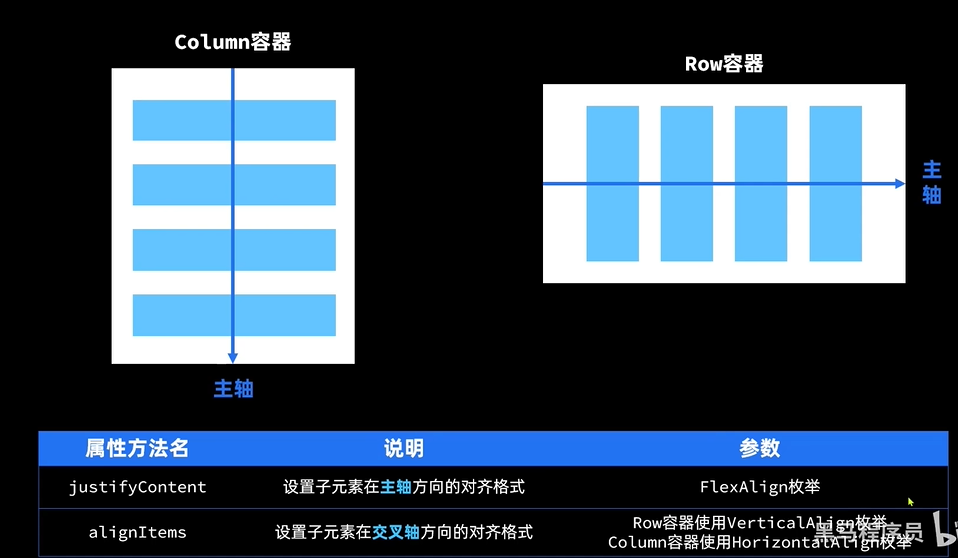
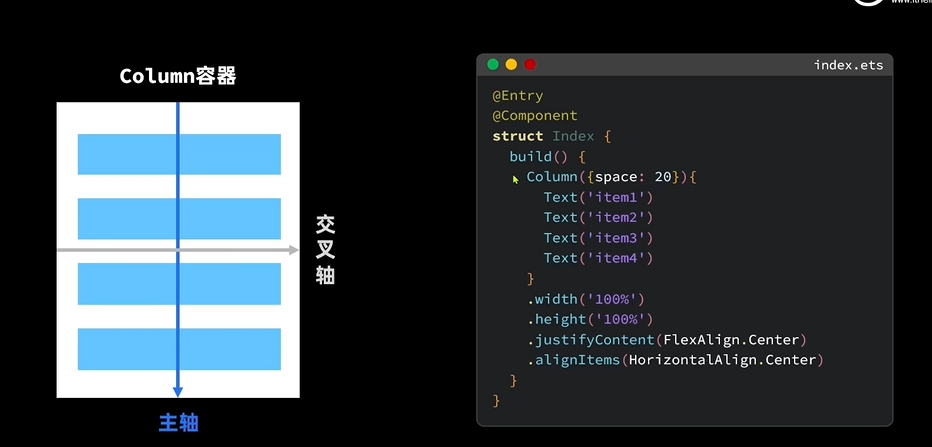
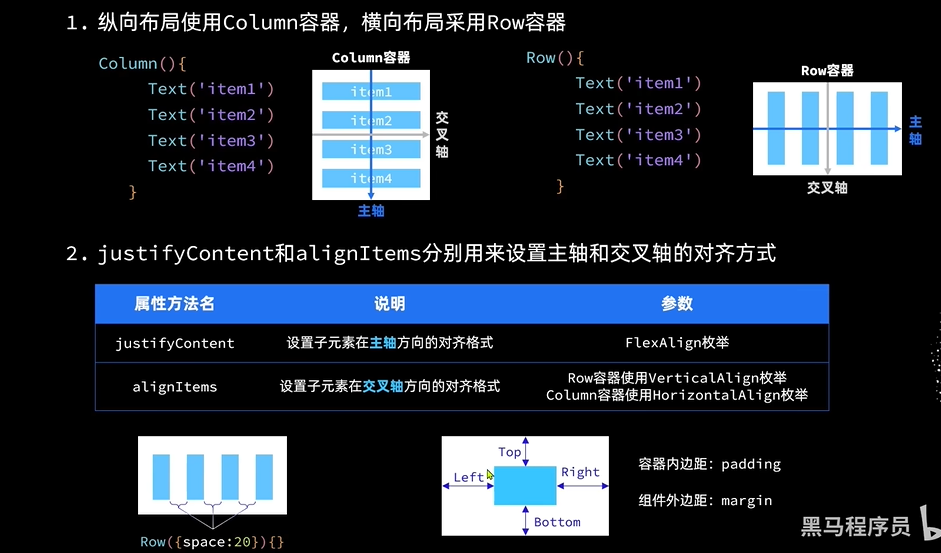
1) 主轴
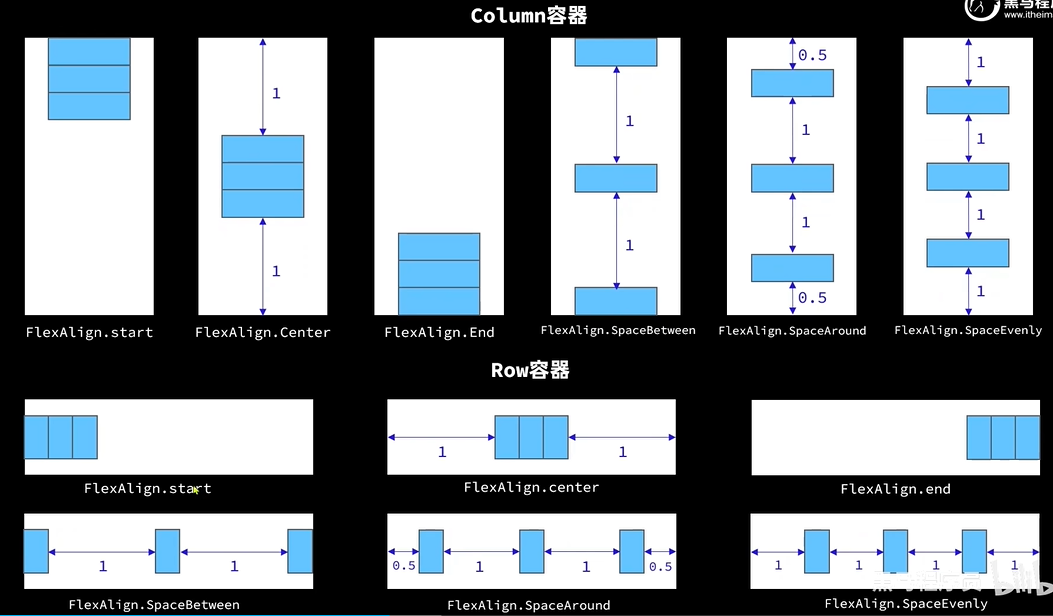
2)交叉轴
7. 案例源码
TypeScript
@Entry
@Component
struct Index { //自定义组件 --可以复用的UI单元
@State message: string = 'HarmonyOS';
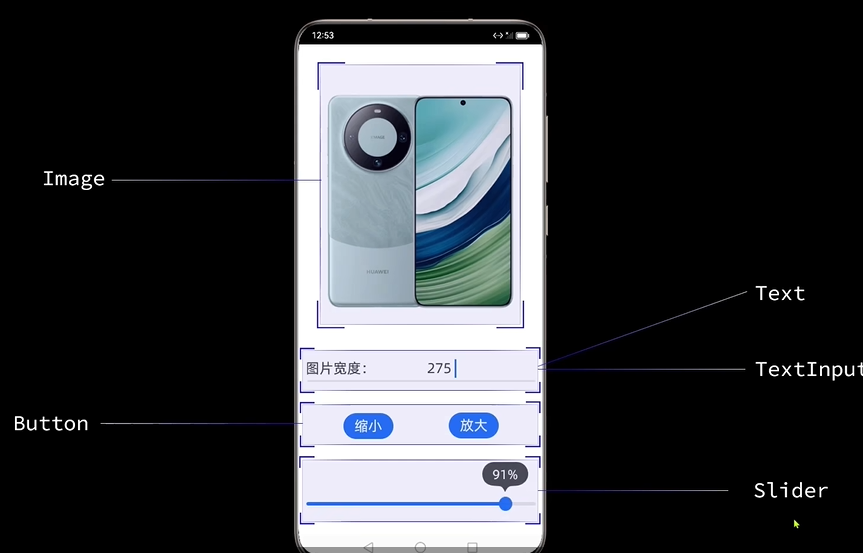
@State imgWidth:number = 250;
build() {
Column() {
// 图片
Row() {
Image($rawfile('HarmonyOS.jpg'))
.width(this.imgWidth) //默认单位 vp(虚拟像素)
.interpolation(ImageInterpolation.High) //处理图片边缘锯齿
.borderRadius(20) //边框弧度
}
.width('100%')
.height(400)
.justifyContent(FlexAlign.Center)
// 文本提示
Row() {
Text($r('app.string.width_label'))
.fontSize(20)
.fontWeight(FontWeight.Bold)
// .toFixed(0) 数值转字符串 保留0位小数
TextInput({placeholder:'请输入宽度',text:this.imgWidth.toFixed(0)})
.width(250)
.type(InputType.Number)
.onChange((value:string) => {
// console.log(value)
// parseInt 字符转数值
this.imgWidth = parseInt(value)
})
}
.width('100%')
.justifyContent(FlexAlign.SpaceBetween)
.padding({left:15,right:15})
// 分割线
Divider()
.width('91%')
.color('red')
// 按钮
Row(){
Button('缩小')
.width(80)
.fontSize(20)
.onClick(() => {
if (this.imgWidth >= 10) {
this.imgWidth -= 10
}
})
Button('放大')
.width(80)
.fontSize(20)
.type(ButtonType.Normal)
.onClick(() => {
if (this.imgWidth <= 300) {
this.imgWidth += 10
}
})
}
.width('100%')
.justifyContent(FlexAlign.SpaceEvenly)
.margin({top:20,bottom:20})
// 滑块
Slider({
min:10,
max:310,
value:this.imgWidth,
step:10,
style: SliderStyle.OutSet
})
.width('90%')
.borderColor('#36D')
.trackThickness(7)
.showTips(true)
.onChange((value)=> {
this.imgWidth = value
})
}
.width('100%')
.height('100%')
}
}8. 渲染控制
1) ForEach
2) if-else
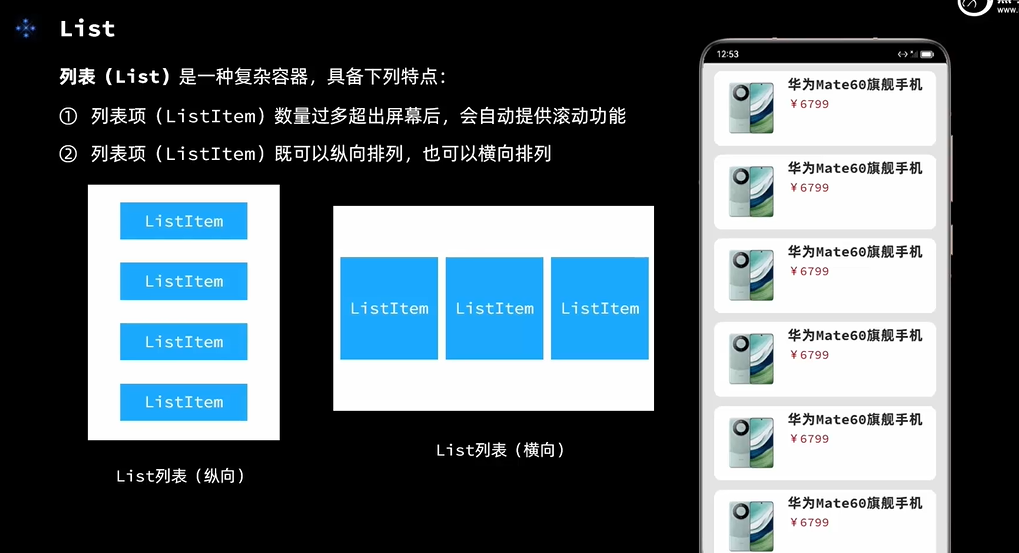
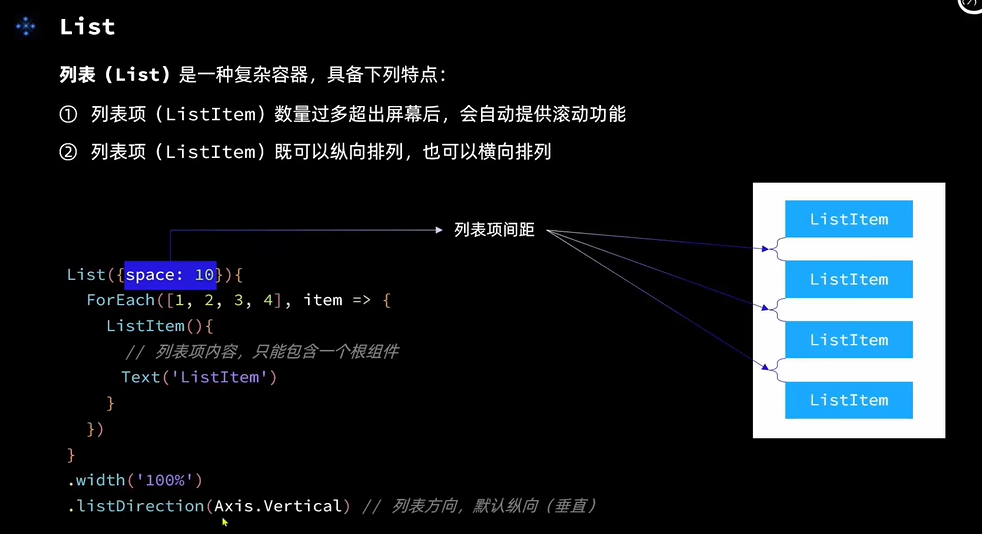
9. List 列表
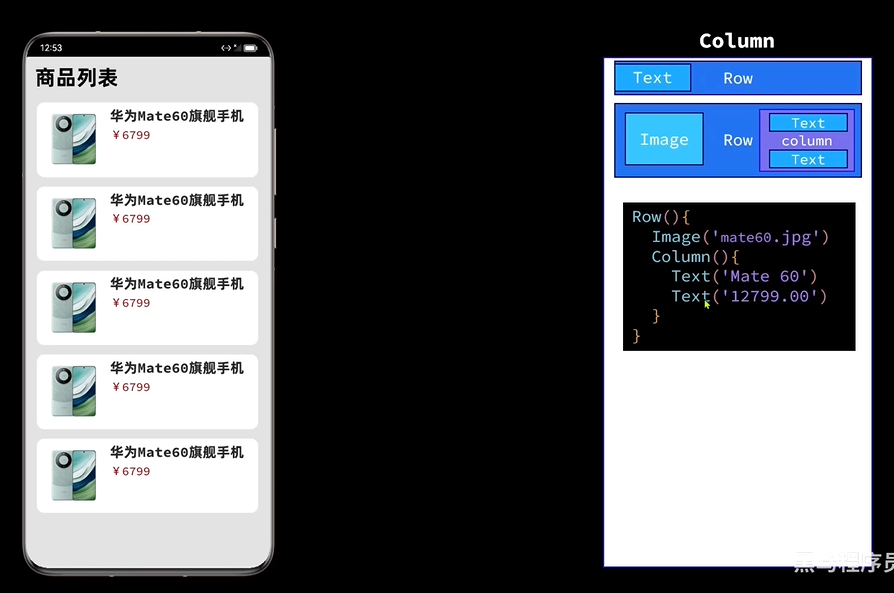
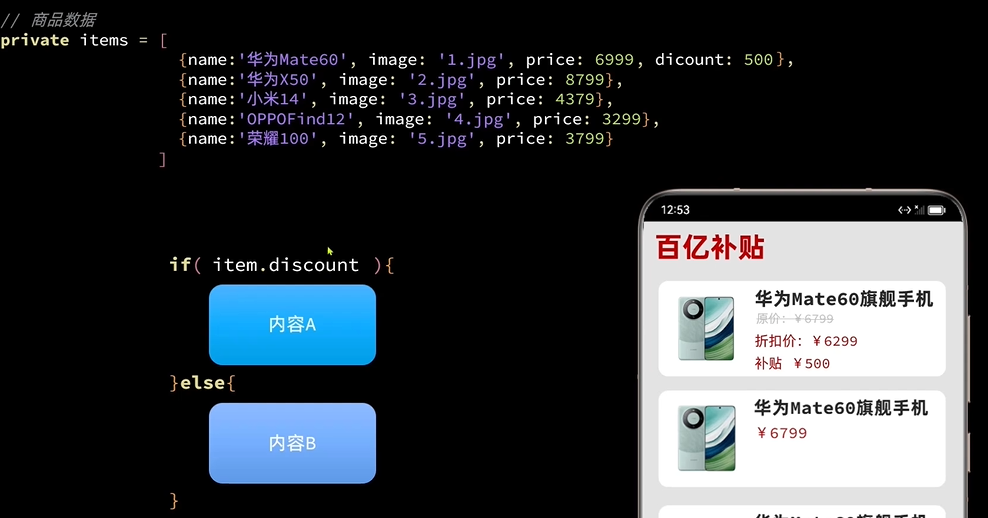
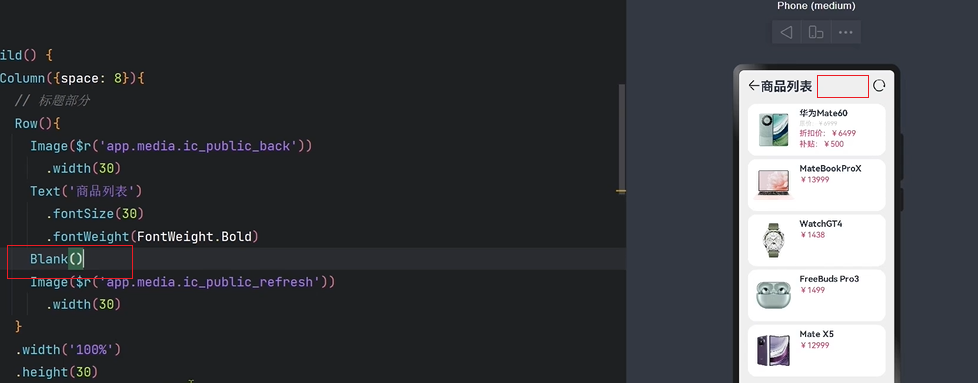
List({space:6}){
  ForEach(this.tasks,(item:Task) => {
    ListItem() {
      Row(){
        Text(item.name)
          .fontSize(20)
          .textAlign(TextAlign.Start)
          .padding({left:10})
        Checkbox()
          .select(item.finished)
          .onChange((val)=> {
            // 更新当前任务状态
            item.finished = val
            // 更新已完成任务数量
            // this.finishTask = this.tasks.filter(i=> i.finished).length
            this.handleTaskChange()
          })
      }
      .card()
      .justifyContent(FlexAlign.SpaceBetween)
    }
  })
}
.width('100%')
.layoutWeight(1) //剩下的高度全是我的
.alignListItem(ListItemAlign.Center) //列表居中
TypeScript
class Item {
name: string
image: ResourceStr
price: number
discount: number
constructor(name:string, image:ResourceStr, price: number , discount:number = 0) {
this.name = name
this.image = image
this.price = price
this.discount = discount
}
}
@Entry
@Component
struct ItemPage {
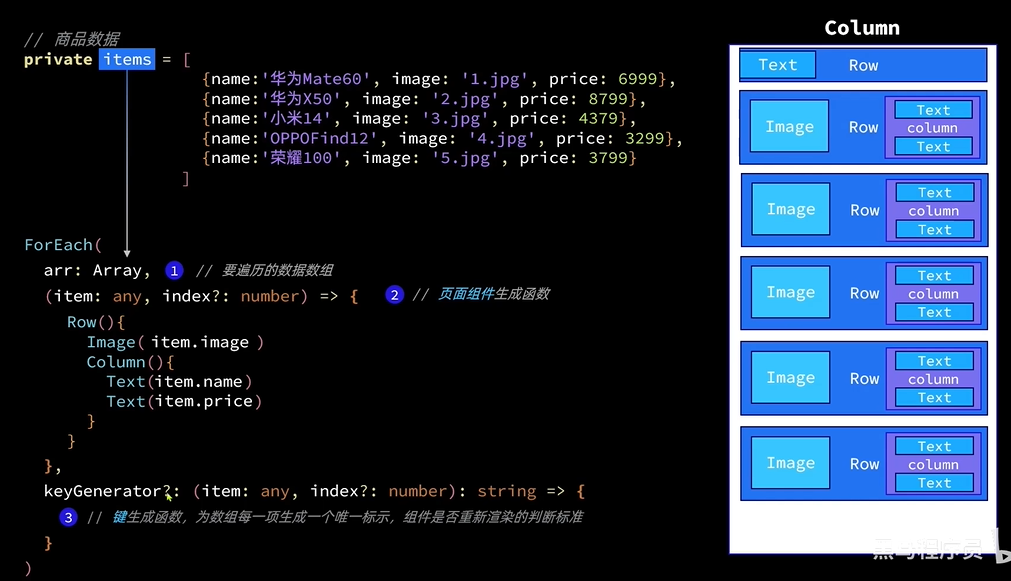
//商品数据
private items:Array<Item> = [
new Item('华为mate60',$rawfile('HarmonyOS.jpg'),6999,500),
new Item('华为mate60',$rawfile('HarmonyOS.jpg'),6999),
new Item('华为mate60',$rawfile('HarmonyOS.jpg'),6999),
new Item('华为mate60',$rawfile('HarmonyOS.jpg'),6999),
new Item('华为mate60',$rawfile('HarmonyOS.jpg'),6999),
new Item('华为mate60',$rawfile('HarmonyOS.jpg'),6999),
new Item('华为mate60',$rawfile('HarmonyOS.jpg'),6999),
]
build() {
Column({space:8}) {
Row(){
Text('商品列表')
.fontSize(18)
.fontWeight(FontWeight.Bold)
}
.width('100%')
.margin({bottom:20})
.height(30)
List({space:8}){
ForEach(this.items,(item:Item) => {
ListItem(){
Row() {
Column(){
Image(item.image)
.width(100)
}
Column(){
Row(){
Text(item.name)
}
Column(){
if (item.discount) {
Row(){
Text('原价:')
Text(item.price.toFixed(0))
.decoration({type: TextDecorationType.LineThrough})
}
Row(){
Text('价格:')
Text((item.price - item.discount).toFixed(0))
}
Row(){
Text('折扣:')
Text(item.discount.toFixed(0))
}
}else {
Row(){
Text('价格:')
Text(item.price.toFixed(0))
}
}
}
}
}
.margin({left:10,right:10})
}
})
}
.width('100%')
.layoutWeight(1)
}
}
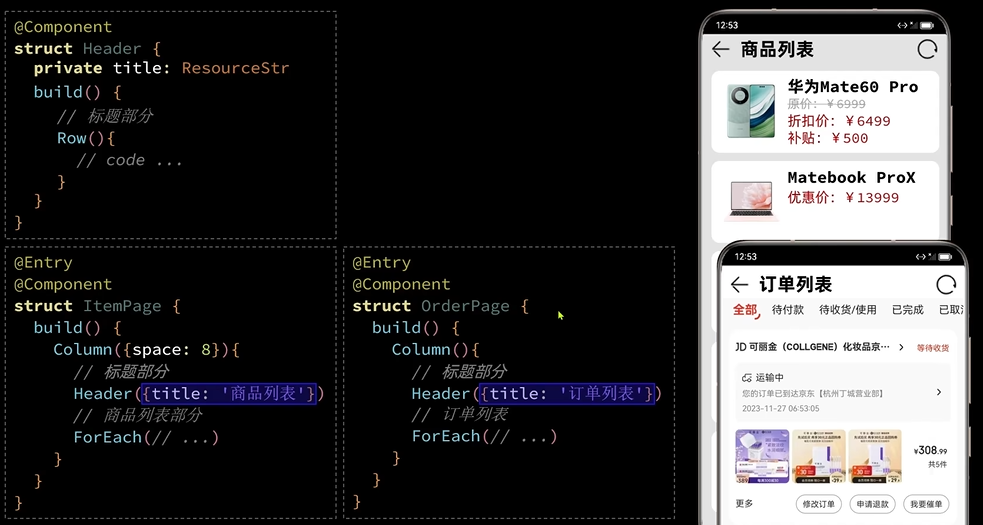
}10. 自定义组件
Blank: 将容器剩余空间全部占满
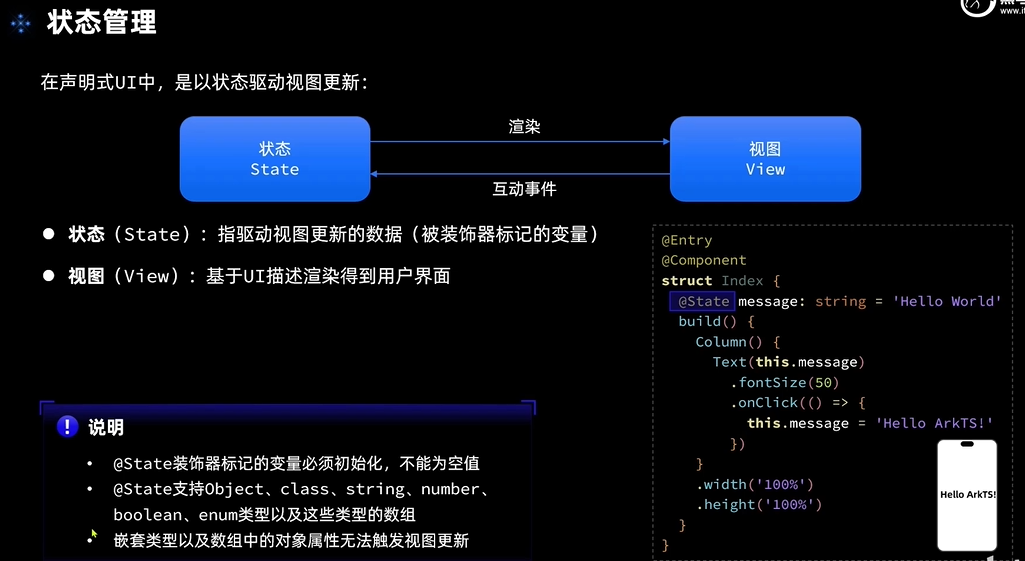
五、状态管理
1. states 装饰器
2. 案例:多任务统计
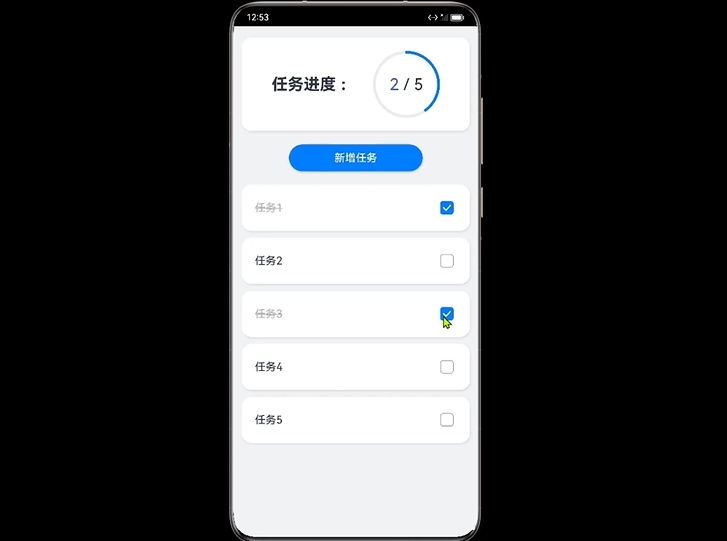
进度条组件:
Progress({
  value:this.finishTask,  //当前值
  total:this.totalTask,   //总值
  type:ProgressType.Ring  //样式 --环形
})
堆叠容器:
Stack() {Progress(...) --盒子1
Row() {...} --盒子2
}
多选框 :
Checkbox(options?: CheckboxOptions)
Checkbox()
  .select(item.finished)
  .onChange((val)=> {
    // 更新当前任务状态
    item.finished = val
    // 更新已完成任务数量
    // this.finishTask = this.tasks.filter(i=> i.finished).length
    this.handleTaskChange()
  })
List 列表项 ListItem 划出样式
swipeAction()
swipeAction({end:this.DeleteBnt(idnex)})
@Builder DeleteBnt(index:number) {
Button('删除')
.backgroundColor('red')
.onClick( () =\> {
this.tasks.splice(index,1)
this.handleTaskChange()
})
}
{ 右边划出:划出之后的内容 }
案例源码
TypeScript
// 案例:多任务统计
import { it } from '@ohos/hypium'
@Observed
class Task{
static id:number = 1 //任务id
name:string = `任务${Task.id++}` //名称
finished:boolean = false //是否完成
}
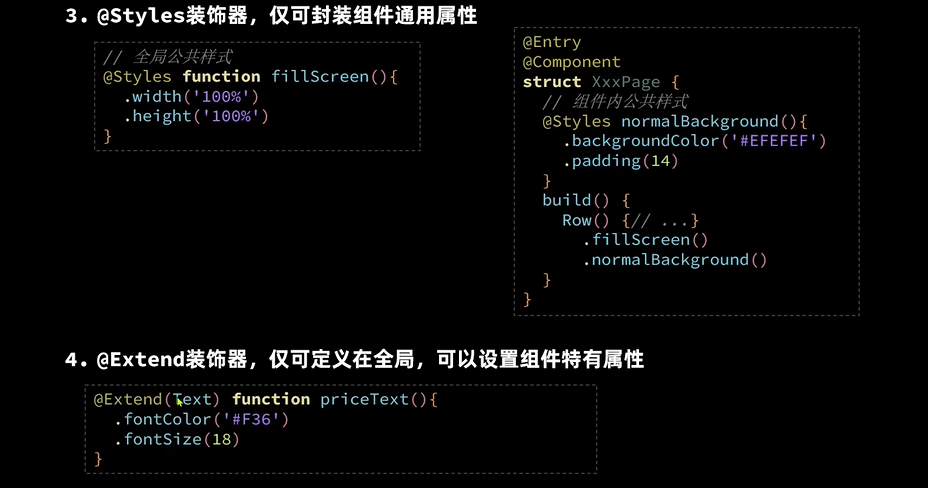
// 统一卡片样式
@Styles function card(){
.width('95%')
.padding(20)
.backgroundColor(Color.White)
.borderRadius(15)
.shadow({radius:6,color:'#1F000000',offsetX:2,offsetY:4})
}
// 任务完成样式
@Extend(Text) function finishedTask() {
.decoration({type:TextDecorationType.LineThrough})
.fontColor('#B1B2B1')
}
@Entry
@Component
struct PropPage {
// 总任务数量
@State totalTask: number = 0
// 已完成任务数量
@State finishTask:number = 0
build() {
Column({space:10}) {
// 1. 任务进度
TaskStatistics({finishTask:this.finishTask,totalTask:this.totalTask})
// 2.任务列表
TaskList({finishTask: $finishTask,totalTask:$totalTask})
}
.width('100%')
.height('100%')
.backgroundColor('#F1F2F3')
}
}
@Component
struct TaskStatistics {
@Prop finishTask:number
@Prop totalTask:number
build() {
Row(){
Text('任务进度')
.fontSize(30)
.fontWeight(FontWeight.Bold)
// 堆叠容器
Stack() {
Progress({ // 进度条
value:this.finishTask,
total:this.totalTask,
type:ProgressType.Ring
})
Row() {
Text(this.finishTask.toString())
.fontSize(24)
.fontColor('#36D')
Text('/'+this.totalTask.toString())
.fontSize(24)
}
}
}
.card()
.margin({top:20,bottom:10})
.justifyContent(FlexAlign.SpaceEvenly)
}
}
@Component
struct TaskItem {
@ObjectLink item:Task;
onTaskChange: ()=> void =() => {}
build() {
Row() {
if(this.item.finished){
Text(this.item.name)
.finishedTask()
}else{
Text(this.item.name)
.fontSize(20)
.textAlign(TextAlign.Start)
.padding({ left: 10 })
}
Checkbox()
.select(this.item.finished)
.onChange((val) => {
// 更新当前任务状态
this.item.finished = val
// 更新已完成任务数量
// this.finishTask = this.tasks.filter(i=> i.finished).length
this.onTaskChange()
})
}
.card()
.justifyContent(FlexAlign.SpaceBetween)
}
}
@Component
struct TaskList {
// 任务数组
@State tasks: Task[] = []
@Link totalTask: number
// 已完成任务数量
@Link finishTask:number
@Builder DeleteBnt(index:number) {
Button('删除')
.backgroundColor('red')
.onClick( () => {
this.tasks.splice(index,1)
this.handleTaskChange()
})
}
handleTaskChange() {
// 更新任务总数
this.totalTask = this.tasks.length
// 更新已完成任务数量
this.finishTask = this.tasks.filter(i=> i.finished).length
}
build() {
Column() {
Button('新增任务')
.width(200)
.onClick(() => {
// 新增任务
this.tasks.push(new Task())
// 更新任务总数
// this.totalTask = this.tasks.length
this.handleTaskChange()
})
// 3.任务列表
List({ space: 6 }) {
ForEach(this.tasks, (item: Task, idnex: number) => {
ListItem() {
TaskItem({item:item,onTaskChange: this.handleTaskChange.bind(this)})
}
.swipeAction({ end: this.DeleteBnt(idnex) })
})
}
.width('100%')
.layoutWeight(1)
.alignListItem(ListItemAlign.Center) //列表居中
}
}
}3. @Prop @Link @Provide @Consume 装饰器
1)@Prop @Link
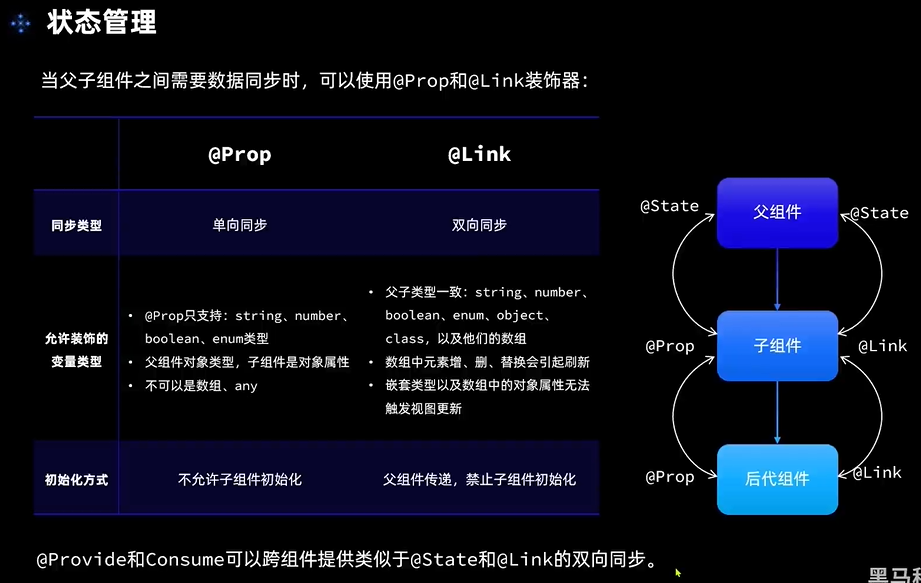
2)@Provide @Consume
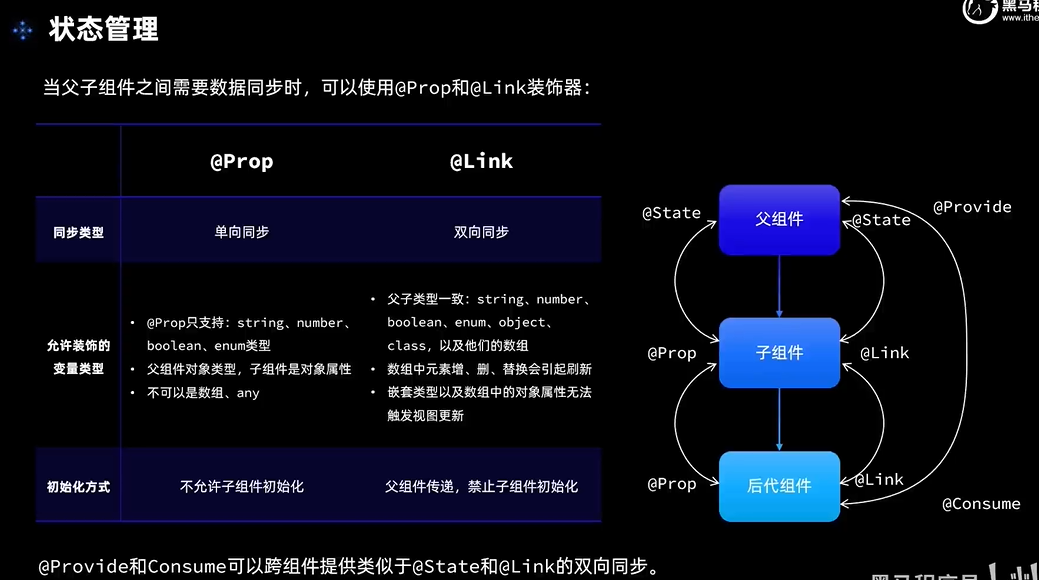
@Provide****父组件 传递
@Consume****子组件 获取
不需要传参
、
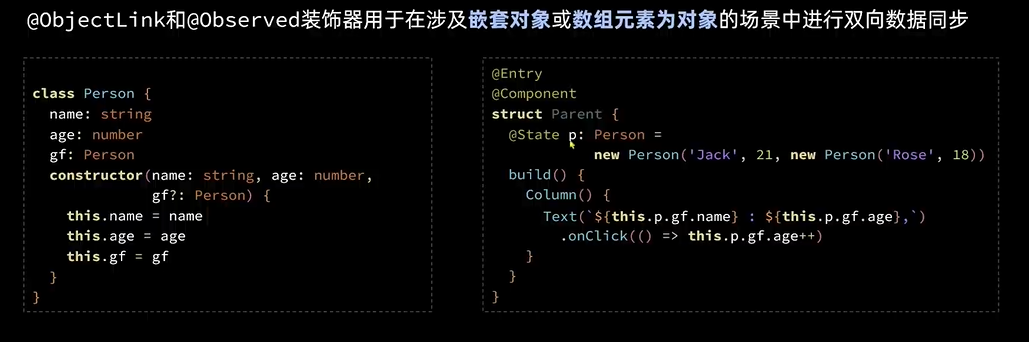
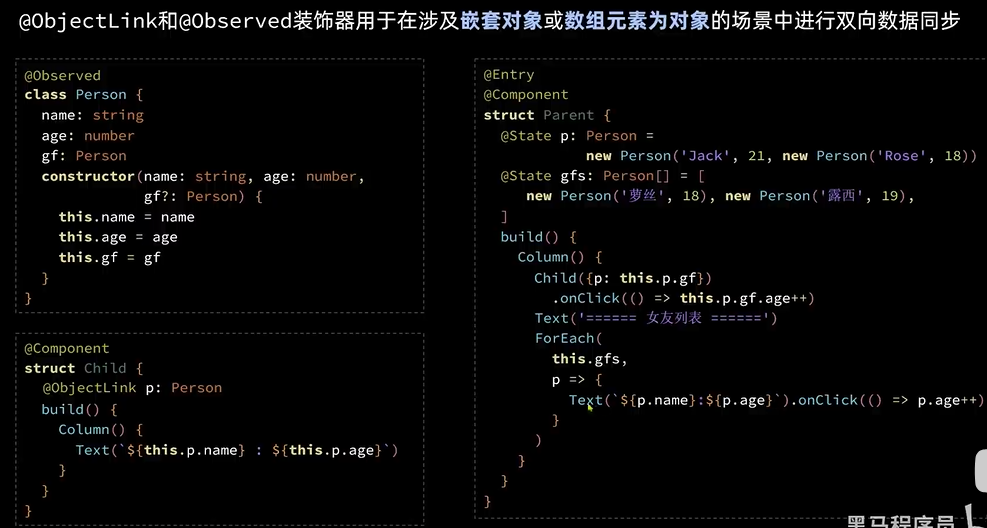
4. @Observed 和 @ObjectLink
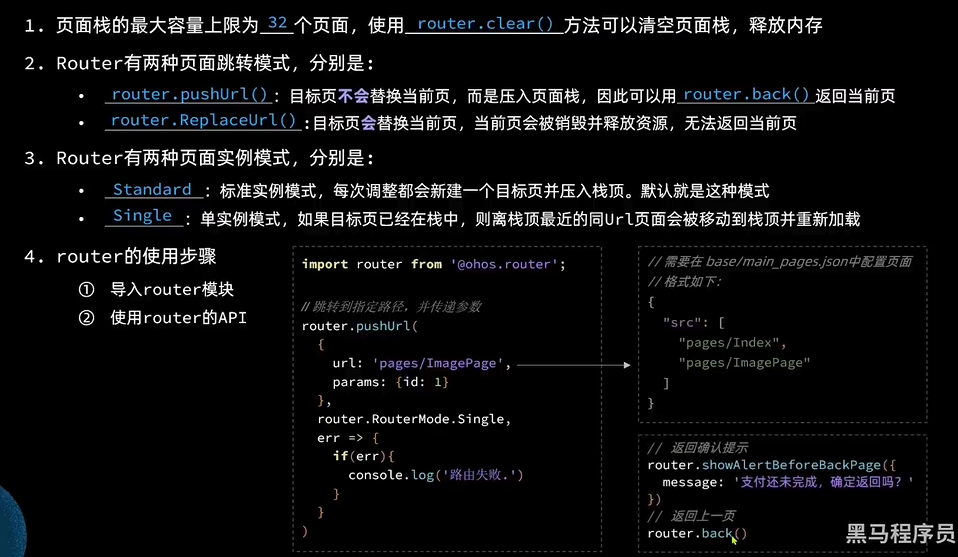
六、页面路由
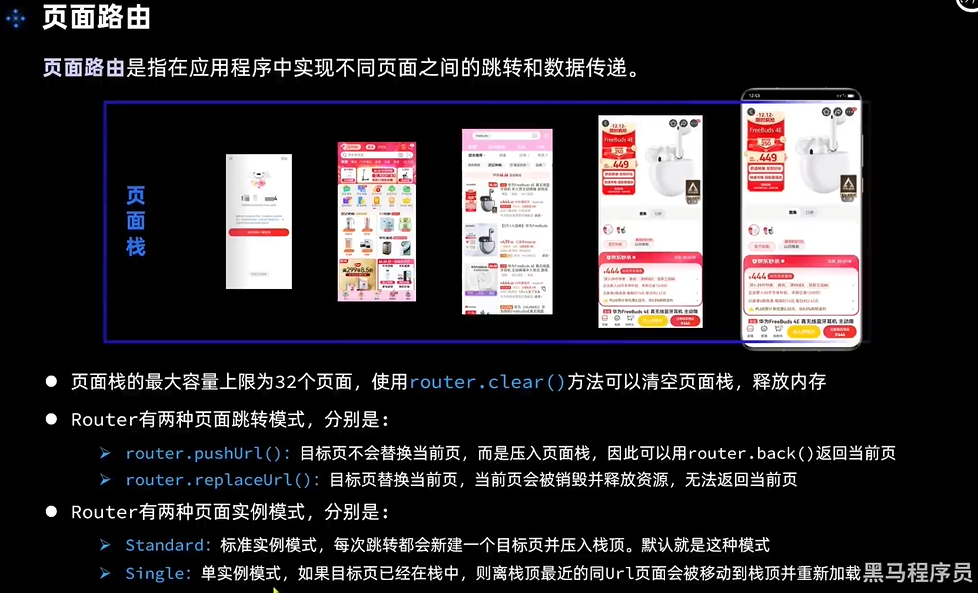
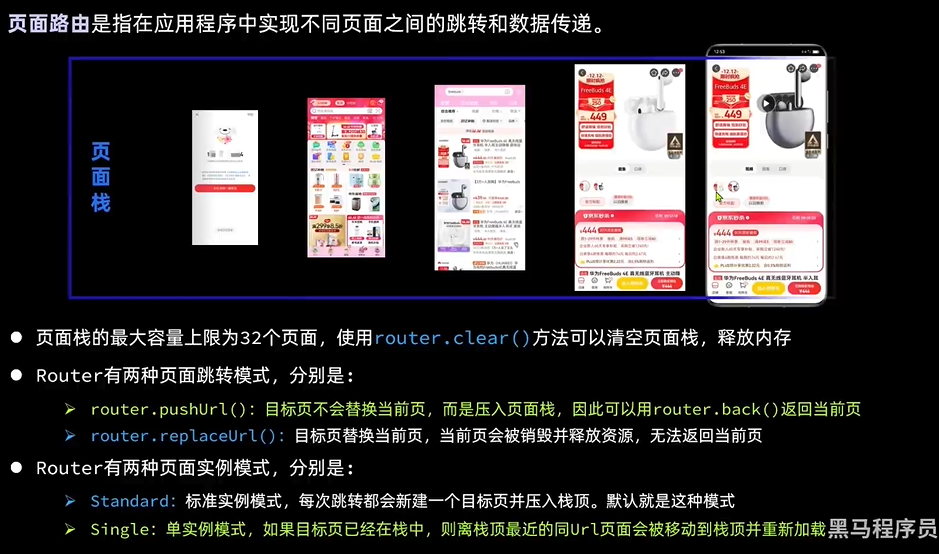
1. 示例
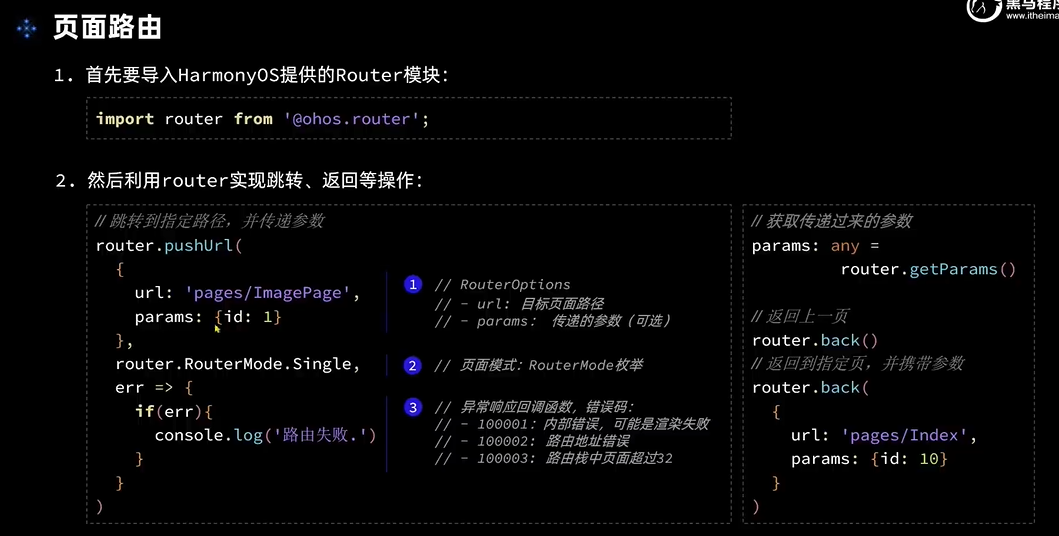
页面路由配置地址

创建文件为页面是则自动添加路径
2. 案例
案例源码
TypeScript
import router from '@ohos.router'
class RouterInfo {
// 页面路径
url: string
// 页面标题
title: string
constructor(url:string, title:string) {
this.url = url
this.title = title
}
}
@Entry
@Component
struct Index {
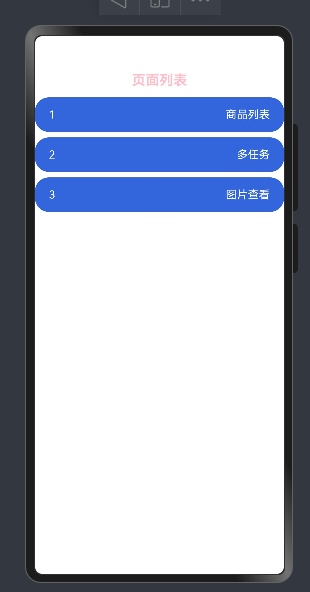
@State message: string = '页面列表'
private routers: RouterInfo[] = [
new RouterInfo('pages/itemPage','商品列表'),
new RouterInfo('pages/PropPage','多任务'),
new RouterInfo('pages/ImagePage','图片查看')
]
@Builder
RouterItem(r: RouterInfo, i: number) {
Row(){
Text(i.toString()).fontColor(Color.White)
Text(r.title).fontColor(Color.White)
}
.justifyContent(FlexAlign.SpaceBetween)
.backgroundColor('#36D')
.padding({left:20,right:20})
.borderRadius(20)
.width('100%')
.height(50)
.onClick(() => {
// router 跳转
router.pushUrl(
{
url:r.url,
params:{
id:i
}
},
router.RouterMode.Single, //页面跳转模式
err => {
if (err) {
console.log(`跳转失败,errCode:${err.code} errMsg:${err.message}`)
}
}
)
})
}
build() {
Column(){
Text(this.message)
.fontSize(20)
.fontWeight(FontWeight.Bold)
.height(50)
.fontColor(Color.Pink)
List({space:8}) {
ForEach(this.routers,(router:RouterInfo,index:number)=>{
ListItem() {
this.RouterItem(router,(index+1))
}
})
}
.layoutWeight(1)
}
}
}
TypeScript
import router from "@ohos.router"

// 定义组件
@Component
export  struct Header {
  private title:ResourceStr = '列表'
  @State params:object = router.getParams() //拿到传参
  build() {
    Row(){
      Text('<-')
        .onClick(()=> {
          router.showAlertBeforeBackPage({
            message:'返回页面'
          })  //返回前提示
          router.back() //返回路由

        })
      if(this.params) {
        Text(`${this.params}, ${this.title}`)
          .fontSize(18)
          .fontWeight(FontWeight.Bold)
      }else {
        Text(this.title) // 只显示默认标题
          .fontSize(18)
          .fontWeight(FontWeight.Bold)
      }


    }
    .width('100%')
    .height(30)
  }
}
3. 总结
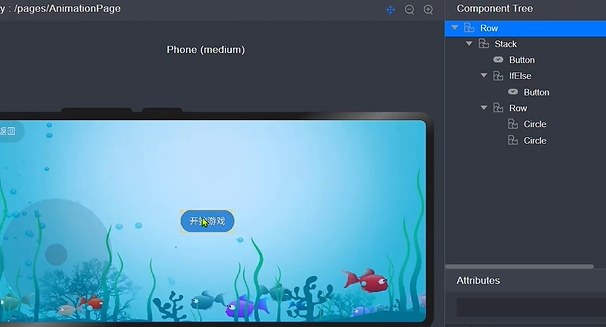
七、动画
1. 属性动画和显式动画

1)属性动画
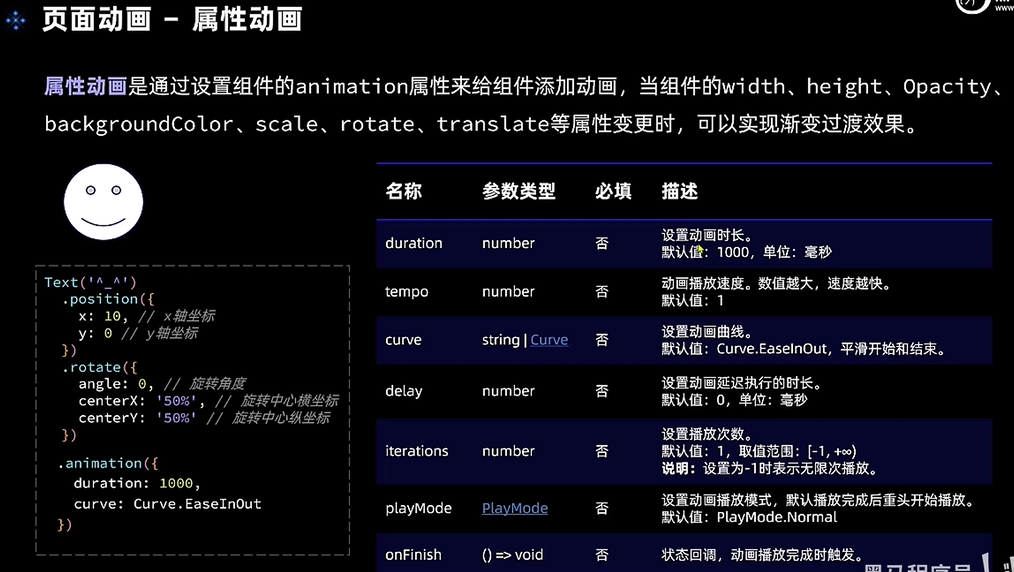
案例:

Image(this.src)
.position({x:this.fishX-20,y:this.fishY-20}) // 定义初始位置
.rotate({angle:this.angle,centerX:"50%",centerY:'50%'}) // 定义动画运动样式
.width(40)
.height(40)
// 添加属性动画
.animation({duration:500}) //动画播放参数{}//修改属性实现动画
Button("v").backgroundColor('#20101010')
  .onClick(()=> {
    this.fishY += 20
  })
TypeScript
import { Header } from '../components/CommonComponents'
import router from '@ohos.router';

@Entry
@Component
struct AnimationPage {
  @State fishX: number = 200
  @State fishY: number = 180
  // 小鱼角度
  @State angle:number = 0
  // 小鱼图片
  @State src: Resource = $r('app.media.startIcon')
  // 是否开始游戏
  @State isBegin: boolean = false;

  build() {
    Row() {
      // Header({title:"小鱼动画"})

      Stack() {  //堆叠容器
        Button('返回')
          .position({x:0,y:0})
          .backgroundColor(Color.Pink)
          .onClick(()=> {
            router.back()
          })
          .margin({top:0})
          .zIndex(1)


        if(!this.isBegin) {
          Button('开始游戏')
            .onClick(() => {
                this.isBegin = true
            })
            .margin({left:250})
        }else{
          // 小鱼图片
          Image(this.src)
            .position({x:this.fishX-20,y:this.fishY-20})
            .rotate({angle:this.angle,centerX:"50%",centerY:'50%'})
            .width(40)
            .height(40)
        //   添加属性动画
            .animation({duration:500})

        //   操作按钮
          Row(){
            Button('<').backgroundColor('#20101010')
              .onClick(()=> {
                this.fishX -= 20
              })
            Column({space:40}) {
              Button('^').backgroundColor('#20101010')
                .onClick(()=> {
                  this.fishY -= 20
                })
              Button("v").backgroundColor('#20101010')
                .onClick(()=> {
                  this.fishY += 20
                })
            }
            Button('>').backgroundColor('#20101010')
              .onClick(()=> {
                this.fishX += 20
              })
          }
          .height(240)
          .width(240)
        }

      }

    }
    .height('100%')
    .width('100%')
  }
}
2)显式动画 *
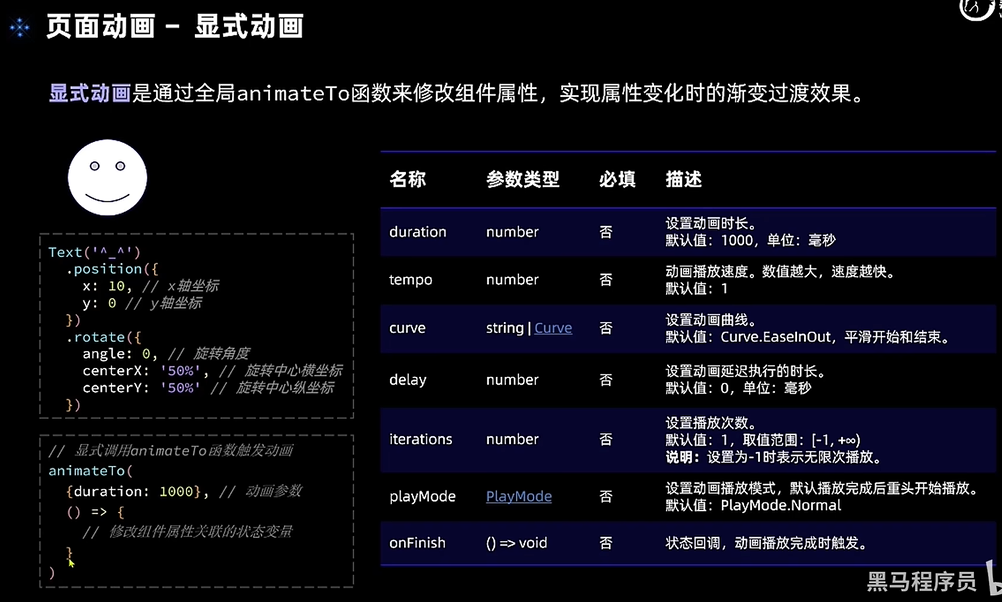
Image(this.src)
  .position({x:this.fishX-20,y:this.fishY-20})
  .rotate({angle:this.angle,centerX:"50%",centerY:'50%'})
  .width(40)
  .height(40)
Button('<').backgroundColor('#20101010')
  .onClick(()=> {
    // this.fishX -= 20
    animateTo({duration:500},()=>{
      this.fishX -= 20
    })
  })
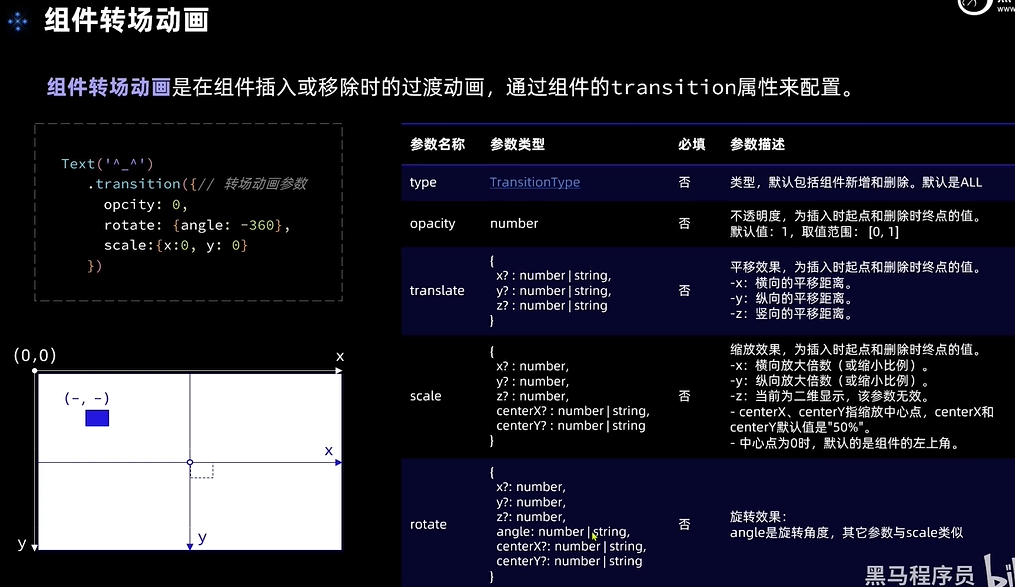
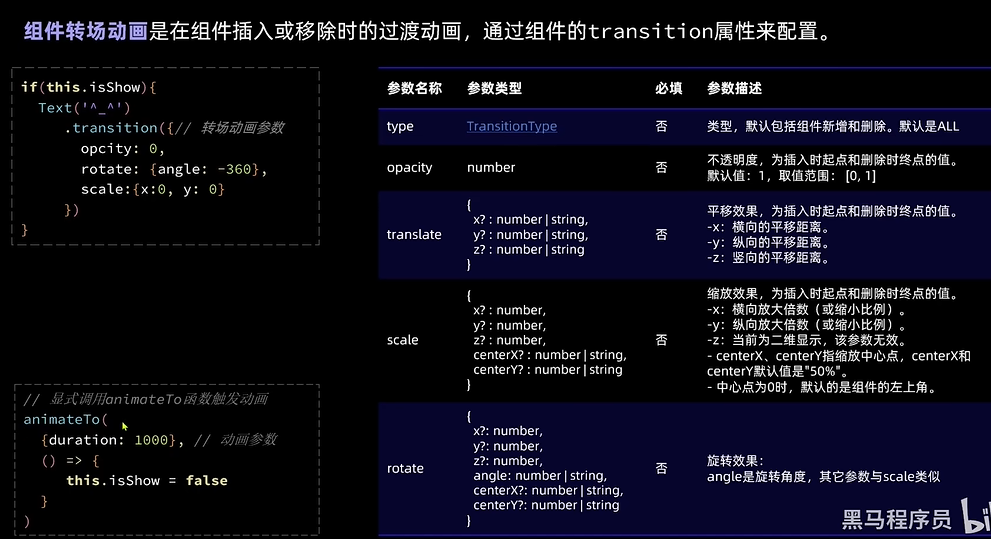
2. 组件转场动画
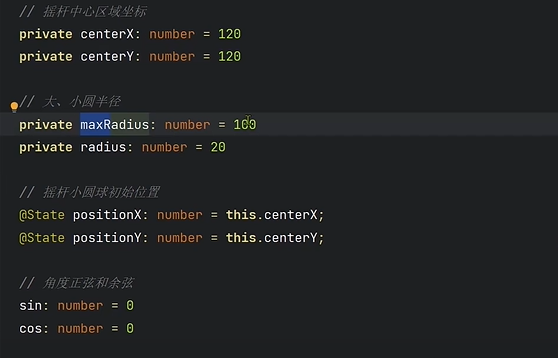
3. 实现摇杆功能

八、Stage 模型
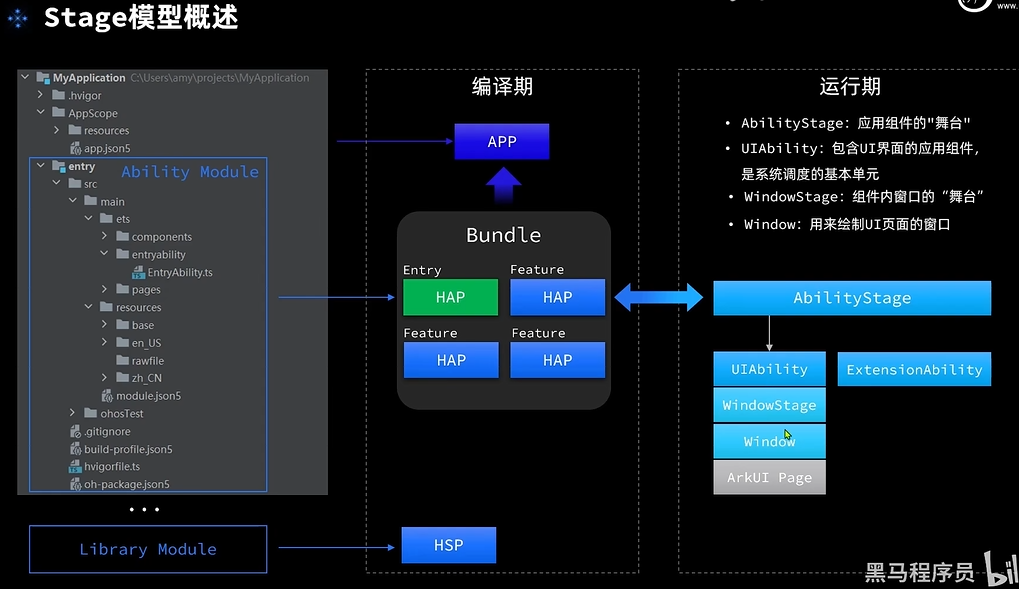
1. 应用配置组件
23-Stage模型-应用配置文件_哔哩哔哩_bilibili
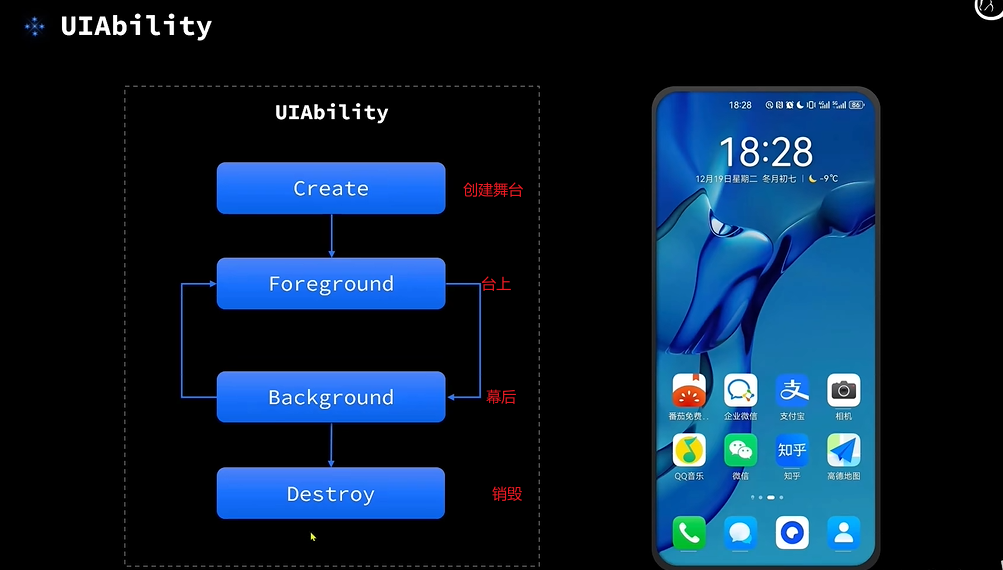
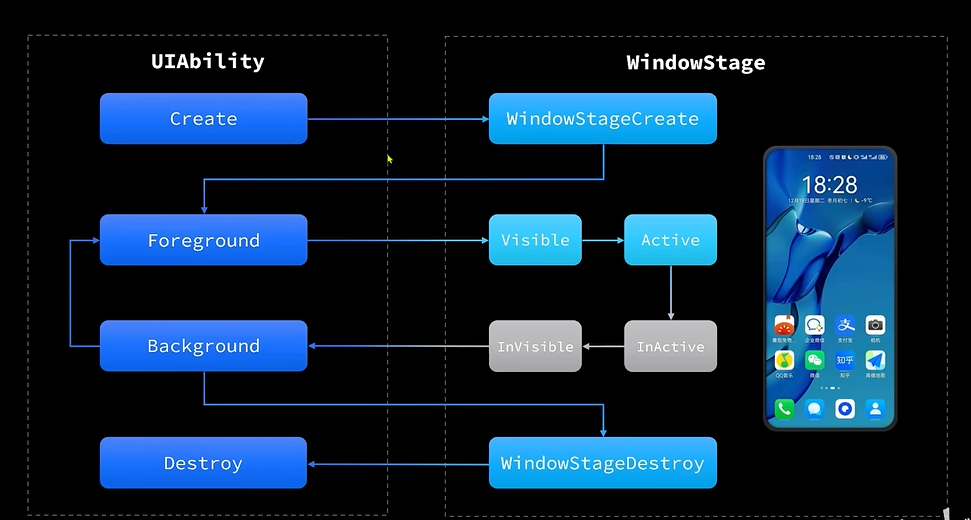
2. UIAbility 生命周期
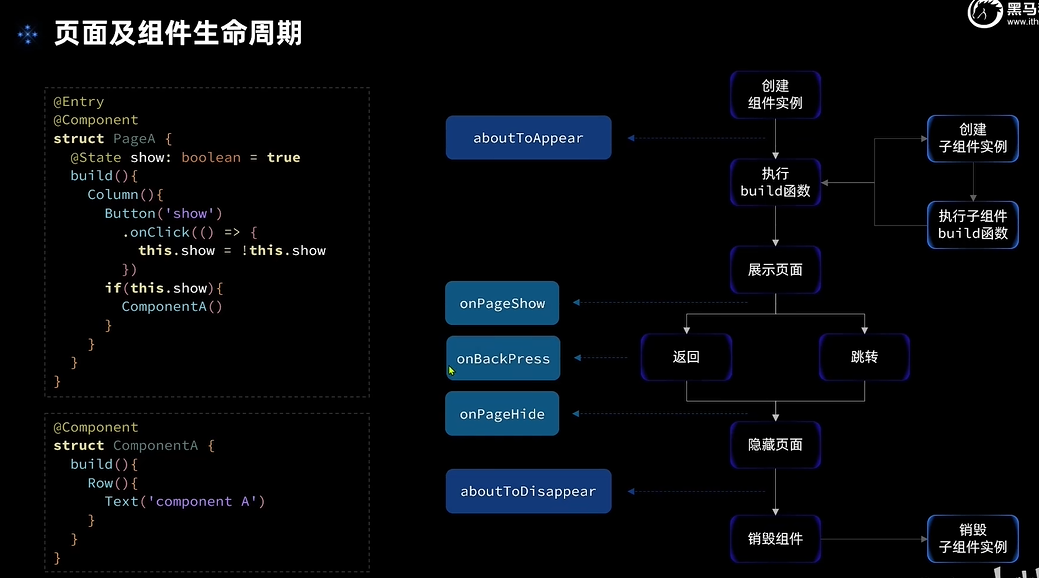
3. 页面组件生命周期
4. UIAbility的启动模式
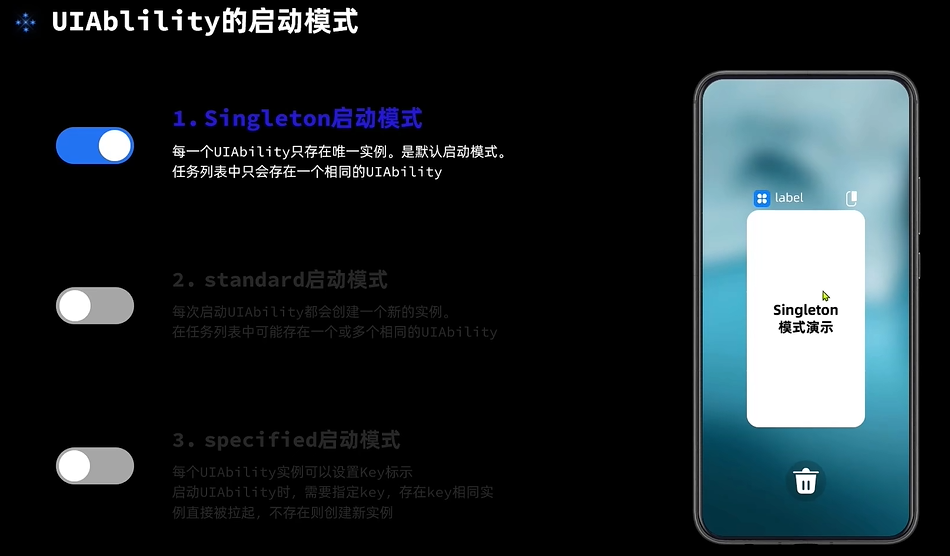

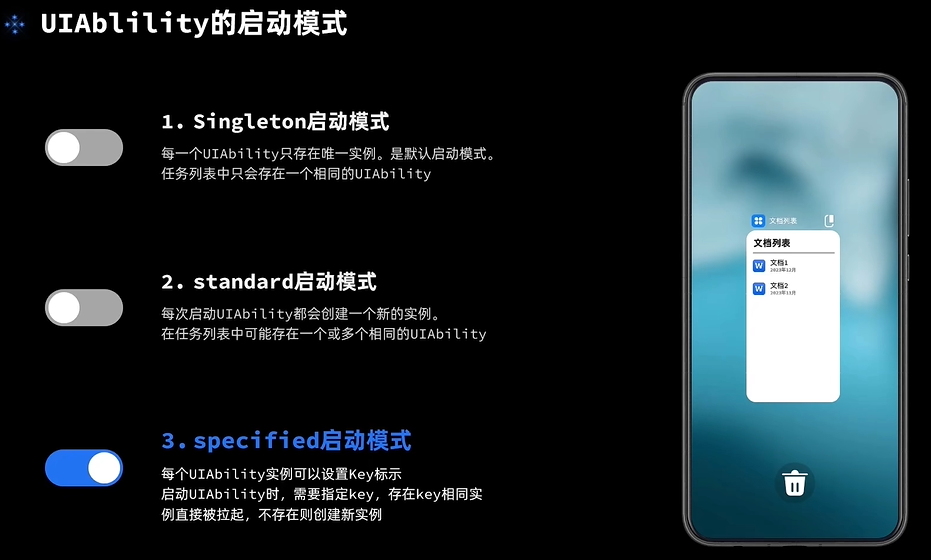
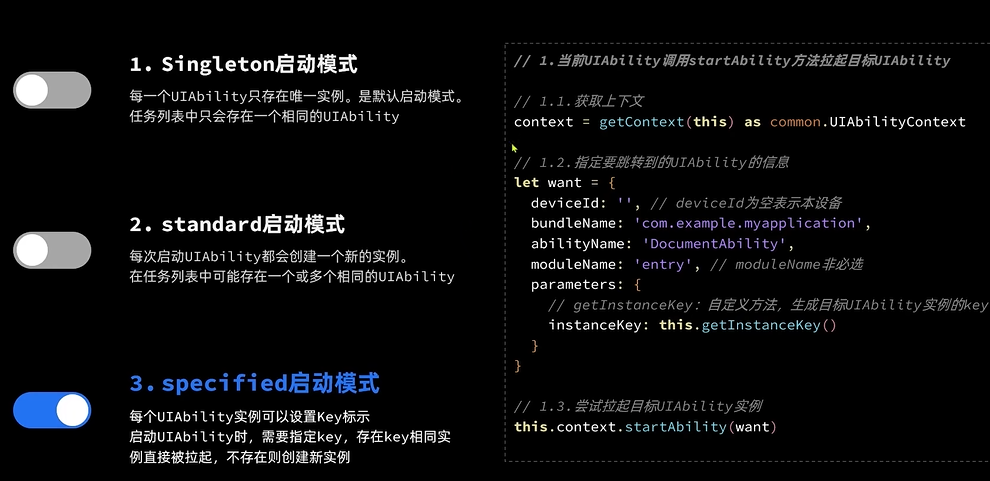

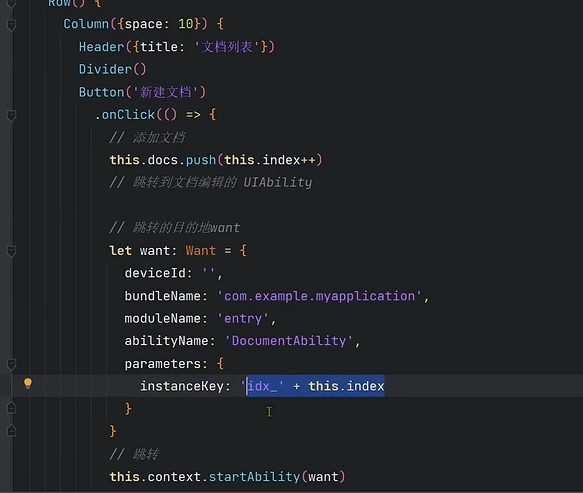
修改模式
1)案例:文档跳转