🔥博客主页: 【小扳_-CSDN博客】**
❤感谢大家点赞👍收藏⭐评论✍**


1.0 SpringAI 概述
目前大模型应用开发最常见的框架就是 LangChain,然而 LangChain 是基于 Python 语言,虽然有 LangChain4j,但是对于大量使用 Spring 生态的应用来说,适配性就稍微差了些。
而 Spring 公司推出的 SpringAI 框架,充分利用了 Spring 框架中 AOP、IOC 的能力,可以与现有的 Java 项目无缝融合,非常方便。
当然,SpringAI 要求的 JDK 版本至少是 JDK17,SpringBoot 也必须是 3.x 的版本才可以,所以如果想要使用 SpringAI,必须先升级 JDK 和 SpringAI 版本才行。
如果是比较老的项目,也可以使用 LangChain4j,它要求的最低 JDK 版本为 JDK8。
1.1 大模型的使用
首先要明确一点,大模型应用开发并不是在浏览器中跟 AI 聊天。而是通过访问模型对外暴露的 API 接口,实现与大模型的交互。
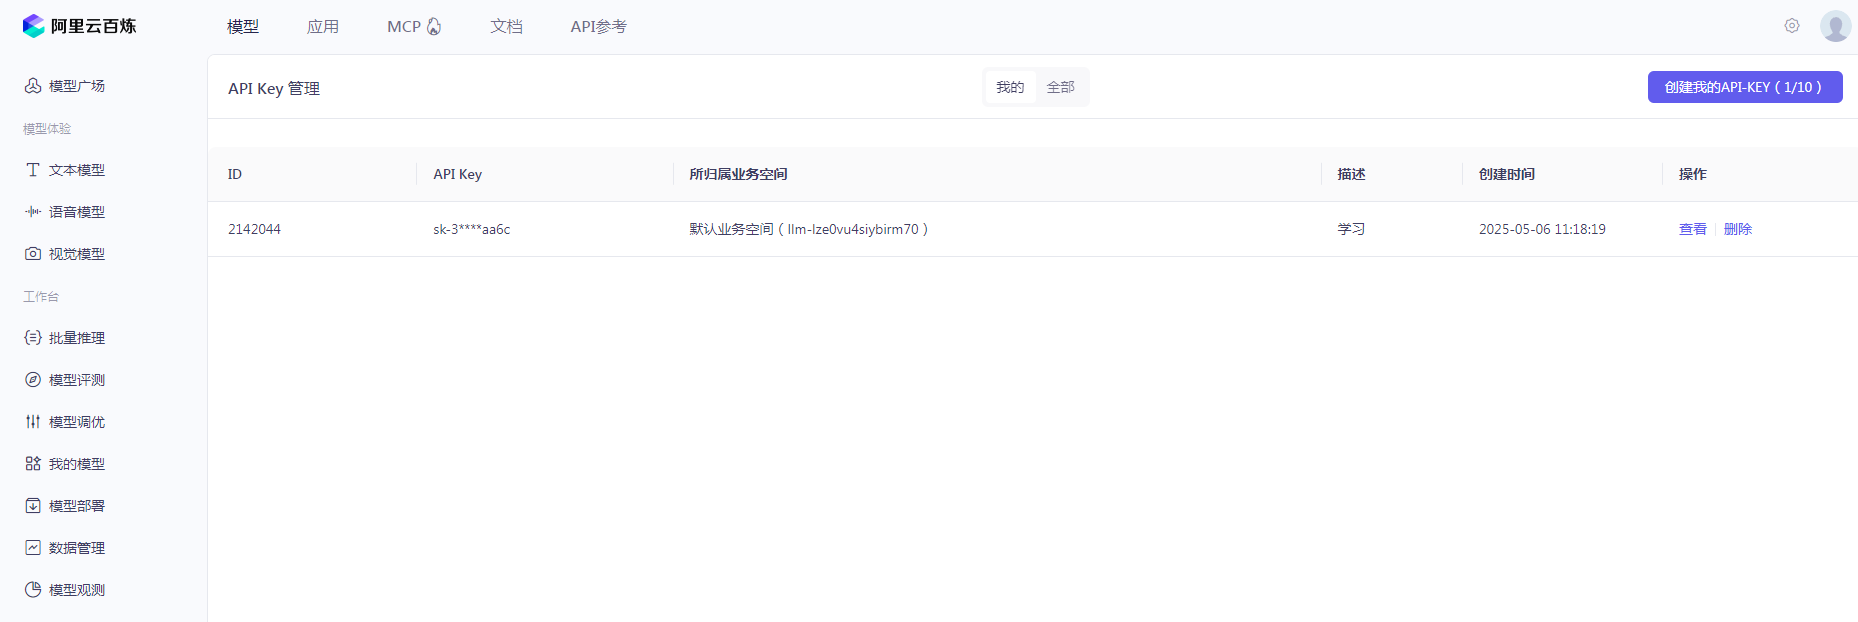
因此,企业首先需要有一个可访问的大模型,通常有三种选择:
1)使用开放的大模型 API;
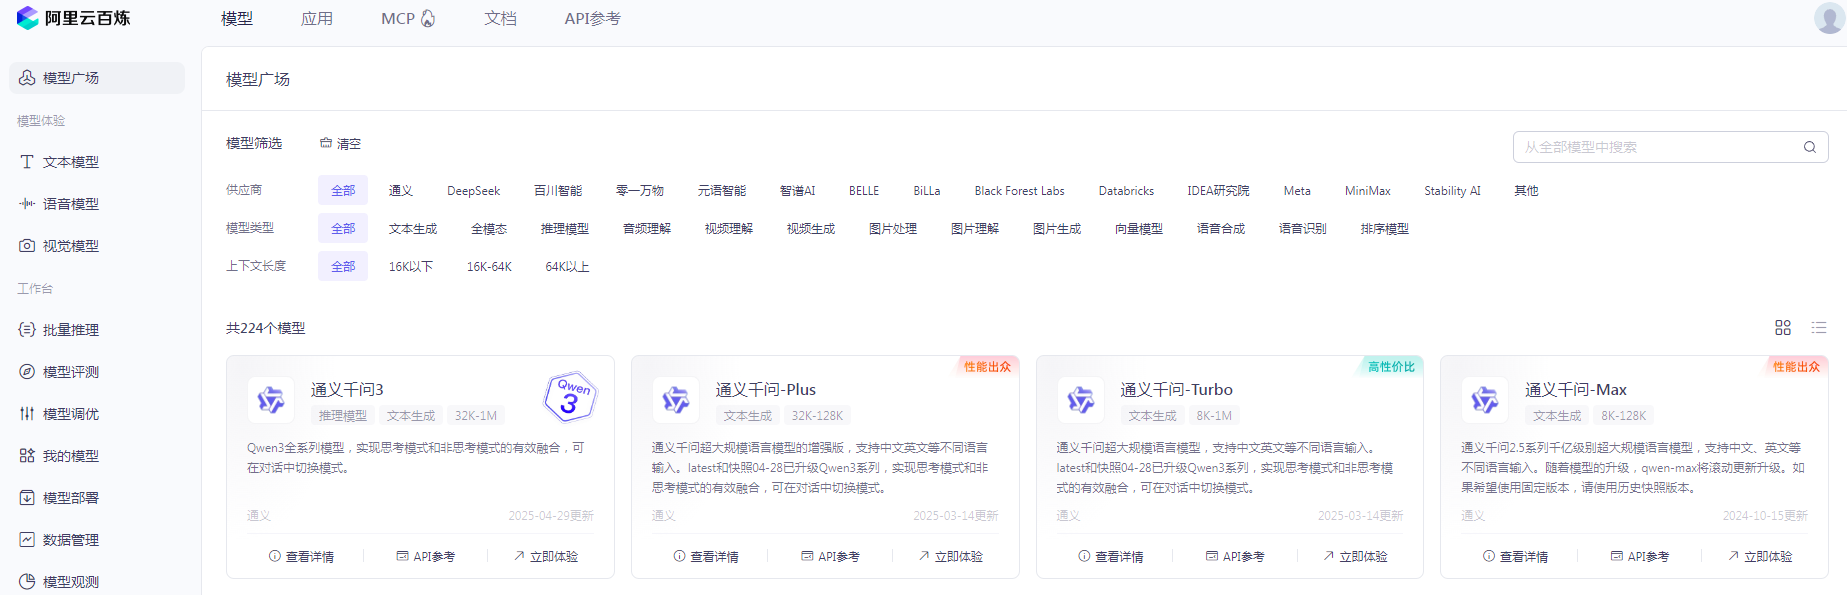
本次演示的都是使用开放的大模型 API,只需要选择自己合适的大模型,创建出自己的 API Key 就能免费使用很长时间了:
2)在云平台部署稀有大模型;
3)在本地服务器部署稀有大模型;
2.0 SpringAI 新手入门
2.1 配置 pom.xml 文件
首先,在 SpringBoot 项目中引入 SpringAI 起步依赖:
XML<dependency> <groupId>org.springframework.ai</groupId> <artifactId>spring-ai-openai-spring-boot-starter</artifactId> </dependency>
接着,在项目 pom.xml 中添加 SpringAI 的版本信息:
XML<spring-ai.version>1.0.0-M6</spring-ai.version>
然后,添加 SpringAI 的依赖管理项:
XML<dependencyManagement> <dependencies> <dependency> <groupId>org.springframework.ai</groupId> <artifactId>spring-ai-bom</artifactId> <version>${spring-ai.version}</version> <type>pom</type> <scope>import</scope> </dependency> </dependencies> </dependencyManagement>
最终,完整 pom.xml 依赖如下:
XML<?xml version="1.0" encoding="UTF-8"?> <project xmlns="http://maven.apache.org/POM/4.0.0" xmlns:xsi="http://www.w3.org/2001/XMLSchema-instance" xsi:schemaLocation="http://maven.apache.org/POM/4.0.0 https://maven.apache.org/xsd/maven-4.0.0.xsd"> <modelVersion>4.0.0</modelVersion> <parent> <groupId>org.springframework.boot</groupId> <artifactId>spring-boot-starter-parent</artifactId> <version>3.4.5</version> <relativePath/> <!-- lookup parent from repository --> </parent> <groupId>com.xbs</groupId> <artifactId>springAI-openAi</artifactId> <version>0.0.1-SNAPSHOT</version> <name>springAI-openAi</name> <description>springAI-openAi</description> <url/> <licenses> <license/> </licenses> <developers> <developer/> </developers> <scm> <connection/> <developerConnection/> <tag/> <url/> </scm> <properties> <java.version>17</java.version> <spring-ai.version>1.0.0-M6</spring-ai.version> </properties> <dependencyManagement> <dependencies> <dependency> <groupId>org.springframework.ai</groupId> <artifactId>spring-ai-bom</artifactId> <version>${spring-ai.version}</version> <type>pom</type> <scope>import</scope> </dependency> </dependencies> </dependencyManagement> <dependencies> <dependency> <groupId>org.springframework.boot</groupId> <artifactId>spring-boot-starter-web</artifactId> </dependency> <dependency> <groupId>org.projectlombok</groupId> <artifactId>lombok</artifactId> <version>1.18.22</version> </dependency> <dependency> <groupId>org.springframework.ai</groupId> <artifactId>spring-ai-openai-spring-boot-starter</artifactId> </dependency> <dependency> <groupId>com.mysql</groupId> <artifactId>mysql-connector-j</artifactId> <scope>runtime</scope> </dependency> <dependency> <groupId>org.springframework.boot</groupId> <artifactId>spring-boot-starter-test</artifactId> <scope>test</scope> </dependency> <dependency> <groupId>com.baomidou</groupId> <artifactId>mybatis-plus-spring-boot3-starter</artifactId> <version>3.5.10.1</version> </dependency> <dependency> <groupId>org.springframework.ai</groupId> <artifactId>spring-ai-pdf-document-reader</artifactId> </dependency> </dependencies> <build> <plugins> <plugin> <groupId>org.springframework.boot</groupId> <artifactId>spring-boot-maven-plugin</artifactId> </plugin> </plugins> </build> </project>
除了以上 SpringAI 的依赖之外,我还额外引入了在之后的项目开发中所用到的依赖。
2.2 配置 application.yaml 文件
我们现在使用的是开放大模型的 API,需要添加以下内容:
XMLspring: application: name: ai-demo ai: openai: base-url: https://dashscope.aliyuncs.com/compatible-mode api-key: 在这里写你自己申请的 API-Key chat: options: model: qwen-max-latest #选择你自己喜欢的模型 https://help.aliyun.com/zh/model-studio/getting-started/models temperature: 0.8 #模型温度,影响模型生成结果的随机性,越小越稳定 embedding: options: model: text-embedding-v3 dimensions: 1024 datasource: driver-class-name: com.mysql.cj.jdbc.Driver url: jdbc:mysql://localhost:3144/ai?serverTimezone=Asia/Shanghai&useSSL=false&useUnicode=true&characterEncoding=utf-8&zeroDateTimeBehavior=convertToNull&transformedBitIsBoolean=true&tinyInt1isBit=false&allowPublicKeyRetrieval=true&allowMultiQueries=true&useServerPrepStmts=false username: root password: 你猜猜看 logging: level: org.springframework.ai: debug # AI对话的日志级别 com.xbs.springaiopenai: debug # 本项目的日志级别 server: port: 8087 mybatis: configuration: log-impl: org.apache.ibatis.logging.stdout.StdOutImpl
2.3 配置 ChatClient
javapackage com.itheima.ai.config; import org.springframework.ai.chat.client.ChatClient; import org.springframework.ai.chat.client.advisor.SimpleLoggerAdvisor; import org.springframework.ai.ollama.OllamaChatModel; import org.springframework.context.annotation.Bean; import org.springframework.context.annotation.Configuration; @Configuration public class CommonConfiguration { // 注意参数中的model就是使用的模型,这里用了Ollama,也可以选择OpenAIChatModel @Bean public ChatClient chatClient(OllamaChatModel model) { return ChatClient.builder(model) // 创建ChatClient工厂 .build(); // 构建ChatClient实例 } }
代码解读:
ChatClient.builder: 会得到一个 ChatClient.Builder 工厂对象,利用它可以自由选择模型、添加各种自定义配置。
2.4 同步调用
接下来,我们定义一个 Controller,在其中接收用户发送的提示词,然后把提示词发送给大模型,交给大模型处理,拿到结果后返回。
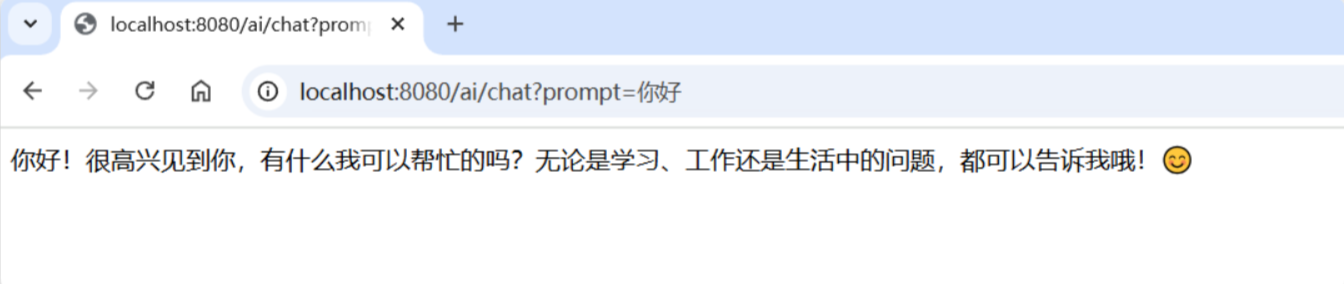
javapackage com.itheima.ai.controller; import lombok.RequiredArgsConstructor; import org.springframework.ai.chat.client.ChatClient; import org.springframework.web.bind.annotation.RequestMapping; import org.springframework.web.bind.annotation.RequestParam; import org.springframework.web.bind.annotation.RestController; @RequiredArgsConstructor @RestController @RequestMapping("/ai") public class ChatController { private final ChatClient chatClient; // 请求方式和路径不要改动,将来要与前端联调 @RequestMapping("/chat") public String chat(@RequestParam(defaultValue = "讲个笑话") String prompt) { return chatClient .prompt(prompt) // 传入user提示词 .call() // 同步请求,会等待AI全部输出完才返回结果 .content(); //返回响应内容 } }
注意,基于 call() 方法的调用属于同步调用,需要所有响应结果全部返回后才能返回给前端。
启动项目,在浏览器中访问:http://localhost:8080/ai/chat?prompt=你好
2.5 流式调用
同步调用需要等待很长时间页面才能看到结果,用户体验不好。为了解决这个问题,我们可以改进调用方式为流式调用。
在 SpringAI 中使用了 WebFlux 技术实现流式调用。
java// 注意看返回值,是Flux<String>,也就是流式结果,另外需要设定响应类型和编码,不然前端会乱码 @RequestMapping(value = "/chat", produces = "text/html;charset=UTF-8") public Flux<String> chat(@RequestParam(defaultValue = "讲个笑话") String prompt) { return chatClient .prompt(prompt) .stream() // 流式调用 .content(); }
重启测试,再次访问:

2.6 System 设定
可以发现,当我们询问 AI 你是谁的时候,它回答自己是 DeepSeek-R1,这是大模型底层的设定。如果我们希望 AI 按照新的设定工作,就需要给它设置 System 背景信息。
在 SpringAI 中,设置 System 信息非常方便,不需要在每次发送时封装到 Message,而是创建 ChatClient 时指定即可:
java@Bean public ChatClient chatClient(OllamaChatModel model) { return ChatClient.builder(model) // 创建ChatClient工厂实例 .defaultSystem("你的名字叫小板。请以友好、乐于助人和愉快的方式解答学生的各种问题。") .defaultAdvisors(new SimpleLoggerAdvisor()) .build(); // 构建ChatClient实例 }
2.7 日志功能
默认情况下,应用于 AI 的交互时不记录日志的,我们无法得知 SpringAI 组织的提示词到底长什么样,有没有问题。这样不方便我们调试。
SpringAI 基于 AOP 机制实现与大模型对话过程的增强、拦截、修改等功能。所有的增强通知都需要实现 Advisor 接口。
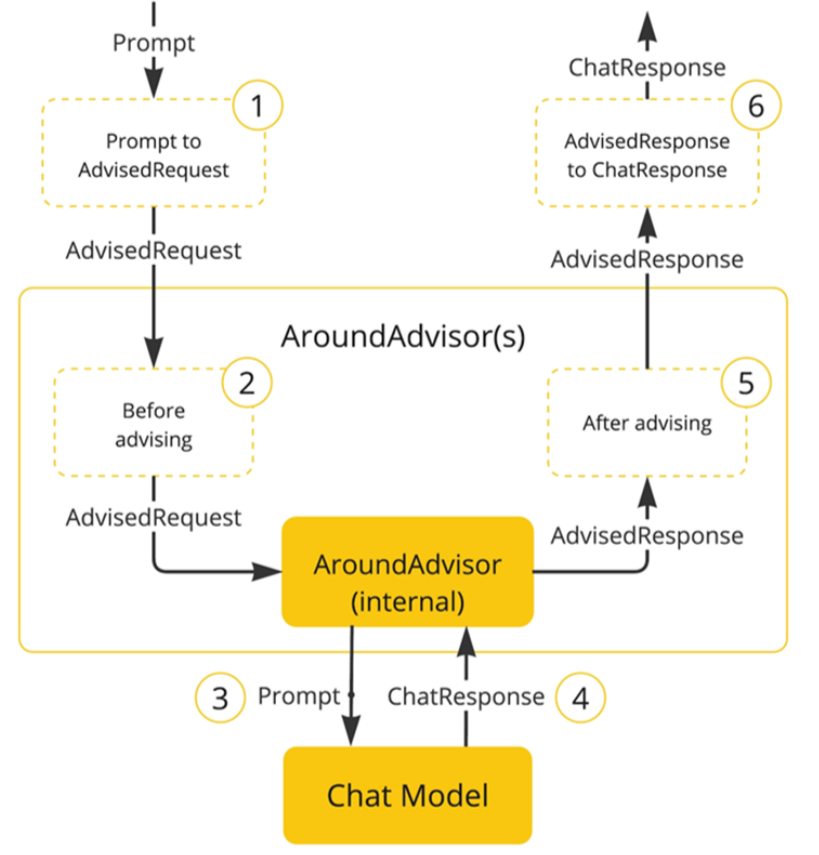
Spring 提供了一些 Advisor 的默认实现,来实现一些基本的增强功能:
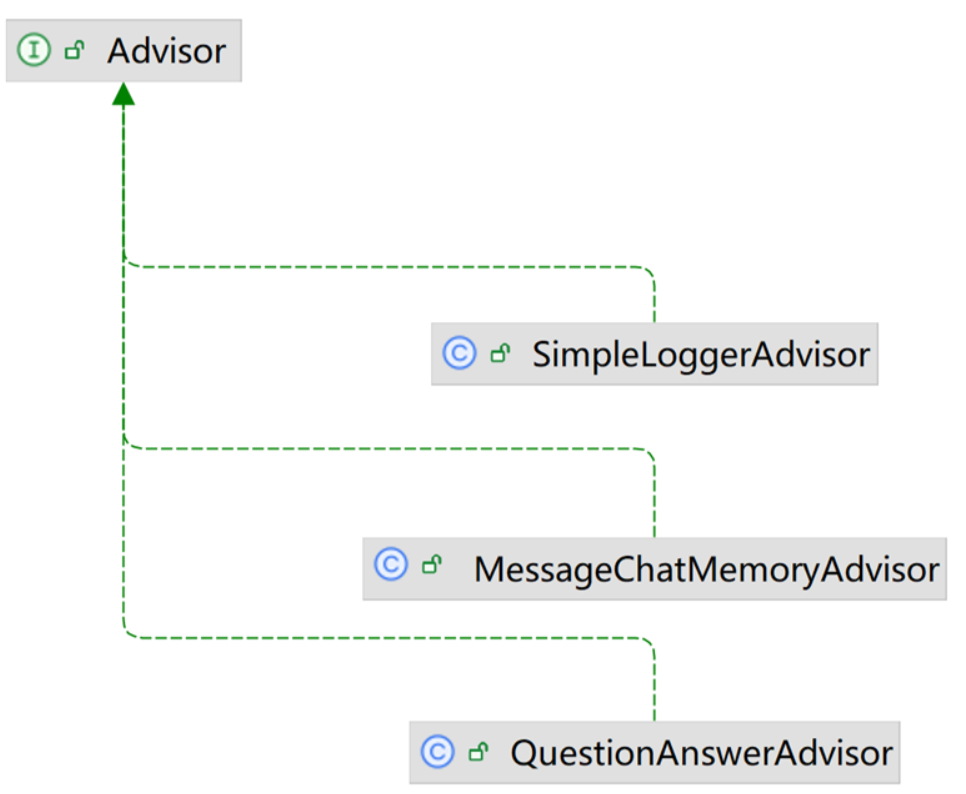
1)SimpleLoggerAdvisor:日志记录的 Advisor。
2)MessageChatMemoryAdvisor:会话记忆的 Advisor。
3)QuestionAnswerAdvisor:实现 RAG 的 Advisor。
只需要在配置 ChatClient 添加日志记录 Advisor:
java@Bean public ChatClient chatClient(OllamaChatModel model) { return ChatClient.builder(model) // 创建ChatClient工厂实例 .defaultSystem("你是一个热心、可爱的智能助手") .defaultAdvisors(new SimpleLoggerAdvisor()) // 添加默认的Advisor,记录日志 .build(); // 构建ChatClient实例 }
接下来,修改日志级别:
javalogging: level: org.springframework.ai: debug # AI对话的日志级别 com.itheima.ai: debug # 本项目的日志级别
重启项目,再次和 AI 聊天就可以在控制台上看到 AI 的日志输出了。
2.8 会话记忆功能
现在,我们的 AI 聊天机器人是没有记忆功能的,上一次聊天的内容,下一次就忘掉了。我们之前说过,让 AI 有会话记忆的方式就是把每一次历史对话内容拼接到 Prompt 中,一起发送过去。是不是还挺麻烦的。别担心,好消息是,我们并不需要自己来拼接,SpringAI 自带了会话记忆功能,可以帮我们把历史会话保存下来,下一次请求 AI 时会自动拼接,非常方便。
2.8.1 ChatMemory
会话记忆功能同样是基于 AOP 实现,Spring 提供了一个 MessageChatMemoryAdvisor 的通知,我们可以像之前添加日志通知一样添加到 ChatClient 即可。
不过,要注意的是,MessageChatMemoryAdvisor 需要指定一个 ChatMemory 实例,也就是会话历史保存的方式。
ChatMemory 接口声明如下:
javapublic interface ChatMemory { // TODO: consider a non-blocking interface for streaming usages default void add(String conversationId, Message message) { this.add(conversationId, List.of(message)); } // 添加会话信息到指定conversationId的会话历史中 void add(String conversationId, List<Message> messages); // 根据conversationId查询历史会话 List<Message> get(String conversationId, int lastN); // 清除指定conversationId的会话历史 void clear(String conversationId); }
可以看到,所有的会话记忆都是与 conversationid 有关联的,也就是会话 Id,将来不同会话 id 的记忆自然是分开管理的。
目前,在 SpringAI 中有两个 ChatMemory 的实现:
1)InMemoryChatMemory:会话历史保存在内存中
2)CassandraChatMemory:会话保存在 Cassandra 数据库中(需要引入额外依赖,并且绑定了向量数据库,不够灵活)
2.8.2 添加会话记忆功能
首先注册 chatMemory 对象:
java@Bean public ChatMemory chatMemory() { return new InMemoryChatMemory(); }
然后添加到 ChatClient 中:
java@Bean public ChatClient chatClient(OllamaChatModel model, ChatMemory chatMemory) { return ChatClient.builder(model) // 创建ChatClient工厂实例 .defaultSystem("你的名字叫小板。请以友好、乐于助人和愉快的方式解答学生的各种问题。") .defaultAdvisors(new SimpleLoggerAdvisor()) // 添加默认的Advisor,记录日志 .defaultAdvisors(new MessageChatMemoryAdvisor(chatMemory)) .build(); // 构建ChatClient实例 }
最后在和 AI 聊天的时候,为了区分每一个用户对应着不同的会话记录,因此需要传入用户 ID 进行区分:
java@RequestMapping(value = "/chat", produces = "text/html;charset=UTF-8") public Flux<String> chat(@RequestParam(defaultValue = "讲个笑话") String prompt, String chatId) { return chatClient .prompt(prompt) .advisors(a -> a.param(CHAT_MEMORY_CONVERSATION_ID_KEY, chatId)) .stream() .content(); }
