VGG16深度学习人脸识别检测系统
文章目录
-
-
- [**1. 数据准备**](#1. 数据准备)
-
- [**1.1 数据加载器**](#1.1 数据加载器)
- [**2. 模型定义**](#2. 模型定义)
- [**3. 训练与评估**](#3. 训练与评估)
-
- [**3.1 训练代码**](#3.1 训练代码)
- [**4. 可视化 UI 界面**](#4. 可视化 UI 界面)
- [1. 数据加载 (`data_loader.py`)](#1. 数据加载 (
data_loader.py)) - [2. 模型定义 (`model.py`)](#2. 模型定义 (
model.py)) - [3. 训练代码 (`train.py`)](#3. 训练代码 (
train.py)) - [4. 可视化 UI 界面 (`ui.py`)](#4. 可视化 UI 界面 (
ui.py)) - 目录结构
-
预达到预期:
基于Pytorch的VGG16学习实现
支持GPU加速训练
可视化UI界面
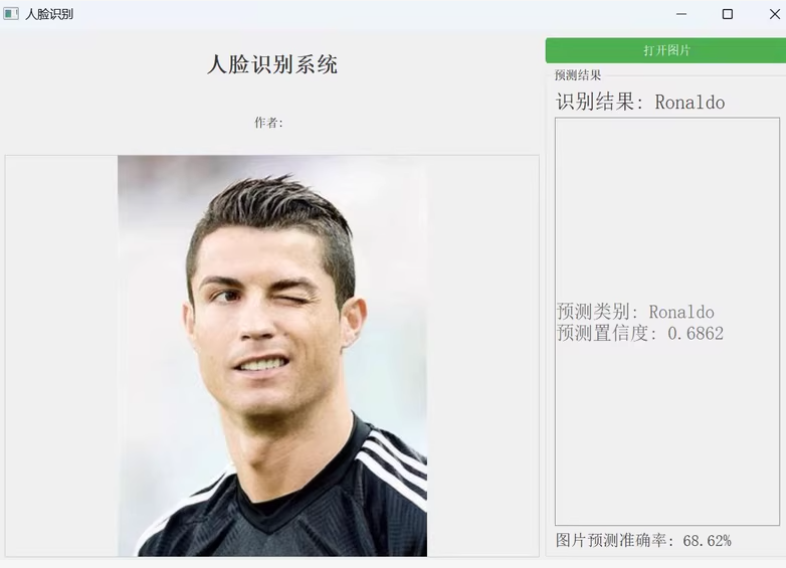
基于 PyTorch 的 VGG16 深度学习人脸识别检测系统的实现,支持 GPU 加速训练和可视化 UI 界面。我们将分步骤完成数据准备、模型定义、训练与评估以及 UI 界面的构建。
1. 数据准备
假设你有一个包含人脸图像的数据集,目录结构如下:
dataset/
├── train/
│   ├── person1/
│   │   ├── img1.jpg
│   │   └── ...
│   ├── person2/
│   │   ├── img1.jpg
│   │   └── ...
│   └── ...
└── val/
    ├── person1/
    │   ├── img1.jpg
    │   └── ...
    ├── person2/
    │   ├── img1.jpg
    │   └── ...
    └── ...
1.1 数据加载器
使用 torchvision.datasets.ImageFolder 和 torch.utils.data.DataLoader 加载数据。
python
import torch
from torchvision import datasets, transforms
from torch.utils.data import DataLoader

# 数据预处理
transform = transforms.Compose([
    transforms.Resize((224, 224)),  # VGG16 输入大小为 224x224
    transforms.ToTensor(),
    transforms.Normalize(mean=[0.485, 0.456, 0.406], std=[0.229, 0.224, 0.225])  # ImageNet 标准化
])

# 加载数据集
train_dataset = datasets.ImageFolder(root="dataset/train", transform=transform)
val_dataset = datasets.ImageFolder(root="dataset/val", transform=transform)

train_loader = DataLoader(train_dataset, batch_size=32, shuffle=True)
val_loader = DataLoader(val_dataset, batch_size=32, shuffle=False)
2. 模型定义
加载预训练的 VGG16 模型,并修改最后的全连接层以适应人脸分类任务。
python
import torch.nn as nn
from torchvision.models import vgg16

class FaceRecognitionModel(nn.Module):
    def __init__(self, num_classes):
        super(FaceRecognitionModel, self).__init__()
        self.vgg16 = vgg16(pretrained=True)  # 加载预训练的 VGG16
        self.vgg16.classifier[6] = nn.Linear(4096, num_classes)  # 修改最后一层

    def forward(self, x):
        return self.vgg16(x)
3. 训练与评估
3.1 训练代码
python
import torch.optim as optim
from tqdm import tqdm

def train_model(model, train_loader, val_loader, num_epochs=20, lr=0.001, device='cuda'):
    optimizer = optim.Adam(model.parameters(), lr=lr)
    criterion = nn.CrossEntropyLoss()

    model.to(device)
    for epoch in range(num_epochs):
        model.train()
        train_loss = 0.0
        correct = 0
        total = 0
        for images, labels in tqdm(train_loader):
            images, labels = images.to(device), labels.to(device)

            optimizer.zero_grad()
            outputs = model(images)
            loss = criterion(outputs, labels)
            loss.backward()
            optimizer.step()

            train_loss += loss.item()
            _, predicted = torch.max(outputs, 1)
            total += labels.size(0)
            correct += (predicted == labels).sum().item()

        print(f"Epoch [{epoch+1}/{num_epochs}], Loss: {train_loss/len(train_loader):.4f}, Accuracy: {correct/total:.4f}")

        # 验证模型
        evaluate_model(model, val_loader, device)

def evaluate_model(model, val_loader, device):
    model.eval()
    correct = 0
    total = 0
    with torch.no_grad():
        for images, labels in val_loader:
            images, labels = images.to(device), labels.to(device)
            outputs = model(images)
            _, predicted = torch.max(outputs, 1)
            total += labels.size(0)
            correct += (predicted == labels).sum().item()

    print(f"Validation Accuracy: {correct/total:.4f}")
4. 可视化 UI 界面
使用 PyQt5 构建一个简单的 GUI 应用程序,用于加载图片并进行人脸识别。
python
from PyQt5.QtWidgets import QApplication, QMainWindow, QPushButton, QLabel, QVBoxLayout, QWidget, QFileDialog
from PyQt5.QtGui import QImage, QPixmap
import cv2
import torch

class App(QMainWindow):
    def __init__(self, model, class_names):
        super().__init__()
        self.setWindowTitle("VGG16 人脸识别系统")
        self.setGeometry(100, 100, 800, 600)

        self.model = model
        self.class_names = class_names

        # UI 元素
        self.label_image = QLabel(self)
        self.label_image.setGeometry(50, 50, 700, 400)

        self.btn_load = QPushButton("加载图片", self)
        self.btn_load.setGeometry(50, 500, 150, 40)
        self.btn_load.clicked.connect(self.load_image)

        self.label_result = QLabel("预测结果:", self)
        self.label_result.setGeometry(250, 500, 500, 40)

    def load_image(self):
        file_path, _ = QFileDialog.getOpenFileName(self, "选择图片", "", "Images (*.jpg *.png)")
        if file_path:
            image = cv2.imread(file_path)
            image = cv2.cvtColor(image, cv2.COLOR_BGR2RGB)

            # 显示原始图像
            height, width, channel = image.shape
            bytes_per_line = 3 * width
            q_img = QImage(image.data, width, height, bytes_per_line, QImage.Format_RGB888)
            self.label_image.setPixmap(QPixmap.fromImage(q_img))

            # 预测
            result = self.predict_image(file_path)
            self.label_result.setText(f"预测结果:{result}")

    def predict_image(self, image_path):
        from PIL import Image
        from torchvision import transforms

        # 图像预处理
        transform = transforms.Compose([
            transforms.Resize((224, 224)),
            transforms.ToTensor(),
            transforms.Normalize(mean=[0.485, 0.456, 0.406], std=[0.229, 0.224, 0.225])
        ])
        image = Image.open(image_path).convert("RGB")
        image = transform(image).unsqueeze(0).to('cuda')

        # 推理
        self.model.eval()
        with torch.no_grad():
            output = self.model(image)
            _, predicted = torch.max(output, 1)
            class_idx = predicted.item()

        return self.class_names[class_idx]

if __name__ == "__main__":
    device = 'cuda' if torch.cuda.is_available() else 'cpu'

    # 加载模型
    model = FaceRecognitionModel(num_classes=len(train_dataset.classes))
    model.load_state_dict(torch.load("face_recognition_model.pth"))
    model.to(device)
    model.eval()

    app = QApplication([])
    window = App(model, train_dataset.classes)
    window.show()
    app.exec_()
为了实现一个基于 VGG16 的人脸识别系统,并且支持 GPU 加速训练和可视化 UI 界面,我们可以分步骤进行。以下是详细的代码实现:
1. 数据加载 (data_loader.py)
python
import torch
from torchvision import datasets, transforms

# 数据预处理
transform = transforms.Compose([
    transforms.Resize((224, 224)),  # VGG16 输入大小为 224x224
    transforms.ToTensor(),
    transforms.Normalize(mean=[0.485, 0.456, 0.406], std=[0.229, 0.224, 0.225])  # ImageNet 标准化
])

def get_data_loaders(data_dir, batch_size=32):
    train_dataset = datasets.ImageFolder(root=f"{data_dir}/train", transform=transform)
    val_dataset = datasets.ImageFolder(root=f"{data_dir}/val", transform=transform)

    train_loader = torch.utils.data.DataLoader(train_dataset, batch_size=batch_size, shuffle=True)
    val_loader = torch.utils.data.DataLoader(val_dataset, batch_size=batch_size, shuffle=False)

    return train_loader, val_loader
2. 模型定义 (model.py)
python
import torch.nn as nn
from torchvision.models import vgg16

class FaceRecognitionModel(nn.Module):
    def __init__(self, num_classes):
        super(FaceRecognitionModel, self).__init__()
        self.vgg16 = vgg16(pretrained=True)  # 加载预训练的 VGG16
        self.vgg16.classifier[6] = nn.Linear(4096, num_classes)  # 修改最后一层

    def forward(self, x):
        return self.vgg16(x)
3. 训练代码 (train.py)
python
import torch
import torch.optim as optim
from model import FaceRecognitionModel
from data_loader import get_data_loaders

def train_model(model, train_loader, val_loader, num_epochs=20, lr=0.001, device='cuda'):
    optimizer = optim.Adam(model.parameters(), lr=lr)
    criterion = nn.CrossEntropyLoss()

    model.to(device)
    for epoch in range(num_epochs):
        model.train()
        train_loss = 0.0
        correct = 0
        total = 0
        for images, labels in tqdm(train_loader):
            images, labels = images.to(device), labels.to(device)

            optimizer.zero_grad()
            outputs = model(images)
            loss = criterion(outputs, labels)
            loss.backward()
            optimizer.step()

            train_loss += loss.item()
            _, predicted = torch.max(outputs, 1)
            total += labels.size(0)
            correct += (predicted == labels).sum().item()

        print(f"Epoch [{epoch+1}/{num_epochs}], Loss: {train_loss/len(train_loader):.4f}, Accuracy: {correct/total:.4f}")

        # 验证模型
        evaluate_model(model, val_loader, device)

def evaluate_model(model, val_loader, device):
    model.eval()
    correct = 0
    total = 0
    with torch.no_grad():
        for images, labels in val_loader:
            images, labels = images.to(device), labels.to(device)
            outputs = model(images)
            _, predicted = torch.max(outputs, 1)
            total += labels.size(0)
            correct += (predicted == labels).sum().item()

    print(f"Validation Accuracy: {correct/total:.4f}")

if __name__ == "__main__":
    device = 'cuda' if torch.cuda.is_available() else 'cpu'
    num_classes = len(train_loader.dataset.classes)
    model = FaceRecognitionModel(num_classes)
    train_loader, val_loader = get_data_loaders("path_to_your_data")

    train_model(model, train_loader, val_loader, num_epochs=20, lr=0.001, device=device)
    torch.save(model.state_dict(), "best_model.pth")
4. 可视化 UI 界面 (ui.py)
python
from PyQt5.QtWidgets import QApplication, QMainWindow, QPushButton, QLabel, QVBoxLayout, QWidget, QFileDialog
from PyQt5.QtGui import QImage, QPixmap
import cv2
import torch
from model import FaceRecognitionModel

class App(QMainWindow):
    def __init__(self, model, class_names):
        super().__init__()
        self.setWindowTitle("VGG16 人脸识别系统")
        self.setGeometry(100, 100, 800, 600)

        self.model = model
        self.class_names = class_names

        # UI 元素
        self.label_image = QLabel(self)
        self.label_image.setGeometry(50, 50, 700, 400)

        self.btn_load = QPushButton("加载图片", self)
        self.btn_load.setGeometry(50, 500, 150, 40)
        self.btn_load.clicked.connect(self.load_image)

        self.label_result = QLabel("预测结果:", self)
        self.label_result.setGeometry(250, 500, 500, 40)

    def load_image(self):
        file_path, _ = QFileDialog.getOpenFileName(self, "选择图片", "", "Images (*.jpg *.png)")
        if file_path:
            image = cv2.imread(file_path)
            image = cv2.cvtColor(image, cv2.COLOR_BGR2RGB)

            # 显示原始图像
            height, width, channel = image.shape
            bytes_per_line = 3 * width
            q_img = QImage(image.data, width, height, bytes_per_line, QImage.Format_RGB888)
            self.label_image.setPixmap(QPixmap.fromImage(q_img))

            # 预测
            result = self.predict_image(file_path)
            self.label_result.setText(f"预测结果:{result}")

    def predict_image(self, image_path):
        from PIL import Image
        from torchvision import transforms

        # 图像预处理
        transform = transforms.Compose([
            transforms.Resize((224, 224)),
            transforms.ToTensor(),
            transforms.Normalize(mean=[0.485, 0.456, 0.406], std=[0.229, 0.224, 0.225])
        ])
        image = Image.open(image_path).convert("RGB")
        image = transform(image).unsqueeze(0).to('cuda')

        # 推理
        self.model.eval()
        with torch.no_grad():
            output = self.model(image)
            _, predicted = torch.max(output, 1)
            class_idx = predicted.item()

        return self.class_names[class_idx]

if __name__ == "__main__":
    device = 'cuda' if torch.cuda.is_available() else 'cpu'

    # 加载模型
    model = FaceRecognitionModel(num_classes=len(train_loader.dataset.classes))
    model.load_state_dict(torch.load("best_model.pth"))
    model.to(device)
    model.eval()

    app = QApplication([])
    window = App(model, train_loader.dataset.classes)
    window.show()
    app.exec_()
目录结构
基于VGG16的人脸识别/
├── data/
│   ├── train/
│   └── val/
├── hub/
│   ├── best_model.pth
│   ├── c罗.jpg
│   ├── c罗_1.jpg
│   ├── data_loader.py
│   ├── model.py
│   ├── train.py
│   ├── ui.py
│   ├── 小罗伯特唐尼.jpg
│   ├── 梅西.jpg
│   └── 梅西_1.jpg
└── 从部署/